Page 584 of 1273

14-32COOLING -Engine Coolant Temperature Gauge Unit, Engine Coolant
Temperature Sensor and Engine Coolant Temperature Switch
/
Sensor
J
046003
3
04GOO32
9FUO156
---
--I ‘Oi
l
QQQQQQ2cmn99
INSPECTIONM14OOAM
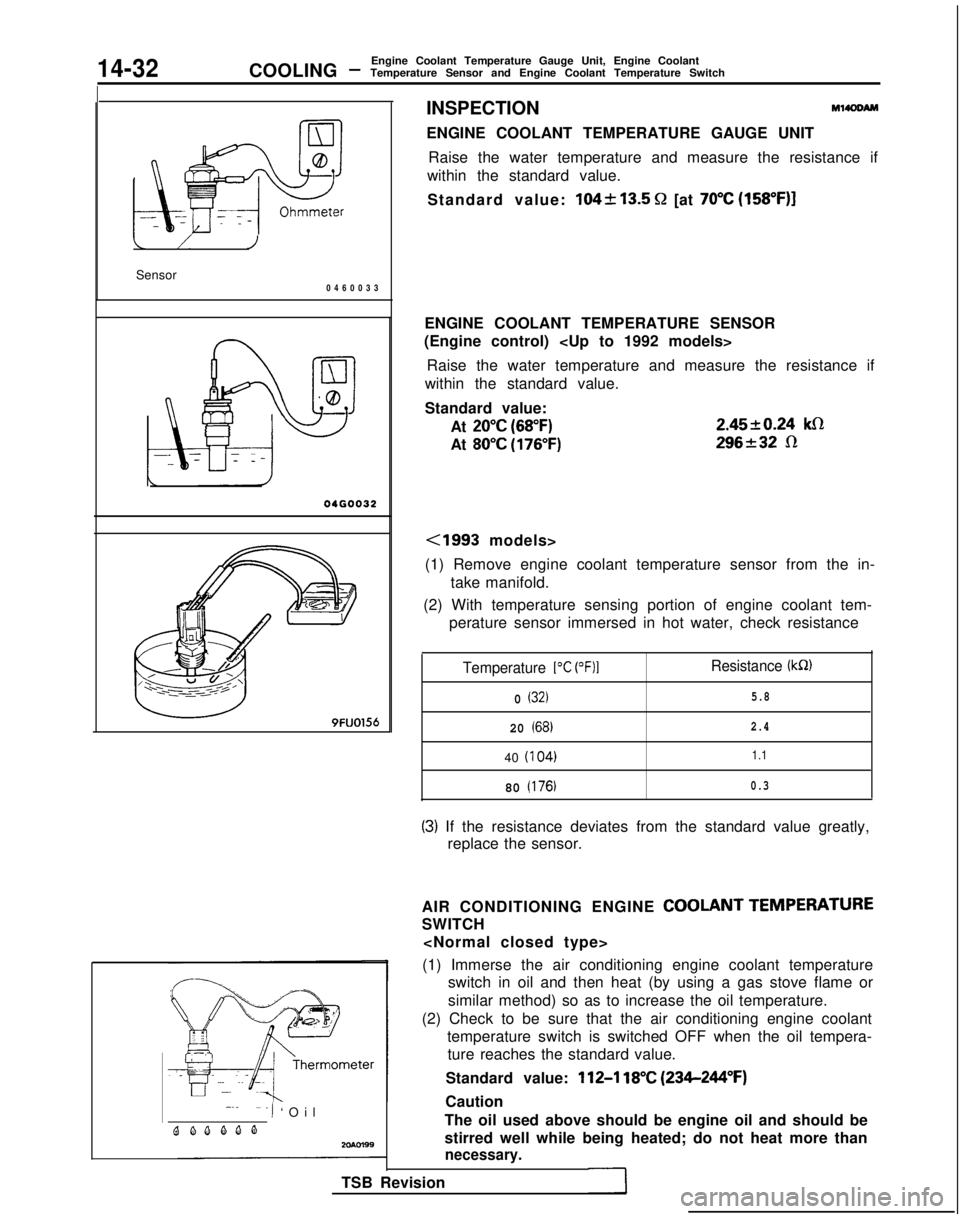
ENGINE COOLANT TEMPERATURE GAUGE UNIT
Raise the water temperature and measure the resistance if
within the standard value.
Standard value:
104k13.5 Q [at 70°C (158”F)]
ENGINE COOLANT TEMPERATURE SENSOR
(Engine control)
Raise the water temperature and measure the resistance if
within the standard value.
Standard value:
At
20°C (68°F)
At 80°C (176°F) 2.4520.24
klR
296232 R
<1993 models>
(1) Remove engine coolant temperature sensor from the in- take manifold.
(2) With temperature sensing portion of engine coolant tem- perature sensor immersed in hot water, check resistance
Temperature 1°C (OF)1Resistance (kR)
0 (32)5.8
20 (68)2.4
40
(I
04)1.1
80 (176)0.3
(3) If the resistance deviates from the standard value greatly,
replace the sensor.
AIR CONDITIONING ENGINE
COOLANT TEMPERATURE
SWITCH
(1) Immerse the air conditioning engine coolant temperature switch in oil and then heat (by using a gas stove flame or
similar method) so as to increase the oil temperature.
(2) Check to be sure that the air conditioning engine coolant temperature switch is switched OFF when the oil tempera-ture reaches the standard value.
Standard value:
112-l 18°C (234-244°F)
Caution
The oil used above should be engine oil and should be
stirred well while being heated; do not heat more than
necessary.
TSB Revision
Page 585 of 1273
COOLING -Engine Coolant Temperature Gauge Unit, Engine Coolant
Temperature Sensor and Engine Coolant Temperature Switch14-33
20R0586
ENGINE COOLANT TEMPERATURE SWITCH
(Air conditioning or A/T control)
(1) Remove the engine coolant temperature switch from the
water outlet fitting.
(2) immerse the engine coolant temperature switch in oil and heat by a gas stove or similar method so as to increase the
oil temperature.
(3) Check to be sure that the engine coolant temperature switch is switched ON when the oil temperature reaches
the standard value.
Standard value:
lOO-104% (212-219°F)
CautionUse engine oil for this test; stir it well while heating,
and do not heat more than necessary.
TSB Revision
1
Page 589 of 1273

INTAKE AND EXHAUST - Specifications15-3
Items) Nm1
ftlbs.
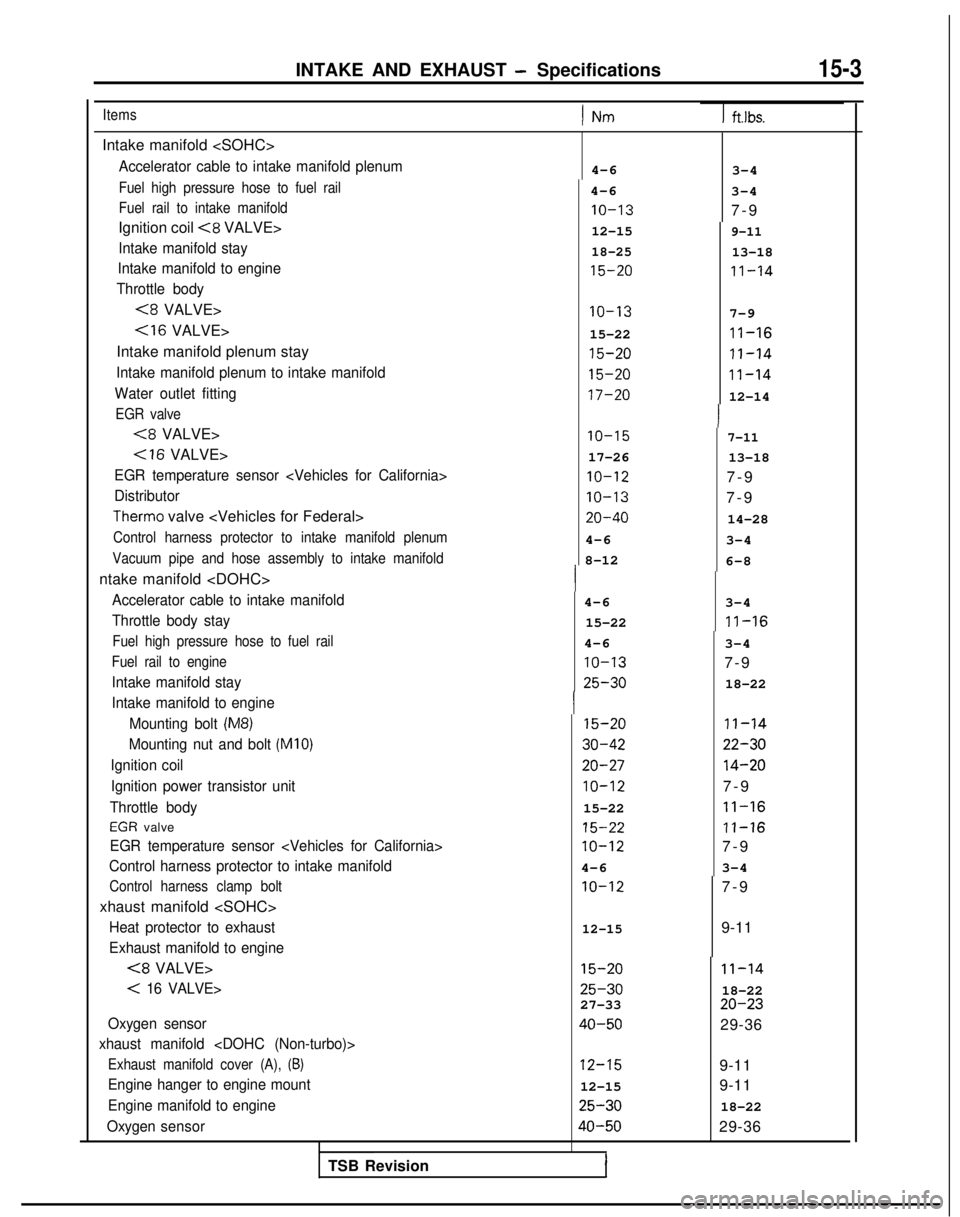
Intake manifold
Accelerator cable to intake manifold plenum
Fuel high pressure hose to fuel rail
Fuel rail to intake manifold
Ignition coil <8 VALVE>
Intake manifold stay
Intake manifold to engine
Throttle body
<8 VALVE>
Intake manifold plenum stay
Intake manifold plenum to intake manifold
Water outlet fitting
EGR valve
(8 VALVE>
Cl6 VALVE>
EGR temperature sensor
Distributor
Therm0 valve
Control harness protector to intake manifold plenum
Vacuum pipe and hose assembly to intake manifold
ntake manifold
Accelerator cable to intake manifold
Throttle body stay
Fuel high pressure hose to fuel rail
Fuel rail to engine
Intake manifold stay
Intake manifold to engine
Mounting bolt
(M8)
Mounting nut and bolt (MIO)
Ignition coilIgnition power transistor unit
Throttle body
EGR valve
EGR temperature sensor
Control harness protector to intake manifold
Control harness clamp bolt
xhaust manifold
Heat protector to exhaust
Exhaust manifold to engine
(8 VALVE>
< 16 VALVE>
Oxygen sensor
xhaust manifold
Exhaust manifold cover (A), (8)
Engine hanger to engine mount
Engine manifold to engine
Oxygen sensor
4-6
4-6 IO-13
12-15
18-25
15-20
3-4
3-4
7-
9
9-11
13-18
11-14
IO-13
7-9
15-22 II-16
15-20
II-14
15-20
11-14
17-20
12-14 IO-15
7-11
17-26
13-18 IO-12
7-9 IO-13
7-9 20-40
14-28
4-6 3-4
8-12 6-8
4-6 3-4
15-22 II-16
4-6 3-4 IO-13
7-9 25-30
18-22 15-20
30-42
20-27
IO-12
15-22
15-22
IO-12
4-6 IO-12 II-14
22-30
14-20
7-9 11-16
11-16
7-9
3-4
12-15
7-
9
9-11 15-20 11-14
25-30
18-22
27-33 20-23
40-50
29-36
12-159-11
12-15 9-11 25-30
18-22 40-50
29-36
TSB Revision
I
Page 590 of 1273

15-4INTAKE AND EXHAUST - Specifications
Items
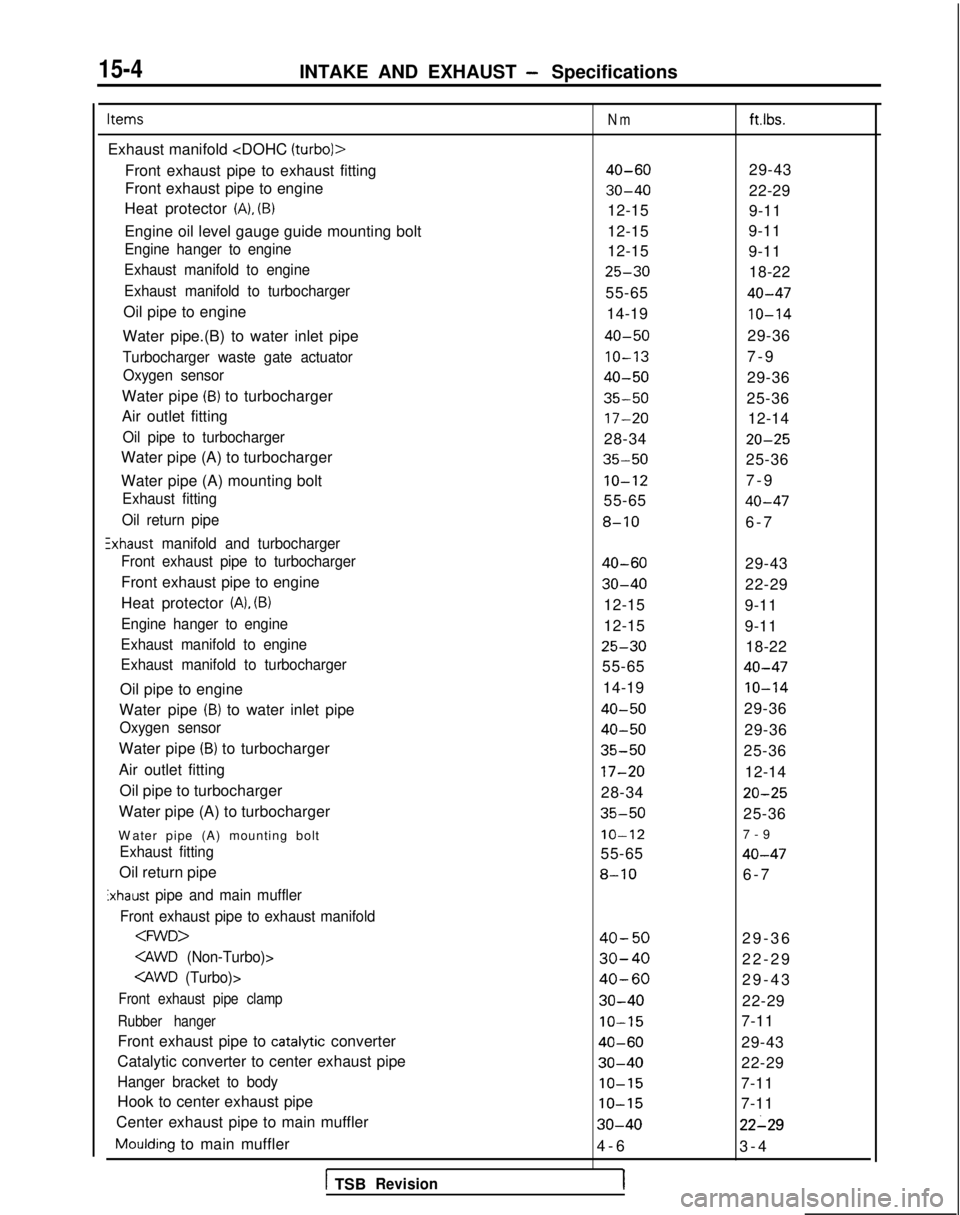
Exhaust manifold
Front exhaust pipe to exhaust fitting
Front exhaust pipe to engine
Heat protector
(A), (B)
Engine oil level gauge guide mounting bolt
Engine hanger to engine
Exhaust manifold to engine
Exhaust manifold to turbocharger
Oil pipe to engine
Water pipe.(B) to water inlet pipe
Turbocharger waste gate actuator Oxygen sensor
Water pipe (B) to turbocharger
Air outlet fitting
Oil pipe to turbocharger
Water pipe (A) to turbocharger
Water pipe (A) mounting bolt
Exhaust fitting
Oil return pipe
!xhaust manifold and turbocharger
Front exhaust pipe to turbocharger
Front exhaust pipe to engine
Heat protector
(A), (B)
Engine hanger to engine
Exhaust manifold to engine
Exhaust manifold to turbocharger
Oil pipe to engine
Water pipe
(B) to water inlet pipe
Oxygen sensor
Water pipe (B) to turbocharger
Air outlet fitting Oil pipe to turbocharger
Water pipe (A) to turbocharger
W
ater pipe (A) mounting bolt
Exhaust fitting
Oil return pipe
Exhaust pipe and main muffler
Front exhaust pipe to exhaust manifold
Front exhaust pipe clamp
Rubber hanger
Front exhaust pipe to catalytic converter
Catalytic converter to center exhaust pipe
Hanger bracket to body
Hook to center exhaust pipe
Center exhaust pipe to main muffler
Moulding to main muffler
1 TSBRevision
Nm
40-60
30-40
12-15
12-15
12-15
25-30
55-65
14-19
40-50
IO-13
40-50
35-50
17-20
28-34
35-50
IO-12
55-65
8-10
40-60
30-40
12-15
12-15
25-30
55-65
14-19
40-50
40-50
35-50
17-20
28-34
35-50
IO-12
55-65
8-10
40-50
30-40
40-60
30-40
IO-15
40-60
30-40
IO-15
IO-15
30-40
4-
6
1
ft.lbs.
29-43
22-29
9-11
9-11
9-11
18-22
40-47
10-14
29-36
7-
9
29-36
25-36 12-14
20-25
25-36
7-
9
40-47
6-
7
29-43
22-29
9-11
9-11 18-22
40-47
IO-14
29-36
29-36
25-36
12-14
20-25
25-36
7-
9
40-47
6-
7
29-36
22-29
29-43
22-29
7-11
29-43
22-29
7-11
7-11
22-29
3-
4
Page 591 of 1273
INTAKE AND EXHAUST - Special Tool/Troubleshooting15-5
SPECIAL TOOLMlSDA-
ToolNumber
Name1 Use
M 0998703
MD998748Oxygen sensor
wrench
Oxygen sensor
wrench Removal/Installation of oxygen sensor <
Non-Turbo >
Removal/installation of oxygen sensor
TROUBLESHOOTINGYl5EAa8
ISymptom
Probable cause1 RemedyI
Loose joints
Broken pipe or muffler Retighten
Repair or replace
Abnormal noise Broken separator in muffler
Replace
Broken rubber hangers
Interference of pipe or muffler with vehicle body
Broken pipe or muffler Correct
Repair or replace
TSB Revision
Page 592 of 1273

15-6INTAKE AND EXHAUST - Service Adjustment Procedures
SERVICE ADJUSTMENT PROCEDU&$
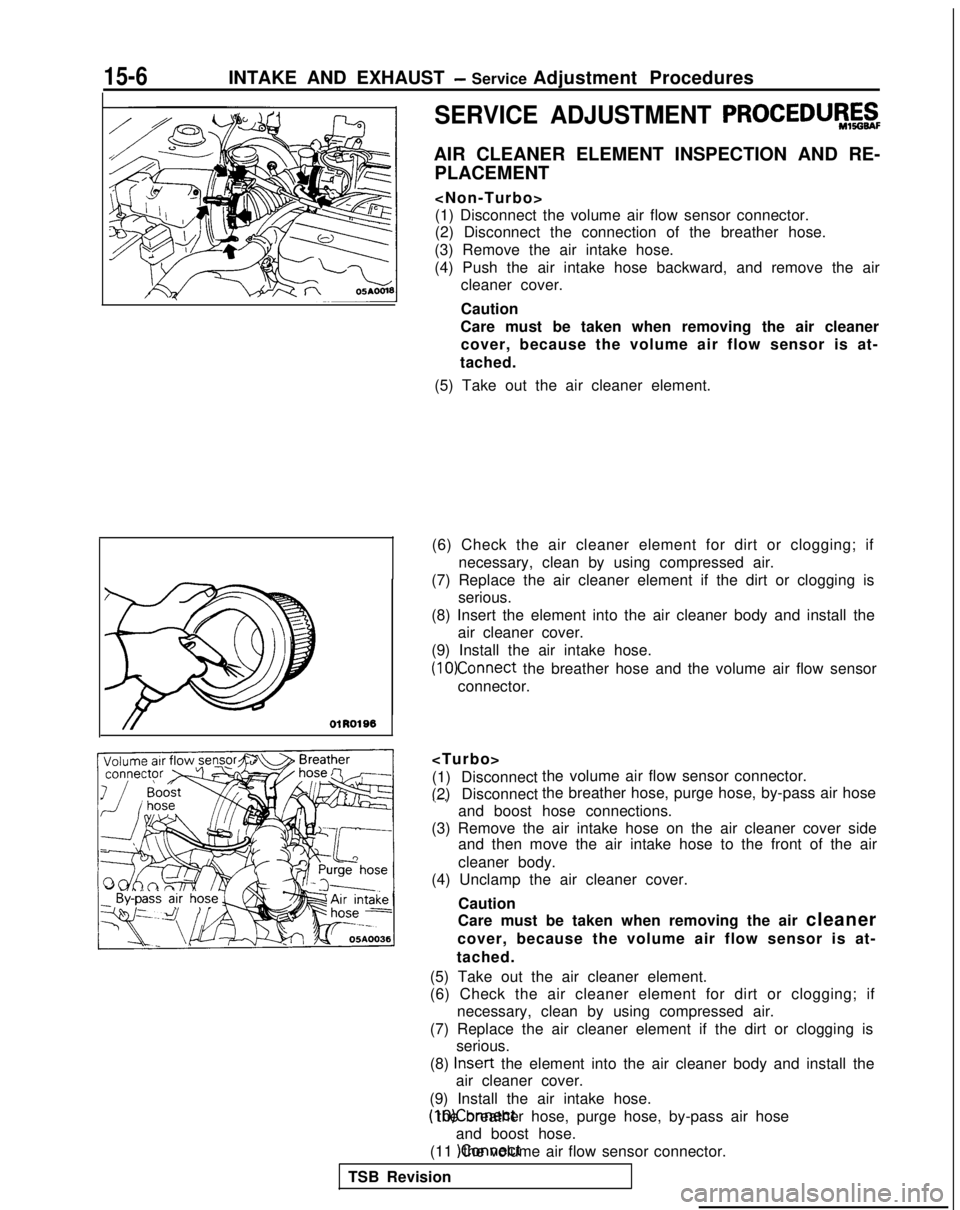
AIR CLEANER ELEMENT INSPECTION AND RE- PLACEMENT
(1) Disconnect the volume air flow sensor connector.
(2) Disconnect the connection of the breather hose.
(3) Remove the air intake hose.
(4) Push the air intake hose backward, and remove the air cleaner cover.
Caution
Care must be taken when removing the air cleaner cover, because the volume air flow sensor is at-
tached.
(5) Take out the air cleaner element.
(6) Check the air cleaner element for dirt or clogging; if necessary, clean by using compressed air.
(7) Replace the air cleaner element if the dirt or clogging is serious.
(8) Insert the element into the air cleaner body and install the air cleaner cover.
(9) Install the air intake hose.
(1O)Connect the breather hose and the volume air flow sensor
connector.
(1) Disconnect
(2) Disconnect the volume air flow sensor connector.
the breather hose, purge hose, by-pass air hose .-.
and boost hose connections.
(3) Remove the air intake hose on the air cleaner cover side and then move the air intake hose to the front of the air
cleaner body.
(4) Unclamp the air cleaner cover.
Caution
Care must be taken when removing the air cleaner
cover, because the volume air flow sensor is at-
tached.
(5) Take out the air cleaner element.
(6) Check the air cleaner element for dirt or clogging; if necessary, clean by using compressed air.
(7) Replace the air cleaner element if the dirt or clogging is serious.
(8) Insert
the element into the air cleaner body and install the
air cleaner cover.
(9) Install the air intake hose. (10)Connect the breather hose, purge hose, by-pass air hose
and boost hose.
(11 )Connect the volume air flow sensor connector.
TSB Revision
Page 594 of 1273

15-8INTAKE AND EXHAUST - Service Adjustment Procedures
u--05A0155
61 N006C
6 I NO056
(6) Put a blind plug on the vacuum hose (black) end.
(7) Apply negative pressure when idling. and check thenegative pressure state when the knock sensor is con-
nected and disconnected.
I
Engine stateKnock sensor Normal state
connectorI
Idling
ml
NOTE
If negative pressure is not normal, it can be assumed that
there is a malfunction in the knock sensor circuit.
(8) Turn off the ignition switch, and connect the connector of the knock sensor.
(9) Use scan tool to erase the diagnostic trouble code or dis- connect the (-) terminal of the battery for 10 seconds or
more.
NOTE
This erases the diagnostic memory of the knock sensor
trouble by disconnecting the knock sensor connector.
TURBOCHARGER WASTE GATE SOLENOID INSPECTION
MlSGGM
(1) Operation check Using a hand vaccum pump, apply a negative pressure to
the solenoid valve nipple on which the white vacuum hose
is connected, and check air-tightness when the voltage is
applied to the solenoid valve terminal and when it is released
from the terminal.
I
Other nipple ofBattery Voltage solenoid valveNormal state
OpenedNegative pressureleaks.I
When applied
Closed by fingerNegative pressureis maintained.LIII
Negative pressureis maintained.IIWhen released Opened
(2) Continuity check of coil Measure the solenoid valve terminal resistance.
Standard value: 36-44
0 [at 20°C (68OF)l
TURBOCHARGER BYPASS VALVE INSPECTIONMlSGHAA
(1) Remove the turbocharger bypass valve.
(2) Connect the hand vacuum pump to the nipple of the turbo-
charger bypass valve.
(3) Apply a negative pressure of approx. 53.3
kPa (7.7 psi), and
check operation of the valve. Also check that air tightness
is maintained.
INegative ‘pressure Valve operation-1
IAbout 53.3 kPa (7.7 psi)It starts opening.I
TSB Revision
Page 595 of 1273
INTAKE AND EXHAUST - Air Cleaner1’5-9
AIR CLEANER
REMOVAL AND INSTALLATIONMlSFA-
8-10 Nm
6-7 ft.lbs.
IKIII
I
I/I /
I, s;qr
ii--l-
-
05AOO97
Removal steps
1. Battery2. Resonator3. Branch tube4. Connection for volume air flow sensor
B
connector5. EGR solenoid 6. Breather hose
7. Air intake hose
8.Air cleaner9.Air ductIO. Air cleaner cover11. Air cleaner element12. Volume air flow sensor assembly
13. Volume air flow sensor gasket
14. Noise reduction filter
15.Cover16.Grommet
17. Air cleaner body
18.Insulator19.Collar
TSB RevisionI