Page 511 of 1273
AUTO-CRUISE CONTROL SYSTEM - Troubleshooting13-369
( Vehicle
speed sensor
(Reed switch)
1610051
cl989 models>1,1I 1.‘\-
-Auto-cruise ’-control swItchI
_\\07AOO23
‘\
rn-1 /---yy--
-.---- ‘L/---
_\ 03A0275
ITSB Revision
Page 519 of 1273
AUTO-CRUISE CONTROL SYSTEM - Troubleshooting13-377
AUTO-CRUISE
CONTROL UNITc-01
~~----------~- -----------
i /
r
z
G
l-HROTTLE
g&p
3-02-lmj
r
I I-+7
I I
bI ,
I I
Ie+8
G
Is %I
!a(36 (7
L
5v
SV__-_-__-___---------
-
6
! !I
IIs
'5
I
45
I I
4
tWiiSt wi
IDLE SPEED
CONTROL MOTOR
POSITION SENSOR
RbROLc-12
KX35-AC-Hl555A-NY
TSB Revision
Page 522 of 1273
13-380AUTO-CRUISE CONTROL SYSTEM - Troubleshooting
CIRCUIT DIAGRAM (CONTINUED)
AUTO-CRUISECONTROL UNITc-01
--
-
I __--___--
--
(SOHC)-? r--------(DOHC>
I I
7---------------------,~
c3
c
6_--es-
0c3
I:
t-
IDLE SPEEDCONTROL MOTOR
POSITION SENSOR
B-02-2j-xeJjT4Tsfiiap,,4,.
,,&#%!LEPOSITION
I“1 "4k!3"' 6~
z+
G
G %cF5g
,IA
I I
I II I
I II I
I I4 I
I I, I
I II I
I II I
I II I
I II 6
I II I
! IF
,c
I I
\
I s
I I+
&La"4
-
FiELEFTITI+;~ON
B-22-2
ml
E58cI
$1
6 Etci t
9 113 124 117A
%fl!j f-iSV
5
0
5
G
jp~FFJi~ t
I-02-1
ttlm) ,,2I.
AL,.
1
E-4
I II I
I I
KXSS-AC-Hl556A-NY
TSB
Revision WI
c-12CONTROL
UNIT
Page 535 of 1273
AUTO-CRUISE CONTROL SYSTEM - Troubleshooting
13-393
AUTO-CRUISECONTROL UNIT C-01
I__-_-_-____l-‘--------l(SOHC)I 0
-I-I I
(DOHC)
I I
A
v5
st,,s------------------
-
c-07-1
2
I1
i
‘6
"4
w
__I ,7
W
I,
wA
t-tI I
I II I
1 I
tx.
IDLE SPEEDCONTROL MOTORPOSITION SENSOR
B-02-2(~@@zjijg# ,,4
1‘s
Y5Y4J
5 1cJ
,,s7
:>
c-07-1---._---
5p7zsq
0I.5w
si2
e-02-1
mfmj ,,2,.l,,,I\
OPV on
Ii
-A-
l
%
I g
!3
CLOsED3 THROTTLE;$W$AON
B-22-2
ia
“1
EsE
s
E
,
Fs8
GIG
6I
MFIc-12CONTROLUNIT
KX35-AC-HlSSW-NY
1 TSB Revision
Page 547 of 1273

AUTO-CRUISE CONTROL SYSTEM - Sewice Adjustment Procedures
ECU connector terminals
19171513ll><7531
2018161412 101 98642
16A1060
ELECTRONIC CONTROL UNIT (ECU) SIGNAL CIRCUIT
CHECK
Disconnect the connector of the ECU, and then check at the
body side wiring harness according to the chart below.
IG SW: Ignition switch
MAIN SW: Main switch
OD SMI: Overdrive switch
Termi-~ Connection or mea-
nal
~
sured part Measure-
Tester con-
ment item nection
Check conditions
Standard
I-
I-
1 ~
Actuator (motor) Resistance1 - “‘2Actuator selector Approx. 120
(Fully closed position)
1
2
3I Stop light switchVoltage3-Ground ~
IG S/W ON, Main SW O
N
Battery positive
~
(for auto-cruise ~
control cancellation)
j )
i (Don’t press brake pedal.)j voltage
and actuator (clutch)I Press brake pedal after checkingBattery positive
5 1 Power supply (MAIN)
/ above.voltage -0V
Voltage5-Ground
1 IG S/W
ON, Main S/W ONBattery positive
voltage
6None-i -i-
7 1
Power supply (IGz)Voltag
e
7-GroundIG SfW O
N
Battery positive
voltage
8*z ~
On-board diagnostic--i- -
TSB Revision
9Accelerator pedal Voltageg-GroundIG SW O
N
Battery positive
switch
(Accelerator pedal free)voltage
1 Press accelerator pedal after/ Battery positive
II checking above.[voltage -0V
IO I Vehicle speed sensor
Voltage1 O-Ground’ W
ith the ignition key at the ON
’ ~
4 voltage
position, slowly turn the speedom- changes/
ca-
eter cable. ble
rotation
11SET switch
Continuity1 l-Ground ’ SET switch ON (Press) Continuity
SET switch OFF (Release) No continuity
12OD switch
13RESUME switch 1
Voltage
Continuity
12-GroundIG SNV ON OD SW ON position
Battery positive
voltage
OD
SW OFF position ~
OV
13-Ground ~
RESUME switch ON (Turn) Continuity
; RESUME switch OFF (Release)
No continuity
14’2 ~
4 A/T control module( -/- I- !
-
I/15 1 Stop light switch load
~
Voltage15-Ground’ Press the brake pedal.Battery positiveside/voltage
16 j Ground
Continuity1 16-GroundAt all times ~
Continuity
Page 548 of 1273

13-406AUTO-CRUISE CONTROL SYSTEM - Service A&tment ~mcec~ure~
Termi-
nal
17
18
19
20
l-
it
L
Connection of mea-
sured part Park/neutral position
switch (P, N)
T
f
+
Stop light switch
power supply side
Continuity ~
17-Ground
1
.~.~.~ ~.-. _ - ~~- -~/Voltage)
18-Ground
~~
____~ _~ ~.. ----+--.. .-~
Clutch pedal position
Voltage1 1 g-Groundswitch
Measure-1
Tester
ment item 1
connection
Ground
1 ~
Continuity ~
20-Ground
-Conrroljunitj I! @jIII LNOtOMl ‘-r’
+-j-
--J--L--
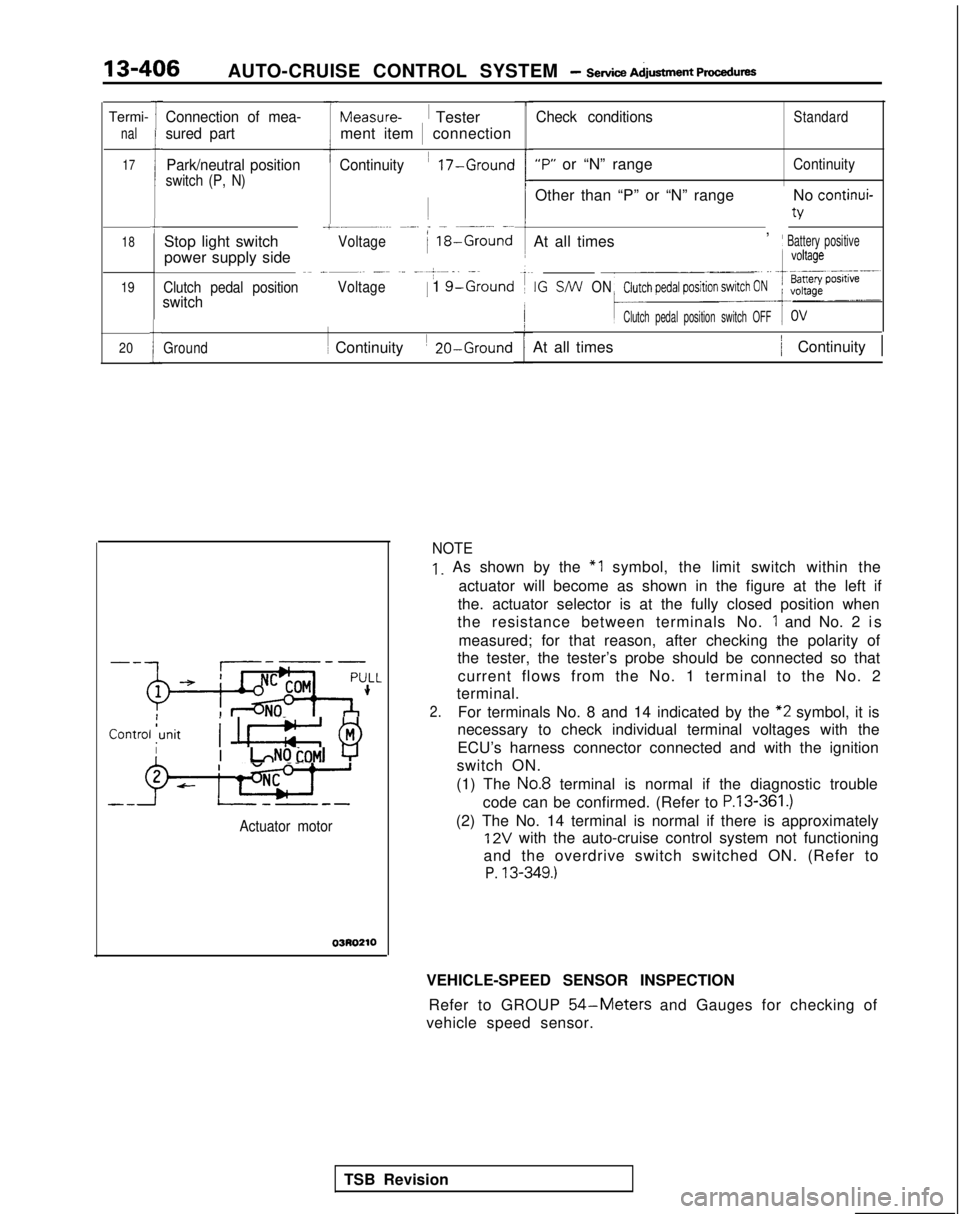
Actuator motor
03R0210
Check conditionsStandard
“P” or “N” rangeContinuity
Other than “P” or “N” range
,No continui-
v
At all timesj Battery positive
IG S/W
ON
Clutch pedal position switch OFF
At all times/ Continuity 1
NOTE
1. As shown by the “1 symbol, the limit switch within the
actuator will become as shown in the figure at the left if
the. actuator selector is at the fully closed position when
the resistance between terminals No.
1 and No. 2 i
s
measured; for that reason, after checking the polarity of
the tester, the tester’s probe should be connected so that
current flows from the No. 1 terminal to the No. 2
terminal.
2.For terminals No. 8 and 14 indicated by the “2
symbol, it is
necessary to check individual terminal voltages with the
ECU’s harness connector connected and with the ignition
switch ON.
(1) The
No.8 terminal is normal if the diagnostic trouble
code can be confirmed. (Refer to
P.13-361.)
(2) The No. 14 terminal is normal if there is approximately
12V with the auto-cruise control system not functioning
and the overdrive switch switched ON. (Refer to
P. 13-349.)
VEHICLE-SPEED SENSOR INSPECTION
Refer to GROUP
54-Meters and Gauges for checking of
vehicle speed sensor.
TSB Revision
Page 549 of 1273

AUTO-CRUISE CONTROL SYSTEM - Setice Adjustment procedures13-407
=\
07A005.1
Controlvalve
L2
07AOO50
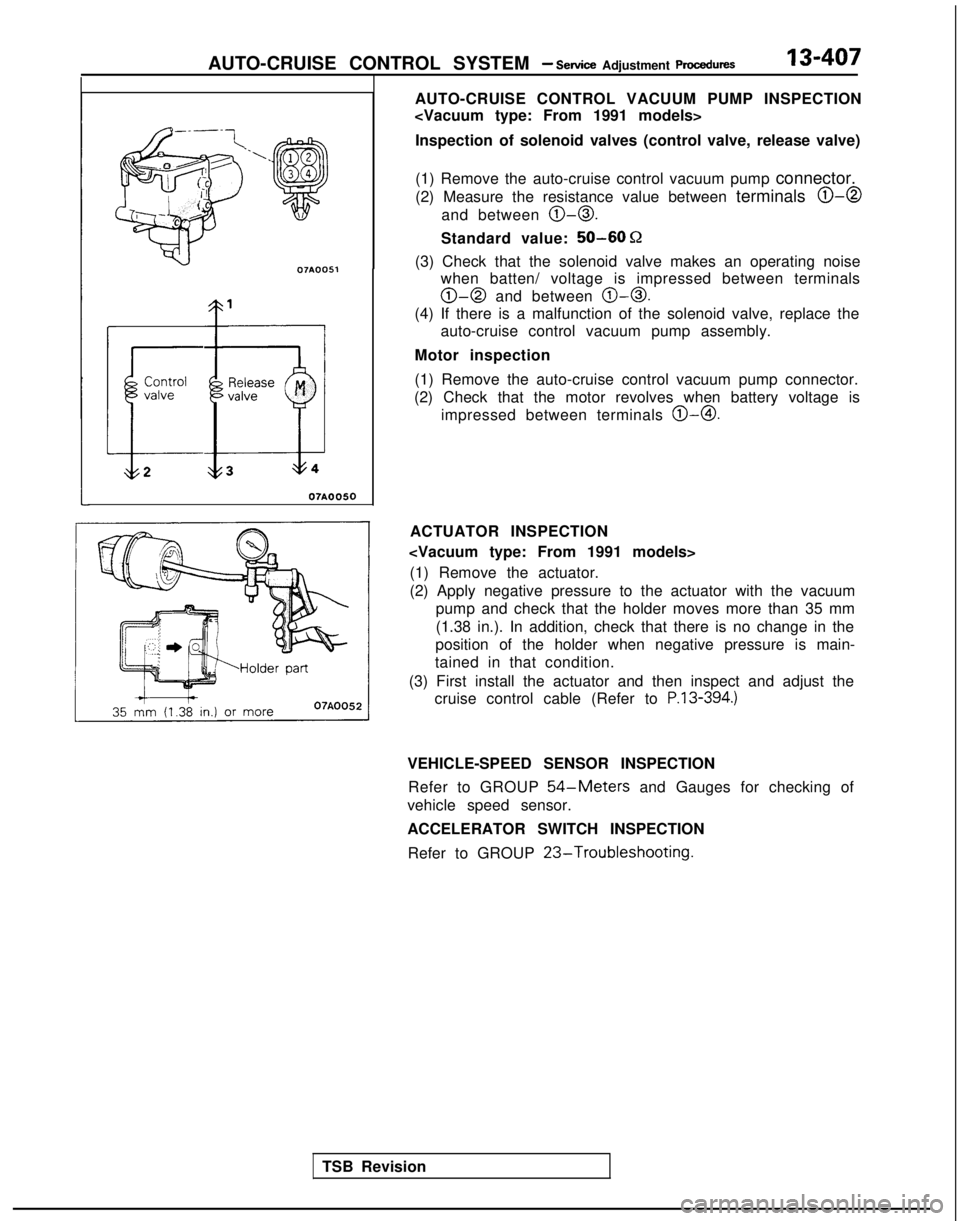
AUTO-CRUISE CONTROL VACUUM PUMP INSPECTION
Inspection of solenoid valves (control valve, release valve)
(1) Remove the auto-cruise control vacuum pump connector.
(2) Measure the resistance value between terminals
0-0
and between 0-0.
Standard value: 50-60 Q
(3) Check that the solenoid valve makes an operating noise
when batten/ voltage is impressed between terminals
0-0 and between 0-0.
(4) If there is a malfunction of the solenoid valve, replace the
auto-cruise control vacuum pump assembly.
Motor inspection
(1) Remove the auto-cruise control vacuum pump connector.
(2) Check that the motor revolves when battery voltage is impressed between terminals
@-0.
TSB Revision ACTUATOR INSPECTION
(1) Remove the actuator.
(2) Apply negative pressure to the actuator with the vacuum pump and check that the holder moves more than 35 mm
(1.38 in.). In addition, check that there is no change in the
position of the holder when negative pressure is main-
tained in that condition.
(3) First install the actuator and then inspect and adjust the cruise control cable (Refer to
P.13-394.)
VEHICLE-SPEED SENSOR INSPECTION
Refer to GROUP
54-Meters and Gauges for checking of
vehicle speed sensor.
ACCELERATOR SWITCH INSPECTION
Refer to GROUP
23-Troubleshooting.
Page 550 of 1273