1988 PONTIAC FIERO window
[x] Cancel search: windowPage 1699 of 1825
2W-2 STATIONARY GLASS - F STYLE
8. Dip pad into mixture frequently to insure that
wheel and glass are always wet during polishing
operation. A dry pad causes too much heat to
build up.
9. After
removing scratch or abrasion, wash glass
with water and wipe body clean of any polish.
10. Clean polishing pad.
Care should be taken during polishing and
storage to keep pad free of foreign material such as dirt,
metal filings, etc.
WINDSHIELD VINYL REVEAL
MOLDINGS
Vinyl Reveal Moldings
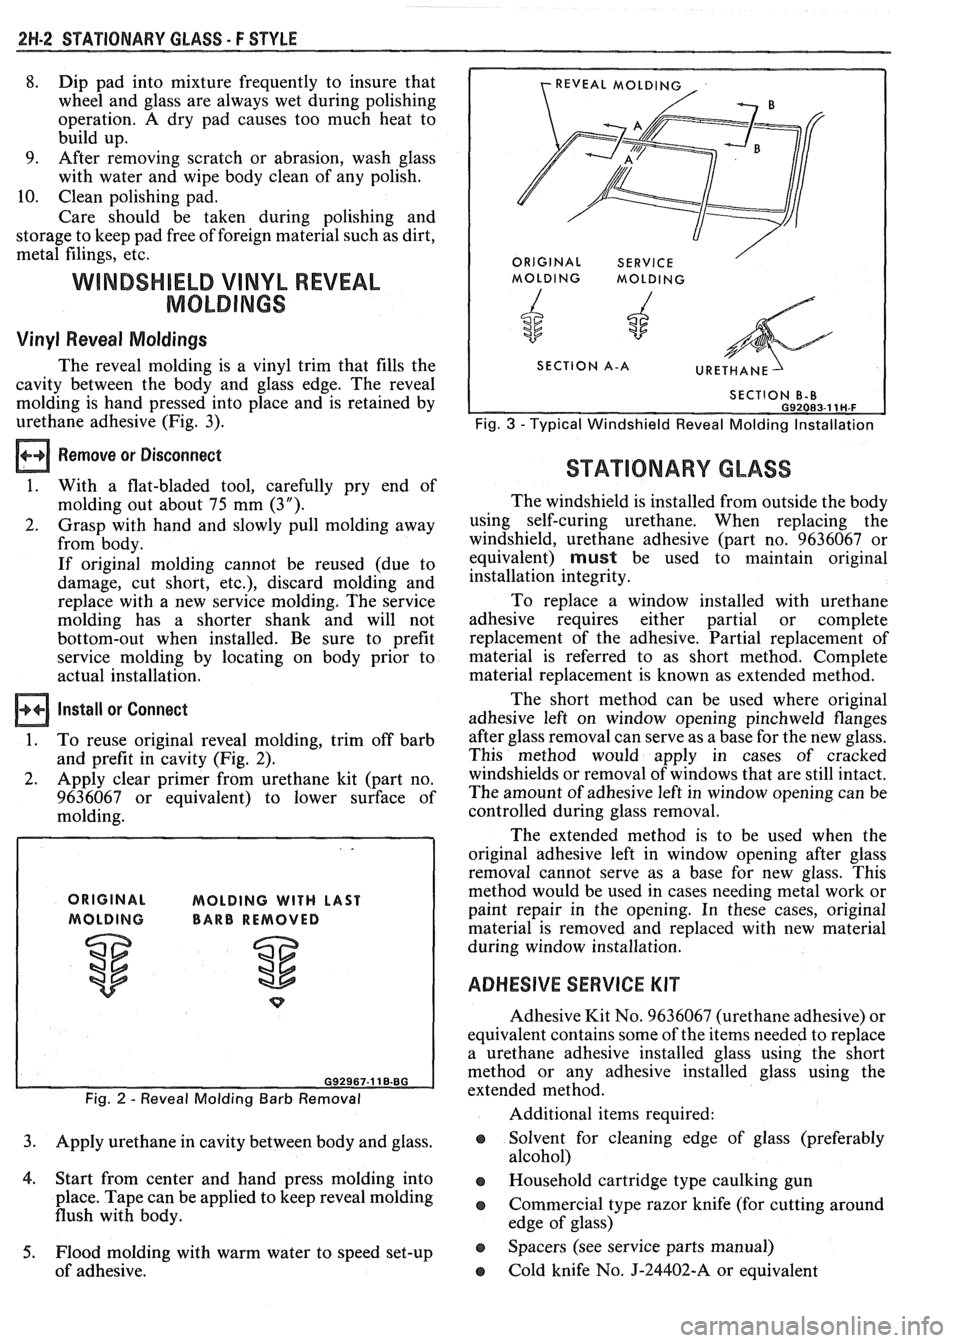
The reveal molding is a vinyl trim that fills the
cavity between the body and glass edge. The reveal
molding is hand pressed into place and is retained by
urethane adhesive (Fig. 3).
REVEAL MOLD1
ORIGINAL SERVICE /
I MOLDING MOLDING
4 6
SECTION A-A
Fig. 3 -Typical Windshield Reveal Molding Installation
Remove or Disconnect
1. With a flat-bladed tool, carefully pry end of
molding out about 75 mm (3").
2. Grasp with hand and slowly pull molding away
from body.
If original molding cannot be reused (due to
damage, cut short, etc.), discard molding and
replace with a new service molding. The service
molding has a shorter shank and will not
bottom-out when installed. Be sure to prefit
service molding by locating on body prior to
actual installation.
install or Connect
1. To reuse original reveal molding, trim off barb
and prefit in cavity (Fig. 2).
2. Apply clear primer from urethane kit (part no.
9636067 or equivalent) to lower surface of
molding.
MOLDING WITH LAST
BARB REMOVED
Fig. 2 - Reveal Molding Barb Removal
3. Apply urethane in cavity between body and glass.
4. Start from center and hand press molding into
place. Tape can be applied to keep reveal molding
flush with body.
5. Flood molding with warm water to speed set-up
of adhesive.
STATIONARY GLASS
The windshield is installed from outside the body
using self-curing urethane. When replacing the
windshield, urethane adhesive (part no. 9636067 or
equivalent)
must be used to maintain original
installation integrity.
To replace a window installed with urethane
adhesive requires either partial or complete
replacement of the adhesive. Partial replacement of
material is referred to as short method. Complete
material replacement is known as extended method.
The short method can be used where original
adhesive left on window opening pinchweld flanges
after glass removal can serve as a base for the new glass.
This method would apply in cases of cracked
windshields or removal of windows that are still intact.
The amount of adhesive left in window opening can be
controlled during glass removal.
The extended method is to be used when the
original adhesive left in window opening after glass
removal cannot serve as a base for new glass. This
method would be used in cases needing metal work or
paint repair in the opening. In these cases, original
material is removed and replaced with new material
during window installation.
ADHESIVE SERVICE KIT
Adhesive Kit No. 9636067 (urethane adhesive) or
equivalent contains some of the items needed to replace
a urethane adhesive installed glass using the short
method or any adhesive installed glass using the
extended method.
Additional items required:
o Solvent for cleaning edge of glass (preferably
alcohol)
o Household cartridge type caulking gun
o Commercial type razor knife (for cutting around
edge of glass)
e Spacers (see service parts manual)
o Cold knife No. J-24402-A or equivalent
Page 1700 of 1825
STATIONARY GLASS - F STYLE 2N-3
Window Removal
The window removal method is the same for both
the short and extended installation methods with one
exception. If the short method is to be used, more care
must be used during cutout to make certain that an
even bead of adhesive remains on window opening to
serve as a base for new glass.
These methods are to be used when removing
urethane installed windshield glass.
Remove or Disconnect
1. Place protective coverings around area where
glass is being removed.
2. Remove windshield
wi~er arm assemblies. lower
glass stops and shroud
iop vent grille (see Section
4H).
3. Remove reveal molding.
4. Using a razor or utility knife, make a preliminary
cut into urethane adhesive around entire
perimeter of glass. Make cut as close to edge of
windshield glass as possible.
5. Mask area around window opening. This
procedure will reduce cleanup after glass is
installed.
6. Using tool J-24402-A or equivalent, cut out
windshield glass keeping blade as close to edge of
glass as possible.
Clean
Glass opening of any loose material. If glass is to
be reinstalled, all urethane must be removed from
glass.
Short Method
Install or Connect
1. Replace glass supports. Position glass in opening,
apply a piece of masking tape over each edge of
glass and adjacent body pillars. Slit tape vertically
at edge of glass. During installation, tape on glass
can be aligned with tape on body to guide glass
into desired position. Remove glass.
Clean
Surface of glass to which adhesive will be applied
(around edge of inside surface) by wiping with a
clean, alcohol dampened cloth. Allow to air dry.
2. Two primers are provided in urethane adhesive
kit no. 9636067 or equivalent. The clear primer
is used on the glass prior to the black primer.
Apply primer around entire perimeter of glass
edge and 6
mrn (1/4") inboard on inner surface.
Allow primer to dry five minutes.
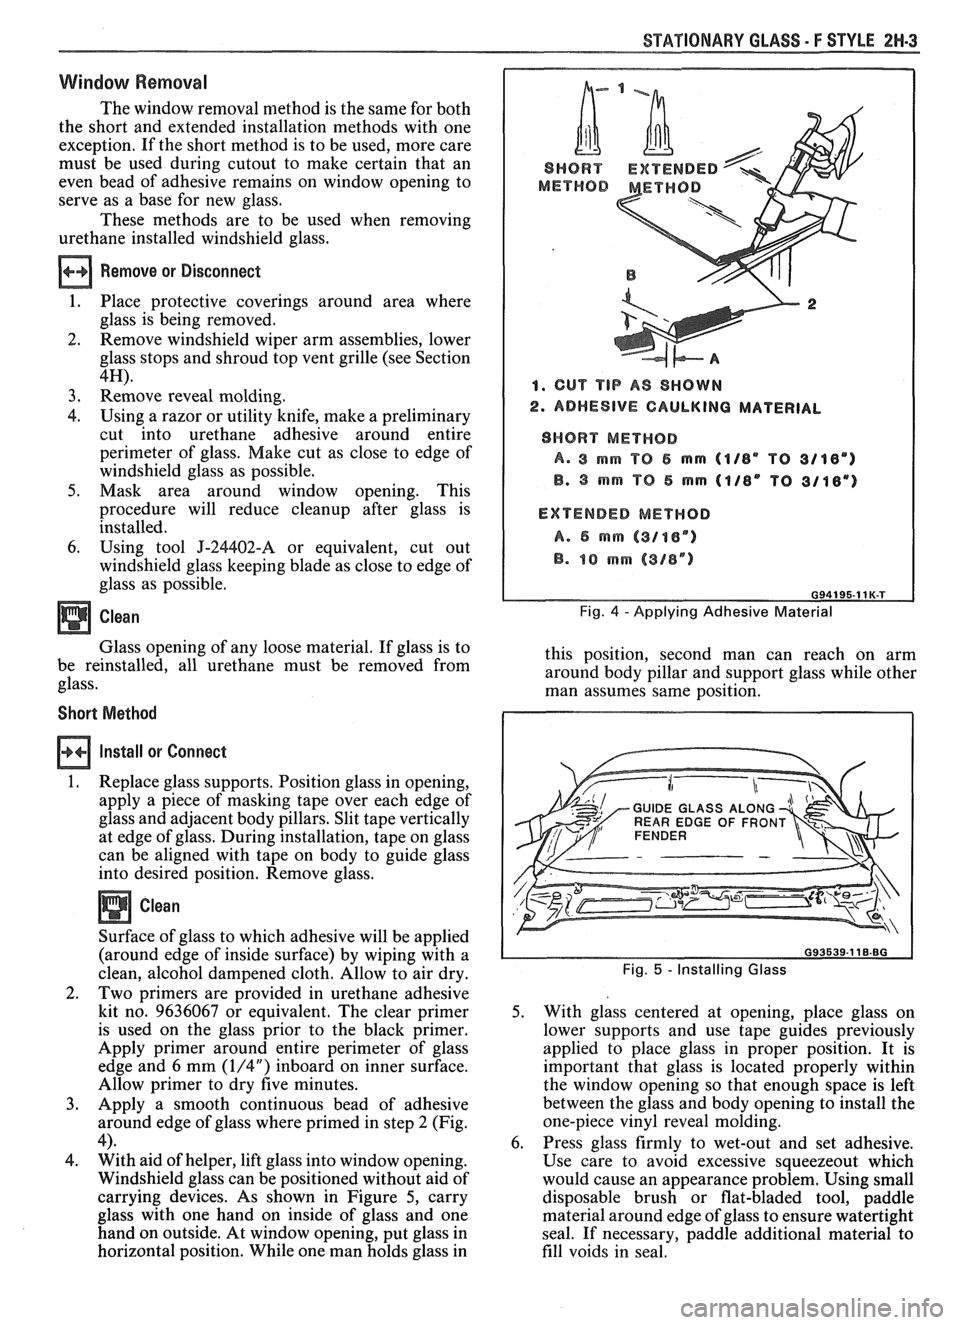
3. Apply a smooth continuous bead of adhesive
around edge of glass where primed in step 2 (Fig.
4). 4. With aid of helper, lift glass into window opening.
Windshield glass can be positioned without aid of
carrying devices. As shown in Figure
5, carry
glass with one hand on inside of glass and one
hand on outside. At window opening, put glass in
horizontal position. While one man holds glass in
1. CUT TIP A8 SHOWN
2. ADHESIVE CAULKING MATERIAL
SHORT METHOD
A. 3 rnm TO 5 mrn (1/8" TO 3/18")
B. 3 mrn "P 5 mm 41/8" TO 3/18")
EXTENDED
MEWHOD
A. 6 mrn (3/oen)
B. 10 rnm (318")
Fig. 4 - Applying Adhesive Material
this position, second man can reach on arm
around body pillar and support glass while other
man assumes same position.
GUIDE GLASS ALONG
WEAR EDGE OF FRON
Fig. 5 - Installing Glass
5. With glass centered at opening, place glass on
lower supports and use tape guides previously
applied to place glass in proper position. It is
important that glass is located properly within
the window opening so that enough space is left
between the glass and body opening to install the
one-piece vinyl reveal molding.
6. Press glass firmly to wet-out and set adhesive.
Use care to avoid excessive squeezeout which
would cause an appearance problem. Using small
disposable brush or flat-bladed tool, paddle
material around edge of glass to ensure watertight
seal.
If necessary, paddle additional material to
fill voids in seal.
Page 1701 of 1825
2H-4 STATIONARY GLASS - F STYLE
7. Watertest car at once using soft spray. Use warm
or hot water if available. Do not direct hard
stream of water at fresh adhesive material. If any
leaks are found, paddle in extra adhesive at leak
point using a small disposable brush or
flat-bladed tool. Water applied on top of urethane
adhesive, either during watertest or as a separate
operation, will speed up the cure of the urethane.
8. Install windshield reveal molding.
9. Install
all other previously removed parts and
clean up.
10. On windshield installations, car must remain at
normal room temperature for six hours to
complete proper cure of adhesive.
Extended Method
It will be necessary to use extended installation
method if prior service installation was made with
butyl tape or if urethane material remaining in window
opening after window removal is damaged, or must be
removed to permit refinishing of window opening.
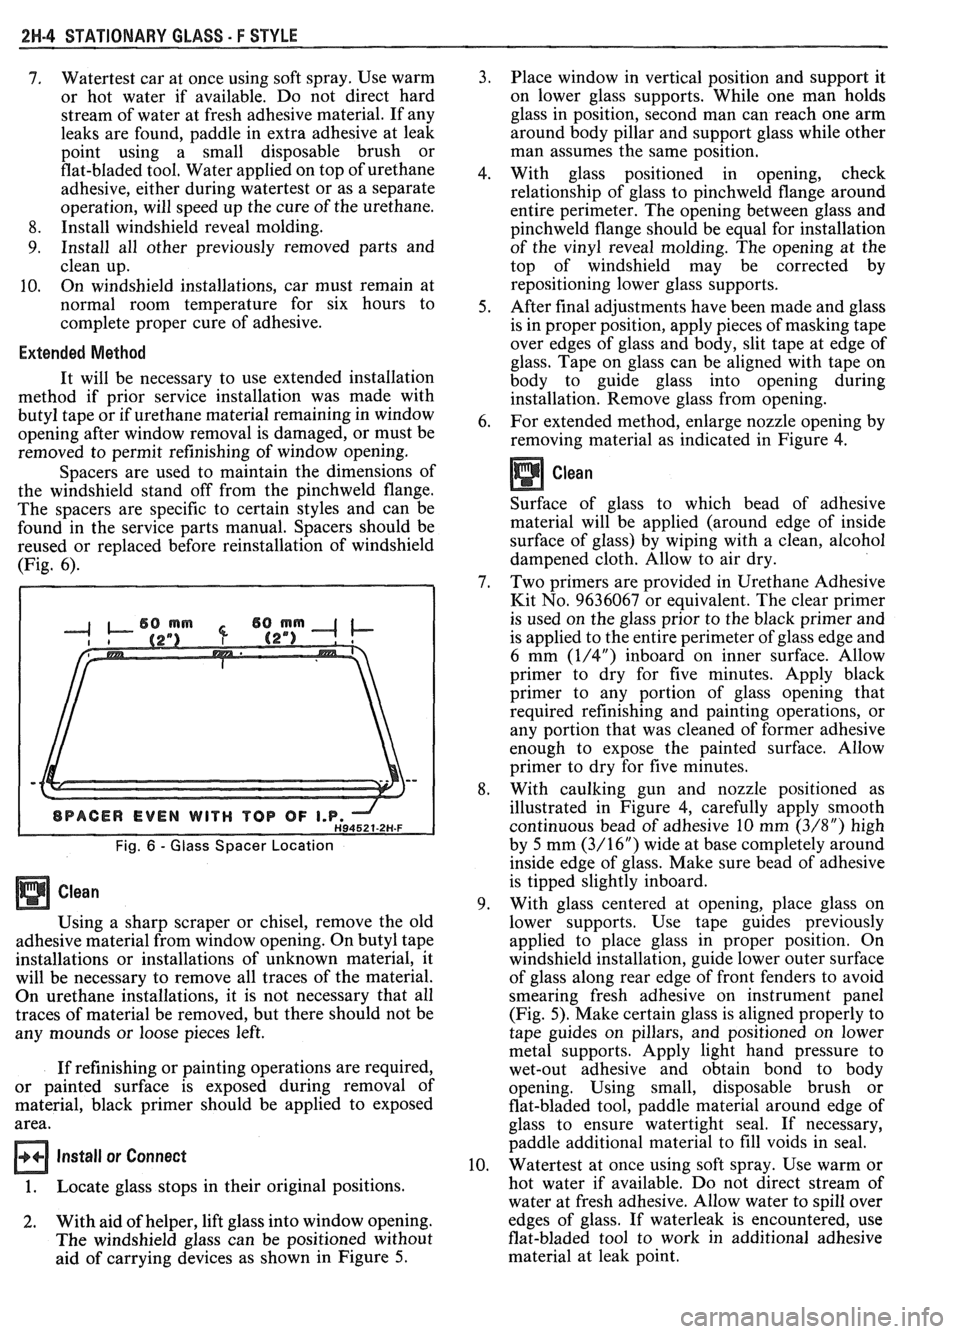
Spacers are used to maintain the dimensions of
the windshield stand off from the pinchweld flange.
The spacers are specific to certain styles and can be
found in the service parts manual. Spacers should be
reused or replaced before reinstallation of windshield
(Fig. 6).
Fig. 6 - Glass Spacer Location
Using a sharp scraper or chisel, remove the old
adhesive material from window opening. On butyl tape
installations or installations of unknown material, it
will be necessary to remove all traces of the material.
On urethane installations, it is not necessary that all
traces of material be removed, but there should not be
any mounds or loose pieces left.
If refinishing or painting operations are required,
or painted surface is exposed during removal of
material, black primer should be applied to exposed
area.
Install or Connect
1. Locate glass stops in their original positions.
2. With aid of helper, lift glass into window opening.
The windshield glass can be positioned without
aid of carrying devices as shown in Figure 5. Place window
in vertical position and support it
on lower glass supports. While one man holds
glass in position, second man can reach one arm
around body pillar and support glass while other
man assumes the same position.
With glass positioned in opening, check
relationship of glass to pinchweld flange around
entire perimeter. The opening between glass and
pinchweld flange should be equal for installation
of the vinyl reveal molding. The opening at the
top of windshield may be corrected by
repositioning lower glass supports.
After final adjustments have been made and glass
is in proper position, apply pieces of masking tape
over edges of glass and body, slit tape at edge of
glass. Tape on glass can be aligned with tape on
body to guide glass into opening during
installation. Remove glass from opening.
For extended method, enlarge nozzle opening by
removing material as indicated in Figure
4.
Clean
Surface of glass to which bead of adhesive
material will be applied (around edge of inside
surface of glass) by wiping with a clean, alcohol
dampened cloth. Allow to air dry.
Two primers are provided in Urethane Adhesive
Kit No. 9636067 or equivalent. The clear primer
is used on the glass prior to the black primer and
is applied to the entire perimeter of glass edge and
6 mm
(1/4") inboard on inner surface. Allow
primer to dry for five minutes. Apply black
primer to any portion of glass opening that
required refinishing and painting operations, or
any portion that was cleaned of former adhesive
enough to expose the painted surface. Allow
primer to dry for five minutes.
With caulking gun and nozzle positioned as
illustrated in Figure 4, carefully apply smooth
continuous bead of adhesive 10 mm
(3/8") high
by 5 mm
(3/16") wide at base completely around
inside edge of glass. Make sure bead of adhesive
is tipped slightly inboard.
With glass centered at opening, place glass on
lower supports. Use tape guides previously
applied to place glass in proper position. On
windshield installation, guide lower outer surface
of glass along rear edge of front fenders to avoid
smearing fresh adhesive on instrument panel
(Fig. 5). Make certain glass is aligned properly to
tape guides on pillars, and positioned on lower
metal supports. Apply light hand pressure to
wet-out adhesive and obtain bond to body
opening. Using small, disposable brush or
flat-bladed tool, paddle material around edge of
glass to ensure watertight seal. If necessary,
paddle additional material to fill voids in seal.
Watertest at once using soft spray. Use warm or
hot water if available. Do not direct stream of
water at fresh adhesive. Allow water to spill over
edges of glass. If waterleak is encountered, use
flat-bladed tool to work in additional adhesive
material at leak point.
Page 1703 of 1825
2H-6 STATIONARY GLASS - F STYLE
all traces of factory installed adhesive must be
removed prior to reinstallation.
5. Wipe sanded mirror support with clean paper
towel saturated with alcohol and allow to dry.
6. Follow directions on manufacturer's kit to
prepare
rearview mirror support prior to
installation on glass.
7. Properly position support to its premarked
location, with rounded end pointed upward; press
support against glass for 30 to 60 seconds,
exerting steady pressure against glass. After five
minutes, any excess adhesive may be removed
with an alcohol moistened paper towel or glass
cleaning solution.
8. Reinstall mirror
4. LOCATING CIRCLE AND BASE OF SUPPORT
LINE ON OUTSIDE GLASS SURFACE
2. CIRCLE ON OUTSIDE GLASS SURFACE
INDICATES AREA TO BE CLEANED
G94301-11 B.BG
Fig. 8-Locating Bonded earv view Mirror Support on
Glass
REAR WlMBOW DEFOGGER
The optional rear window defogger system
consists of a tinted glass that has a number of
horizontal ceramic silver compound element lines and
two vertical bus bars baked into the inside surface
during the glass forming operation. The feed wire or
terminal is soldered to the bus bar on the side. The
ground wire or terminal is soldered to the bus bar on
the right side.
The system operates on 12 volts. Under some
conditions, heat from the glass may not be detected by
finger touch. The length of time required to remove
interior fog from the back glass will vary with such
conditions as vehicle speed, outside glass temperature
and atmospheric pressure and number of passengers. This
system uses an instrument panel mounted
switch with an integral indicator lamp; and will operate
for five to ten minutes and automatically turn off
through the use of an automatic timer. The system can
be turned off during this operating period by turning
either the instrument panel mounted switch or ignition
switch to off.
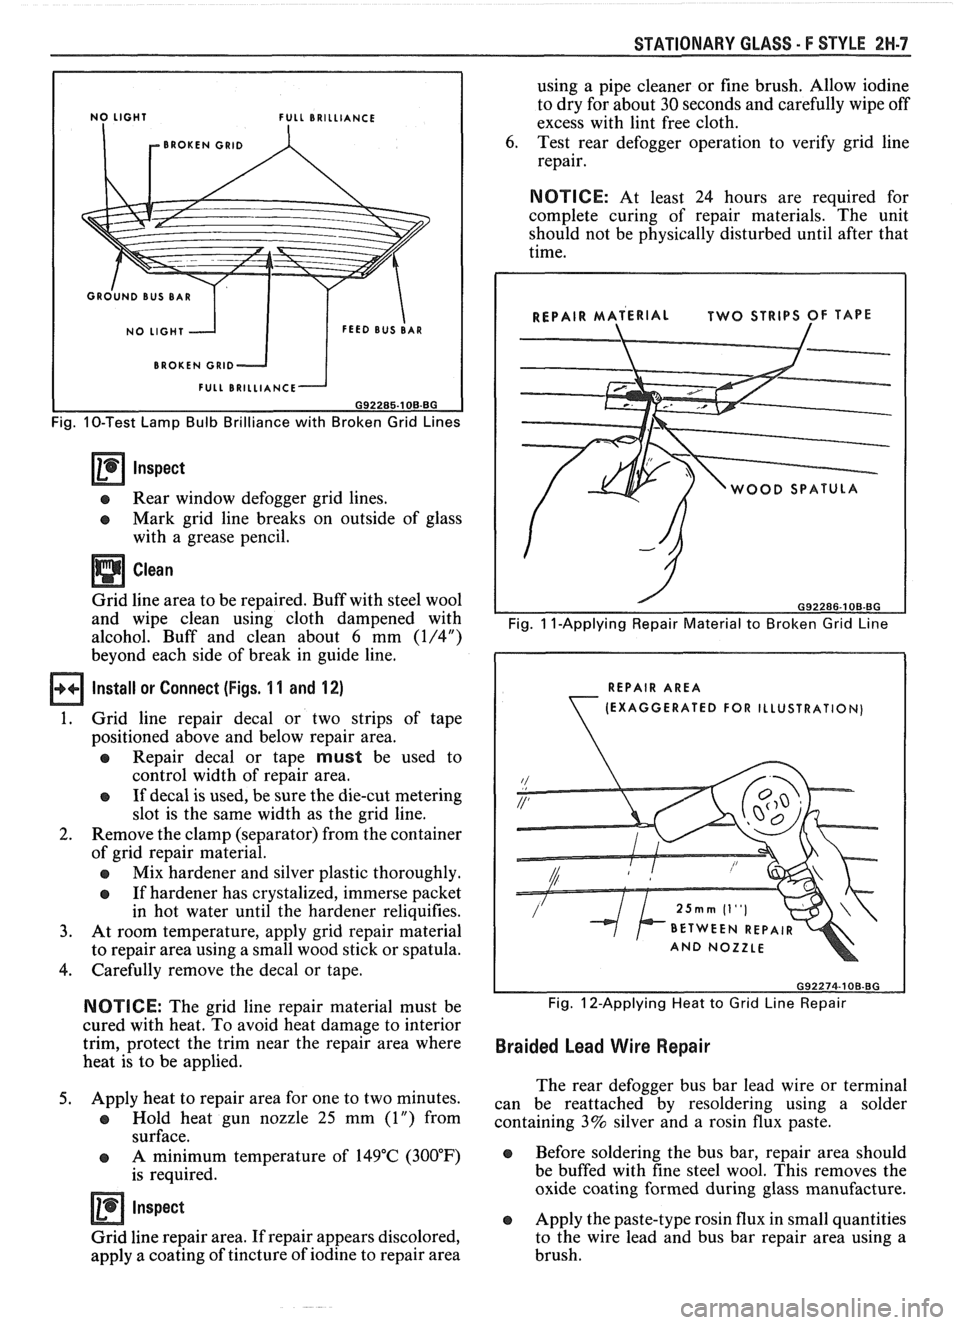
Testing Grid Lines
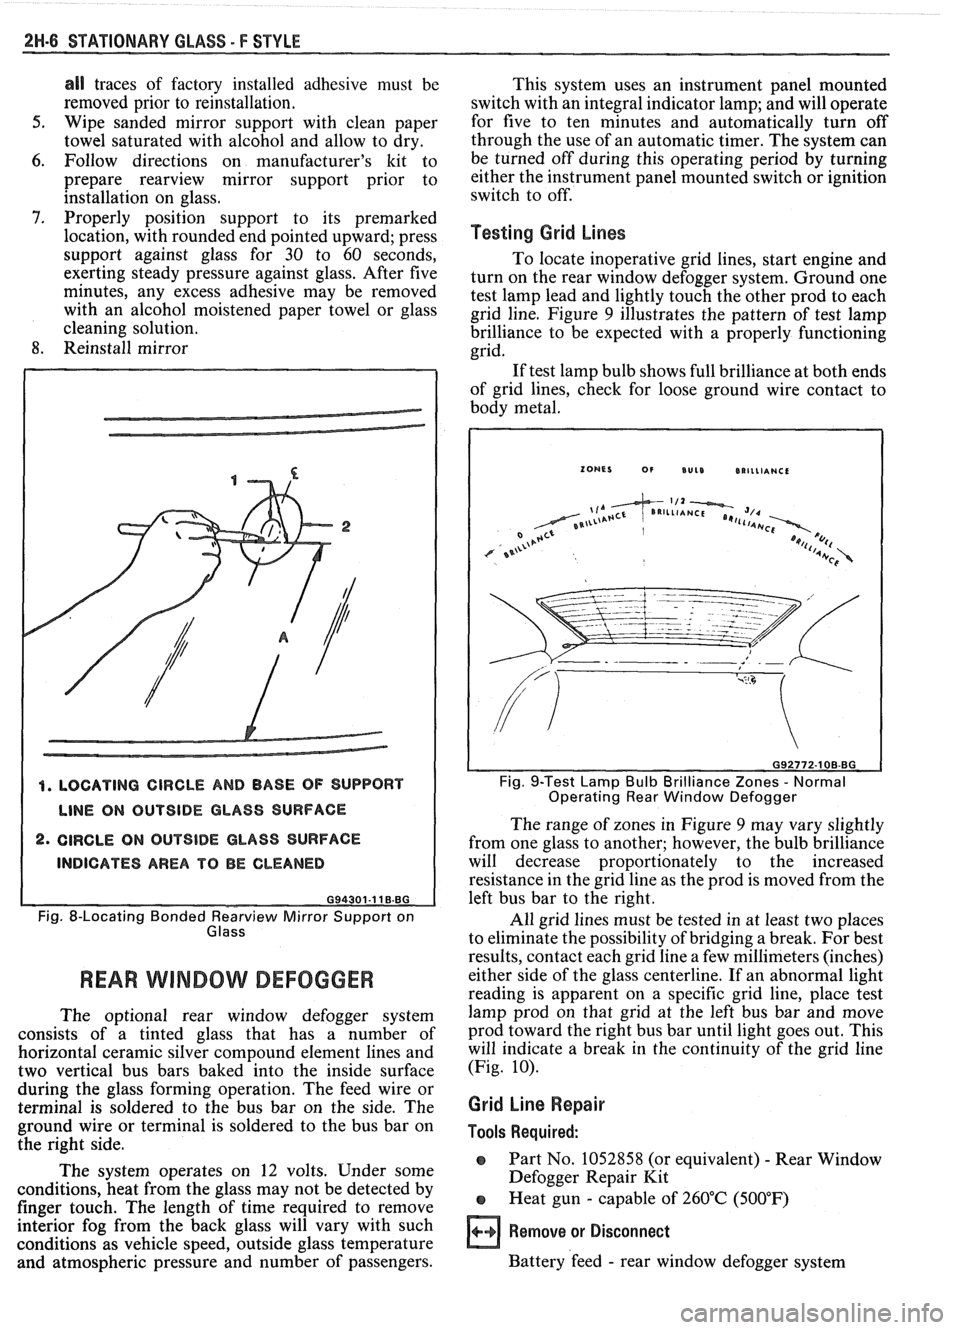
To locate inoperative grid lines, start engine and
turn on the rear window defogger system. Ground one
test lamp lead and lightly touch the other prod to each
grid line. Figure
9 illustrates the pattern of test lamp
brilliance to be expected with a properly functioning
grid.
If test lamp bulb shows full brilliance at both ends
of grid lines, check for loose ground wire contact to
body metal.
Fig. 9-Test Lamp Bulb Brilliance Zones - Normal
Operating Rear Window Defogger
The range of zones in Figure 9 may vary slightly
from one glass to another; however, the bulb brilliance
will decrease proportionately to the increased
resistance in the grid line as the prod is moved from the
left bus bar to the right.
All grid lines must be tested in at least two places
to eliminate the possibility of bridging a break. For best
results, contact each grid line a few millimeters (inches)
either side of the glass centerline. If an abnormal light
reading is apparent on a specific grid line, place test
lamp prod on that grid at the left bus bar and move
prod toward the right bus bar until light goes out. This
will indicate a break in the continuity of the grid line
(Fig.
10).
Grid Line Repair
Tools Required:
o Part No. 1052858 (or equivalent) - Rear Window
Defogger Repair Kit
e Heat gun - capable of 260°C (500°F)
Remove or Disconnect
Battery 'feed - rear window defogger system
Page 1704 of 1825
STATIONARY GLASS - F STYLE 2W.7
L BRILLIANCE
BROKEN
GRlD
BROKEN GRlD
Fig. 10-Test Lamp Bulb Brilliance with Broken Grid Lines
Inspect
e Rear window defogger grid lines.
e Mark grid line breaks on outside of glass
with a grease pencil.
Clean
Grid line area to be repaired. Buff with steel wool
and wipe clean using cloth dampened with
alcohol. Buff and clean about
6 mm (1/4")
beyond each side of break in guide line.
Install or Connect (Figs. 1 1 and 12)
1. Grid
line repair decal or two strips of tape
positioned above and below repair area.
a Repair decal or tape must be used to
control width of repair area.
e If decal is used, be sure the die-cut metering
slot is the same width as the grid line.
2. Remove the clamp (separator) from the container
of grid repair material.
a Mix hardener and silver plastic thoroughly.
e If hardener has crystalized, immerse packet
in hot water until the hardener reliquifies.
3. At room temperature, apply grid repair material
to repair area using a small wood stick or spatula.
4. Carefully remove the decal or tape.
NOTICE: The grid line repair material must be
cured with heat. To avoid heat damage to interior
trim, protect the trim near the repair area where
heat is to be applied.
5. Apply heat to repair area for one to two minutes.
a Hold heat gun nozzle 25 mm (1") from
surface.
e A minimum temperature of 149°C (300°F)
is required.
Inspect
Grid line repair area. If repair appears discolored,
apply a coating of tincture of iodine to repair area using
a pipe cleaner or fine brush. Allow iodine
to dry for about
30 seconds and carefully wipe off
excess with lint free cloth.
6. Test rear defogger operation to verify grid line
repair.
NOTICE: At least 24 hours are required for
complete curing of repair materials. The unit
should not be physically disturbed until after that
time.
WOOD SPATUL
Fig. 1 I-Applying Repair Material to Broken Grid Line
REPAIR AREA
(EXAGGERATED
FOR ILLUSTRATION)
Fig. 12-Applying Heat to Grid Line Repair
Braided Lead Wire Repair
The rear defogger bus bar lead wire or terminal
can be reattached by resoldering using a solder
containing 3% silver and a rosin flux paste.
e Before soldering the bus bar, repair area should
be buffed with fine steel wool. This removes the
oxide coating formed during glass manufacture.
e Apply the paste-type rosin flux in small quantities
to the wire lead and bus bar repair area using a
brush.
Page 1714 of 1825
DOORS - F STYLE 5H-1
SEC"610N 5H
DOORS
NOTICE: The anit-theft label found on some major sheet metal, engines, and transmissions must be masked
prior to painting, rustproofing, undercoating, etc. The mask
must be removed following the above operations.
Failure to keep the label clean and readable may result in liability for violation of Federal Vehicle Theft Prevention
Standard, and subject the vehicle owner to possible suspicion that the part was stolen.
Door Trim
...................................................... 5H- 1
Armrest and Pull Handle .......................... 5H- 1
Mirror Remote Controls/Bezel ................... 5H- 1
Inside Handles and Cover Plates ................ 5H- 1
Lock Knob .................................... .... ........... 5H-2
Trim Panel Assemblies .............................. 5H-2
Doors ............................................................ 5H-3
Door Weatherstrip ....................................... 5H-4
Side Roof Rail Weatherstrip ....................... 5H-4
Window Belt Sealing Strips ......................... 5H-6
Insulator Pads - Optional ............................ 5H-6
Inner Panel Water Deflectors ...................... 5H-6
Door Hinge System .................................. .... 5H-7
Door Side Hinge Strap ............................... 5H-8
Body Side Hinge Strap ................................ 5H- 10
Door Window ..................... .. ................... 5H- 10
Window Sash Channel ................................. 5H- 1 1
Window Regulator and Motor .................... 5H- 1 1
Filler Assembly (at Belt) ......................... ... . 5H- 13
Up Stop ............................ .. ...................... 5H- 14
Rear Guide Channel .................................... 5H- 15
DOOR SECnONS
This section of the manual contains the service
operations necessary for the removal, installation,
adjustment and sealing of door assemblies and
individual hardware and trim components. It is divided
into three subsections:
1. DOOR TRIM
- removal and installation
procedures for all door trim items.
2. DOORS - including hinges, door and side roof
rail weatherstrip and all lock system components.
3. EXTERIOR MOLDINGS - removal and
installation of exterior door moldings. Standard Mirror
......................................... 5H- 15
........................... Remote
Control Mirrors 5H- 15
Power-Operated Outside Mirror ................. 5H-16
Spring Clips .................................................. 5H- 16
Connecting Rods and Locking Rods .......... 5H-16
Inside Remote Handle ................................ 5H- 16
......................................... Outside Handle 5H- 16
............................. Lock Cylinder Assembly 5H- 17
...................................... Door Lock Striker 5H- 17
....................................... Door Wedge Plate 5H- 18
....................................... Door Jamb Switch 5H- 19
........................ Door Hardware Lubrication 5H- 19
Hardware Attachment Thread
.................................................. Locking 5H- 19
................................... Door Lock Assembly 5H- 19
............................ Power Door Lock System 5H-20
........................ Power Door Lock Actuator 5H-20
............. .................................... Bell Crank ... 5H-20
.......................................... Exterior Moldings 5H-20
.......................................... Spoiler on Door 5H-21
.......................................... Spoiler on Body 5H-2 1
DOOR OUTSIDE MIRROR REMOTE CONTROLS
AND BEZEL
On styles with remote control door outside
mirror, the remote control mirror cable must be
disengaged from the bezel on the door trim panel to
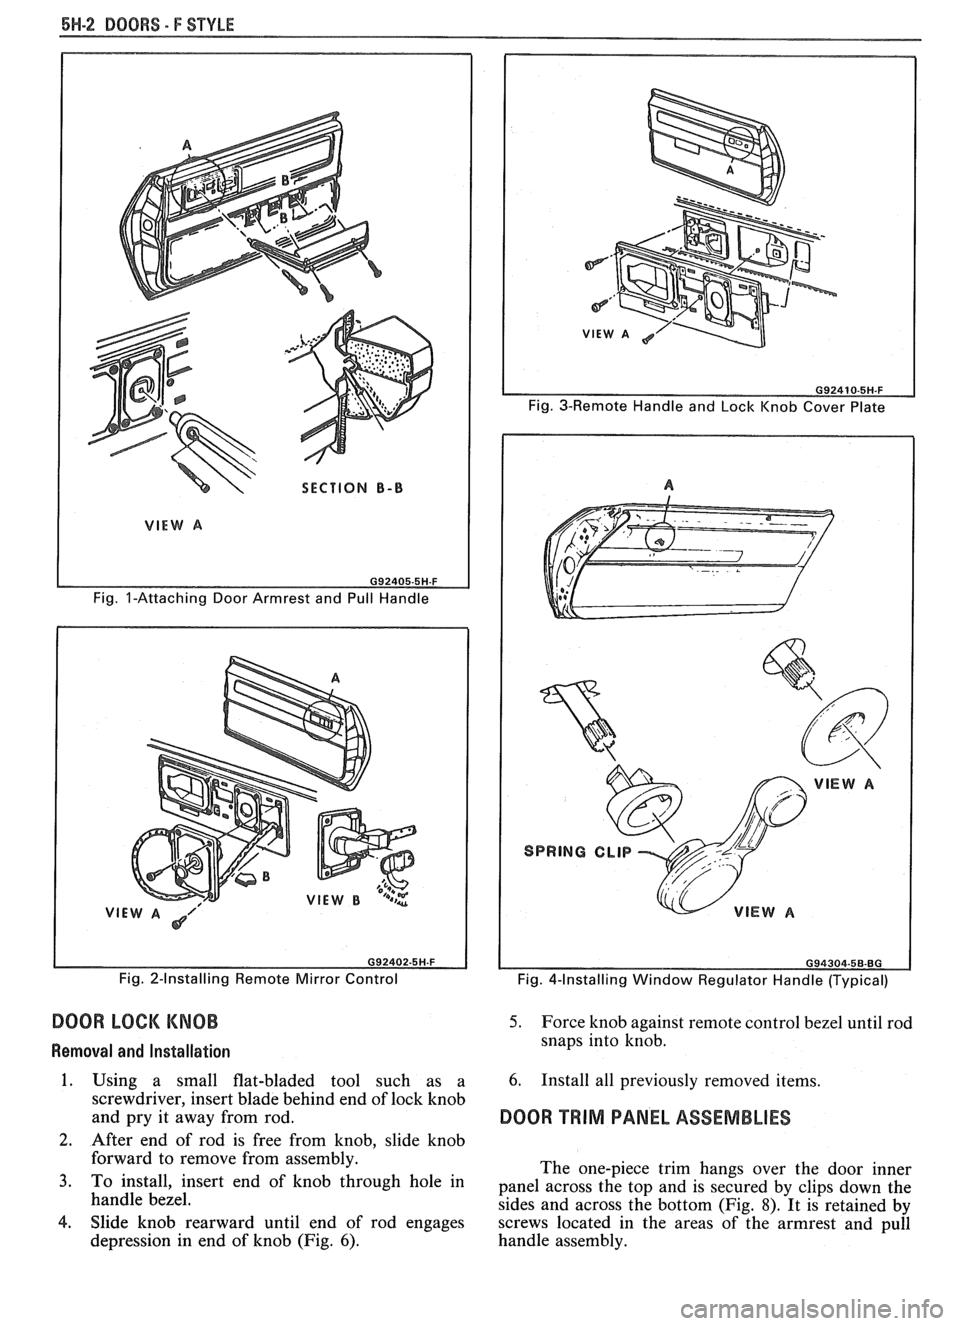
permit trim panel removal. To disengage the remote
cable from the door trim panel, refer to Figure
2.
DOOR INSIDE HANDLES AND COVER PLATES
Door inside handles are retained by either rivets
or spring clips (Fig.
4). On styles equipped with rivet
retained handles, the rivets are covered by a screw
retained cover plate that can be removed as shown in
Figure
3.
DOOR TRIM Removal and Installation
DOOR ARMREST AND PULL HANDLE 1.
ASSEMBLIES
The armrest and pull handle is a one-piece
assembly and is secured to the door inner panel with
screws after door trim panel is installed (Fig. 1). Clips hidden
by window regulator handles (Fig,
4) can be disengaged by depressing door trim
assembly enough to permit inserting tool J-9886
or equivalent between handle and trim panel or
plastic bearing plate (Fig.
5). Then, with tool in
same plane as inside handle, push tool as
indicated to disengage clip. Pull handle inboard
The removal of the door trim panel on styles with to
remove from
s$n>le. -
door armrest and pull handle assemblies requires 2. To install window regulator handles, engage
removal of screws inserted through the assembly's base retaining clip on handle. Position handle at same
into the armrest hanger plate and removal of the screw angle as opposite side handle and press handle
at the top of the pull handle section.
outboard until clip engages regulator spindle.
Page 1715 of 1825
6H-2 DOORS - F STYLE
SECTION B-B
Fig. I-Attaching Door Armrest and Pull Handle
VIE Fig. 2-Installing Remote Mirror Control
DOOR LOCK KNOB
Removal and Installation
1. Using a small flat-bladed tool such as a
screwdriver, insert blade behind end of lock knob
and pry it away from rod.
2. After end of rod is free from knob. slide knob
Fig. 3-Remote Handle and Lock Knob Cover Plate
Fig. 4-Installing Window Regulator Handle (Typical)
5. Force knob against remote control bezel until rod
snaps into knob.
6. Install all previously removed items.
DOOR TRIM PANEL ASSEMBLIES
forward to remove from assembly.
The one-piece trim hangs over the door inner
3. To install, insert end of knob through hole in panel across the top and is secured by clips down the
handle bezel.
sides and across the bottom (Fig.
8). It is retained by
4. Slide knob rearward until end of rod engages
screws located in the areas of the armrest and pull
depression in end of knob (Fig.
6). handle assembly.
Page 1716 of 1825
BOORS - F STYLE 5H-3
I
J-9886
7
RETAINING SPRING
DISENGAGED 7
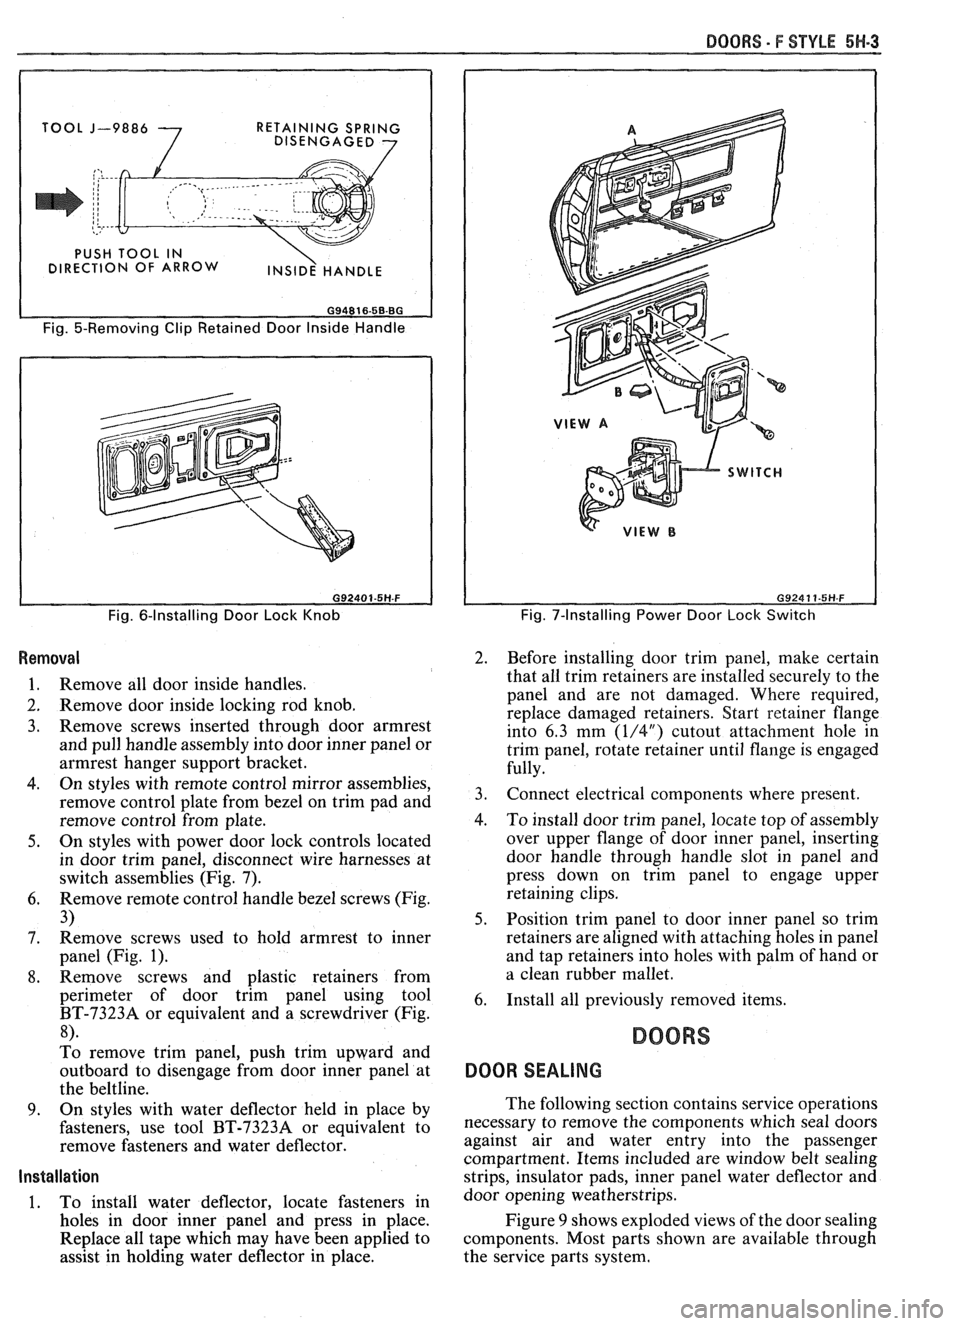
Fig. 5-Removing Clip Retained Door Inside Handle
Fig. 6-Installing Door Lock Knob
Removal
1. Remove all door inside handles.
2. Remove door inside locking rod knob.
3. Remove screws inserted through door armrest
and pull handle assembly into door inner panel or
armrest hanger support bracket.
4. On styles with remote control mirror assemblies,
remove control plate from bezel on trim pad and
remove control from plate.
5. On styles with power door lock controls located
in door trim panel, disconnect wire harnesses at
switch assemblies (Fig. 7).
6. Remove remote control handle bezel screws (Fig.
3)
7. Remove
screws used to hold armrest to inner
panel (Fig.
1).
8. Remove screws and plastic retainers from
perimeter of door trim panel using tool
BT-73238 or equivalent and a screwdriver (Fig.
8).
To remove trim panel, push trim upward and
outboard to disengage from door inner panel at
the beltline.
9. On styles with water deflector held in place by
fasteners, use tool BT-7323A or equivalent to
remove fasteners and water deflector.
Installation
1. To install water deflector, locate fasteners in
holes in door inner panel and press in place.
Replace all tape which may have been applied to
assist in holding water deflector in place.
Fig. 7-Installing Power Door Lock Switch
2. Before installing door trim panel, make certain
that all trim retainers are installed securely to the
panel and are not damaged. Where required,
replace damaged retainers. Start retainer Range
into 6.3 mm
(1/4") cutout attachment hole in
trim panel, rotate retainer until flange is engaged
fully.
3. Connect electrical components where present.
4. To install door trim panel, locate top of assembly
over upper flange of door inner panel, inserting
door handle through handle slot in panel and
press down on trim panel to engage upper
retaining clips.
5. Position trim panel to door inner panel so trim
retainers are aligned with attaching holes in panel
and tap retainers into holes with palm of hand or
a clean rubber mallet.
6. Install all previously removed items.
BOORS
DOOR SEALING
The following section contains service operations
necessary to remove the components which seal doors
against air and water entry into the passenger
compartment. Items included are window belt sealing
strips, insulator pads, inner panel water deflector and
door opening weatherstrips.
Figure
9 shows exploded views of the door sealing
components. Most parts shown are available through
the service parts system.