1988 PONTIAC FIERO jump cable
[x] Cancel search: jump cablePage 367 of 1825
6A2-16 2.8 LITER V-6
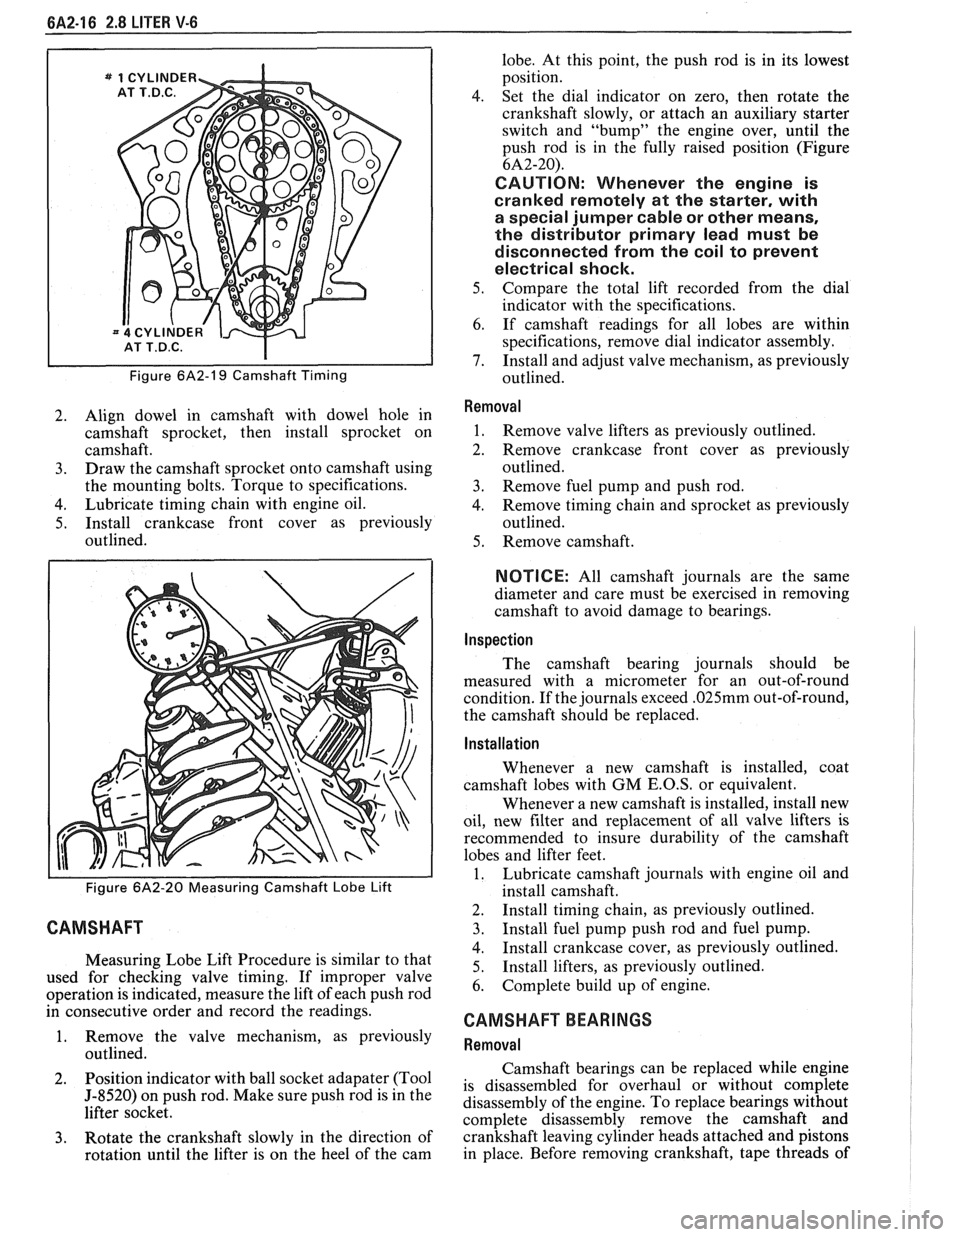
Figure 6A2-19 Camshaft Timing
2. Align dowel in camshaft with dowel hole in
camshaft sprocket, then install sprocket on
camshaft.
3. Draw the camshaft sprocket onto camshaft using
the mounting bolts. Torque to specifications.
4. Lubricate timing chain with engine oil.
5. Install crankcase front cover as previously
outlined.
Figure 6A2-20 Measuring Camshaft Lobe Lift
CAMSHAFT
Measuring Lobe Lift Procedure is similar to that
used for checking valve timing. If improper valve
operation is indicated, measure the lift of each push rod
in consecutive order and record the readings.
1. Remove the valve mechanism, as previously
outlined.
2. Position
indicator with ball socket adapater (Tool
5-8520) on push rod. Make sure push rod is in the
lifter socket.
3. Rotate the crankshaft slowly in the direction of
rotation until the lifter is on the heel of the cam lobe.
At this point, the push rod is in its lowest
position.
4. Set the dial indicator on zero, then rotate the
crankshaft slowly, or attach an auxiliary starter
switch and "bump" the engine over, until the
push rod is in the fully raised position (Figure
6A2-20).
CAUTION: Whenever the engine is
cranked remotely at the starter, with
a special jumper cable or other means,
the distributor primary lead must be
disconnected from the coil to prevent
electrical shock.
5. Compare the total lift recorded from the dial
indicator with the specifications.
6. If camshaft readings for all lobes are within
specifications, remove dial indicator assembly.
7. Install and adjust valve mechanism, as previously
outlined.
Removal
1. Remove valve lifters as previously outlined.
2. Remove crankcase front cover as previously
outlined.
3. Remove fuel pump and push rod.
4. Remove timing chain and sprocket as previously
outlined.
5. Remove camshaft.
NOTICE: All camshaft journals are the same
diameter and care must be exercised in removing
camshaft to avoid damage to bearings.
Inspection
The camshaft bearing journals should be
measured with a micrometer for an out-of-round
condition. If the journals exceed
.025mm out-of-round,
the camshaft should be replaced.
Installation
Whenever a new camshaft is installed, coat
camshaft lobes with
GM E.O.S, or equivalent.
Whenever a new camshaft is installed, install new
oil, new filter and replacement of all valve lifters is
recommended to insure durability of the camshaft
lobes and lifter feet.
1. Lubricate camshaft journals with engine oil and
install camshaft.
2. Install timing chain, as previously outlined.
3. Install fuel pump push rod and fuel pump.
4. Install crankcase cover, as previously outlined.
5. Install
lifters, as previously outlined.
6. Complete build up of engine.
CAMSHAFT BEARINGS
Removal
Camshaft bearings can be replaced while engine
is disassembled for overhaul or without complete
disassembly of the engine. To replace bearings without
complete disassembly remove the camshaft and
crankshaft leaving cylinder heads attached and pistons
in place. Before removing crankshaft, tape threads of
Page 396 of 1825
V-8 ENGINE 6A3.17
4. Set dial indicator on zero, then rotate the
crankshaft slowly, or attach an auxiliary starter
switch and "bump" the engine over, until the
push rod is fully raised position.
e Whenever the engine is cranked remotely at
the started, with a special jumper cable or
other means, the distributor primary lead
should be disconnected from the distributor
(coil).
5. Compare the total lift recorded from the dial
indicator with specifications.
6. If camshaft readings for all lobes are within
specifications, remove dial indicator assembly.
7. Install and adjust valve mechanism as outlined.
Removal
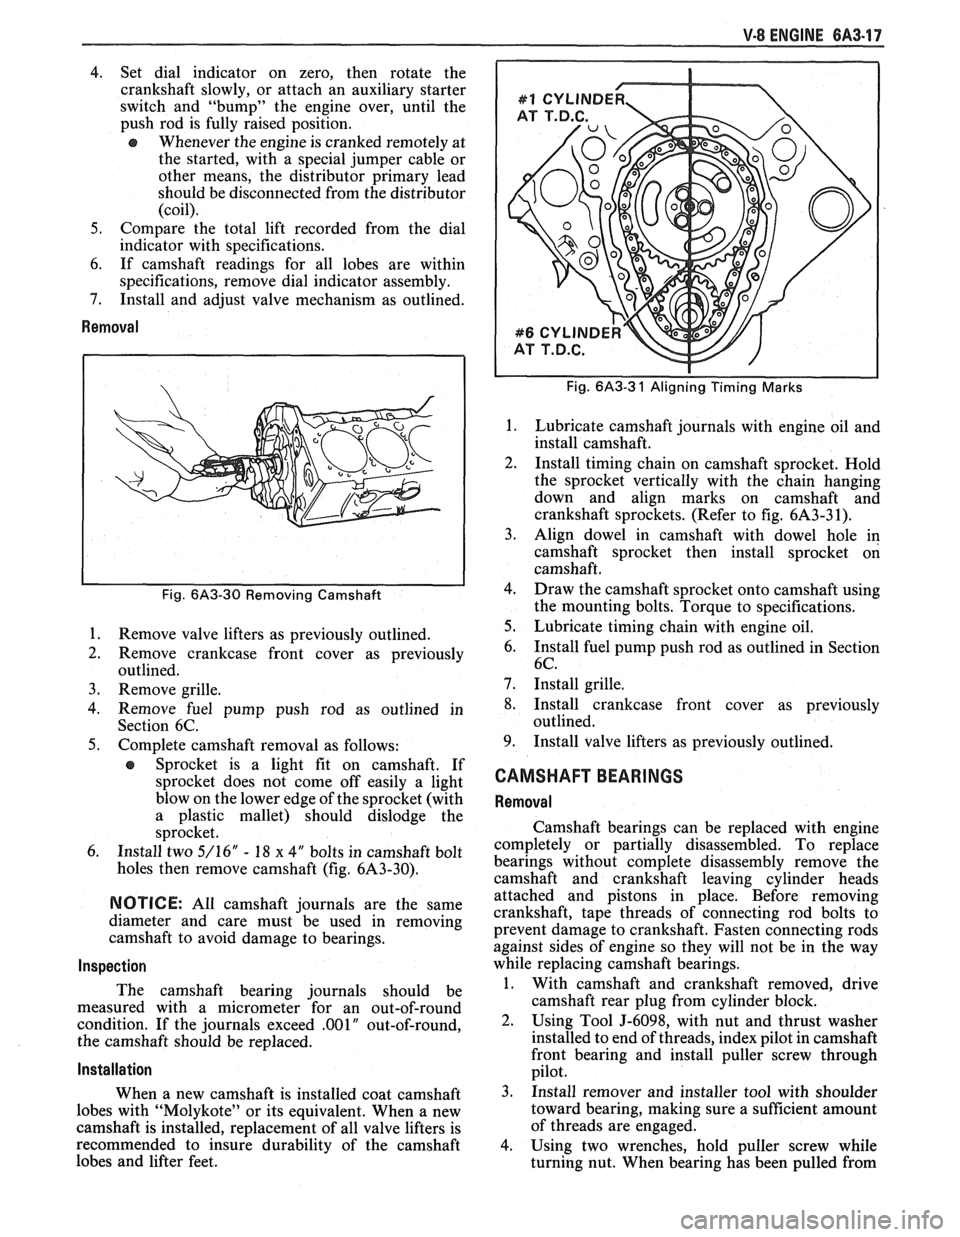
Fig. 6A3-30 Removing Camshaft
1.
Remove valve lifters as previously outlined.
2. Remove crankcase front cover as previously
outlined.
3. Remove grille.
4. Remove fuel pump push rod as outlined in
Section 6C.
5. Complete camshaft removal as follows:
e Sprocket is a light fit on camshaft. If
sprocket does not come off easily a light
blow on the lower edge of the sprocket (with
a plastic mallet) should dislodge the
sprocket.
6. Install two 5/16" - 18 x 4" bolts in camshaft bolt
holes then remove camshaft (fig. 6A3-30).
NOTICE: All camshaft journals are the same
diameter and care must be used in removing
camshaft to avoid damage to bearings.
Inspection
The camshaft bearing journals should be
measured with a micrometer for an out-of-round
condition. If the journals exceed
.001" out-of-round,
the camshaft should be replaced.
Installation
When a new camshaft is installed coat camshaft
lobes with "Molykote" or its equivalent. When a new
camshaft is installed, replacement of all valve lifters is
recommended to insure durability of the camshaft
lobes and lifter feet.
Fig. 6A3-3 1 Aligning Timing Marks
Lubricate camshaft journals with engine oil and
install camshaft.
Install timing chain on camshaft sprocket. Hold
the sprocket vertically with the chain hanging
down and align marks on camshaft and
crankshaft sprockets. (Refer to fig. 6A3-3 1).
Align dowel in camshaft with dowel hole in
camshaft sprocket then install sprocket on
camshaft.
Draw the camshaft sprocket onto camshaft using
the mounting bolts. Torque to specifications.
Lubricate timing chain with engine oil.
Install fuel pump push rod as outlined in Section
6C.
Install grille.
Install crankcase front cover as previously
outlined.
Install valve lifters as previously outlined.
CAMSHAFT BEARINGS
Removal
Camshaft bearings can be replaced with engine
completely or partially disassembled. To replace
bearings without complete disassembly remove the
camshaft and crankshaft leaving cylinder heads
attached and pistons in place. Before removing
crankshaft, tape threads of connecting rod bolts to
prevent damage to crankshaft. Fasten connecting rods
against sides of engine so they will not be in the way
while replacing camshaft bearings.
1. With camshaft and crankshaft removed, drive
camshaft rear plug from cylinder block.
2. Using Tool J-6098, with nut and thrust washer
installed to end of threads, index pilot in camshaft
front bearing and install puller screw through
pilot.
3. Install remover and installer tool with shoulder
toward bearing, making sure a sufficient amount
of threads are engaged.
4. Using two wrenches, hold puller screw while
turning nut. When bearing has been pulled from
Page 444 of 1825
BATTERY 6D1.1
SECTION 6Dl
BATTERY
CONTENTS
.......................... .. General Description ................................ 6D1- 1 Battery Charging ...... 6D 1-2
Battery .......................... ... ....................... 6D 1 - 1 Charging Completely Discharged
.................................................... ............................. Ratings .................... ... 6D 1 - 1 Battery 6D 1-3
........................................... Reserve Capacity ..................................... 6D 1 - 1 Jump Starting 6D
1-4
Cranking ............a*............ 6D1-1 On-Gar Service ...................................... 6Dl-5 .................................. Built-In Hydrometer 6D 1-2 Battery Cable Routing ............................... 6D 1-5 Diagnosis ................................................... 6Dl-2
Specifications .............................................. 6D 1-7 ............................. Service Procedures ..... 6D 1-2
GENERAL DESCRIPTION
The engine electrical system includes the battery,
ignition (primary and secondary), starter (and related
wiring) and the generator (and related wiring).
Diagnostic charts (see Section 6D) will aid in
trouble-shooting system faults. When a fault is traced
to a particular component, refer to that components'
section of the service manual.
BATTERY
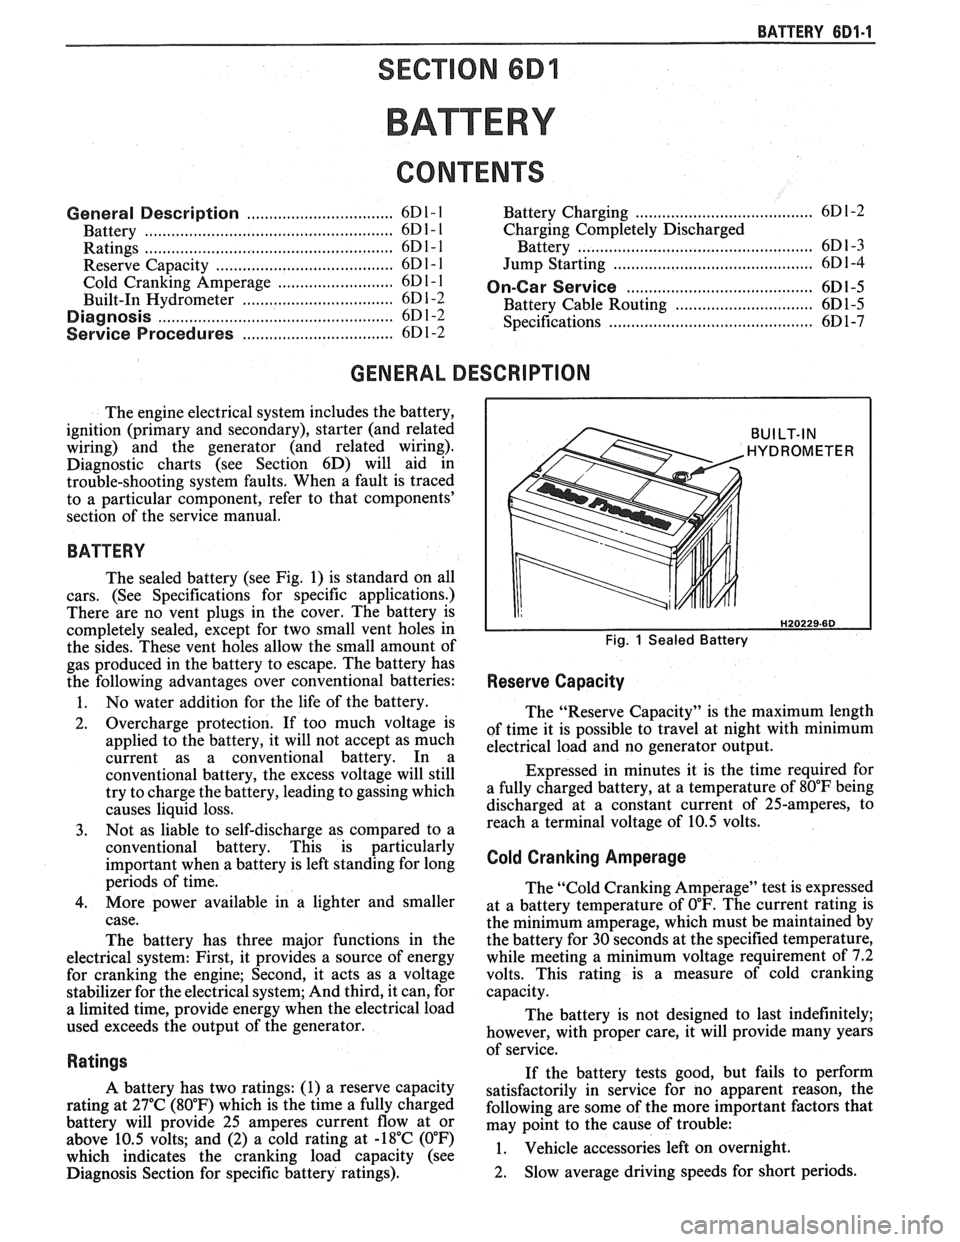
The sealed battery (see Fig. 1) is standard on all
cars. (See Specifications for specific applications.)
There are no vent plugs in the cover. The battery is
completely sealed, except for two small vent holes in
the sides. These vent holes allow the small amount of
gas produced in the battery to escape. The battery has
the following advantages over conventional batteries:
1. No water addition for the life of the battery.
2. Overcharge protection. If too much voltage is
applied to the battery, it will not accept as much
current as a conventional battery. In a
conventional battery, the excess voltage will still
try to charge the battery, leading to gassing which
causes liquid loss.
3. Not as liable to self-discharge as compared to a
conventional battery. This is particularly
important when a battery is left standing for long
periods of time.
4. More power available in a lighter and smaller
case.
The battery has three major functions in the
electrical system: First, it provides a source of energy
for cranking the engine; Second, it acts as a voltage
stabilizer for the electrical system; And third, it can, for
a limited time, provide energy when the electrical load
used exceeds the output of the generator.
Ratings
A battery has two ratings: (1) a reserve capacity
rating at 27°C (80°F) which is the time a fully charged
battery will provide 25 amperes current flow at or
above 10.5 volts; and (2) a cold rating at -18°C (0°F)
which indicates the cranking load capacity (see
Diagnosis Section for specific battery ratings).
BUILT-IN
HYDROMETER
Fig. 1 Sealed Battery
Reserve Capacity
The "Reserve Capacity" is the maximum length
of time it is possible to travel at night with minimum
electrical load and no generator output.
Expressed in minutes it is the time required for
a fully charged battery, at a temperature of 80°F being
discharged at a constant current of 25-amperes, to
reach a terminal voltage of 10.5 volts.
Cold Cranking Amperage
The "Cold Cranking Amperage" test is expressed
at a battery temperature of
0°F. The current rating is
the minimum amperage, which must be maintained by
the battery for 30 seconds at the specified temperature,
while meeting a minimum voltage requirement of 7.2
volts. This rating is a measure of cold cranking
capacity.
The battery is not designed to last indefinitely;
however, with proper care, it will provide many years
of service.
If the battery tests good, but fails to perform
satisfactorily in service for no apparent reason, the
following are some of the more important factors that
may point to the cause of trouble:
1. Vehicle
accessories left on overnight.
2. Slow
average driving speeds for short periods.
Page 447 of 1825
6D1-4 BATTERY
VOLTAGE
A. 16.0 or more
B. 14.0
- 15.9
C. 13.9 or less HOURS
1. Set parking brake and place automatic
Up to 4 Hours transmission in "PARK" (NEUTRAL for
Up to 8 Hours manual transmission.) Turn off the ignition,
Up to 16 Hours turn off lights, and all other electrical
If the charge current is still not
measurable
at the end of the above charging
times, the battery should be replaced.
If the charge current is measurable during
the charging time, the battery is considered to be
good and charging should be completed in the
normal manner.
5. It
is important to remember that a completely
discharged battery must be recharged for a
sufficient number of ampere hours (AH) to
restore it to a usable state. As a general rule of
thumb, using the reserve capacity rating (RC) of
the battery as the number of ampere hours of
charge will usually bring the green dot into view.
For example, if battery is rated at 75 RC minutes,
it would be completely recharged as follows:
10 ampere charge x 7-1/2 hours
= 75 AH
25 ampere charge x 3 hours = 75 AH, etc.
6. It
is recommended that any battery recharged by
this procedure be
LOAD TESTED to establish
serviceability.
JUMP STARTING IN CASE OF EMERGENCY
WITH AUXILIARY (BOOSTER) BAVEEWY
NOTICE: Do not push or tow the vehicle to start.
Damage to the emission system, or to other parts
of the vehicle may result.
Both booster and discharged battery should be
treated carefully when using jumper cables. Follow the
procedure outlined below, being careful not to cause
sparks:
CAUTION: Departure from these
conditions or the procedure below
could result in:
(1) Serious personal
injury (particularly to eyes) or property
damage from such causes as battery
explosion, battery acid, or electrical
burns; and/or
(2) damage to electronic
components of either vehicle.
Never expose battery to open flame or electric
spark
- batteries generate a gas which is flammable and
explosive.
Remove rings, watches, and other jewelry. Wear
approved eye protection.
Do not allow battery fluid to contact eyes, skin,
fabrics, or painted surfaces
- fluid is a corrosive acid.
Flush any contacted area with water immediately and
thoroughly. Be careful that metal tools or jumper
cables do not contact the positive battery terminal (or
metal in contact with it) and any other metal on the
car, because a short circuit could occur. Batteries
should always be kept out of the reach of children.
loads.
2. Check the built-in hydrometer. If it is clear or
light yellow, replace the battery.
3. Attach the end of one jumper cable to the positive
terminal of the booster battery and the other end
of the same cable to the positive terminal of the
discharged battery. Do not permit vehicles to
touch each other as this could cause a ground
connection and counteract the benefits of this
procedure. (Use 12-volt battery only to jump start
the engine).
4. Attach one end of the remaining negative cable
to the negative terminal of the booster battery,
and the other end to a solid engine ground (such
as
A/C compresser bracket or generator
mounting bracket) at least 18 inches from the
battery of the vehicle being started (DO NOT
CONNECT DIRECTLY TO THE NEGATIVE
TERMINAL OF THE DEAD BATTERY).
5. Start the engine of the vehicle that is providing
the jump start and turn off electrical accessories.
Then start the engine in the car with the
discharged battery.
6. Reverse these directions exactly when removing
the jumper cables. The negative cable must be
disconnected from the engine that was jump
started first.
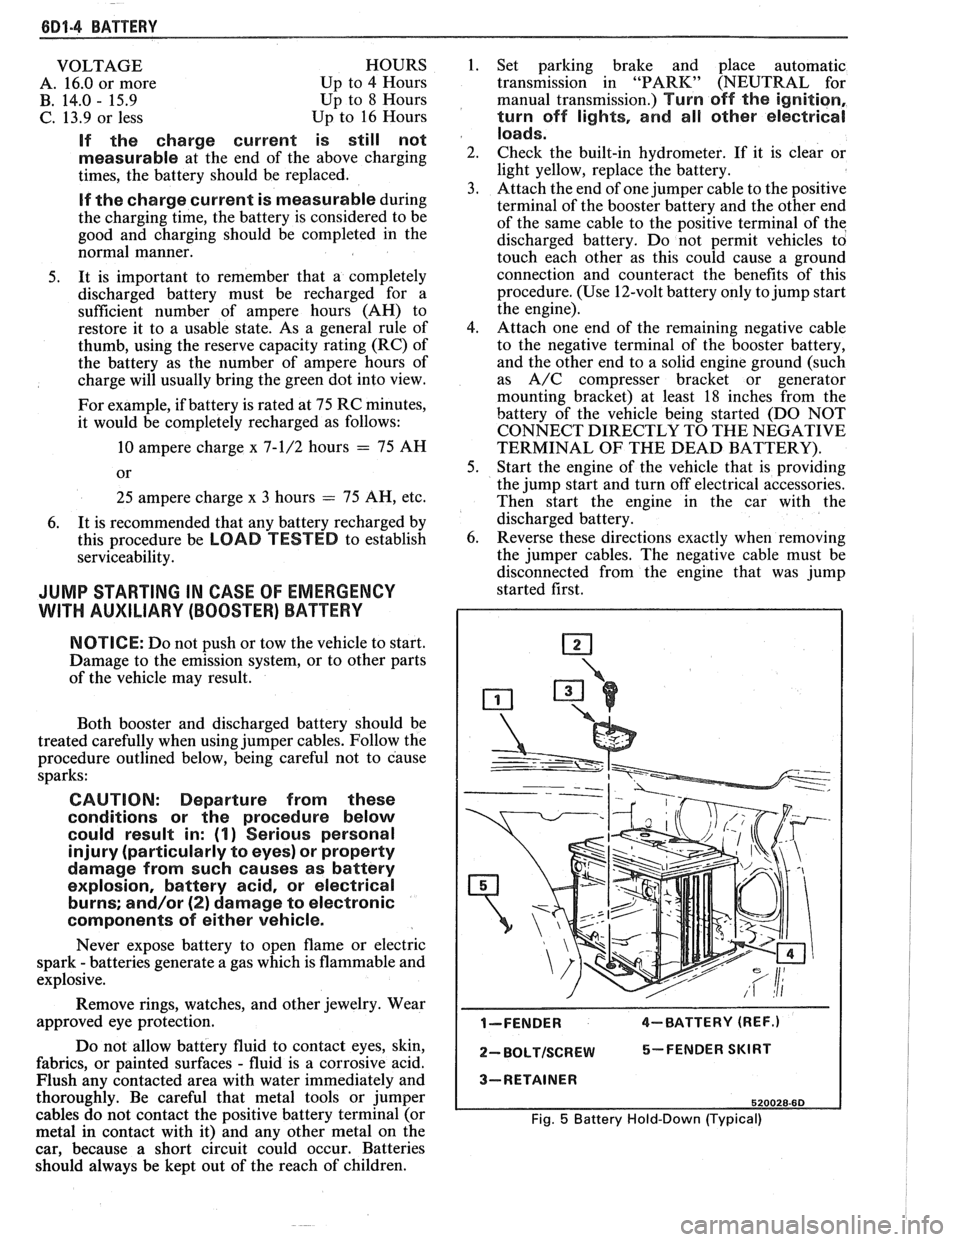
I-FENDER 4-BATTERY (REF.)
2- BOLTISCREW 5-FENDER SKIRT
3-RETAINER
520028-60
Fig. 5 Battery Hold-Down (Typical)
Page 470 of 1825
IGNITION SYSTEM 6D4-1
ON SYSTEM
CONTENTS
General Description ............................... 6D4-1 Service Procedures ............................. 6D4-3
Ignition System .......................................... 6D4-1
Ignition System .......................................... 6D4-3
Distributor Ignition ................................ 6D4-1
Distributor Ignition ................................ 6D4 -3
Diannosis .................................................... 6D4-3 On-Car Service ......................................... 6D4-5 -
Ignition System .......................................... (334-3 Ignition System ........................... .. .............. 6D4-5
Distributor ................................................. 6D4 -7 HE1 Distributor .................................... 6D4-3
GENERAL DESCRIPION
The engine electrical system includes the battery,
ignition (primary and secondary), starter (and related
wiring) and the generator (and related wiring).
Diagnostic charts (see Section 6D) will aid in
trouble-shooting system faults. When a fault is traced
to a particular component, refer to that components'
section of the service manual.
IGNITION SYSTEM
Distributor Ignition
The ignition circuit consists of the battery,
distributor, ignition switch, spark plugs and primary
and secondary wiring. Refer to the Battery portion of
this section for battery information.
PIE1 Distributor
The Nigh Energy Ignition (HEI) distributor with
Electronic Spark Timing (EST), used on most engines,
combines all ignition components in one unit. The
ignition coil is in the distributor cap and connects
through a resistance brush to the rotor.
The distributor has an internal magnetic pick-up
assembly which contains a permanent magnet, a pole
piece with internal teeth and a pick-up coil. When the
teeth of the timer core, rotating inside the pole piece,
line up with the teeth of the pole piece, an induced
voltage in the pick-up coil signals the electronic module
to trigger the coil primary circuit. The primary current
decreases and a high voltage is induced in the ignition
coil secondary winding. This voltage is directed
through the rotor and secondary leads to fire the spark
plugs. The capacitor in the distributor is for radio noise
suppression,
All spark timing changes in the
HE1 (EST)
distributor are done electronically by an Electronic
Control Module (ECM), which monitors information
from various engine sensors, computes the desired
spark timing and signals the distributor to change the
timing accordingly.
A back-up spark advance system
is incorporated to signal the ignition module in case of
(ECM) failure. No vacuum or mechanical advance is
used. Further (EST) information is found in sections 6E
Emissions Control, and
8A Electrical
Troubleshooting.
Ignition Timing
Timing specifications for each engine are listed in
Section
6E. When using a timing light, connect an
adapter between the No. 1 spark plug and the No. 1
spark plug wire, or use an inductive type pick-up.
Do
not pierce the plug lead.
Once the insulation of the
spark plug cable has been broken, voltage will jump to
the nearest ground, and the spark plug will not fire
properly.
Always follow the tune-up label
procedures when adjusting timing.
Some engines will incorporate a magnetic timing
probe hole for use with special electronic timing
equipment. Fig.
1A shows a typical magnetic probe
hole. Consult manufacturer's instructions for use of
this equipment.
Secondary Wiring
The spark plug wiring used with ignition systems
is a carbon impregnated cord conductor, encased in an
8MM (5/16") diameter silicone rubber jacket. The
silicone jacket withstands very high temperatures and
also provides an excellent insulator for the higher
voltage of the
HE1 system. Silicone spark plug boots
form a tight seal on the plug.
The boot should be
twisted 1/2 turn before removing. Care should
also be exercised when connecting a timing light or
other pick-up equipment. Do not force anything
between the boot and wiring, or through the silicone
jacket. Connections should be made in parallel using
an adapter. DO NOT pull on the wire to remove. Pull
on the boot, or use a tool designed for this purpose.
Spark Plugs
Resistor type, tapered seat spark plugs are used
on all engines (except aluminum heads). No gasket is
used on these tapered seat plugs. See Figs.
1B and 1C
for an explanation of coding on spark plugs.
Normal service is assumed to be a mixture of
idling, slow speed, and high speed driving. Occasional
or intermittent high-speed driving is needed for good
Page 562 of 1825
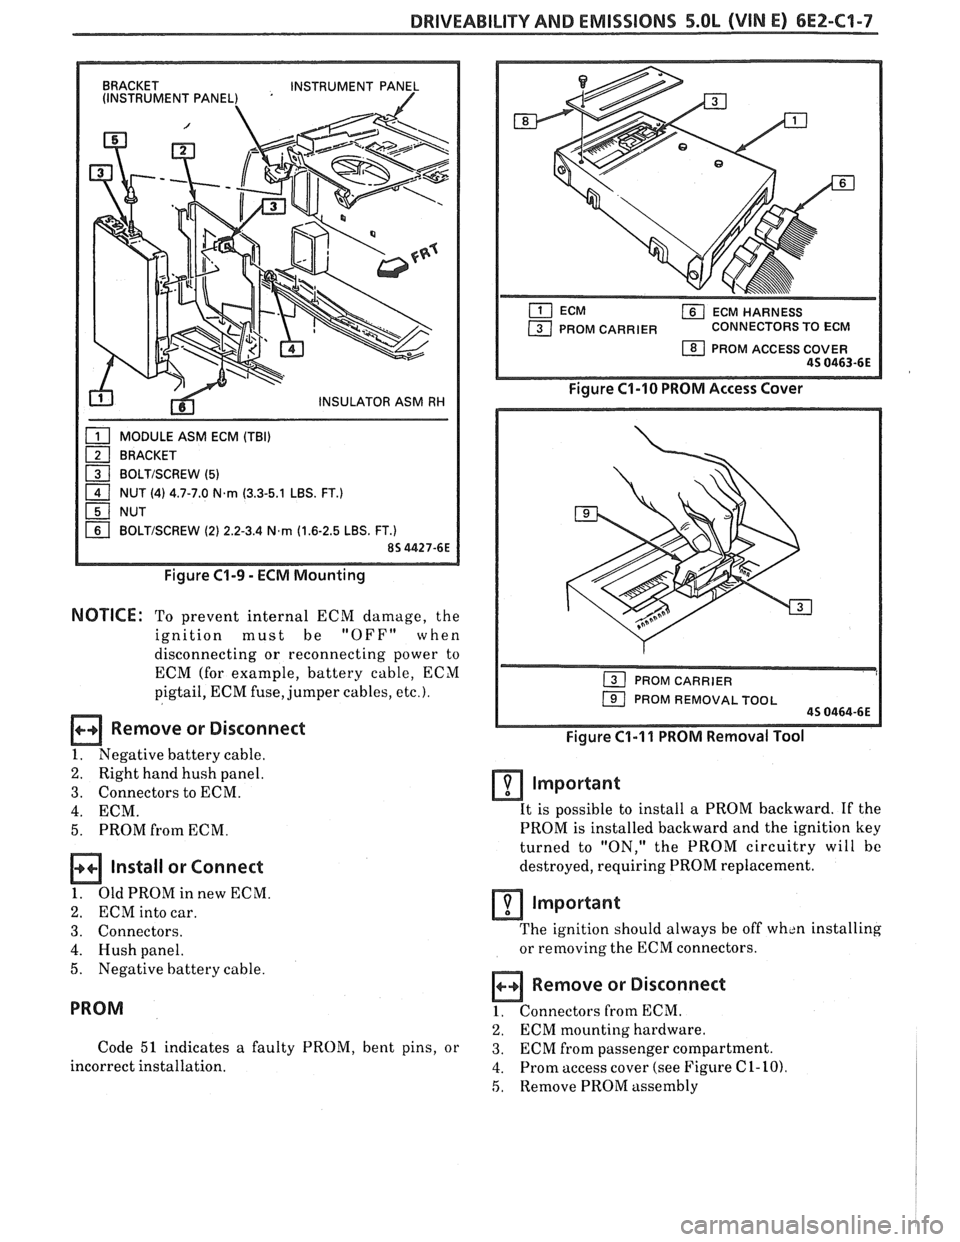
DRIVEABILITY AND EMISSIONS 5.OL (VIN E) 6EZ-C1-7
BRACKET
INSTRUMENT PANEL
(INSTRUMENT PANEL) '
MODULE ASM ECM (TBI)
BRACKET
1 BOLTISCREW (5) - 1 NUT (4) 4.7-7.0 N.rn (3.3-5.1 LBS. FT.)
NUT
BOLTISCREW (2) 2.2-3.4 N,rn (1.6-2.5 LBS. FT.)
Figure C1-9 - ECM Mounting
NOTICE: To prevent internal ECM damage, the
ignition must be
"OFF" when
disconnecting or reconnecting power to
ECM (for example, battery cable, ECM
pigtail, ECM fuse, jumper cables,
etc.).
Remove or Disconnect
1. Negative battery cable.
2. Right hand hush panel.
3. Connectors to ECM.
4. ECM.
5. PROM from ECM.
Install or Connect
1. OldPROMinnewECM.
2. ECM into car.
3. Connectors.
4. Hush panel.
5. Negative battery cable.
PROM
Code 51 indicates a faulty PROM, bent pins, or
incorrect installation.
ECM HARNESS
PROM CARRIER CONNECTORS TO ECM
1 PROM ACCESS COVER 45 0463-6E
Figure C1-10 PROM Access Cover
1 PROM REMOVAL TOOL 45 0464-6E
Figure C1-I 1 PROM Removal Tool
Important
It is possible to install a PROM backward. If the
PROM is installed backward and the ignition key
turned to "ON," the PROM circuitry will bc
destroyed, requiring PROM replacement.
lmportant
The ignition should always be off wh~n installing
or removing the ECM connectors.
Remove or Disconnect
1. Connectors from ECM.
2. ECM mounting hardware.
3. ECM from passenger compartment.
4. Prom access cover (see Figure C 1- 10)
5, Remove PROM assembly
Page 725 of 1825
6E3-C1-6 2.8L (VIM O) DRlVEABlLlTY AND EMISSIONS
amportant
When replacing the production ECM with a
service ECM (controller), it is important to
transfer the Broadcast code and production
ECM number to the service ECM label. Please
do not record on ECM cover. This will allow
positive identification of ECM parts
throughout the service life of the vehicle.
amportant
To prevent internal ECM damage, the ignition
must be "OFF" when disconnecting or
reconnecting power to ECM (for example,
battery cable, ECM pigtail, ECM fuse, jumper
cables,
etc.).
ECM AND COMPONENTS REPLACEMENT
PROM OR ECM
Code 51 indicates a faulty PROM, possibly caused
by bent pins, or incorrect installation.
mmportant
It is possible to install a PROM backwards. If the
PROM
is installed backwards and the ignition key
turned to "ON," the PROM circuitry will be destroyed,
requiring PROM replacement.
NOTICE: The ignition should always be off when
installing or removing the ECM
connectors or internal components.
memove or Disconnect
1. Negative battery cable.
2. Right hand hush panel.
3. Connectors from ECM.
4. ECM mounting hardware.
5. ECM from passenger compartment.
6. ECM access cover (see Figure
C1-6).
7. Remove PROM assembly.
amportant
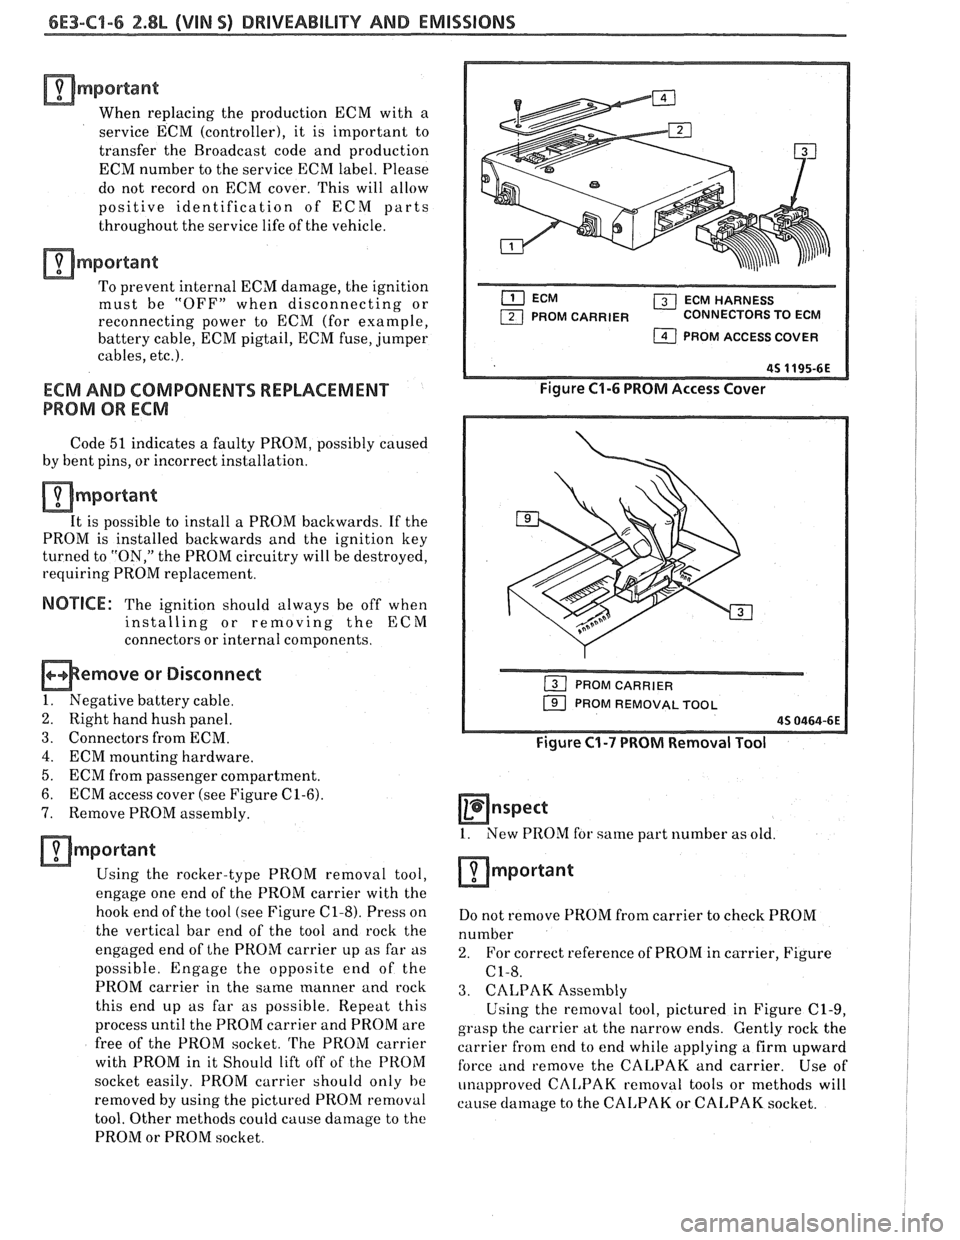
Using the rocker-type PROM removal tool,
enga& one end of t-hk PROM carrier with the
hook end of the tool (see Figure
C1-8). Press on
the vertical bar end of the tool and rock the
engaged end of the PROM carrier up as far as
possible. Engage the opposite end of the
PROM carrier in the same manner and
rock
this end up as far as possible. Repeat this
process until the PROM carrier and PROM are
free of the PROM socket.
The PROM carrier
with PROM in it Should lift off of the PROM
socket easily. PROM carrier should only
he
removed by using the pictured PROM removal
tool. Other methods could cause damage to the
PROM or PROM socket.
( ECM HARNESS
PROM CARRIER CONNECTORS TO ECM
1 PROM ACCESS COVER
Figure C1-6 PROM Access Cover
PROM CARRIER
PROM REMOVAL TOOL
Figure C1-7 PROM Removal Tool
Hnspect
1. New PROM for same part number as old.
Do not remove PROM from carrier to check PROM
number
2. For correct reference of PROM in carrier, Figure
C1-8.
3. CALPAK Assembly
Using the removal tool, pictured in Figure C1-9,
grasp the carrier
at the narrow ends. Gently rock the
carrier
from end to end while applying a firm upward
force and remove the CALPAK and carrier. Use of
unapproved
CAL,PAK removal tools or methods will
cause
damage to the CAI,PAK or CALPAK socket.
Page 881 of 1825
6E3-C9-6 5.OL (VIN F) & 5.7L (VIN 8) DRIVEABILIW AND EMISSIONS
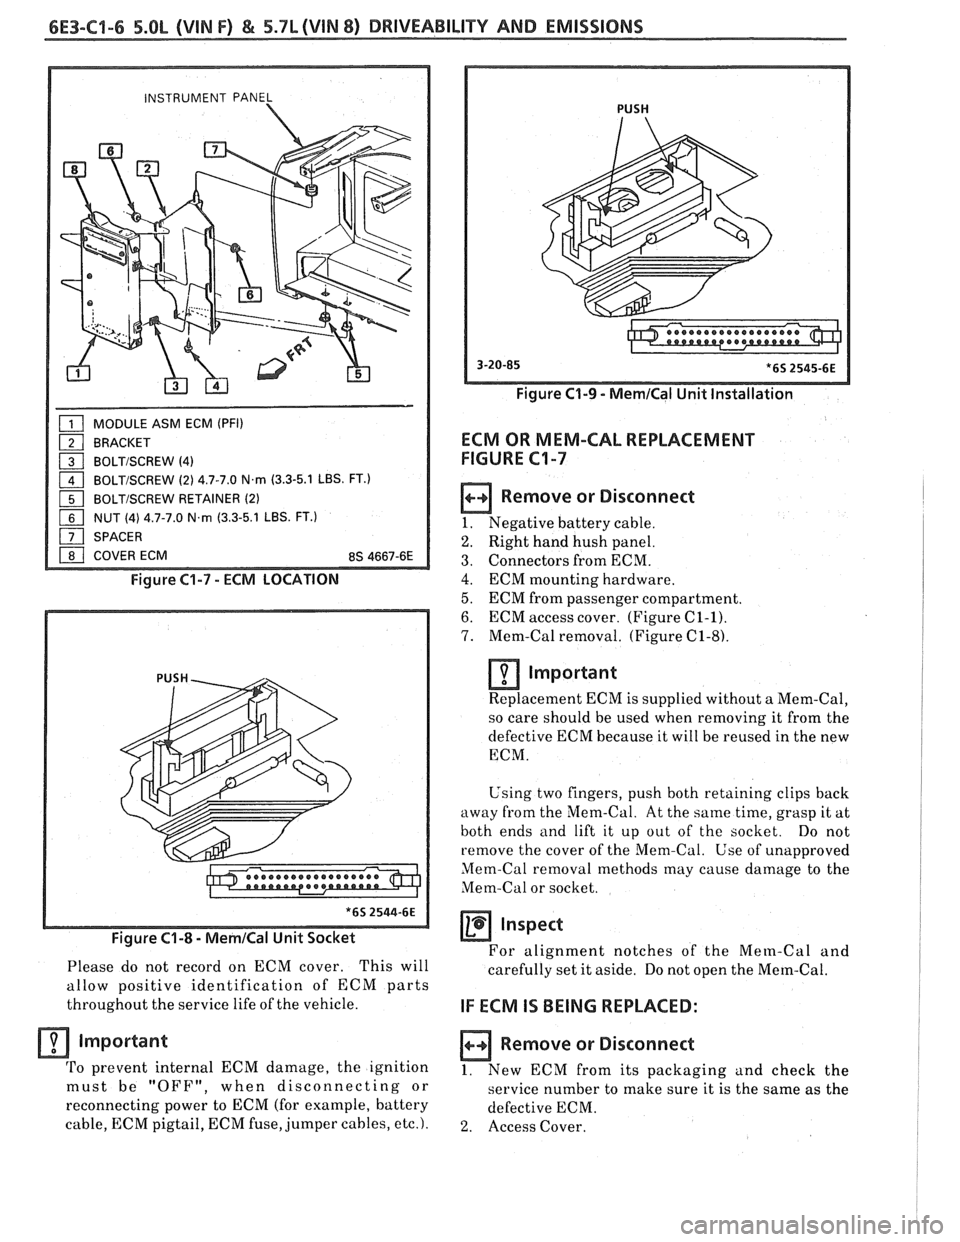
INSTRUMENT PANEL 1
MODULE ASM ECM (PFI)
BRACKET
a BOLTISCREW (4)
1 BOLTISCREW (2) 4.7-7.0 N.m (3.3-5.1 LBS. FT.)
1 BOLTISCREW RETAINER (2)
NUT (4) 4.7-7.0 N.m (3.3-5.1 LBS. FT.)
SPACER
I 1 COVER ECM 8s 4667-6E 1
Figure C1-7 - ECM LOCATION
Figure
C1-8 - MemICal Unit Socket
Please do not record on ECM cover. This will
allow positive identification of ECM parts
throughout the service life of the vehicle.
Important
'I'o prevent internal ECM damage, the ignition
must be "OFF", when
disconnecting or
reconnecting power to ECM (for example, battery
cable, ECM pigtail, ECM fuse, jumper cables,
etc.).
PUSH
Figure C1-9 - MernICal Unit Installation
ECM OR MEM-CAL REPLACEMENT
FIGURE
C1-7
Remove or Disconnect
1. Negative battery cable.
2. Right hand hush panel.
3. Connectors from ECM.
4. ECM mounting hardware.
5. ECM from passenger compartment.
6. ECM access cover. (Figure C1-1).
7. Mem-Cal removal. (Figure C1-8).
lmportant
Replacement ECM is supplied without a Mem-Cal,
so care should be used when removing it from the
defective ECM because it will be reused
in the new
ECM.
Using two fingers, push both retaining clips back
away from the Mem-Cal. At the
same time, grasp it at
both ends and lift it up out of the socket. Do not
remove the cover of the Mem-Cal.
Use of unapproved
Mem-Cal removal methods may cause damage to the
Mem-Cal or socket.
Inspect
For alignment notches of the Mem-Cal and
carefully set it aside. Do not open the
Mern-Cal.
IF ECM IS BEING REPLACED:
Remove or Disconnect
1. New ECM from its packaging and check the - -
service number to make sure it is the same as the
defective ECM.
2. Access Cover.