1988 PONTIAC FIERO distributor
[x] Cancel search: distributorPage 473 of 1825
684.4 IGNITION SYSTEM
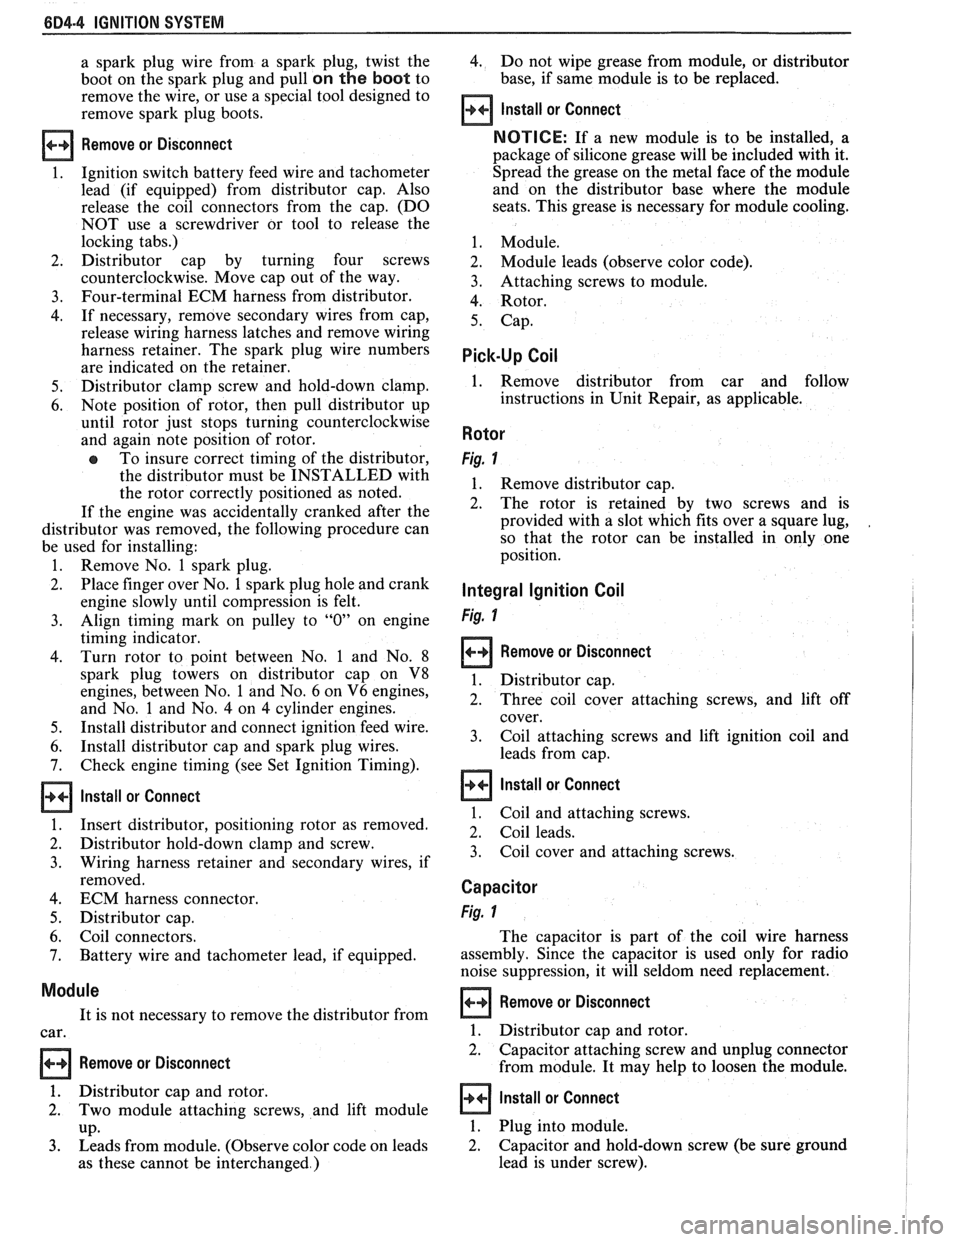
a spark plug wire from a spark plug, twist the 4. Do not wipe grease from module, or distributor
boot on the spark plug and pull
on the boot to base,
if same module is to be replaced.
remove the wire, or use a special tool designed to
remove spark plug boots.
Install or Connect
Remove or Disconnect
1. Ignition switch battery feed wire and tachometer
lead (if equipped) from distributor cap. Also
release the coil connectors from the cap. (DO
NOT use a screwdriver or tool to release the
locking tabs.)
2. Distributor cap by turning four screws
counterclockwise. Move cap out of the way.
3. Four-terminal ECM harness from distributor.
4. If necessary, remove secondary wires from cap,
release wiring harness latches and remove wiring
harness retainer. The spark plug wire numbers
are indicated on the retainer.
5. Distributor clamp screw and hold-down clamp.
6. Note position of rotor, then pull distributor up
until rotor just stops turning counterclockwise
and again note position of rotor.
To insure correct timing of the distributor,
the distributor must be INSTALLED with
the rotor correctly positioned as noted.
If the engine was accidentally cranked after the
distributor was removed, the following procedure can
be used for installing:
1. Remove No. 1 spark plug.
2. Place finger over No. 1 spark plug hole and crank
engine slowly until compression is felt.
3. Align timing mark on pulley to "0" on engine
timing indicator.
4. Turn rotor to point between No. 1 and No. 8
spark plug towers on distributor cap on V8
engines, between No. 1 and No. 6 on V6 engines,
and No.
1 and No. 4 on 4 cylinder engines.
5. Install distributor and connect ignition feed wire.
6. Install distributor cap and spark plug wires.
7. Check engine timing (see Set Ignition Timing).
Install or Connect
1. Insert distributor, positioning rotor as removed.
2. Distributor hold-down clamp and screw.
3. Wiring harness retainer and secondary wires, if
removed.
4. ECM harness connector.
5. Distributor cap.
6. Coil connectors.
7. Battery wire and tachometer lead, if equipped.
Module
It is not necessary to remove the distributor from
car.
Remove or Disconnect
1. Distributor cap and rotor.
2. Two module attaching screws, and lift module
UP. 3. Leads from module. (Observe color code on leads
as these cannot be interchanged.)
NOTICE: If a new module is to be installed, a
package of silicone grease will be included with it.
Spread the grease on the metal face of the module
and on the distributor base where the module
seats. This grease is necessary for module cooling.
1. Module.
2. Module leads (observe color code).
3. Attaching screws to module.
4. Rotor.
5. Cap.
Pick-Up Coil
1. Remove distributor from car and follow
instructions in Unit Repair, as applicable.
Rotor
Fig. 1
1. Remove distributor cap.
2. The rotor is retained by two screws and is
provided with a slot which fits over a square lug,
,
so that the rotor can be installed in only one
position.
Integral Ignition Coil
Fig. I
Remove or Disconnect
1. Distributor cap.
2. Three coil cover attaching screws, and lift off
cover.
3. Coil attaching screws and lift ignition coil and
leads from cap.
Install or Connect I
1. Coil and attaching screws.
2. Coil leads.
3. Coil cover and attaching screws.
Capacitor
Fig. 1
The capacitor is part of the coil wire harness
assembly. Since the capacitor is used only for radio
noise suppression, it will seldom need replacement.
Remove or Disconnect I
1. Distributor cap and rotor.
2. Capacitor attaching screw and unplug connector
from module. It may help to loosen the module.
Install or Connect I
1. Plug into module.
2. Capacitor and hold-down screw (be sure ground
lead is under screw).
Page 474 of 1825
IGNITION SYSTEM 6014.5
3. Rotor and cap. 4. Turn off the engine and remove the timing light.
Reconnect the number one spark plug wire, if
Set Ignition Timing removed.
Spark Plug Wires 1. Refer to the tune-up label located in the engine
compartment. Follow all instructions on the Use
care when removing spark plug wire boots
label. from
spark plugs. Twist the boot
1/2 turn before
removing and pull on the
boot only to remove the
With ignition off, connect the pick-up lead of
timing light to the number one spark plug. Use
a jumper lead between the wire and plug, or an
inductive type pick-up.
DO NOT pierce the wire,
or attempt to insert a wire between the boot and
the wire. Connect the timing light power leads
according to manufacturer's instructions.
Start the engine and aim the timing light at the
timing mark. The line on the balancer or pulley
will line up at the timing mark. If a change is
necessary, loosen the distributor hold-down
clamp bolt at the base of the distributor. While
observing the mark with the timing light, slighty
rotate the distributor until the line indicates the
correct timing. Tighten the hold-down bolt and
re-check the timing. wire.
When replacing plug wires, route the wires
correctly and through the proper retainers. Failure to
route the wires properly can lead to radio ignition noise
and crossfiring of the plugs, or shorting of the leads to
ground.
Special care should be exercised when reinstalling
spark plug boots, to assure that the metal terminal
within the boot is fully seated on the spark plug
terminal and that the boot has not moved on the wire.
If boot to wire movement has occurred, the boot will
give a false visual impression of being fully seated.
A
good check to assure that boots have been properly
assembled is to push sideways on the installed boots.
If they have been correctly installed, a stiff boot, with
only slight looseness, will be noted. If the terminal has
not been properly seated on the spark plug, only the
resistance of the rubber boot will be felt when pushing
sideways.
ON-CAR SERVICE
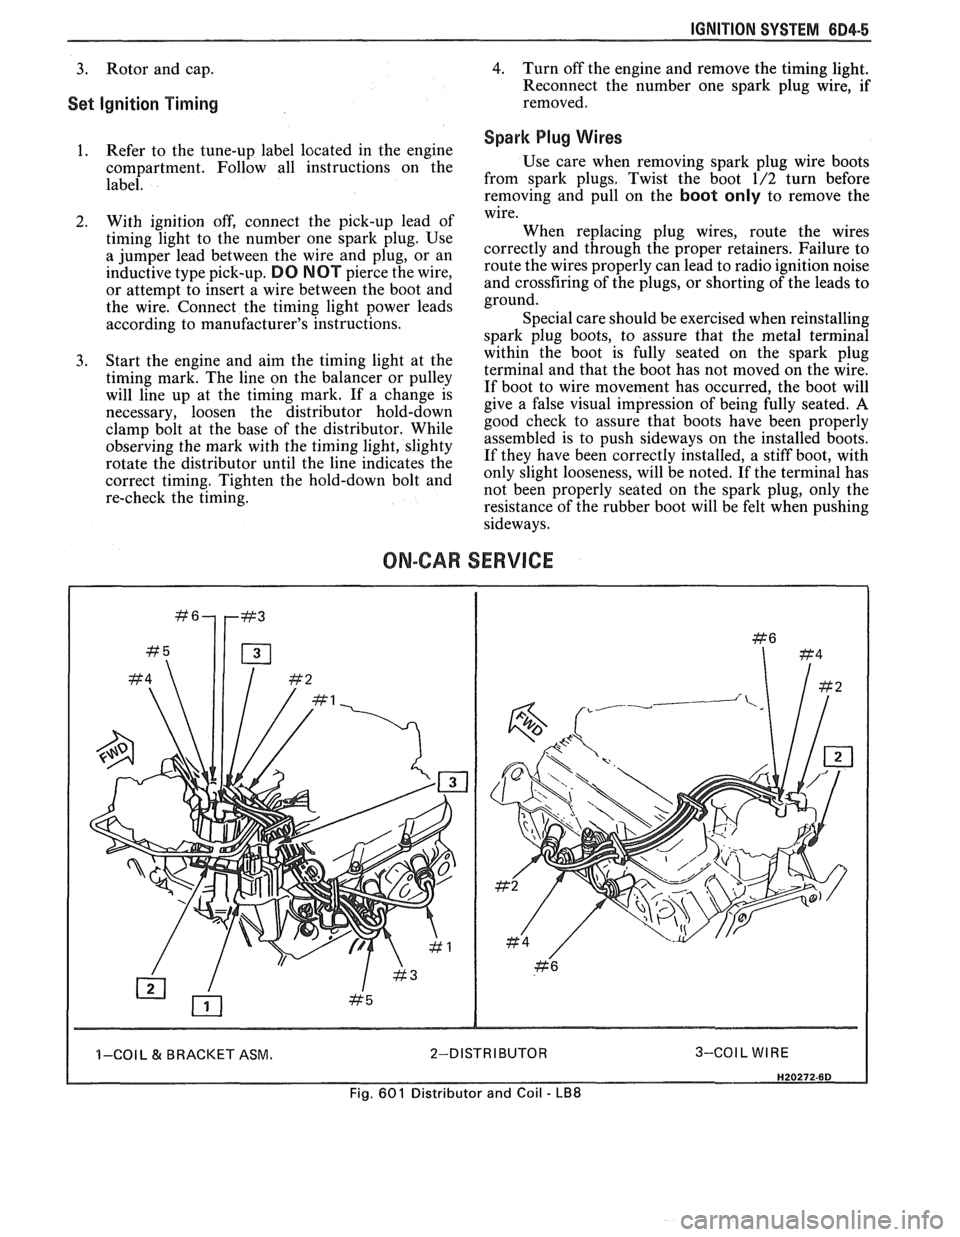
I I -COI L & BRACKET ASM. 2-DISTRIBUTOR 3-COIL WIRE I
Fig. 601 Distributor and Coil - LB8
Page 475 of 1825
6D4-6 IGNITION SYSTEM
LEFT
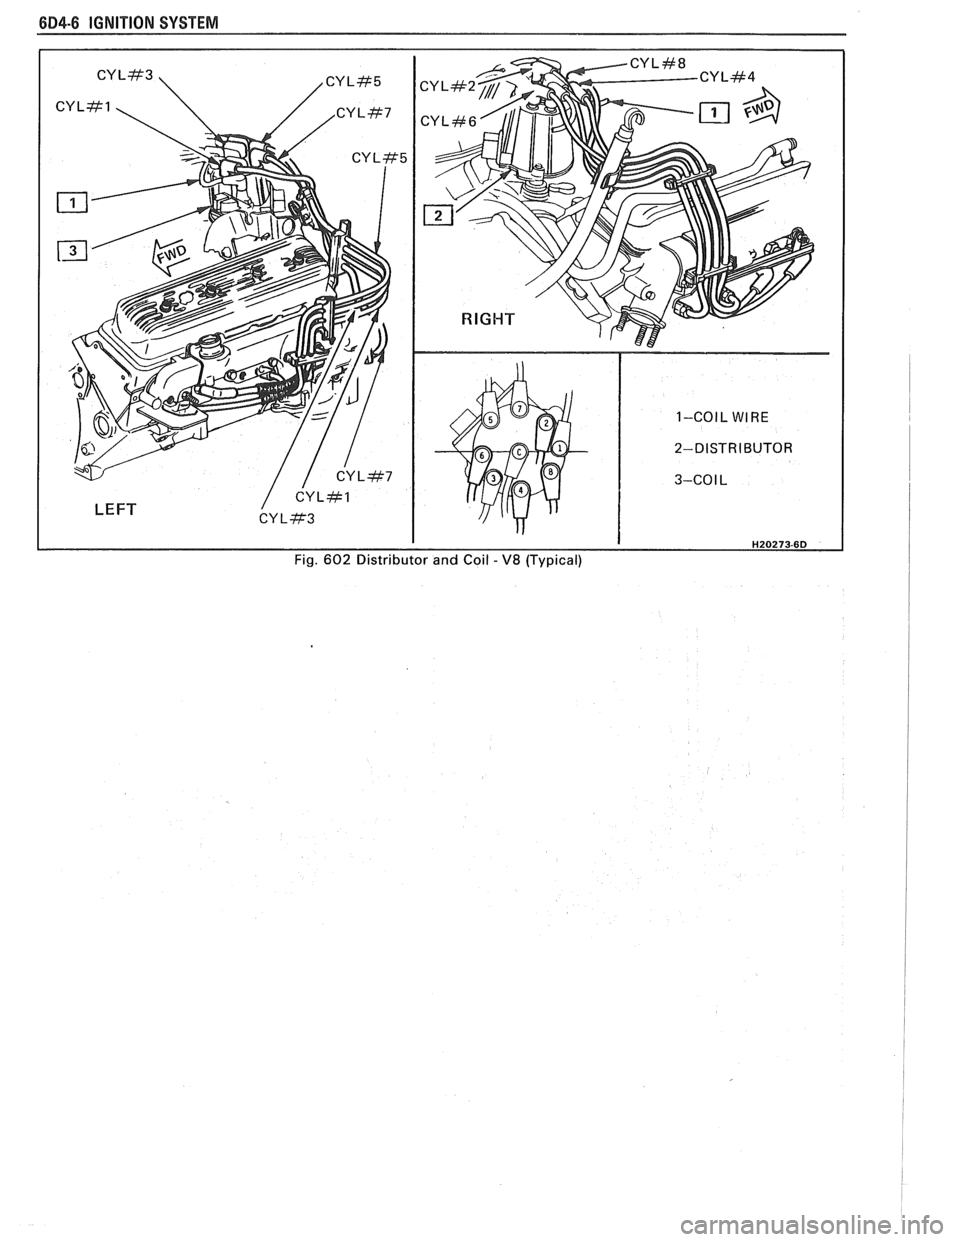
1-COIL WIRE
2-DISTRIBUTOR
3-CO
I L
Fig.
602 Distributor and Coil - V8 (Typical)
Page 476 of 1825
IGNITION SYSTEM 604-7
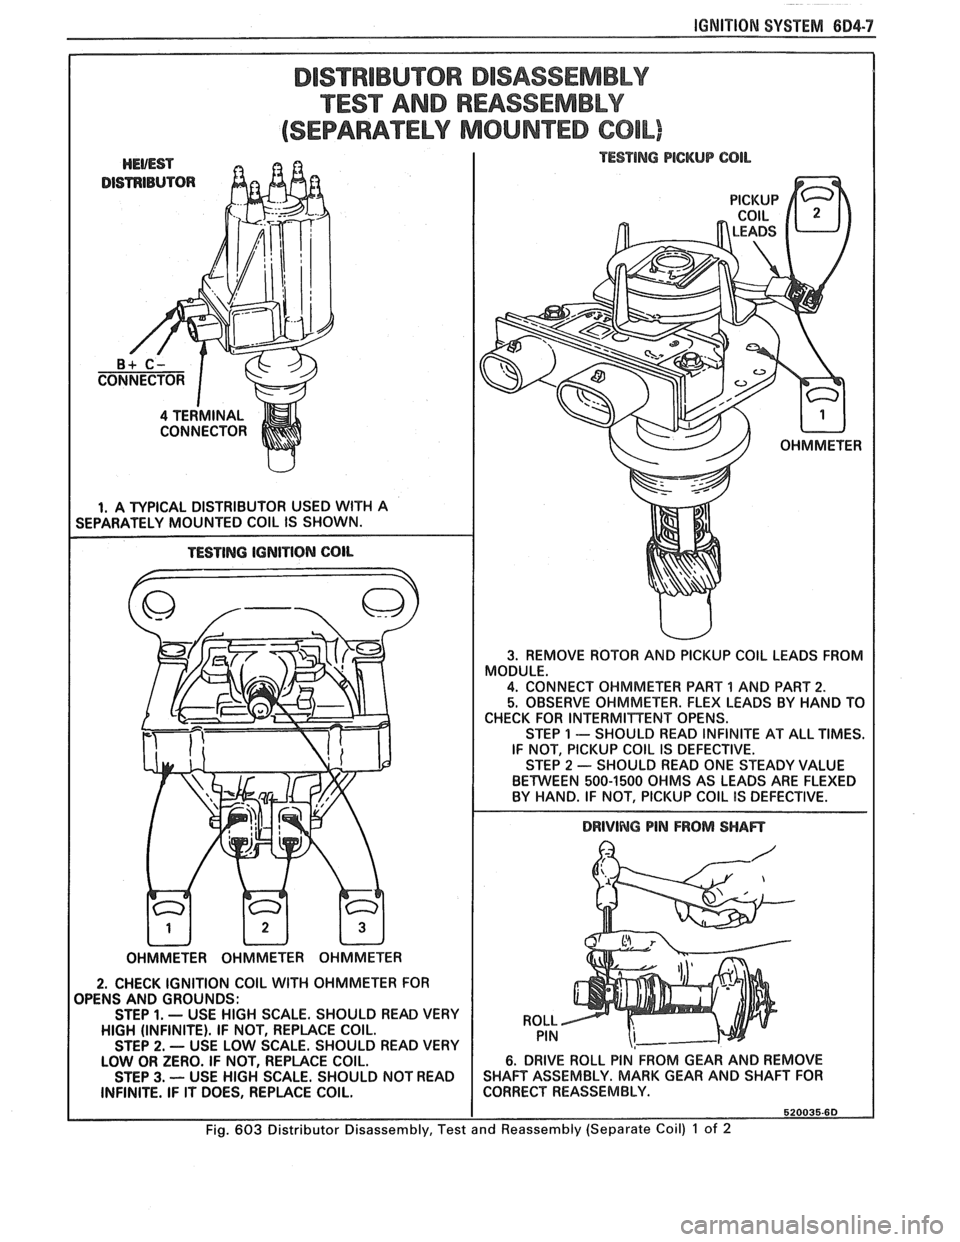
DISTRIBUTOR DISASSEMBLY
TEST AND REASSEMBLY
(SEPARATELY MOUNTED COIL)
DISTRIBUTOR
I 4 TERMINAL
CONNECTOR
I I. A TYPICAL DISTRIBUTOR USED WlTH A
SEPARATELY MOUNTED COlL IS SHOWN.
I TESTING PlCKUP CQlL
TESTING IGNITION COlL
I DRIVING PIN FROM SHAFT
I OHMMETER OHMMETER OHMMETER
2. CHECK IGNITION COIL WlTH OHMMETER FOR
OPENS AND GROUNDS:
STEP
1. - USE HIGH SCALE. SHOULD READ VERY
HIGH (INFINITE). IF NOT, REPLACE COIL.
STEP
2. - USE LOW SCALE. SHOULD READ VERY
LOW OR ZERO. IF NOT, REPLACE COIL.
STEP
3. -- USE HIGH SCALE. SHOULD NOT READ
INFINITE. IF IT DOES, REPLACE COIL.
Fig. 603 Distributor Disassembly, Test
w
3. REMOVE ROTOR AND PICKUP COlL LEADS FROM
MODULE.
4. CONNECT OHMMETER PART 1 AND PART 2.
5. OBSERVE OHMMETER. FLEX LEADS BY HAND TO
CHECK FOR INTERMITTENT OPENS.
STEP
1 - SHOULD READ INFINITE AT ALL TIMES.
IF NOT, PICKUP COlL IS DEFECTIVE.
STEP
2 - SHOULD READ ONE STEADY VALUE
BETWEEN 500-1500 OHMS AS LEADS ARE FLEXED
BY HAND. IF NOT, PICKUP COIL
IS DEFECTIVE.
ROLL PIN
6. DRIVE ROLL PIN FROM GEAR AND REMOVE
SHAFT ASSEMBLY. MARK GEAR AND SHAFT FOR
CORRECT REASSEMBLY.
520035.60
and Reassembly (Separate Coil) 1 of 2
Page 477 of 1825
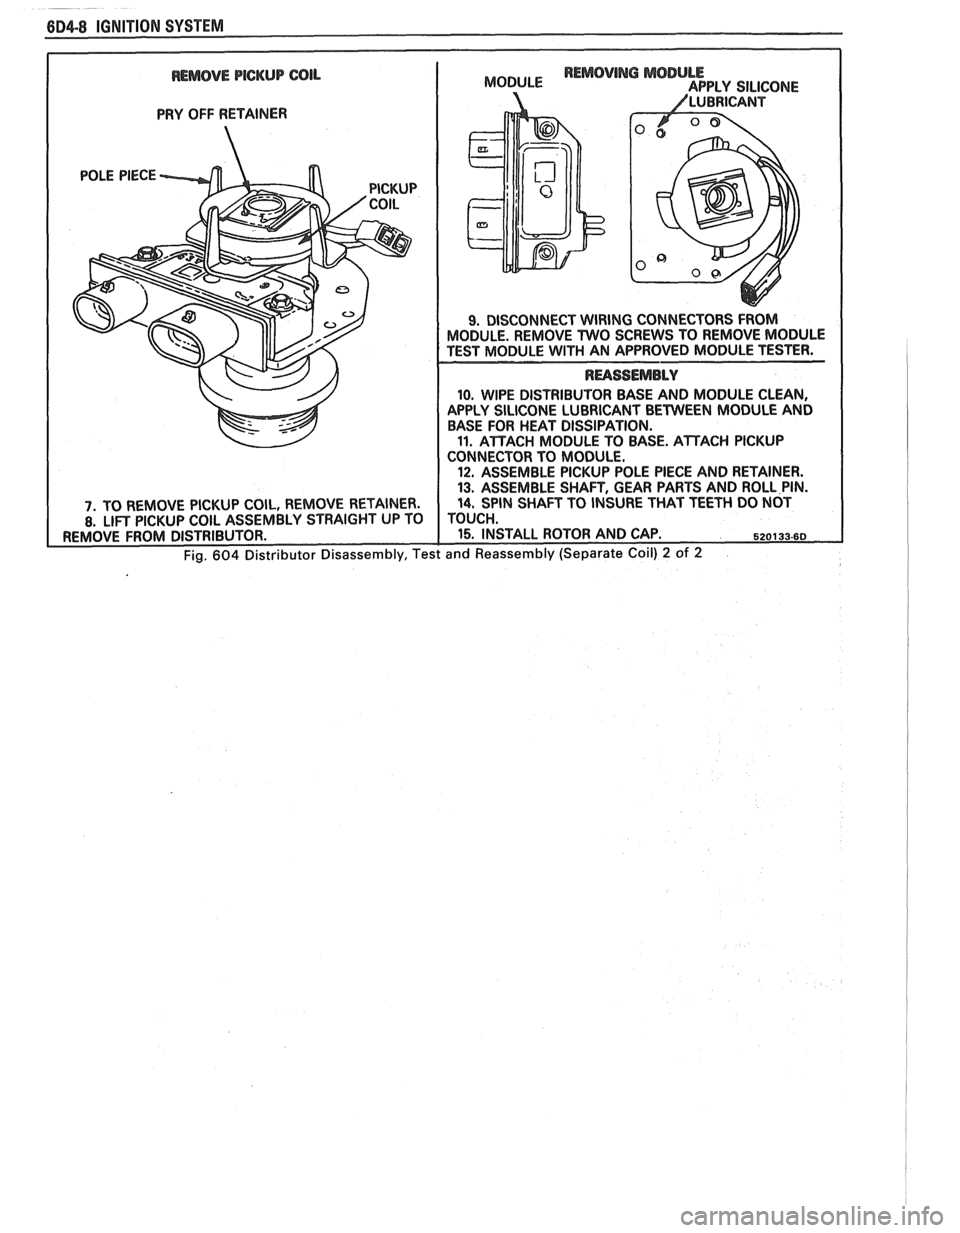
REMOVE PICKUP COIL
PRY OFF RETAINER
10. WIPE DISTRIBUTOR BASE AND MODULE CLEAN,
APPLY SILICONE LUBRICANT BETWEEN MODULE AND
BASE FOR HEAT DISSIPATION.
11. ATTACH MODULE TO BASE. ATTACH PICKUP
CONNECTOR TO MODULE.
12. ASSEMBLE PICKUP POLE PIECE AND RETAINER.
13. ASSEMBLE SHAFT, GEAR PARTS AND ROLL PIN.
Page 480 of 1825
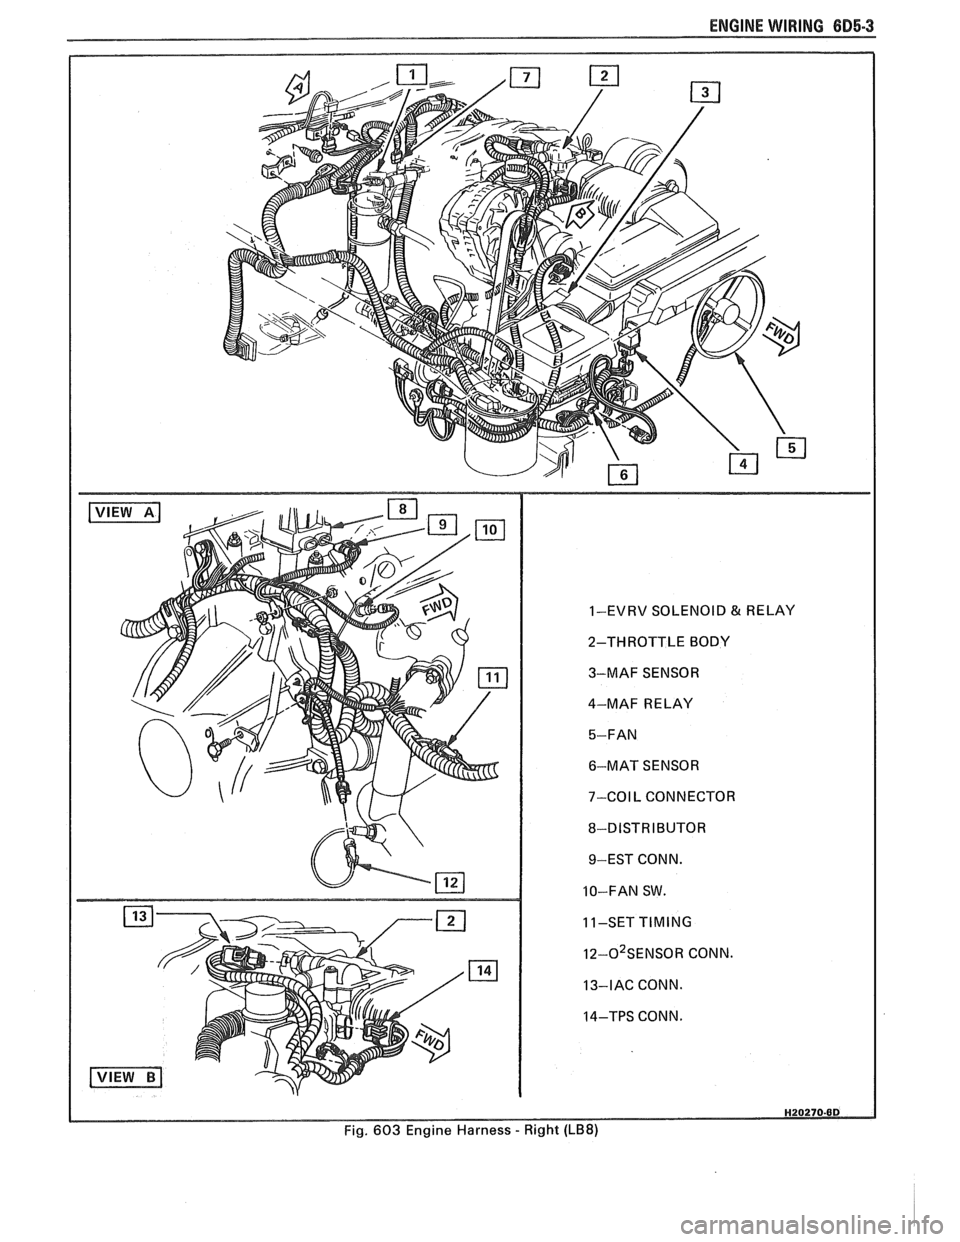
ENGINE WIRING 605.3
1-EVRV SOLENOID & RELAY
2-THROTTLE BODY
3-MAF SENSOR
4-MAF RELAY
6-MAT SENSOR
7-COIL CONNECTOR
8-DISTRIBUTOR 9-EST CONN.
10-FAN SW.
11-SET
TIMING
I~-O~SENSOR CONN.
13-IAC CONN.
14-TPS CONN.
Fig. 603 Engine Harness
- Right (LB8)
Page 482 of 1825
ENGINE ELECTRICAL 6B.l
SECTION 6D
NE ELECTR
General Description ................................... 6D- 1 Cranking System ..................................... 6D- 1
Battery .................... ... .............................. 6D- 1 ....................................................... Diagnosis ,6D-2
.................................. Charging System - CS 6D- 1 Battery ................... .. ..................................... 6D1
......................................... Ignition System ............................................ 6D- 1 Cranking System 6D2
Charging System .......................... .. ............... 6D3 .................................. Distributor Ignition 6D- 1 Ignition Svstem .......................................... 6D4 - Engine Wiring ................................................ 6D5
GENERAL DESCRIPTION
The engine electrical system includes the battery,
ignition (primary and secondary), starter (and related
wiring) and the generator (and related wiring). The
accompanying diagnosis charts will aid in
trouble-shooting system faults. When a fault is traced
to a particular component, refer to that components'
section of the service manual.
BATTERY
The sealed battery is standard on all cars.
The battery has three major functions in the
electrical system: First, it provides a source of energy
for
cranking the engine; Second, it acts as a voltage
stabilizer for the electrical system; And third, it can, for
a limited time, provide energy when the electrical load
used exceeds the output of the generator.
CHARGING SYSTEM-CS
The CS Charging System has several sizes
available, including the CS-130 and CS-144. The
number (130 or 144) denotes the
OD in mm of the
stator laminations.
CS generators use a new type regulator and a
diode trio is not used. A delta stator, rectifier bridge,
and rotor with slip rings and brushes are electrically
similar to earlier generators. A conventional pulley and
fan is used and, on the CS-130, an internal fan cools the
slip ring end frame, rectifier bridge and regulator.
IGNITION SYSTEM
Distributor Ignition
The ignition circuit consists of the battery,
distributor, ignition switch, spark plugs and primary
and secondary wiring. Refer to the Battery Section
(6D 1) for battery information.
Distri but~r
The High Energy Ignition (HEI) distributor with
Electronic Spark Timing (EST), used on most engines,
combines all ignition components in one unit. The
ignition coil is in the distributor cap and connects
through a resistance brush to the rotor. Another type of
HEVEST ignition system,
used on some engines,
has a separately mounted coil.
Ignition Timing
Timing specifications for each engine are listed in
Section 6E. When using a timing light, connect an
adapter between the No. 1 spark plug and the No. 1
spark plug wire, or use an inductive type
Secondary Wiring
The spark plug wiring used with ignition systems
is a carbon impregnated cord conductor, encased in an
8MM (5/16") diameter silicone rubber jacket. The
silicone jacket withstands very high temperatures and
also provides an excellent insulator for the higher
voltage of the system.
Spark Plugs
Resistor type, tapered seat spark plugs are used
on all engines, except those with aluminum heads.
lgnition Switch
The mechanical switch is located in the steering
column on the right hand side just below the steering
wheel.
CRANKING SYSTEM
The cranking circuit consists of the battery,
starting motor, ignition switch, and related electrical
wiring.
Starter Motor
Wound field starter motors have pole pieces,
arranged around the armature, that are energized by
wound field coils.
Solenoid
Enclosed shift lever cranking motors have the
shift lever mechanism and the solenoid plunger
enclosed in the drive housing, protecting them from
exposure to dirt, icing conditions and splash.
Page 487 of 1825
6E2-2 5.OL (VIN El DRlVEABlLlTV AND EMISSIONS
Power Steering Pressure Switch (PSPS) Diagnosis
Chart C-1
E ......................... C1-18
ldle Air Control (IAC) Valve Check
Chart C-2C
......................... C2-16
Canister Purge Valve Check
Chart C-3
.......................... C3-4
Ignition System Check
Chart C-4
......................... C4-4
Electronic Spark Control (ESC) System Check
Chart C-5
.......................... C5-4
A.I.R. Management Check . Pedes Valve
Chart C-6
......................... C6-6
Exhaust Gas Recirculation (EGR) Check
Chart C-7
.......................... C7-4
Transmission Converter Clutch (TCC)
Electrical Diagnosis Chart C-8A
(1 of 2) ... C8-4
700-4R Transmission . Electrical Diagnosis
Chart C8-A
(2 of 2) ................... C8-6
Manual Transmission Shift Light Diagnosis
Chart
C-8B ........................ C8-8
SECTION C . COMPONENT SYSTEMS
Table of Contents .................... C-1
SECTION
C1
ELECTRONIC CONTROL MODULE AND SENSORS
GENERAL DESCRIPTION
............... C1-1
ELECTRONIC CONTROL MODULE (ECM) . . C1-1
PROM ........................... C1-1
CALPAK .......................... C1-2
ECMFUNCTION .................... C1-2
INFORMATION SENSORS ............. C1-2
Engine Coolant Temperature Sensor . . C1-2
MAP Sensor ...................... C1-2
MAT Sensor ...................... C1-3
Oxygen (Oz) Sensor ................ C1-3
Throttle Position Sensor (TPS) ........ C1-3
Knock Sensor .................... C1-4
Park Neutral Switch (Auto Only) ...... C1-4
Crank Signal ..................... C1-4
A/C Request Signal ............... C1-4
Vehicle Speed Sensor (VSS) ......... C1-4
Distributor Reference Signal ......... C1-4
(PSPS) ......................... C1-4
DIAGNOSIS ......................... C1-5
ECM ............................. C1-5
PROM ........................... C1-5
ECMINPUTS ....................... C1-5
Coolant Temperature Sensor ........ C1-5
MAT Sensor ...................... C1-5
MAP Sensor ...................... C1-6
Oxygen (Oz) Sensor ................ C1-6
Throttle Position Sensor (TPS) ........ C1-6
Vehicle Speed Sensor (VSS) ......... C1-6
P/N Switch ....................... C1-6
(PSPS) ......................... C1-6
A/C Request Signal ................ C1-6
......... Distributor Reference Signal C1-6
Knock Signal ................... C1-6
..................... ON-CARSERVICE C1-6
....... ELECTRONIC CONTROL MODULE C1-6
........................... PROM C1-7
Functional Check ................. C1-8
.......................... CALPAK C1-8
.................. COOLANTSENSOR C1-9
MAPSENSOR e..................... C1-9
OXYGEN (02) SENSOR ............... C1-9
THROTTLE POSITION SENSOR (TPS) ..... C1-10
PARKINEUTRAL SWITCH .............. C1-10
PARTS INFORMATION ................. C1-10
ParklNeutral Switch Diagnosis
Chart
C-1A ..................... C1-12
Crank Signal
Chart
C-1B ..................... C1-14
MAP Output check
Chart C-1 D
..................... C1-16
Power Steering Pressure Switch (PSPS) Diagnosis
ChartC-lE ..................... C1-18
SECTION C2
FUEL CONTROL SYSTEM
GENERAL DESCRIPTION
............... C2-1
PURPOSE ...*..................... C2-1
MODES OF OPERATION .............. C2-1
Starting Mode ................... C2-1
Clear Flood Mode ................ C2-2
RunMode ...................... C2-2
Open Loop ...................... C2-2
Closed Loop ..................... C2-2
Acceleration Mode ............... C2-2
Deceleration Mode ............... C2-2
Battery Correction Mode ........... C2-2
Fuel Cut Off Mode ................ C2-2
... FUEL CONTROL SYSTEM COMPONENTS C2-2
BASIC SYSTEM OPERATION ........... C2-3
THROTTLE BODY INJECTION (TBI) UNIT ... C2-3
Fuel Injectors .................... C2-3
Pressure Regulator ............... C2-3
.......... Idle Air Control (IAC) Valve C2-4
........ Throttle Position Sensor (TPS) C2-4
FUELPUMP ........................ C2-5
....... FUEL PUMP ELECTRICAL CIRCUIT C2-5
DIAGNOSIS
......................... C2-5
FUEL CONTROL .................... C2-5
......... Idle Air Control Valve (IAC) C2-5
Dr~veability ..................... C2-5
ON VEHICLE SERVICE
................. C2-5
...... GENERALSERVICE INFORMATION C2-5
Fuel Pressure Relief ............... C2-7
........... Fuel System Pressure Test C2-7
Cleaning and lnspect~on ........... C2-7
......... Thread Lockrng Compound C2-7