1988 PONTIAC FIERO check engine
[x] Cancel search: check enginePage 770 of 1825
DRIVEABILITY AND EMISSIONS 2.8L (VIN S) 6E3-C6-4
SECTION C6
AIR INJECTION REACTlON (A.I.R.) SYSTEM
MANUAL, TRANSMISSION ONLY
CONTENTS
............... GENERAL DESCRIPTION C6-1
........................ PURPOSE C6-1
........... A.I.R. PUMP OPERATION.. C6-1
................... AIR CONTROL.. C6-1
.......... Electric Air Control Valve C6-1
............... Deceleration Valve C6-2
... RESULTS OF INCORRECT OPERATION C6-2
........................ DIAGNOSIS C6-2
............. OPERATIONAL CHECKS C6-2
.................... A.I.R. Pump C6-2
GENERAL DESCRlPTlON
PURPOSE
These systems are used to reduce carbon monoxide
(CO), hydrocarbon (HC) and oxides of nitrogen (NO,)
emissions. They also heat up the catalytic converter
quickly "ON" engine start-up so conversion of exhaust
gases will start quickly.
A.I.R. PUMP OPERATION
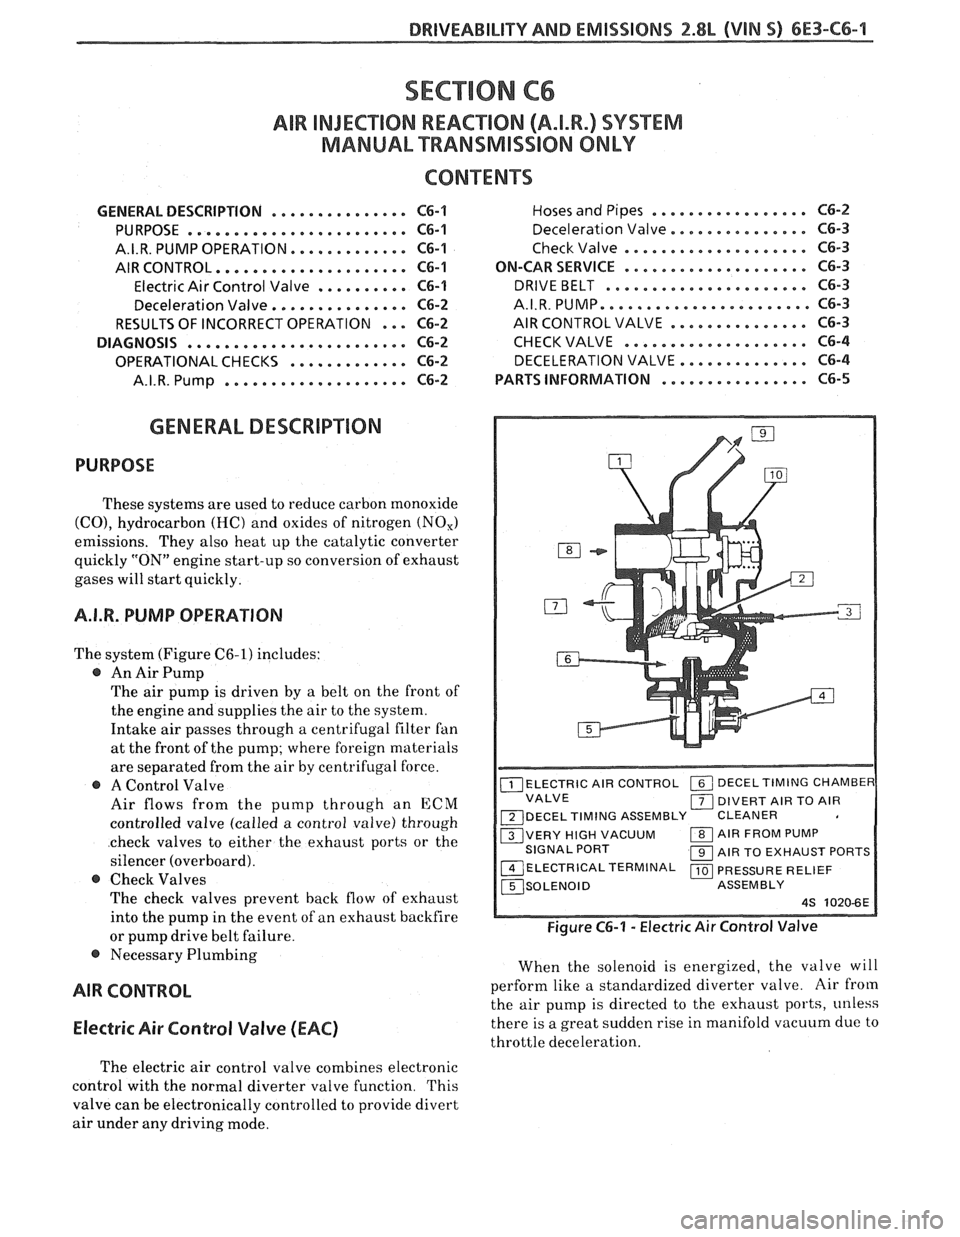
The system (Figure C6-1) includes:
@ An Air Pump
The air pump is driven by a belt on the front of
the engine and supplies the air to the system.
Intake air passes through a centrifugal filter fan
at the front of the pump; where foreign materials
are separated from the air by centrifugal force.
@ A Control Valve
Air flows from the pump through an
ECM
controlled valve (called a control valve) through
check valves to either the exhaust ports or the
silencer (overboard).
@ Check Valves
The check valves prevent back flow of exhaust
into the pump in the event of an exhaust backfire
or pump drive belt failure.
@ Necessary Plumbing
AIR CONTROL
Electric
Air Control Valve (EAC)
................. Hoses and Pipes C6-2
............. Deceleration Valve.. C6-3
.................... Check Valve C6-3
.................... ON-CAR SERVICE C6-3
................... DRIVE BELT ... C6-3
............... A.I.R.PUMP.....,.. C6-3
............... AIR CONTROL VALVE C6-3
.................... CHECK VALVE C6-4
............ DECELERATION VALVE.. C6-4
................ PARTS INFORMATION C6-5
ELECTRIC AIR CONTROL 1 DECELTIMING CHAMBEF VALVE 1 DIVERT AIR TO AIR
~DECEL TIMING ASSEMBLY CLEANER
VERY HIGH VACUUM 1 AIR FROM PUMP
SIGNAL PORT 1 AIR TO EXHAUST PORTS
14~~c~R1cA~~~RM1NAL 1 PRESSURE RELIEF ~SOLENOID ASSEMBLY
4s 1020-6E
Figure C6-1 - Electric Air Control Valve
When the solenoid is energized, the valve will
perform like a standardized diverter valve. Air
from
the air pump is directed to the exhaust ports, unless
there is a great sudden rise in manifold vacuum due to
throttle deceleration.
The electric air control valve combines electronic
control with the normal diverter valve function. This
valve can be electronically controlled to provide divert
air under any driving mode.
Page 771 of 1825
6E3-C6-2 2.8L (WIN 5) DRIVEABILITY AND EMISSIONS
When the solenoid is de-energized, the pressurized
air from the air pump is allowed to enter the decel
timing chamber. This places sufficient pressure on
the metering valve diaphragm to overcome spring
tension, closing the
valve,causing air to divert to the
silencer.
At higher engine speeds, excess air is exhausted to
the silencer through the pressure relief valve. (Figure
C6-1)
Deceleration Valve
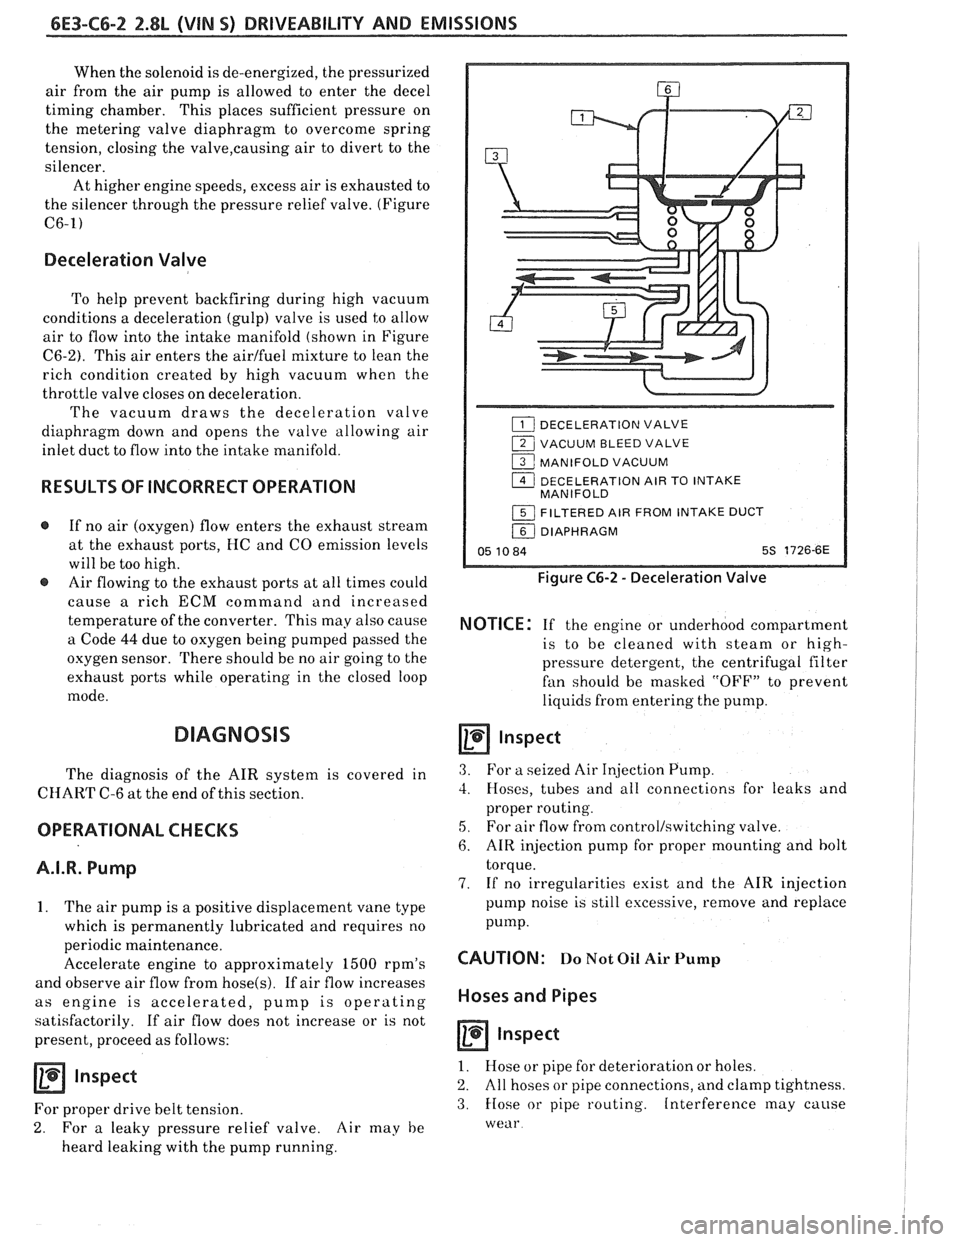
To help prevent backfiring during high vacuum
conditions a deceleration (gulp) valve is used to allow
air to flow into the intake manifold (shown in Figure
C6-2). This air enters the airlfuel mixture to lean the
rich condition created by high vacuum when the
throttle valve closes on deceleration.
The vacuum draws the deceleration valve
diaphragm down and opens the valve allowing air
inlet duct to flow into the intake manifold.
RESULTS OF INCORRECT OPERATION
@ If no air (oxygen) flow enters the exhaust stream
at the exhaust ports, HC and
CO emission levels
will be too high.
@ Air flowing to the exhaust ports at all times could
cause
a rich ECM command and increased
temperature of the converter. This may also cause
a Code
44 due to oxygen being pumped passed the
oxygen sensor. There should be no air going to the
exhaust ports while operating in the closed loop
mode.
DIAGNOSIS
The diagnosis of the AIR system is covered in
CHART C-6 at the end of this section.
OPERATIONAL CHECKS
A.I.R. Pump
1. The air pump is a positive displacement vane type
which is permanently lubricated and requires no
periodic maintenance.
Accelerate engine to approximately
1500 rpm's
and observe air flow from
hose(s). If air flow increases
as engine is accelerated, pump is operating
satisfactorily. If air flow does not increase or is not
present, proceed as follows:
Inspect
For proper drive belt tension.
2. For a leaky pressure relief valve. Air may he
heard leaking with the pump running.
DECELERATION VALVE
1 VACUUM BLEED VALVE
1 MANIFOLD VACUUM
1 DECELERATION AIR TO INTAKE
MANIFOLD
1 FILTERED AIR FROM INTAKE DUCT
/ DIAPHRAGM
05 10 84 5s 1726-6E
Figure C6-2 - Deceleration Valve
NOTICE: If the engine or underhood compartment
is to he cleaned with
steam or high-
pressure detergent, the centrifugal filter
fan should be masked "OFF7' to prevent
liquids from entering the pump.
Inspect
3. For a seized Air Injection Pump.
3. Hoses, tubes and all connections for leaks and
proper routing.
5, For air flow from controllswitching valve.
6. AIR injection pump for proper mounting and bolt
torque.
7. If no irregularities exist and the AIR injection
pump noise is still excessive, remove and replace
pump.
CAUTION: Do Not Oil Air Pump
Hoses and Pipes
Inspect
1. Hose or pipe for deterioration or holes.
2. All hoses or pipe connections, and clamp tightness.
3. Hose or pipe routing. Interference may cause
wear
Page 772 of 1825
DRIVEABILITY AND EMISSIONS 2.8L (WIN 5) 6E3-C6-3
4. If a leak is suspected on the pressure side of the
system or if
a hose or pipe has been disconnected
on the pressure side, the connections should be
checked for leaks with a soapy water solution.
With the pump running, bubbles will form if
a
leak exists.
Deceleration Valve
1. Connect tachometer, start engine and allow idle to
stabilize.
2. With the engine running at specified idle speed,
remove the small deceleration valve signal hose
from the manifold vacuum source.
3. Reconnect the signal hose and listen for air flow
through the ventilation pipe and into the
deceleration valve. There should also be a
noticeable speed drop when the signal hose is
reconnected.
4. If the air flow does not continue for at least one
second or the engine speed does not drop
noticeably, check the deceleration valve hoses for
restrictions or leaks.
5. If no restrictions or leaks are found, replace the
deceleration valve.
Check Valve
Inspect
1. A check valve should be inspected whenever the
hose is disconnected form
a check valve or
whenever check valve failure is suspected.
(A
pump that had become inoperative and had shown
indications of having exhaust gases in the pump
would indicate check valve failure).
2. Blow through the check valve (toward the exhaust
manifold) then attempt to suck back through the
check valve. Flow should only be in one
direction(towax-d the exhaust manifold). Replace
valve which does not operate properly.
ON-CAR SERVICE
DRIVE BELT
Remove or Disconnect
1. Inspect drive belt for ware, cracks or deterioration
and replace if required. When installing new belt,
it must be seated and fully secured in grooves of
A/C compressor, AIR pump, generator, and
crankshaft pulleys.
A.I.R. PUMP
Remove or Disconnect
1. Hold pump pulley from turning by compressing
drive belt, then loosen pump pulley bolts.
2. Loosen bolt, holding pump to mounting brackets,
release tension on drive belts.
3. Move belts out of the way, then remove pump
hoses, vacuum and electrical connections, and
control valve.
4. Pulley, then pump.
5. If required, insert needle nose pliers and pull filter
fan from hub.
Install or Connect
1. Air pump assembly, and tighten mounting bolts.
2. I-loses, vacuum and electrical connections, and
control valve
3. New
filter
fan on pump hub.
4. Spacer and pump pulley against centrifugal filter
fan.
5. Pump pulley bolts and tighten equally to 13 N m
(10 lb.
ft.). This will compress the centrifugal
filter fan onto the pump hole. Do not drive filter
fan on with a hammer. A slight amount of
interference with the housing bore is normal.
After a new filter fan has been installed, it
ma?;
squeal upon initial operation or until 0.11, sealing
lip has worn in. This
may require a short period of
purnp operation at various engine speeds.
6. Pump drive belt and adjust.
a Lon 7. Check air injection system for proper oper t'
(see CHART C-6)
AIR CONTROL VALVE
Remove or Disconnect
1. Battery ground cable.
2. Adapter bolts (See Figure C6-3).
3. Air outlet hoses from valve.
4. Adapter.
5. Electrical connectors and vacuum hoses from
valve. ve.
6. Control
va 1
Install or Connect
1. Control valve.
2. Electrical connectors and vacuum hoses.
3. Adapter.
4. Air hoses to valve.
5. Adapter bolts to pump.
6 Batterv ground crtble.
7. Check system operation (see CHART C-6)
Page 773 of 1825
6E3-C6-4 2.8L (WIN S) DRIVEABILITY AND EMlSDlONS
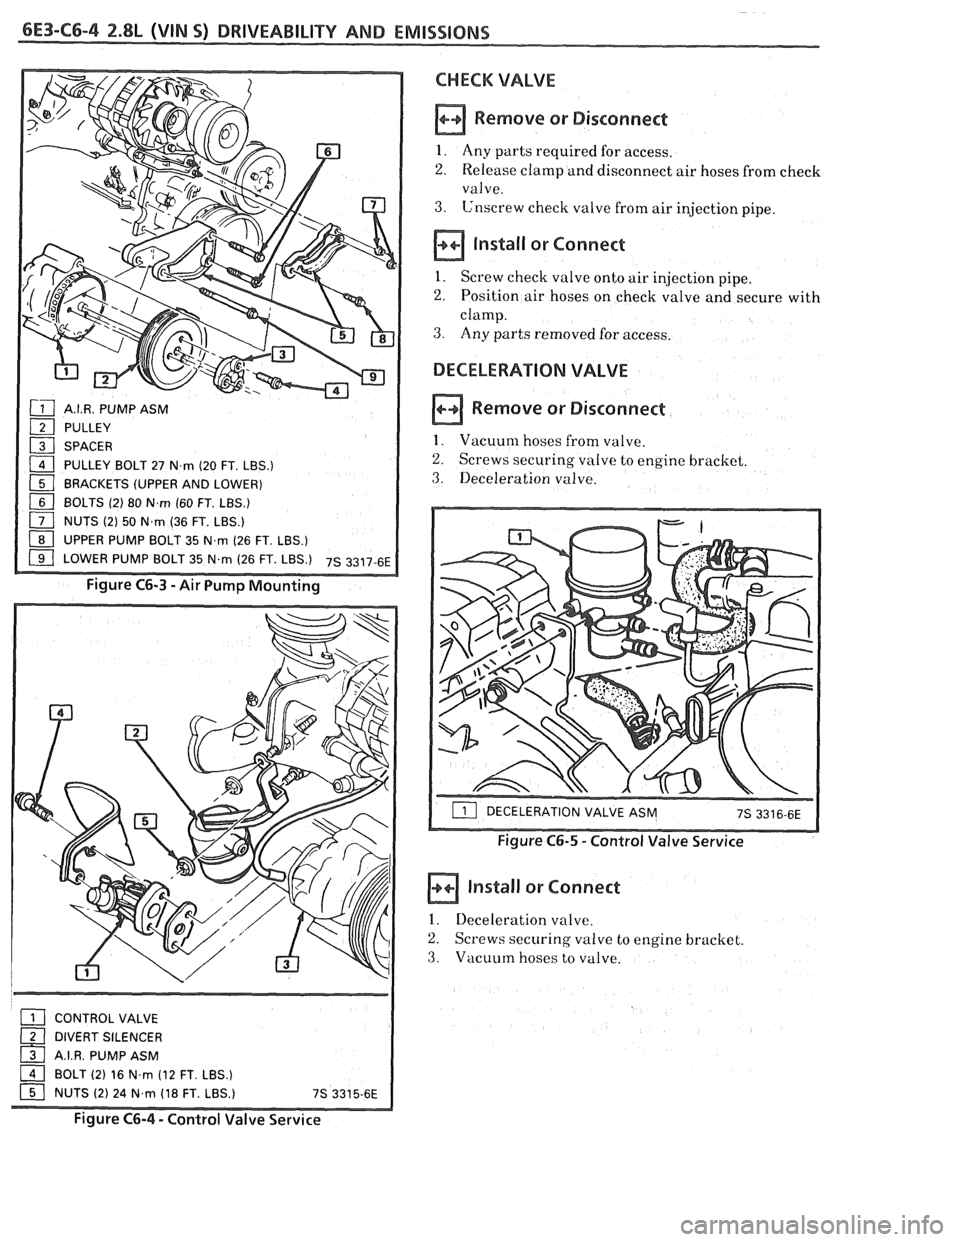
A.I.R. PUMP ASM
PULLEY
SPACER
PULLEY BOLT 27 N
rn (20 FT. LBS.)
BRACKETS (UPPER AND LOWER)
[ BOLTS (2) 80 Nm (60 FT. LBS.)
NUTS (2) 50 N.rn (36 FT. LBS.)
( UPPER PUMP BOLT 35 N,rn (26 FT. LBS.)
( LOWER PUMP BOLT 35 N.rn (26 FT. LBS.) 7s 3317-6E
Figure C6-3 -Air Pump Mounting
CONTROL VALVE
( DIVERT SILENCER
1 A.I.R. PUMP ASM
CHECK VALVE
Remove or Disconnect
1. Any parts required for access.
2. Release clamp and disconnect air hoses from check
valve.
3. Unscrew check valve from air injection pipe.
install or Connect
1. Screw check valve onto air injection pipe.
2. Position air hoses on check valve and secure with
clamp.
3. Any parts removed for access.
DECELERATION VALVE
Remove or Disconnect
1. Vacuum hoses from valve.
2. Screws securing valve to engine bracket.
3. Deceleration valve.
Figure C6-5 - Control Valve Service
Install or Connect
1. Deceleration valve.
2. Screws securing valve to engine bracket.
3. Vacuum hoses to valve.
1 BOLT (2) 16 N.rn (12 FT. LBS.)
1 NUTS (2) 24 N.rn (18 FT. LBS.) 7s 3315-6E
Figure C6-4 - Control Valve Service
Page 779 of 1825
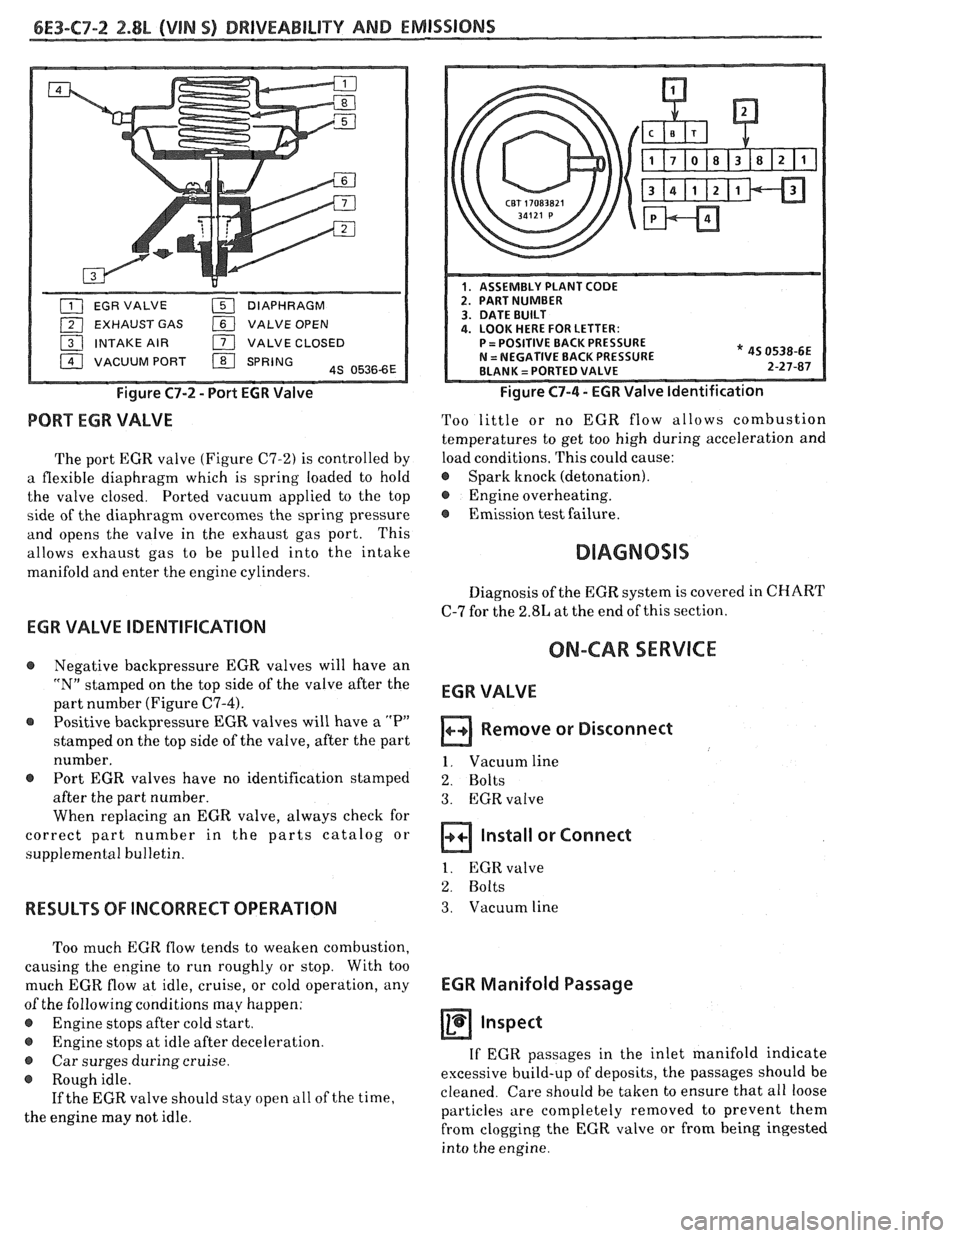
EXHAUST GAS VALVE OPEN
INTAKE AIR
171 VALVE CLOSED
VACUUM PORT
/ SPRING 4s 05366E
Figure C7-2 - Port EGR Valve
PORT EGR VALVE
The port EGR valve (Figure C7-2) is controlled by
a flexible diaphragm which is spring loaded to hold
the valve closed. Ported vacuum applied to the top
side of the diaphragm overcomes the spring pressure
and opens the valve in the exhaust gas port. This
allows exhaust gas to be pulled into the intake
manifold and enter the engine cylinders.
* 45 0538-6E 2-27-87
Figure C7-4 - EGR Valve Identification
Too little or no EGR flow allows combustion
temperatures to get too high during acceleration and
load conditions. This could cause:
@ Spark knock (detonation).
@ Engine overheating.
@ Emission test failure.
Diagnosis of the EGR system is covered in CHART
C-7 for the 2.8L at the end of this section.
EGR VALVE IDENTIFICATION
ON-CAR SERVICE @ Negative backpressure EGR valves will have an
"N" stamped on the top side of the valve after the
part number (Figure
C7-4).
Positive backpressure EGR valves will have a "P"
stamped on the top side of the valve, after the part
number.
@ Port EGR valves have no identification stamped
after the part number.
When replacing an EGR valve, always check for
correct part number in the parts catalog or
supplemental bulletin.
RESULTS OF INCORRECT OPERATION
Too much EGR flow tends to weaken combustion,
causing the engine to run roughly or stop. With too
much EGR flow at idle, cruise, or cold operation, any
of the following conditions may happen:
@ Engine stops after cold start.
e Engine stops at idle after deceleration.
@ Car surges during cruise.
@ Rough idle.
If the EGR valve should stay open
a11 of the time,
the engine may not idle.
EGR VALVE
Remove or Disconnect
1. Vacuum line
2. Bolts
3. EGRvalve
Install or Connect
1. EGR valve
2. Bolts
3. Vacuum line
EGR Manifold Passage
Inspect
If EGR passages in the inlet manifold indicate
excessive build-up of deposits, the passages should be
cleaned. Care should be taken to ensure that all loose
particles are completely removed to prevent them
from clogging the EGR valve or from being ingested
into the engine.
Page 783 of 1825
6E3-C7-6 2.8L (VIN S) DRIWEABIILBTY AND EMISSIONS
I.P. CONN. "G'
450 BLWWHT
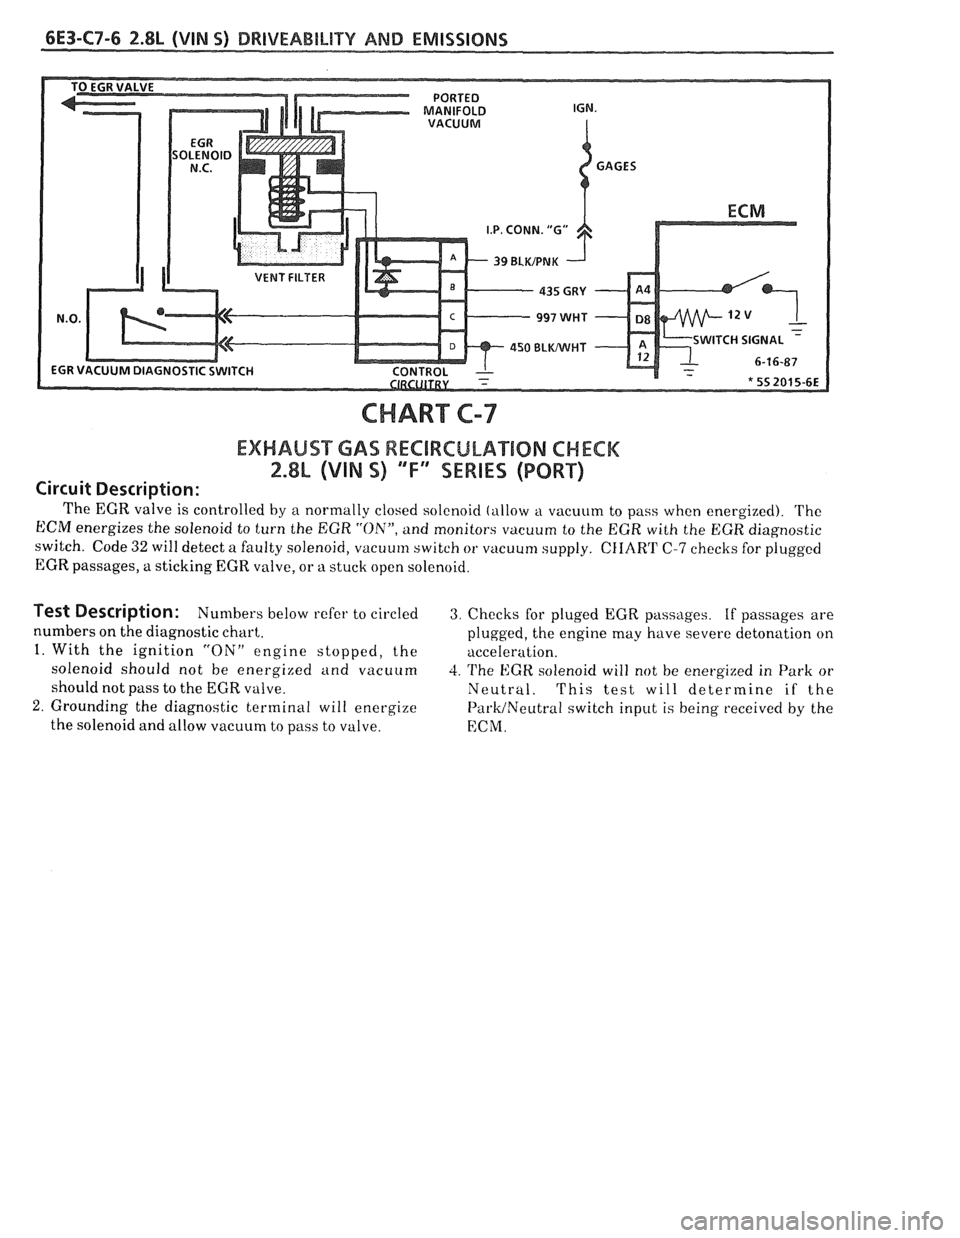
CHART C-7
EXHAUST GAS RECIRCULATION CHECK
2.$h (VIN %) ""F-SERIES (PORT)
Circuit Description:
The EGR valve is controlled by a normally closed solenoid (allow a vacuum to pass when energized). 'I'he
ECM energizes the solenoid to turn the EGR "ON", and monitors vacuum to the EGR with the EGR diagnostic
switch. Code
32 will detect a faulty solenoid, vacuum switch or vacuum supply. CIIART C-7 checks for plugged
EGR passages, a sticking EGR valve, or
n stuck open solenoid.
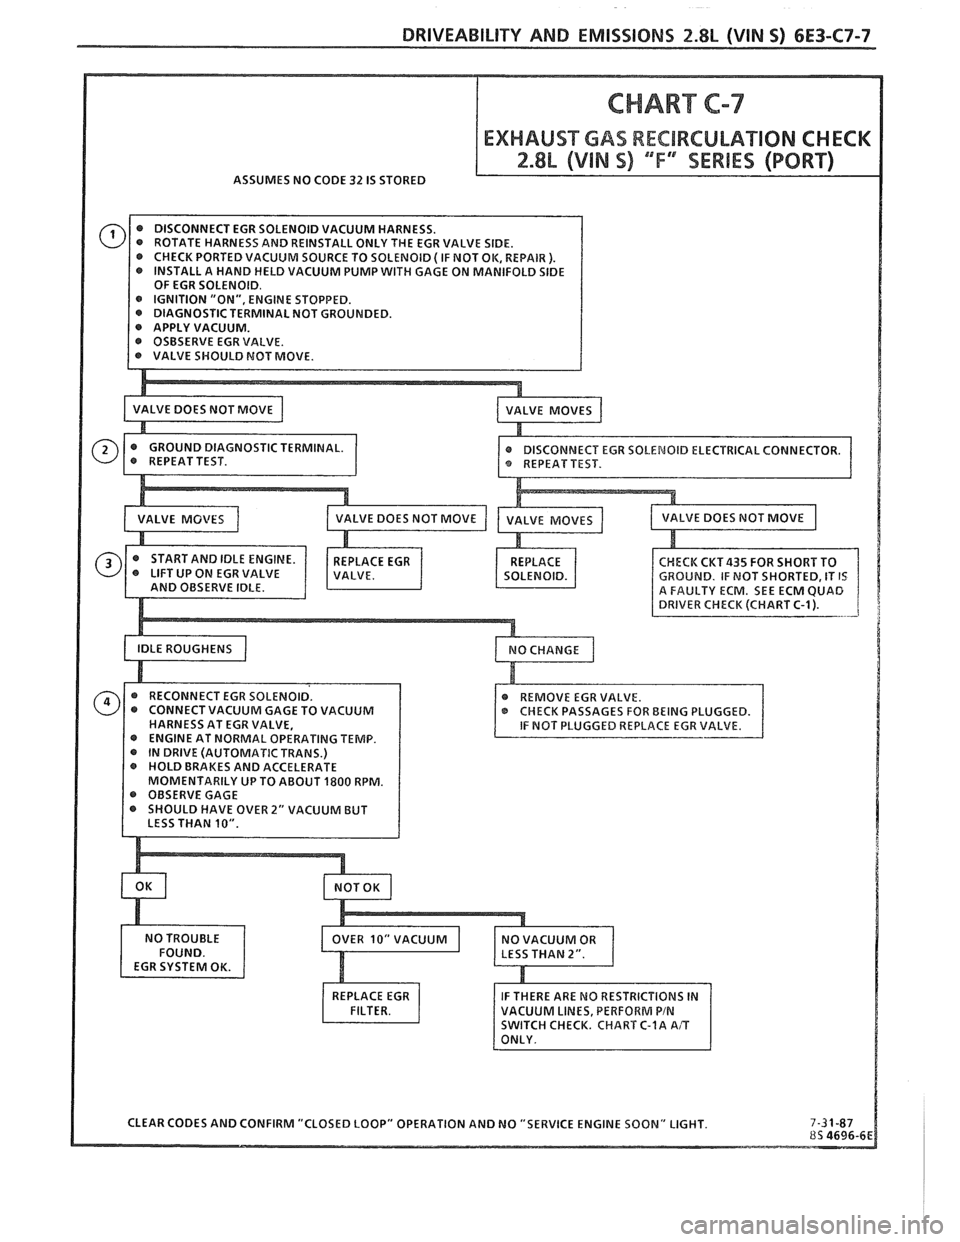
Test Description: Numbers below refer to circled 3. Checks for pluged EGR passLlges. If passages are
numbers on the diagnostic chart.
plugged, the engine may have severe deton
a t' lon on
1. With the ignition "ON" engine stopped, the
acceleration.
solenoid should not be energized and vacuum
4. The EGR solenoid will not be energized in Park or
should not pass to the EGR valve. Neutral. This test will determine if the
2. Grounding the diagnostic terminal will energize Pal.k/Neutral switch input is being received by the
the solenoid and allow vacuum to pass to valve.
ECM.
Page 784 of 1825
DRIVEABILITY AND EMISSIONS 2.8L (WIN S) 6E3-C7-7
CHART &-7
ASSUMES NO CODE 32 IS STORED
@ DISCONNECT EGR SOLENOID VACUUM HARNESS.
ROTATE HARNESS AND REINSTALL ONLY THE EGR VALVE SIDE.
@ CHECK PORTED VACUUM SOURCE TO SOLENOID ( IF NOT OK, REPAlR ). @ INSTALL A HAND HELD VACUUM PUMP WITH GAGE ON MANIFOLD SIDE
OF EGR SOLENOID.
@a IGNITION "ON", ENGINE STOPPED. @ DIAGNOSTIC TERMINAL NOT GROUNDED. @ APPLY VACUUM. @a OSBSERVE EGR VALVE.
REPLACE EGR
CHECK
CKT435 FOR SHORT TO GROUND. IF MOT SHORTED, IT IS FAULTY ECM. SEE ECM QUAD
@ CHECK PASSAGES FOR BEING PLUGGED.
IF NOT PLUGGED REPLACE EGR VALVE.
REPLACE EGR
VACUUM LINES, PERFORM
PIN SWITCH CHECK. CHART C-1A A,'T
Page 786 of 1825
DRIVEABILITY AND EMlSSlONS 2.8L (VIN %I 6E3-C8-1
TRANSMISSION CONVERTER CLUTCH (KC) SYSTEM
AND MANUAL
TRANSMISSION SHIFT LIGHT
CONTENTS
GENERAL DESCRIPTION ................ C8-1 DIAGNOSIS ..........ee...ee....e.e. C8-1
PURPOSE ......................... C8-1 SHIFT LIGHT (MIT) DESCRIPTION ........ C8-1
OPERATION ....................... C8-1 DIAGNOSIS ....................... .. C8-1
ON-CAR SERVICE ...................*. C8-1
GENERAL DESCRIPTION
PURPOSE
The transmission converter clutch (TCC) svstem
uses a solenoid operated valve in the automatic
transmission to couple the engine flywheel to the
output shaft of the transmission thru the torque
converter. This reduces the slippage losses in the
converter, which increases fuel economy.
OPERATION
For the converter clutch to apply, two conditions
must be met:
o Internal transmission fluid pressure must be
correct. For information on internal transmission
operation, see Section
"7A". This section will cover
only the electrical operation of the TCC system.
@ The ECM grounds a switch internally to turn on a
solenoid in the transmission. This moves a check
ball, which will allow the converter clutch to
apply, if the hydraulic pressure is correct, as
described above.
The ECM controls the TCC apply solenoid by
looking at several sensors:
@ Speedo Buffer Sensor (also called vehicle speed
sensor
(VSS). Speed must be above a certain value
before the clutch can apply.
@ Coolant Temperature Sensor. Engine must be
warmed up before clutch can apply about
65OC
(149°F').
Throttle position sensor ('I'PS). After the
converter clutch applies, the
HCM uses the
information from the TPS to release thc clutch
when the car is accelerating or decelerating at a
certain rate.
@ 'I'he brake switch is also part of the 'I'CC circuit as
it will remove battery voltage to the 'KC solenoid
when the brake pedal is depressed.
@ Gear Select Switch. The 4th gear switch is used to
send a signal to the
ECM telling it when the
transmission is in 4th gear. The ECM uses this
information to vary the conditions under which
the clutch applies or releases.
IIowever, the
transmission does not have to be in fourth gear in
order for the ECM to turn the clutch on.
If the converter clutch is applied at all times. the
engine will stall immediately, just as in
u manual
transmission with the clutch applied.
If the converter clutch does not apply, fuel
ecomony
may be lower than expected. If the vehicle
speed sensor fails, the TCC will not apply. If the 4th
gear switch does not operate, the TCC may not apply
at the right time.
DIAGNOSIS
The diagnosis of the TCC system is covered in
CHART C-8
. If the ECM detects a problem in the
system,
a Code 24 should set. In this case see Code 24
CHART.
SHIFT LIGHT (MiT) DESCRIPTION
'The purpose of the shift light is to provide a
display which indicates the optimum fuel economy
point for up
shifling the manual transmission based
on engine speed
and load. 'I'he display is a lamp on the
instrument panel. Activation of the ECM driver turns
the lamp
on.
'I'he shift light circuit can he checlted using
CHAR?' C-8C.
ON-CAR SERVICE
@ See Section "8B" if the shift light bulb needs
replacement.
@ See Section "6E" to repair wiring problem.
@ See Section "6C" if ECM is to be replaced.