1988 PONTIAC FIERO check engine
[x] Cancel search: check enginePage 571 of 1825
6EZ-C1-16 DRIVEABILITY AND EMISSIONS - 5.OL (VIN E)
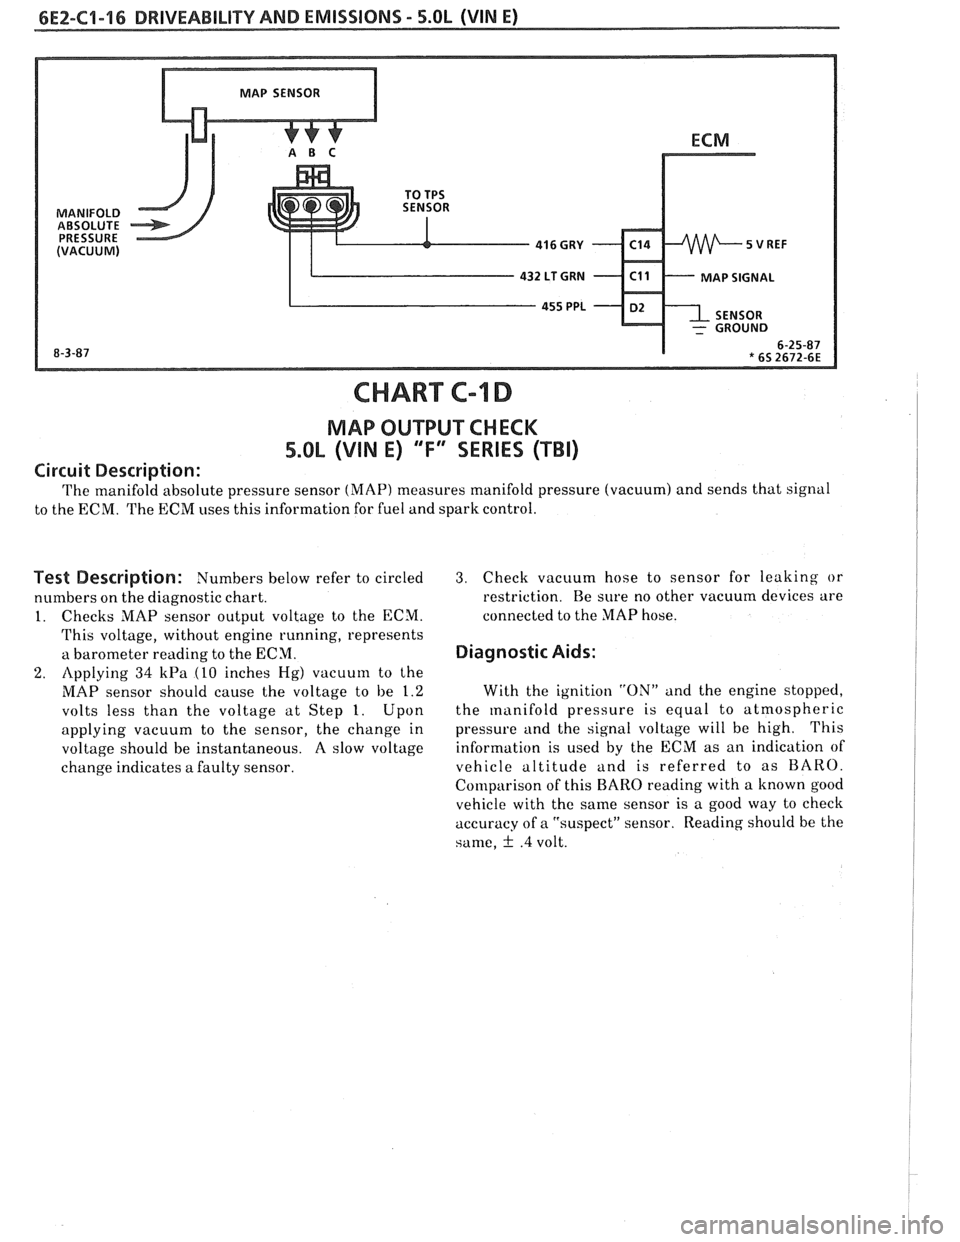
MAP SIGNAL
CHART C-l D
MAP OUTPUT CHECK
5.OL (VIN E) 'T" SERIES (TBI)
Circuit Description:
The manifold absolute pressure sensor (MAP) measures manifold pressure (vacuum) and sends that signal
to the ECM. The ECM uses this information for fuel and spark control.
Test Description: Numbers below refer to circled
numbers on the diagnostic chart.
1. Checks MAP sensor output voltage to the ECM.
This voltage, without engine running, represents
a barometer reading to the ECM.
2. Applying 34 kPa (10 inches Hg) vacuum to the
MAP sensor should cause the voltage to be 1.2
volts less than the voltage at Step 1. Upon
applying vacuum to the sensor, the change in
voltage should be instantaneous. A slow voltage
change indicates
a faulty sensor.
3. Check vacuum hose to sensor for leaking or
restriction. Re sure no other vacuum devices are
connected to the MAP hose.
Diagnostic Aids:
With the ignition "ON" and the engine stopped,
the
manifold pressure is equal to atmospheric
pressure and the signal voltage will be high. This
information is used by the ECM as an indication of
vehicle altitude and is referred to as BARO.
Comparison of this
BARO reading with a known good
vehicle with the same sensor is a good way to check
accuracy of a "suspect" sensor. Reading should be the
same,
f .4 volt.
Page 573 of 1825
6E2-C1-18 DRIVEABILITY AND EMISSIONS - 5.OL (VIN E)
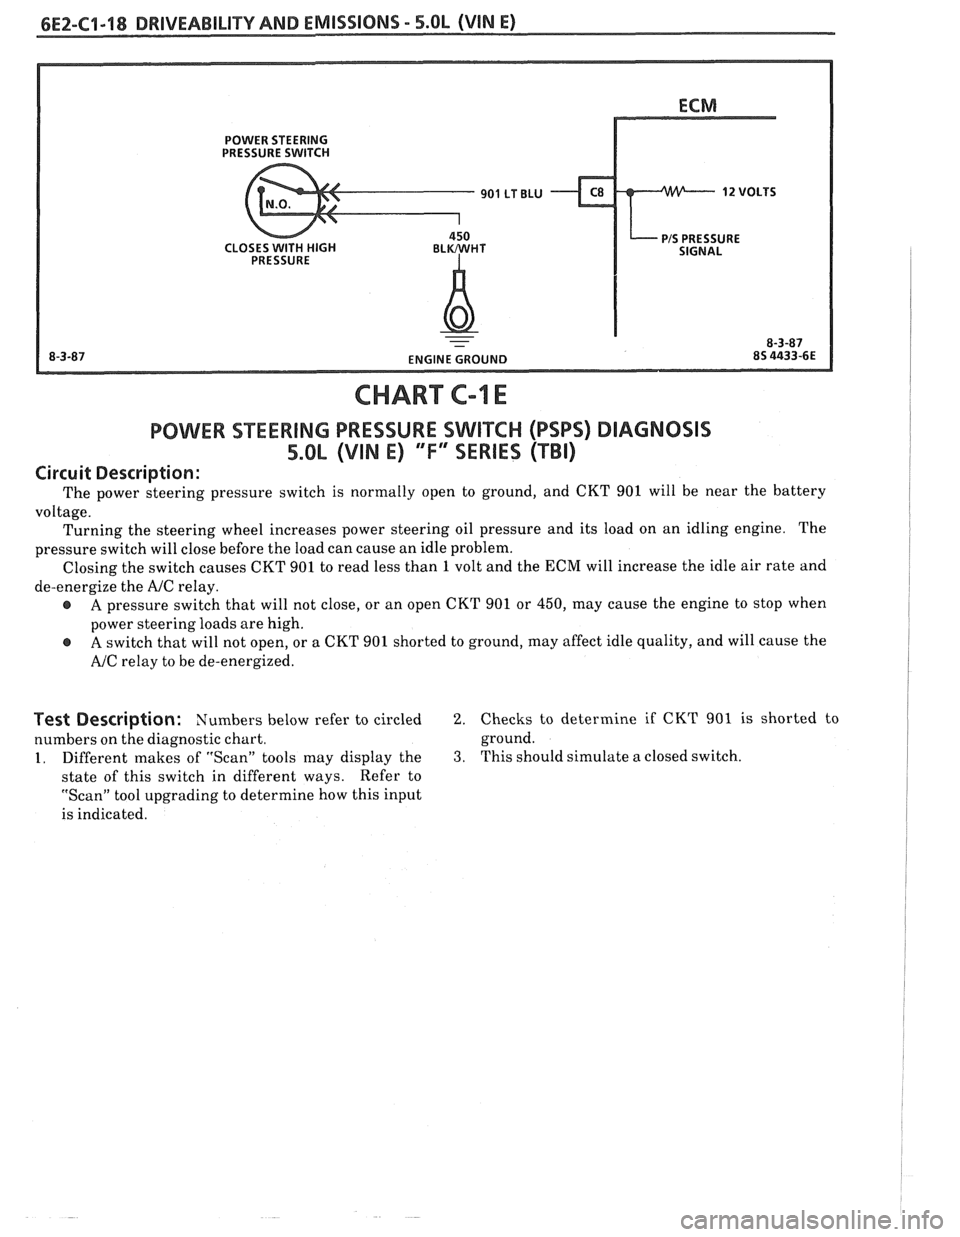
CHART C-1 E
POWER SEERING PRESSURE SWIKCH (PSPS) DIAGNOSIS
5.0L (VIN E) "F" SERIES (TBI)
Circuit Description:
The power steering pressure switch is normally open to ground, and CKT 901 will be near the battery
voltage. Turning the steering wheel increases power steering oil pressure and its load on an idling engine. The
pressure switch will close before the load can cause an idle problem.
Closing the switch causes CKT 901 to read less than
1 volt and the ECM will increase the idle air rate and
de-energize the
AJC relay.
A pressure switch that will not close, or an open CKT 901 or 450, may cause the engine to stop when
power steering loads are high.
A switch that will not open, or a CKT 901 shorted to ground, may affect idle quality, and will cause the
AJC relay to be de-energized.
Test Description: Numbers below refer to circled 2. Checks to determine if CKT 901 is shorted to
numbers on the diagnostic chart. ground.
1. Different
makes of "Scan" tools may display the 3. This should simulate a closed switch.
state of this switch in different ways. Refer
to
"Scan" tool upgrading to determine how this input
is indicated.
Page 576 of 1825
DRIVEABILIW AND EMISSIONS - 5.OL (VIN E) 6E2-62-1
SECTION C2
FUEL CONTROL SYSTEM
TBI MODEL 228
CONTENTS
GENERAL DESCRIPTION . . . . . . . . . . . . . . . C2-1
PURPOSE ......................... C2-1
MODES OF OPERATION . . . . . . . . . . . . . . C2-1
Starting Mode . . . . . . . . . . . . . . . . . . . C2-1
Clear Flood Mode . . . . . . . . . . . . . . . . C2-2
RunMode . . . . . . . . . . . . . . . . . . . . . . C2-2
Open Loop . . . . . . . . . . . . . . . . . . . . . . C2-2
Closed Loop . . . . . . . . . . . . . . . . . . . . . C2-2
Acceleration Mode . . . . . . . . . . . . . . . C2-2
Deceleration Mode . . . . . . . . . . . . . . . C2-2
Battery Correction Mode . . . . . . . . . . . C2-2
Fuel Cut Off Mode . . . . . . . . . . . . . . . . C2-2
FUEL CONTROL SYSTEM COMPONENTS
. . . C2-2
BASIC SYSTEM OPERATION . . . . . . . . . . . C2-3
THROTTLE BODY INJECTION (TBI) UNIT. . . C2-3
Fuel Injectors . . . . . . . . . . . . . . . . . . . . C2-3
Pressure Regulator . . . . . . . . . . . . . . . C2-3
ldle Air Control (IAC) Valve . . . . . . . . . . C2-4
Throttle Position Sensor (TPS) . . . . . . . . C2-4
FUEL PUMP.. . . . . . . . . . . . . . . . . . . . . . . C2-5
FUEL PUMP ELECTRICAL CIRCUIT . . . . . . . C2-5
DIAGNOSIS . . . . . . . . . . . . . . . . . . . . . . * C2-5
FUEL CONTROL . . . . . . . . . . . . . . . . . . . . C2-5
GENERAL DESCRIPTION
PURPOSE
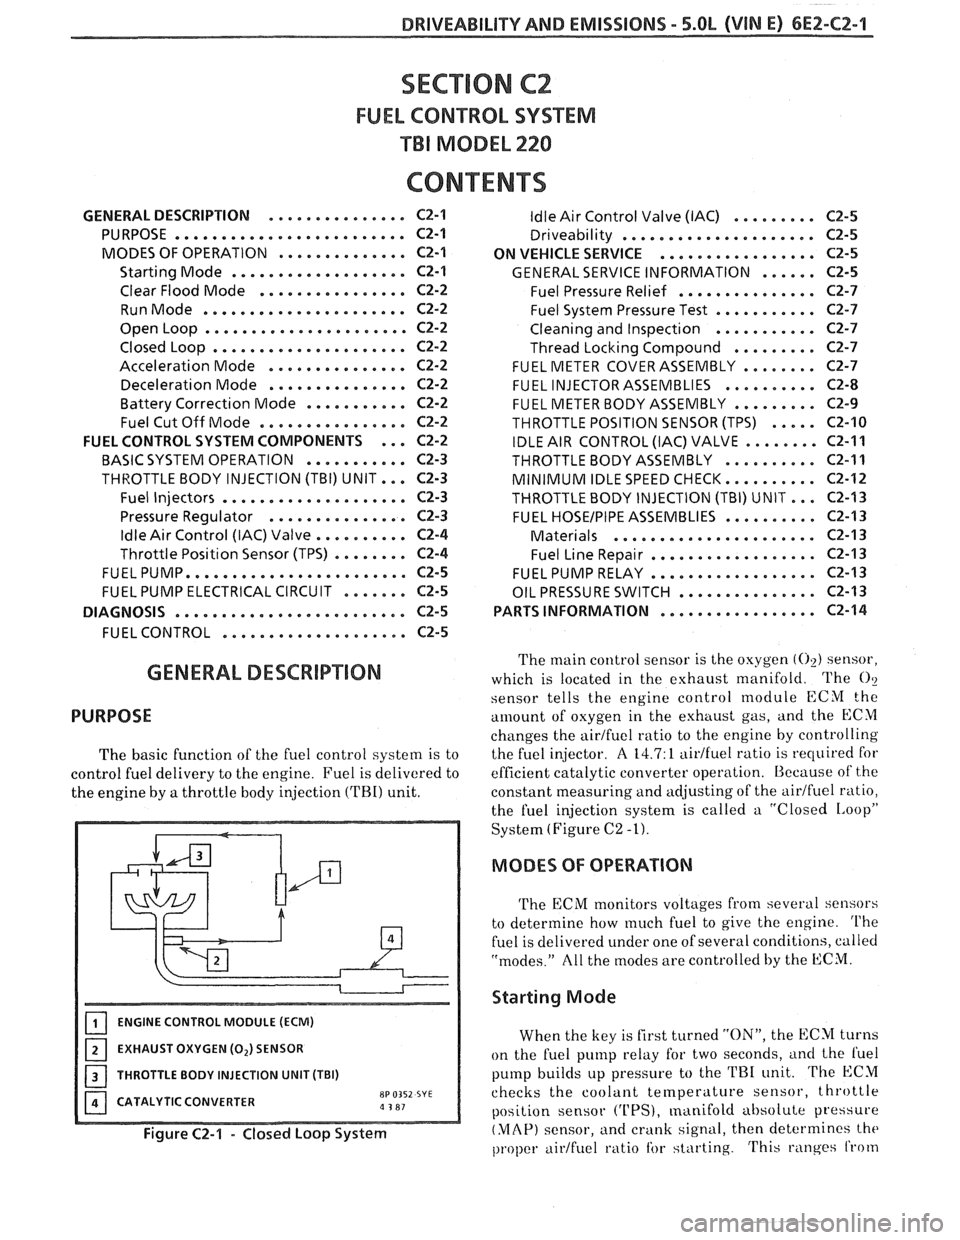
The basic function of the fuel control system is to
control fuel delivery to the engine. Fuel is delivered to
the engine by
a throttle body injection ('FBI) unit.
ENGINE CONTROL MODULE (ECM)
EXHAUST OXYGEN (0,) SENSOR
I 1 THROTTLE BODY INJECTION UNIT (TBI)
CATALYTIC CONVERTER
8P 0352 SYE a 3 81
Figure C2-1 - Closed Loop System
ldle Air Control Valve (IAC) . . . . . . . . . C2-5
Driveability . . . . . . . . . . . . . . . . . . . .. C2-5
ON VEHICLE SERVICE
. . . . . . . . . . . . . . . . . C2-5
GENERAL SERVICE INFORMATION . . . . . . C2-5
Fuel Pressure Relief . . . . . . . . . . . . . . . C2-7
Fuel System Pressure Test . . . . . . . . . . . C2-7
Cleaning and Inspection . . . . . . . . . . . C2-7
Thread Locking Compound . . . . . . . . . C2-7
FUEL METER COVER ASSEMBLY . . . . . . . . C2-7
FUEL INJECTOR ASSEMBLIES . . . . . . . . . . C2-8
FUEL METER BODY ASSEMBLY . . . . . . . . . C2-9
THROTTLE POSITION SENSOR (TPS) . . . . . C2-10
IDLE AIR CONTROL (IAC) VALVE . . . . . . . . C2-11
THROTTLEBODYASSEMBLY .......... C2-11
MINIMUM IDLE SPEED CHECK.. . . . . . . . . C2-12
THROTTLE BODY INJECTION (TBI) UNIT.. . C2-I3
FUEL HOSEIPIPE ASSEMBLIES . . . . . . . . . . C2-13
Materials . . . . . . . . . . . . . . . . . . . . . . C2-13
Fuel Line Repair . . . . . . . . . . . . . . . . . . C2-13
FUEL PUMP RELAY . . . . . . . . . . . . . . . . . . C2-13
OIL PRESSURE SWITCH . . . . . . . . . . . . . . . C2-13
PARTS INFORMATION
. . . . . . . . . . . . . . . . . C2-14
The main control sensor is the oxygen (02) sensor,
which is located in the exhaust manifold. The
O?
sensor tells
the engine control module ECM the
amount of osygen in the exhttust gas, and the ECM
changes the airtfuel ratio to the engine by controlling
the fuel injector.
A 14.7: 1 aidfuel ratio is required for
efficient catalytic converter operation. Because of the
constant measuring and adjusting of the
airlfuel ratio,
the fuel injection system is called a "Closed
IAoopP
System (Figure C2 -1).
MODES OF OPERATION
The ECM monitors voltages from several sensors
to determine how
much fuel to give the engine. The
fuel is delivered under one of several conditions, called
"modes." All the modes are controlled by the ECM.
Starting Mode
When the key is first turned "ON", the ECM turns
on the fuel pump relay for two seconds,
i~nd the l'uel
pump builds up pressure to the TRI unit. The ECM
checks the coolant
temperature sensor, throttle
position sensor
('UPS), manifold absolute pressure
(MAP) sensor, and crank signal, then determines the
proper airtfuel ratio tbr starting. This ranges from
Page 580 of 1825

DRIVEABILITY AND EMISSIONS - 5.OL (\/IN El 6EZ-CZ-5
sent to the ECM. The ECM then increases the injector
base pulse width, permitting increased fuel flow.
As the throttle valve rotates in response to
movement of the accelerator pedal, the throttle shaft
transfers this rotational movement to the
'I'PS. A
potentiometer (variable resistor) within the TPS
assembly changes its resistance (and voltage drop) in
proportion to throttle movement.
By applying a reference voltage (5.0 volts) to the
TPS input, a varying voltage (reflecting throttle
position) is available at the TPS output. For example,
approximately 2.5 volts results from a 50% throttle
valve opening (depending on TPS calibration). The
voltage output from the TPS assembly is routed to the
ECM for use in determining throttle position.
FUEL PUMP
The fuel pump is a turbine type, low pressure
electric pump, mounted in the fuel tank. Fuel
is
pumped at a positive pressure (above 62
kPa or 9 psi)
from the fuel pump through the in-line filter to the
pressure regulator in the TBI assembly Excess
fuel is
returned to the fuel tank through the fuel return line.
The fuel pump is attached to the fuel gage sender
assembly. A fuel strainer is attached to the fuel pump
inlet line and prevents dirt particles from entering the
fuel line and tends to separate
water from the fuel
Vapor lock problems are reduced when using an
electric
pump because the fuel is pushed from the tank
under pressure rather than being pulled
under
vacuum, a condition that produces vapor.
An inoperative fuel pump would cause
a. no start
condition. A fuel pump which does not provide enough
pressure can result in poor performance. (See "Fuel
System Pressure Test" procedure).
FUEL PUMP ELECTRICAL CIRCUIT
When the key is first turned "ON" without the
engine running, the ECM turns the
Fuel pump relay
"ON" for two seconds. This builds
up the fuel pressure
quickly. If the engine is not started within two
seconds, the
ECM shuts the fuel pump "OFF" and
waits until the engine starts. As soon as the engine is
cranked, the ECM turns the relay
"ON" and runs the
fuel pump.
As a backup system to the fuel pump relay, the
fuel pump can also be turned on
by the oil pressure
switch. The oil pressure sender has two circuits
internally. One operates the oil pressure indicator or
gage in the instrument cluster,
itnd the other is
anormally open switch which closes when oil pressure
reaches about 28
kPa (4 psi). If the fuel pump relay
fails, the oil pressure switch will run the fuel pump. An
inoperative fuel pump relay can result in long
cranking times, particularly if the engine is cold. The
oil pressure switch will turn on the fuel pump as soon
as oil pressure
reaches about 28 kPa (4 psi).
FUEL CONTROL
Always start with the "Diagnostic Circuit Check"
in Section
"6E2-A". This will reduce diagnosis time
and prevents unnecessary replacement of parts. The
information in this check will direct diagnosis
concerning "Engine
Crunlis But Won't Run" and the
"Fuel Control System," Section
"6E2-C2", including
diagnosis of an injector, pressure regulator,
fuel pump,
fuel
pump relay, and oil pressure switch.
Idle Air Control (IAC) Valve
A "Scan" tool reads IAC position in steps, calletl
"Counts." "0" steps indicates the ECM is commanding
the
IAC to be driven in, to a fully seiltetl position
(minimum idle air).
The higher the number steps, the
more idle air being allowed to pass
by the IAC valve.
cnose Refer to CHART C-2C for information to cliil,
the function of the IAC valve.
Driva bility
Refer to Section "B" for driveability symptoms
related to the fuel control.
ON-VEHICLE SERVICE
GENERAL SEWVICE INFORMATION
CAUTION:
e To prevent personal injury or damage to the
vehicle
as the result sf an accidental start,
disconnect and reconnect the negative
battery cable before and after service is
performed.
@ Also, catch any fuel that leaks out when
disconnecting the fuel lines, by covering the
fittings with
a shop cloth. Place the cloth in
an approved container when work is
complete.
The 'FBI unit repair procedures cover component
replacement with the unit on the vehicle,
tIowever,
throttle body replacement requires that the complete
unit
be removed from the enginc.
Page 582 of 1825
DRIVEABILITY AND EMISSIONS - 5.BL (VIN E) 6E2-CZ-7
Refer to the disassembled view (Figure C2-8) for
identification of parts during repair procedures.
Service repair of individual components is performed
without removing the TBI unit from the engine. If
removed, it is essential that care is taken to prevent
damage to the throttle valve or sealing surface while
performing any service.
Whenever service is performed on the TBI or any
of its components, first remove the air cleaner, adapter
and air cleaner gaskets. Discard the gaskets and
replace them with new ones before replacing the air
cleaner after service is complete.
When disconnecting the fuel lines, be sure to use a
backup wrench
(J-29698-A, or BT8251-A, or
equivalent) to keep the TBI nuts from turning.
Fuel Pressure Relief
The TBI Model 220 on this engine contains a
constant bleed feature in the pressure regulator that
relieves pressure. Therefore, no special pressure relief
procedure is required.
Fuel System Pressure Pest
A fuel system pressure test is part of several of the
diagnostic charts and symptom checks. To perform
this test, follow this procedure:
1. Turn engine "OFF" to relieve fuel pressure.
2. Remove air cleaner and plug THERMAC vacuum
port on TBI.
3. Uncouple fuel supply flexible hose in engine
compartment. Install fuel pressure gage
J-29658AlBT8205 and adapter 29658A-85
between steel line and flexible hose.
4. Tighten gage in line to ensure no leaks occur
during testing.
5. Start car and observe fuel pressure reading. It
should be 62-90
kPa (9-13 psi); if not, refer to
CHART A-7.
6. Relieve fuel pressure.
7. Remove fuel pressure gage.
8. Reinstall fuel line.
9. Start car and check for fuel leaks.
10. Remove plug from vacuum port and install air
cleaner with new gasket.
Cleaning and inspection
All TBI component parts, with the exception of
those noted below, should be cleaned in a cold
immersion cleaner such as Carbon
X (X-55) or
equivalent.
NOTICE: The throttle position sensor ('I'PS), idle air
control
(IAC) valve, pressure regulator
diaphragm assembly, fuel injectors or other
components containing
rubber,should NOT be placed in a solvent
or cleaner bath. A chemical reaction will
cause these parts to swell, harden or
distort. Do not soak the throttle body with
the above parts attached. If the throttle
body assembly requires cleaning, soaking
time in the cleaner should be kept to a
minimum. Some models have hidden
throttle shaft dust seals that could lose
their effectiveness by extended soaking.
1. Clean all metal parts thoroughly and blow dry
with shop air. Be sure that all fuel and air
passages are free of dirt or burrs.
2. Inspect mating casting surfaces for damage that
could affect gasket sealing.
Thread Locking Compound
Service repair kits are supplied with a small vial
of thread locking compound with directions for use. If
material is not available, use Loctite 262, or
GM part
number 10522624, or equivalent.
NOTICE: Do not use a higher strength locking
compound than recommended, since to do
so could make removing the screw
extremely difficult, or result in damaging
the screw head.
FUEL METER COVER ASSEMBLY
Replacement (Figure
C2-9)
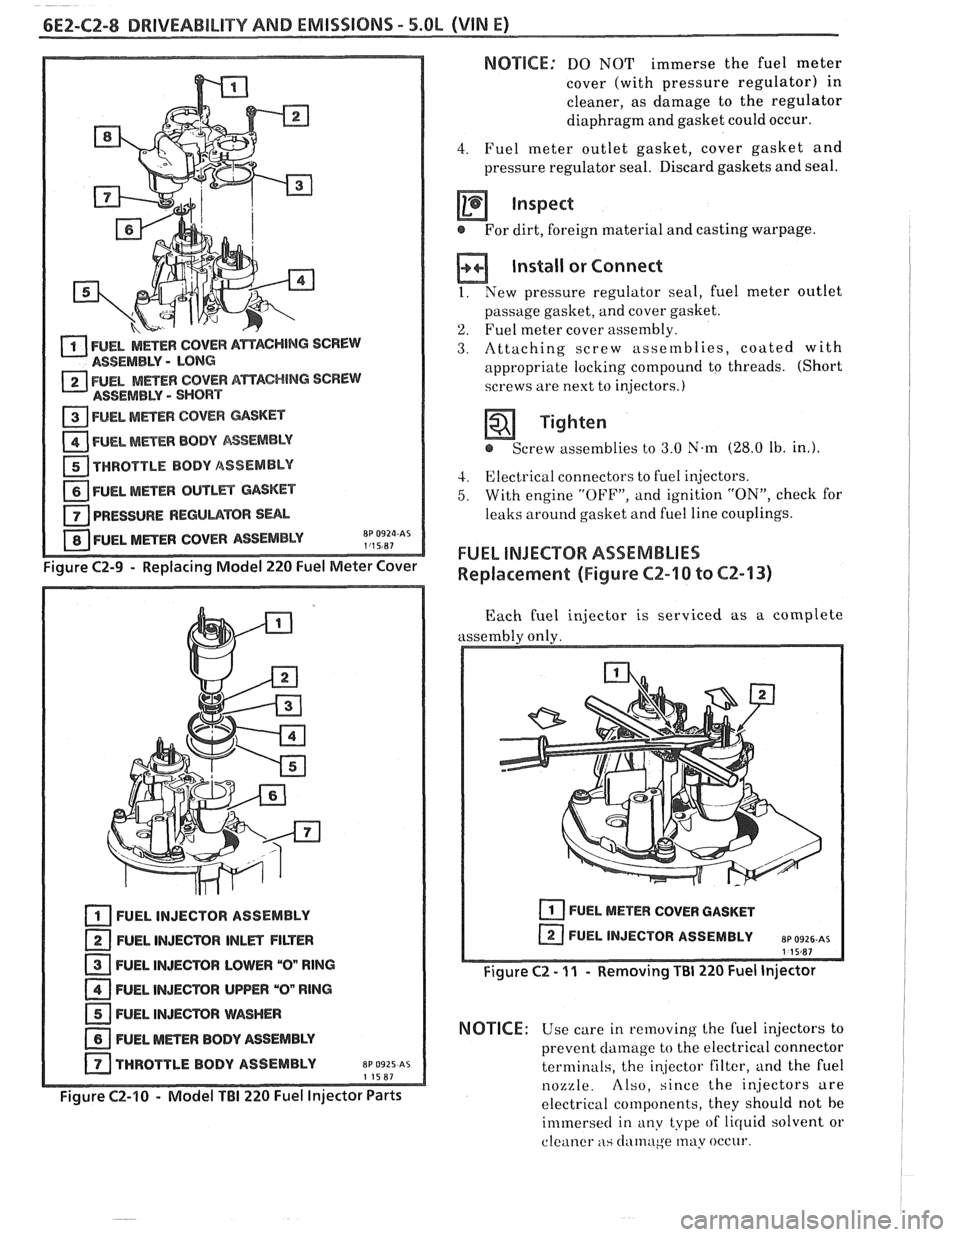
The fuel meter cover assembly contains the fuel
pressure regulator assembly. The regulator has been
adjusted at the factory and should only be serviced as
a complete preset assembly.
CAUTION: DO NOT remove the four screws
securing the pressure regulator to
the fuel meter cover. The fuel
pressure regulator includes a large
spring under heavy compression
which, if accidentally released,
could cause personal injury.
Disassembly might also result in a
fuel leak between the diaphragm
and the regulator container.
Remove or Disconnect
I. Electrical connectors to fuel injectors. (Squeeze
plastic tabs and pull straight up.)
2. Long
and short fuel meter cover screw assemblies.
3. Fuel meter cover assembly.
Page 583 of 1825
6E2-CZ-8 DRIVEABILITY AND EMISSIONS - 5.OL (VIN E)
a FUEL METER COVER A~ACHING SCREW ASSEMBLY - LONG
2 FUEL MmEW COVER AmAC#ING SCREW
ASSEMBLY - SHORT
1 FUEL MmEW COVER GASKET
FUEL METER BODY ASSEMBLY
a THROTTLE BODY /ASSEMBLY
FUEL MnER OUTL- GASKET
PRESSURE
REGUUTOR SUL
FUEL METER COVER ASSEMBLY
Figure C2-9 - Replacing Model 220 Fuel Meter Cover
FUEL INJECTOR ASSEMBLY
FUEL INJECTOR
lNLm FILTER
FUEL INJECTOR LOWER
"On RlNG
FUEL INJECTOR UPPER "On RlNG
FUEL INJEmR WASHER
NEL METER BODY ASSEMBLY
THROTTLE BODY ASSEMBLY
EP 0925 AS 11587
Figure C2-10 - Model TBI 220 Fuel Injector Parts
NOTSCE: DO NOT immerse the fuel meter
cover (with pressure regulator) in
cleaner, as damage to the regulator
diaphragm and gasket could occur.
4. Fuel meter outlet gasket, cover gasket and
pressure regulator seal. Discard gaskets and seal.
inspect
@ For dirt, foreign material and casting warpage.
Install or Connect
I. New pressure regulator seal, fuel meter outlet
passage gasket, and cover gasket.
'2. Fuel meter cover assembly.
3. Attaching screw assetnblies, coated with
appropriate locking compound to threads. (Short
screws are next to injectors.)
Tighten
e Screw assemblies to 3.0 N.m (28.0 Ib. in.).
4. Electrical connectors to fuel injectors.
5. With engine "OFF", and ignition "ON", check for
leaks around gasket and fuel line couplings.
FUEL INJECTOR ASSEMBLIES
Replacement (Figure CZ-10 to CZ-13)
Each fuel injector is serviced as a complete
assembly only.
FUEL METER COVER GASKET
I Figure C2 - 11 - Removing Ti31 220 Fuel Injector
NOTICE: Use care in removing the Cuel injectors to
prevent
clamage to the electrical connector
terminals, the
in,jector filter, and the fuel
nozzle. Also, since the injectors are
electrical components, they should not be
immersecl in any type of lirluid solvent or
cleaner
as clatnuge may occur.
Page 584 of 1825
DRIVEABILITY AND EMISSIONS - 5.OL (VIN El CEZ-C2-9
u PART IDENTIFICATION NUMBER
VENDOR IDENTlFlCATl
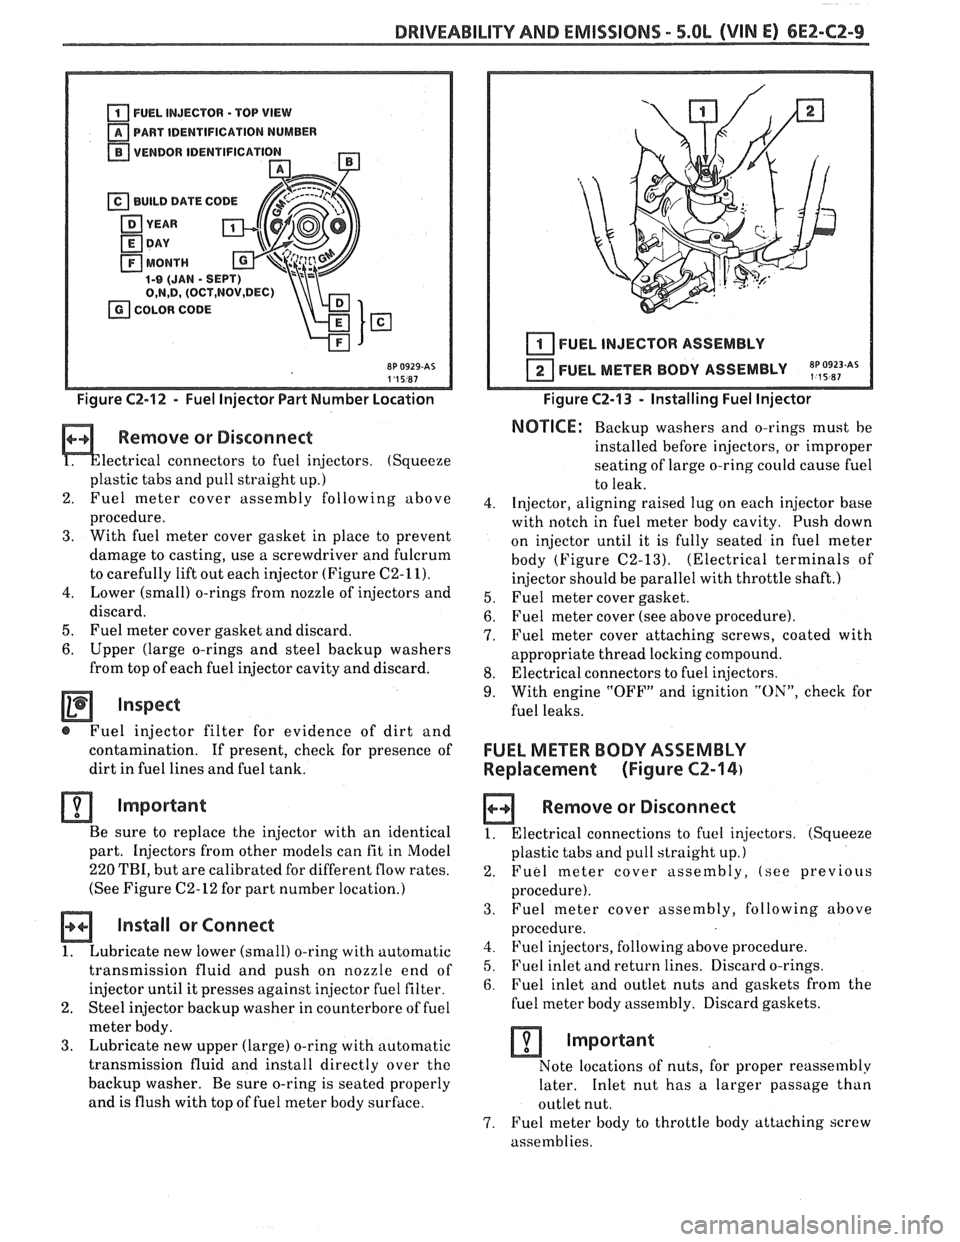
Figure C2-12 - Fuel Injector Part Number Location
Remove or Disconnect
lectrical connectors to fuel injectors. (Squeeze
plastic tabs and pull straight
up.)
2. Fuel meter
cover assembly following above
procedure.
3. With fuel meter cover gasket in place to prevent
damage to casting, use a screwdriver and fulcrum
to carefully lift out each injector (Figure
C2-11).
4. Lower (small) o-rings from nozzle of injectors and
discard.
5. Fuel meter cover gasket and discard.
6. Upper (large o-rings and steel backup washers
from top of each fuel injector cavity and discard.
Inspect
@ Fuel injector filter for evidence of dirt and
contamination.
If present, check for presence of
dirt in fuel lines and fuel tank.
Important
Be sure to replace the injector with an identical
part. Injectors from other models can fit in Model
220 TBI, but are calibrated for different flow rates.
(See Figure
C2-12 for part number location.)
Install or Connect
1. Lubricate new lower (small) o-ring with automatic
transmission fluid and push on nozzle end of
injector until it presses against
in,jector fuel filter.
2. Steel injector backup washer in counterbore of fuel
meter body.
3. Lubricate new upper (large) o-ring with automatic
transmission fluid and install directly over
the
backup washer. Be sure o-ring is seated properly
and is flush with top of fuel meter body surface.
I I 1 I FUEL INJECTOR ASSEMBLY
FUEL METER BODY ASSEMBLY
~p,~9~~~As
Figure C2-13 - Installing Fuel Injector
NOTICE: Backup washers and o-rings must be
installed before injectors, or improper
seating of large o-ring
could cause fuel
to leak.
4. Injector, aligning raised lug on each injector base
with notch in fuel meter body cavity. Push down
on injector until it is fully seated in fuel meter
body (Figure
C2-13). (Electrical terminals of
injector should be parallel with throttle shaft.)
5. Fuel meter cover gasket.
6. Fuel meter cover (see above procedure).
7. Fuel meter cover attaching screws, coated with
appropriate thread locking compound.
8. Electrical connectors to fuel injectors.
9. With engine "OFF" and ignition "ON", check for
fuel leaks.
FUEL METER BODY ASSEMBLY
Replacement (Figure
CZ-14)
a Remove or Disconnect
1. Electrical connections to fuel injectors. (Squeeze
plastic tabs and pull straight up.)
2. Fuel meter cover assembly, (see previous
procedure).
3. Fuel
meter cover assembly, following above
procedure.
4. Fuel injectors, following above procedure.
5. Fuel inlet and return lines. Discard o-rings.
6. Fuel inlet and outlet nuts and gaskets from the
fuel meter body assembly. Discard gaskets.
Important
Note locations of nuts, for proper reassembly
later. Inlet nut has a larger passage than
outlet nut.
7. Fuel meter body to throttle body attaching screw
assemblies.
Page 585 of 1825
6E2-CZ-10 DRlVEABlLlTV AND EMISSIONS - 5.OL (WIN E)
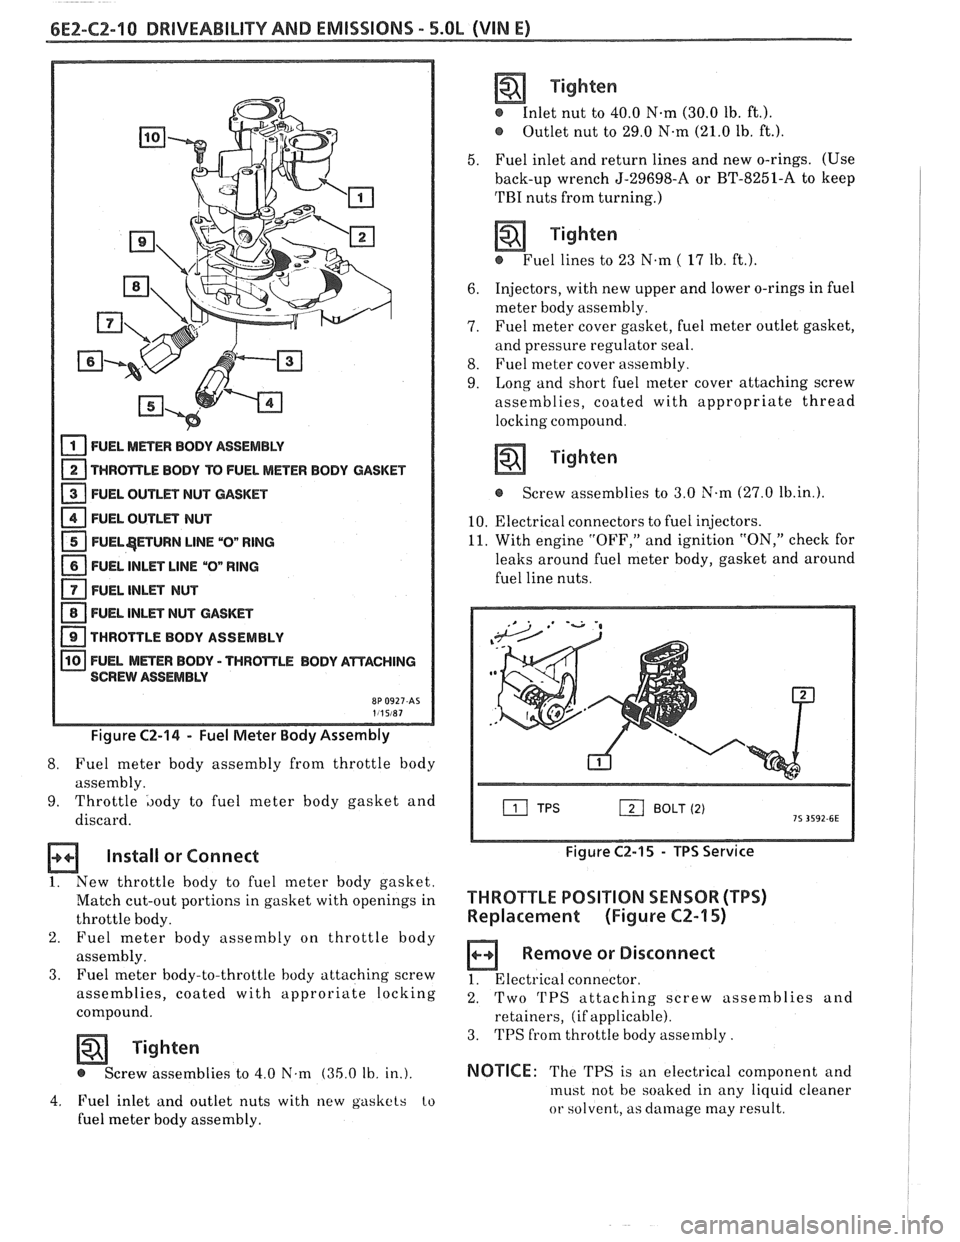
FUEL METER BODY ASSEMBLY
THROTTLE BODY TO FUEL METER BODY GASKET
- 13 FUEL OUTLET NUT CASKET
1 FUEL OUTLET NUT - 1 FUEL$ETURN LlNE "Ow RING
1 FUEL INLET LlNE "Ow RlNG
FUEL INLET NUT
1 FUEL INLET NUT GASKET
1 THROTTLE BODY ASSEMBLY
FUEL
MmER BODY - TWROmLE BODY AWACHING
SCREW ASSEMBLY
Figure C2-14 - Fuel Meter Body Assembly
8. Fuel
meter body assembly from throttle body
assembly.
9. Throttle ,)ody to fuel meter body gasket and
discard.
a Install or Connect
1. New throttle hody to fuel meter body gasket.
Match cut-out portions in gasket with openings in
throttle body.
2. Fuel meter body assembly on throttle body
assembly.
3. Fuel meter body-to-throttle hody attaching screw
assemblies, coated with approriate locking
compound.
Tighten
@ Screw assemblies to 4.0 N.m (35.0 Ib. in.).
4. Fuel inlet and outlet nuts with new gaskets to
fuel meter body assembly.
Tighten
e Inlet nut to 40.0 N.m (30.0 lb. ft.).
Outlet nut to 29.0 N.m (21.0 lb. ft.).
5. Fuel inlet and return lines and new o-rings. (Use
back-up wrench J-29698-A or BT-8251-A to keep
TBI nuts from turning.)
Tighten
@ Fuel lines to 23 N.m ( 17 lb. ft.).
6. Injectors,
with new upper and lower o-rings in fuel
meter body assembly.
7. Fuel meter cover gasket, fuel meter outlet gasket,
and pressure regulator seal.
8. Fuel meter cover assembly.
9. Long and short fuel meter cover attaching screw
assemblies, coated with appropriate thread
locking compound.
Tighten
e Screw assemblies to 3.0 N.m (27.0 lb.in.1.
10. Electrical connectors to fuel injectors.
11. With engine "OFF," and ignition "ON," check for
leaks around fuel meter body, gasket and around
fuel line nuts.
12] BOLT (2)
Figure C2-15 - TPS Service
THROTTLE POSITION SENSOR (TPS)
Replacernent (Figure CZ-15)
Remove or Disconnect
1. Electrical connector.
2. Two 'I'PS attaching screw assemblies and
retainers, (if applicable).
3. TPS from throttle body assembly.
NOTICE: The TPS is an electrical component and
must not be soaked in any liquid cleaner
or solvent, as damage may result.