1988 PONTIAC FIERO check engine
[x] Cancel search: check enginePage 629 of 1825

6EZ-C8-4 DRIVEABILITY AND EMISSIONS - 5.OL (VIN E)
I5 WAY (FRONT VIEW)
SPEED INPUT
4rH GEAR SIGNAL
422 TANIBLK
ALDL CONNECTOR
CHART C-8A
TRANSMISSION CONVERTER CLUTCH (TCC)
ELECTRICAL DIAGNOSIS
(Page 1 of 2)
5.OL (VIN E) "F" "SERIES (TBI)
Circuit Description:
The purpose of the automatic transmission torque converter clutch is to eliminate the power loss of the
torque converter, when the vehicle is in a cruise condition. This allows the convenience of the automatic
transmission and the fuel economy of a manual transmission.
Fused battery ignition is supplied to the TCC solenoid through the brake switch. the ECM will engage
TCC
by grounding CKT 422 to energize the solenoid.
TCC will engage when:
- Vehicle speed above 24 mph - Engine at normal operating temperature (above 70°C, 156°F)
- Throttle position sensor output not changing, indicating a steady road speed
- Brake switch closed
Test Description: Numbers below refer to circled solenoids
and relays before installing a
numbers on the diagnostic chart. replacement ECM. Replace
any solenoid or relay
1. Confirms 12 volt supply as well as continuity of that
measures less than 20 ohms.
TCC circuit.
2. Grounding the diagnostic terminal with engine Diagnostic Aids:
"OFF", should energize the capability of the ECM An
engine coolant thermostat that is stuck open or
to control the solenoid. opens
at too low a temperature, may result in an
3. Solenoid coil resistance must measure more than inoperative TCC.
20 ohms. Less resistance will cause early failure
of the ECM
drive^.". Using an ohmmeter, check
the solenoid coil resistance of
all ECM controlled
Page 636 of 1825
DRIVEABILITY AND EMISSIONS - 5.OL (VIN E) 6E2-CI 3-1 --
SECTION C13
POSI"BVE CRANKCASE VENTILATION (PCV)
CONTENTS
GENERAL DESCRIPTION ............*.. C13-1 ON-CARSERVICE .................... C13-2
DIAGNOSIS
.*.....................* C13-1 PARTSINFORMATION...,............. C13-2
RESULTS OF INCORRECT OPERATION ... C13-1
GENERAL DESCRIPTION
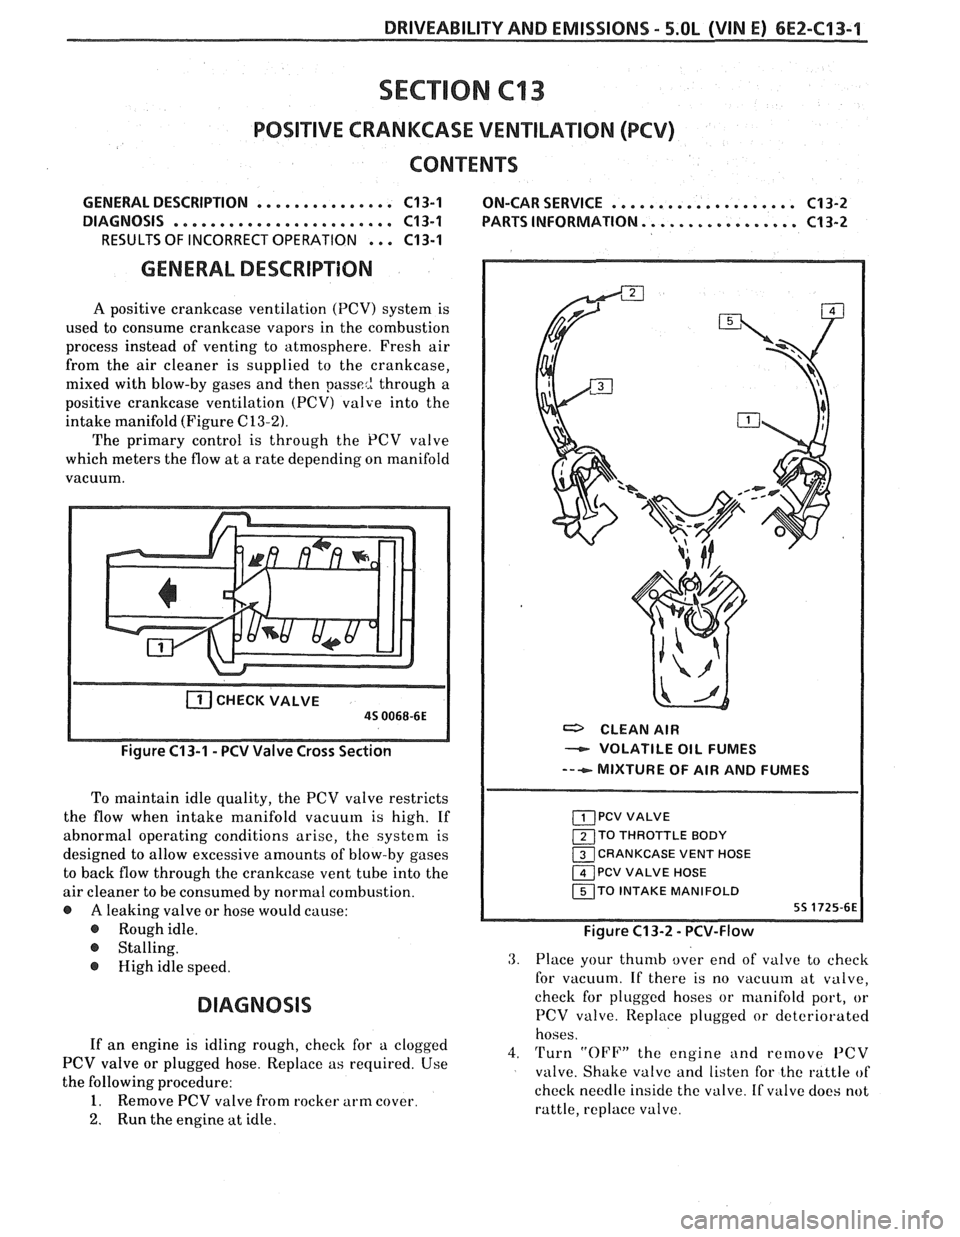
A positive crankcase ventilation (PCV) system is
used to consume crankcase vapors in the combustion
process instead of venting to atmosphere. Fresh air
from the air cleaner is supplied to the crankcase,
mixed with blow-by gases and then
passe2 through a
positive crankcase ventilation
(PCV) valve into the
intake manifold (Figure
C13-2).
The primary control is through the PCV valve
which meters the flow at a rate depending on manifold
vacuum.
CHECKVALVE
a CLEAN AIR
- VOLATILE OIL FUMES
--+ MIXTURE OF AIR AND FUMES
To maintain idle quality, the PCV valve restricts
the flow when intake manifold vacuum is high. If
abnormal operating conditions arise, the system is
TO THROTTLE BODY
designed to allow excessive amounts of blow-by gases CRANKCASE VENT HOSE
to back flow through the crankcase vent tube into the PCV VALVE HOSE
air cleaner to be consumed by normal combustion. TO INTAKE MANIFOLD
@ A leaking valve or hose would cause:
@ Roughidle. Figure C13-2 - PCV-Flow
@ Stalling.
@ High idle speed.
DIAGNOSIS
3. Place your thumb over end of valve to check
for vacuum. If there is no
vacuuin at valve,
check for plugged hoses or manifold port, or
PCV valve. Iteplace plugged or deteriorated
hoses.
If an engine is idling rough, check for a clogged
4. Turn "OFF" the engine and remove PCV PCV valve or plugged hose. Replace as required. Use
valve. Shake valve and listen for the rattle of
the following procedure:
check needle inside the valve. If
valve does not 1. Remove PCV valve from rocker arm cover.
rattle, replace valve.
2. Run the engine at idle.
Page 637 of 1825
6E2-C"1-2 DRIVEABILITY AND EMISSIONS - 5.OL (VIN E)
With this system, any blow-by in excess of the
system capacity (from a badly-worn engine, sustained
heavy load,
etc.) is exhausted into the air cleaner and
is drawn into the engine.
Proper operation of the PCV System is dependent
upon a sealed engine. If oil sludging or dilution is
noted, and the PCV System is functioning properly,
check engine for possible cause and correct to ensure
that system will function as intended.
Results of Incorrect PCV Operation
@ A plugged valve or hose may cause:
@ Rough idle.
@ Stalling or slow idle speed.
Oil leaks.
@ Oil in air clcaner.
@ Sludge in engine.
ON-CAR SERVICE
An engine which is operated without any
crankcase ventilation can be damaged. Therefore, it is
important to replace the
PCV valve and air cleaner
breather at intervals shown in Section
"OB".
Periodically, inspect the hoses and clamps and
replace any showing signs of deterioration.
PARTS INFORMATION
PART NAME GROUP
Air Cleaner ......................... 3.402
................ Valve Asm, UCase Vent 1.745
Page 638 of 1825
DRIVEABILITY AND EMISSIONS - S.OL (VIN El 6EZ-C44-1
SECTION C14
"FHERMOSTATlC AIR CLEANER (THERMAC)
CONTENTS
GENERAL DESCRIPTION ............... C14-1 VACUUM MOTORCHECK ............. C14-2
PURPOSE ........................ C14-1 TEMPERATURE SENSOR CHECK ........ 614-3
.................... OPERATION ...................... C14-1 ON CAR SERVICE C14-3
DIAGNOSIS ...e..oe........e.ee.~.. C14-2 AIRCLEANER ELEMENT .............. Cl4-3
RESULT OF INCORRECT THERMAC VACUUM
DIAPHRAGM MOTOR ........ 614-3
.................... OPERATION C14-2
SENSOR .......................... 614-3
THERMACAIR CLEANER CHECK ........ C14-2 PARTS INFORMATION ................ C14-4
GENERAL DESCRIPmION
PURPOSE
A heated intake air system is used to give good
driveability under varying climatic conditions. By
having a uniform inlet air temperature, the fuel
system can be calibrated to reduce exhaust emissions
and to eliminate throttle valve icing.
OPERATION
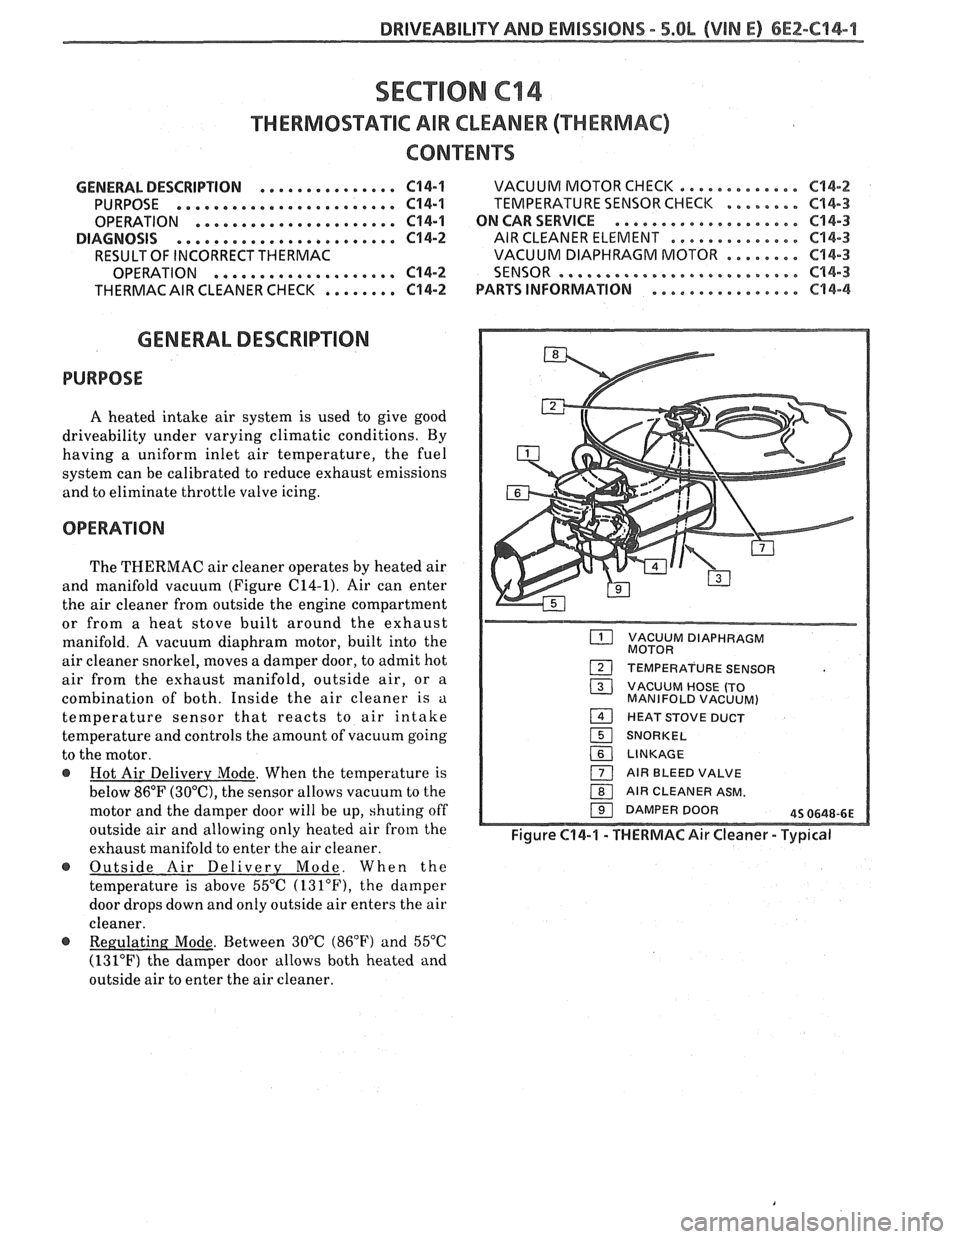
The THERMAC air cleaner operates by heated air
and manifold vacuum (Figure C14-1). Air can enter
the air cleaner from outside the engine compartment
or from a heat stove built around the exhaust
manifold.
A vacuum diaphram motor, built into the
air cleaner snorkel, moves a damper door, to admit hot
air from the exhaust manifold, outside air, or
a
combination of both. Inside the air cleaner is a
temperature sensor that reacts to air intake
temperature and controls the amount of vacuum going
to the motor.
@ Hot Air Delivery Mode. When the temperature is
below
86°F (30°C), the sensor allows vacuum to the
motor and the damper door will be up, shuting off
outside air and allowing only heated air
from the
exhaust manifold to enter the air cleaner.
@ Outside Air Delivery Mode. When the
temperature is above 55°C
(131°F), the damper
door drops down and only outside air enters the air
cleaner.
VACUUM DIAPHRAGM
MOTOR
TEMPERATURE SENSOR
( VACUUM HOSE (TO
MANIFOLD VACUUM)
1 HEAT STOVE DUCT
151 SNORKEL
16( LINKAGE
1 AIR BLEED VALVE
1 AIR CLEANER ASM.
191 DAMPER DOOR 45 0648-6E
~igure C14-1 - THERMACAir Cleaner - Typical
@ . Between 30°C (86°F) and 55°C
(131°F) the damper door allows both heated and
outside air to enter the air cleaner.
Page 639 of 1825
6E2-C14-2 DRIVEABILITY AND EMISSIONS - 5.OL (VIN E)
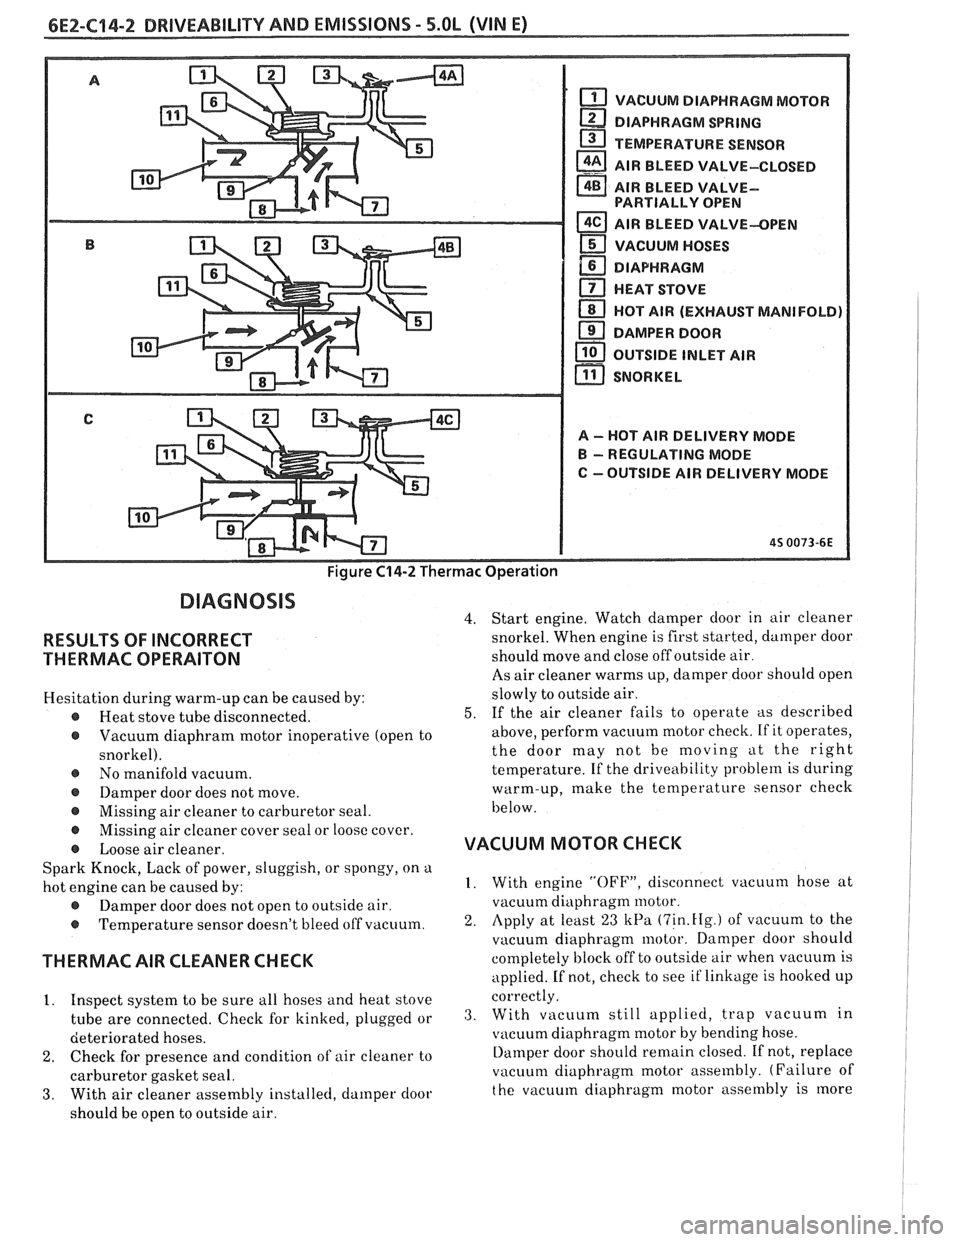
Figure C14-2 Thermac Operation
VACUUM DIAPHRAGM MOTOR
DIAPHRAGM
SPRING
TEMPERATURE SENSOR
a AIR BLEED VALVE-CLOSED - AIR BLEED VALVE- PARTIALLY OPEN
AIR BLEED VALVE-OPEN
VACUUM HOSES
DIAPHRAGM
a HEAT STOVE
HOT
AIR (EXHAUST MANIFOLD)
DAMPER
DOOR
OUTSIDE INLET AIR
11 SNORKEL r"l
A - HOT AIR DELIVERY MODE
B - REGULATING MODE
C
--OUTSIDE AIR DELIVERY MODE
DIAGNOSIS
4.
RESULTS OF INCORRECT
THERMAC OPERAITON
Hesitation during warm-up can be caused by:
r Heat stove tube disconnected. 5.
r Vacuum diaphram motor inoperative (open to
snorkel).
@ No manifold vacuum.
Damper door does not move.
Missing air cleaner to carburetor seal. Start
engine. Watch damper door in air cleaner
snorkel. When engine is first started, damper door
should move and close off outside air.
As air cleaner warms up, damper door should open
slowly to outside air.
If the air cleaner fails to operate as described
above, perform vacuum motor check. If it operates,
the door may not be moving
at the right
temperature. If the driveability
problem is during
warm-up, make the temperature sensor check
below.
- @ Missing air cleaner cover seal or loose cover.
r Loose air cleaner. VACUUM MOTOR CHECK
Spark Knock, Lack of power, sluggish, or spongy, on a
hot engine can be caused by: I. With engine "OFF", disconnect vacuum hose at
@ Damper door does not open to outside air. vacuum
diaphragm motor.
@ Temperature sensor doesn't bleed off vacuum. 2. Apply at least 23 kPa (7in.fIg.) of vacuum to the
vacuum diaphragm motor. Damper door should
THERMAC AIR CLEANER CHECK completely block off to outside air when vacuum is
applied. If not, check to see if linkage is hooked up
. .
1. Inspect system to be sure all hoses and heat stove correctly.
tube are connected. Check for kinked, plugged or 3. With vacllum still applied, trap Vacuum in
deteriorated
hoses. vitcuum diaphragm motor by bending hose.
2. Check for presence and condition of air cleaner to Ilarnper door should remain closed. If not, replace
carburetor gasket seal. vacuum
diaphragm motor assembly. (Failure of
3. With air cleaner assembly installecl, damper door the
vacuum diaphragm motor assembly is more
should be open to outside air.
Page 640 of 1825
DRIVEABILITY AND EMISSIONS - 5.OL (VIN E) 6EZ-C14-3
likely to be caused from binding linkage or a
corroded snorkel than from a failed diaphragm.
This should be checked first, before replacing the
diaphragm.)
4. If vacuum motor checks OK, check vacuum hoses
and connections. If OK, replace the temperature
sensor.
TEMPERATURE SENSOR CHECK
1. Start
test with air cleaner temperature below 30°C
(86°F). If engine has been run recently, remove air
cleaner cover and place thermometer as close as
possible to the sensor. Let air cleaner cool until
thermometer reads below 30°C
(86°F) about 5 to 10
minutes. Reinstall air cleaner on engine and
continue to Step
2.
2. Start and idle engine. Damper door should move to
close off outside air immediately if engine is cool
enough. When damper door starts to open the
snorkel passage (in a few minutes), remove air
cleaner cover and read thermometer. It must read
about
55°C (131°F).
3. If
the damper door is not open to outside air at
temperature indicated, temperature sensor is
malfunctioning and must be replaced.
OM-CAR SERVICE
AIR CLEANER ELEMENT
Remove or Disconnect
1. Air cleaner cover.
2. Old element.
Install or Connect
1. New element.
2. Air cleaner
cover. Do not over-torque nuts (install
finger- tight).
i
VACUUM DIAPHRAGM MOTOR
~emove or Disconnect
1. Air cleaner.
2. Vacuum hose from motor.
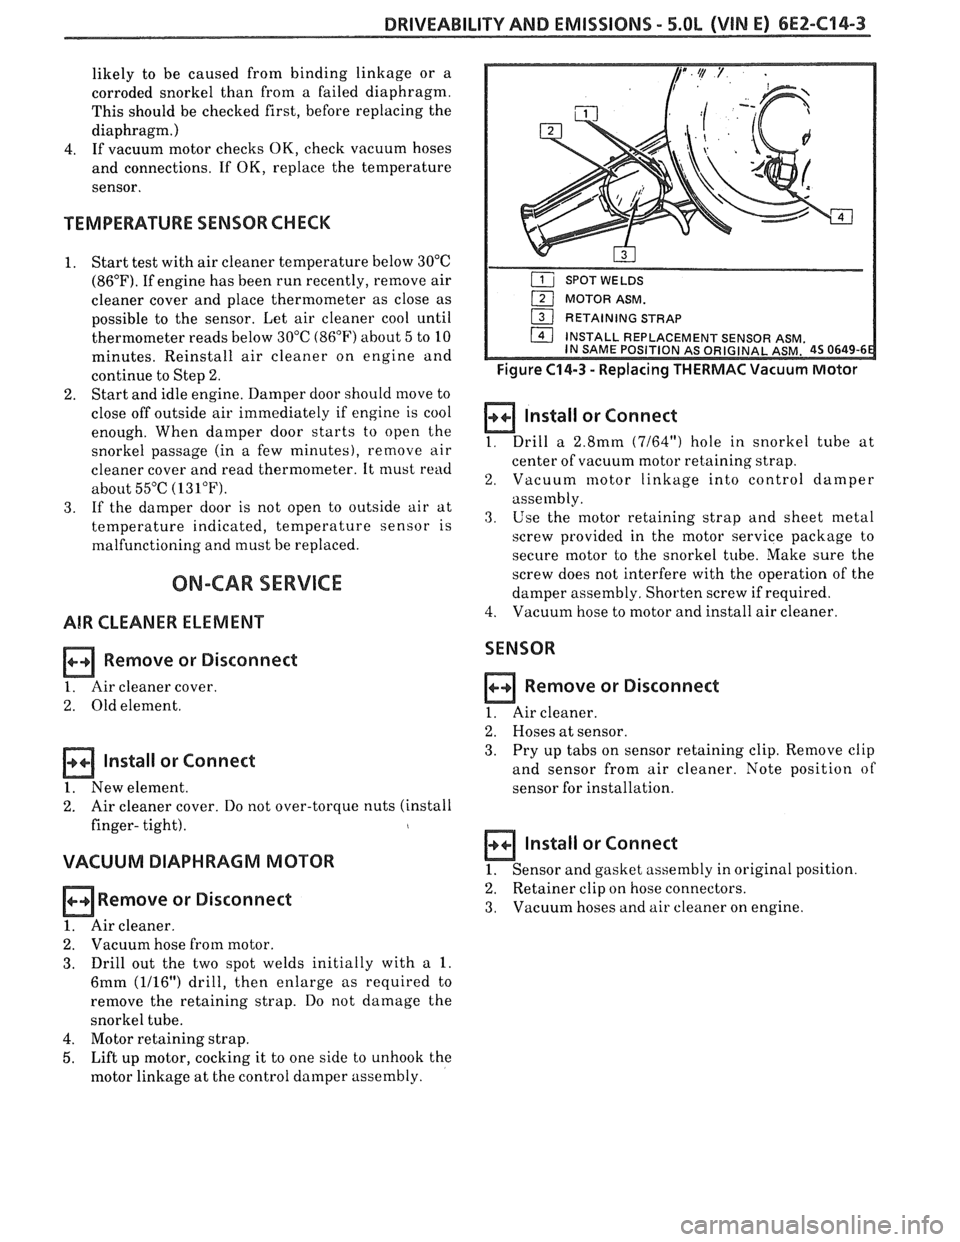
3. Drill out the two spot welds initially with a 1.
6mm (1116") drill, then enlarge as required to
remove the retaining strap. Do not damage the
snorkel tube.
4. Motor retaining strap.
5. Lift up motor, cocking it to one side to unhook the
motor linkage at the control damper assembly.
MOTOR ASM.
I 1 RETAINING STRAP - I
Figure C14-3 - Replacing THERMAC Vacuum Motor
Install or Connect
1. Drill a 2.8mm (7164") hole in snorkel tube at
center of vacuum motor retaining strap.
2. Vacuum motor linkage into control damper
assembly.
3. Use the motor retaining strap and sheet metal
screw provided in the motor service package to
secure motor to the snorkel tube. Make sure the
screw does not interfere with the operation of the
damper assembly. Shorten screw if required.
4. Vacuum
hose to motor and install air cleaner.
SENSOR
n Remove or Disconnect
1. Air cleaner.
2. Hoses at sensor.
3. Pry
up tabs
on sensor retaining clip. Remove clip
and sensor from air cleaner. Note position
of
sensor for installation.
Install or Connect
1. Sensor and gasket assembly in original position.
2. Retainer clip on hose connectors.
3. Vacuum hoses and air cleaner on engine.
Page 642 of 1825
SECTION PAGE
A
Acceleration Mode .................... C2-2
AIC Request Signal
General Description
................. C1-4
Diagnosis ......................... C1-5
Air Injection Check Valve C6-3
Air Injection Control (Pedes) Valve
........ C6-3
Air
lnjection Reaction (A.I.R.) System
General Description
.................. C6- 1
Diagnosis ......................... C6-2
Part Information
.................... C6-4
Air Management Check (Pedes)
.......... C6-6
Air Pump
............................ C6-2
........................... Service C6-3
ALDL Connector ....................... A-1 2
Automatic Transmission Converter Clutch
(TCC) Electrical Diagnosis
.............. C8-4
C8-6
B
Backfire ............................ 6-6
......... Battery Voltage Correction Mode C2-2
Before
Start~ng ...................... B-1
C
Cal Pak General
Descript~on ................. C1-2
Service
........................... C1-8
Canister Control Valve
................. C3-2
Canister Hoses
....................... C3-3
Canister Purge Solenoid
................ C3-3
Canister Purge Valve Check
............. C3-6
Chart A-
I :
No Service Engine Soon Light .......... A-10
Chart A-2:
No ALDL Data. Or Won't Flash Code 12.
Or Service Engine Soon Light On Steady
. . A-1 2
Chart A-3:
Engine Cranks But Won't Run
.......... A-14
Chart A-7:
Fuel System Diagnosis
................ A-1 8
Chart
B-1:
Restricted Exhaust System Check ........ 6-7
Chart C-IA:
ParkINeutral Switch Diagnosis ......... Cl-12
Chart C-16:
Crank Signal
....................... C1-14
Chart C-1 D
.................. MAP Output Check C1-16
SECTION
Chart C-2C:
Idle Air Control (IAC) System Check ...... C2-18
Chart C-3:
Canister Purge Valve Check
........... C3-6
Chart C-4B:
Ignition System Check
................ C4-4
Chart C-5:
Electronic Spark Control
(ESC) .......... C5-4
Chart C-66:
Air Management Check
.............. C6-6
Chart C-7:
Exhaust Gas Recirculation
............. C7-4
Chart
C-$A:
Transmission Converter Clutch (TCC) .... C8-4
Chart
C-8A
700-4R Transmission Electrical Diagnosis . . C8-6
Chart
C-86:
Shift Light ......................... C8-8
Chuggle
............................ B-3
Clear Flood Mode
..................... C2-2
Closed Loop
......................... C2-2
Code12
............................ C4-2
Code13
............................ A-22
Code14
............................ A-24
Code43
............................ A-42
Code44
............................ A-44
Code45
............................ A-46
Code54
............................ A-48
Codes 5 1.52. 55
...................... A-50
Component Location
.................. A-2
Control Valves
....................... C3-3
Coolant Temperature Sensor
General Description
.................. C1-2
Diagnosis
.......................... Cl-5
Service
........................... C1-8
Cuts Out ............................ 6-4
Crank Signal General Description
................. C1-4
Diagnosis
......................... C1-14
D
Deceleration Mode .................... C2-2
Page 643 of 1825
INDEX
SECTION PACE
....................... Detonation... B-4
.................. Diagnostic Procedure 2-5
................ Diagnostic Circuit Check A-8
..................... Dieseling. Run On B-6
Distributor Reference Signal
................. General Description C1-4
......................... Diagnosis C1-5
E
.................... ECM Terminals ... A-6
.................. ECM Wiring Diagram A3-A6
..................... EGR Control Valve C7-1
................. Valve Identification C7-2
................... Diagnosis. Service C7-2
EGR Control Solenoid
.................. C7-3
Parts Information
................... C7-3
......................... EGR Check C7-4
Electronic Control Module
................. General Description C1-I
......................... Diagnosis C1-5
............................ Service C1-6
..................... Function Check C1-6
Electronic Spark Control (ESC) System
................. General Description C5-1
................... Diagnosis. Service C5-I
Engine Coolant Temperature Sensor
................. General Description C1-2
......................... Diagnosis C1-5
Engine Cranks But Won't Run
............ A-14
........................ Engine Knock C5-4
.......................... ESC Module C5-1
.......................... ESC Sensor C5-1
..................... ESC System Check C5-4
ESTIlgnition System ................... C4-1
Evaporative Emission
Conirol System
General Description
................. C3-1
.......................... Diagnosis C3-2
Exhaust Emissions Excessive (Odors)
....... B-7
Exhaust Gas Recirculation (EGR) System
..... C7-1
Exhaust System Check Restricted
......... B-8
Fuel Control System
General Description
................. C2-1
Diagnosis. Parts Information
........... C2-6
Fuel Cutoff Mode
.................... C2-2
Fuel Meter Body Assembly
.............. C2- 1 I
Fuel Injectors ........................ C2-3
Fuel Meter Cover Assembly
.............. C2-8
Fuel Pressure Connection Assy
............ C2- 10
SECTION PAGE
........... Fuel Pressure Relief Procedure C2-6
.............. Fuel Pump Electrical Circuit C2-5
...................... Fuel Pump Relay C2-15
.................. Fuel System Diagnosis A- 18
............... Fuel System Pressure Test C2-7
......... Fuel Tank Pressure Control Valve C3-3
................... Fuel
Vapor Canister C3-3
G
.................. General Information 2-5
H
.......................... Hard Start B-2
.......... HE1 High Energy Ignition System C4-1
.......................... Hesitation
B-4
............ ldle Air Control System Check
.................. ldle Air Control Valve
......................... Diagnosis
....................... Service (EST)
Ignition System
................. General Descr~ption
......................... Diagnosis
Check
............................
........................ Incorrect ldle
.................. lnformation Sensors
................... Injector Balance Test
........................ Intermittents
......................... Introduction
Knock Sensor
................. General Description C1-4
......................... Diagnosis C1-6
....................... Lack Of Power B-3
Light. Manual Transmission Shift
......... C8-8
Light. Service Engine Soon
.............. A-10
Manual Transmission Electrical Diagnosis
... C8-10
Manual Transmission Overdrive Relay ..... C8-3
MAP Sensor
General Description
................. C1-2