Page 401 of 962
Disc
1) After taking down the wheel, remove caliper
assembly by loosening carrier bolts (2 pcs).
CAUTION:
During removal, be careful not to damage
brake flexible hose and not to depress
brake pedal.II
Fig. 19-25
2) Remove disc by using 8 mm bolts @I (2 pcs).
INSPECTION OF COMPONENTS
Brake Pad
Check pad lining for wear. When wear exceeds
its limit, replace with a new one.
Fig. 19-27
~~
CAUTION :
Never polish pad lining with sandpaper. If
lining is polished with sandpaper, hard
particles of sandpaper will be deposited in
lining and may damage disc. When pad
lining requires correction, replace it with a
new one.
Pad thickness
(lining + pad rim)
NOTE:
When pads are removed, visually inspect caliper
for brake fluid leak. Correct leaky point, if any.
Fig. 19-26
19-16
Page 402 of 962

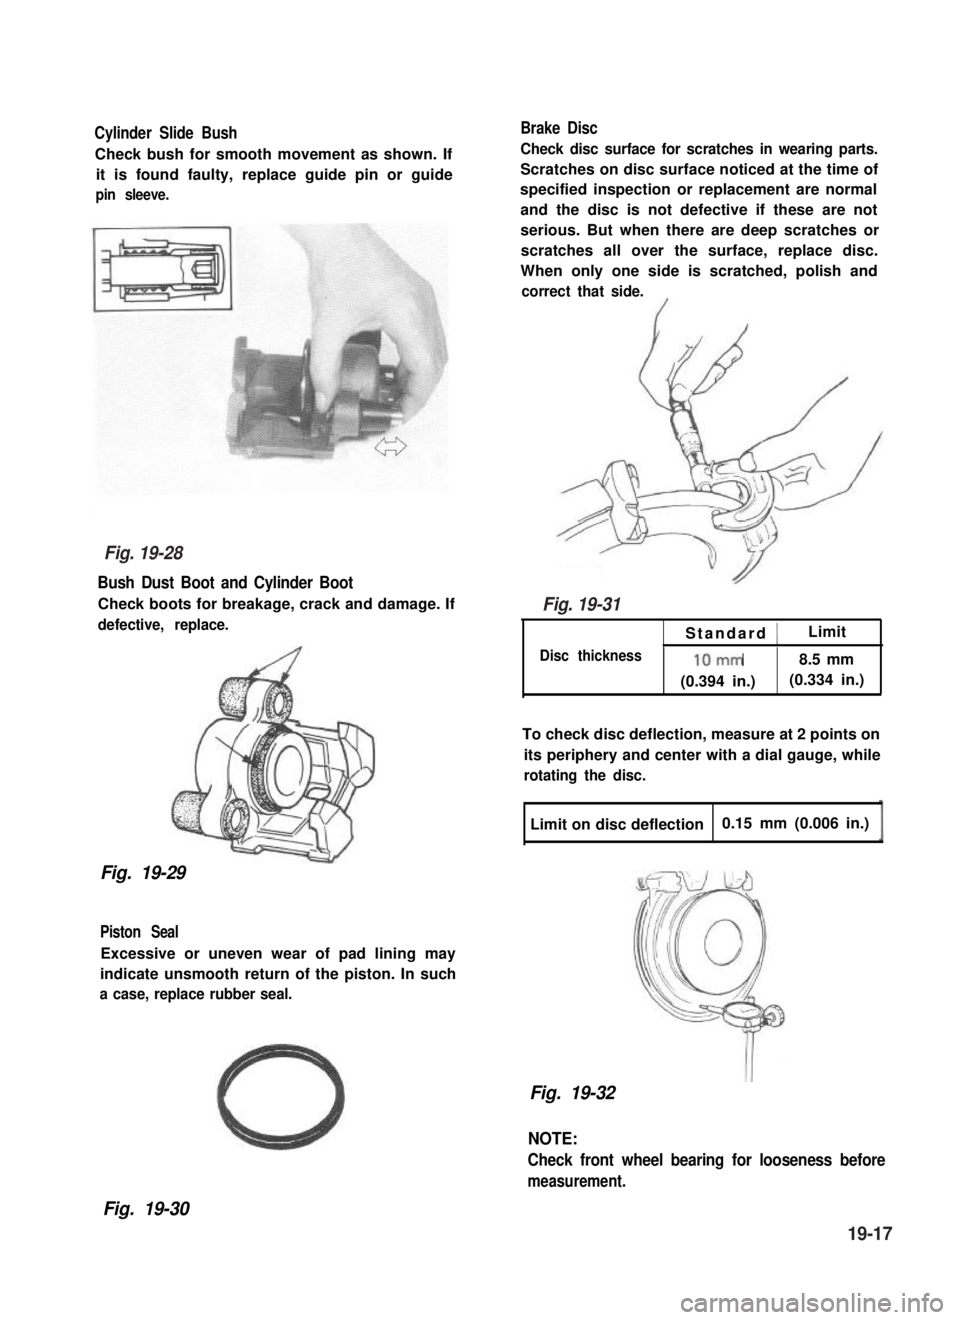
Cylinder Slide Bush
Check bush for smooth movement as shown. If
it is found faulty, replace guide pin or guide
pin sleeve.
Bush Dust Boot and Cylinder Boot
Check boots for breakage, crack and damage. If
defective, replace.
Fig. 19-29
Piston Seal
Excessive or uneven wear of pad lining may
indicate unsmooth return of the piston. In such
a case, replace rubber seal.
Brake Disc
Check disc surface for scratches in wearing parts.
Scratches on disc surface noticed at the time of
specified inspection or replacement are normal
and the disc is not defective if these are not
serious. But when there are deep scratches or
scratches all over the surface, replace disc.
When only one side is scratched, polish and
correct that side.
Standard 1Limit
Disc thickness10mm8.5 mm
(0.394 in.)(0.334 in.)
To check disc deflection, measure at 2 points on
its periphery and center with a dial gauge, while
rotating the disc.
Limit on disc deflection0.15 mm (0.006 in.)
Fig. 19-32
NOTE:
Check front wheel bearing for looseness before
measurement.
Fig. 19-30
Fig. 19-28
Fig. 19-31
19-17
Page 404 of 962

Fig. 19-36
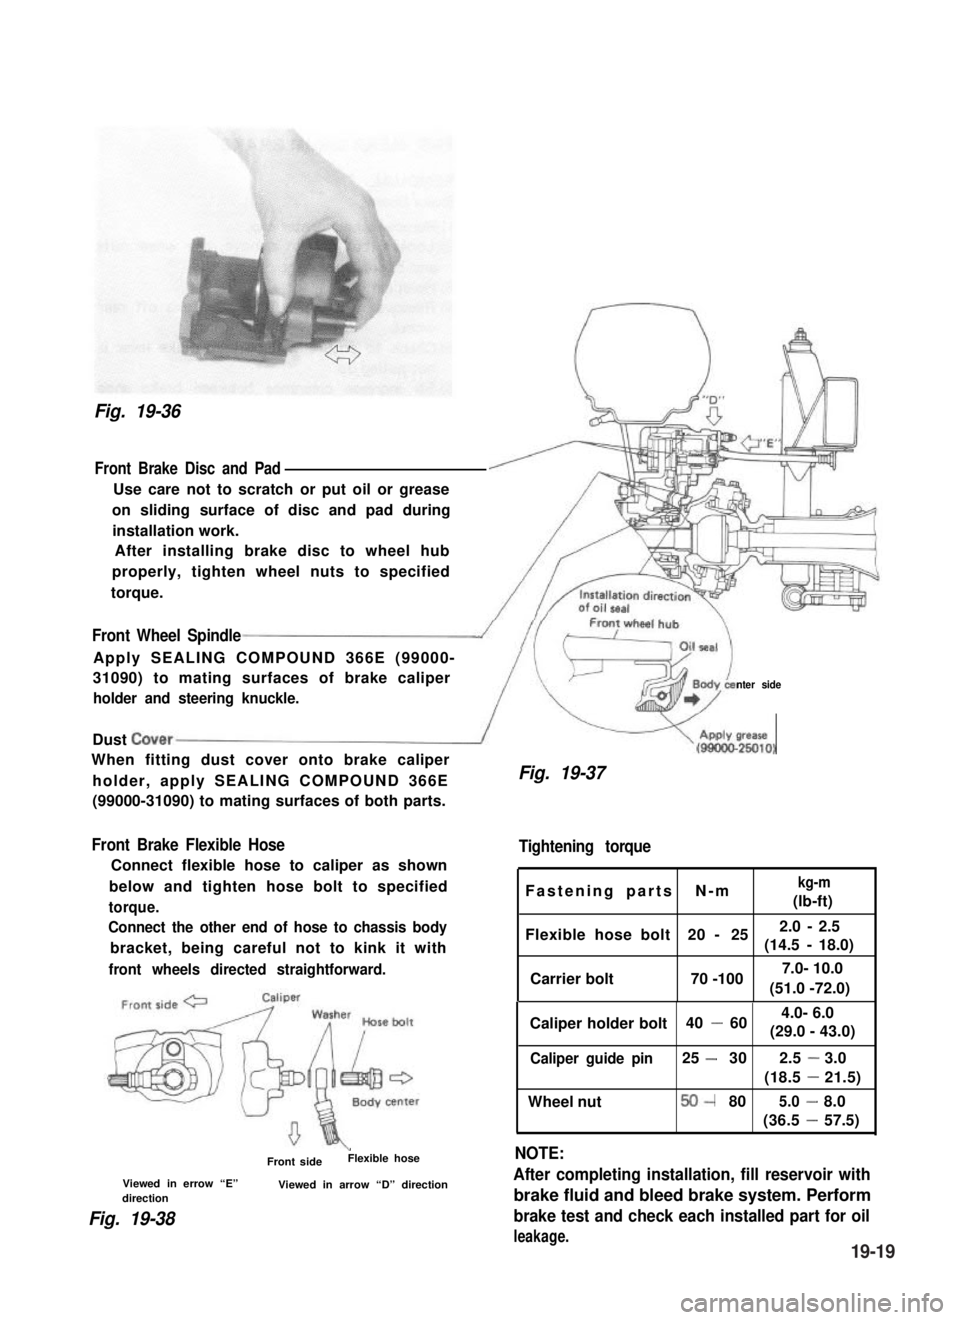
Front Brake Disc and Pad
Use care not to scratch or put oil or grease
on sliding surface of disc and pad during
installation work.
After installing brake disc to wheel hub
properly, tighten wheel nuts to specified
torque.
Front Wheel Spindle
Apply SEALING COMPOUND 366E (99000-
31090) to mating surfaces of brake caliper
holder and steering knuckle.nter side
Dust Cover/
When fitting dust cover onto brake caliper
holder, apply SEALING COMPOUND 366E
(99000-31090) to mating surfaces of both parts.
Front Brake Flexible Hose
Connect flexible hose to caliper as shown
below and tighten hose bolt to specified
torque.
Connect the other end of hose to chassis body
bracket, being careful not to kink it with
front wheels directed straightforward.
\Front sideFlexible hose
Viewed in errow “E”Viewed in arrow “D” directiondirection
Fig. 19-38
V(gg!&
Fig. 19-37
Tightening torque
Fastening parts N-mkg-m
(lb-ft)
Flexible hose bolt 20 - 252.0 - 2.5
(14.5 -18.0)
Carrier bolt 70 -100
Caliper holder bolt 40 -60
Caliper guide pin25 -302.5-3.0
(18.5-21.5)
Wheel nut50-805.0-8.0
(36.5-57.5)
NOTE:
After completing installation, fill reservoir with
brake fluid and bleed brake system. Perform
brake test and check each installed part for oil
leakage.
(51.0 -72.0)
7.0- 10.0
4.0- 6.0
(29.0 - 43.0)
19-19
Page 405 of 962

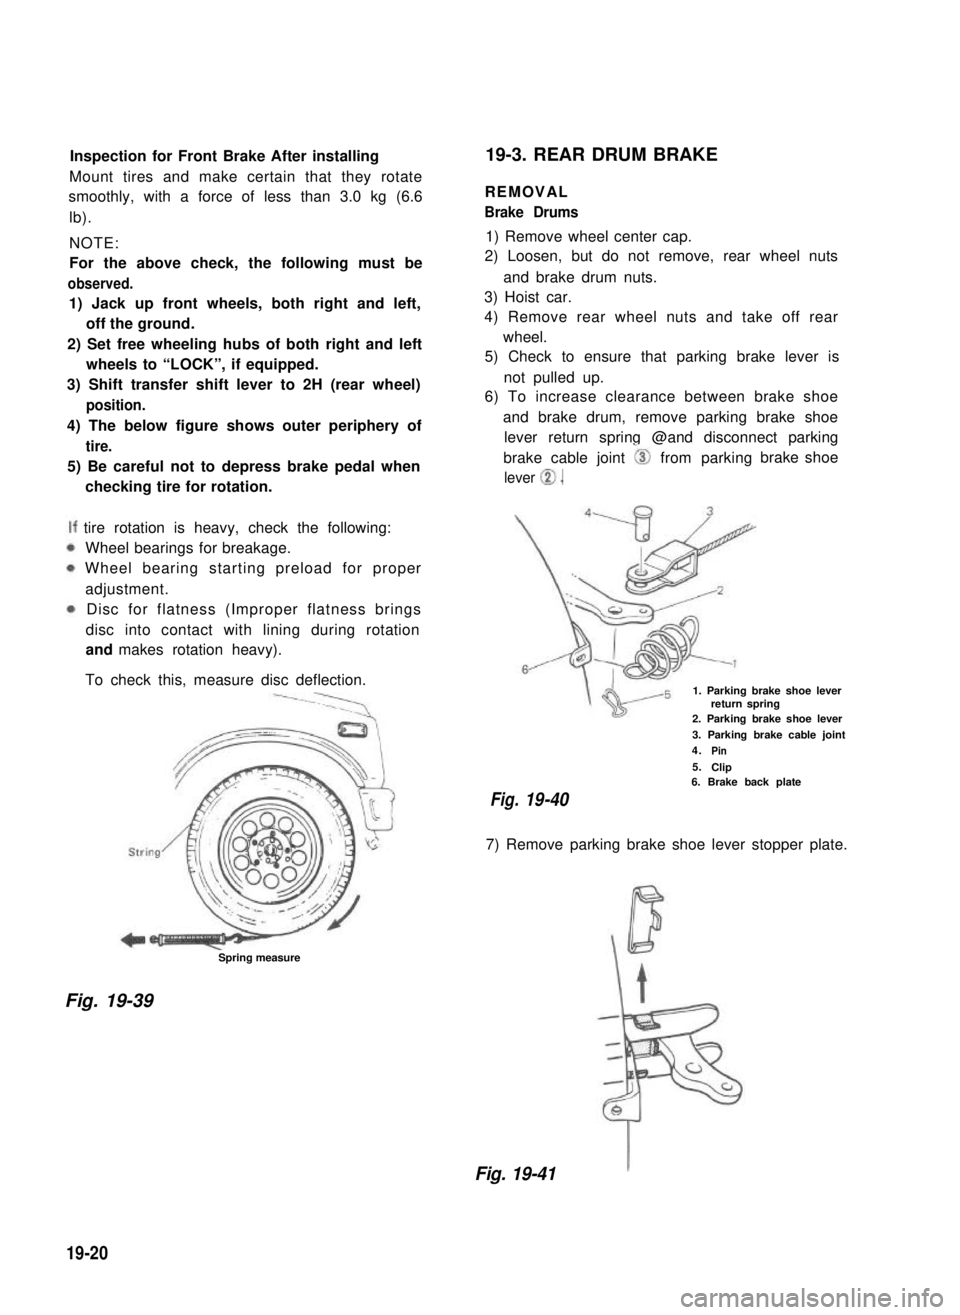
Inspection for Front Brake After installing
Mount tires and make certain that they rotate
smoothly, with a force of less than 3.0 kg (6.6
lb).
NOTE:
For the above check, the following must be
observed.
1) Jack up front wheels, both right and left,
off the ground.
2) Set free wheeling hubs of both right and left
wheels to “LOCK”, if equipped.
3) Shift transfer shift lever to 2H (rear wheel)
position.
4) The below figure shows outer periphery of
tire.
5) Be careful not to depress brake pedal when
checking tire for rotation.
tire rotation is heavy, check the following:
Wheel bearings for breakage.
Wheel bearing starting preload for proper
adjustment.
Disc for flatness (Improper flatness brings
disc into contact with lining during rotation
and makes rotation heavy).
To check this, measure disc deflection.
Spring measure
19-3. REAR DRUM BRAKE
REMOVAL
Brake Drums
1) Remove wheel center cap.
2) Loosen, but do not remove, rear wheel nuts
and brake drum nuts.
3) Hoist car.
4) Remove rear wheel nuts and take off rear
wheel.
5) Check to ensure that parking brake lever is
not pulled up.
6) To increase clearance between brake shoe
and brake drum, remove parking brake shoe
lever return spring @and disconnect parking
brake cable joint 0 from parking
lever 0.
brake shoe
1. Parking brake shoe leverreturn spring2. Parking brake shoe lever
3. Parking brake cable joint
4.Pin
5.Clip6. Brake back plate
Fig.19-40
7) Remove parking brake shoe lever stopper plate.
Fig. 19-39
Fig. 19-41
19-20
Page 406 of 962

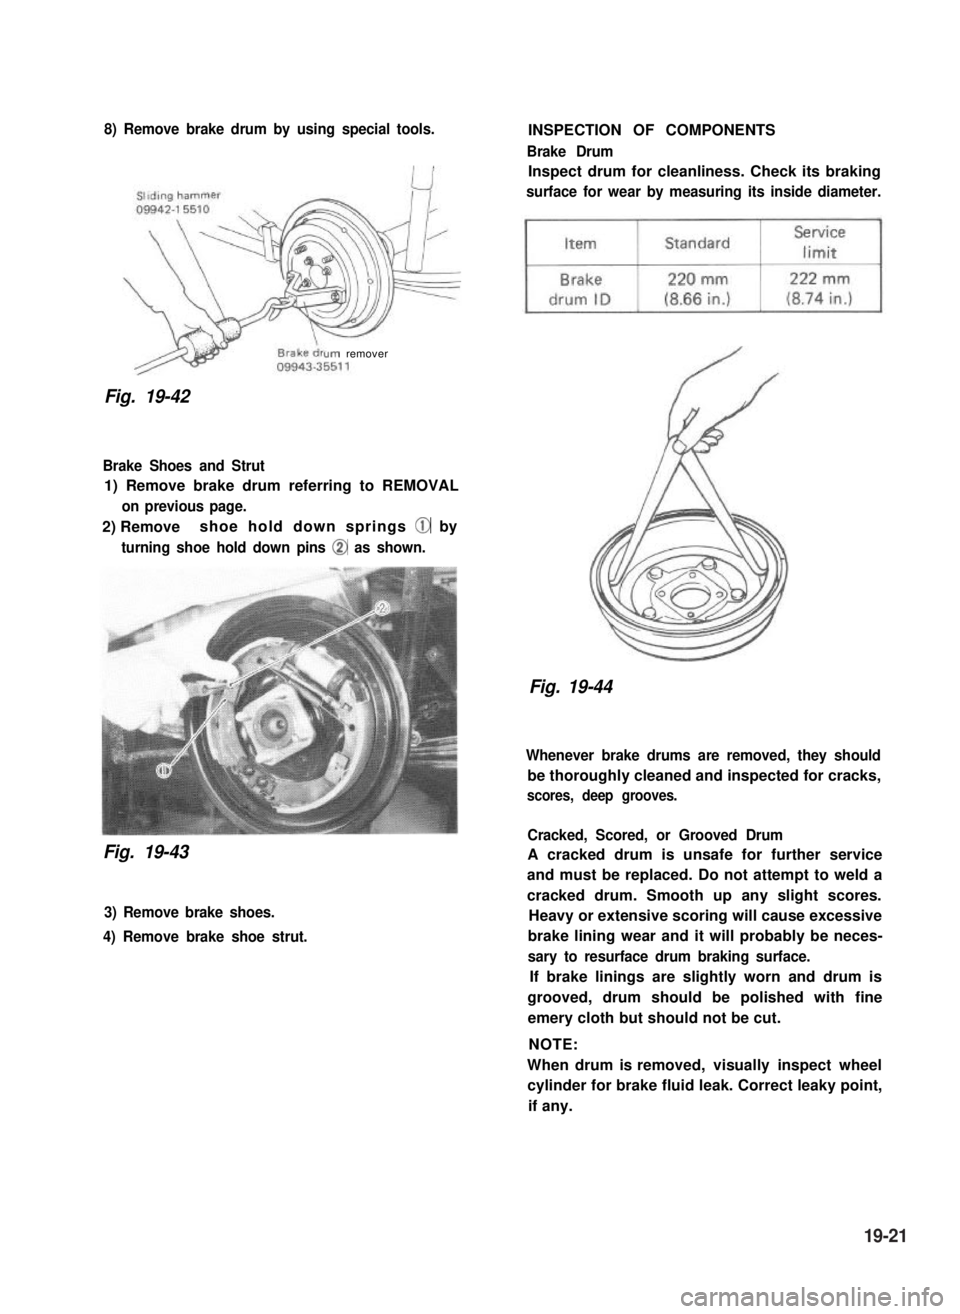
8) Remove brake drum by using special tools.
urn remover
Fig. 19-42
Brake Shoes and Strut
1) Remove brake drum referring to REMOVAL
on previous page.
2) Removeshoe hold down springs @ by
turning shoe hold down pins @ as shown.
Fig. 19-43
3) Remove brake shoes.
4) Remove brake shoe strut.
INSPECTION OF COMPONENTS
Brake Drum
Inspect drum for cleanliness. Check its braking
surface for wear by measuring its inside diameter.
Fig. 19-44
Whenever brake drums are removed, they should
be thoroughly cleaned and inspected for cracks,
scores, deep grooves.
Cracked, Scored, or Grooved Drum
A cracked drum is unsafe for further service
and must be replaced. Do not attempt to weld a
cracked drum. Smooth up any slight scores.
Heavy or extensive scoring will cause excessive
brake lining wear and it will probably be neces-
sary to resurface drum braking surface.
If brake linings are slightly worn and drum is
grooved, drum should be polished with fine
emery cloth but should not be cut.
NOTE:
When drum is removed, visually inspect wheel
cylinder for brake fluid leak. Correct leaky point,
if any.
19-21
Page 407 of 962
Brake Shoe and Rim
If lining is worn out beyond service limit,
replace shoe.
Brake
liningStandardService
limit
Thickness
(lining +
shoe rim)
7.0 mm3.0 mm
(0.28 in.)(0.12 in.)
Wheel Cylinder
When removing brake drum, check wheel
cylinder for oil leakage. If any leakage is found,
replace wheel cylinder inner parts.
Inspect wheel cylinder disassembled parts for
wear, cracks, corrosion or damage.
NOTE:
Clean wheel cylinder components with brake
fluid.
Fig. 19-46
Fig. 19-45
If one of brake linings is worn to or beyond
service limit, all linings must be replaced at the
same time.
NOTE:
Never polish lining with sandpaper. If lining is
polished with sandpaper, hard particles of sand-
paper will be deposited in lining and may
damage drum. When it is required to correct
lining, replace it with a new one.
Brake Strut
Inspect ratchet of strut for wear or damage.
Fig. 19-47
19-22
Page 409 of 962
6) Remove brake drum and check fan-shaped
ratchet position.
If it has shifted off its previous position in step
2) when it was pushed down, it proves proper
operation of shoe adjusting system.
PRECAUTIONS ON INSTALLATION
Wheel Cylinder
1) Tighten wheel cylinder to brake back plate to
specified torque.
2)Tighten flare nut of brake pipe to specified
torque.
3) Install breather plug cap.
8-12N.m14-18N.m-(0.8 - 1.2 kg-m)(I .41.8 kg-m)4,(6.0 - 8.5 lb-ft)(10.5-13.0 lb-ft)
1. Brake back plate3. Brake pipe
2. Brake pipe flare nut4. Wheel cylinder bolts
Fig. 19-50
Brake Shoes
1) Assemble parts as shown in the reverse order
of removal.
If not, replace strut assembly.
Fig. 19-49-4
NOTE:
For brake drum installation, refer to steps 1)
through 8) of brake drum installation in this
section (p. 19-25).
Fig. 19-50-1
NOTE:
When installing shoes, use care not to cause
damage to wheel cylinder boots.
19-24
Page 411 of 962
4) Before installing brake drum, to maximize
brake shoe-todrum clearance, put screw
driver between rod and ratchet and push
down ratchet as shown in figure.
\
2. Ratchet
3. Driver
Below figure shows ratchet positionwhere brake shoe-to-drum clearanceis maximum.
Fig. 19-54
5) Install brake drum after making sure that
inside of brake drum and brake shoes are free
from dirt and oil.
6) Torque wheel nuts and brake drum nuts to
specification.
NOTE:
If brake backing plate was removed from wheel
cylinder or brake pipe was disconnected from
wheel cylinder. Bleed air from brake system.
(For bleeding operation, refer to p. 19-46.)
7) Upon completion of all jobs, depress brake
pedal with about 30 kg (66 Ibs) load four or
five times so as to obtain proper drum-to-
shoe clearance.
8) Check to ensure that brake drum is free from
dragging and proper braking is obtained. Then
remove car from hoist and perform brake test
(foot brake and parking brake).
Fig. 19-55
19-26