1985 FORD GRANADA check engine
[x] Cancel search: check enginePage 81 of 255
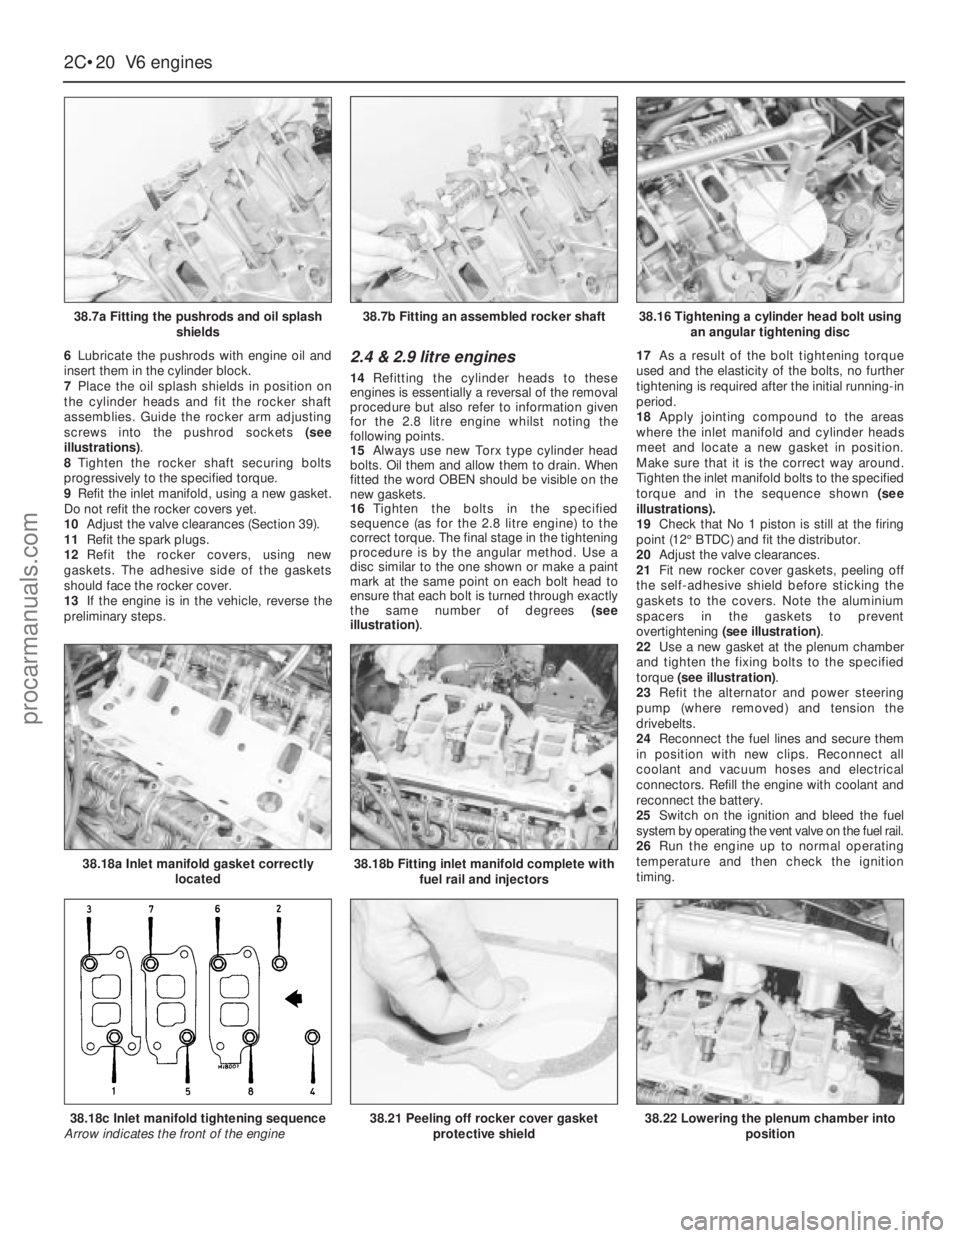
6Lubricate the pushrods with engine oil and
insert them in the cylinder block.
7Place the oil splash shields in position on
the cylinder heads and fit the rocker shaft
assemblies. Guide the rocker arm adjusting
screws into the pushrod sockets (see
illustrations).
8Tighten the rocker shaft securing bolts
progressively to the specified torque.
9Refit the inlet manifold, using a new gasket.
Do not refit the rocker covers yet.
10Adjust the valve clearances (Section 39).
11Refit the spark plugs.
12Refit the rocker covers, using new
gaskets. The adhesive side of the gaskets
should face the rocker cover.
13If the engine is in the vehicle, reverse the
preliminary steps.2.4 & 2.9 litre engines
14Refitting the cylinder heads to these
engines is essentially a reversal of the removal
procedure but also refer to information given
for the 2.8 litre engine whilstnoting the
following points.
15Always use new Torx type cylinder head
bolts. Oil them and allow them to drain. When
fitted the word OBEN should be visible on the
new gaskets.
16Tighten the bolts in the specified
sequence (as for the 2.8 litre engine) to the
correct torque. The final stage in the tightening
procedure is by the angular method. Use a
disc similar to the one shown or make a paint
mark at the same point on each bolt head to
ensure that each bolt is turned through exactly
the same number of degrees (see
illustration).17As a result of the bolt tightening torque
used and the elasticity of the bolts, no further
tightening is required after the initial running-in
period.
18Apply jointing compound to the areas
where the inlet manifold and cylinder heads
meet and locate a new gasket in position.
Make sure that it is the correct way around.
Tighten the inlet manifold bolts to the specified
torque and in the sequence shown (see
illustrations).
19Check that No 1 piston is still at the firing
point (12°BTDC) and fit the distributor.
20Adjust the valve clearances.
21Fit new rocker cover gaskets, peeling off
the self-adhesive shield before sticking the
gaskets to the covers. Note the aluminium
spacers in the gaskets to prevent
overtightening (see illustration).
22Use a new gasket at the plenum chamber
and tighten the fixing bolts to the specified
torque (see illustration).
23Refit the alternator and power steering
pump (where removed) and tension the
drivebelts.
24Reconnect the fuel lines and secure them
in position with new clips. Reconnect all
coolant and vacuum hoses and electrical
connectors. Refill the engine with coolant and
reconnect the battery.
25Switch on the ignition and bleed the fuel
system by operating the vent valve on the fuel rail.
26Run the engine up to normal operating
temperature and then check the ignition
timing.
2C•20V6 engines
38.7a Fitting the pushrods and oil splash
shields
38.18a Inlet manifold gasket correctly
located38.18b Fitting inlet manifold complete with
fuel rail and injectors
38.22 Lowering the plenum chamber into
position38.18c Inlet manifold tightening sequence
Arrow indicates the front of the engine38.21 Peeling off rocker cover gasket
protective shield
38.7b Fitting an assembled rocker shaft38.16 Tightening a cylinder head bolt using
an angular tightening disc
procarmanuals.com
Page 82 of 255
27The inlet manifold bolts should be
retightened to the specified torque in the correct
sequence. This will mean disconnecting the air
hoses from the throttle valve housing, the
vacuum hose from the left-hand rocker cover,
and the wiring connector from the idle speed
control valve and throttle valve potentiometer.
Remove the plenum chamber, place it to one
side, then release the fuel rail bolts but do not
disconnect the fuel pipes. It may also be
necessary to remove the distributor again to
gain access to one of the bolts.
See Chapter 1, Section 23.
1Refer to Section 7 and refit the items listed.
2If the oil cooler and its threaded bush were
removed, refit them as follows (see
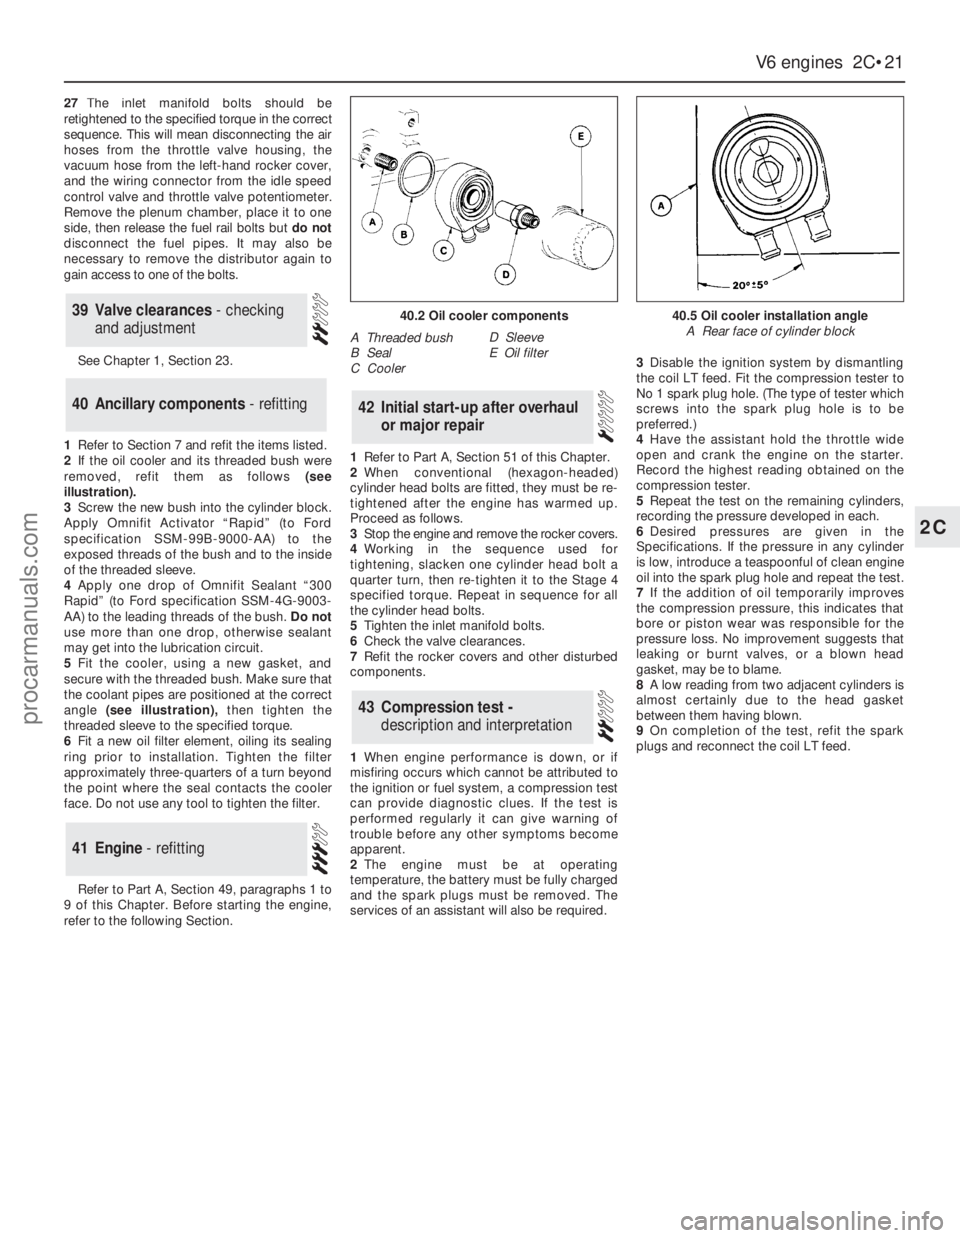
illustration).
3Screw the new bush into the cylinder block.
Apply Omnifit Activator “Rapid” (to Ford
specification SSM-99B-9000-AA) to the
exposed threads of the bush and to the inside
of the threaded sleeve.
4Apply one drop of Omnifit Sealant “300
Rapid” (to Ford specification SSM-4G-9003-
AA) to the leading threads of the bush.Do not
use more than one drop, otherwise sealant
may get into the lubrication circuit.
5Fit the cooler, using a new gasket, and
secure with the threaded bush. Make sure that
the coolant pipes are positioned at the correct
angle (see illustration),then tighten the
threaded sleeve to the specified torque.
6Fit a new oil filter element, oiling its sealing
ring prior to installation. Tighten the filter
approximately three-quarters of a turn beyond
the point where the seal contacts the cooler
face. Do not use any tool to tighten the filter.
Refer to Part A, Section 49, paragraphs 1 to
9 of this Chapter. Before starting the engine,
refer to the following Section.1Refer to Part A, Section 51 of this Chapter.
2When conventional (hexagon-headed)
cylinder head bolts are fitted, they must be re-
tightened after the engine has warmed up.
Proceed as follows.
3Stop the engine and remove the rocker covers.
4Working in the sequence used for
tightening, slacken one cylinder head bolt a
quarter turn, then re-tighten it to the Stage 4
specified torque. Repeat in sequence for all
the cylinder head bolts.
5Tighten the inlet manifold bolts.
6Check the valve clearances.
7Refit the rocker covers and other disturbed
components.
1When engine performance is down, or if
misfiring occurs which cannot be attributed to
the ignition or fuel system, a compression test
can provide diagnostic clues. If the test is
performed regularly it can give warning of
trouble before any other symptoms become
apparent.
2The engine must be at operating
temperature, the battery must be fully charged
and the spark plugs must be removed. The
services of an assistant will also be required.3Disable the ignition system by dismantling
the coil LT feed. Fit the compression tester to
No 1 spark plug hole. (The type of tester which
screws into the spark plug hole is to be
preferred.)
4Have the assistant hold the throttle wide
open and crank the engine on the starter.
Record the highest reading obtained on the
compression tester.
5Repeat the test on the remaining cylinders,
recording the pressure developed in each.
6Desired pressures are given in the
Specifications. If the pressure in any cylinder
is low, introduce a teaspoonful of clean engine
oil into the spark plug hole and repeat the test.
7If the addition of oil temporarily improves
the compression pressure, this indicates that
bore or piston wear was responsible for the
pressure loss. No improvement suggests that
leaking or burnt valves, or a blown head
gasket, may be to blame.
8A low reading from two adjacent cylinders is
almost certainly due to the head gasket
between them having blown.
9On completion of the test, refit the spark
plugs and reconnect the coil LT feed.
43Compression test -
description and interpretation
42Initial start-up after overhaul
or major repair
41Engine - refitting
40Ancillary components - refitting
39Valve clearances - checking
and adjustment
V6 engines 2C•21
2C
40.2 Oil cooler components
A Threaded bush
B Seal
C CoolerD Sleeve
E Oil filter
40.5 Oil cooler installation angle
A Rear face of cylinder block
procarmanuals.com
Page 86 of 255
See Chapter 1, Section 46.
See Chapter 1, Section 46.
See Chapter 1, Section 46.
1Drain the radiator. There is no need to drain
the cylinder block. On DOHC engines the
electric cooling fan assembly must be removed
to gain the clearance to remove the radiator.
2Disconnect the top and bottom hoses from
the radiator by slackening the hose clips and
pulling off the hoses with a twisting motion
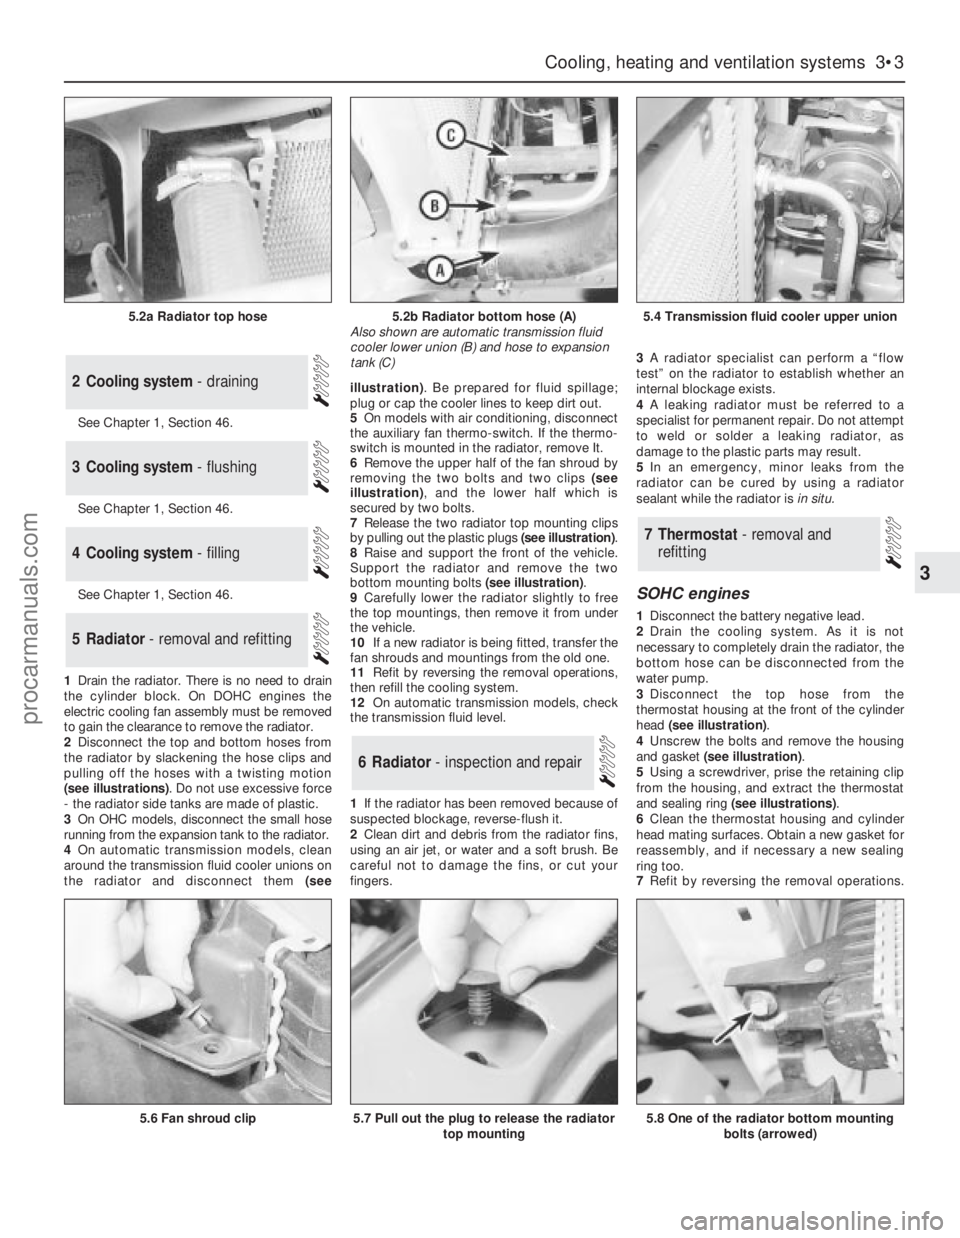
(see illustrations). Do not use excessive force
- the radiator side tanks are made of plastic.
3On OHCmodels, disconnect the small hose
running from the expansion tank to the radiator.
4On automatic transmission models, clean
around the transmission fluid cooler unions on
the radiator and disconnect them (seeillustration). Be prepared for fluid spillage;
plug or cap the cooler lines to keep dirt out.
5On models with air conditioning, disconnect
the auxiliary fan thermo-switch. If the thermo-
switch is mounted in the radiator, remove It.
6Remove the upper half of the fan shroud by
removing the two bolts and two clips (see
illustration), and the lower half which is
secured by two bolts.
7Release the two radiator top mounting clips
by pulling out the plastic plugs (see illustration).
8Raise and support the front of the vehicle.
Support the radiator and remove the two
bottom mounting bolts (see illustration).
9Carefully lower the radiator slightly to free
the top mountings, then remove it from under
the vehicle.
10If a new radiator is being fitted, transfer the
fan shrouds and mountings from the old one.
11Refit by reversing the removal operations,
then refill the cooling system.
12On automatic transmission models, check
the transmission fluid level.
1If the radiator has been removed because of
suspected blockage, reverse-flush it.
2Clean dirt and debris from the radiator fins,
using an air jet, or water and a soft brush. Be
careful not to damage the fins, or cut your
fingers. 3A radiator specialist can perform a “flow
test” on the radiator to establish whether an
internal blockage exists.
4A leaking radiator must be referred to a
specialist for permanent repair. Do not attempt
to weld or solder a leaking radiator, as
damage to the plastic parts may result.
5In an emergency, minor leaks from the
radiator can be cured by using a radiator
sealant while the radiator is in situ.
SOHC engines
1Disconnect the battery negative lead.
2Drain the cooling system. As it is not
necessary to completely drain the radiator, the
bottom hose can be disconnected from the
water pump.
3Disconnect the top hose from the
thermostat housing at the front of the cylinder
head (see illustration).
4Unscrew the bolts and remove the housing
and gasket (see illustration).
5Using a screwdriver, prise the retaining clip
from the housing, and extract the thermostat
and sealing ring (see illustrations).
6Clean the thermostat housing and cylinder
head mating surfaces. Obtain a new gasket for
reassembly, and if necessary a new sealing
ring too.
7Refit by reversing the removal operations.
7Thermostat - removal and
refitting
6Radiator - inspection and repair
5Radiator - removal and refitting
4Cooling system - filling
3Cooling system - flushing
2Cooling system - draining
Cooling, heating and ventilation systems 3•3
3
5.2a Radiator top hose5.2b Radiator bottom hose (A)
Also shown are automatic transmission fluid
cooler lower union (B) and hose to expansion
tank (C)5.4 Transmission fluid cooler upper union
5.6 Fan shroud clip5.7 Pull out the plug to release the radiator
top mounting5.8 One of the radiator bottom mounting
bolts (arrowed)
procarmanuals.com
Page 88 of 255
V6 engines
17The thermostat is removed in the course
of water pump removal.
1A rough test of the thermostat may be made
by suspending it with a piece of string in a
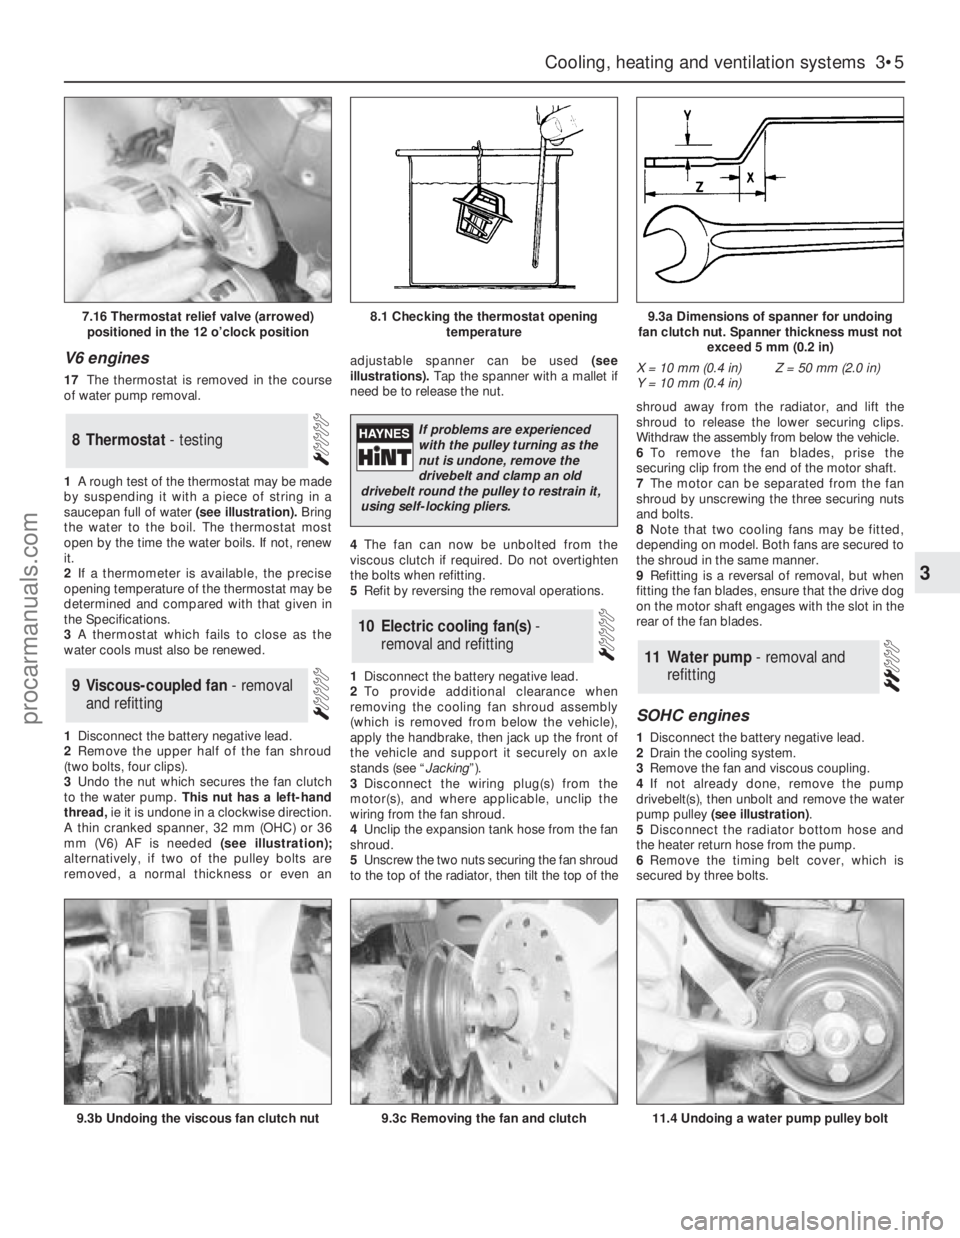
saucepan full of water(see illustration).Bring
the water to the boil. The thermostat most
open by the time the water boils. If not, renew
it.
2If a thermometer is available, the precise
opening temperature of the thermostat may be
determined and compared with that given in
the Specifications.
3A thermostat which fails to close as the
water cools must also be renewed.
1Disconnect the battery negative lead.
2Remove the upper half of the fan shroud
(two bolts, four clips).
3Undo the nut which secures the fan clutch
to the water pump.This nut has a left-hand
thread, ie it is undone in a clockwise direction.
A thin cranked spanner, 32 mm (OHC) or 36
mm (V6) AF is needed(see illustration);
alternatively, if two of the pulley bolts are
removed, a normal thickness or even anadjustable spanner can be used (see
illustrations). Tap the spanner with a mallet if
need be to release the nut.
4The fan can now be unbolted from the
viscous clutch if required. Do not overtighten
the bolts when refitting.
5Refit by reversing the removal operations.
1Disconnect the battery negative lead.
2To provide additional clearance when
removing the cooling fan shroud assembly
(which is removed from below the vehicle),
apply the handbrake, then jack up the front of
the vehicle and support it securely on axle
stands (see “Jacking”).
3Disconnect the wiring plug(s) from the
motor(s), and where applicable, unclip the
wiring from the fan shroud.
4Unclip the expansion tank hose from the fan
shroud.
5Unscrew the two nuts securing the fan shroud
to the top of the radiator, then tilt the top of theshroud away from the radiator, and lift the
shroud to release the lower securing clips.
Withdraw the assembly from below the vehicle.
6To remove the fan blades, prise the
securing clip from the end of the motor shaft.
7The motor can be separated from the fan
shroud by unscrewing the three securing nuts
and bolts.
8Note that two cooling fans may be fitted,
depending on model. Both fans are secured to
the shroud in the same manner.
9Refitting is a reversal of removal, but when
fitting the fan blades, ensure that the drive dog
on the motor shaft engages with the slot in the
rear of the fan blades.
SOHC engines
1Disconnect the battery negative lead.
2Drain the cooling system.
3Remove the fan and viscous coupling.
4If not already done, remove the pump
drivebelt(s), then unbolt and remove the water
pump pulley (see illustration).
5Disconnect the radiator bottom hose and
the heater return hose from the pump.
6Remove the timing belt cover, which is
secured by three bolts.
11Water pump - removal and
refitting
10Electric cooling fan(s) -
removal and refitting
9Viscous-coupled fan - removal
and refitting
8Thermostat - testing
Cooling, heating and ventilation systems 3•5
3
7.16 Thermostat relief valve (arrowed)
positioned in the 12 o’clock position8.1 Checking the thermostat opening
temperature9.3a Dimensions of spanner for undoing
fan clutch nut. Spanner thickness must not
exceed 5 mm (0.2 in)
9.3b Undoing the viscous fan clutch nut9.3c Removing the fan and clutch11.4 Undoing a water pump pulley bolt
X = 10 mm (0.4 in)
Y = 10 mm (0.4 in)Z = 50 mm (2.0 in)
If problems are experienced
with the pulley turning as the
nut is undone, remove the
drivebelt and clamp an old
drivebelt round the pulley to restrain it,
using self-locking pliers.
procarmanuals.com
Page 90 of 255
See Chapter 1, Section 21.
1On 2.0 litre DOHC engines only, remove the
water pump/alternator drivebelt as described
in the previous Section.
2Loosen the alternator lower mounting
through-bolt, then remove the alternator upper
mounting bolt, and swing the alternator away
from the engine.
3Unscrew the central securing bolt, and
withdraw the drivebelt tensioner assembly.
4Commence refitting by positioning the
tensioner on the cylinder block, ensuring that
the lug on the rear of the tensioner bracket
engages with the corresponding hole in the
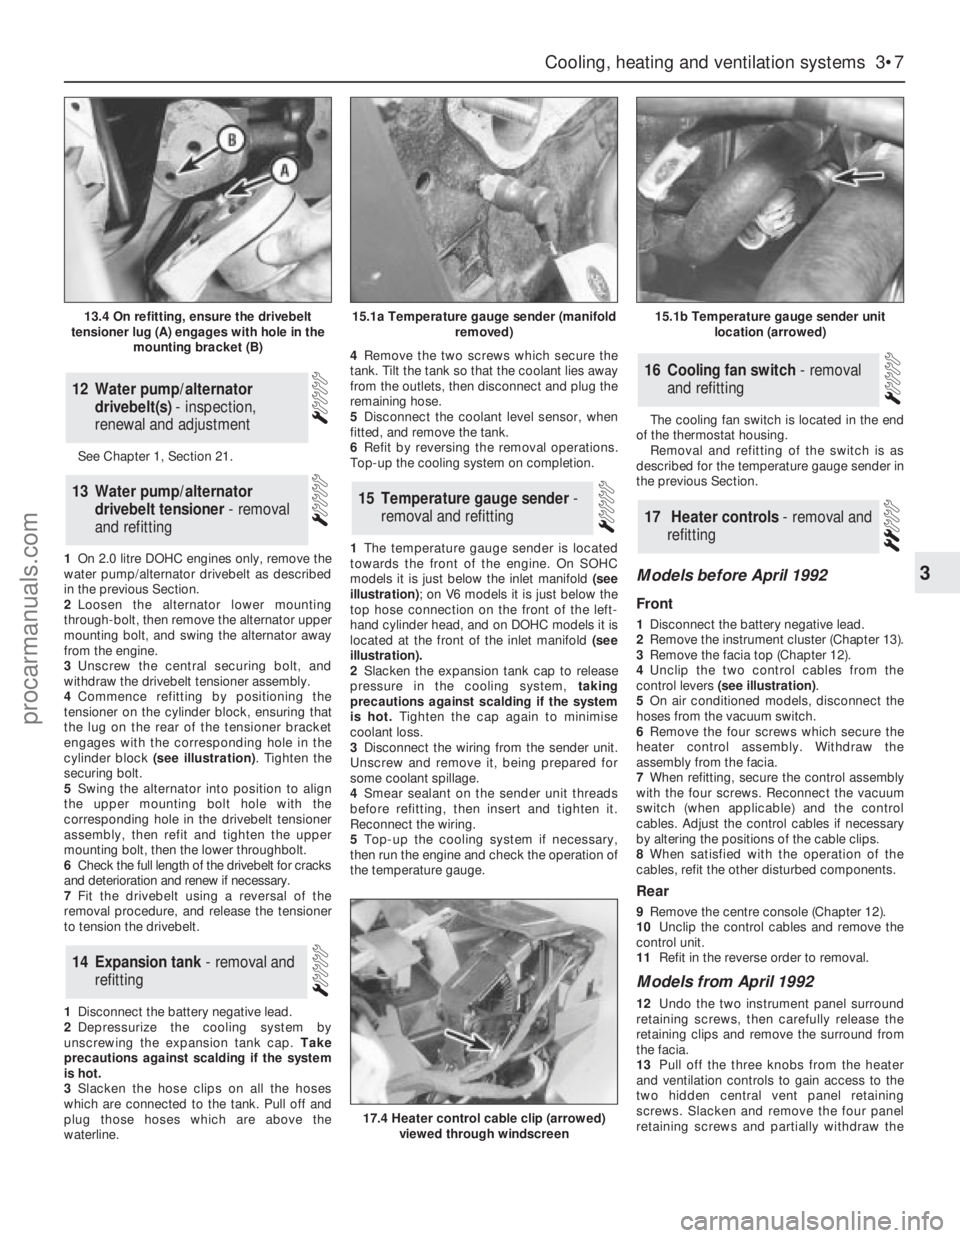
cylinder block (see illustration). Tighten the
securing bolt.
5Swing the alternator into position to align
the upper mounting bolt hole with the
corresponding hole in the drivebelt tensioner
assembly, then refit and tighten the upper
mounting bolt, then the lower throughbolt.
6Check the full length of the drivebelt for cracks
and deterioration and renew if necessary.
7Fit the drivebelt using a reversal of the
removal procedure, and release the tensioner
to tension the drivebelt.
1Disconnect the battery negative lead.
2Depressurize the cooling system by
unscrewing the expansion tank cap. Take
precautions against scalding if the system
is hot.
3Slacken the hose clips on all the hoses
which are connected to the tank. Pull off and
plug those hoses which are above the
waterline.4Remove the two screws which secure the
tank. Tilt the tank so that the coolant lies away
from the outlets, then disconnect and plug the
remaining hose.
5Disconnect the coolant level sensor, when
fitted, and remove the tank.
6Refit by reversing the removal operations.
Top-up the cooling system on completion.
1The temperature gauge sender is located
towards the front of the engine. On SOHC
models it is just below the inlet manifold (see
illustration); on V6 models it is just below the
top hose connection on the front of the left-
hand cylinder head, and on DOHC models it is
located at the front of the inlet manifold (see
illustration).
2Slacken the expansion tank cap to release
pressure in the cooling system, taking
precautions against scalding if the system
is hot.Tighten the cap again to minimise
coolant loss.
3Disconnect the wiring from the sender unit.
Unscrew and remove it, being prepared for
some coolant spillage.
4Smear sealant on the sender unit threads
before refitting, then insert and tighten it.
Reconnect the wiring.
5Top-up the cooling system if necessary,
then run the engine and check the operation of
the temperature gauge.The cooling fan switch is located in the end
of the thermostat housing.
Removal and refitting of the switch is as
described for the temperature gauge sender in
the previous Section.
Models before April 1992
Front
1Disconnect the battery negative lead.
2Remove the instrument cluster (Chapter 13).
3Remove the facia top (Chapter 12).
4Unclip the two control cables from the
control levers (see illustration).
5On air conditioned models, disconnect the
hoses from the vacuum switch.
6Remove the four screws which secure the
heater control assembly. Withdraw the
assembly from the facia.
7When refitting, secure the control assembly
with the four screws. Reconnect the vacuum
switch (when applicable) and the control
cables. Adjust the control cables if necessary
by altering the positions of the cable clips.
8When satisfied with the operation of the
cables, refit the other disturbed components.
Rear
9Remove the centre console (Chapter 12).
10Unclip the control cables and remove the
control unit.
11Refit in the reverse order to removal.
Models from April 1992
12Undo the two instrument panel surround
retaining screws, then carefully release the
retaining clips and remove the surround from
the facia.
13Pull off the three knobs from the heater
and ventilation controls to gain access to the
two hidden central vent panel retaining
screws. Slacken and remove the four panel
retaining screws and partially withdraw the
17Heater controls - removal and
refitting
16Cooling fan switch - removal
and refitting
15Temperature gauge sender -
removal and refitting
14Expansion tank - removal and
refitting
13Water pump/alternator
drivebelt tensioner - removal
and refitting
12Water pump/alternator
drivebelt(s) - inspection,
renewal and adjustment
Cooling, heating and ventilation systems 3•7
3
13.4 On refitting, ensure the drivebelt
tensioner lug (A) engages with hole in the
mounting bracket (B)15.1a Temperature gauge sender (manifold
removed)15.1b Temperature gauge sender unit
location (arrowed)
17.4 Heater control cable clip (arrowed)
viewed through windscreen
procarmanuals.com
Page 91 of 255
panel. Disconnect the wiring connectors from
the heated window switches and fuel
computer (where fitted) and remove the panel
from the car.
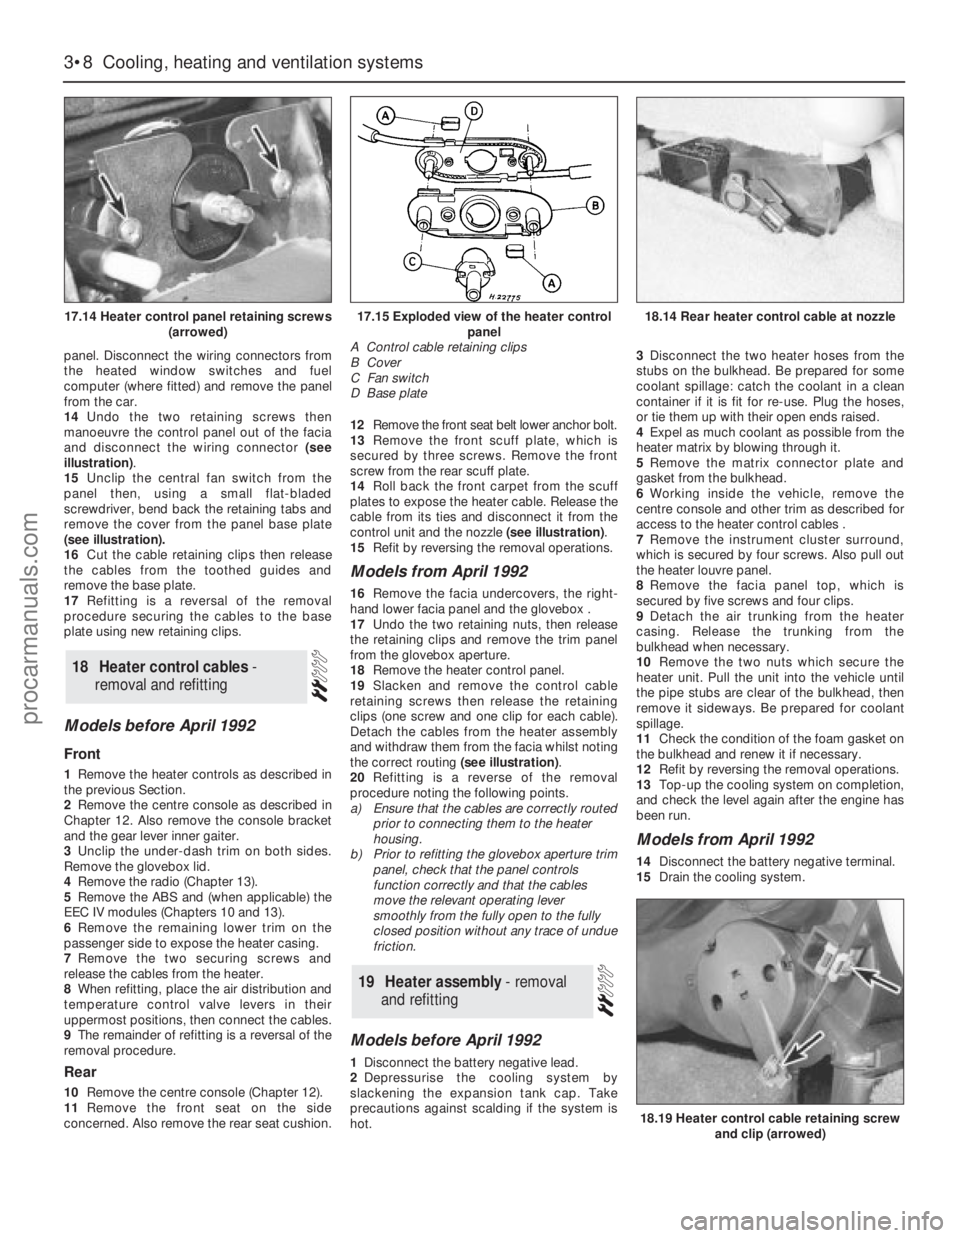
14Undo the two retaining screws then
manoeuvre the control panel out of the facia
and disconnect the wiring connector (see
illustration).
15Unclip the central fan switch from the
panel then, using a small flat-bladed
screwdriver, bend back the retaining tabs and
remove the cover from the panel base plate
(see illustration).
16Cut the cable retaining clips then release
the cables from the toothed guides and
remove the base plate.
17Refitting is a reversal of the removal
procedure securing the cables to the base
plate using new retaining clips.
Models before April 1992
Front
1Remove the heater controls as described in
the previous Section.
2Remove the centre console as described in
Chapter 12. Also remove the console bracket
and the gear lever inner gaiter.
3Unclip the under-dash trim on both sides.
Remove the glovebox lid.
4Remove the radio (Chapter 13).
5Remove the ABS and (when applicable) the
EEC IV modules (Chapters 10 and 13).
6Remove the remaining lower trim on the
passenger side to expose the heater casing.
7Remove the two securing screws and
release the cables from the heater.
8When refitting, place the air distribution and
temperature control valve levers in their
uppermost positions, then connect the cables.
9The remainder of refitting is a reversal of the
removal procedure.
Rear
10Remove the centre console (Chapter 12).
11Remove the front seat on the side
concerned. Also remove the rear seat cushion. 12Remove the front seat belt lower anchor bolt.
13Remove the front scuff plate, which is
secured by three screws. Remove the front
screw from the rear scuff plate.
14Roll back the front carpet from the scuff
plates to expose the heater cable. Release the
cable from its ties and disconnect it from the
control unit and the nozzle (see illustration).
15Refit by reversing the removal operations.
Models from April 1992
16Remove the facia undercovers, the right-
hand lower facia panel and the glovebox .
17Undo the two retaining nuts, then release
the retaining clips and remove the trim panel
from the glovebox aperture.
18Remove the heater control panel.
19Slacken and remove the control cable
retaining screws then release the retaining
clips (one screw and one clip for each cable).
Detach the cables from the heater assembly
and withdraw them from the facia whilst noting
the correct routing (see illustration).
20Refitting is a reverse of the removal
procedure noting the following points.
a)Ensure that the cables are correctly routed
prior to connecting them to the heater
housing.
b)Prior to refitting the glovebox aperture trim
panel, check that the panel controls
function correctly and that the cables
move the relevant operating lever
smoothly from the fully open to the fully
closed position without any trace of undue
friction.
Models before April 1992
1Disconnect the battery negative lead.
2Depressurise the cooling system by
slackening the expansion tank cap. Take
precautions against scalding if the system is
hot.3Disconnect the two heater hoses from the
stubs on the bulkhead. Be prepared for some
coolant spillage: catch the coolant in a clean
container if it is fit for re-use. Plug the hoses,
or tie them up with their open ends raised.
4Expel as much coolant as possible from the
heater matrix by blowing through it.
5Remove the matrix connector plate and
gasket from the bulkhead.
6Working inside the vehicle, remove the
centre console and other trim as described for
access to the heater control cables .
7Remove the instrument cluster surround,
which is secured by four screws. Also pull out
the heater louvre panel.
8Remove the facia panel top, which is
secured by five screws and four clips.
9Detach the air trunking from the heater
casing. Release the trunking from the
bulkhead when necessary.
10Remove the two nuts which secure the
heater unit. Pull the unit into the vehicle until
the pipe stubs are clear of the bulkhead, then
remove it sideways. Be prepared for coolant
spillage.
11Check the condition of the foam gasket on
the bulkhead and renew it if necessary.
12Refit by reversing the removal operations.
13Top-up the cooling system on completion,
and check the level again after the engine has
been run.
Models from April 1992
14Disconnect the battery negative terminal.
15Drain the cooling system.
19Heater assembly - removal
and refitting
18Heater control cables -
removal and refitting
3•8Cooling, heating and ventilation systems
17.14 Heater control panel retaining screws
(arrowed)
18.19 Heater control cable retaining screw
and clip (arrowed)
17.15 Exploded view of the heater control
panel
A Control cable retaining clips
B Cover
C Fan switch
D Base plate18.14 Rear heater control cable at nozzle
procarmanuals.com
Page 92 of 255
16Locate the heater matrix feed and return
hoses on the engine compartment bulkhead.
Slacken the retaining clips and disconnect
both hoses from the matrix unions. Be
prepared for some coolant spillage. Plug the
matrix unions to prevent residual coolant
being spilt as the assembly is removed.
17Slacken and remove the two retaining
screws then remove the matrix cover plate
and gasket from the bulkhead; discard the
gasket as a new one should be used on
refitting.
18Remove the facia panel.
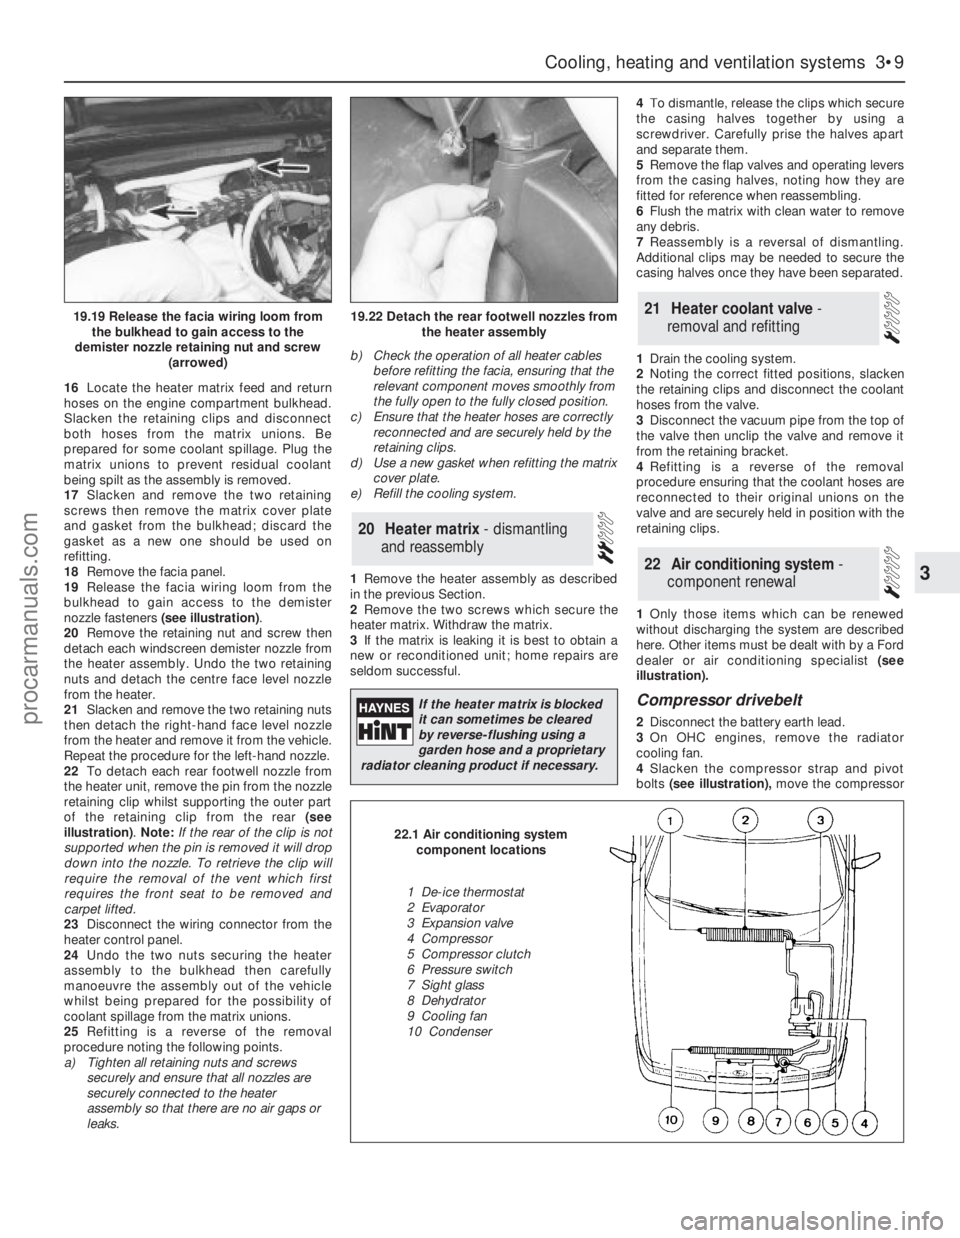
19Release the facia wiring loom from the
bulkhead to gain access to the demister
nozzle fasteners (see illustration).
20Remove the retaining nut and screw then
detach each windscreen demister nozzle from
the heater assembly. Undo the two retaining
nuts and detach the centre face level nozzle
from the heater.
21Slacken and remove the two retaining nuts
then detach the right-hand face level nozzle
from the heater and remove it from the vehicle.
Repeat the procedure for the left-hand nozzle.
22To detach each rear footwell nozzle from
the heater unit, remove the pin from the nozzle
retaining clip whilst supporting the outer part
of the retaining clip from the rear (see
illustration). Note: If the rear of the clip is not
supported when the pin is removed it will drop
down into the nozzle. To retrieve the clip will
require the removal of the vent which first
requires the front seat to be removed and
carpet lifted.
23Disconnect the wiring connector from the
heater control panel.
24Undo the two nuts securing the heater
assembly to the bulkhead then carefully
manoeuvre the assembly out of the vehicle
whilst being prepared for the possibility of
coolant spillage from the matrix unions.
25Refitting is a reverse of the removal
procedure noting the following points.
a)Tighten all retaining nuts and screws
securely and ensure that all nozzles are
securely connected to the heater
assembly so that there are no air gaps or
leaks.b)Check the operation of all heater cables
before refitting the facia, ensuring that the
relevant component moves smoothly from
the fully open to the fully closed position.
c)Ensure that the heater hoses are correctly
reconnected and are securely held by the
retaining clips.
d)Use a new gasket when refitting the matrix
cover plate.
e)Refill the cooling system.
1Remove the heater assembly as described
in the previous Section.
2Remove the two screws which secure the
heater matrix. Withdraw the matrix.
3If the matrix is leaking it is best to obtain a
new or reconditioned unit; home repairs are
seldom successful.4To dismantle, release the clips which secure
the casing halves together by using a
screwdriver. Carefully prise the halves apart
and separate them.
5Remove the flap valves and operating levers
from the casing halves, noting how they are
fitted for reference when reassembling.
6Flush the matrix with clean water to remove
any debris.
7Reassembly is a reversal of dismantling.
Additional clips may be needed to secure the
casing halves once they have been separated.
1Drain the cooling system.
2Noting the correct fitted positions, slacken
the retaining clips and disconnect the coolant
hoses from the valve.
3Disconnect the vacuum pipe from the top of
the valve then unclip the valve and remove it
from the retaining bracket.
4Refitting is a reverse of the removal
procedure ensuring that the coolant hoses are
reconnected to their original unions on the
valve and are securely held in position with the
retaining clips.
1Only those items which can be renewed
without discharging the system are described
here. Other items must be dealt with by a Ford
dealer or air conditioning specialist (see
illustration).
Compressor drivebelt
2Disconnect the battery earth lead.
3On OHC engines, remove the radiator
cooling fan.
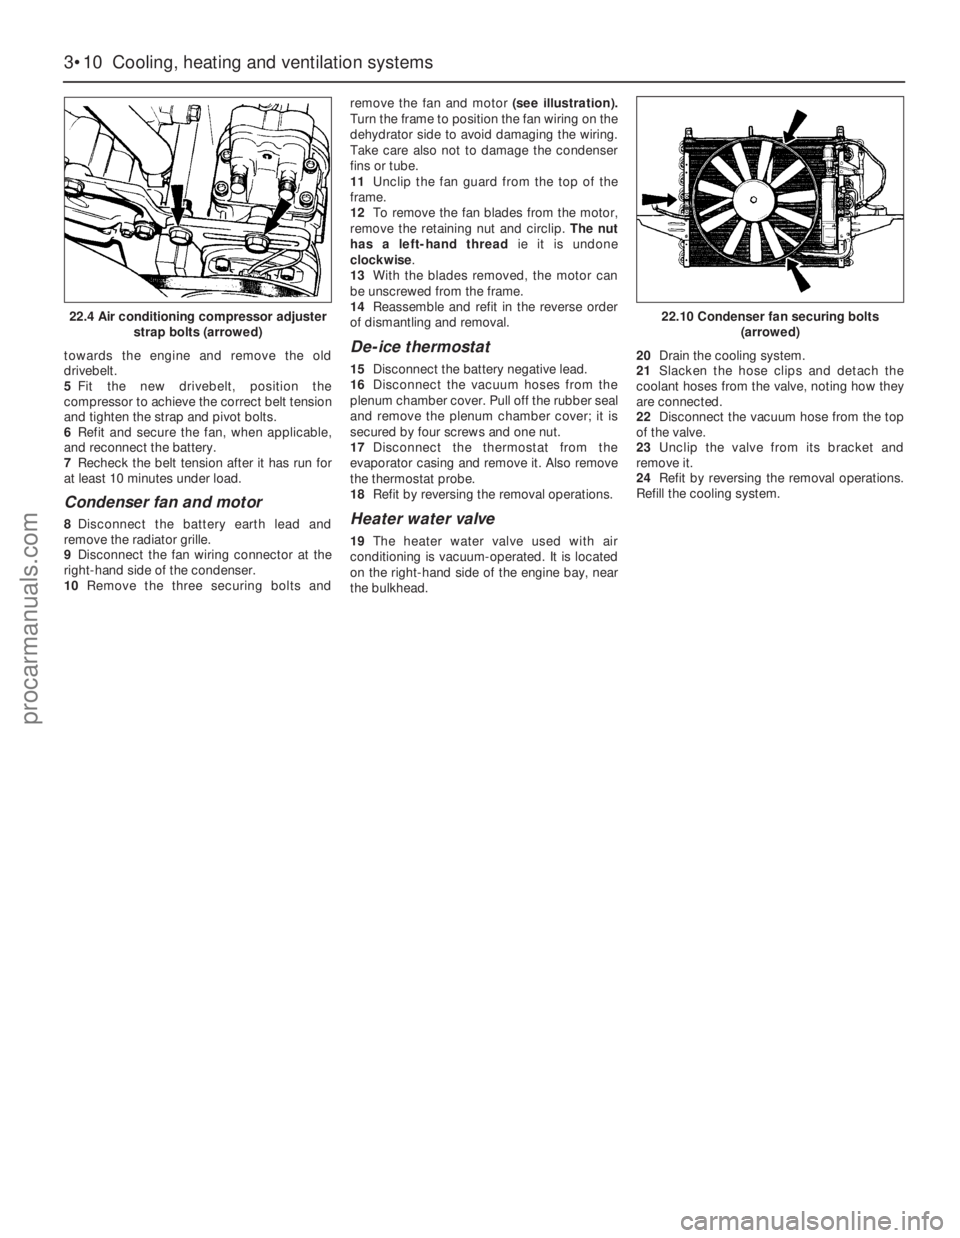
4Slacken the compressor strap and pivot
bolts (see illustration),move the compressor
22Air conditioning system -
component renewal
21Heater coolant valve -
removal and refitting
20Heater matrix - dismantling
and reassembly
Cooling, heating and ventilation systems 3•9
3
19.19 Release the facia wiring loom from
the bulkhead to gain access to the
demister nozzle retaining nut and screw
(arrowed)19.22 Detach the rear footwell nozzles from
the heater assembly
If the heater matrix is blocked
it can sometimes be cleared
by reverse-flushing using a
garden hose and a proprietary
radiator cleaning product if necessary.
22.1 Air conditioning system
component locations
1 De-ice thermostat
2 Evaporator
3 Expansion valve
4 Compressor
5 Compressor clutch
6 Pressure switch
7 Sight glass
8 Dehydrator
9 Cooling fan
10 Condenser
procarmanuals.com
Page 93 of 255
towards the engine and remove the old
drivebelt.
5Fit the new drivebelt, position the
compressor to achieve the correct belt tension
and tighten the strap and pivot bolts.
6Refit and secure the fan, when applicable,
and reconnect the battery.
7Recheck the belt tension after it has run for
at least 10 minutes under load.
Condenser fan and motor
8Disconnect the battery earth lead and
remove the radiator grille.
9Disconnect the fan wiring connector at the
right-hand side of the condenser.
10Remove the three securing bolts andremove the fan and motor(see illustration).
Turn the frame to position the fan wiring on the
dehydrator side to avoid damaging the wiring.
Take care also not to damage the condenser
fins or tube.
11Unclip the fan guard from the top of the
frame.
12To remove the fan blades from the motor,
remove the retaining nut and circlip. The nut
has a left-hand threadie it is undone
clockwise.
13With the blades removed, the motor can
be unscrewed from the frame.
14Reassemble and refit in the reverse order
of dismantling and removal.
De-ice thermostat
15Disconnect the battery negative lead.
16Disconnect the vacuum hoses from the
plenum chamber cover. Pull off the rubber seal
and remove the plenum chamber cover; it is
secured by four screws and one nut.
17Disconnect the thermostat from the
evaporator casing and remove it. Also remove
the thermostat probe.
18Refit by reversing the removal operations.
Heater water valve
19The heater water valve used with air
conditioning is vacuum-operated. It is located
on the right-hand side of the engine bay, near
the bulkhead. 20Drain the cooling system.
21Slacken the hose clips and detach the
coolant hoses from the valve, noting how they
are connected.
22Disconnect the vacuum hose from the top
of the valve.
23Unclip the valve from its bracket and
remove it.
24Refit by reversing the removal operations.
Refill the cooling system.
3•10Cooling, heating and ventilation systems
22.4 Air conditioning compressor adjuster
strap bolts (arrowed)22.10 Condenser fan securing bolts
(arrowed)
procarmanuals.com