1985 FORD GRANADA check engine
[x] Cancel search: check enginePage 40 of 255
1Refit the thermostat and housing.
2Refit the timing belt tensioner if it was
removed, but do not tighten the bolts yet.
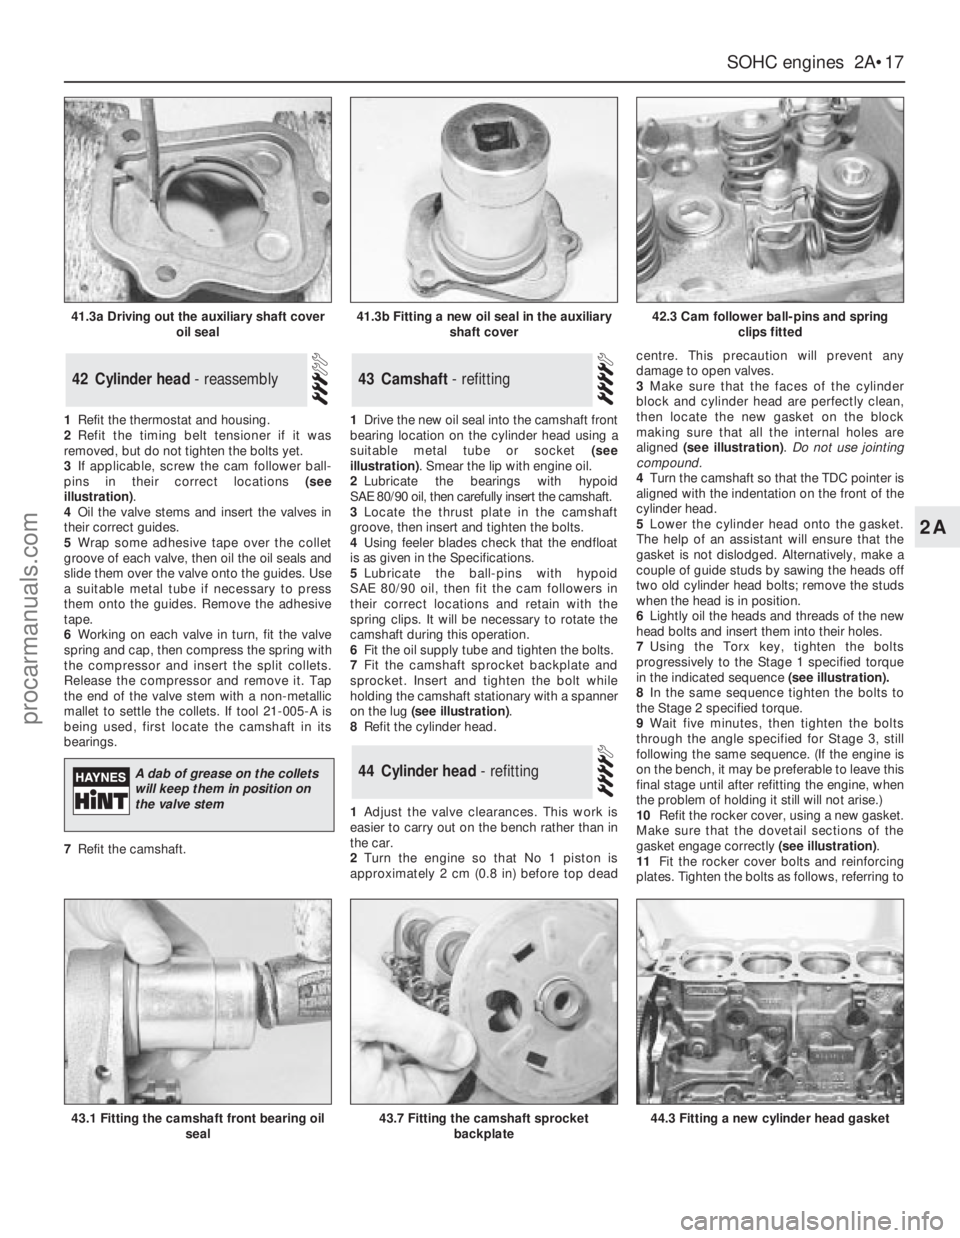
3If applicable, screw the cam follower ball-
pins in their correct locations (see
illustration).
4Oil the valve stems and insert the valves in
their correct guides.
5Wrap some adhesive tape over the collet
groove of each valve, then oil the oil seals and
slide them over the valve onto the guides. Use
a suitable metal tube if necessary to press
them onto the guides. Remove the adhesive
tape.
6Working on each valve in turn, fit the valve
spring and cap, then compress the spring with
the compressor and insert the split collets.
Release the compressor and remove it. Tap
the end of the valve stem with a non-metallic
mallet to settle the collets. If tool 21-005-A is
being used, first locate the camshaft in its
bearings.
7Refit the camshaft.1Drive the new oil seal into the camshaft front
bearing location on the cylinder head using a
suitable metal tube or socket (see
illustration). Smear the lip with engine oil.
2Lubricate the bearings with hypoid
SAE 80/90 oil, then carefully insert the camshaft.
3Locate the thrust plate in the camshaft
groove, then insert and tighten the bolts.
4Using feeler blades check that the endfloat
is as given in the Specifications.
5Lubricate the ball-pins with hypoid
SAE 80/90 oil, then fit the cam followers in
their correct locations and retain with the
spring clips. It will be necessary to rotate the
camshaft during this operation.
6Fit the oil supply tube and tighten the bolts.
7Fit the camshaft sprocket backplate and
sprocket. Insert and tighten the bolt while
holding the camshaft stationary with a spanner
on the lug (see illustration).
8Refit the cylinder head.
1Adjust the valve clearances. This work is
easier to carry out on the bench rather than in
the car.
2Turn the engine so that No 1 piston is
approximately 2 cm (0.8 in) before top deadcentre. This precaution will prevent any
damage to open valves.
3Make sure that the faces of the cylinder
block and cylinder head are perfectly clean,
then locate the new gasket on the block
making sure that all the internal holes are
aligned (see illustration). Do not use jointing
compound.
4Turn the camshaft so that the TDC pointer is
aligned with the indentation on the front of the
cylinder head.
5Lower the cylinder head onto the gasket.
The help of an assistant will ensure that the
gasket is not dislodged. Alternatively, make a
couple of guide studs by sawing the heads off
two old cylinder head bolts; remove the studs
when the head is in position.
6Lightly oil the heads and threads of the new
head bolts and insert them into their holes.
7Using the Torx key, tighten the bolts
progressively to the Stage 1 specified torque
in the indicated sequence(see illustration).
8In the same sequence tighten the bolts to
the Stage 2 specified torque.
9Wait five minutes, then tighten the bolts
through the angle specified for Stage 3, still
following the same sequence. (If the engine is
on the bench, it may be preferable to leave this
final stage until after refitting the engine, when
the problem of holding it still will not arise.)
10Refit the rocker cover, using a new gasket.
Make sure that the dovetail sections of the
gasket engage correctly (see illustration).
11Fit the rocker cover bolts and reinforcing
plates. Tighten the bolts as follows, referring to
44Cylinder head - refitting
43Camshaft - refitting42Cylinder head - reassembly
SOHCengines 2A•17
2A
41.3a Driving out the auxiliary shaft cover
oil seal41.3b Fitting a new oil seal in the auxiliary
shaft cover42.3 Cam follower ball-pins and spring
clips fitted
43.1 Fitting the camshaft front bearing oil
seal43.7 Fitting the camshaft sprocket
backplate44.3 Fitting a new cylinder head gasket
A dab of grease on the collets
will keep them in position on
the valve stem
procarmanuals.com
Page 41 of 255
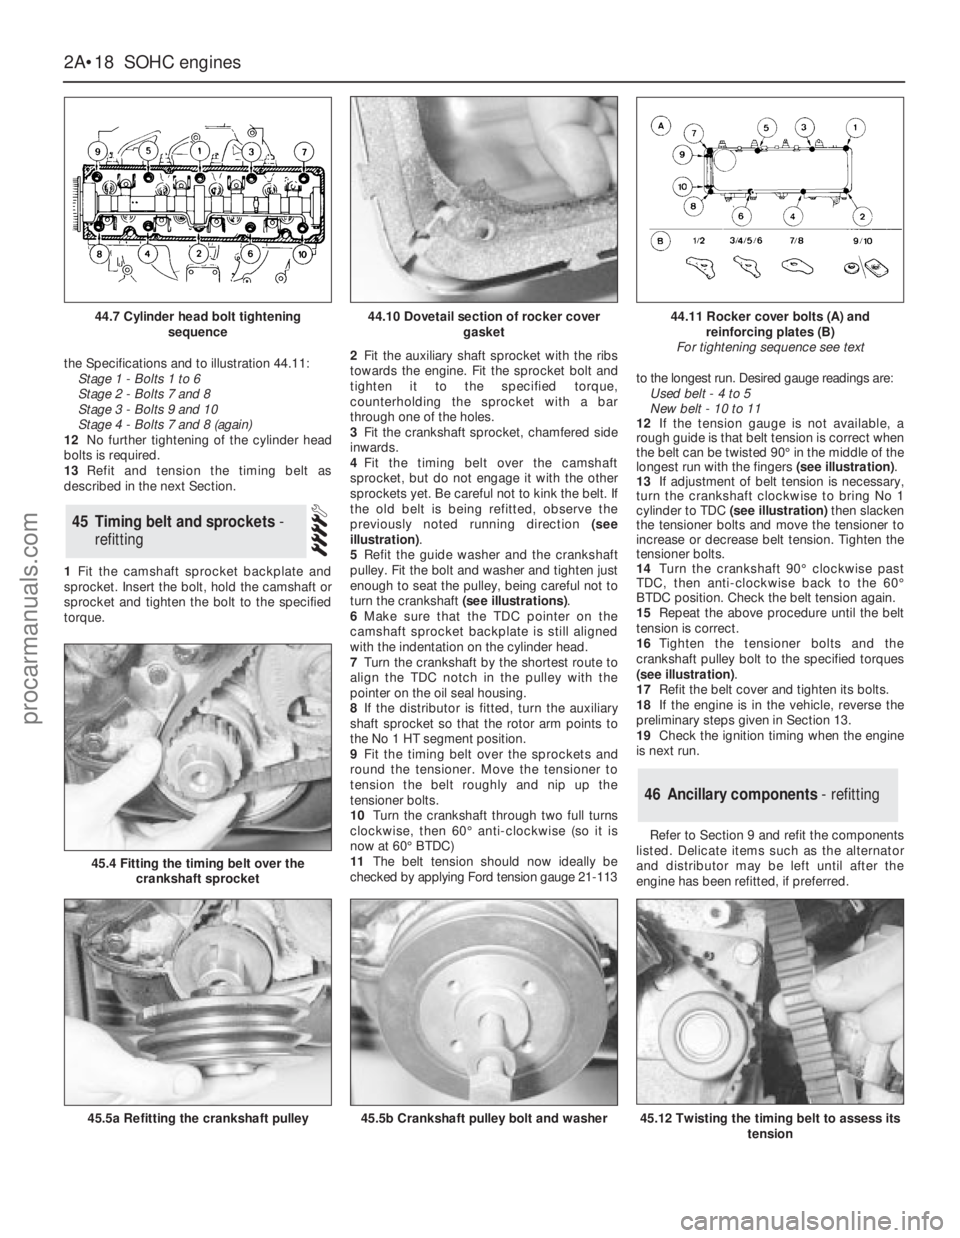
the Specifications and to illustration 44.11:
Stage 1 - Bolts 1 to 6
Stage 2 - Bolts 7 and 8
Stage 3 - Bolts 9 and 10
Stage 4 - Bolts 7 and 8 (again)
12No further tightening of the cylinder head
bolts is required.
13Refit and tension the timing belt as
described in the next Section.
1Fit the camshaft sprocket backplate and
sprocket. Insert the bolt, hold the camshaft or
sprocket and tighten the bolt to the specified
torque. 2Fit the auxiliary shaft sprocket with the ribs
towards the engine. Fit the sprocket bolt and
tighten it to the specified torque,
counterholding the sprocket with a bar
through one of the holes.
3Fit the crankshaft sprocket, chamfered side
inwards.
4Fit the timing belt over the camshaft
sprocket, but do not engage it with the other
sprockets yet. Be careful not to kink the belt. If
the old belt is being refitted, observe the
previously noted running direction (see
illustration).
5Refit the guide washer and the crankshaft
pulley. Fit the bolt and washer and tighten just
enough to seat the pulley, being careful not to
turn the crankshaft (see illustrations).
6Make sure that the TDC pointer on the
camshaft sprocket backplate is still aligned
with the indentation on the cylinder head.
7Turn the crankshaft by the shortest route to
align the TDC notch in the pulley with the
pointer on the oil seal housing.
8If the distributor is fitted, turn the auxiliary
shaft sprocket so that the rotor arm points to
the No 1 HT segment position.
9Fit the timing belt over the sprockets and
round the tensioner. Move the tensioner to
tension the belt roughly and nip up the
tensioner bolts.
10Turn the crankshaft through two full turns
clockwise, then 60°anti-clockwise (so it is
now at 60°BTDC)
11The belt tension should now ideally be
checked by applying Ford tension gauge 21-113to the longest run. Desired gauge readings are:
Used belt - 4 to 5
New belt - 10 to 11
12If the tension gauge is not available, a
rough guide is that belt tension is correct when
the belt can be twisted 90°in the middle of the
longest run with the fingers (see illustration).
13If adjustment of belt tension is necessary,
turn the crankshaft clockwise to bring No 1
cylinder to TDC(see illustration)then slacken
the tensioner bolts and move the tensioner to
increase or decrease belt tension. Tighten the
tensioner bolts.
14Turn the crankshaft 90°clockwise past
TDC, then anti-clockwise back to the 60°
BTDC position. Check the belt tension again.
15Repeat the above procedure until the belt
tension is correct.
16Tighten the tensioner bolts and the
crankshaft pulley bolt to the specified torques
(see illustration).
17Refit the belt cover and tighten its bolts.
18If the engine is in the vehicle, reverse the
preliminary steps given in Section 13.
19Check the ignition timing when the engine
is next run.
Refer to Section 9 and refit the components
listed. Delicate items such as the alternator
and distributor may be left until after the
engine has been refitted, if preferred.
46Ancillary components - refitting
45Timing belt and sprockets -
refitting
2A•18SOHCengines
44.7 Cylinder head bolt tightening
sequence
45.4 Fitting the timing belt over the
crankshaft sprocket
45.5a Refitting the crankshaft pulley45.5b Crankshaft pulley bolt and washer45.12 Twisting the timing belt to assess its
tension
44.10 Dovetail section of rocker cover
gasket44.11 Rocker cover bolts (A) and
reinforcing plates (B)
For tightening sequence see text
procarmanuals.com
Page 42 of 255
If the crankcase ventilation oil separator was
removed, apply a liquid locking agent to its
tube before pressing it into the cylinder block.
1Make sure that the clutch is centred.
2Apply a smear of grease or anti-seize
compound to the gearbox input shaft splines.
3With the aid of an assistant, offer the
gearbox to the engine. If the input shaft is
reluctant to enter the clutch, rock the gearbox
slightly or turn the crankshaft back and forth.
Support the gearbox until it is engaged with
the dowels on the engine - do not leave it
hanging on the input shaft.4Refit the engine-to-bellhousing bolts, the
bracing strap and the starter motor.
1Sling the engine/gearbox unit so that it
hangs at an angle of approximately 45°.
2Lower the unit into the engine bay, at the
same time moving it towards the rear of the
vehicle. Have an assistant watch as the unit is
lowered to check that no pipes, wires etc are
fouled or trapped.
3Raise the gearbox as the engine is lowered
until the unit takes up its correct position.
Secure the engine bearers to the mountings
and refit the gearbox crossmember.
4The remainder of refitting is a reversal of the
removal procedure. Refer to Section 6. Also
refer to Section 49, paragraph 9.
5Before starting the engine, refer to Section 51.
1On manual gearbox models, check that the
clutch is centred correctly. Apply a smear of
grease or anti-seize compound to the gearbox
input shaft.
2On automatic transmission models, check
that the torque converter is fully engaged with
the transmission oil pump.
3Sling the engine so that it is roughly horizontal.Lift it and position it over the engine bay.
4Lower the engine into place. Have an
assistant watch as the unit is lowered to check
that no pipes, wires etc are fouled or trapped.
5Guide the engine onto the transmission,
raising or lowering the transmission slightly if
necessary. Do not place any weight on the
transmission input shaft. With manual gearbox
models, rock the engine gently from side to
side to encourage the input shaft to enter the
clutch.
6When the engine and transmission are fully
engaged, refit the engine-to-bellhousing bolts.
Do not overlook the earth strap.
7Lower the engine so that the engine bearers
engage with the mountings. Fit the mounting
nuts and remove the lifting tackle.
8On automatic transmission models, bolt the
torque converter to the driveplate.
9The remainder of refitting is a reversal of the
removal procedure. Note the following
additional points:
a)Refill the engine with oil
b)Check the transmission oil level if
necessary
c)Adjust the tension of the accessory
drivebelts
d)Adjust the throttle cable
e)Adjust the downshift cable when
applicable
f)Refill the cooling system
10Before starting the engine, see Section 51
49Engine - refitting without
gearbox/transmission
48Engine - refitting with manual
gearbox
47Engine and gearbox -
reconnection
SOHCengines 2A•19
2A
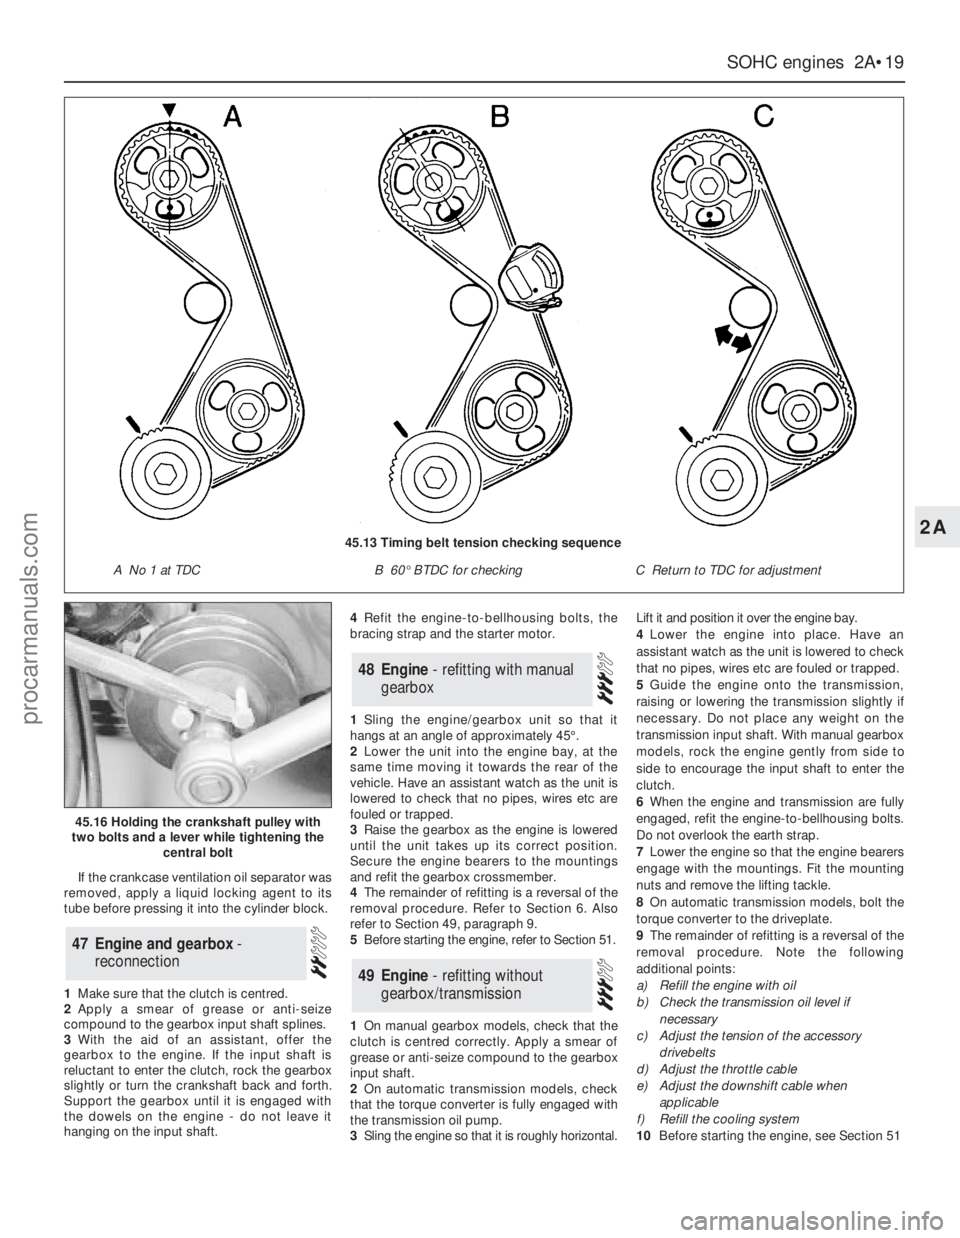
45.16 Holding the crankshaft pulley with
two bolts and a lever while tightening the
central bolt
45.13 Timing belt tension checking sequence
A No 1 at TDCB 60°BTDC for checkingC Return to TDC for adjustment
procarmanuals.com
Page 43 of 255
See Chapter 1, Section 23.
1Make a final check to ensure that everything
has been reconnected to the engine and that no
rags or tools have been left in the engine bay.
2Check that oil and coolant levels are
correct.
3Start the engine. This may take a little longer
than usual as fuel is pumped up to the engine.
4Check that the oil pressure light goes out
when the engine starts.
5Run the engine at a fast tickover and check
for leaks of oil, fuel and coolant. Also check
power steering and transmission fluid cooler
unions, when applicable. Some smoke and
odd smells may be experienced as assembly
lubricant burns off the exhaust manifold and
other components.6Bring the engine to operating temperature.
Check the ignition timing then adjust the idle
speed (if applicable) and mixture.
7Stop the engine and allow it to cool, then re-
check the oil and coolant levels.
8If new bearings, pistons etc have been
fitted, the engine should be run in at reduced
speeds and loads for the first 500 miles (800
km) or so. It is beneficial to change the engine
oil and filter after this mileage.
1When engine performance is down, or if
misfiring occurs which cannot be attributed to
the ignition or fuel system, a compression test
can provide diagnostic clues. If the test is
performed regularly it can give warning of
trouble before any other symptoms become
apparent.
2The engine must be at operating
temperature, the battery must be fully charged
and the spark plugs must be removed. The
services of an assistant will also be required.
3Disable the ignition system by dismantlingthe coil LT feed. Fit the compression tester to
No 1 spark plug hole. (The type of tester which
screws into the spark plug hole is to be
preferred.)
4Have the assistant hold the throttle wide
open and crank the engine on the starter.
Record the highest reading obtained on the
compression tester.
5Repeat the test on the remaining cylinders,
recording the pressure developed in each.
6Desired pressures are given in the
Specifications. If the pressure in any cylinder
is low, introduce a teaspoonful of clean engine
oil into the spark plug hole and repeat the test.
7If the addition of oil temporarily improves
the compression pressure, this indicates that
bore or piston wear was responsible for the
pressure loss. No improvement suggests that
leaking or burnt valves, or a blown head
gasket, may be to blame.
8A low reading from two adjacent cylinders is
almost certainly due to the head gasket
between them having blown.
9On completion of the test, refit the spark
plugs and reconnect the coil LT feed.
52Compression test -
description and interpretation
51Initial start-up after overhaul
or major repair
50Valve clearances - checking
and adjustment
2A•20SOHCengines
procarmanuals.com
Page 48 of 255
27Remove the starter motor.
28Remove the exhaust downpipe.
29Ensure that the steering wheel is
positioned in the straight-ahead position then,
using a dab of paint or a suitable marker pen,
make alignment marks between the
intermediate shaft lower clamp and steering
gear pinion. Slacken and remove the lower
clamp bolt then disconnect the intermediate
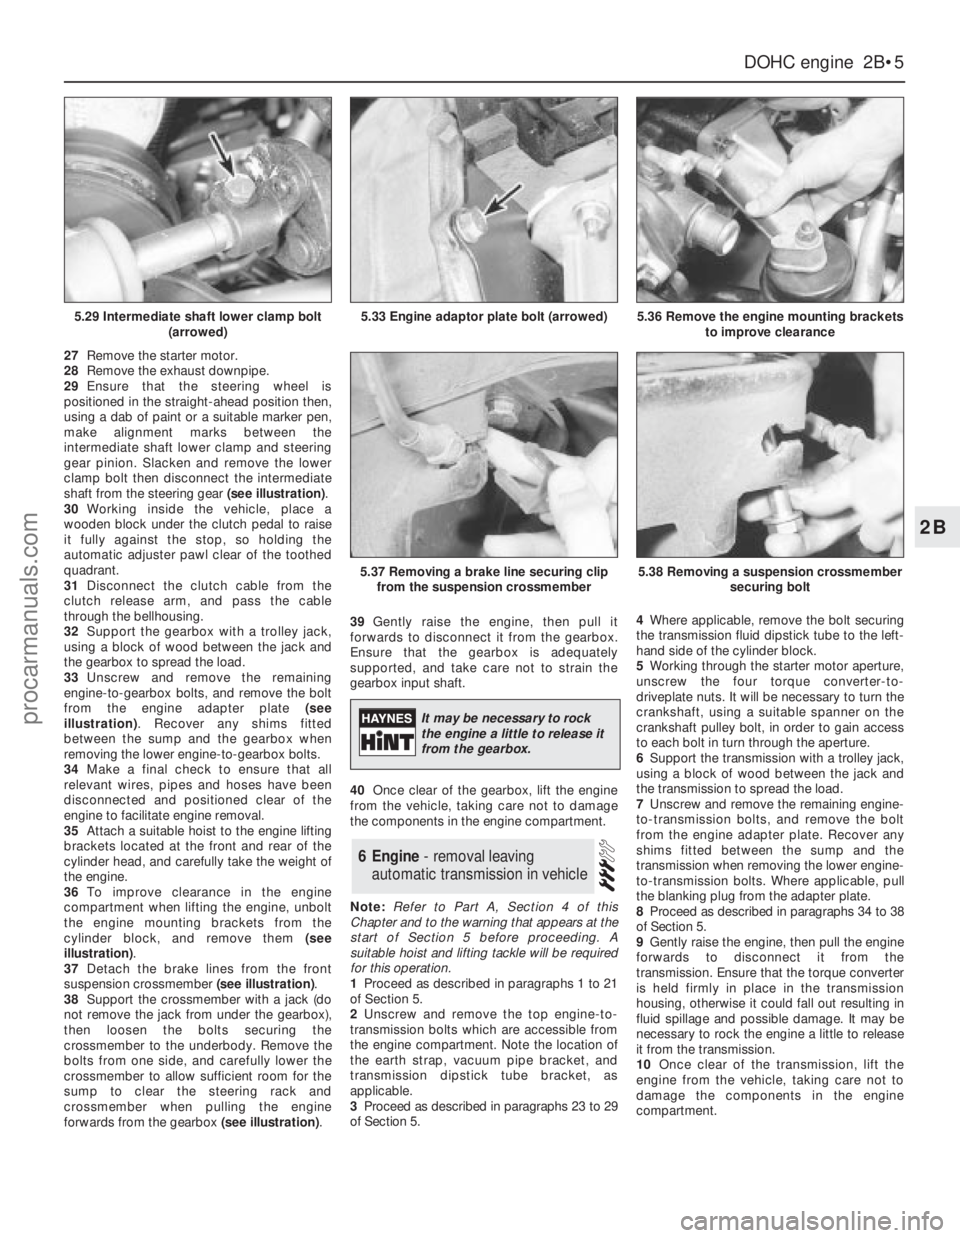
shaft from the steering gear (see illustration).
30Working inside the vehicle, place a
wooden block under the clutch pedal to raise
it fully against the stop, so holding the
automatic adjuster pawl clear of the toothed
quadrant.
31Disconnect the clutch cable from the
clutch release arm, and pass the cable
through the bellhousing.
32Support the gearbox with a trolley jack,
using a block of wood between the jack and
the gearbox to spread the load.
33Unscrew and remove the remaining
engine-to-gearbox bolts, and remove the bolt
from the engine adapter plate (see
illustration). Recover any shims fitted
between the sump and the gearbox when
removing the lower engine-to-gearbox bolts.
34Make a final check to ensure that all
relevant wires, pipes and hoses have been
disconnected and positioned clear of the
engine to facilitate engine removal.
35Attach a suitable hoist to the engine lifting
brackets located at the front and rear of the
cylinder head, and carefully take the weight of
the engine.
36To improve clearance in the engine
compartment when lifting the engine, unbolt
the engine mounting brackets from the
cylinder block, and remove them (see
illustration).
37Detach the brake lines from the front
suspension crossmember (see illustration).
38Support the crossmember with a jack (do
not remove the jack from under the gearbox),
then loosen the bolts securing the
crossmember to the underbody. Remove the
bolts from one side, and carefully lower the
crossmember to allow sufficient room for the
sump to clear the steering rack and
crossmember when pulling the engine
forwards from the gearbox (see illustration).39Gently raise the engine, then pull it
forwards to disconnect it from the gearbox.
Ensure that the gearbox is adequately
supported, and take care not to strain the
gearbox input shaft.
40Once clear of the gearbox, lift the engine
from the vehicle, taking care not to damage
the components in the engine compartment.
Note:Refer to Part A, Section 4 of this
Chapter and to the warning that appears at the
start of Section 5 before proceeding. A
suitable hoist and lifting tackle will be required
for this operation.
1Proceed as described in paragraphs 1 to 21
of Section 5.
2Unscrew and remove the top engine-to-
transmission bolts which are accessible from
the engine compartment. Note the location of
the earth strap, vacuum pipe bracket, and
transmission dipstick tube bracket, as
applicable.
3Proceed as described in paragraphs 23 to 29
of Section 5.4Where applicable, remove the bolt securing
the transmission fluid dipstick tube to the left-
hand side of the cylinder block.
5Working through the starter motor aperture,
unscrew the four torque converter-to-
driveplate nuts. It will be necessary to turn the
crankshaft, using a suitable spanner on the
crankshaft pulley bolt, in order to gain access
to each bolt in turn through the aperture.
6Support the transmission with a trolley jack,
using a block of wood between the jack and
the transmission to spread the load.
7Unscrew and remove the remaining engine-
to-transmission bolts, and remove the bolt
from the engine adapter plate. Recover any
shims fitted between the sump and the
transmission when removing the lower engine-
to-transmission bolts. Where applicable, pull
the blanking plug from the adapter plate.
8Proceed as described in paragraphs 34 to 38
of Section 5.
9Gently raise the engine, then pull the engine
forwards to disconnect it from the
transmission. Ensure that the torque converter
is held firmly in place in the transmission
housing, otherwise it could fall out resulting in
fluid spillage and possible damage. It may be
necessary to rock the engine a little to release
it from the transmission.
10Once clear of the transmission, lift the
engine from the vehicle, taking care not to
damage the components in the engine
compartment.
6Engine - removal leaving
automatic transmission in vehicle
DOHCengine 2B•5
2B
5.29 Intermediate shaft lower clamp bolt
(arrowed)5.33 Engine adaptor plate bolt (arrowed)5.36 Remove the engine mounting brackets
to improve clearance
5.37 Removing a brake line securing clip
from the suspension crossmember5.38 Removing a suspension crossmember
securing bolt
It may be necessary to rock
the engine a little to release it
from the gearbox.
procarmanuals.com
Page 49 of 255
Note: Refer to Part A, Section 4 of this Chapter
and to the warning that appears at the start of
Section 5 before proceeding. A hoist and lifting
tackle will be required for this operation.
1Proceed as described in paragraphs 1 to 21
of Section 5.
2Unscrew the securing bolt, and disconnect
the earth lead from the rear left-hand side of
the cylinder head.
3Unscrew the nuts securing the engine
mountings to the engine mounting brackets.
4Jack up the vehicle and support it securely
on axle stands (see “Jacking”). Ensure that
there is enough working room beneath the
vehicle.
5To improve access, disconnect the exhaust
downpipe from the manifold and remove the
exhaust system.
6Drain the engine oil into a suitable container.
7On models fitted with a catalytic converter,
release the securing clips and withdraw the
exhaust heat shield from under the vehicle for
access to the propeller shaft.
8Remove the propeller shaft.
9Where applicable, bend back the locktabs,
then unscrew the two bolts in each case
securing the two anti-roll bar mounting clamps
to the vehicle underbody. Lower the anti-roll
bar as far as possible.
10Proceed as described in paragraphs 30
and 31 of Section 5.
11Support the gearbox with a trolley jack,
using a block of wood between the jack and
the gearbox to spread the load.
12Unscrew the four nuts securing the
gearbox crossmember to the vehicle
underbody. Unscrew the central bolt securing
the crossmember to the gearbox, and remove
the crossmember. Note the position of the
earth strap, where applicable. Recover the
mounting cup, and the exhaust mounting
bracket and heat shield (as applicable).
13Lower the gearbox slightly on the jack,
then remove the circlip, and disconnect the
speedometer drive cable from the gearbox.
14Disconnect the wiring from the reversing
lamp switch, and on models with fuel-injection,
disconnect the wiring from the vehicle speed
sensor mounted in the side of the gearbox.
15Slacken and remove the two bolts and
washers (one either side) securing the gear
linkage support bracket to the gearbox.
16Using a pin punch, drive out the roll pin
securing the gearchange rod to the gear linkage.
17Attach a hoist to the engine lifting brackets
located at the front and rear of the cylinder head,
and slowly take the weight of the engine. Arrange
the lifting tackle so that the engine/gearbox
assembly will assume a steep angle of
approximately 40°to 45°as it is being removed.
18To improve clearance in the engine
compartment when lifting the engine, unboltthe engine mounting brackets from the
cylinder block, and remove them.
19Ensure that the steering wheel is positioned
in the straight-ahead position then, using a dab
of paint or a marker pen, make alignment marks
between the intermediate shaft lower clamp
and steering gear pinion. Slacken and remove
the lower clamp bolt then disconnect the
intermediate shaft from the steering gear.
20Detach the brake lines from the front
suspension crossmember.
21Support the crossmember with a jack (do not
remove the jack from under the gearbox), then
loosen the bolts securing the crossmember to the
underbody. Remove the crossmember securing
bolts, and carefully lower the crossmember to
allow sufficient room for the engine sump to clear
the steering rack and crossmember as the
engine/gearbox assembly is removed.
22Make a final check to ensure that all
relevant wires, pipes and hoses have been
disconnected to facilitate removal of the
engine/gearbox assembly.
23Raise the engine/gearbox, at the same
time lowering the trolley jack which is
supporting the gearbox.
24Place a suitable rod across the vehicle
underbody to support the gear linkage support
bracket whilst the gearbox is removed.
25Tilt the engine/gearbox assembly using
the hoist and the trolley jack, until the
assembly can be lifted from the vehicle. Take
care not to damage surrounding components.
26If the vehicle is to be moved, with the
engine/gearbox assembly removed, temporarily
refit the suspension crossmember and the anti-
roll bar to the underbody, and reconnect the
steering column to the intermediate shaft.
27To separate the engine from the gearbox,
proceed as follows.
28Remove the starter motor.
29Support the engine and gearbox
horizontally on blocks of wood.
30Unscrew the engine-to-gearbox bolts,
noting the locations of the bolts, and the
positions of the earth strap and any wiring clips
attached to the bolts. Recover any shims fitted
between the sump and the gearbox when
removing the lower engine-to-gearbox bolts.
31Unscrew the bolt from the engine adapter
plate.
32Pull the engine and gearbox apart, taking
care not to strain the gearbox input shaft. It
may be necessary to rock the units slightly to
separate them.
Note: Refer to Part A, Section 4 of this
Chapter and to the warning that appears at the
start of Section 5 before proceeding. A
suitable hoist and lifting tackle will be required
for this operation. Any suspected faults in the
automatic transmission should be referred to a
Ford dealer or automatic transmissionspecialist before removal of unit, as the
specialist fault diagnosis equipment is
designed to operate with the transmission in
the vehicle.
1Proceed as described in paragraphs 1 to 21
of Section 5.
2Unscrew the securing bolt, and disconnect
the earth lead from the rear left-hand side of
the cylinder head.
3Unscrew the nuts securing the engine
mountings to the engine mounting brackets.
4Jack up the vehicle and support it securely
on axle stands (see “Jacking”). Ensure that
there is enough working room beneath the
vehicle.
5To improve access, disconnect the exhaust
downpipe from the manifold and remove the
exhaust system .
6Drain the engine oil into a suitable container.
7On models fitted with a catalytic converter,
release the securing clips and withdraw the
exhaust heat shield from under the vehicle for
access to the propeller shaft.
8Remove the propeller shaft.
9Where applicable, bend back the locktabs,
then unscrew the two bolts in each case
securing the two anti-roll bar mounting clamps
to the vehicle underbody. Lower the anti-roll
bar as far as possible.
10Support the transmission with a trolley
jack, using a block of wood between the jack
and the transmission to spread the load.
11Unscrew the four bolts securing the
transmission crossmember to the vehicle
underbody. Unscrew the central bolt securing
the crossmember to the transmission, and
remove the crossmember. Note the position of
the earth strap, where applicable. Recover the
mounting cup, and the exhaust mounting
bracket and heat shield (as applicable).
12Lower the transmission slightly on the jack.
13Unscrew the unions and disconnect the
fluid cooler pipes from the transmission. Plug
the open ends of the pipes and the
transmission to prevent dirt ingress and fluid
leakage. Where applicable, detach the fluid
cooler pipe bracket from the engine mounting
bracket, and move it to one side.
14Remove the two clips securing the
selector rod, and detach the selector rod from
the manual selector lever, and the selector
lever on the transmission.
15Disconnect the wiring from the starter
inhibitor switch, downshift solenoid, lock-up
clutch, reversing lamp switch, and where
applicable, the 3rd/4th gearchange solenoid.
16Remove the securing screw, and
disconnect the speedometer cable (where
fitted) from the transmission extension
housing. Plug the opening in the transmission
to prevent dirt ingress.
17Proceed as described in paragraphs 17 to 26
of Section 7, substituting transmission for
gearbox and ignoring paragraph 24.
18To separate the engine from the
transmission, proceed as follows.
19Remove the starter motor.
20Support the engine and transmission
horizontally on blocks of wood.
8Engine/automatic
transmission assembly -
removal and separation
7Engine/manual gearbox
assembly - removal and
separation
2B•6DOHCengine
procarmanuals.com
Page 50 of 255
21Working through the starter motor
aperture, unscrew the four torque converter-
to-driveplate nuts. It will be necessary to turn
the crankshaft using a spanner on the
crankshaft pulley bolt in order to gain access
to each nut in turn through the aperture.
22Where applicable, remove the bolt
securing the transmission fluid dipstick tube to
the left-hand side of the cylinder block.
23Unscrew the engine-to-transmission bolts,
noting the locations of the bolts, and the
positions of the earth strap and any wiring
clips attached to the bolts. Recover any shims
fitted between the sump and the transmission
when removing the lower engine-to-
transmission bolts.
24Unscrew the bolt from the engine adapter
plate and, where applicable, pull the blanking
plug from the adapter plate.
25Pull the engine and the transmission apart,
ensuring that the torque converter is held firmly
in place in the transmission housing, otherwise
it could fall out resulting in fluid spillage and
possible damage. It may be necessary to rock
the units slightly to separate them.
1Reverse the procedure described in
paragraphs 1 to 40 ofSection 5, noting the
following points.
2Before attempting to refit the engine, check
that the clutch friction disc is centralised.
3Check that the clutch release arm and
bearing are correctly fitted, and lightly grease
the input shaft splines.
4Check that the engine adapter plate is
correctly positioned on the locating dowels. If
necessary, a cable-tie can be used to
temporarily secure the adapter plate in
position on the cylinder block using one of the
engine-to-gearbox bolt holes.
5If shims were fitted between the sump and
the gearbox, refit them in their original
locations when mating the engine to the
gearbox. If the engine has been overhauled,
where applicable fit the relevant shims as
calculated during engine reassembly .
6Reconnect the clutch cable to the release arm,
ensuring that it is routed as noted during removal.
7Ensure that the roadwheels and the steering
wheel are in the straight-ahead position then
align the marks made on removal and reconnect
the intermediate shaft to the steering gearing.
Tighten the clamp bolt to the specified torque.
8Refit the exhaust downpipe.
9Fill the engine with the correct grade and
quantity of oil.
10Check the throttle cable adjustment. Where
necessary, also adjust the speed control cable
in the same way so that there is only a small
amount of slack present in the cable.
11Reconnect the coolant hoses to the water
pump housing.
12Fill the cooling system .
13Tighten all fixings to the specified torque,
where applicable.1Reverse the procedure described in Section 6,
noting the following points.
2Check that the engine adapter plate is
correctly positioned on the locating dowels. If
necessary, a cable-tie can be used to
temporarily secure the adapter plate in
position on the cylinder block using one of the
engine-to-transmission bolt holes.
3As the torque converter is only loosely
engaged in the transmission, care must be taken
to prevent the torque converter from falling out
forwards. When the torque converter hub is fully
engaged with the fluid pump drivegear in the
transmission, distance A (see illustration 2.20 in
Chapter 7B)must be as specified. Incorrect
installation of the torque converter will result in
damageto the transmission.
4If shims were fitted between the sump and
the transmission, refit them in their original
locations when mating the engine to the
transmission. If the engine has been
overhauled, where applicable fit the relevant
shims as calculated during engine reassembly.
5As the engine is installed, guide the torque
converter studs through the holes in the
driveplate. When the engine is positioned flush
with the engine adapter plate and the
transmission housing, check that the torque
converter is free to move axially a small
amount before refitting and tightening the
engine-to-transmission bolts.
6Do not tighten the torque converter-to-
driveplate nuts until the lower engine-to-
transmission bolts have been fitted and
tightened.
7Ensure that the roadwheels and the steering
wheel are in the straight-ahead position then
align the marks made on removal and
reconnect the intermediate shaft to the
steering gearing. Tighten the clamp bolt to the
specified torque.
8Refit the exhaust downpipe.
9Fill the engine with the correct grade and
quantity of oil.
10Check the throttle cable adjustment. Where
necessary, also adjust the speed control cable
in the same way so that there is only a small
amount of slack present in the cable.
11Reconnect the coolant hoses to the water
pump housing.
12Fill the cooling system.
13Tighten all fixings to the specified torque,
where applicable.
1Reverse the procedure described in Section 7,
noting the following points.
2Before attempting to reconnect the engine
to the gearbox, check that the clutch friction
disc is centralised.
3Check that the clutch release arm andbearing are correctly fitted, and lightly grease
the input shaft splines.
4Check that the engine adapter plate is
correctly positioned on the locating dowels. If
necessary, a cable-tie can be used to
temporarily secure the adapter plate in
position on the cylinder block using one of the
engine-to-gearbox bolt holes.
5If shims were fitted between the sump and
the gearbox, refit them in their original
locations when mating the engine to the
gearbox. If the engine has been overhauled,
where applicable fit the relevant shims as
calculated during engine reassembly.
6Ensure that the roadwheels and the steering
wheel are in the straight-ahead position then
align the marks made on removal and
reconnect the intermediate shaft to the
steering gearing. Tighten the clamp bolt to the
specified torque.
7Reconnect the clutch cable to the release
arm, ensuring that it is routed as noted during
removal.
8Refit the propeller shaft.
9Refit the exhaust system.
10Fill the engine with the correct grade and
quantity of oil.
11Check the throttle cable adjustment. Where
necessary, also adjust the speed control cable
in the same way so that there is only a small
amount of slack present in the cable.
12Reconnect the coolant hoses to the water
pump housing.
13Fill the cooling system.
14Check and if necessary top-up the
gearbox oil level.
15Tighten all fixings to the specified torque,
where applicable.
1Reverse the procedure described in Section 8,
noting the following points.
2Check that the engine adapter plate is
correctly positioned on the locating dowels. If
necessary, a cable-tie can be used to
temporarily secure the adapter plate in
position on the cylinder block using one of the
engine-to-transmission bolt holes.
3As the torque converter is only loosely
engaged in the transmission, care must be taken
to prevent the torque converter from falling out
forwards. When the torque converter hub is fully
engaged with the fluid pump drivegear in the
transmission, distance A (see illustration 2.20 in
Chapter 7B)must be as specified. Incorrect
installation of the torque converter will result in
damage to the transmission.
4If shims were fitted between the sump and
the transmission, refit them in their original
locations when mating the engine to the
transmission. If the engine has been
overhauled, where applicable fit the relevant
shims as calculated during engine reassembly.
5As the engine and transmission are mated
12Engine/automatic
transmission assembly -
reconnection and refitting
11Engine/manual gearbox
assembly - reconnection and
refitting
10Engine - refitting (automatic
transmission in vehicle)
9Engine - refitting (manual
gearbox in vehicle)
DOHCengine 2B•7
2B
procarmanuals.com
Page 51 of 255
together, guide the torque converter studs
through the holes in the driveplate. When the
engine is positioned flush with the engine
adapter plate and the transmission housing,
check that the torque converter is free to move
axially a small amount before refitting and
tightening the engine-to-transmission bolts.
6Do not tighten the torque converter-to-
driveplate nuts until the lower engine-to-
transmission bolts have been fitted and
tightened.
7Ensure that the roadwheels and the steering
wheel are in the straight-ahead position then
align the marks made on removal and
reconnect the intermediate shaft to the
steering gearing. Tighten the clamp bolt to the
specified torque.
8Reconnect the selector rod and adjust as
described in Chapter 7, PartB.
9Refit the propeller shaft.
10Refit the exhaust system.
11Fill the engine with the correct grade and
quantity of oil.
12Check the throttle cable adjustment. Where
necessary, also adjust the speed control cable
in the same way so that there is only a small
amount of slack present in the cable.
13Reconnect the coolant hoses to the water
pump housing.
14Fill the cooling system.
15Check and if necessary top-up the
transmission fluid level.
16Tighten all fixings to the specified torque,
where applicable.
Proceed as described in Part A, Section 23
of this Chapter but note that on certain
models, it may be necessary to unbolt the
engine mounting brackets from the cylinder
block to allow sufficient clearance to remove
the mountings.
1Refer to Part A, Section 8 of this Chapter,
paragraphs 1 to 8 inclusive.
2A selection of splined and Torx sockets will
be required to remove many of the bolts when
dismantling the engine.
3Before dismantling the main engine
components, the following externally mounted
ancillary components can be removed.
a)Inlet manifold (and carburettor, where
applicable).
b)Exhaust manifold.
c)Alternator.
d)Water pump, and thermostat.
e)Water pump/alternator drivebelt tensioner.
f)Distributor cap, HT leads and spark plugs.
g)Oil pressure warning lamp switch.
h)Crankshaft speed/position sensor.
i)Oil filter.
j)Dipstick.
k)Engine mounting brackets (if not already
done).
l)Crankcase ventilation pipe and hoses.m)Clutch.
n)Alternator mounting bracket.
o)Air conditioning compressor mounting
bracket (where applicable).
p)Engine lifting brackets.
Note: A puller will be required to remove the
crankshaft pulley. A new crankshaft pulley bolt,
a new timing chain tensioner plunger
assembly, new upper and lower timing chain
cover gaskets and a new camshaft cover
gasket and reinforcing sleeve sealing rings
must be used on refitting.
1If the engine is in the car, carry out thefollowing operations.
a)Disconnect the battery negative lead.
b)To improve access, remove the radiator. It
will be difficult to remove the crankshaft
pulley with the radiator in place.
c)On carburettor models, remove the air
cleaner.
d)On fuel-injection models, remove the air
inlet hose, plenum chamber and air
cleaner lid as an assembly.
e)Disconnect the breather hose from the
camshaft cover.
f)Remove the distributor cap and HT leads,
and the rotor arm and housing.
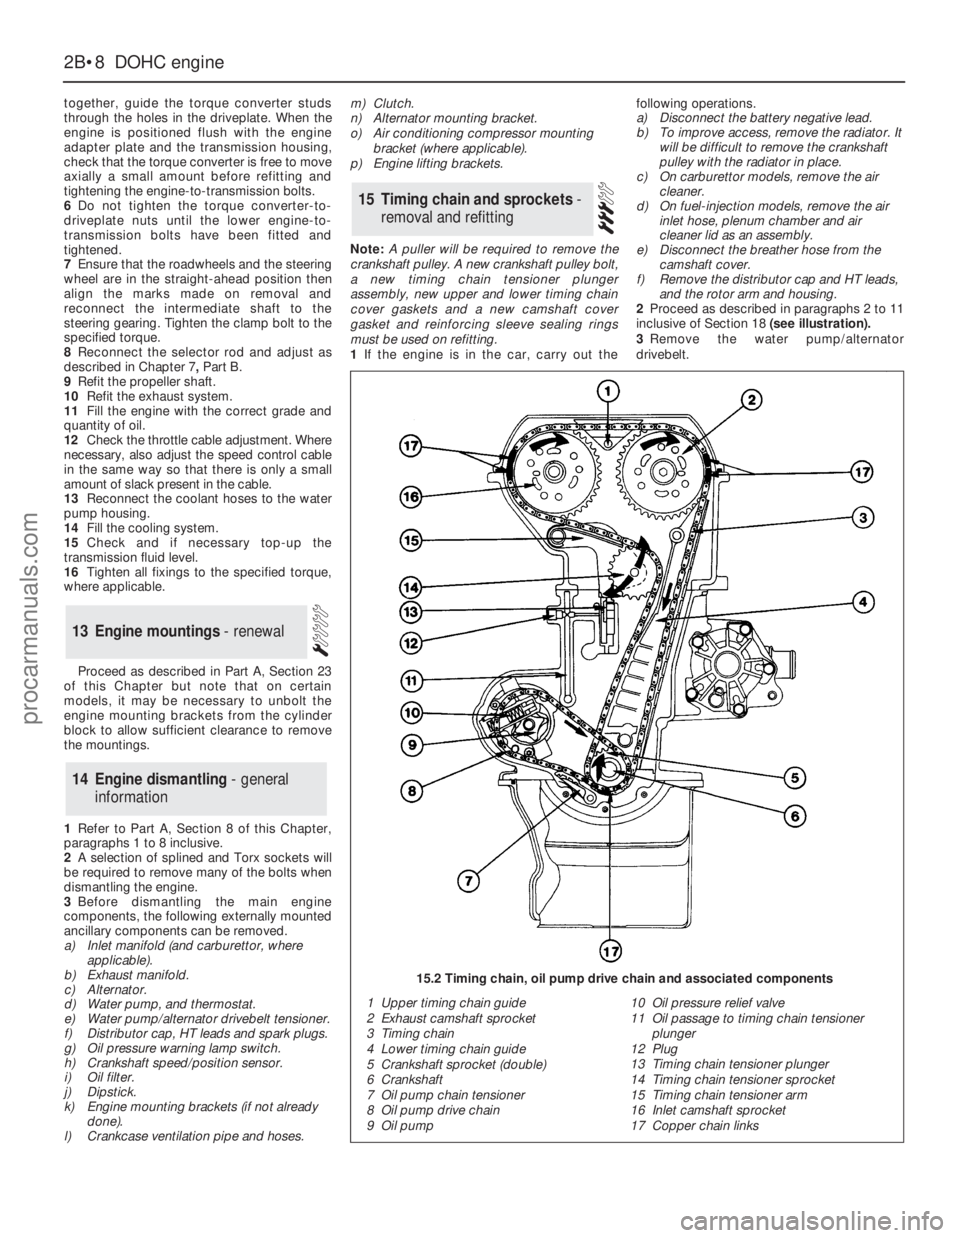
2Proceed as described in paragraphs 2 to 11
inclusive of Section 18 (see illustration).
3Remove the water pump/alternator
drivebelt.
15Timing chain and sprockets -
removal and refitting
14Engine dismantling - general
information
13Engine mountings - renewal
2B•8DOHCengine
1 Upper timing chain guide
2 Exhaust camshaft sprocket
3 Timing chain
4 Lower timing chain guide
5 Crankshaft sprocket (double)
6 Crankshaft
7 Oil pump chain tensioner
8 Oil pump drive chain
9 Oil pump10 Oil pressure relief valve
11 Oil passage to timing chain tensioner
plunger
12 Plug
13 Timing chain tensioner plunger
14 Timing chain tensioner sprocket
15 Timing chain tensioner arm
16 Inlet camshaft sprocket
17 Copper chain links
15.2 Timing chain, oil pump drive chain and associated components
procarmanuals.com