1985 FORD GRANADA radiator cap
[x] Cancel search: radiator capPage 4 of 255
1•3
1
Maintenance Schedule
Engine oil
SOHC:
With filter . . . . . . . . . . . . . . . . . . . . . . . . . . . . . .3.75 litres (6.6 pints)
DOHC:
With filter . . . . . . . . . . . . . . . . . . . . . . . . . . . . . . .4.5 litres (7.9 pints)
Without filter . . . . . . . . . . . . . . . . . . . . . . . . . . . . .4.0 litres (7.0 pints)
V6:
With filter . . . . . . . . . . . . . . . . . . . . . . . . . . . . . .4.25 litres (7.5 pints)
Cooling system
OHC . . . . . . . . . . . . . . . . . . . . . . . . . . . . . . . . . . . .8.0 litres (14.1 pints)
V6 . . . . . . . . . . . . . . . . . . . . . . . . . . . . . . . . . . . .8.5 litres (15.0 pints)
Fuel tank
All models . . . . . . . . . . . . . . . . . . . . . . . . . . . . .70 litres (15.4 gallons)
Manual gearbox
All models . . . . . . . . . . . . . . . . . . . . . . . . . . . . . .1.25 litres (2.2 pints)
Automatic transmission
All models (from dry) . . . . . . . . . . . . . . . . . . . . . . .8.5 litres (15.0 pints)
Final drive
7 inch crownwheel . . . . . . . . . . . . . . . . . . . . . . . . . .0.9 litres (1.6 pints)
7.5 inch crownwheel . . . . . . . . . . . . . . . . . . . . . . . . .1.3 litres (2.3 pints)
Power steering
OHC . . . . . . . . . . . . . . . . . . . . . . . . . . . . . . . . . . . .0.65 litres (1.1 pints)
V6 . . . . . . . . . . . . . . . . . . . . . . . . . . . . . . . . . . . .0.75 litres (1.3 pints)
Capacities
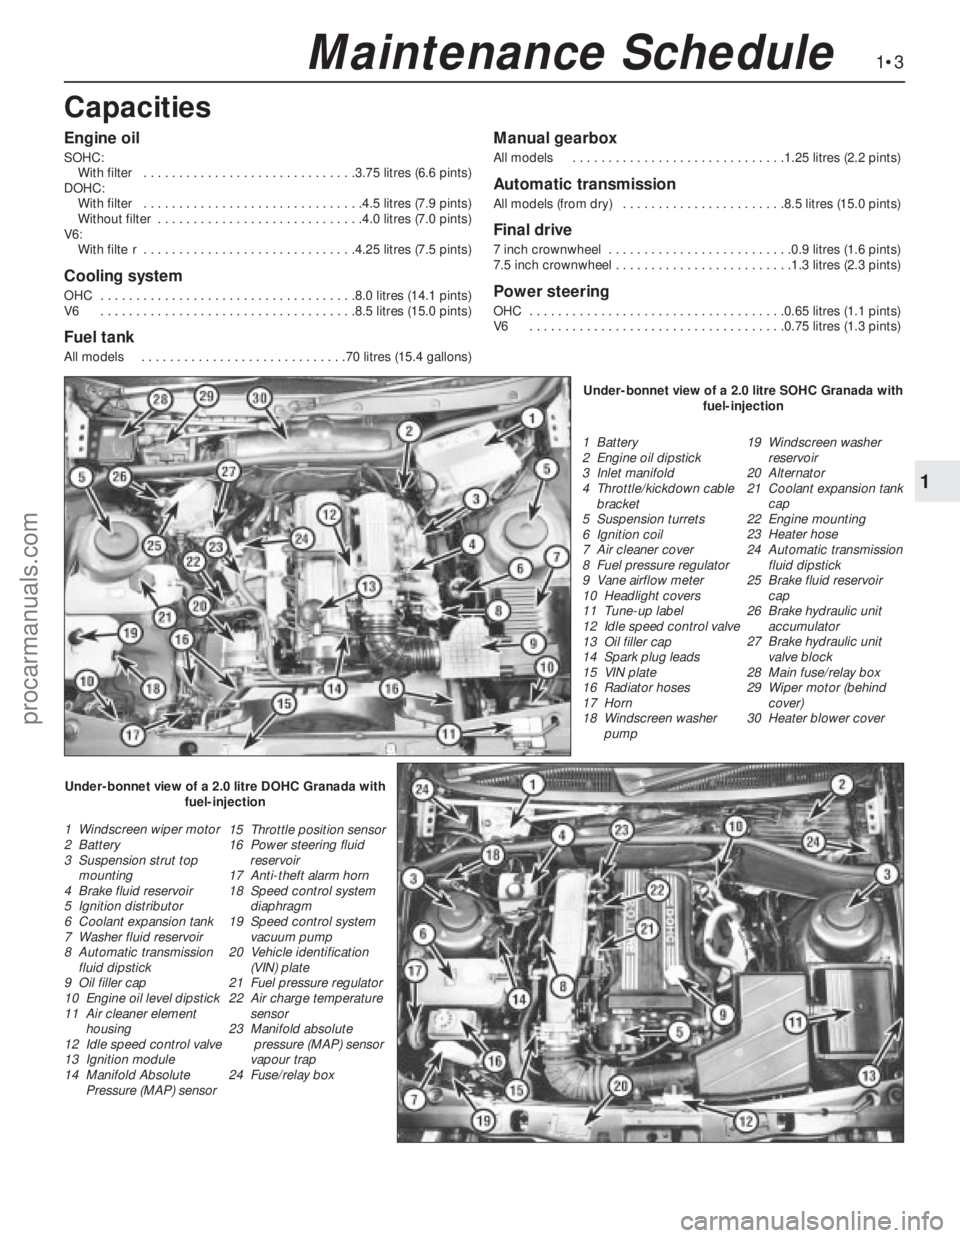
1 Battery
2 Engine oil dipstick
3 Inlet manifold
4 Throttle/kickdown cable
bracket
5 Suspension turrets
6 Ignition coil
7 Air cleaner cover
8 Fuel pressure regulator
9 Vane airflow meter
10 Headlight covers
11 Tune-up label
12 Idle speed control valve
13 Oil filler cap
14 Spark plug leads
15 VIN plate
16 Radiator hoses
17 Horn
18 Windscreen washer
pump19 Windscreen washer
reservoir
20 Alternator
21 Coolant expansion tank
cap
22 Engine mounting
23 Heater hose
24 Automatic transmission
fluid dipstick
25 Brake fluid reservoir
cap
26 Brake hydraulic unit
accumulator
27 Brake hydraulic unit
valve block
28 Main fuse/relay box
29 Wiper motor (behind
cover)
30 Heater blower cover
1 Windscreen wiper motor
2 Battery
3 Suspension strut top
mounting
4 Brake fluid reservoir
5 Ignition distributor
6 Coolant expansion tank
7 Washer fluid reservoir
8 Automatic transmission
fluid dipstick
9 Oil filler cap
10 Engine oil level dipstick
11 Air cleaner element
housing
12 Idle speed control valve
13 Ignition module
14 Manifold Absolute
Pressure (MAP) sensor15 Throttle position sensor
16 Power steering fluid
reservoir
17 Anti-theft alarm horn
18 Speed control system
diaphragm
19 Speed control system
vacuum pump
20 Vehicle identification
(VIN) plate
21 Fuel pressure regulator
22 Air charge temperature
sensor
23 Manifold absolute
pressure (MAP) sensor
vapour trap
24 Fuse/relay boxUnder-bonnet view of a 2.0 litre SOHC Granada with
fuel-injection
Under-bonnet view of a 2.0 litre DOHC Granada with
fuel-injection
procarmanuals.com
Page 5 of 255
1•4Maintenance Schedule
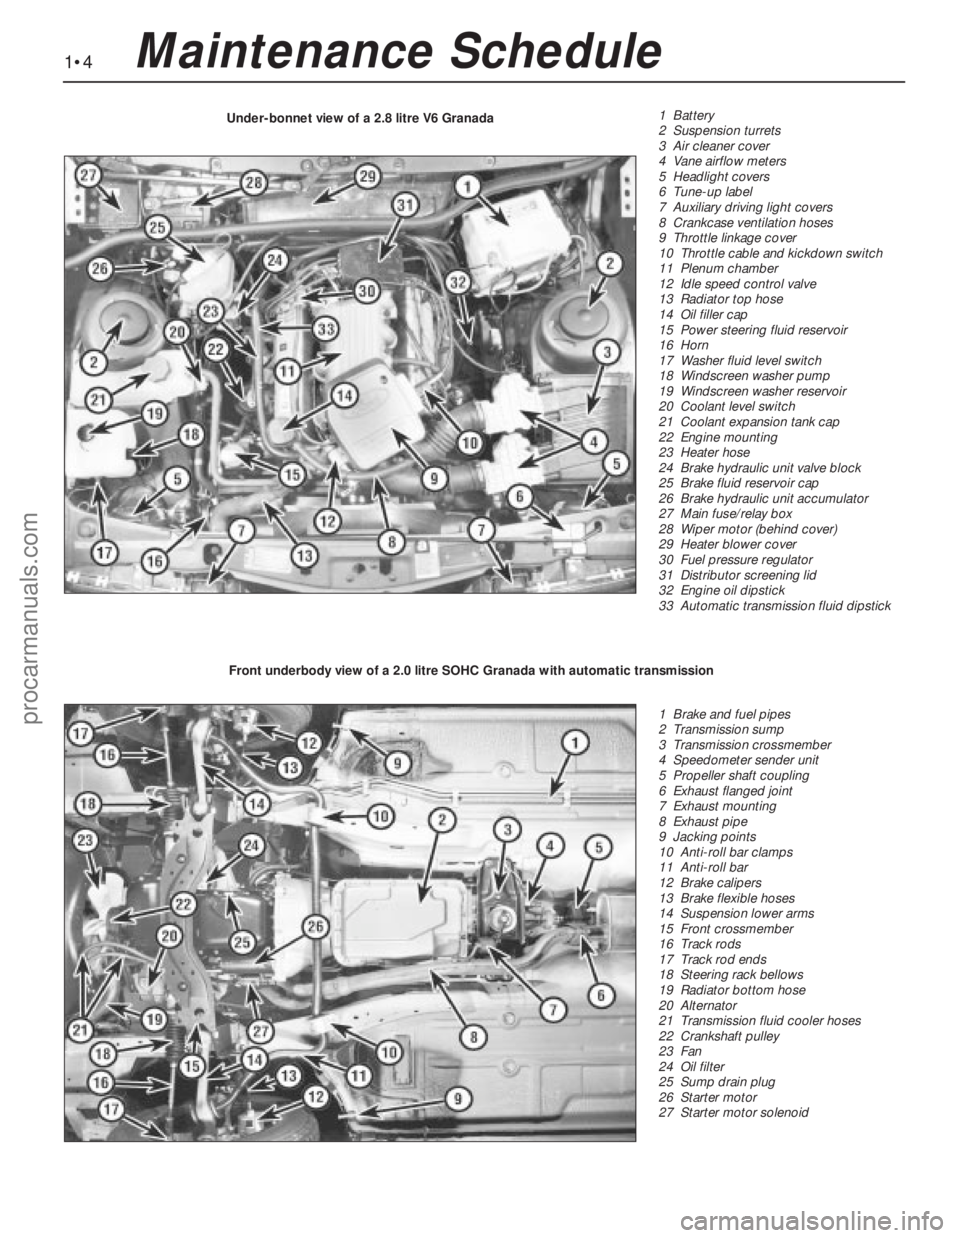
1 Battery
2 Suspension turrets
3 Air cleaner cover
4 Vane airflow meters
5 Headlight covers
6 Tune-up label
7 Auxiliary driving light covers
8 Crankcase ventilation hoses
9 Throttle linkage cover
10 Throttle cable and kickdown switch
11 Plenum chamber
12 Idle speed control valve
13 Radiator top hose
14 Oil filler cap
15 Power steering fluid reservoir
16 Horn
17 Washer fluid level switch
18 Windscreen washer pump
19 Windscreen washer reservoir
20 Coolant level switch
21 Coolant expansion tank cap
22 Engine mounting
23 Heater hose
24 Brake hydraulic unit valve block
25 Brake fluid reservoir cap
26 Brake hydraulic unit accumulator
27 Main fuse/relay box
28 Wiper motor (behind cover)
29 Heater blower cover
30 Fuel pressure regulator
31 Distributor screening lid
32 Engine oil dipstick
33 Automatic transmission fluid dipstick Under-bonnet view of a 2.8 litre V6 Granada
1 Brake and fuel pipes
2 Transmission sump
3 Transmission crossmember
4 Speedometer sender unit
5 Propeller shaft coupling
6 Exhaust flanged joint
7 Exhaust mounting
8 Exhaust pipe
9 Jacking points
10 Anti-roll bar clamps
11 Anti-roll bar
12 Brake calipers
13 Brake flexible hoses
14 Suspension lower arms
15 Front crossmember
16 Track rods
17 Track rod ends
18 Steering rack bellows
19 Radiator bottom hose
20 Alternator
21 Transmission fluid cooler hoses
22 Crankshaft pulley
23 Fan
24 Oil filter
25 Sump drain plug
26 Starter motor
27 Starter motor solenoid Front underbody view of a 2.0 litre SOHC Granada with automatic transmission
procarmanuals.com
Page 8 of 255
to release any pressure. When pressure has
been released, carry on unscrewing the cap
and remove it.
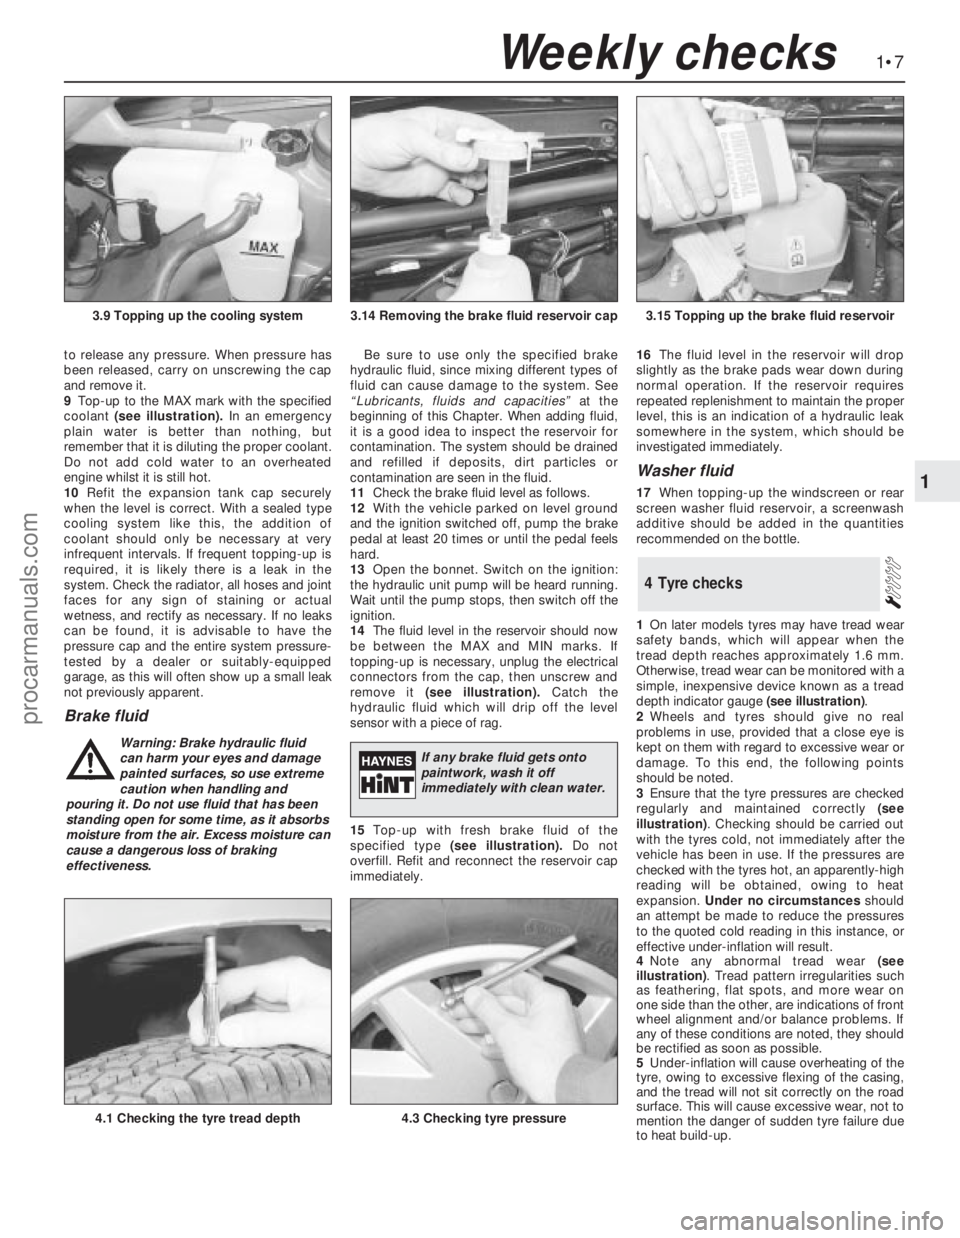
9Top-up to the MAX mark with the specified
coolant (see illustration).In an emergency
plain water is better than nothing, but
remember that it is diluting the proper coolant.
Do not add cold water to an overheated
engine whilst it is still hot.
10Refit the expansion tank cap securely
when the level is correct. With a sealed type
cooling system like this, the addition of
coolant should only be necessary at very
infrequent intervals. If frequent topping-up is
required, it is likely there is a leak in the
system. Check the radiator, all hoses and joint
faces for any sign of staining or actual
wetness, and rectify as necessary. If no leaks
can be found, it is advisable to have the
pressure cap and the entire system pressure-
tested by a dealer or suitably-equipped
garage, as this will often show up a small leak
not previously apparent.
Brake fluid
Be sure to use only the specified brake
hydraulic fluid, since mixing different types of
fluid can cause damage to the system. See
“Lubricants, fluids and capacities”at the
beginning of this Chapter. When adding fluid,
it is a good idea to inspect the reservoir for
contamination. The system should be drained
and refilled if deposits, dirt particles or
contamination are seen in the fluid.
11Check the brake fluid level as follows.
12With the vehicle parked on level ground
and the ignition switched off, pump the brake
pedal at least 20 times or until the pedal feels
hard.
13Open the bonnet. Switch on the ignition:
the hydraulic unit pump will be heard running.
Wait until the pump stops, then switch off the
ignition.
14The fluid level in the reservoir should now
be between the MAX and MIN marks. If
topping-up is necessary, unplug the electrical
connectors from the cap, then unscrew and
remove it (see illustration).Catch the
hydraulic fluid which will drip off the level
sensor with a piece of rag.
15Top-up with fresh brake fluid of the
specified type (see illustration).Do not
overfill. Refit and reconnect the reservoir cap
immediately.16The fluid level in the reservoir will drop
slightly as the brake pads wear down during
normal operation. If the reservoir requires
repeated replenishment to maintain the proper
level, this is an indication of a hydraulic leak
somewhere in the system, which should be
investigated immediately.
Washer fluid
17When topping-up the windscreen or rear
screen washer fluid reservoir, a screenwash
additive should be added in the quantities
recommended on the bottle.
1On later models tyres may have tread wear
safety bands, which will appear when the
tread depth reaches approximately 1.6 mm.
Otherwise, tread wear can be monitored with a
simple, inexpensive device known as a tread
depth indicator gauge (see illustration).
2Wheels and tyres should give no real
problems in use, provided that a close eye is
kept on them with regard to excessive wear or
damage. To this end, the following points
should be noted.
3Ensure that the tyre pressures are checked
regularly and maintained correctly (see
illustration). Checking should be carried out
with the tyres cold, not immediately after the
vehicle has been in use. If the pressures are
checked with the tyres hot, an apparently-high
reading will be obtained, owing to heat
expansion. Under no circumstancesshould
an attempt be made to reduce the pressures
to the quoted cold reading in this instance, or
effective under-inflation will result.
4Note any abnormal tread wear (see
illustration). Tread pattern irregularities such
as feathering, flat spots, and more wear on
one side than the other, are indications of front
wheel alignment and/or balance problems. If
any of these conditions are noted, they should
be rectified as soon as possible.
5Under-inflation will cause overheating of the
tyre, owing to excessive flexing of the casing,
and the tread will not sit correctly on the road
surface. This will cause excessive wear, not to
mention the danger of sudden tyre failure due
to heat build-up.
4Tyre checks
1•7
1
Weekly checks
3.14 Removing the brake fluid reservoir cap3.15 Topping up the brake fluid reservoir
4.1 Checking the tyre tread depth4.3 Checking tyre pressure
3.9 Topping up the cooling system
Warning: Brake hydraulic fluid
can harm your eyes and damage
painted surfaces, so use extreme
caution when handling and
pouring it. Do not use fluid that has been
standing open for some time, as it absorbs
moisture from the air. Excess moisture can
cause a dangerous loss of braking
effectiveness.If any brake fluid gets onto
paintwork, wash it off
immediately with clean water.
procarmanuals.com
Page 21 of 255
12Place a piece of wood in the caliper jaws
to limit piston travel. Keep your fingers clear of
the piston. Have the assistant depress the
brake pedal gentlyin order to move the
caliper piston out.
13With the pedal held depressed, slacken
the bleed screw on the right-hand caliper and
again depress the piston. Tighten the bleed
screw when the piston is retracted. The pedal
can now be released.
14Disconnect the bleed tube. Refit the right-hand brake pad and caliper.
15Remove the left-hand caliper and inboard
pad again. Carry out the operations described
in paragraphs 10 to 14 on the left-hand
caliper.
16Bleed the rear brakes as described in
Chapter 10.
17Refit the front wheels, lower the vehicle
and tighten the wheel nuts.
18Pump the brake pedal to bring the pads
up to the discs, then make a final check of thehydraulic fluid level. Top-up and refit the
reservoir cap.
Camshaft drivebelt renewal is
recommended as a precautionary measure.
Refer to Chapter 2, Part A, Sections 13 and 45
for the full renewal procedure.
45Camshaft drivebelt renewal -
SOHC engines
1Before proceeding, note the precautions
given in Chapter 3, Section 1.
2Disconnect the battery negative lead.
3Remove the expansion tank cap. Take
precautions against scalding if the system is
hot.
4Place a drain pan of adequate capacity
beneath the radiator drain plug. Unscrew the
plug, without removing it, and allow the
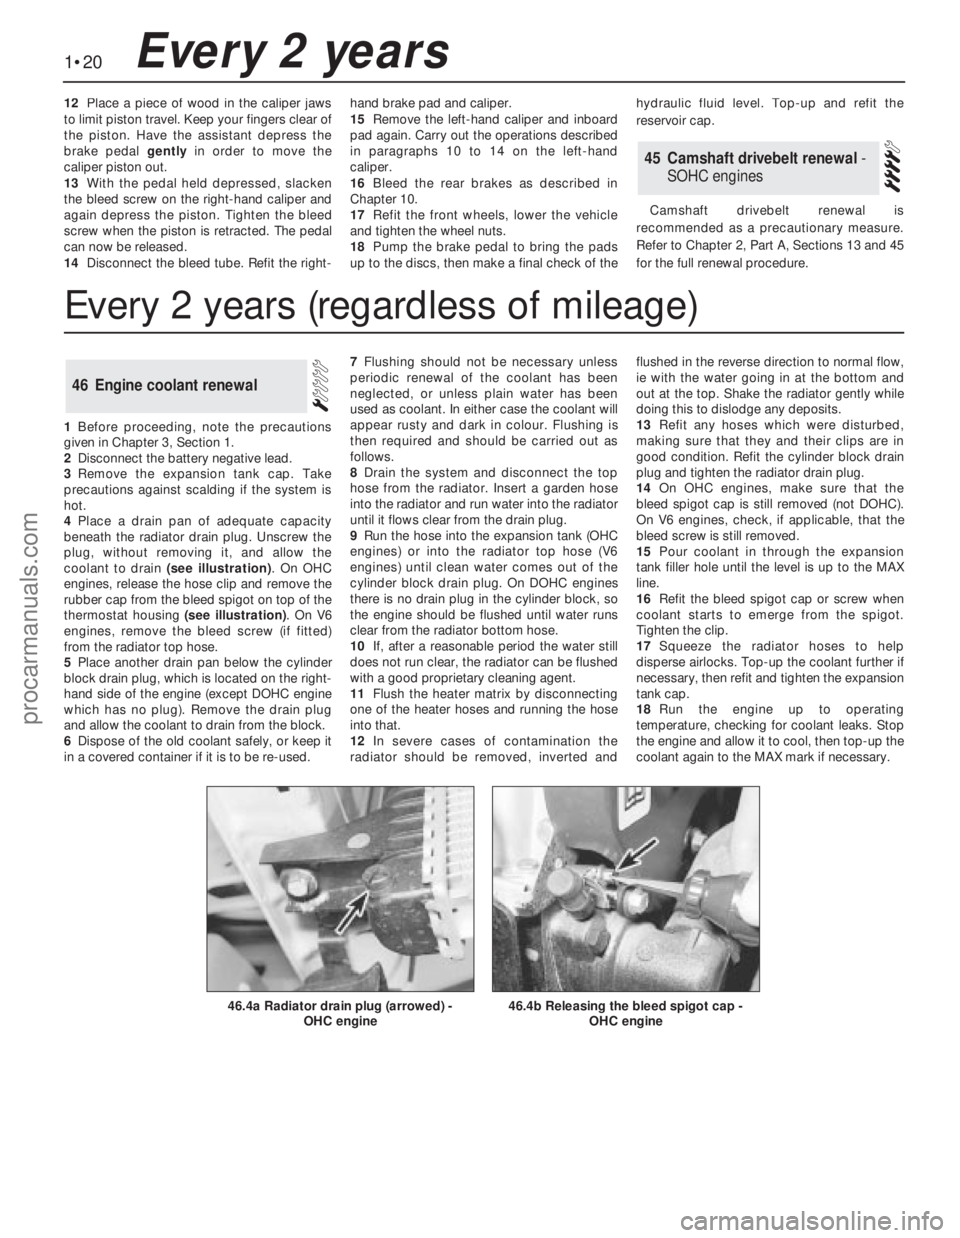
coolant to drain (see illustration). On OHC
engines, release the hose clip and remove the
rubber cap from the bleed spigot on top of the
thermostat housing (see illustration). On V6
engines, remove the bleed screw (if fitted)
from the radiator top hose.
5Place another drain pan below the cylinder
block drain plug, which is located on the right-
hand side of the engine (except DOHC engine
which has no plug). Remove the drain plug
and allow the coolant to drain from the block.
6Dispose of the old coolant safely, or keep it
in a covered container if it is to be re-used.7Flushing should not be necessary unless
periodic renewal of the coolant has been
neglected, or unless plain water has been
used as coolant. In either case the coolant will
appear rusty and dark in colour. Flushing is
then required and should be carried out as
follows.
8Drain the system and disconnect the top
hose from the radiator. Insert a garden hose
into the radiator and run water into the radiator
until it flows clear from the drain plug.
9Run the hose into the expansion tank (OHC
engines) or into the radiator top hose (V6
engines) until clean water comes out of the
cylinder block drain plug. On DOHC engines
there is no drain plug in the cylinder block, so
the engine should be flushed until water runs
clear from the radiator bottom hose.
10If, after a reasonable period the water still
does not run clear, the radiator can be flushed
with a good proprietary cleaning agent.
11Flush the heater matrix by disconnecting
one of the heater hoses and running the hose
into that.
12In severe cases of contamination the
radiator should be removed, inverted andflushed in the reverse direction to normal flow,
ie with the water going in at the bottom and
out at the top. Shake the radiator gently while
doing this to dislodge any deposits.
13Refit any hoses which were disturbed,
making sure that they and their clips are in
good condition. Refit the cylinder block drain
plug and tighten the radiator drain plug.
14On OHC engines, make sure that the
bleed spigot cap is still removed (not DOHC).
On V6 engines, check, if applicable, that the
bleed screw is still removed.
15Pour coolant in through the expansion
tank filler hole until the level is up to the MAX
line.
16Refit the bleed spigot cap or screw when
coolant starts to emerge from the spigot.
Tighten the clip.
17Squeeze the radiator hoses to help
disperse airlocks. Top-up the coolant further if
necessary, then refit and tighten the expansion
tank cap.
18Run the engine up to operating
temperature, checking for coolant leaks. Stop
the engine and allow it to cool, then top-up the
coolant again to the MAX mark if necessary.
46Engine coolant renewal
1•20Every 2 years
46.4b Releasing the bleed spigot cap -
OHC engine46.4a Radiator drain plug (arrowed) -
OHC engine
Every 2 years (regardless of mileage)
procarmanuals.com
Page 29 of 255
14Take the weight of the engine and remove
the two engine bearer-to-mounting nuts.
15Lift the engine/transmission, at the same
time lowering the trolley jack. Draw the unit
forwards and lift it out of the engine bay.
16Temporarily refit the anti-roll bar if the
vehicle is to be moved.
1With the engine and gearbox on the bench,
remove the starter motor.
2Remove the bolt from the engine adapter plate.
3Remove the bracing strap and the
remaining engine-to-bellhousing bolts.
4With the aid of an assistant draw the
gearbox off the engine. Do not allow the weight
of the gearbox to hang on the input shaft.
1It is best to mount the engine on a
dismantling stand, but if this is not available,
stand the engine on a strong bench at a
comfortable working height. Failing this, it will
have to be stripped down on the floor.
2Cleanliness is most important, and if the
engine is dirty, it should be cleaned with
paraffin while keeping it in an upright position.
3Avoid working with the engine on a concrete
floor, as grit can be a real source of trouble.
4As parts are removed, clean them in paraffin.
However, do not immerse parts with internal
oilways in paraffin as it is difficult to remove,
usually requiring a high pressure hose.
5It is advisable to have suitable containers to
hold small items according to their use, as this
will help when reassembling the engine and
also prevent possible losses.
6Always obtain complete sets of gaskets
when the engine is being dismantled, but
retain the old gaskets with a view of using
them as a pattern to make a replacement if a
new one is not available.7When possible, refit nuts, bolts and washers
in their location after being removed, as this
helps protect the threads and will also be
helpful when reassembling the engine.
8Retain unserviceable components in order
to compare them with the new parts supplied.
9A Torx key, size T55, will be needed for
dealing with the cylinder head bolts. A 12-
spline key (to fit bolt size M8) will be needed
for the oil pump bolts. Other Torx and 12-
spline bolts may be encountered; sets of the
keys required to deal with them are available
from most motor accessory shops and tool
factors.
10Another tool which is useful, though by no
means essential, is a valve spring compressor
of the type which hooks under the camshaft
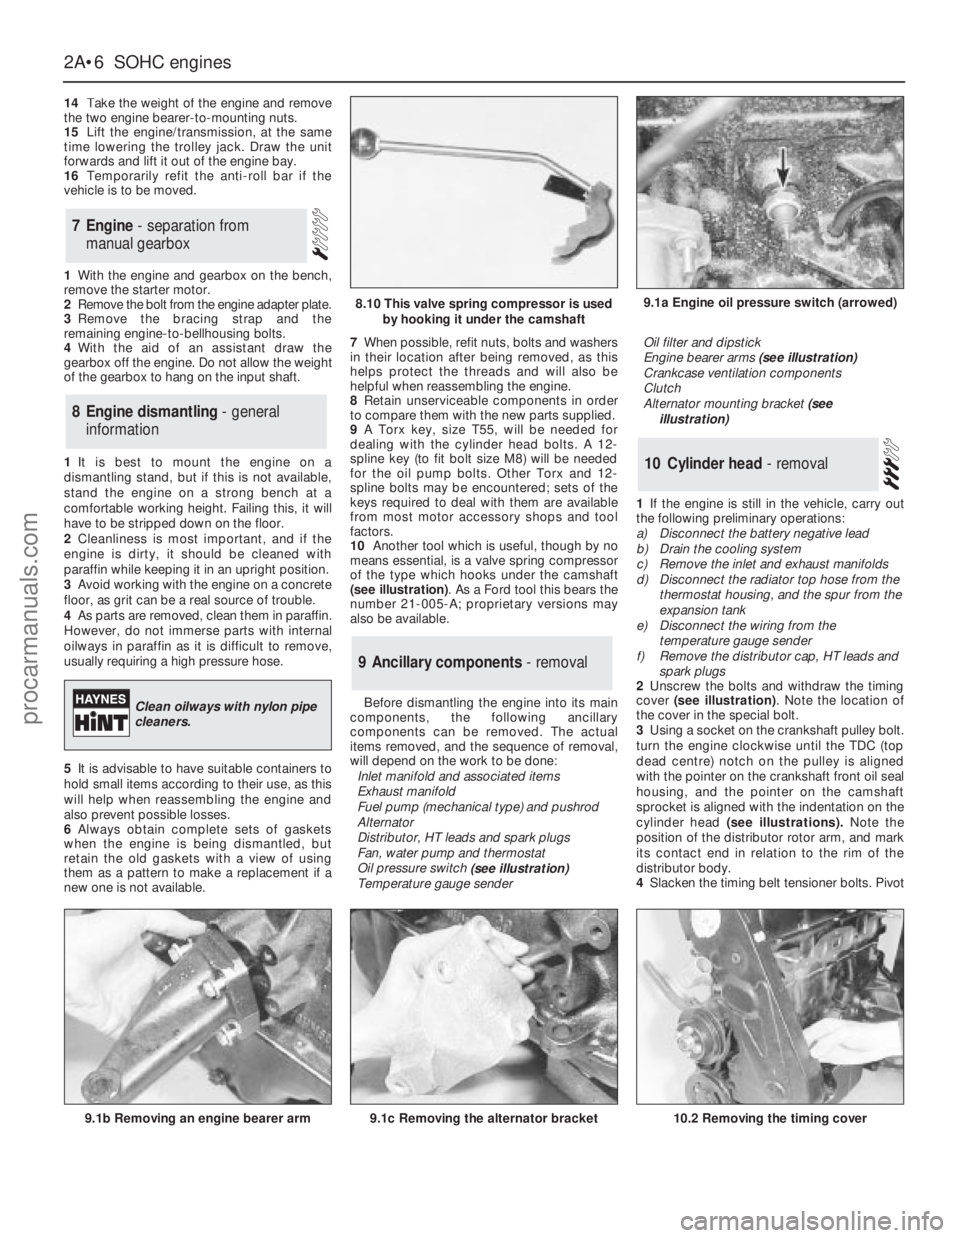
(see illustration). As a Ford tool this bears the
number 21-005-A; proprietary versions may
also be available.
Before dismantling the engine into its main
components, the following ancillary
components can be removed. The actual
items removed, and the sequence of removal,
will depend on the work to be done:
Inlet manifold and associated items
Exhaust manifold
Fuel pump (mechanical type) and pushrod
Alternator
Distributor, HT leads and spark plugs
Fan, water pump and thermostat
Oil pressure switch
(see illustration)
Temperature gauge senderOil filter and dipstick
Engine bearer arms (see illustration)
Crankcase ventilation components
Clutch
Alternator mounting bracket (see
illustration)
1If the engine is still in the vehicle, carry out
the following preliminary operations:
a)Disconnect the battery negative lead
b)Drain the cooling system
c)Remove the inlet and exhaust manifolds
d)Disconnect the radiator top hose from the
thermostat housing, and the spur from the
expansion tank
e)Disconnect the wiring from the
temperature gauge sender
f)Remove the distributor cap, HT leads and
spark plugs
2Unscrew the bolts and withdraw the timing
cover (see illustration). Note the location of
the cover in the special bolt.
3Using a socket on the crankshaft pulley bolt.
turn the engine clockwise until the TDC (top
dead centre) notch on the pulley is aligned
with the pointer on the crankshaft front oil seal
housing, and the pointer on the camshaft
sprocket is aligned with the indentation on the
cylinder head (see illustrations).Note the
position of the distributor rotor arm, and mark
its contact end in relation to the rim of the
distributor body.
4Slacken the timing belt tensioner bolts. Pivot
10Cylinder head - removal
9Ancillary components - removal
8Engine dismantling - general
information
7Engine - separation from
manual gearbox
2A•6SOHCengines
9.1a Engine oil pressure switch (arrowed)
9.1b Removing an engine bearer arm9.1c Removing the alternator bracket
8.10 This valve spring compressor is used
by hooking it under the camshaft
Clean oilways with nylon pipe
cleaners.
10.2 Removing the timing cover
procarmanuals.com
Page 31 of 255
1Remove the camshaft as described in the
previous Section. (If tool 21-005-A is available,
leave the camshaft in place until the valves
have been removed).
2Using a valve spring compressor, compress
each valve spring in turn until the split collets
can be removed. Release the compressor and
remove the cap and spring, keeping them
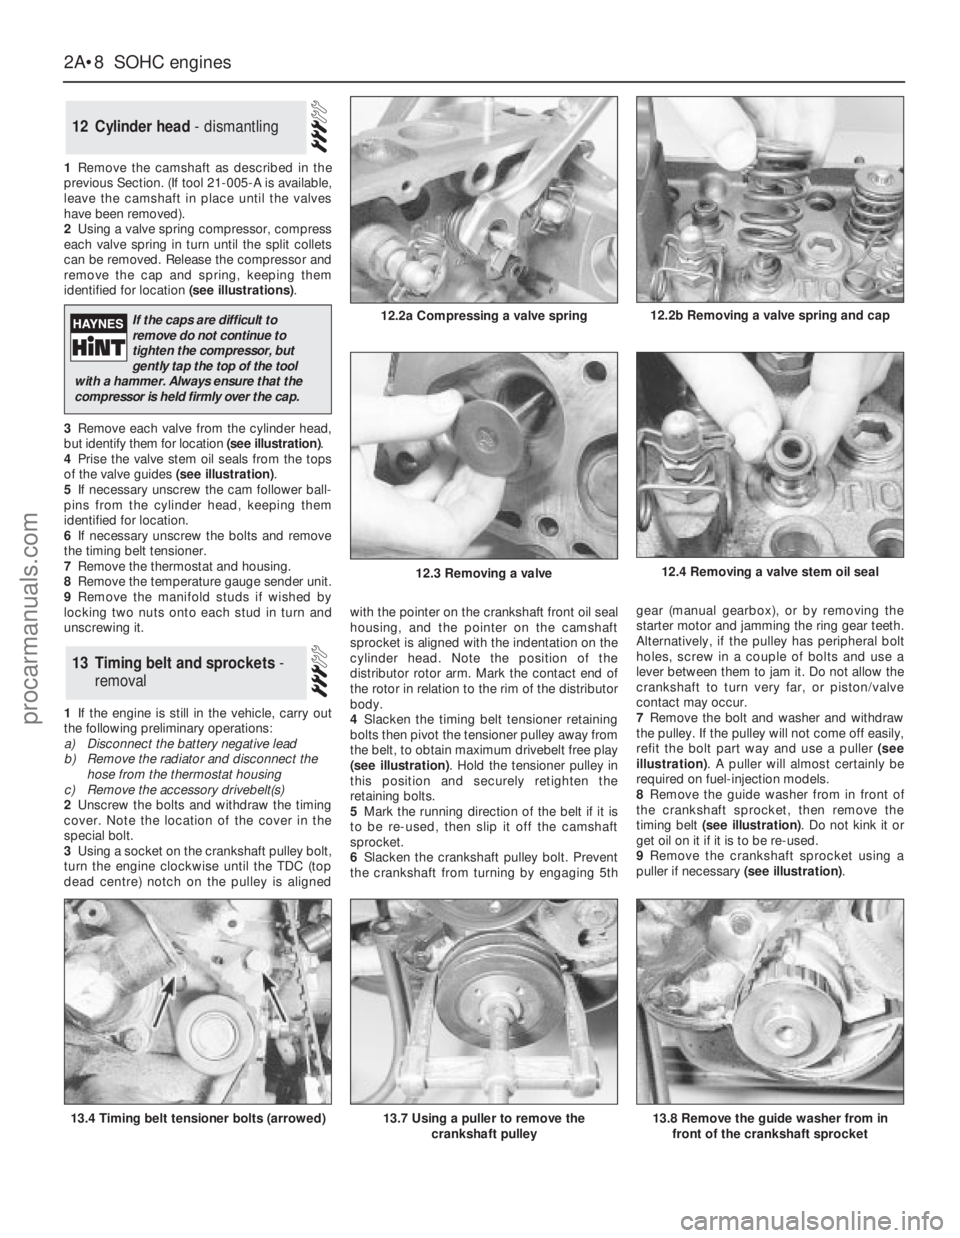
identified for location (see illustrations).
3Remove each valve from the cylinder head,
but identify them for location (see illustration).
4Prise the valve stem oil seals from the tops
of the valve guides (see illustration).
5If necessary unscrew the cam follower ball-
pins from the cylinder head, keeping them
identified for location.
6If necessary unscrew the bolts and remove
the timing belt tensioner.
7Remove the thermostat and housing.
8Remove the temperature gauge sender unit.
9Remove the manifold studs if wished by
locking two nuts onto each stud in turn and
unscrewing it.
1If the engine is still in the vehicle, carry out
the following preliminary operations:
a)Disconnect the battery negative lead
b)Remove the radiator and disconnect the
hose from the thermostat housing
c)Remove the accessory drivebelt(s)
2Unscrew the bolts and withdraw the timing
cover. Note the location of the cover in the
special bolt.
3Using a socket on the crankshaft pulley bolt,
turn the engine clockwise until the TDC (top
dead centre) notch on the pulley is alignedwith the pointer on the crankshaft front oil seal
housing, and the pointer on the camshaft
sprocket is aligned with the indentation on the
cylinder head. Note the position of the
distributor rotor arm. Mark the contact end of
the rotor in relation to the rim of the distributor
body.
4Slacken the timing belt tensioner retaining
bolts then pivot the tensioner pulley away from
the belt, to obtain maximum drivebelt free play
(see illustration). Hold the tensioner pulley in
this position and securely retighten the
retaining bolts.
5Mark the running direction of the belt if it is
to be re-used, then slip it off the camshaft
sprocket.
6Slacken the crankshaft pulley bolt. Prevent
the crankshaft from turning by engaging 5thgear (manual gearbox), or by removing the
starter motor and jamming the ring gear teeth.
Alternatively, if the pulley has peripheral bolt
holes, screw in a couple of bolts and use a
lever between them to jam it. Do not allow the
crankshaft to turn very far, or piston/valve
contact may occur.
7Remove the bolt and washer and withdraw
the pulley. If the pulley will not come off easily,
refit the bolt part way and use a puller (see
illustration). A puller will almost certainly be
required on fuel-injection models.
8Remove the guide washer from in front of
the crankshaft sprocket, then remove the
timing belt (see illustration). Do not kink it or
get oil on it if it is to be re-used.
9Remove the crankshaft sprocket using a
puller if necessary (see illustration).
13Timing belt and sprockets -
removal
12Cylinder head - dismantling
2A•8SOHCengines
12.2a Compressing a valve spring
13.4 Timing belt tensioner bolts (arrowed)13.7 Using a puller to remove the
crankshaft pulley
12.4 Removing a valve stem oil seal
13.8 Remove the guide washer from in
front of the crankshaft sprocket
12.2b Removing a valve spring and cap
12.3 Removing a valve
If the caps are difficult to
remove do not continue to
tighten the compressor, but
gently tap the top of the tool
with a hammer. Always ensure that the
compressor is held firmly over the cap.
procarmanuals.com
Page 51 of 255
together, guide the torque converter studs
through the holes in the driveplate. When the
engine is positioned flush with the engine
adapter plate and the transmission housing,
check that the torque converter is free to move
axially a small amount before refitting and
tightening the engine-to-transmission bolts.
6Do not tighten the torque converter-to-
driveplate nuts until the lower engine-to-
transmission bolts have been fitted and
tightened.
7Ensure that the roadwheels and the steering
wheel are in the straight-ahead position then
align the marks made on removal and
reconnect the intermediate shaft to the
steering gearing. Tighten the clamp bolt to the
specified torque.
8Reconnect the selector rod and adjust as
described in Chapter 7, PartB.
9Refit the propeller shaft.
10Refit the exhaust system.
11Fill the engine with the correct grade and
quantity of oil.
12Check the throttle cable adjustment. Where
necessary, also adjust the speed control cable
in the same way so that there is only a small
amount of slack present in the cable.
13Reconnect the coolant hoses to the water
pump housing.
14Fill the cooling system.
15Check and if necessary top-up the
transmission fluid level.
16Tighten all fixings to the specified torque,
where applicable.
Proceed as described in Part A, Section 23
of this Chapter but note that on certain
models, it may be necessary to unbolt the
engine mounting brackets from the cylinder
block to allow sufficient clearance to remove
the mountings.
1Refer to Part A, Section 8 of this Chapter,
paragraphs 1 to 8 inclusive.
2A selection of splined and Torx sockets will
be required to remove many of the bolts when
dismantling the engine.
3Before dismantling the main engine
components, the following externally mounted
ancillary components can be removed.
a)Inlet manifold (and carburettor, where
applicable).
b)Exhaust manifold.
c)Alternator.
d)Water pump, and thermostat.
e)Water pump/alternator drivebelt tensioner.
f)Distributor cap, HT leads and spark plugs.
g)Oil pressure warning lamp switch.
h)Crankshaft speed/position sensor.
i)Oil filter.
j)Dipstick.
k)Engine mounting brackets (if not already
done).
l)Crankcase ventilation pipe and hoses.m)Clutch.
n)Alternator mounting bracket.
o)Air conditioning compressor mounting
bracket (where applicable).
p)Engine lifting brackets.
Note: A puller will be required to remove the
crankshaft pulley. A new crankshaft pulley bolt,
a new timing chain tensioner plunger
assembly, new upper and lower timing chain
cover gaskets and a new camshaft cover
gasket and reinforcing sleeve sealing rings
must be used on refitting.
1If the engine is in the car, carry out thefollowing operations.
a)Disconnect the battery negative lead.
b)To improve access, remove the radiator. It
will be difficult to remove the crankshaft
pulley with the radiator in place.
c)On carburettor models, remove the air
cleaner.
d)On fuel-injection models, remove the air
inlet hose, plenum chamber and air
cleaner lid as an assembly.
e)Disconnect the breather hose from the
camshaft cover.
f)Remove the distributor cap and HT leads,
and the rotor arm and housing.
2Proceed as described in paragraphs 2 to 11
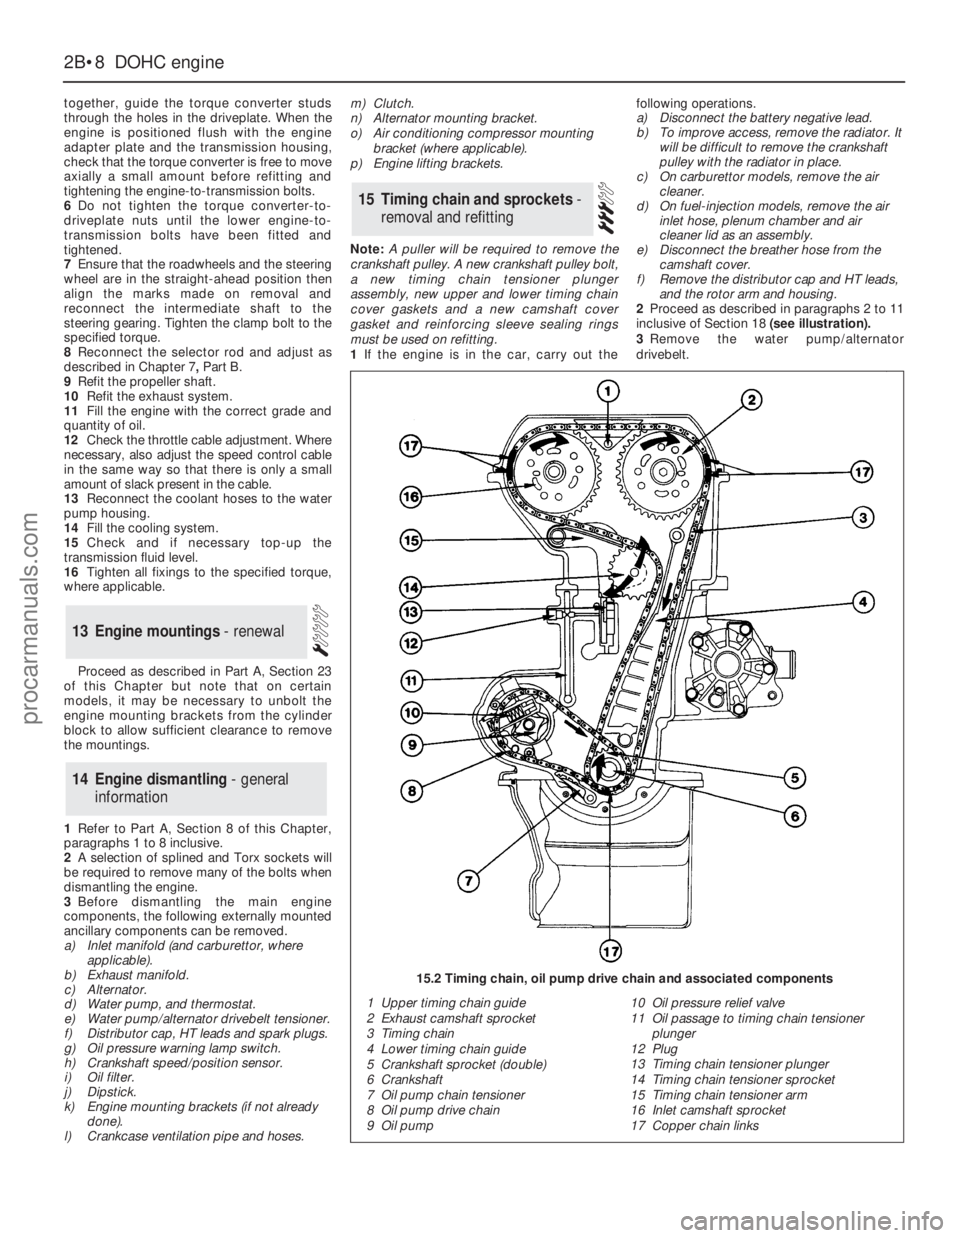
inclusive of Section 18 (see illustration).
3Remove the water pump/alternator
drivebelt.
15Timing chain and sprockets -
removal and refitting
14Engine dismantling - general
information
13Engine mountings - renewal
2B•8DOHCengine
1 Upper timing chain guide
2 Exhaust camshaft sprocket
3 Timing chain
4 Lower timing chain guide
5 Crankshaft sprocket (double)
6 Crankshaft
7 Oil pump chain tensioner
8 Oil pump drive chain
9 Oil pump10 Oil pressure relief valve
11 Oil passage to timing chain tensioner
plunger
12 Plug
13 Timing chain tensioner plunger
14 Timing chain tensioner sprocket
15 Timing chain tensioner arm
16 Inlet camshaft sprocket
17 Copper chain links
15.2 Timing chain, oil pump drive chain and associated components
procarmanuals.com
Page 58 of 255
d)Disconnect the breather hose from the
camshaft cover.
e)Remove the distributor cap and HT leads,
and the rotor arm and housing. If
necessary, mark the HT leads to aid
refitting.
2Proceed as described in paragraphs 2 to 15
inclusive of Section 18.
3Examine the surfaces of the camshaft
journals and lobes and the contact surfaces of
the cam followers for wear. If wear is
excessive, considerable noise would have
been noticed from the top of the engine when
running, and new camshafts and followers
must be fitted. It is unlikely that this level of
wear will occur unless a considerable mileage
has been covered. Note that the cam followers
cannot be dismantled for renewal of individual
components.
4Check the camshaft bearing surfaces in the
cylinder head and the bearing caps for wear. If
excessive wear is evident, the only course of
action available is to renew the cylinder head
complete with bearing caps.
5Check the cam follower bores in the
cylinder head for wear. If excessive wear is
evident, the cylinder head must be renewed.
6Check the cam follower oil grooves and the
oil ports in the cylinder head for obstructions.
7Refit the cam followers and the camshafts as
described in paragraphs 27 to 55 of Section 18.
8If the engine is in the vehicle, reverse the
operations given in paragraph 1.
Refer to Part A, Section 15 of this Chapter,
noting the following points.
a)If the engine is in the car, refer to Chapter
6 when removing and refitting the clutch,
where applicable.
b)The flywheel/driveplate securing bolts
must be renewed on refitting; the new
bolts are supplied ready-coated with
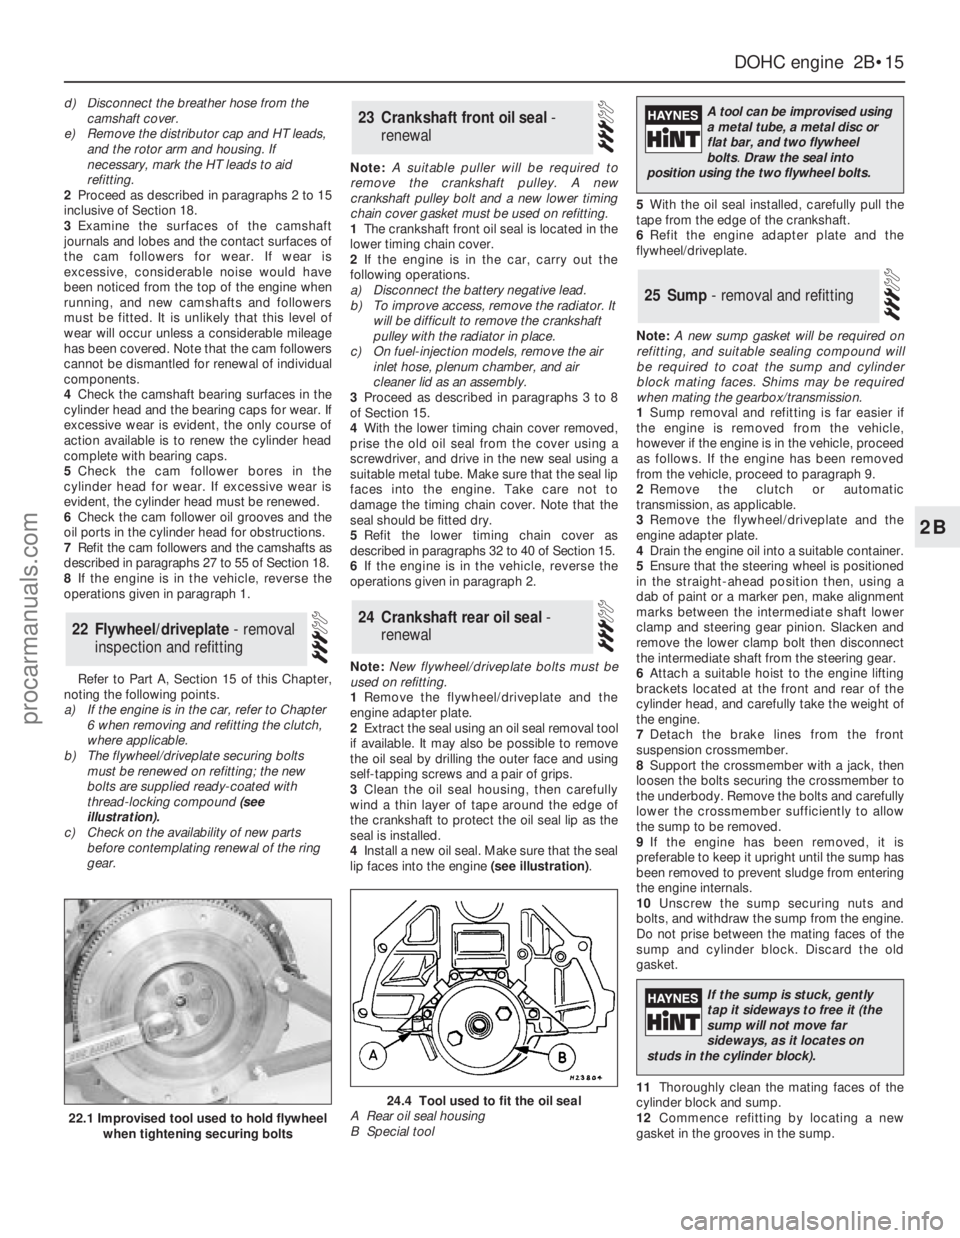
thread-locking compound (see
illustration).
c)Check on the availability of new parts
before contemplating renewal of the ring
gear.Note: A suitable puller will be required to
remove the crankshaft pulley. A new
crankshaft pulley bolt and a new lower timing
chain cover gasket must be used on refitting.
1The crankshaft front oil seal is located in the
lower timing chain cover.
2If the engine is in the car, carry out the
following operations.
a)Disconnect the battery negative lead.
b)To improve access, remove the radiator. It
will be difficult to remove the crankshaft
pulley with the radiator in place.
c)On fuel-injection models, remove the air
inlet hose, plenum chamber, and air
cleaner lid as an assembly.
3Proceed as described in paragraphs 3 to 8
of Section 15.
4With the lower timing chain cover removed,
prise the old oil seal from the cover using a
screwdriver, and drive in the new seal using a
suitable metal tube. Make sure that the seal lip
faces into the engine. Take care not to
damage the timing chain cover. Note that the
seal should be fitted dry.
5Refit the lower timing chain cover as
described in paragraphs 32 to 40 of Section 15.
6If the engine is in the vehicle, reverse the
operations given in paragraph 2.
Note: New flywheel/driveplate bolts must be
used on refitting.
1Remove the flywheel/driveplate and the
engine adapter plate.
2Extract the seal using an oil seal removal tool
if available. It may also be possible to remove
the oil seal by drilling the outer face and using
self-tapping screws and a pair of grips.
3Clean the oil seal housing, then carefully
wind a thin layer of tape around the edge of
the crankshaft to protect the oil seal lip as the
seal is installed.
4Install a new oil seal. Make sure that the seal
lip faces into the engine (see illustration).5With the oil seal installed, carefully pull the
tape from the edge of the crankshaft.
6Refit the engine adapter plate and the
flywheel/driveplate.
Note: A new sump gasket will be required on
refitting, and suitable sealing compound will
be required to coat the sump and cylinder
block mating faces. Shims may be required
when mating the gearbox/transmission.
1Sump removal and refitting is far easier if
the engine is removed from the vehicle,
however if the engine is in the vehicle, proceed
as follows. If the engine has been removed
from the vehicle, proceed to paragraph 9.
2Remove the clutch or automatic
transmission, as applicable.
3Remove the flywheel/driveplate and the
engine adapter plate.
4Drain the engine oil into a suitable container.
5Ensure that the steering wheel is positioned
in the straight-ahead position then, using a
dab of paint or a marker pen, make alignment
marks between the intermediate shaft lower
clamp and steering gear pinion. Slacken and
remove the lower clamp bolt then disconnect
the intermediate shaft from the steering gear.
6Attach a suitable hoist to the engine lifting
brackets located at the front and rear of the
cylinder head, and carefully take the weight of
the engine.
7Detach the brake lines from the front
suspension crossmember.
8Support the crossmember with a jack, then
loosen the bolts securing the crossmember to
the underbody. Remove the bolts and carefully
lower the crossmember sufficiently to allow
the sump to be removed.
9If the engine has been removed, it is
preferable to keep it upright until the sump has
been removed to prevent sludge from entering
the engine internals.
10Unscrew the sump securing nuts and
bolts, and withdraw the sump from the engine.
Do not prise between the mating faces of the
sump and cylinder block. Discard the old
gasket.
11Thoroughly clean the mating faces of the
cylinder block and sump.
12Commence refitting by locating a new
gasket in the grooves in the sump.
25Sump - removal and refitting
24Crankshaft rear oil seal -
renewal
23Crankshaft front oil seal -
renewal
22Flywheel/driveplate - removal
inspection and refitting
DOHCengine 2B•15
2B
22.1 Improvised tool used to hold flywheel
when tightening securing bolts
24.4 Tool used to fit the oil seal
A Rear oil seal housing
B Special tool
A tool can be improvised using
a metal tube, a metal disc or
flat bar, and two flywheel
bolts.Draw the seal into
position using the two flywheel bolts.
If the sump is stuck, gently
tap it sideways to free it (the
sump will not move far
sideways, as it locates on
studs in the cylinder block).
procarmanuals.com