Page 177 of 205
76 Chapter 11 Bodywork and fitting
General description
The body is of all-s teel welded construction with impact ilbsorbing hont Dnd rear sections . Anli-burSllocks nrc lilted 10 the doors, ilnd")
)76 Chapter 11 Bodywork and fitting
General description
The body is of all-s teel welded construction with impact ilbsorbing hont Dnd rear sections . Anli-burSllocks nrc lilted 10 the doors, ilnd the
t ailgDte is supponcd by \J
2 Routine nwintenancc
AI the in1erVills speCIfIed in the Routine M"IIl\cnilnCe section in the front 0 1 the nl
Check seal bellS 1 ThorouUh1y check nil sent hellS 101 frayu10 . cu\s,
iheck and lubricafe bonnet and door locks 2 011 the bonnet lock ilnd sillety c~tch ilnt! check thilt they oper~lle correctly. 3 011 illl the (Ioor check strilps ilrld lock hilrwls 4 011 the luel 1IIIer CilP hlnw:! ilnd lock
Check underbody protective coatiog 5 W,th the CM supponed on i1xle stilnds. check the cond,tlon 01 the un(lelbody protcctivc coating. i1nd wherc neceSSilry clean
w
3
M,,;ntcll
The gorH)!
ose solids which lIl.1y have stllt:k to the vehIcle. It is i",portant 10 Ilush these oU in such a way ilS 10 prevent \}lIt 110m scratching Ih(l Irni sh . T11e wheel arches o1I1(f unded'nrne need w~lshln9 in the s;rrne
Wily to remove any aCCUIllUI,lted mud whIch WIll retillll mOlslu re
f or inspection. Periodically, except on vehicles w'lh iI wax· bnsed underbody protec tive cO
After w
4 Mnintenllnce -upholstery MId eMpets
Mats and C
5 Minor body dnnl
rhe phOlo{Jr.1phic SCl/rICIICCS 011 P,IflcS 174 ilfld 175111051'.11" Ihe OIWfil/iofl$ d"lo1Ifcd ill Ih" 101i0willY suh·SCC(IOII$. Note: Fo, mon' (il-1,1iIL'd ili/OlilialiOIl 01/)01/1 I}odywork fCfwir. Ihe U"ylll:s P"hlislllilY Group pu/)/ish II book by Lilli/say POller c!llIed The C,If lJodywork H"II,11f Mill",al flII:~ lIIeorpor"ll!s ;lIlo,,,,,l(ioll on sllcli
Repair of minor scratches it) bodywork II the scratch is very superllclill, MId docs not penetrilte 10 the Illelill 01 the hodywork, repnir is very simple. LIghtly rub the area 01 the scratch with a pilintwork renoviltor, or il vcry line CUtlll'\} p
pa il11work by rubbing Ihe sC/Dtch men w ith iI pilintwork renovator or a
very line culling pils te. Finally, opply wax polish. WhNe the scrotch has penctrDt(ld right through to the metill of the bodywork. causing the mowl \0 rust. iI d ifferent repa ir lechnique is
required. Remove any loosc rus t fronl the bottom 01 the scra tch with a penknile. then apply rUSI inhibiting paint 10 prevent the lormation 01 rust in Ihe future. Using n rubber or nylon appliCiltor fill the scratch with bodystopper paste. II requ ired. this paste Ciln be mixed with cellulose thinners to provide a very thin paste which is ideal for filling narrow scratches. Before t he stopper·paSI(l in the scratch hardens. wrilp il piece 01 smooth COllon rJg i1round the lOp 01 J linger. Dip the finger in cellulose thinners and then quickly sweep it i1CIOSS the surlace of the 5topper-pJste in the scratCh: this will ensure tha t the surfilce 01 the stopper,pilste is slightly hollowed. The scratch can now be p
Repair o f dents ill bodywork When deep denting 01 the vehicle's bodywork hilS taken plilce. the
first wsk is to pull the dent out, untrl t he affected bodywork almost
procarmanuals.com
Page 178 of 205
 Chapter 11 Bodywork and fittin g 17 7
~!t~InS its oriOin,11 sh~flC. There is lillie point in trying to restore the original s hllpe complClC ly, as the me1011 on the darnllged arca will have stret")
) Chapter 11 Bodywork and fittin g 17 7
~!t~InS its oriOin,11 sh~flC. There is lillie point in trying to restore the original s hllpe complClC ly, as the me1011 on the darnllged arca will have stretched on impact ilnd cannOl be reshaped fully !O its original contou r, II is belter to bring the level of the dellt up to 11 poin t which is aboul ~ in (3 111111) below the level 01 the surrounding bodywork . In cases whe.e the dent is very shallow anywi'lY. i, is nOI worth trying \0 pull 1 ou t 111 all, II the ull{lersidc 01 the dent is accessible. il can be hammercd oul gently from behind, using a malleI with a wooden or plastic head. WhilSt doing Ihis. hold a suitable block of wood l'flllly a{),111151 the outside 01 the panel 10 absorb the impact from the hammer blowS and thuS Il,event 11 Imge area of the bodywo.k hom being 'belled,ouf, Should tho dem be in a section of tho bodywo.k which has iI double skin or SOI1IIl other filclOr mokil1g It inaccesslhle from behind, a
dllferent technique is cillied lor, Drill severill sm;1U holes through the
mewl II1slde the i1reil (Jilrtlcul,ldy in tho deeper section, Then screw long sel1·tap~ing screws into the holes IllSt suffIcien tly for Ihem to gilln iI good purchase In the mewl. Now the Ilen t C"n he 1)lJlled out by pulllllg on the protruding headS of the screws wllh iI pnll of pliers. The no.t stilgo of the rep,lir is the .emOllill of the PilUlt from the 113Ued meil, and hom nn Inch or so of tho SurroundlilU 'SOUfl(r
Jdywork , Tills is accomplished most oilslly by usil1U a wire brush or ab'~sllle pild on " ,)owe< dflll, ~,lthou9h It Clln he done Just i1S e ively hy hnmf usmg shoots 01 1I1)'i151110 P.l,)C •. To COlll,llete the p
Repair of fIIst holes or gashes ill bodYWOlk Romovo i111 point f rom the affected ;lIen i1nd from ifn IIlch or so 01 the surrounding 'sound' bodywork. using ;1Il nll.a$llIe pnd or 11 wire brush on 0 power drill. If these iIIe not i111",lahle a few sheets 01 abrasive pilper will do the job JUSt as offoctivilly Wrth the paint removed you will be able to gauge the sovori ty of the corrosion alld
thorelore decide whether to renew the whole polllel (II this IS possihle) or to .ep[lir the affoctod illoa. New body Po1nols arc not ,1S expensive as mos t flCOple think and it is often (Iuicker and mo.e satislacto • .,. to fit" new t)anelthan to auempt to rellair larue n.e,1S 01 corrosion.
RenlOlifl all f,llln\Js hom the .. lIeeted a.o" cxcoptthose which Will
act ~s ,1 uu,(ie t o the oliUllwl shape 01 the (i,lIlla\je(i bodywork (ell hn,1(1lnll1l) ~h.~lIs etc). ThOll, USlnu tin snIps or ~ h"cks
all 100SI) met,,1 ,,,,d allY other IIwtill b;I(I'Y 1IIIo.:t..,d hy cOffosion H"lIllller tIro cdIJlls 01 lire hole Il\wartfs In Older to CW1Ite a shulrt
d epreSSion fo r Ih c frllcr pas\(!
'll/lle hrush the aHected Me[l to 'CIilOlle tiro powdery rust from the ,ICO 01 the lelllilllllll!l lIlet,,1 P;lInl thc "flected arc" wllh lUst
IIII"I)ltll1l) p""'t. If the hilck 01 the ,usle.1 me,1 's accesSlhle treolt tillS
" delo.o frlhflU cml t
some w".,. . Th,s COil be [lchl(~ved by tho use 0 1 aluminium o. Illastlc
me sh. or altlflll1l1um t",Joe. AlulIll"'um 0' pl;1strc mesh IS Il.oh"bl.,. lile hest m
lar\Je holo. Cut a I>.eeo to tho "pprOXlfll"te Srte ;1n(1 sh[lpe 01 the hole to he frlled. then pOSit lOll It in tho 11010 so th;rlltS ed!leS arc below the lovel 01 the sUffoundrng bodywork. It c"n he ret"mcd in position by sevcral blobs of hiler paste [lround Its per'l)lIelY,
Aluminium wpe should be us ed lor slll ;rll 0' vCly narrow holes. Pull a picce oil tho .011 ond tri'" It to tho apIl
r equired, Ihe n pull off the backrng p,1por (If used) and stick th e tape
ove . the hole, rt C[ln be overlapped II tho thickness of one piece is
i nsufficient. Burnish down the 00ges of tho tapO With the handle 01 "
screwdrillC ' or srmllOf, to ensure that the ",po.s securely auached to the
metal undomeath .
Bodywork rCIJ<1irs -filling a"d re-sprayi"g BefOte uSlIlg thiS Seetion, soe the Sections on denl. doep scratc h.
rust holes "nd gash repai.s . M~ny types of hodyfllfer Me ~val'ahlo, but Uonerally spe~k.ng those nrOpnelOry kits which conlain 0 till of f illor paste and a tube of resin h~fdener Me best for this type of rcp,llf A wide, !ieKilJle plured fUlish 10 thc surface 01 Ih c filler , h up a hulc fille. 011 a cle,,,, piece 01 card or boo.d -measure tho
hardener carefully (follow the m"kCI's instructions on the pack) othe.wrse thO folic. Will !>tt too rill)luly or tOO Slowly . Using the
"pplicator apply the filler paste to Ihe prcpared area: draw the
applicalOr across the surfaco 01 tho IllIer to achieve the correct contour and to lovel the fillef surface. As soon /1S it contour that approxim"tes 10 thO corrOCt one is achielled, SlOp wo.kinU the pas le - il you carryon too long the pasto will becomc sticky and begin to 'pick up' on tho
app lic"tol. Continue to add thin layels of Iiller paste at twenty· minute intervals until the level of the filler is just pfoud of the surrounding bodywork Once the IllIer has hardened, excess can be removed using a met;!1 plane or IiIe. F.om then on. progressively finer grades of abrasive paper should be used. starling with a 40 grade p.oduction paper and l.nishing With 400 o."de wet·and·dry paper . Always wrap the abrasille p"pcr IIrOUlld a flat rubber, cork. or wooden block -otherwise the surfaco 01 the frller Will nOI be completely flat. DUling the smoothing of the fIller SUI face the wel·and·dry paper shoufd be periodically rinsod in walCr. ThiS will ensure thaI alle.y smooth linish is imparted 10 the frller (It th O flllni SHIIJO. At t!\l S st1lge the 'dont ' shoul(! be surrounded by a ring of bme
mowl, whIch in IUfn Should he encirclod !.Iy the finely 'feathered' edge
0 1 th e good paintwork . Rinse tho repair nrea wilh clean water, until all 01 the dust I>roduced by the rubblllu·down operation has gone. Sp."y the whole .ep.1ir a.oa with" light coat of primer -this will show UI> any ,mpcrfOChons in lhe su.face of the fll1e •. Repai. theso Iml)CdectlOIlS with frosh 1,110' paste or bodySlOpper, and onco mOte
smoOth the sUflaper, If bodystopper is used, it c"n he mixed wllh cellulose thinnors to lorm a really thi n p.1Ste which is Idt(lllo, "'''ng smilll holes. Repeat this spray and repair procedure until you a.o satIs fied th"tthe sudaco of the filler, and the fe
thl'.! pnintwork nrc perfect. Ctean thO rep"ir ;lfea with clean water and .1l1ow to d.y fully, The .ep,," arc" is now ready for 1",,,1 sprilying. Paint spraying muSI
he call1od out in a w".m, dry, wind loss and dus t free atmosphero. This condition can be created mtllicially II you have access to a large indoor working "reil. but rl you nre lorced to work in the open. you Will have to pick your day lIe.y ca.efully . II you a.e working indoors. dousin\J the
floor in the work mea with water will holp 10 SOllie the dust which would otherwise be in the iltmosphe.e . If the ,epai. mea is con fined to one bod.,. pilllOl, mask off tho SUffoundlflg panels; lhis Will hell) 10 minllllise tho effocts 01 a slight mis,match in lH,lint colou.s Bodywo.k hUUlUS (eU ch.omo strips. door handles Otc) Will "'SO noed to be
"';1sked ot! Use uenume fII
thon s pray n tes t mea (0' I>enod,cally . insed III w"ter. Allow to dry befo.e sprayinu 011 mOl(l ,laln t
S ilray on t he t op CO"1. "\Jain bUlldmu ull the tluckness by usul9
sOllof1lllhlfl'"ye .s 01 p<111l!. S Ia .t spraying in theCllnlre 01 the .epair mOil and theil, USH\g a clfcular mOllon, work outwards untrlthe whole ropmr
"rea ond al>out 2 inches 01 tho surrounding origmal pallltwork IS COvered Remolle allm"sklng mnteflaf 1010 15 minutes alter spr
paint Illto the OXlst lng paintwork . Frnally. apply wax polish
Plastic compOllc"ts Wllh the use 01 mo.o and more pl"stic l>ody components by the
vehrcle manufac turers (eg bumpers, spolle.s. and in some cases major
body panels). reCllilcation 01 damago to such items .hilS .t.>e<:0me a
mOller o f eHhor emruSling relhl'r wOtk to a specialist m thiS field, o. renewing complete components Rep"ir by the DIY owner is nOlleillly feaSible owing to Ihe cost of the equipmen t and materials reQui.ed for effecting such repairs. The baSIC technique inllolves making a grOOllo
atong th o hno of the crack in the plastic using a rotary hurr in a pow~r drill. The damnged pal! is then welded hack togeth er by uSing a hot "" gun to heat up nnd luse a pl
plastiC is then remolled an(lthe Mea .ubbed down to a smooth l in ish. I t IS Ifnpo.t3nt that a IllIer rod 0 1 tho correc t plas tic IS used. as body components can b e made of a lIaliety 01 dlHerenl types (eu
polyca.bonate. ABS, poIYllropylene) .
procarmanuals.com
Page 179 of 205

17 8 Chapter 11 B odywork and fitting
If the owner is renewing ~ complete component himself. he will be left with the problem of IlIldmg a sUI1
6
Major u o d y damage - repair
Where serious danHlge has or.cur",d or la,ue aWroperly and. secondly. nneven slresses w,1I be Impos".r nil tli,! S1o:"rmu. (!n\l'n(~ nnrt
Ir
7 Door r
The most common C
(,1)
Loose door or window winde, ",,,,dft,!; (Ii) Loose 0' lIIiS.lliUned d(Jo, lock c(lillj/olJC!lJl~ (c) Loose or worn relllOle con/iol ""."/."";",i$III
2 It IS quite possrule 10' r,rllies 10 he the ",suit of" [O,,,lrrllirl,Orl 01 111<.1 atrove laullS. so a c;,r(:/ul <.1xanrrrr;riron should he rn",h, 10 ilCIl'UllU1e III<, exact CillrSf:! 3 If
cd\Jes A and B (FIIJ . 11 1) should I", p,Hirl l,,) ,md "an he d1ecked by slrrnm\J a torch tlrrou\jh Ihe dOllr \Jap lrom "iJovo 'Irld Irelow the strrker • Cheek the
..
)
7 .3 Door striker plate
f ,i
j
I
j
I
\:
it
1
(.'----+"<, --'-1 ------<0
00>-----1\.. -~--.
F i!J.1l.1 A lignin!J the s triker 10 lock support plnte (Sec 7)
Edyes A and lJ shoold be 1'.1(.lllel
A
'0- - -- . ,
,'---I.::i.I I ,
--/
F ig 11.2 Lock claw·to·striker cleiHance (Sec 7)
A -70,11111 (028111)
5 Wrlh t he lock in the open positron. check the lock cl
milterral on Ihe siroker POSI ,lnd cheding Its hergllt n!tar gently closll1g the doo •. The striker plale call be reposnroned verlrC
d lmensron. bw t~ke Colle 10 not to dislurb any prevrous milral se1\lI1gs 01 Ihe pl,lte.
8 Bumper s -removal nnd refitlin g
FrOIll bumpN 1 D,sconnect the u<.rttery earth lend. Also where necessary dis connect the IIldrC
3 Renlove the fOI" bumper rewining screws (pholo) nnd hit away the bumper. On Imer models drser1!lage the bumper corner sectiOns f,om the body side clips as the I)umper IS wnhdrJwn. <1 Refrl1ing r$ the reverse 01 the removal p.ocedure. but do nOI fully truhlCn Ihe uolts unlrl tire bumper is correclly aliUned .
Rear bUll/pel 5 Open the lJ.tgate. Ihen rernOve the mal ilnd the sub·floor. G Remove the Jack ilnd washer water reservOIr (where applrcable) . 7 Remove the two nuts. Sp",l(J wilsher and 11m wilshers.
procarmanuals.com
Page 180 of 205
 (S,!,; H)
1 /\"\"., \"II/III!} /\",11./..\"/
830\" 1.,10\" 1I1I\"ld~ Ill\" 1\"\"\"1\"\" C(I\"\"\" \"\".11111 ~'\"�")
Clwptcr 11 Bodywork and fitting 179
AI
I
FiO 11.3 F 'Olll humpe r mnlOOlIill!) (S,!,; H)
1 /"'"., '''''"II/III!} /",11./.."/
830" 1.,10" 1I1I"ld~ Ill" 1"""1"" C(I""" ""'.11111' ~'"·W~ ... " 1,".11,,01 IJencalli pl.I'I,,: C:;IP~
g.2A RClllOVII1\j Ihe uppcr
8 i1ef'III1lU IS the ,eve,se of ,he lemov~1 p.oce
tigillell the nulS unlil the 11IIIlIpCI 'S conectly ~lllll)cd
Bumper (rim strips 9 The bUlnpei tllm stilPS c~" b" lemoved. iIlHI'l:pl,lCCIIH:OOI$lollcd. hy P '0 lh(:rll,n ~nd oul of Ihe 'l:I;"",nu U'OOVC S Till: )oh IS 1ll,,,Jc a 1o111e ea~'
grOov e
(2.. (6"") --
Fi! 1 11.' Roar hUIl'pcr ",Olu,lin(l (Sec 5)
87 Ikal I"JIl'p'" "'1.11"""1 nlJt~ (dllllw"d)
.. "
... '~{"';~~...,:r--~'~~
. . _",1'--
"
9 .2B ... and IOWN I,,(I,atOl (lrdlc mOIlIlI"'U ~crcws
9 Radialor grille -removal Dnd refitting
1 Discoilneci th e bmtery eDllh lead Open the 1)01'"'"
•
2 Remove the moun''''1J screws and W,"SI""5 ,,,,d loll "w,IY the 911l1e (photo). On early mod(:ls II IS necessary lO (1'$[01"",<: 1 th" ,nd,cator wiring belore the 11"l le con be rc:move d hilly 3 Reiollin(l IS a revels,11 of removn l.
'I
procarmanuals.com
Page 181 of 205

.80 Chapter 11 B odywork and fitting
10 Windscreen -re rnavnl and re titting
II you ;lIe unlo,'unnlO enough 10 h:1\IO .1 wind$CICCIl shallC., 01 should you wIsh 10 . enew yOu. present windSClccn. humg J rel)lncemcnt is ono 0 1 the few Johs wluch lhe nvC'alJC owner IS advIsed 10 leave 10 n profeS SIon
;'lIld Ilush r"lIlly (Sr.e Fill 11 5) 4 Whr.n Ihe wemhcrslIIp hns f,ecd Ilse l! fromlhe hody U
'lrfls. 8 Apply ,1 s",,;,hle S\:a lantlO Ih e wealhcrsllIlHn·hndy !Iroovc FI1 a IUle. hut SlrOIlO . 1)ICCe 01 COr(1 .iUhllhe way rOIlIlc1lhe !jIo()ve. ;1IJowII'!1 an ove.laj) 0 1 ,.bout 150 mm (6 111) althe 101nt. 9 F.om oulsid c Ihe car, placo Ihe windSCH!el1 III lI S cnlll'CI pOSIIoOI1. Illnking su re Ihallhe loose end o f Ihe cord is IIlslde Ihe C,l'
1 0 Wilh an assis tant I>ressin g firml y on Ihe ouls.(Je of Ihe windscreen. gOI 1010 Ihe ca. and slowly puU the co.d Ihus d.,lwlng Ihe weathe.SllIll over Ihe body ffnnge (See FiU. 11.6). 11 Apply a lurlher Inye . 01 se"lilllI 10 Ihe omlelslde 01 Ihe lubber·lo·glass groove. from oOlside Ihe car. 1 2 Rellllh(l chromiom flnis hCI suit) Into I1S !!Joove In Ihe weallu"slliP ;"lIld 111 Ih(l clip which covers Ihe ,0inl. 1 3 CmefuHy clc,1 n all ;Iily SUiplus seal;mt 111)'" Ihe wlO\d~;"""..!" 1I';lss. ileJooe 1t ha s a Ch;'l"C!! to h;.,den ilild Ihell leflt the wtndscrecn WI",!r WillS ; IIId blades
11 T ailijato window g lnss -rem ov;,1 nnd rcfitting
Where applicnble. !elllove Ihe window ijl<1sS wipe. nrm and bln(l(l. and calefolly disconnCC I Ihe hunter elemenl conneCliOlls. 2 C,lr(lfully priso OUI Ih o myl;'l r Inser t from the rubber moullhng 3 If possIble. 01l1,1111 hell1110111 an nssist;1II1 nnd "nelolly usc a Illunt blnded scrcw(ffivcr 10 IlU sh the wenthc,slrop hi) "Ionu the u llpe. transverse sCGlion unde. th(l Inl lijnte aperl\lIe flange. When applOxl' Illately two Ihirds o f the wei'lherslllp hi) has been treated III Ihls manne •. pressu. e s holiid be apl>hed to the gl can then Uc removed from the outside. 4 Clean Ihe !tp o f t he wmdow apc.lOre ilnd the ijlnss and weathe'Slrip i f they are to be used ngam. D o not usc solvents soch as pel.ol or white spirit on the weathe,s\lip. ilS Ihese may cause delerioration 0 1 the .u1J1Je •. 5 Wh(ln ' (lfotting. lit I he wenthe.str'p 10 Ihe glass. Ihen inser t a d.awcord in the .01J1Je.·to·body Oroove. so Ihatthe co.d ends eme.ge at the 1JOllom centre with npl>roximately 150 mm (6 in) 01 overlap. Doring this ope.ation it may help to relilm the w(latherstrip t o Ihe glass by using s horl lenUlhs o f ll1ilsking IiIP(l.
G Apply a $uililhle seill,IIl1 to I he hody flilnijo . Posilion Ihe glass and w(lather$llip ;'I5sembly 10 Ihe body i1perlUre nnd pus h up unlil thO wemherstrip Oroove (lngnues tho top tl
(
, I '
I ,
FiU . 11.5 Win dscreen removal (Sec 10)
FiO . 11.6 Windscree" filting using a drawcor d (Sec 10)
8 LubflCillO the mylnr insert wilh a rubbel lobricanl and re lit il. 9 Refit Iho wi,>or arm and blado (whele applicable) and leconne<:t the heale. elemenl connections.
1 2 D
oor rClliote control handle -removal and .elitting
I Flcmovc Ihe door uim panel. as descflhed in SeCI;on 13.
2 Posh Iho rem OIO COnlrol h,lndl(l ilssembly low;"uds the lronl of 1110 C1ll and poll il oot o l lh e opening in Ih(l dool inner pan(ll (photo).
3 L ilt Ihe protec tive cap o ff the rea, and Iwis t Ih(l assembly 10 dis(lngago itlrom Iho operating .od {phOIO).
4 Removo t h(l prO leClivo cap hom Iho operating .od 5 Flel illing is Ihe reV(ltSe of the removal procedu.e.
----------------------------~~ 灲潣慲浡湵慬献捯m
Page 182 of 205
7
""NO~E IISS[~'!I~Y IOVTS'OEI ~ GROI~Mr.1
sell,,',
A'::>.n __ flOI) l)001l lOCo;
H(,u
I)()OH """ill\.
Hr, ( .... Sl co,."nOl
1i!IPJf-e@
\ ___ flO!)
!looTl 10C ..
11m, ------\, ""NIII! 10 I (l1~.
Hl~'1)1I {:Ofll"U)L HOU
---"·\NUI! f\S~1 MU, , ""'Sill! ,
SClll:1
•
S H " .. ElI ,\SSE'.IlI!. '<
lOt:.; IISS(I.1!H'
"""-IJ()Ol' I'''Nf I IN"[I<
FiIJ . 11.7 Door handle ;lssemiJly (Sees 12 .. nd 16)
5' RIK(R PU\I£
-
122 Rt'!m ovlnU the remall! con"ol h~ndle l.oIIl [he door 123 Olsengauc [he remote control handle from Ihe ope.allng 10(1
1 Bl
procarmanuals.com
Page 183 of 205
![FORD CAPRI 1974 Workshop Manual 82 Chapter 11 Bodywork and fitting
3 , n,~(lIOVlr'!J
13 Door trim
Ih" w in, low winder mson ( , ,lIC, models)
panel renoval ,,,,(1 refit" III!]
1 Carefully loll (photo) "p alU l "II" 2](/manual-img/11/56932/w960_56932-182.png "FORD CAPRI 1974 Workshop Manual 82 Chapter 11 Bodywork and fitting
3 , n,~(lIOVlr'!J
13 Door trim
Ih\" w in, low winder mson ( , ,lIC, models)
panel renoval ,,,,(1 refit\" III!]
1 Carefully loll (photo) \"p alU l \"II\" 2")
82 Chapter 11 Bodywork and fitting
3 , n,~(lIOVlr'!J
13 Door trim
Ih" w in, low winder mson ( ' , ,lIC, models)
panel re'noval ,,,,(1 refit" III!]
1 Carefully loll (photo) "p alU l "'II" 2 ' I"e {I", w Remove II", '''dow w"HI",
",,' ",,,,,,,,". ~"'d'" ',.",d'"'·" ,,,"",, .. """" 3 • Remov e Ih~\:hOIOS) u . ",wl\1 sc,ew ,,,,d pull
:0 ",,' po" mol ,,~.""'''''' ,,'''''''''' ,," "" h"",," C~{cfllil (. lOp II .",. ( , !J SCtcws. luon II Y !<""OVc Ill" J Ii lo toS) ,e ",m,est I t. ,,,.note cont , I HOUIJh 10 ilelclt 'Y shduUJ 11 10 . rWiuds ilnd
",'.
13 2A R ",nove 11 h -'" ~clew
lJl1sere I 5 W wile!,,,,,,,,,,, -, h"I() _') I . 01_ InltlO.1 I knob ( I • I P U:
,.,,, .... '''''' """ ",," " """ "" , ..... ,,"' "'" '"'''' ",. " d,,,,",,,, '" ""''0' CO,,,,,,,
d'SCOIlIlCC.l II c ,"m p.mel r til() p,mel UI 7 n I 'U spc~kc' lorn th o do I"""lwork ","""'"'' . w""'" (ph'" "' "."'"' W, """,, '" ,h,,, w,,..,, ,;, "'''"." ,,' ""'"',,' 7" "". "pp''''''''; pOSitIon . () wmduw IS (;1{1' ,u, I" the wm I sp
---
'"
,
13 3A R emove lile st,ews 133B lhen'turn l' remove 11 Ie m rmes! 90 ' 10
13 <1 B Door lock iJul10n 13" R :.:> emoving tl mmOi control kn~~ nul frOlll lhe t)xt eriOi
procarmanuals.com
Page 184 of 205

Chapter 11 Bodywork and fitting 183
.", .
13 6A Door Ir;I" rwool lewining chp 136(3 Oisconll(:CIIIlg spen kOl WiWl!J when ICIllOV;"U Ihe dool Ir"ll p;lnel 14.2 Removing Iho plastic sheel from tho inllcr (Ioor
•
:, .. '
•
14.4A On l a tel models Ihe window IC9ullltor is I;ve ted 10 the doo.
14 Door window rcgul;otor (lsscf11b ly -r el1lov(l1 lmd refining
1 Remove Ihe dool II"n Ihlllei. liS dcscllb(~(1 III lhe preVIOUS Seclloll 2 Peel oH Ihe pl;1StiC shee t (phOto) 3 Teltll)Ol;111ly ICfl1 the wI"der h;1nd le and lowel the WII1(low 4 On emil' models lelllOve the screws SCC!ll"lU the reuul;rIOI ~<~ernbly to Ihe innel dool p;1l1el On l
t mlln pOSition
G Push t he window g lilSS UI) ilnd use ildhcslve t.,pc on eilch Side of Ihe glilSS and over the Window ";rmc to rewin It If It IS to be lelt fO/ lilly
Fig.l1. S Door window regulator assembly (Sec 14)
...r,
14.48 Window regulilto r relay b.acket
sc'ews
l e
nglh of '"lle. usc a wooden SUI>I>o.t ,,5 well 7 W,thdl
15 Exterior door handlo -f(!1ll0vHt (rn(i refilling
1 R eillove Ihe door 11;111 pam:l. ;15 plevlously deSCfibed . 2 Pull aw"y horn the pl"sII c sh ee . 'he cxtello, handle then dlsconncc. 'he .wo corlll&''''iJ hnks from 'he door lock \0 the extello, handlc .
Fig. 11.9 Ex te rior door hlllldle (Sec 15)
procarmanuals.com
 1
1 2
2 3
3 4
4 5
5 6
6 7
7 8
8 9
9 10
10 11
11 12
12 13
13 14
14 15
15 16
16 17
17 18
18 19
19 20
20 21
21 22
22 23
23 24
24 25
25 26
26 27
27 28
28 29
29 30
30 31
31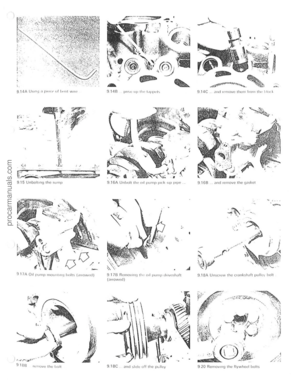 32
32 33
33 34
34 35
35 36
36 37
37 38
38 39
39 40
40 41
41 42
42 43
43 44
44 45
45 46
46 47
47 48
48 49
49 50
50 51
51 52
52 53
53 54
54 55
55 56
56 57
57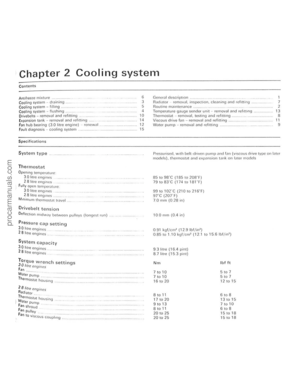 58
58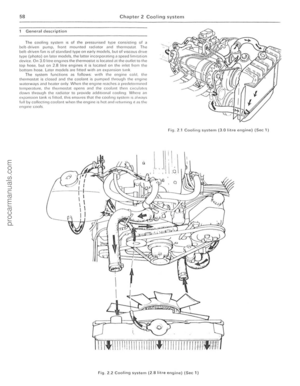 59
59 60
60 61
61 62
62 63
63 64
64 65
65 66
66 67
67 68
68 69
69 70
70 71
71 72
72 73
73 74
74 75
75 76
76 77
77 78
78 79
79 80
80 81
81 82
82 83
83 84
84 85
85 86
86 87
87 88
88 89
89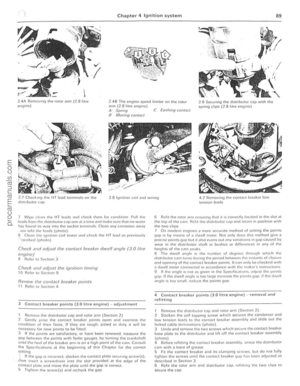 90
90 91
91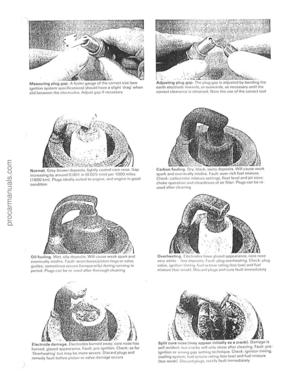 92
92 93
93 94
94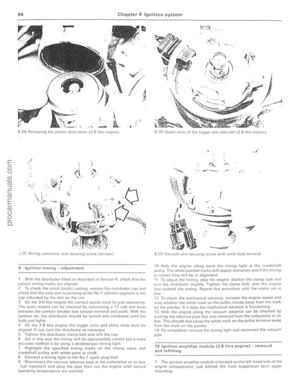 95
95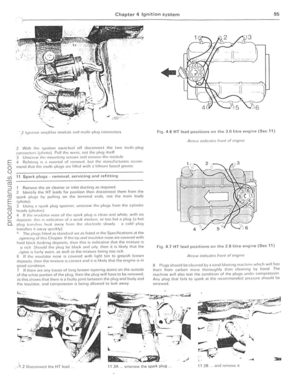 96
96 97
97 98
98 99
99 100
100 101
101 102
102 103
103 104
104 105
105 106
106 107
107 108
108 109
109 110
110 111
111 112
112 113
113 114
114 115
115 116
116 117
117 118
118 119
119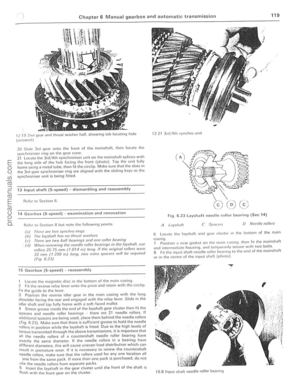 120
120 121
121 122
122 123
123 124
124 125
125 126
126 127
127 128
128 129
129 130
130 131
131 132
132 133
133 134
134 135
135 136
136 137
137 138
138 139
139 140
140 141
141 142
142 143
143 144
144 145
145 146
146 147
147 148
148 149
149 150
150 151
151 152
152 153
153 154
154 155
155 156
156 157
157 158
158 159
159 160
160 161
161 162
162 163
163 164
164 165
165 166
166 167
167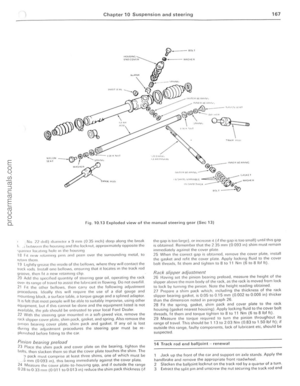 168
168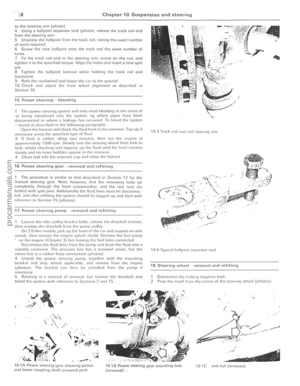 169
169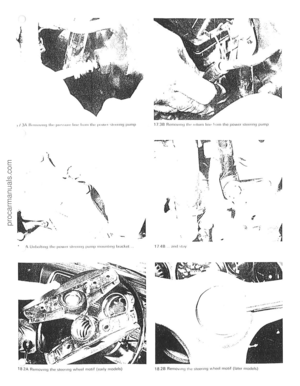 170
170 171
171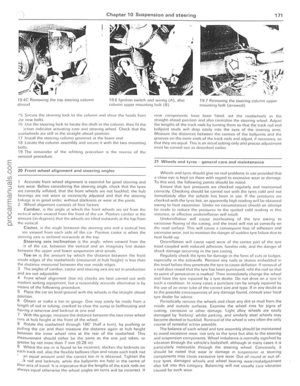 172
172 173
173 174
174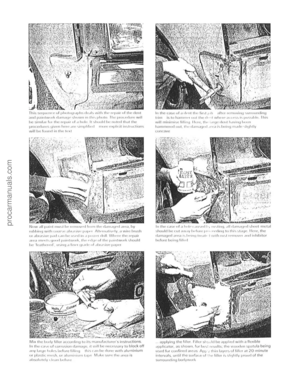 175
175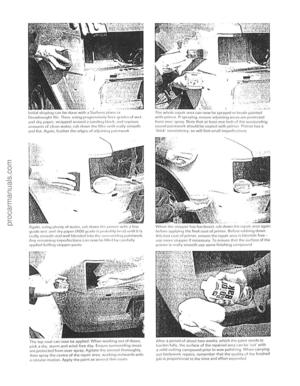 176
176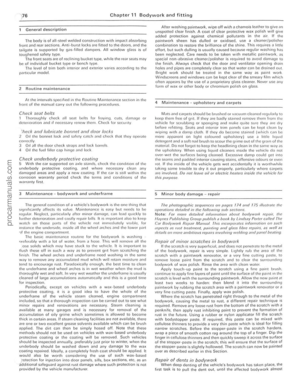 177
177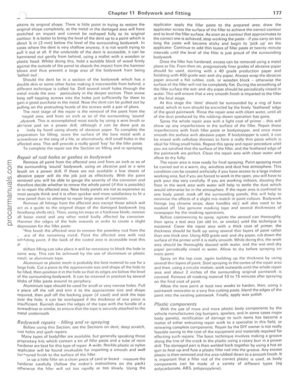 178
178 179
179 180
180 181
181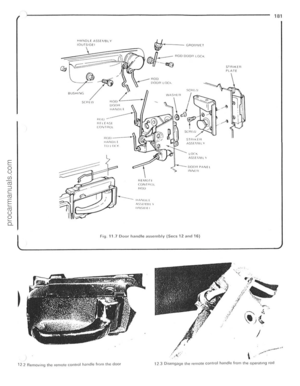 182
182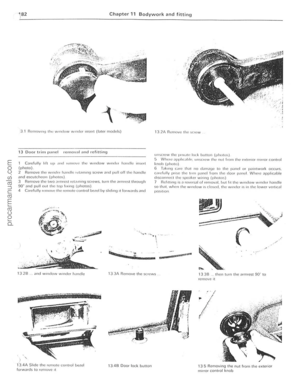 183
183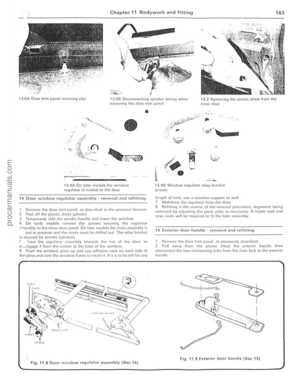 184
184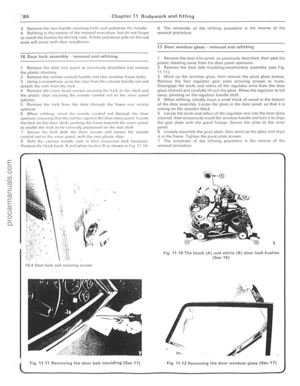 185
185 186
186 187
187 188
188 189
189 190
190 191
191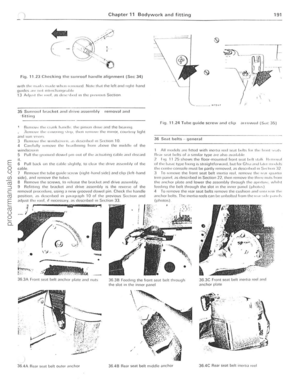 192
192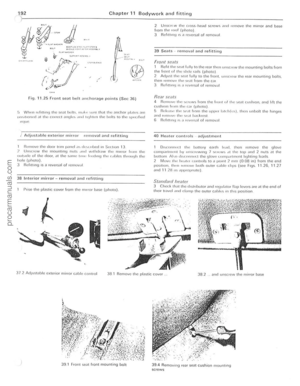 193
193 194
194 195
195 196
196 197
197 198
198 199
199 200
200 201
201 202
202 203
203 204
204 l)001l lOCo;
H(,u
I)()OH \"\"\"ill\.
Hr, ( .... Sl co,.\"nOl
1i!IPJf-e@
\ ___ flO!)
!looTl 10C ..
11m, ------\, \"")