Page 193 of 205
r-------------------------------------------------------------------- ---
-, jj
t~
' ,.,,,.
·l .. ..... ..
-.. \"\"~\" . . ,. ~ lOO''")
19 2 Chapter" Bodywork and fitting
)r-------------------------------------------------------------------- ---
-, jj
t~
' ',.,,,. '
·l .. ..... ..
-.. ""~" . . ,. ~ lOO'''''''''' ''''''''~' "'" , .. ,:.'~.:~'"''''.'''"''''~'''
".L. e' ' ...... "" .,,,~., ,
e: ii)<> .. , ,
'----;,' J
r:~
" , • IJ( .. , ",
(~
" ., -"' '' ...
Gj ...... ".
FiU.ll.25 Front sen 1 h e l! ;,IIchorilu e points (Sec 36 )
!; Wlu,,, ",!oWIl!) Ihe se a t hcll~. rn," " ,."'fl thai lin: .l1H:hor pl.,u,s ;H() "n~'t(()lu,d n! Ihe co"eCI an!ll,,~ a"d 1'!lilll,n IllI! h()lt~ 10 11m sp,,(:,I',~d
"'J'lI!
) Adju slilhle exterio r .n ir ror HlInovnl ilnd refittinu
1l,,,,,OV'!
Ih~ doo< 1"1ll panel "~ ,lo:~,-"lJr:d .. , S"C\ ,orl 13 ? Un~c'cw Ihl) mOunllll!) nul,; ... ,of wllhd,aw 110" 'lHllll! f""" IIor: ()ul~"le 01 111() doo,. ill Ihe S,Hll<: I """ I""(!")~I 1Il1' (,,,hies I Io",u,)h liln hole (),holO). 3 fkllltlllg ,s n ,eve'slli 01 ,ellloval
38 Interior m ir ror -remova l ,mel relittinu
P"se Ihe p!nstic cover 110m the nlllio r bilsc (photo)
2 Un!":" .w the C«)~~·heillj scr~wS nnd ,r.move the IlHr fO' and bilse
/,om thp. ,o"f (photo) 3 Rd,tI'fln 'S n ,e"crsal of remo",,1
39 S eilt s - .e lllovill illle! relittin\!
Fronl scals 1 Hef,1 tllp. seat fully In Ihp. len, Ihl'" \ll\sc,ew Ill(! ",ount,n\! hails from the f,ont "I tl", ~fode 'ilil$ (photo) 2 Adlust Ih" seat fully to the fran I. unsc'ew Ihe r~m [nOwllong boits. th~" ,e'nn"" th" SI,,11 frail' the eil' 3 R(,f'II"'~1 os a ,cvllosill of 1I;1110V,oI
Rcnr sl.'als 4 RCIIl"V", lilt) ~';'"ws hom the 10",,, "I th" ~e,ll cosh,on. nnd 1011 the cush,on f",m Ill" cn, (pholo) 5 n"l"a~" 110" s,';l1 from 11m LlPP'" l:oIch«; s). 11«,,, ,,"bolt the hmUes nlHl ",n,,,v., 11<" S""I i>;)cklr:s l
6 n"roIIO!l!! o~ a ",v,~os"l of removal
4 0 Huatflr (;onU'ols
D'~{:{"HH:';1 th" iM ll(l'y (l,lOlh I".,d. lhan [Ilnlova Ihe ulova COIll!>;"IO",,,1 by U(\~"'''W''lO 7 ~""'WS ,11 lill) lop <1m! 2 nuts ,1t Iha llot1
Slil ndard hei/ler 3 Child thm the (h~lldJ\llor nnll le~J"I;tIO' Jlap favers
3 ', 2 Adjustahle cxlclio, millOI c;i/)I() cOl1ltol 381 namove the pillstic cover. 382 and lJ"SC'~W the mirro' base
) 39.1 F,ont seat fron t nlounting bolt
39_4 RernovlllU ,ear seat cushion rnoulllIng sClews
procarmanuals.com
Page 194 of 205
~--------------------------~-- ------------
Fig . 11 .2 6 Heilter control cil blc 1Hljus tm ent
on SlHn (IMd heilter (S ec 40)
A (),.\·/\"UlI/Ot flajl COII")
Chapter 11 B odywork an d fitting 1 93
)~--------------------------~-- ------------
Fig . 11 .2 6 Heilter control cil blc 1Hljus tm ent
on SlHn (IMd heilter (S ec 40)
A (),.\·/"UlI/Ot flajl COII/ro//aVllr 8 I/Cgll/;I/O( Il.7p con/fo/h'vt'f
"'!ovy dilly IIfHltOf Chl.-r.k thilt Ihe d'Slflhutor 1I"p levc. ,HId WilIC, cont.ollcve. (FlU 11 28) we 011 Ihc cnd ollhl)" Ir,"vel ilnd clamp Ihe oulC, cablcs "I \IllS lIon.
AlllwMCfS 5 On complct ion. reconrWC I Ihe ulove comp;lr llllent liUhtinU leads.
Ihen lelil Ihe Ulove COllll)nltrllell1 nnd reconnet;1 Ihe hnllelY emlh len {1
41 H OMe r controls - removal and refittinu
1 Disconnect Ihe ballery eimh lend. 2 Rcmove Ihe s teer ing column shroud (2 screws D tthe bOliO",. then pull oul .lIlhe lOp). Lo wer thc stee.ing column (lel\Ving Ihe twO bOltS in position) sufficiently to ullow t he inst.umenl cluster I rim to be remOve d. 3 DIsconnect Ihc switch 10MIs ;lnd remove the instruments cluSIO' t"m. COllll)lot e with cowl "im (11 screws). Rcmovc the instrumont clusle r l!clOI (3 scrcws). 4 Pull oil Ihe hOiltor control knobs. II t his IS 1I0t possIble I>
sWItch illI(1 light i"'1 leild5 . D,sconncct the cilhles 110111 tho hCiller COl1lrols Rcll1tlllU IS the .evcrse 01 Ihe rcmovi,l p.ocoduro. du"ng whIch It
.. hc neccssmy 10 adjust th e callies. as dl.'SCfllled III the p.evlous ::. .on Also it w,1I be necessary to obtall1 new hCille. control knobs where npphcable.
42 HCHte r
water villve (hellvy duty heater) -IC lll oval an( 1
refittin g
Drilin
the engine coolant ilnd dlsconncct tho lowe. hosc !rom th c ,aulato. (,efe. to Chapter 2. II necessary). 2 Disconnect Ihe th.ee water hoses f,olll tho Wille. valve. 3 Removo the OUWr cilble from the clip on the WilWr v~lve bracket.
Ihen lenlOve the assembly from the bulkhead (2 screws). 4 Twis t the wate r valve. to disconnect the cable IrOI11 the operilt ing
l ever .
S Relilling is Ihe reve'so of the removal p.occdure. during which ~dJustl\lcnt should be m~do. as described in Section 40 fOf the heavy duty healCf On completion. re li t the rudiutor hose and fililhe cooling SYSt(:rll . us described in Chapler 2 .
43 Heater assembly -re mova l and re fillin u
1 DlsconnOCl lhc tJiltH:ry ea.th ICild. 2 -,,,in the COOIIlI1l. rei!;fliny 10 Chllpte. 2. II neCCSSilry. 3 sconnect th e Wiltcr hoscs from the hoale. he;!t e.chanuc. (phOtO). II I>
2111111
- ' = 1 --·-~··""I c,
'1,:-1
F ig .
11 .27 Heale r COl\trol cilhle ncJju stm ont on heilvy cJllty hl"latot (Sec 40)
A /),., ·{n/w/III If,}!, CQII/lo/ft'vct
Il"'·I·"1>.1 VU[ CO""'OL U·OL(
".."Tt"CO""'OL -NIL\[
Fig. 11.28 Willer varv e o n heavy duty heilter (Sec 40)
43.3 H eiltel water hoses
i , , . ,,
"
procarmanuals.com
Page 195 of 205
11 Alh,,,)attv,,lv pl;)c\" clothS JII,l")
~'l4 Chilpter 11 Bodywork and fitting
~I-----------------------------------------------------------
complessnd ~" to IcmOVI! ,OIly I.nolar ,,,",,,"1111)11 Alh,,,)attv,,lv pl;)c" clothS JII,l/or I1CW~I)ilP'''S 1)(!I\!;o1th In ,11",,, 1, al'V SI"lld!!" 11 Remov" thc (.over pan,,1. tn!I"lh," wllh II", lw,'t nxch'''''Ie! 10 watel cOI"'~~(:IIOIl \J,;~k...r. f,om th,~ IlLII~I"',1,J (2 ~r:tI~WS) 5 SlackclI till! !1"o1ll~N'" l(l(.k"(li. 111,·" ""''''Vl) Ihl) !)"oI,I,~vf)f The locknut IClIlIlICS a 5p,,(;'al p"!J Sp""""'. ,IV,HI.lhl" hOIll Foul. hllt It IS lIot
d,fficult to 1;)10'11:;\1" ,1 10,, 1 wh'<.-II which wIll do Ih" 1010 6 Rcmove til.., I'n,r,d I';IV (1 ~':II!WS) WI""" til",,, IS a celli'" fOI1S<)t.i. this must hc ICmOVl!ri "Iso (lcfcl to SC,.t'Oll 32 ) 7 Remove Ihe strJ(!IIllli coll,"m sl"olld (2 ~n"ws al tl", hOllUm. th(!n
pull out
CO'lneCI'Olls (1 '01""W ",II.h) 11 D'SI:OII'H,,:t 110" I,ll.'" ""IIt h"~",, h",,, 110" 1"'011," TI"·,,, ,',,:") '''' tI'" 'lilnrt;)ld lHloll<;r .",<1.1 "" II", 1 .. ,,,vV d"IV 1,,·.110" ? Rel\\o"" tlo" IIIw,,, d.l~h 1'.,"0:1 ~"I'I""t ~I"y (1 ~""w) 13 O,s",,,,,,,,,,t II", C,,,,I,,,I (""1,1,,,, (,'"'' 11,,· 1",.,1", .",,1 11", 10",,10"
J.se Rel\\ov,n\! lire il~ht")V
hlowef If!a
1111 Heatcr ass(l'lIhlv (Behr) dismantling
Runl""" Ih" d",\I,I",IOI 1I"I'~hol(1 (1 clop) NOI" th,lt Ihe fl.1p ""ll;)UlS II) Ihe 1"""'1 SI,,:tl"') "f the IU)lISI"!! ? R"",ov" tlw ,: I.IInps ~"r.""n!1 Ih,~ IWO h"lv"s 01 the IIm,s,n!j, "srn!) c"ciop pi"",. Iklll"'" 11\" "I'P'" ~"r:I""', ~'Ol"pl"jll w llh tilt, m01o,.from tlw low"" ~""trOI\ 3 Rem,,,,,, tI,!! 1",.11 !!~d'."HJ'" ""tI I",m Ih" I"rn,,, Ihe low!!' SCCllnn
43.16 He,ltcI tnounilng holt (a,rowed)
procarmanuals.com
Page 196 of 205
-' ,J"i
<~
195
2
~ --3
4
,
Fig .1129S . tilndard Beh r heater (5 1 ec44)
2 Mowr ,1nd f"n 3 Upper housing 4 Lower housillg Deli/isle, " 5 Helll CXChaosc connection 6 Neil l crl /lye( COVIN plale 7 C ... liJllger 8 Oll/rol {hll' 9 ;,001l011/,1fJ shaN cal CXC hiW 10 Dis/rib I ger sC
=
J
procarmanuals.com
Page 197 of 205
96 Chapter 11 Bodywork an d fittings
of the housing, then remOlle the heal exchanger from the 1ramc and lake ott the fOilm pilcking. 4 To remove the distributor flap from the housing. remove t")
)96 Chapter 11 Bodywork an d fittings
of the housing, then remOlle the heal exchanger from the 1ramc and lake ott the fOilm pilcking. 4 To remove the distributor flap from the housing. remove the clip and withdraw the conlrollcvcr sideways. 5 Remove the rcgul<110r flap from the lower section of the housing, Bend bJck the 2 claillping straps sulticicnlly \0 enable the conlrollCIICI 10 be withdrawn (liter i, hilS been turned tow;1rds the side, then remove the regulating flilp. 6 Remove the retaining straps for the blower mOlor cap. by pressing outwards from the inside uSing 11 screwdriver. 7 Deweh the mOlOr from the upper sectioll. Disconnect the motor leads, remove til(! <1 rewining clumps and remove the motor and filiI inw,uds. a When reassembling. positIon thc blower mOlOr so that the clectric
control lever from the si(lc.
11
11 The remainder 01 the reassembl y procedure is the reverse 01 the
r emova l procedure.
45 Heate r nssenlbly (Smiths standard and heavy duty) -dismantl ing and reassem bly
Standard he,1ler I Remove clips A and B (Fig. 11.32) ilnd remove lhe heater housing
sidc cover complete with flaps (15 screws) .
Heavy duty healer 2 Remove clip A (FIg . 11.32) olnd remove thc hcater housing SIde cover complete WIth flaps (15 screws)
All he,lIers 3 Remove thc heat e~chnnger nnd 10,1111 sen I. <1 Prise off the c"clip nnd remove the Ian I.om the blower motor shall. 5 Detach the blowe r motor from the support (3 nuts and holts). 6 Reassemhly is the reverse of the dismantl ing procedure.
Fig .
11.30 Stilndllrd Smiths h eater (Sec 4 5 )
1 M%r assembly
2 COVt·( and black!:t assembly 3 Control valve operatillg le vel
4 Righr·hand housing cover 5 Dis/ributor flap 6 Fan
7 Control v
10 Heal eXChanger seal 11 Plenum cflambe! cover
-------------------------------~ 灲潣慲浡湵慬献捯m
Page 198 of 205
 Chapte r 11 Bodyw ork an d f ittings 197
Fig. 11 .3 1 H eavy duty Smith s h eate r (Sec 4 5)
1 Housing 6 Plenum chamber covel
2 Hot ai, supply /0 laciil 7 Ois/fibulor flap
connec tion 8 R")
7
) Chapte r 11 Bodyw ork an d f ittings 197
Fig. 11 .3 1 H eavy duty Smith s h eate r (Sec 4 5)
1 Housing 6 Plenum chamber covel
2 Hot ai, supply /0 laciil 7 Ois/fibulor flap
connec tion 8 Right·hand hOllsing cover
3 OrlniSlef hos e connectioll 9 Cover ,ltld bfackel assembfy
4 F.ln 10 MOIOI .lSscmlJly
5 HeM exclllmgcr scM
4 6 Dcmister nOlzle s -remova l alld refiuing
r :cngcr's side rtcnlOve thc glove COlllpiUll1lCllt by Ullscrcw"'9 the 7 screws iI the to · 'ld 2 nuts (ll lhe hall()m. Also discoIH'oG I the glovo compJrlrllCIl h\, ,19 Icads. 2 WIthdraw lhe hose frorll\he dCnllSlC . noale (lnd remove the noule (I sClew ). 3 RefItting is Ihe rev erse 01 the .cmovill Il' occ du.e .
Driver'S side 4 Initially proceed a s descullnd in palagr,lphs I , 2 and 3 0 1 SectIo n 41. Additionally remove th O ashu".,. and CIgar Irgluer .
o
Fig. 11.32 He ate r d istributo r flap (A ) and regulator flap (S ) clips (Sec 45)
5 Remove the inSllumen l cluster (4 screws ). disconne<:ling Ihe speedomele . d.ive cable and elect.ical conneClio ns . If lhere is any doubl about Ihe position 01 ~my 01 Ih e ele<:trical connec tions, make a nOle of them fn SI 0' ,111. 6 Withdraw the d ernis te . noale hose i1nd remove the demiste r noule (1 scre w), turning it upward and ou twards so thililhe inlet side 01 Ihe nonle can come ou t first from th e in strument cluste. opening. 7 R efiuing is th e reverse of Ihe removil ' procedure .
47 Fac e level vonts -removal an d re litting
Passengers side 1 Hcmove Ihe gl ove comparlment by unsc!ew 'ng 7 SCfcwS at t he lOp ;Uld 2 !llltS ,11 th e bottom . Also drsconnec t Ihc glove compar tmen l Irghlrng leads. 2 Wrlhclraw I he hose( s) h om th e vent. 3 Remove the vent by unscrewing the 2 flu lS which a rc access ible from the reilr of th e pan el. 4 Rcliu in\j is lhe reverse 0 1 the relllovill procedulC.
Driver's side 5 Inil iall y p'oceed as described rn paragr aphs I, 2 ilnd 3 0 1 Secti on 41. Addrlionally remove Ihe 9 screws at the lO p ollhe rnstrumenl pilnel tllm. 6 W,lh the hose(s) Irom the vent .
7 Remove the ven l by usncrewlIlg the 2 nuts which i1re ,1ccesslble from the reM o f the p.,lnel. 8 Relru.ng is the reverse of the remova l procedure .
••
,
1 ' I
procarmanuals.com
Page 199 of 205

Index
A
Accelerator cilble removal ilnd refining -14 shnft ilnd pedal removal and refining -75 Air cleaner removill Jnd ref,nrng cal buren or mod cis -68 fuel injecllon models -80
P rnator .,ru")
)
Index
A
Accelerator cilble removal ilnd refining -14 shnft ilnd pedal removal and refining -75 Air cleaner removill Jnd ref,nrng cal buren or mod cis -68 fuel injecllon models -80
P rnator .,rushes inspecllon. removal and refilling Bosch -202 Femsa -203 Lucas - 202
dismantling and rcassembly -203
removal and refining -201 Antifreeze mixture -60 Automatic transmission descrip tion -122
B
downshift cable removal. refi11ing and adjustment -121 extension housing oil seal renewal -121 faull diagnosis -127
maintenance. routine -123
removal and refOlting -123
selector mechanism ildjustment - 126 rcmovill. overhaul ilnd refl11lng -125 speclflf:iltions -103 SI.1r1er IIlh'bilm/reVerse lamp switch remov
Bilttery clrilrgmg _ 201 description and testing -200 removal and rcfll\lng -201 Big-end bearings -37. 52 Bleeding the hydr
centre console -189
demister
noules reOlov
description _ 174
doms-178.180. 18210 185 face level vents removal and refItting -197 facia panel -188 fuel filler flap -188 heater -192 to 194. 196 10
) bodywork and under/rame _ 176 routine _ 116
uphOISlCry
and carpets -176 mirrors
-
192 open rem quarter glass assembly
removal and refitting -186
re~r qllMlcr trim panel removal and refitting -185 repi'lir millor damaue -178 minor damage -176 sent belts -191 seats -192 sunroof-189la 191 lailgate -180. 187. 188 torque wrench scuings -173 windscreen -180 Bodywork repair sequence (colour) -174, 175 Bonnet release c
p ipes
c
Camshaft (3.0 litre engine) retitting -54 removal -50 Camshaft and camshaf t bearings examination and renovation 2 _8 litre engine -35
3 .0 litre engine -51 Camshah and front intermediate plate (2.8 litre engine) refilling -41 Capacities. general -6 Carburetlor (Weber) aulomat ic choke
adjustment -71 removal. overhaul and retitting -71
dismantling and reassembly -69 general -68 idling adjustment -73
procarmanuals.com
Page 200 of 205

rernoy .. and refl Uing -69 spcc,iC<ltions -66 Carpets maimcnancc -1 76 Centre console removal .. nd refluing -189 Choke . au tomatic _ 71 Cigar ighter romoval ;lIld . e ru in g -225 C loc")
)
rernoy .. ' and refl Uing -69 spcc,'iC
d'ilUlinU 59
(IlIvchells
G3 e~p:mSloll I nnk 6<1 Ian hub l)()nllllH (30 hilI] 1110<1111,;) 64 f~ull (II;)Ul1osl~ 65
flll".U -
60 lIush"'9 59
",nmlen,lncc. roullllC 59
'ild,nlOr
GO speclficn llon5 57 lem,)er;!lurc unuuc Sf:n(Ie. unil -134 IhcrmOSl<11 -61 10Htlle wrench selll ngs 57 VISCOUS drlv\! 11'111 -63 W1)ler IWIllP 61 Crankca se ventiln tion system 2.8 tol'c engine -39 3.0 rillC engine 53 Cranksh1)ft 2.8 li l.e engine examinat ion nnd rcnoviuion -37 refilling -<10
3 .0 til.e cn gine examination lind renOV1'l110n -52 Crankshilft and main bearings (3.0 litr o engino) removal -51 Crankshllft pulley refitting (2.8 hIre engine) -44
removal ( 3 .0 litre engine) -50 Crankshaft r ear oil seal (3.0 litre engine) .efllling - 55 .emova l -51 Cylinder bores ~xaminalion and .enovation -36. 51 Indo r heads 2.8 titre engine dismanll ing .• cnova lion and .eassembl y -35
Index
D
refining - 45
3.0 litre engin e
. eassembly -55 refining -55 .emoval wilh engIne -49
removal wil h engine in car -49
Decarhonising -52 Dimensions. vehicle _ 6 Dim-dip lighting system _ 226 Disc br1lke s scc Front disc brakes Distributor overhaul 2.8 hlle engIne -93 3 a !r1l0 cng,ne -92 rcmoval and r efIlling _ 90 Doors eXle.io. hllndle ,emoval and refilling - 183 lock 1Issernbly removal and .efilling -184 pillar swi lc h -224
priVill e lock ,ernovill and ref'lIing -185 fnllics tracing nnd feCllik al ion -178 remOle conlroi hnndle removal and refilling -180 Hlmoval and rell\1l11g _ 185 Irim j>ilnel removal and ,efi ning _ 182 window Irnm c
moul(II ng nnd door wealhcrSlrips
removal and refining -185 rcmoval and relining -185 wmdow glass removal and retilling - 184 window regulnlor nssembly
r emoval and relilling -183 Drivebelt s .emov,,1 ilnd refil ling -63 Drum brakes sce Renl drum brakes
E
Eloc triclIl.system -198 e/ seq Electrical systcm altell11110, -201 10 203
ilu xiha.y driving "ghl -212 bmlery -200. 201 bulbs -199.21310217 ciga. IighlOf -225
clock -223
d escrip llon -200 dim-dip ligh ling syslem -226 laull diilgnOSIS -19. 233 ""sher unils and rel1lys -225
fuse s -199. 220
headligllls -211 10213 horn -220
inSI.ument clUSler -22 1 inSI.ument vollage .egula lor - 226 Inmp5 -21410217 mninlenance. fOUline w 200 mobite r"dio equIpment - 226
precautions - 200
rildio /casse tte player -226 specif ications - 198
speedomeler cab le -226 Slmte . mOlOr -207 swi tches -223 10 22 5 lailgall) wash er -217 laHgme wipef -217 to.que wrench sell ings -199
w indscree n washer -219 windscreen wiper -21810 220 wi.ing diagrams -235 10 249
25'
Ii
procarmanuals.com
 1
1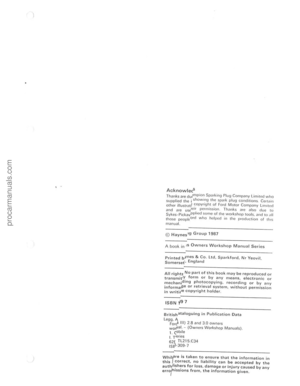 2
2 3
3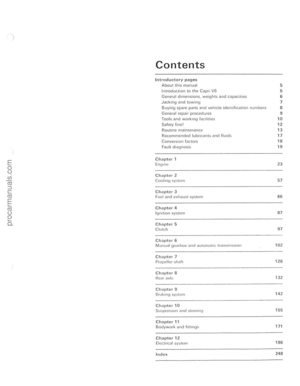 4
4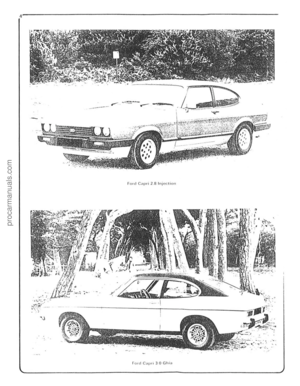 5
5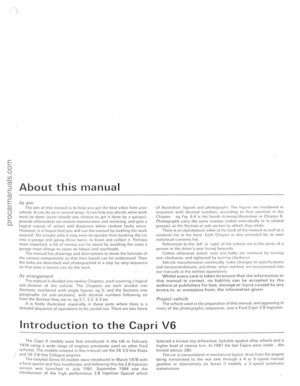 6
6 7
7 8
8 9
9 10
10 11
11 12
12 13
13 14
14 15
15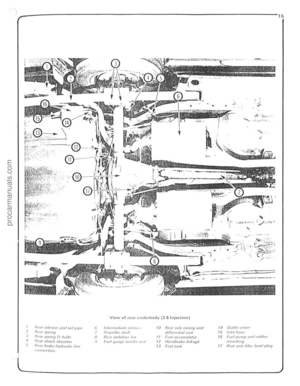 16
16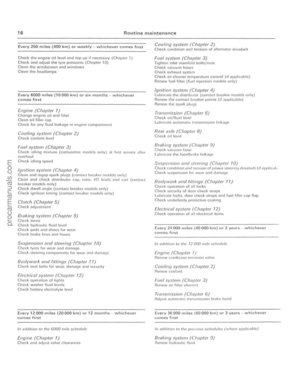 17
17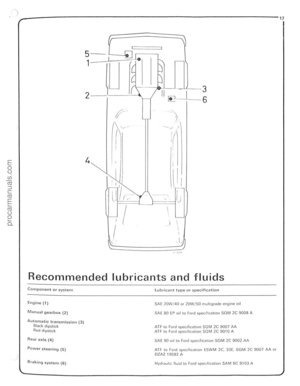 18
18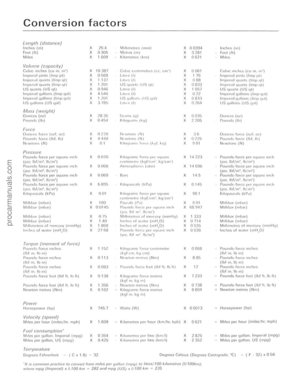 19
19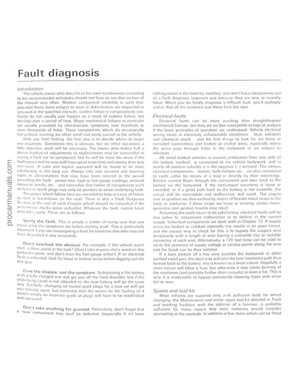 20
20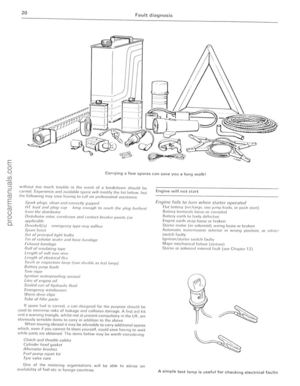 21
21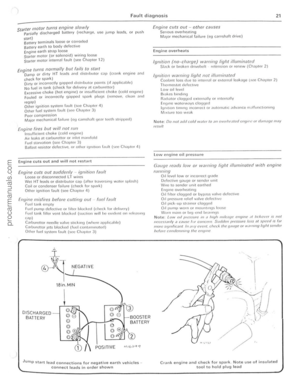 22
22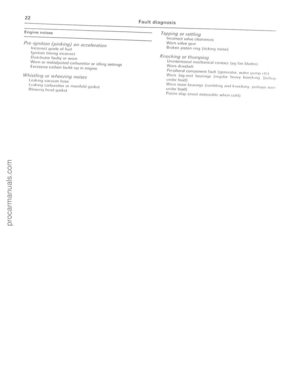 23
23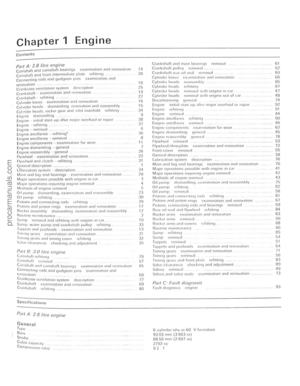 24
24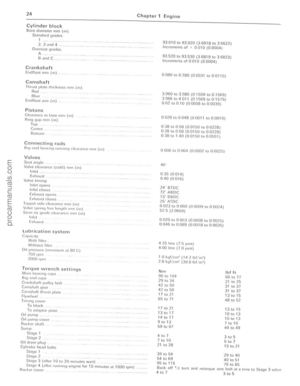 25
25 26
26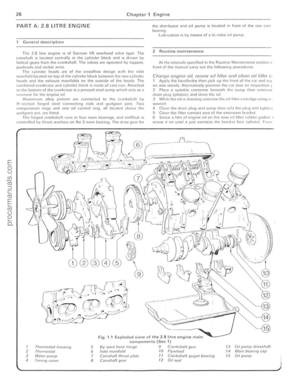 27
27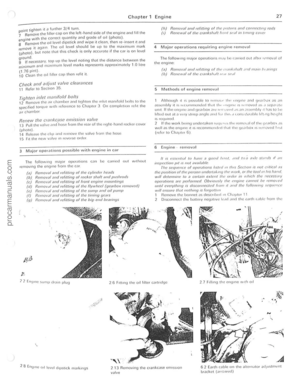 28
28 29
29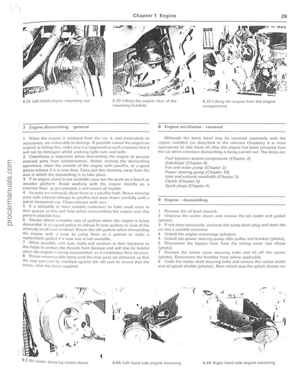 30
30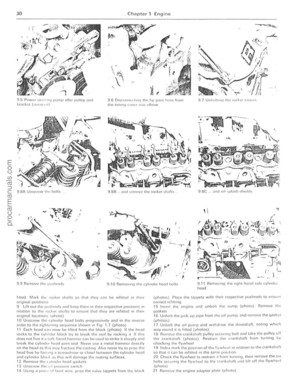 31
31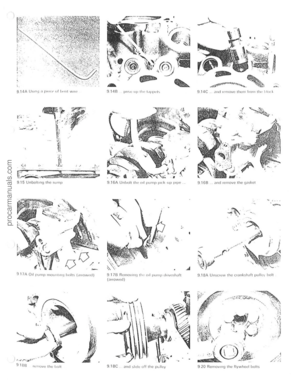 32
32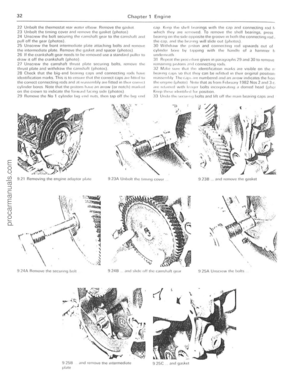 33
33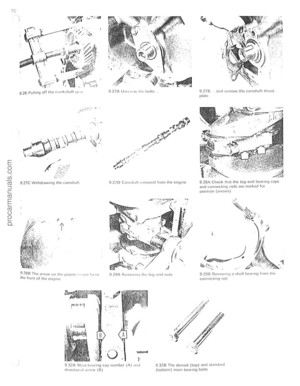 34
34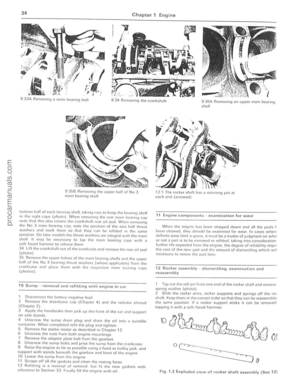 35
35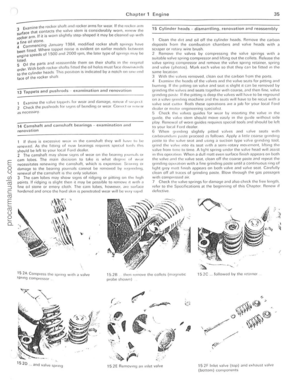 36
36 37
37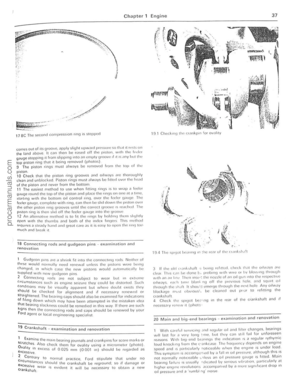 38
38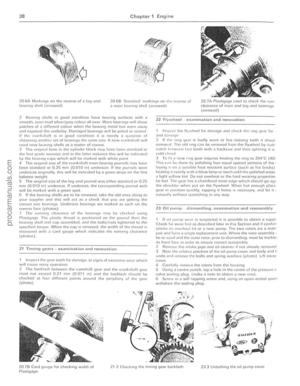 39
39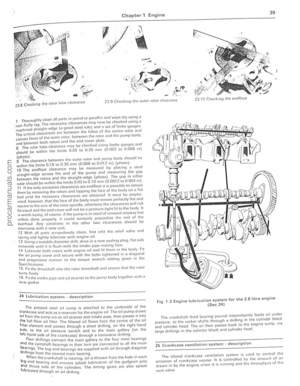 40
40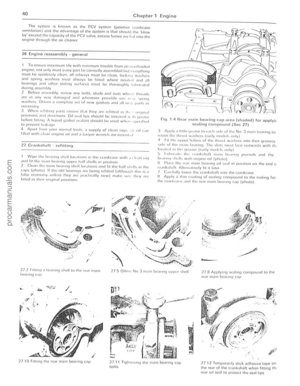 41
41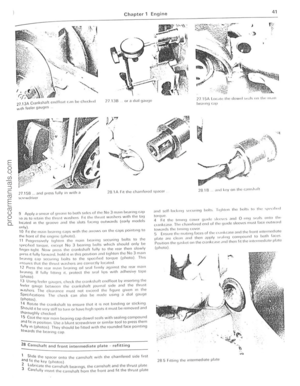 42
42 43
43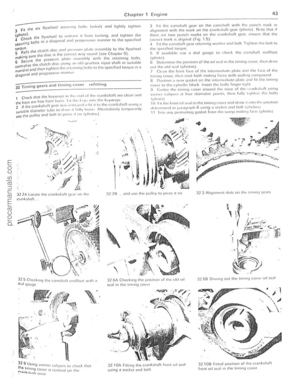 44
44 45
45 46
46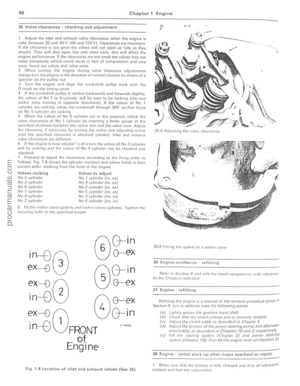 47
47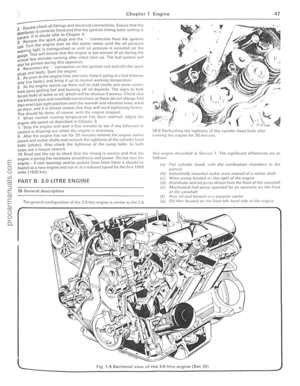 48
48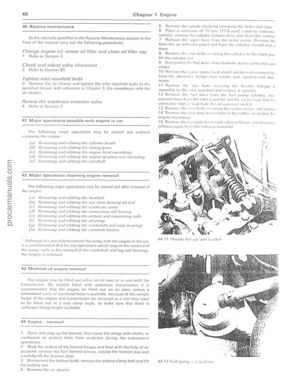 49
49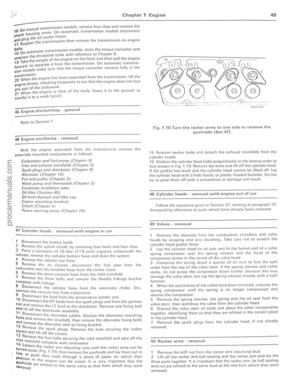 50
50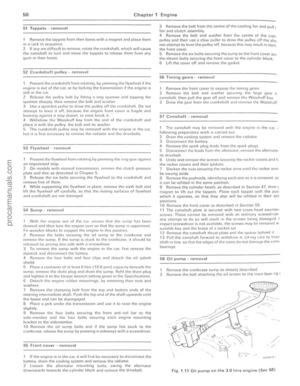 51
51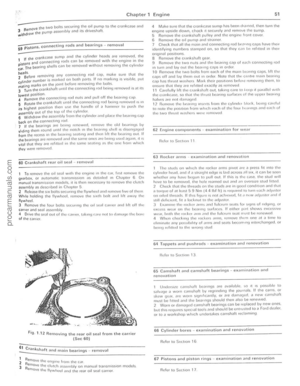 52
52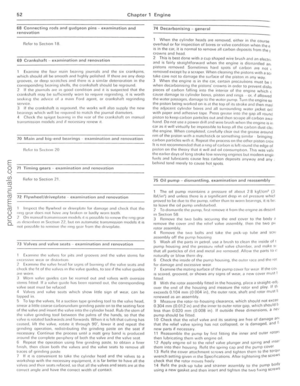 53
53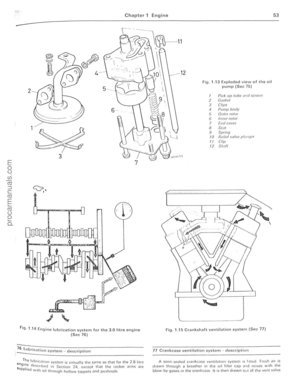 54
54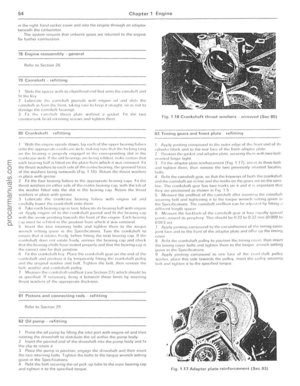 55
55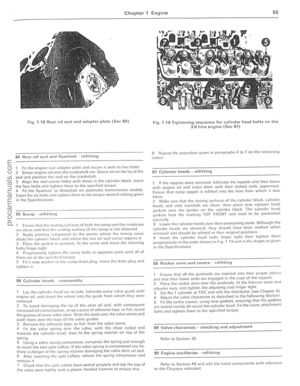 56
56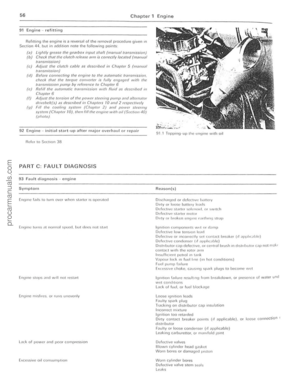 57
57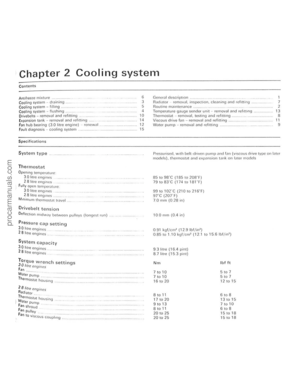 58
58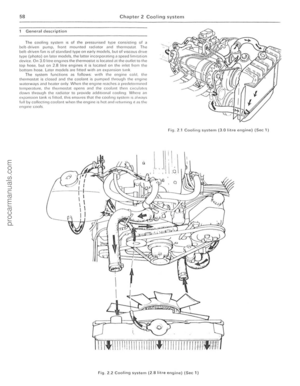 59
59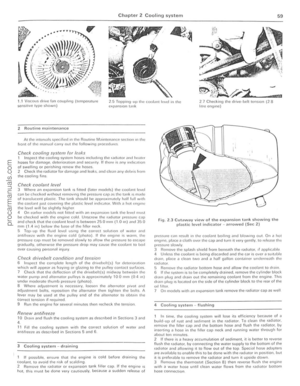 60
60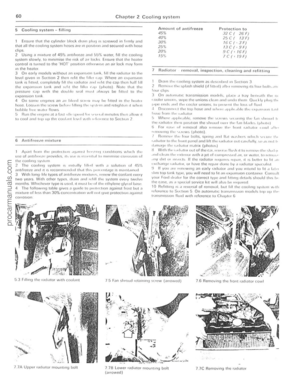 61
61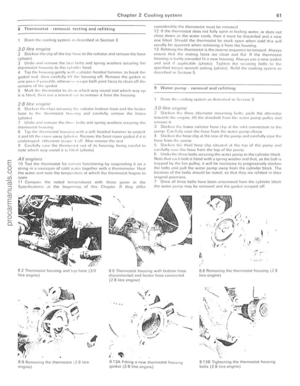 62
62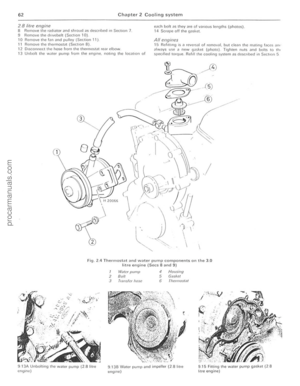 63
63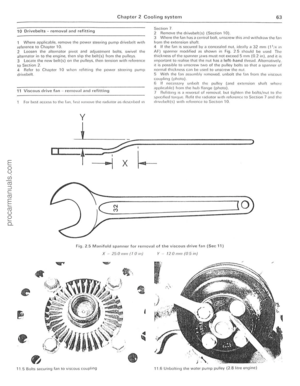 64
64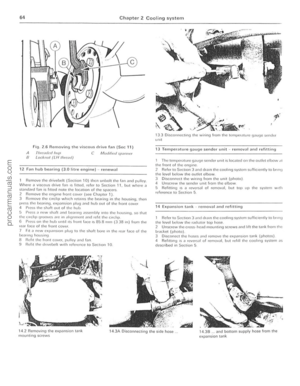 65
65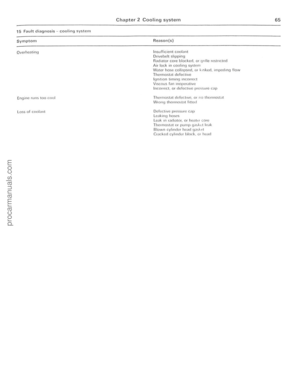 66
66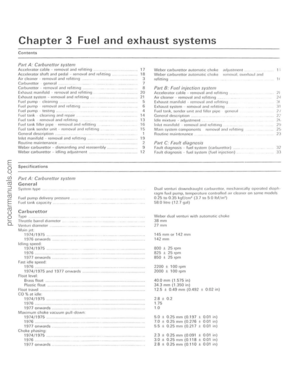 67
67 68
68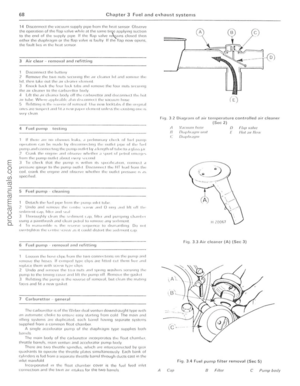 69
69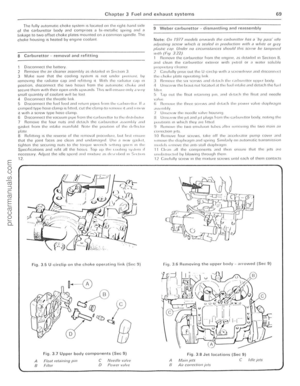 70
70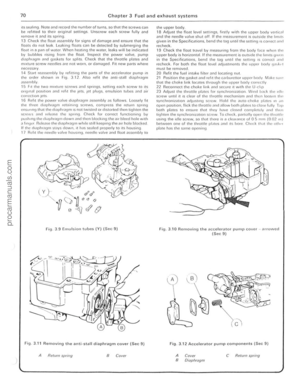 71
71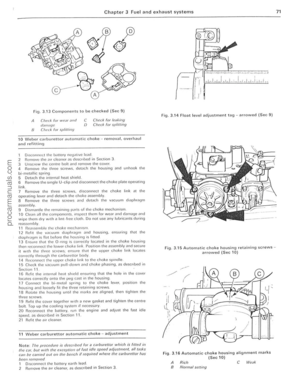 72
72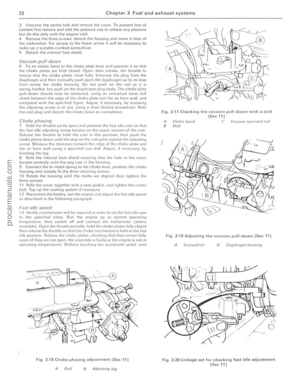 73
73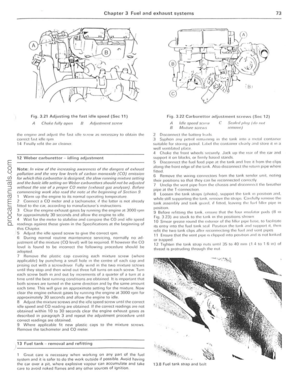 74
74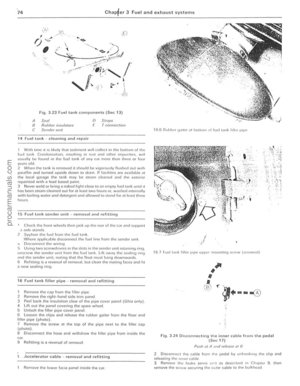 75
75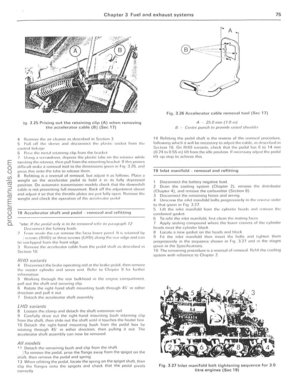 76
76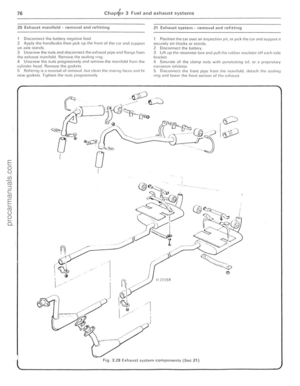 77
77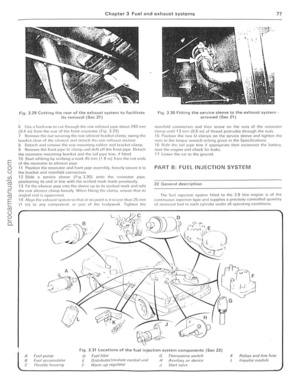 78
78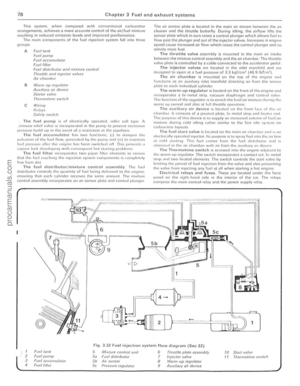 79
79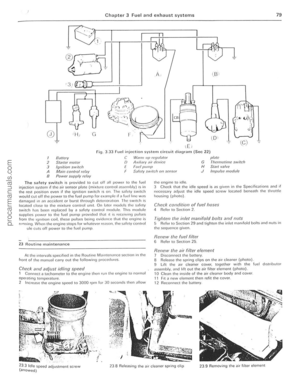 80
80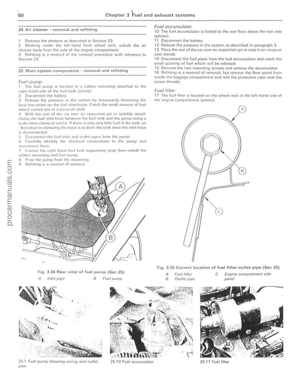 81
81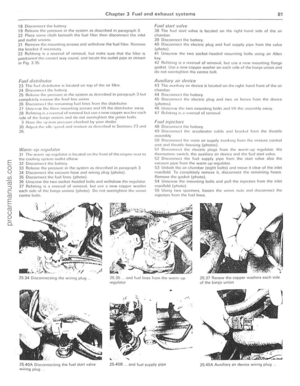 82
82 83
83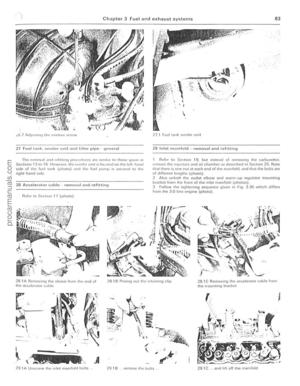 84
84 85
85 86
86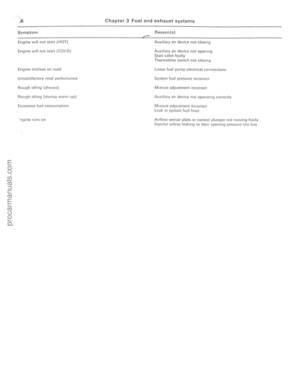 87
87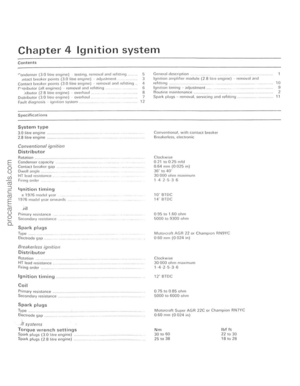 88
88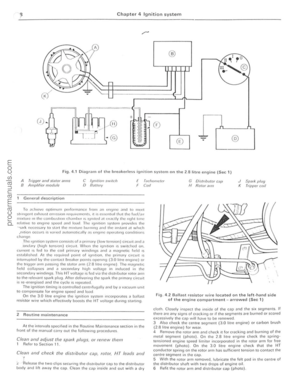 89
89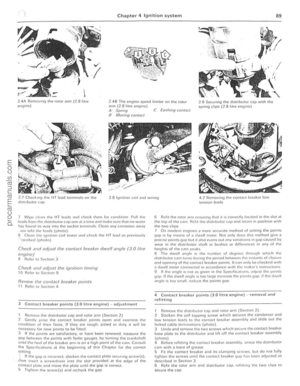 90
90 91
91 92
92 93
93 94
94 95
95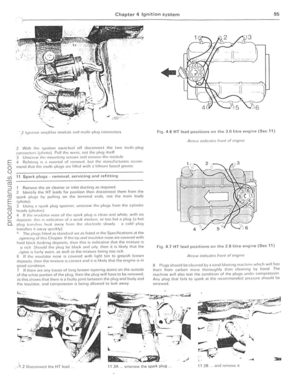 96
96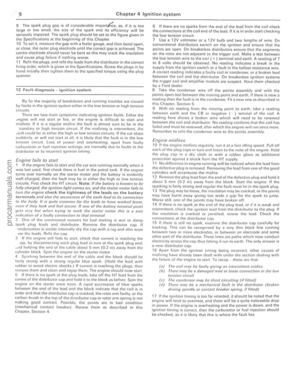 97
97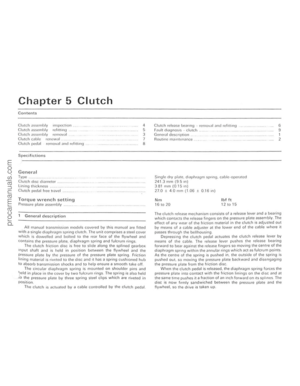 98
98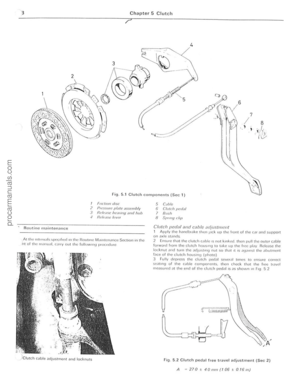 99
99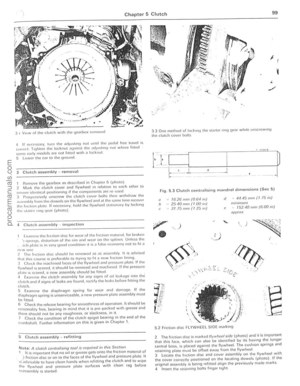 100
100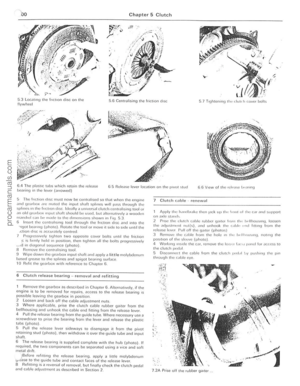 101
101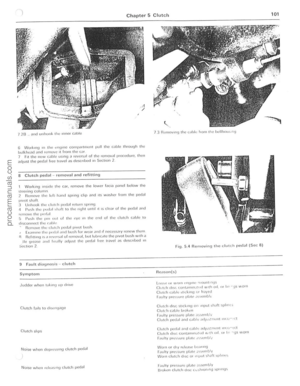 102
102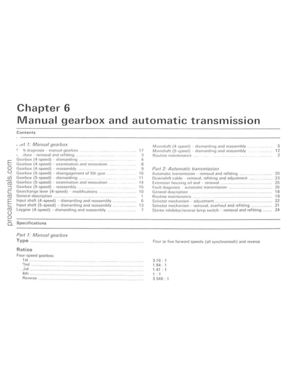 103
103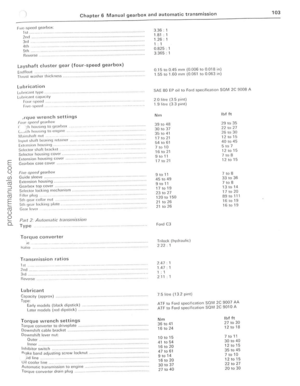 104
104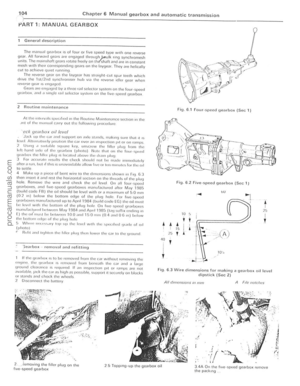 105
105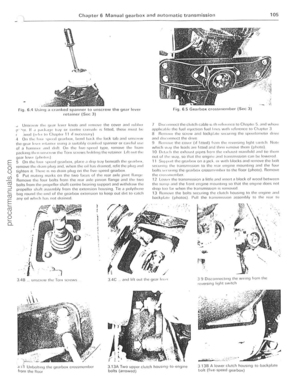 106
106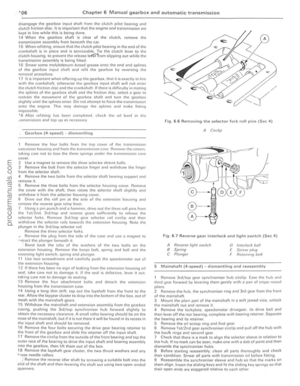 107
107 108
108 109
109 110
110 111
111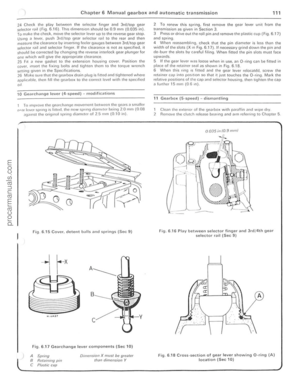 112
112 113
113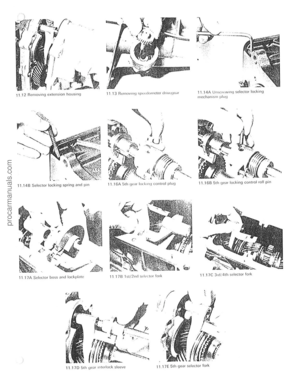 114
114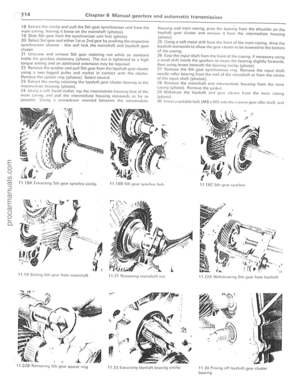 115
115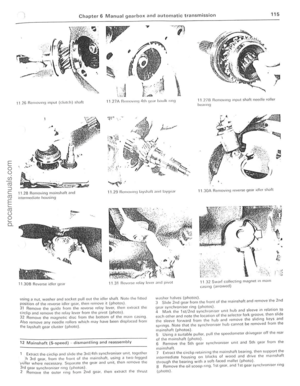 116
116 117
117 118
118 119
119 120
120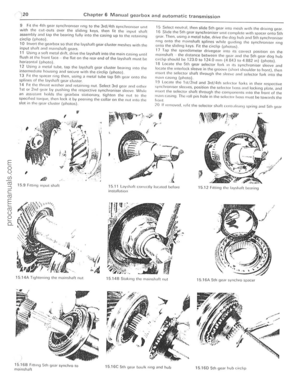 121
121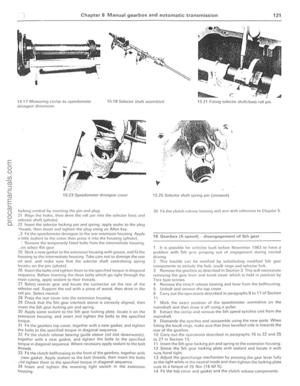 122
122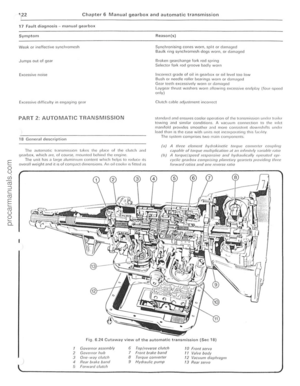 123
123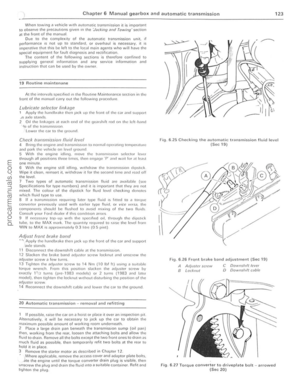 124
124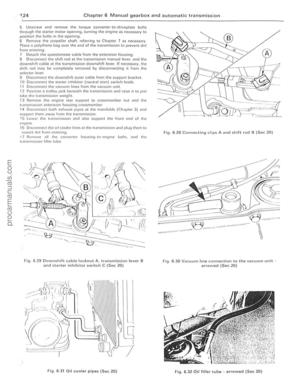 125
125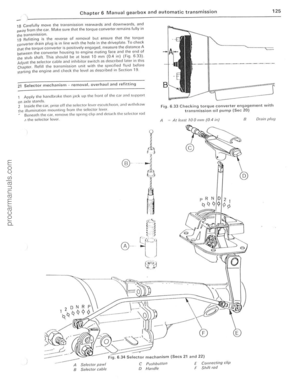 126
126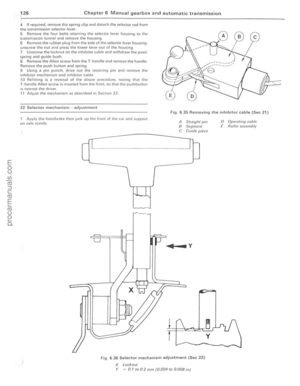 127
127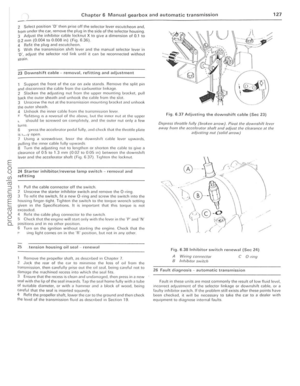 128
128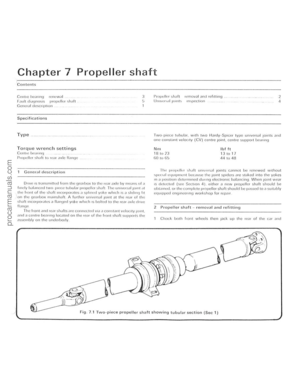 129
129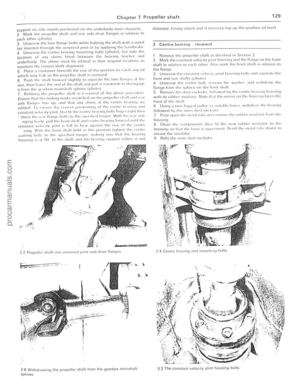 130
130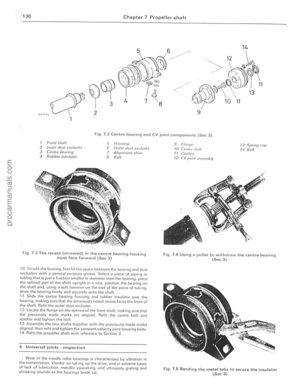 131
131 132
132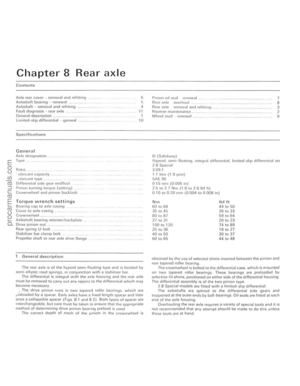 133
133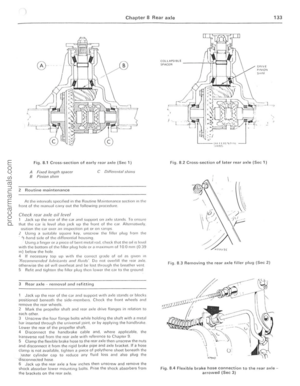 134
134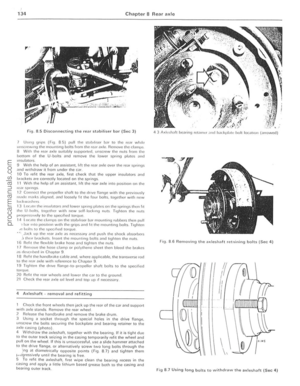 135
135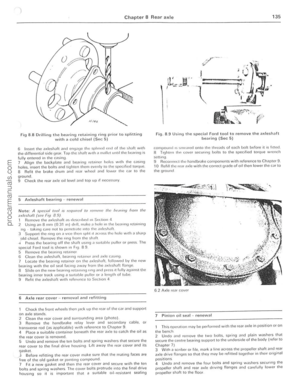 136
136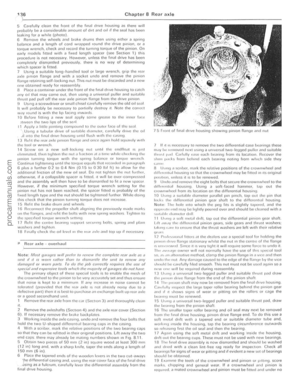 137
137 138
138 139
139 140
140 141
141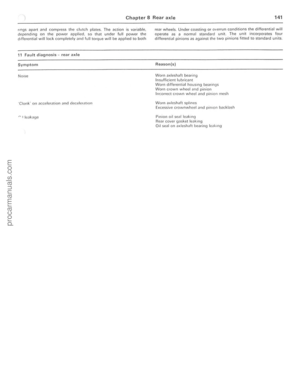 142
142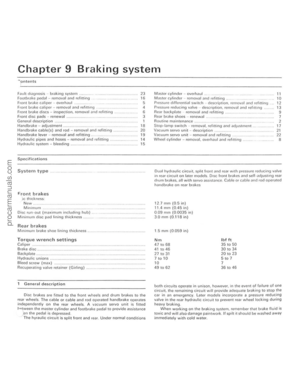 143
143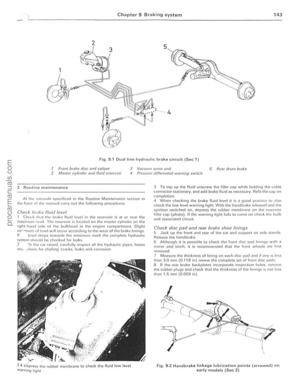 144
144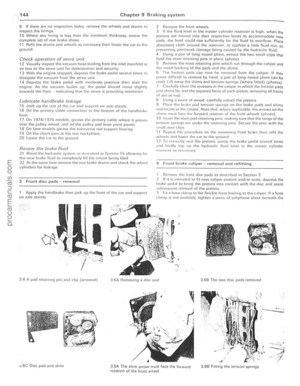 145
145 146
146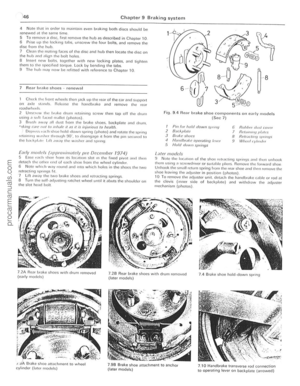 147
147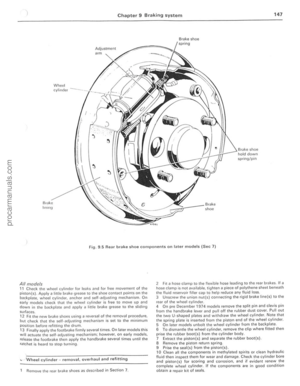 148
148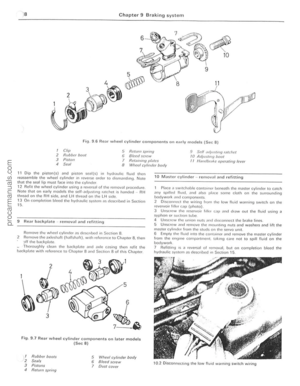 149
149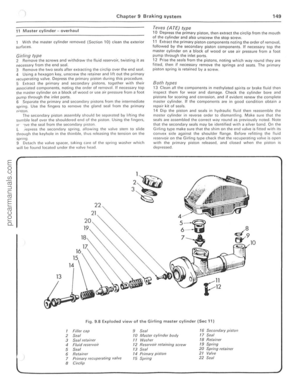 150
150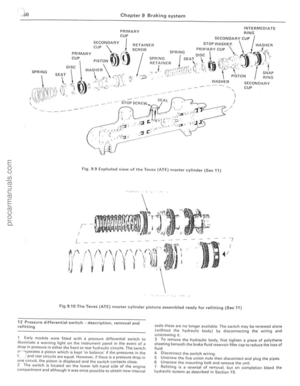 151
151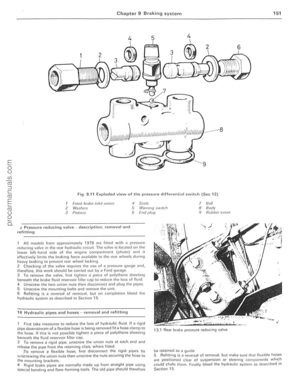 152
152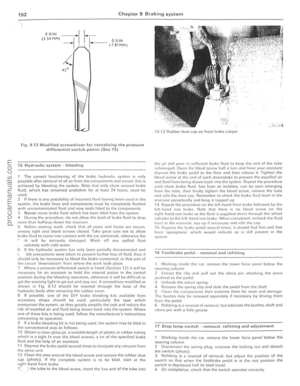 153
153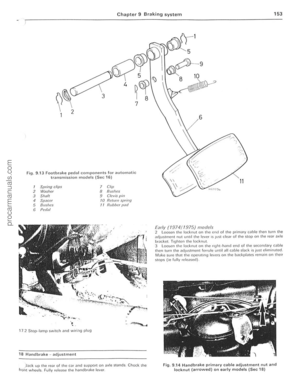 154
154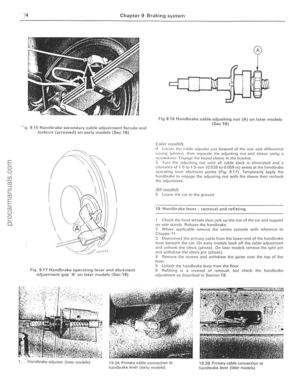 155
155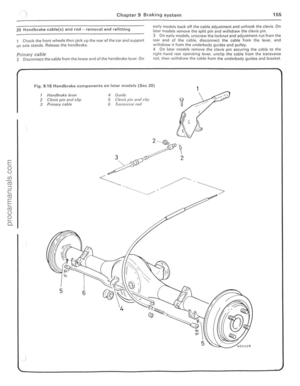 156
156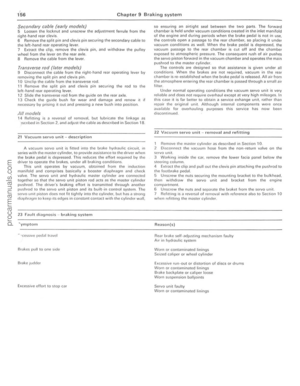 157
157 158
158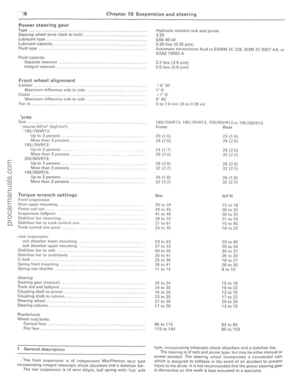 159
159 160
160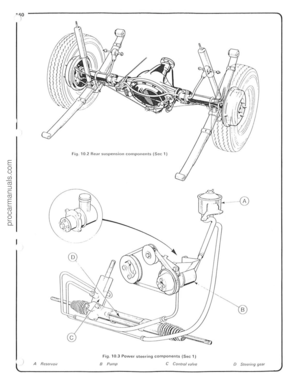 161
161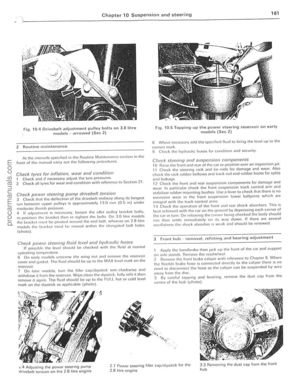 162
162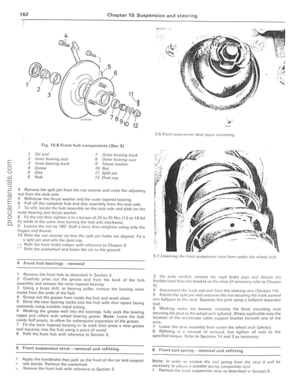 163
163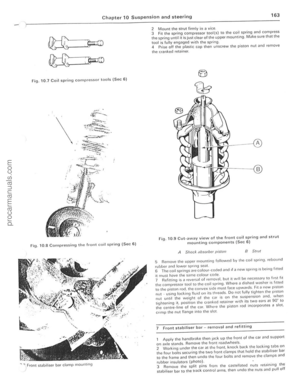 164
164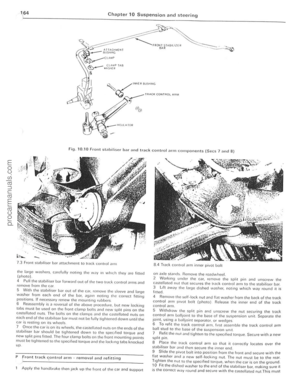 165
165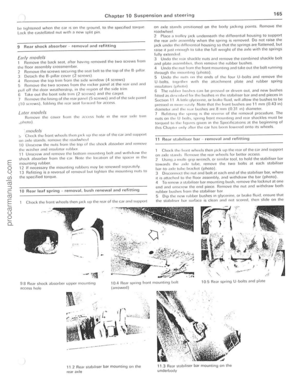 166
166 167
167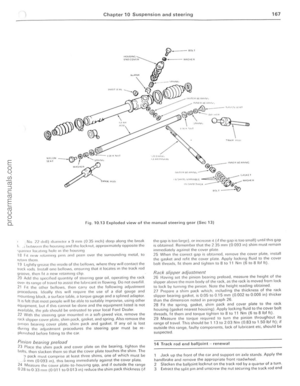 168
168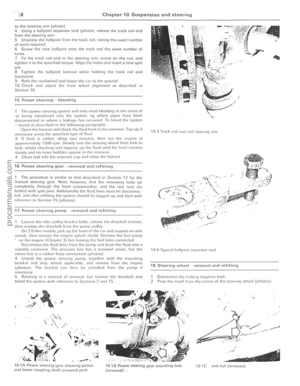 169
169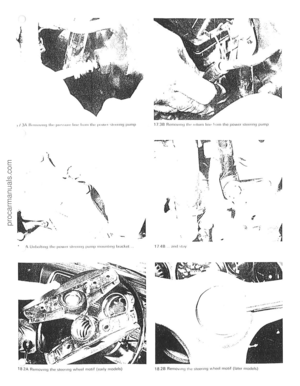 170
170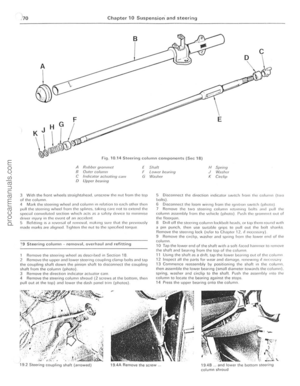 171
171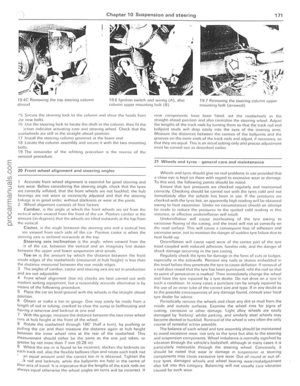 172
172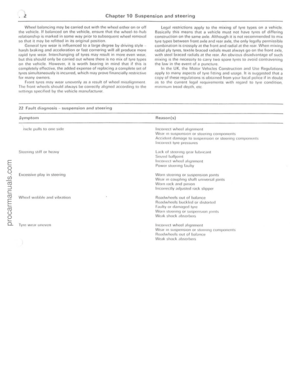 173
173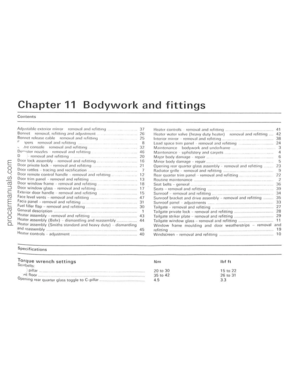 174
174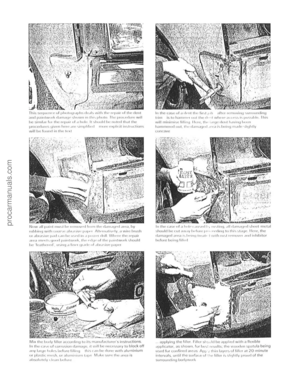 175
175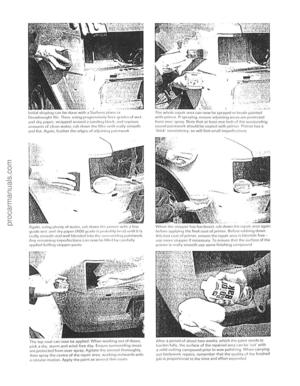 176
176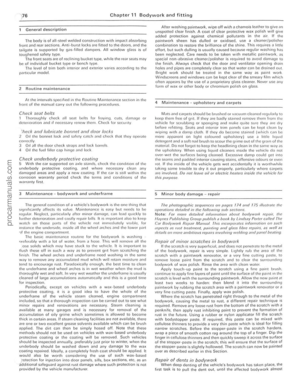 177
177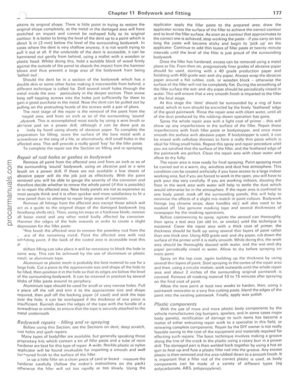 178
178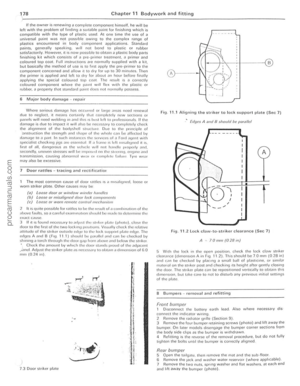 179
179 180
180 181
181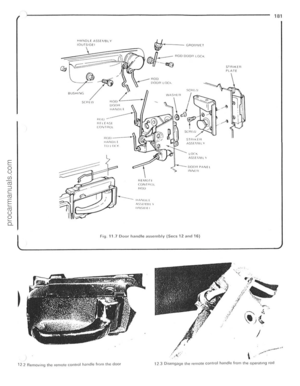 182
182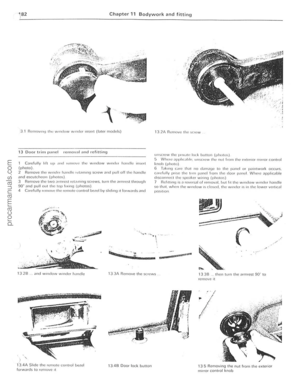 183
183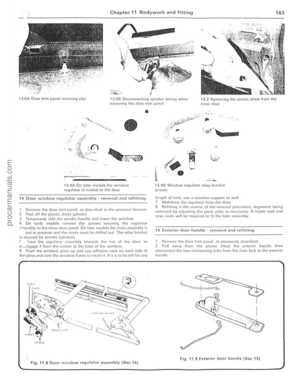 184
184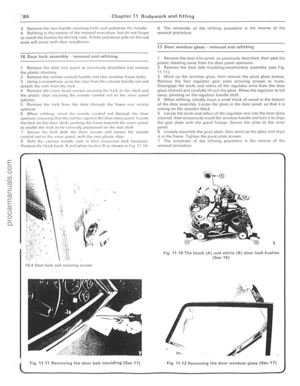 185
185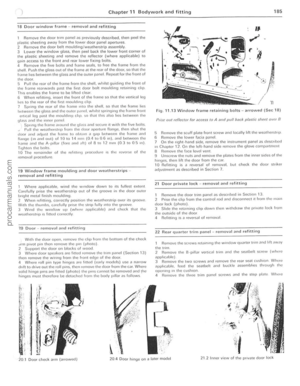 186
186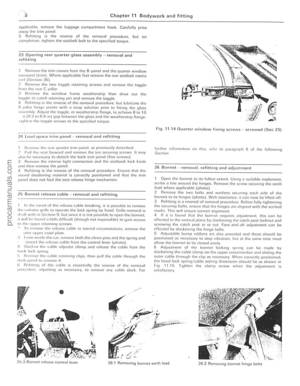 187
187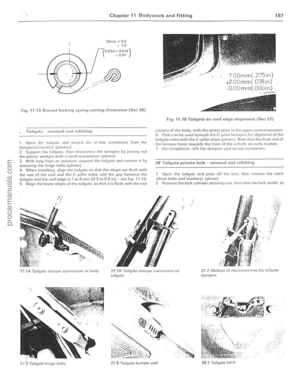 188
188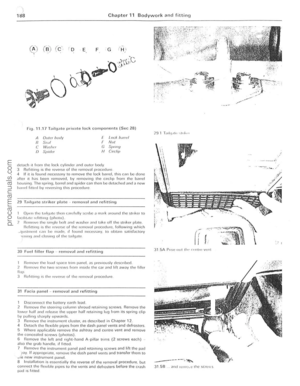 189
189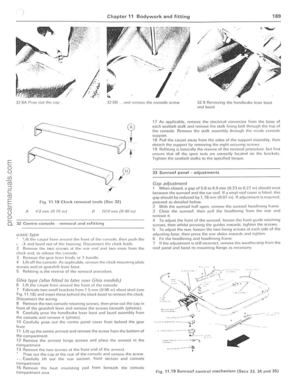 190
190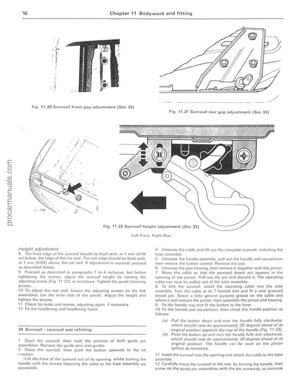 191
191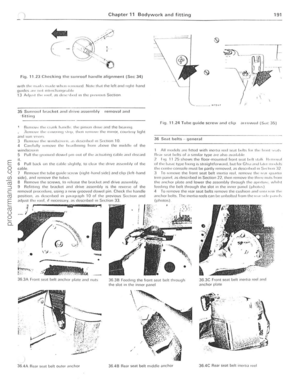 192
192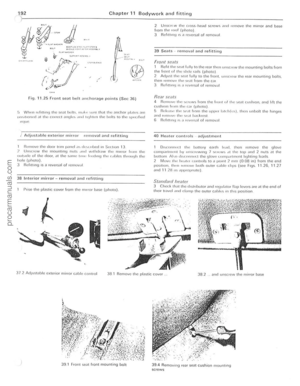 193
193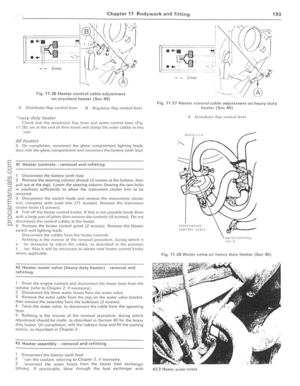 194
194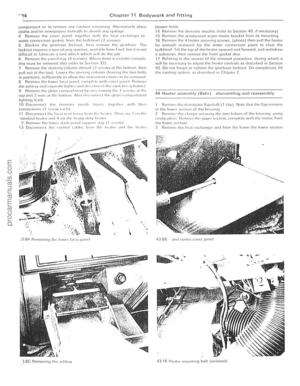 195
195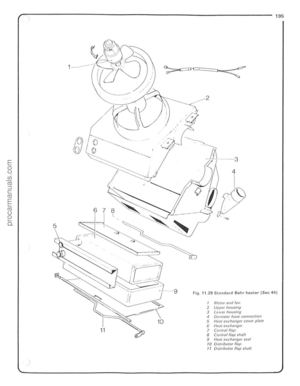 196
196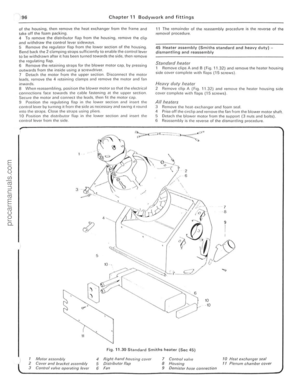 197
197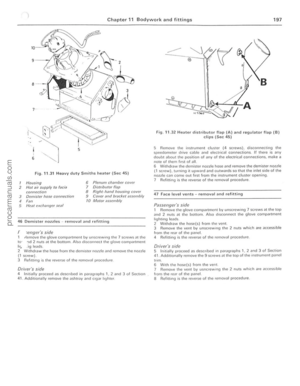 198
198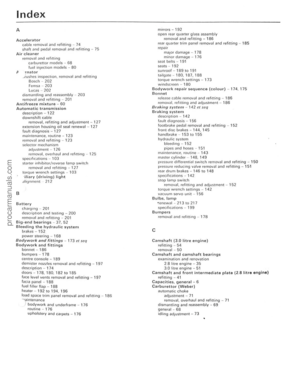 199
199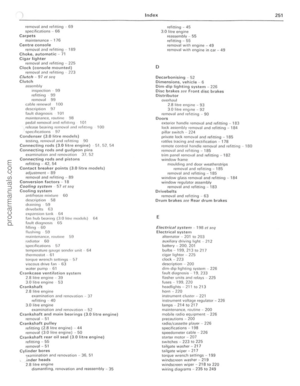 200
200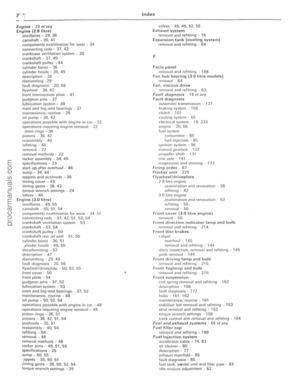 201
201 202
202 203
203 204
204
2 Mowr ,1nd f\"n 3 Upper housing 4 Lower housillg Deli/isle, \" 5 Helll CXChaosc connection 6 Neil l crl /lye( COVIN pla")