1974 FORD CAPRI oil pressure
[x] Cancel search: oil pressurePage 14 of 205

Routine maintenance
Maintenance is essential tOI C"~l"'Il\J sal"I\,.
The 1"II<)wII'~1 Sr:r",,:,~ schedules ,"lJ ol I rS I of the maintenance req
.
,
. . c;~
~--------------------'--~~~~'~
I Br,lke St'fVO uni/ 12 A" mIN duct 21 f/,ld'o,IOI l"lm c:,/, 31 Coohng sys/em pressure 2 Slarl v
Page 17 of 205

" ,
'6 Routine maintenance
)
Every 250 miles (400 lUll) or weekly -whichever comes first
Check the engine 011 level and lOp up " OCCCSSJry (Chapler 1) Check and adlus t lhe IYIC pressures (Chilplcr 10) Clean the windscreen and windows C lean the hcadlamps
Every 6000 miles (10000 km) o r six Illonlhs - whichever comes fir s t
£II[1ille (Clwpter 1) Change engllle 011 and IIher
Cleiln oil flilm c"p Chcck 10 1 ,IllY fluid leaka!)e ,n enUme CO'llp:lnUlCIl1
Cooling syslem (Clwptet 2) Check cool:'lnt level
Fuel syslem (Clmpler 3) Check idh"U mi~lUle (cmiJUiello1 IllUdels onlv) al I"SI se.v,ce ollIe, overhaul C heck idllllg sj)ee d
Ignition sys/Cm (C/I,Wler 4) Clean ,1nd re!)"p Sl)".k plu!)s (.:on!nC ' breilkCl Illudels olllv) Cle an and check d'Shibu\o. C"I). '010'. HT lealls mId co.1 (COllWct
bleaker modcls only) Check elwell angle (cOntact b.e"ke. mo
Bri/king sys/Cm (Ch,1pter 9) Check selva
Che ck hydraulic flu id h,vel
Ch(: ck p"ds :'Illd sho(:s lor wear Check h.ake hllcs and hoses
Suspension .wel stvi'ring (Chi/pICr 10) Check tyres 10' w ear and dam:lge Check steering COmp{lIlCnlS l o r w e:l l "lid d.1nlilue
Bodywork. .111d fittings (Clwptef 11) C lu .. >ek se"t belts fa. we .... damage :lnd secwity
Elvc(ric.11 systcm (Ch,7jJ(ef 12 ) Check Ope.iltoon 01 "Uhts Check wilsher flUId levels Check b.1ltery eleclrolvle lev el
Every 12000 miles (20000 kill) or 12 mOll1hs - whichever comes first
III .1(/(lIlioll 10 Ihe 6000 m/le sciler/Ille
Engine (Ch.1f)ter 1) Check and adlUSI valve clearanc es
r"' .......... ~.~-.... ._ •• -.... __ .... . 3lii1&l •
Cooling system (Chapter 2) Check condition "net tension of 1111011)<1101 dflvehelt
Fllel sys tem (Chapter 3) Tighlcn inlel IIHlnl lold boits/nuts Check vacuum hoses Check e~hiluSI syst em Check ll1r ctonne. temperature cOllllol (,I applicable) Renew fuclllllC ' (fuel injec tion models only)
Ignilion system (Chapler 4) lubricate th e dis'flbulOf (conUlel br eake r models only) Renew the coninCt hu,akcr points (II nppllcJblc) Renew the spMk plugs
Transmission (Chapter 6) Check ool/th"d level Lulmc;ue automatIC 1.,'Insmlss,on IInk:'lue
Rcar axle (C/MplCt 8) Check 011 level
Bli/king system (Chaplet 9) Check v,lcuun' hose
llliJllc:'l1C Ihe handhlake Imk,loe
Suspensioll {//j(J swelill!J (C".1plt~( 10) Check condItIon and hlllSlon o f POWI.II ~I!'tllllli dllvthtl1 (II .1l1pllcal,
Check MlspenSlon 101 we;" ;111(1 d;1Il1.1!)e
Bodywork ,1I)d fillings (Clwpler 11) Check opera lion of all locks Check secu.ity 01 dOOf check sl.aps
LlIl)fIcalC locks. door c heck S\','P5 :'Ind fuel fdler cap flap
Check underbody pr olCctive coalm!)
Electrical system (Chapter 12) Check Opcra1l0n of all eleC111!:al IIcm5
Evcry 2<1 000 llIiles (40000 kill) or 2 yc;u s -\Nhichever comes firsl
III ,1(/111/'011 10 the 12000 111"'1 $d'~'f/u/e
[nyino (CIWpICf 1) f!ell'!W crankC:l $e e""5510l1 v;llve
Cooling syslofll (Clwptor 2) Renew COO!:1II1
Fllel SYS(CIII (Ch, '/pliJr 3) Renew"" II Ih!r elemenl
TrallsmissiOIl (ClwjJWr 6) AdjUSI aulom;1\IC trall5nll5SIOll h,ake b;'IIld
Every 36000 miles (60000 kill) o r 3 yenrs - whichever comes first
III .1(/{/I('01l 10 Illc JJIl'VlOUS schc(/ulcs (",lIc" JJJIJ"ci,bfc)
Brakillg system (Clwpter 9) Renew hyd,auhc flUId
procarmanuals.com
Page 61 of 205

'.to.
60 C hapter 2 Cooling system
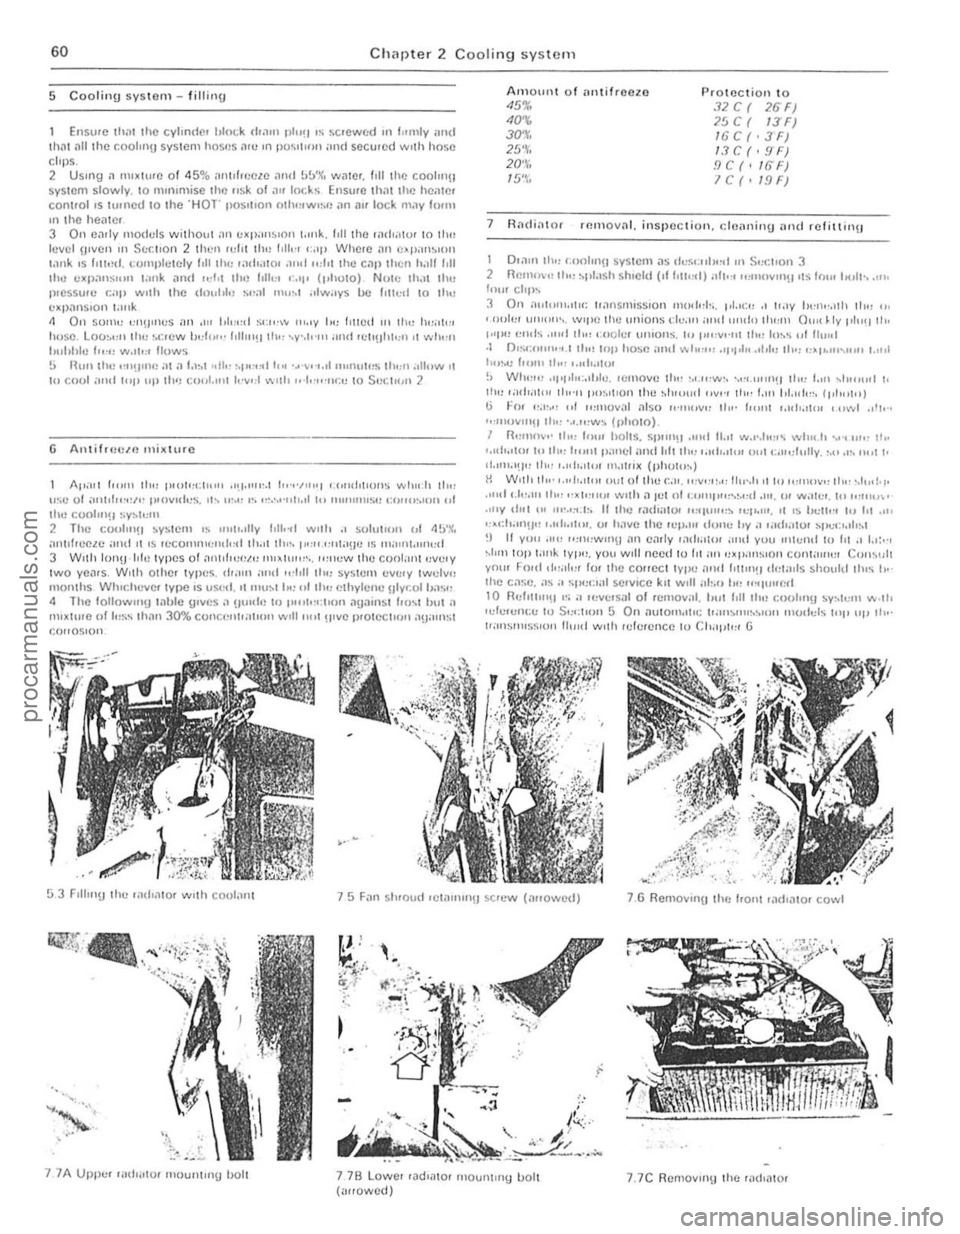
5 Cooling system -fillinu
Ensure 111m the cylinder hlot.k d',1111 pi,,!! IS SCfCWCU "' rumly wl(1 th .. , tlilihe coolll'U system h(')s'~s .1!tl1n POSl t'''1l and secured wIth hose clops. 2 USH1g ~ 1111~IUIC of 45% nnt,hN!IC ilnd b!/)(, wmer. 1,1) the coolll\lI system slowly. 10 nHnlnlise the fisk of "U locks Ellsure IIKIt the hC;'lC' control IS Wined \0 the 'Hor pOSItIon oll"l'W'~: ,10 IIU lock m.ly 101m Ifl the hemer 3 On fl,lIly models w i thou I 01" C'P"II~OOIi t .. llk. hll the liuhnlU ' 10 llHi
hlvel U'llcn III S!:f.rran 2 then ",ht 1110 Itll,·, ,:,,1' Where nil e~Jlan~lIl1l !OInk .s f,[h:d, t.:olllplclCly 1I1I11u; ,;)Ih;no • .11101 ,.,tn the CilP then h.llll,11 the cxp;ms",11 lank and "JI, the hlle . ,'" " (pholO) Notll 1h.11 thl) pressure (:0111 wIlh the Iln"lol" :,..;,1 "'"~, .• tW;II'S be 1111ed 10 Ihe CXI),1IlS,OIl I.,,,k
I) 01 so"'" "1\\I'''es i'" ,II, 1,1",,01 ~"".'" ", .. y I,,, I'"eti Ifl Ih" IW',h:l hose. Loo~"11 Ihe ~,c:rcw boA"", 1,11""111", ' V·.Io'IIl .",d ,cl'\lII",,, ,I wil,'u hubhle I"·,, W,,,",, 110ws 5 nUll Ih.~ ""\I,n<: al,1 I.'~I "tI,· ~'I"',~IIt~ ·~',.· •. ,I "''''ul,,!> Ih,," "lInw ,I 1U tool iHUII,,1' up til') co(,I.", ' I.·v'" '~!lh ,.'t.''''"r.,; 10 SHCl"," 7.
6 A,IIi1f{W/fl milliu re
Ap,lIl I",,,, II,,, p'''I,,''I',,'' .,,, .. ,,,,.1 1""''''''1 .. ",,(I,t'OIlS ",.1,,0:11 II", usc 0 1 ilnld"·,,,.· I',nvules. II, 11'." I, """",,10 .• 1 I" "IUlI""SI) ':''''CI~IO'' "I Ihe ,:oolu'!1 sy:. I",,, 7. Thc (:ou1l1111 ~y:.lcm I:' ""lIdlly 1I1I.~1 wllh .1 sulu'u", "I II!>'". al1lll,cc~c ;lI,d II.s 'CCOIIIll""lIl"d Ih,'1 II,,, l":u.",,t"He ,s 111,11"1.1"",,1
3 Willi 1011\1·111" tvpes olall1,I,,,cl." ""~"""'" '''''''w lhe Cl)o l:")1 "ve,y IWO VCiI'S. W,III ot hel lypCS. d'iI'lI ",,,I ",10" 110" syslcm cv,,'y Iwelv" "lO'lIhs Wh'f.hcver Ivpe.s used, 'I I11\l~1 b" "'llll' ethylclle Ulyr.oll",s" II The lollow".!) l,1ble !)IVe s;o !J'IId., 10 l""I.":I'uu ;l!)aiIl SI l
-..-.. -::-' , .
I '
If
~
Amount 0 1 ilnlilr(l(lzo 45% 40~ 30')(, 25'\', 20'¥, 15'~,
P ro tection to .J2C( 26"F) 25 C ( I3'F) 16 C ( . 3'F) IJC(·!fF) .'JC(·IG'F) IC(tI.'JF)
7 iladialOr rCllloval. inspection, dcaninu and relittinu
1 O,arn Ih" ,:oolll1U S ySICIII as ~h,s ... 'h,·d ,,' S",:I'OI1 3
2 flclllo\" II", :."t;I s h shlcld (,11,"" .. 1) ;011". 'I:III()VIllII.IS fOIH .. "II-. .11" 10", cft l" 3 0" ;,,,I,,!],.II,,, 1,,1nSIllISs,o n 111011,,1-.. 1'1.":,, ., I'.IV 1><·".·,,11, Ill" " . , "ole' """"",. w'l,e till! un ions de.lll ;111,1 '''}!!,' Ih,,,', Oil'! ~ Iv I'''''' II" j"IH! "",h "",I II", '."010:;' 1""0IlS. I .. 1""v""1 110" h,,~ "111,,,,1 .f O'Sf:"""'· •. 1 110.,1<)1' hosf: ,m'I .... I""" "1'1'1" .,1>1" Ih" "~I""'"'''' 1 .,,,1 h"",) I""" II .. , •• ,,10"1110 :, WI",,,, .1",,1,,:.,1>1,]. 'CIllOV!! tl". "',",w~. -."'."''''!! 110" I.", ,tl"",,1 " "w .ati""", IIo"n p"~'I,on Ihc ~h,,,,,,, '''"., II", t.III 1,1."1",, 1,,1"'1"1 l.l Fo< 1:."'" "f ",movnl ;0150 ,,''''''Vo: IIII' troll! •• ,,10,"0' • "' .... 1 .. I"" "''''')\I'''!! th" ·"."'W~ (,)hOlo). I fl"ltmv,· II", I",,, holls. SP"Il!! .• ",1 11 .• 1 w"·.h,,, .. wll".h ,-,. , "". 11 •• , ... It.,101 I" Ih" 1",," ,W(\cllIl1d Iofllll" ,.UIo.IW' Oll( .;,,,,,r,,Uv. ,."." ""t t. '1.1I11"~I" Ih.· ,."1,. ,1,,, "'.IIr,x (phUlo,,) H W'lio II,,· ,."10.,1,,, ,,"I ollhe c.". II,VI:"." tl"'.10 ,I 10 ,,,"'0",, IIII' ·.I",!." .""1 •. 1"",, til" "~I"'"'' ",,,h,1 lei 01 • . ,,,,,,,",,-~,,d .111. '" Will(:,. 10 """"" ,"'v 11", IH """".1" II Ih" 'ild':l!OI ""IUI",~ '''p.II!, ,I ,~ h..,u,', h) 1.1 .11, ..... :h,"'!!'1 ,."1,.*,,. 0 ' havc Ihc 'cp.", do"" hy.1 tiOlIr"to, ~1 ... ~:,.,Ir:.' !) II yuu .u,' "",,:w"'\] iln cady ':0<1'.'101 ;,"d YOll "!l"nd 10 t,t ., I.,:, " ~1"11 lOp 1.11I~ typ". yuu Will nccd Iu fn 111, HXI'.lI1S'OIl contill"'" COil",,, yOll' FCltd oI"ill", lor Ihe COUCCI IYPII all" h""'!1 dt,liliis should Ih,~ .,. 1he C,1~;C. :,~ :0 ~1"":t:'1 se.v,ce kll w,lI il1:.0 .,,' "~IIII!CfI 10 Refllllll!1 , .. iI t(Jv(:,s(ll 0 1 ,cl11oval .• ,,,' t,lIlh" c:l)ohliH SY~I,,'" w .l h ''''e,enl:e 1 0 S,,,;I'OIl 5 On .1ul0"'''I''; ":"'l.'"'~~l(m 1110d"ls IIII' "I' Ih ,· 1';II1"IIHSS'IJII lI",d w,th .et(l.ence lu CIo""I'" G
S 3 F,IhnU Ihe 'ad,;OIO' WIlh coul:",! 75 Fan s h.oud '(:Ii"""}!) sc.ew (.mowed) 7.6 RernovulU Ihe 1<0111 .adlato r cowl
"
"""
, "
7 7A Upper .mlrillOI 'n1JUIlI"'U IJ()II 7 7B Lowe •• ad'nlo, 1ll0un1111U boll ("!lowed) 7.7C ReIllOVII1\J Ihe rJ(MIO'
procarmanuals.com
Page 98 of 205

Chapter 5
Contents
CIUICh il$scmhty '"SIJoCcl'Qn . Clu\(;11 assembly 'Urn!!ll!) Clutch llsscmhly lemOY," C lutc h cilhle .efluwal._
Clutch
Clutch !Jedal rClllovnl illld ,cflltl"U
Specifictions
Genera l Type ..... Clutch (lise (hamClcr lining tlnckncss Clutch pedal hcc "
Gene.al description
,
5 3 1 8
All manu:!1 transmission madllis covered by this manual nrc lilted Wilh a singlo dl3phrilgll SpllJlg clutch. The unit COlllt)riscs il steel cover which is dowelled and bolted to the tear lace of the lIywheci ilnd conla i.lS the pressure plnte. diaphragm spring and fulCrum .ings . The clutc h " iClio n disc is
ee to slice along the splineJ gearllox
Inpu t Shillt and is held in posi t,on between the flywheel and the pressure plate by the pressure of the pressure plate spring , Friction linIng materiill is riveled 10 the d,sc and II has a spring cushioned hull to absorb transmission shocks and to help ensure a smoo th take oft. The circular diaphrilUm spring is mounted on shoulder pins ilnd
'Ield in place in the cover b.,. two fulcrum rings . The spring is also held ,0 th e pressure platc by three spling steel clips which are rive ted in
posi tion .
The
clu tC h ,s aCluated b.,. a cable controlled b.,. the clulCh pedal.
Clutch '0Ie,150 bCilfl"U -remova' and wl,u,"g Filult (ioilU"OS'S -clutch Generill descllptlon . noutlilc rn,untenanco .
SlIlgle (Iry plate. dlill)hragm sprong. cilhle ·ope.ated 241,3 rnm (95 Ill) 381 nun (0 15 In) 27.01 40mm (1.OG:i 0 .16,n)
No. Ib l It 16 to 20 12 10 15
G 9 1 2
The clutch release mechanism consists 01 a .elease leve. and a bearing which conwcts the lelease Imgers on the pressure plilte assembl.,.. The eHect of an.,. wear of the friction ma terial in the clutch is adjuSled out b.,. means 01 a cable adjuster at the lowel end 01 the cable where it
passes through the bell housing .
Dep.ess lng the clutch pedal actuates the clutch release leve. b.,. means of the cable . The lelease level pushes the lelease bearing
forward to bear against thO release l ingels so moving the centre of the diaphf()gm sprong within the annular rings which act as fulcrum points.
A s th e centrO of thO spring is pushed in. the outside of the Spling is pushed OUI. so Illoving Ihe pressure plme backward and disengaging the p.essu.e plate flom the /tielion disc . When the Clutch pedJI is Icleased. the diaptllaglll spring torces the plessule plate into contac t w ith the frictIon linings on the d,sc and at the saIne t,me pushes it a flactlon 01 an InCh fOlward on I\S splines . The
disc is now fuml.,. sandwic h ed between the plcsswe plnte Dnd the
flywheel. so the d.ive IS laken up.
procarmanuals.com
Page 100 of 205

Chapter 5 Clutch 99
--.;,:;.~.--.
. '
3 I V,,'W 01 Ihe clutch wIth the Ue,IIbox r~movcd
1 If IH,<:~SS;lIy. ill'" Ihe
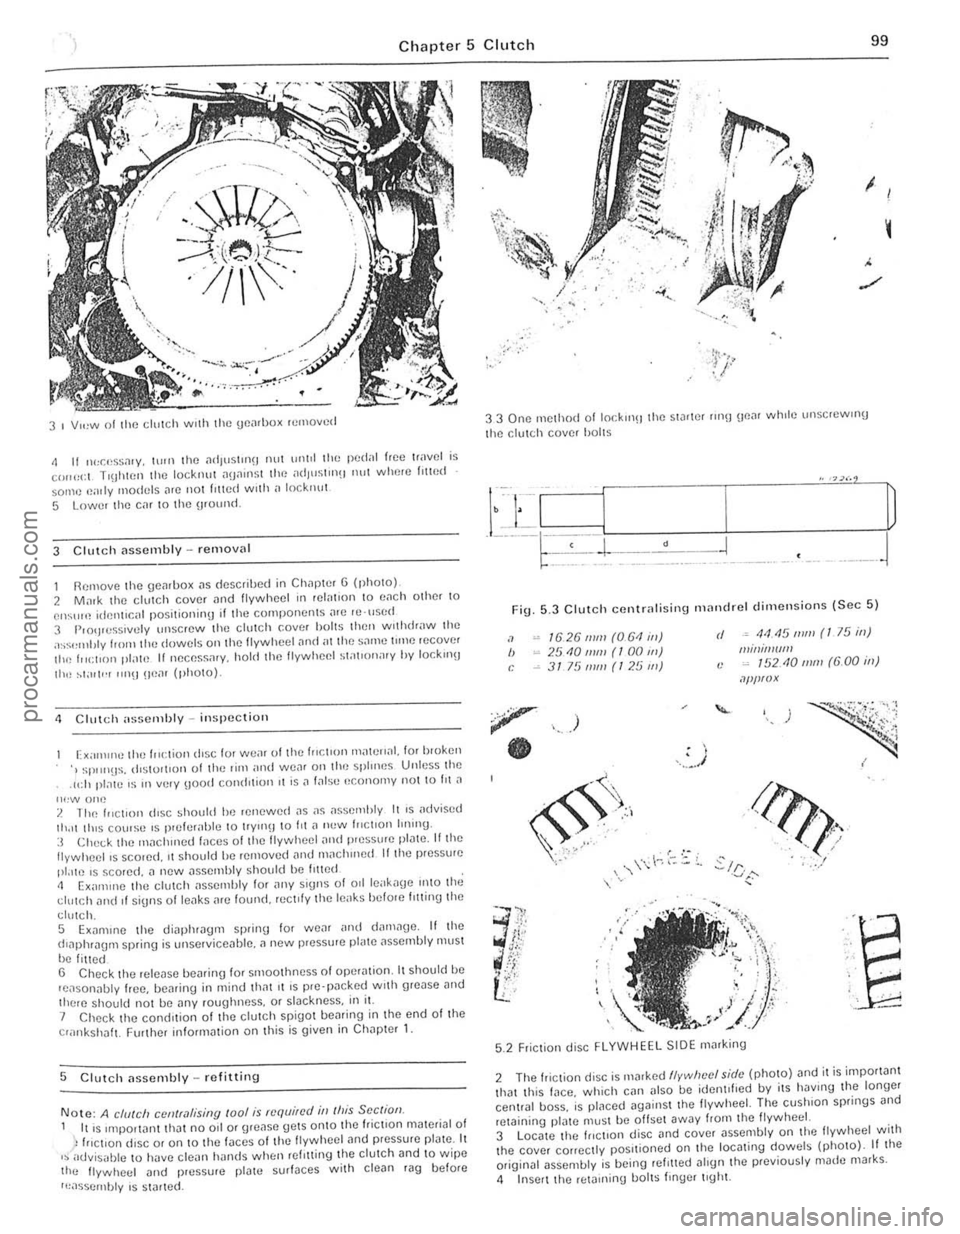
I Remove the ~Jenrbox .. 5 described in Chapter G (photo). 2 Ma,k Ihe chltd, cove,
II", ~1'''I'·r ""!I Uoar (photo).
1 Cili lch assemhly -inspectioll
Ex;"nIlIO IllI] 1", :lio n dISC lor we,ll ollhe In<:lIon 1ll'lIe"al. for bwkell .j ,;pllilUS. (ilSlull rOll of the rilll "ml we;lr all the splmos Unless the
. 1I:h plate IS In ve'y \Jood condlliull II is ;I false "cono"'y not 10 hi J
II""" ono ? The I"ctron d,sc should he ren ewed as as "ssemhly II IS adviscd Ih.ll th,s co\m;r~ IS prelelahle to lIymB 10 1'1 .. IIew I"ctlon IIIHIlU· :3 Chec k tho tnJchlned Iilces 01 Ihe flywheel "nd p'essure plate . lithe Ilywheells scoled. II should he relllove<1 "lid m~ch",cd Illhe preSSIJle pl.lIe IS scored.
cluic h nnd II si9nS 01 le"ks "re found. rec t,ly Ihe le"ks be/Ole hlling Ihe
clutch.
5 E x nmlllC Ihe diapl""9fll sprinu lor wear ,lIld <1
., Ch eck Ihe comt.tion ollhe dolCh spigol be .. ring in Ihe end 01 Ihe o""kshillt. Further inlorlllillion on this is given in Ch;lpICr 1.
5 Clu tc h assembly _ relitting
Note: A chI/eli CCII(r,l/ising roo/ is required in (his See (ion. I IllS IInpOllanllhal no od or gre.lse gelS onlO th(l friction mated,,1 01 h,c t,on diSC 01 on 10 the laces of Ihe lIywheel find pressure plalc. It ,~advisi,llle to have clean hands when rel'lIing the dolCh and 10 w ipe lho lIywheel ;lIld pressure [lla\\! surfaces wilh clean rag belore
I~assernhly IS s1
.... , ... "
'.
33 One method 01 10cklllH the Slarter lin!) \lo"r wlHle \II1SCleWll1U
the clulCh cover hailS
•
Fig . 5.3 Clulc h centr" lising nHllldrel dimellsio ns ISec 5 )
"
" ,
1626 111111 (061 ill) 25101ll11! (100 1ft) 3175 mill (125 1ft)
)
.. , . I .. ~ .
rI .• 44.15 mm (I 75 ill) IIImil!l(IfII (: ~ 15210111111 (6.00 ill)
.l/lf!f(!X
./J?f1. ' ,
.?!<'. , , ..... /
~/ r .... :./ .:..1('":'
'''r' ....... , .
. )i";; , i ,
. . ~:.. • j • ,
/'" , , -..
··E
"
.. . -
5.2 Friction disc FLYWHEEL SIDE marking
2 The friClion disc is Il,arkcd flvwlwcl shit· (photo) and il i$ impol1anl Ihal th is face . which can 11150 be idenl,lled by ils haVing the longe, cenllal boss. ;s plnced againSI Ihe lIywheel. The cushion springs and reJaining pl"te muSI b(l ollsel away hom lhe Ilywheei. 3 Loca te the Inctlon disc "nd cover "ssembly on t he lIywheel with the cover cOlleclly positioned on J he loc .. ting dowels (phOto) . If lhe oliginal assembly is being , efllled .. lIgn Ihe previously made marks .
<1 Insell Ihe reta,ning boilS I"'ger Ilghl.
,
I
I
I
I,
procarmanuals.com
Page 145 of 205

144 Chapter 9 Braking systom
9 II there Dre no inspec tion holes, remove the wheels and drums In inspect the linings . 10 Where any lining is less Ih,111 the nllnimufll thickness, renew Ihp. complete SCI 01 re,ll b,~ke shoes. 11 Refi ' the drums lind wheels as necessary then lowe. tho em \0 thl) 9lOund.
Ch eck operation of servo lIoil 12 Visually inspCCllhe vaCUUll1 hose IClIding hom the inlet mlllllfolll Of air box 10 the servo unit fOf dc\c,iOf1l1lon and security. 13 Wit h the engine Slopped. dCI).es s the bra ke pedal several ,imes to dissipate t he VOC U\Ull hoUl the sorvo Imit. 14 Depress the b'i1kc 11Cdll1 wilh moderate pressure then Sin' I the
cnU illC . As the V
R/mew fhe /)rilke I/Ilid 21 lJIucd Ihe hyd.; ."loc sySle m as d"scllherl III Seelloll 15 ilUOwnl! II",
Ihe new h ,,,k\) Ih"d to COnlph: lely 1,lIlhe C:"CUtt he"I!1 bled . 22 AI Ihe sanl\) I"ne rcn,uve Ihe 'Ci" ",ake \I'lOn,s alld check tho wlu,,,1
cylonclers 10' leak"IJe.
3 Front disc pl1ds - renewal
Apply t
he handbr
I .
. ~ .. " ,) •. :Y.
2 RemOV(l Ihe hont wheels.
3 It Ihe fhnd level in the maste' cylondel reservoir is high. when the pistons l1re moved into thei, respecI,ve bo,es to accommodate new pi1ds. thO leyel could rise sulticienlly fo, Iho fluid 10 oyerflow. Place ilhsoruent clOlh .1round the reSe,yO". o. syphon a Imlo Ituid oul. so 1)'Cven tUlg Pil"ltwOlk
<1 F rollt brake caliper _ rcmoy'll iltld refitting
1 nemove the f,on! disc pads i1S tie sc"lJc(/ in Section 3. 2 1111 'S Itll,,,,d,,(1 10 lit ncw Ci1tiper pistoll s "nd/o, seals. dep,ess the tH.1k'J Iwel,,1 10 hlUlU the pistons i"to COI11i1ct with thO (fisc and
'-.. ~
, .
3 .9B Fitting the tenS ion springs
.--.::.:.:; .
....... . ~,'
灲潣慲浡湵慬献捯m
Page 157 of 205

,
156 Chapter 9 Brakin g syste m
Secondary cc1ble (early models) 5 Loosen 1I1c lock.nut ~nd unscrew the adju stment ferrule from the right-hand rear clevis.
6 Remove the split pin and clevis pin securing the secanda.v caulo \0 the left-hand Icar operating le ve l. 7 htrac the clip, remove the clovis pin. and withdraw the pullcy wheel from the lever on the Ical a~le. 8 Remove Ihe cable from the lever.
Transverse rod (later models) 9 Disconne ct the cable from the righi-hand rear opCfating Icvcr by
removing the split pin and clovis pin. to Uncl.p the cable hom the 'Hlnsvcrse rod . 11 Remove Iho spli, pin and clevis pin securing the fod 10 the Icft·h~nd le;!1 operating lever . 12 Slide the transverse rod Irom the guide on the rOM axle . 13 Check thO {luide bush lor wear and dama ge and renew It il necessary by prising il oul and pressing a new bush irllo POSilioll.
All models 14 Refining is a r e versa' of removal. but lubr icllto the lin kage as )scflhed in Section 2, and atljl' stthe cable as (fescri bed in Section 18.
21 VilCUUrll sorvo unit -dosCrilHion
A vacuum servo unit is linod Into the lir,lk e hydrallirc cil cu il. 111 series with I he 111,1S ler cylinde f. to provide assiswnco to the dllver whlln Ihe brake pedal is depressed . Thi s reduces the eHolI le{luired try the driller to oper,lIe the brakes, under all brak ing condi tions .
This unit operates by vacuum, obtained from Ihe indu ction mnni rold and comprises basicall y iI booster diilphragnl and check lIallle . The servo unit and hydraulic master cylinder are connected
t o gether so that th e serllO unit piston rod acts as the master cylrnder pUShrod. The driller's b rilking ellon is trilnsmitted through allot her PIi ShlOd 10 the serllO unit piston and ils built-in COmrol system . The scrllo unll pislon docs not fit tightly inro the cylinder. but has a strong ,lltl flhril!Jlllto ke el) liS edges in COllst ilnt COntaCI with I he cylinder Willi_
23 rilult diagnosis -hrilking system
~ylllptom
-'ceSSllle ped,,1 u;tllel
nrakcs pull 10 ono Side
Or;tke ludder
E~cessive eHor l to stop car
so ensuring an i1inigh t seal between the two parts, The fo rward
chamber is held undelllaCUUm condi tions cleilted in the inle t manifold of the engine and during periods when the brake pedill is not in use, the controls open a passtlge 10 the rear ch ambe ., so placing it under lIacuum conditions as well. When the b.ake pedal is dep.essed. the lIacuum pass.Jge to the rear chamber is CUI oH and the chamber expos ed to atmospheric pressure. The consequent rush 01 ail pushes
the servo piston lorward in tile lIacuum chamber and operates the main push rod to the m.Jster cylindcl. The controls are designed so that assistance is given under all condllions. When the brakes are 1'101 requ ired, vacuum in the rear chamuer i s .e -es tabl ished when the br.Jke ped.J1 is released . All air Irom the atmosphe.e entering tho rear ch.Jmbe. is passed through II sma ll air trlter. Und er normal opcr.Jting cond itions tho IIflC(IUm serllO unit is lIery relraule and does not require ollerhaul e~cepl at IIcry high mile,1geS. In this case it is far bcner 1 0 o bta in a serllice e~hange uni l. r,1the, than rcp;ti . the o,igi'lo11 unit . Although inlernal components we,e once .Jv'lIlaule 10 ' ovcrhauling purposes this service has no w been
d,scont,nue(t .
22 Vacuulll servo unit _ remOlla l MId re filtillg
I RemOIlO the master cylinder as desc.ihed In Section 10. 2 D,scolllwc l thc vacuum hose from the non·return lIalve on the serllo \lI1it. 3 Work i,,!) insido thc cal. remOlle th e lower l;t cia panel below the stccring column. 4 E~tractlhc clip and l)ul1 outlho clellis pin attaching Ihe push.od to the l ootu .ake ped;t!. 5 Unsc.ew the nuts securing thc mount ing b.ack.et to the bulkhead.
then withdraw thc serllo unit and bracket from the engine COlllp,lJtlnen t, 6 UnSClew th e nuts ar1(1 serlar,lle the braket 110m the SCIIIO uni, . 7 netrning IS;t rell e.sal 0 1 remOllal w ith leference .Jlso 10 Section 1 0 when retrumg Ihe master cylrnder.
Renson(s)
RC.Jr blake self adju sting mechanism faulty All i n hydrilulic system
WOIll or cont,llllina led /rnin{Js Seized Caliper or wheel cy linde r
E~cessille run-out or distortion of discs o. drums
Worn Of cont aminated linings Brake backplate or caliper l oose WOIll suspensio n bailloints
SerllO unit faulty
Worn or conwmin.Jted linings
I
J
procarmanuals.com
Page 162 of 205

Chapter 10 Suspension and steering 161
fig. 10.11 Drivebelt [ldjustlllent pulley holts on 3.0 litre models -arrowed (Sec 2)
2 Routine maintenance
At the "*',vals spec ,f,ed III the Routine MainhHlance $()(;t,on in the front of til() manunl c,lIIy out the 101l0wlIl\j p,o(;cdures.
Check lyres for illflalioll, wear and conditioll 1 Check [lnd If necessary adjust the tyre pressures .
2 Check [III t yres for WC[lr and condition with referenc e to Section 21
Check power steering pump drive belt tensiof) 3 Check thm the deflection of the drivebelt m,dway ulon!) its lonyest nlll between upper pulleys is approxirn
(photo).
Clwck puwer steering fluid levef (lnd hydraulic huses II pOSStble the level should be checked w,th the Buid [It nOll1lal
uper,\!mg tClIll)Cr[lture . 6 On c;lrly modcls unscrcw the wing nut nnd relnove Ihe rese,voir cover ilild uaskel. The flu,d should be up 10 Ihe MAX level mark on the
reservo". 7 On later models, wrn tht! hiler C
Fig. 10. 5 Topping·up the power steering reservoir on early models (Sec 2)
8 Whele nec.ess.1'y ~dd Ihe ~pccilled lIU1d to bring Ihe level up to the
correct ,nilrk. 9 ChC(;k the hydr[luhc hoses for comJit,on and security.
Check steerinfj ,-md suspension components 10 n,ll$O tilt) front ilno reM 01 the Cill or position over an inspeclion pn. 11 Check the SleetinlJ wck and t'e 'rods for d[lm3ge und weM. Also check the wek HJbber bellows and track rod end rubber bOOIS for spfilS
ilnd leilk[lge. 12 Chec k the front ,md reilr suspension components lor d"m.Jge [lnd wear. In particuf;lr check the front suspension tr.Jck control Mm ilrod stahiliwr r"bber mounling bushes. Usc a lever to check that there is no excessive we[lr III the Iron I slispenSlon lower IJ[ll lJoints which Me
"'\()\JIill wnh the track conlrol ilflllS . 13 Check the operat,on of the I,ont ;IIHt rear shock absorbers This is
be st ilchievcd with thO} Cilr on the \lfOlind by depressing euch corner of the ca' 1111\I1. On 'ele[lsil\ljthe C()"H~r helllU checked Ihe body should ,,~c thell s"llie IIlIl11ed,mely on ,t~ way down. II there nrc sever.J1 ()sclll;ot'ons the sho(;k absorber IS weilk nnd should be renewed.
3 Front hub _ removal. refitliny and bearing adjustillent
Apply the h[llldhr[lke then Jilek tip the front 01 the cm ilnd support
on axlt! standS Remove til(! rOildwhecl 2 Rernove the front ul;lke CJllper With ,elerence 10 Ch.Jpter 9. Whele the flex,ble br[lke host! is connecte(t dueclly to the cililper ther e IS no need 10 disconnect the hose i1S thO} caliper can be suspcnded by wire
aWily from the diSC. 3 By calelul 1
" :<>,:,~,.
Adjusting the power Sleering pump drivebelt tension on the 2.8 litre engine
2.7 Powcr steeling filler c.Jp/d,pstlck for the 2.8 hIre engine
3.3 Removing the dUSI cap from the front
hob
i
i ,
~ !
procarmanuals.com