1973 DATSUN B110 service
[x] Cancel search: servicePage 120 of 513
REAR
AXLE
REAR
SUSPENSION
DESCRIPTION
Rear
suspension
consists
of
semi
elliptic
leaf
springs
telescopic
hydraulic
shock
absorbers
and
rubber
bumpers
The
rear
spring
center
pin
is
off
set
110
mm
4
33
in
toward
the
front
from
the
center
of
the
spring
This
is
done
to
reduce
spring
wind
up
and
to
decrease
the
arc
while
the
rear
wheel
swings
through
Thereby
minimizing
the
possibility
of
the
rear
suspension
effecting
vehicle
stability
Iso
clamp
devices
are
used
for
attaching
the
axle
housing
to
the
spring
The
leaf
springs
shock
absorbers
and
rear
axle
housing
are
mounted
on
rubber
bushings
at
each
end
to
minimize
noise
and
vibration
of
the
transmission
to
the
car
body
and
passenger
compartment
REAR
SPRING
Removal
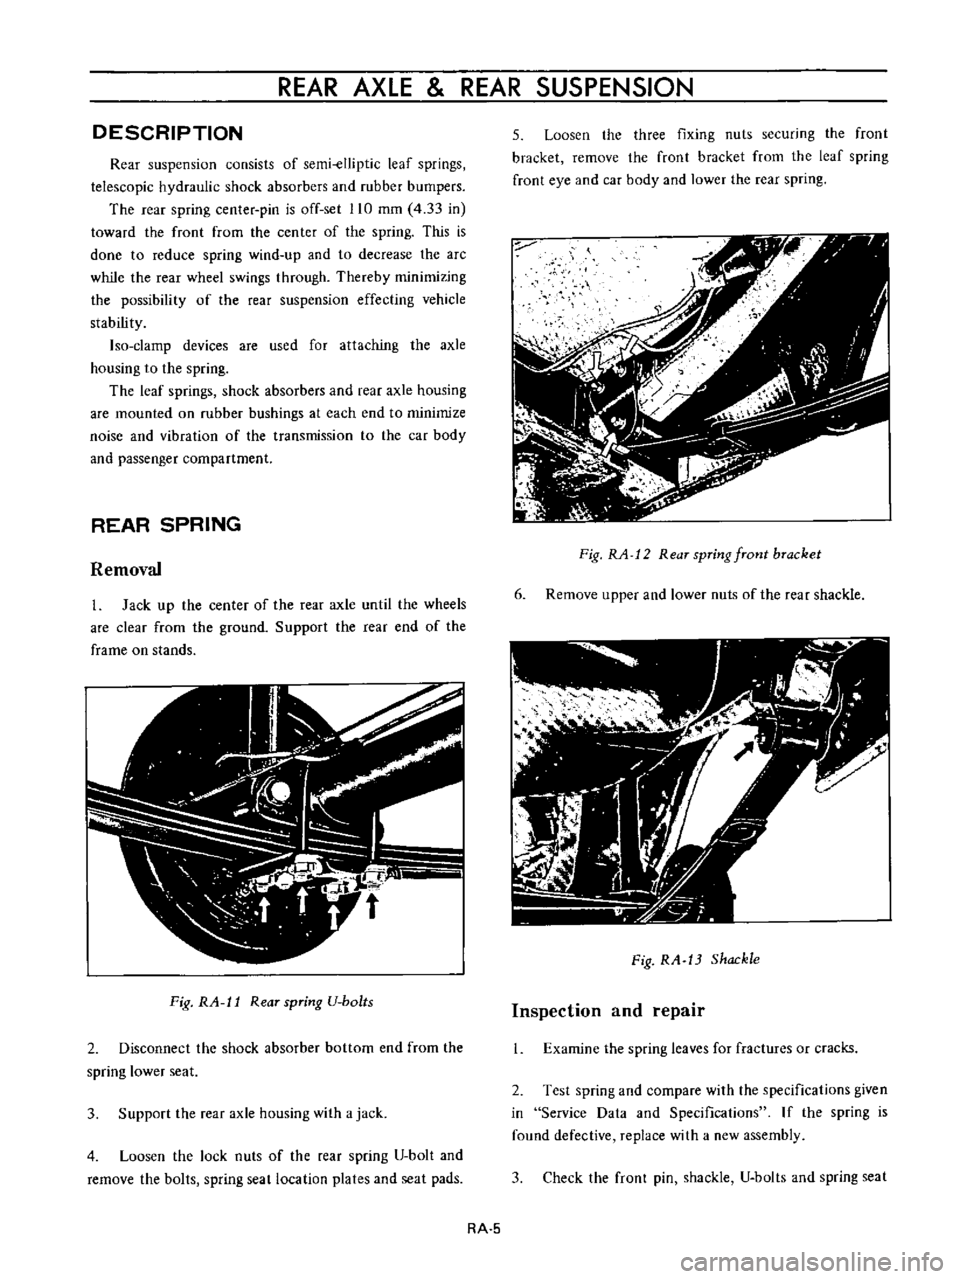
1
Jack
up
the
center
of
the
rear
axle
until
the
wheels
are
clear
from
the
ground
Support
the
rear
end
of
the
frame
on
stands
Fig
RA
l1
Rear
spring
U
bo
ts
2
Disconnect
the
shock
absorber
bottom
end
from
the
spring
lower
seat
3
Support
the
rear
axle
housing
with
a
jack
4
Loosen
the
lock
nuts
of
the
rear
spring
U
bolt
and
remove
the
bolts
spring
seat
location
plates
and
seat
pads
5
Loosen
the
three
fixing
nuts
securing
the
front
bracket
remove
the
front
bracket
from
the
leaf
spring
front
eye
and
car
body
and
lower
the
rear
spring
Fig
RA
12
Rear
spring
front
bracket
6
Remove
upper
and
lower
nuts
of
the
rear
shackle
Fig
RA
13
Shackle
Inspection
and
repair
1
Examine
the
spring
leaves
for
fractures
or
cracks
2
Test
spring
and
compare
with
the
specifications
given
in
Service
Data
and
Specifications
If
the
spring
is
found
defective
replace
with
a
new
assembly
3
Check
the
front
pin
shackle
U
bolts
and
spring
seat
RA
5
Page 121 of 513
CHASSIS
for
wear
cra
ks
straightness
and
damaged
thread
s
If
defective
parts
are
found
replace
with
new
ones
4
Inspect
all
rubber
pans
for
wear
damage
separation
and
deformation
Replace
them
if
necessary
Installation
Install
the
rear
spring
in
reverse
sequence
of
removal
noting
the
following
matters
Coat
the
front
bracket
pin
front
bracket
bushing
shackle
pin
and
shackle
bushing
with
a
soap
solution
prior
to
assembly
2
The
front
pin
securing
nut
and
shock
absorber
lower
end
securing
nut
should
be
tightened
with
the
vehicle
unladen
Note
Make
sure
that
the
flange
of
the
shackle
bushing
is
clamped
evenly
on
both
sides
REAR
SHOCK
ABSORBER
Replacement
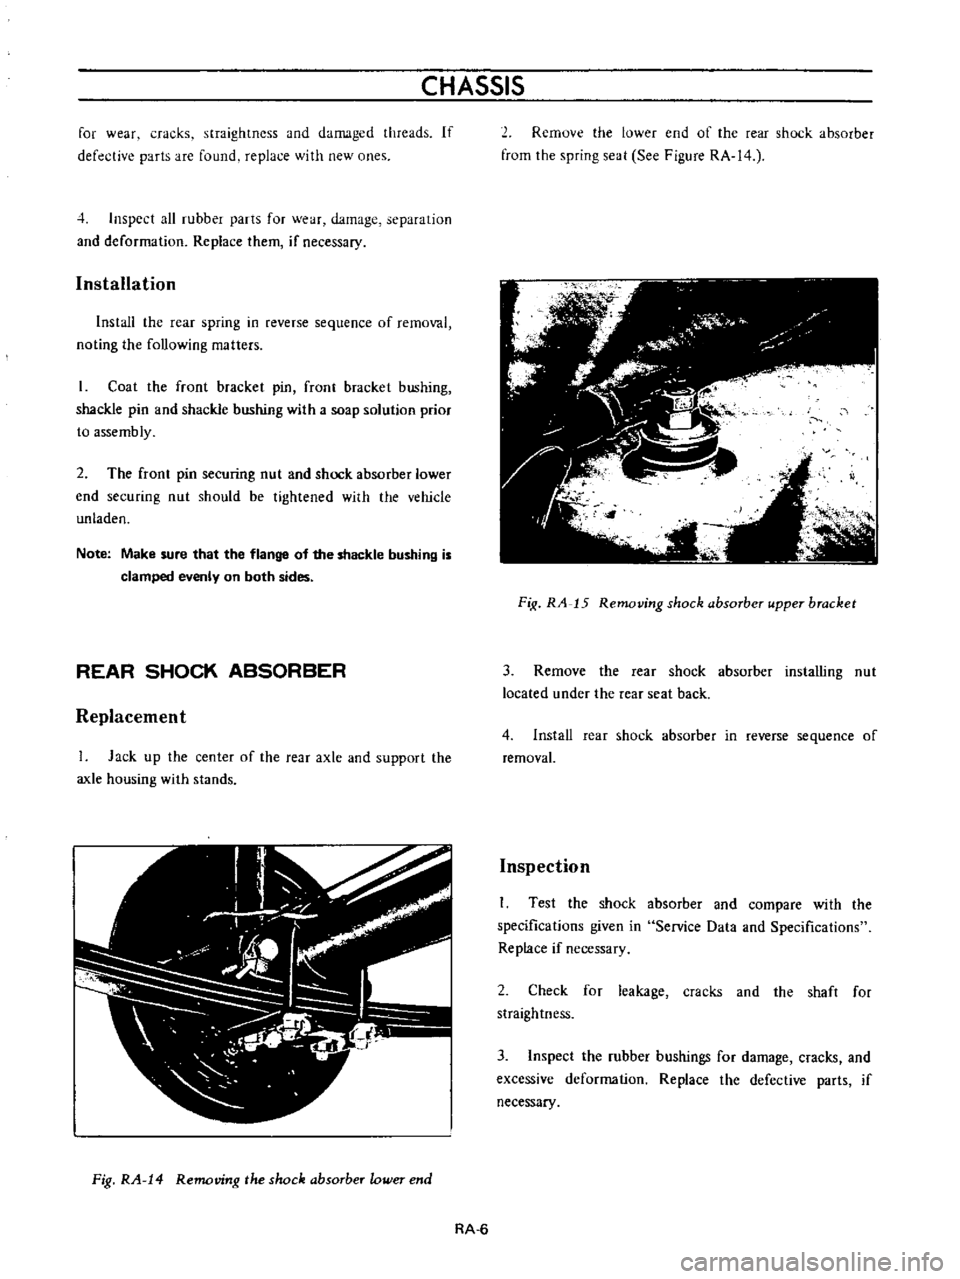
lack
up
the
center
of
the
rear
axle
and
support
the
axle
housing
with
stands
Fig
RA
14
Removing
the
shock
absorber
ower
end
2
Remove
the
lower
end
of
the
rear
shock
absorber
from
the
spring
seat
See
Figure
RA
14
FiK
RA
15
Removing
shock
absorber
upper
bracket
3
Remove
the
rear
shock
absorber
installing
nut
located
under
the
rear
seat
back
4
Install
rear
shock
absorber
in
reverse
sequence
of
removal
Inspection
Test
the
shock
absorber
and
compare
with
the
specifications
given
in
Service
Data
and
Specifications
Replace
if
necessary
2
Check
for
leakage
cracks
and
the
shafl
for
straightness
3
Inspect
the
rubber
bushings
for
damage
cracks
and
excessive
deformation
Replace
the
defective
parts
jf
necessary
RA
6
Page 122 of 513
REAR
AXLE
REAR
SUSPENSION
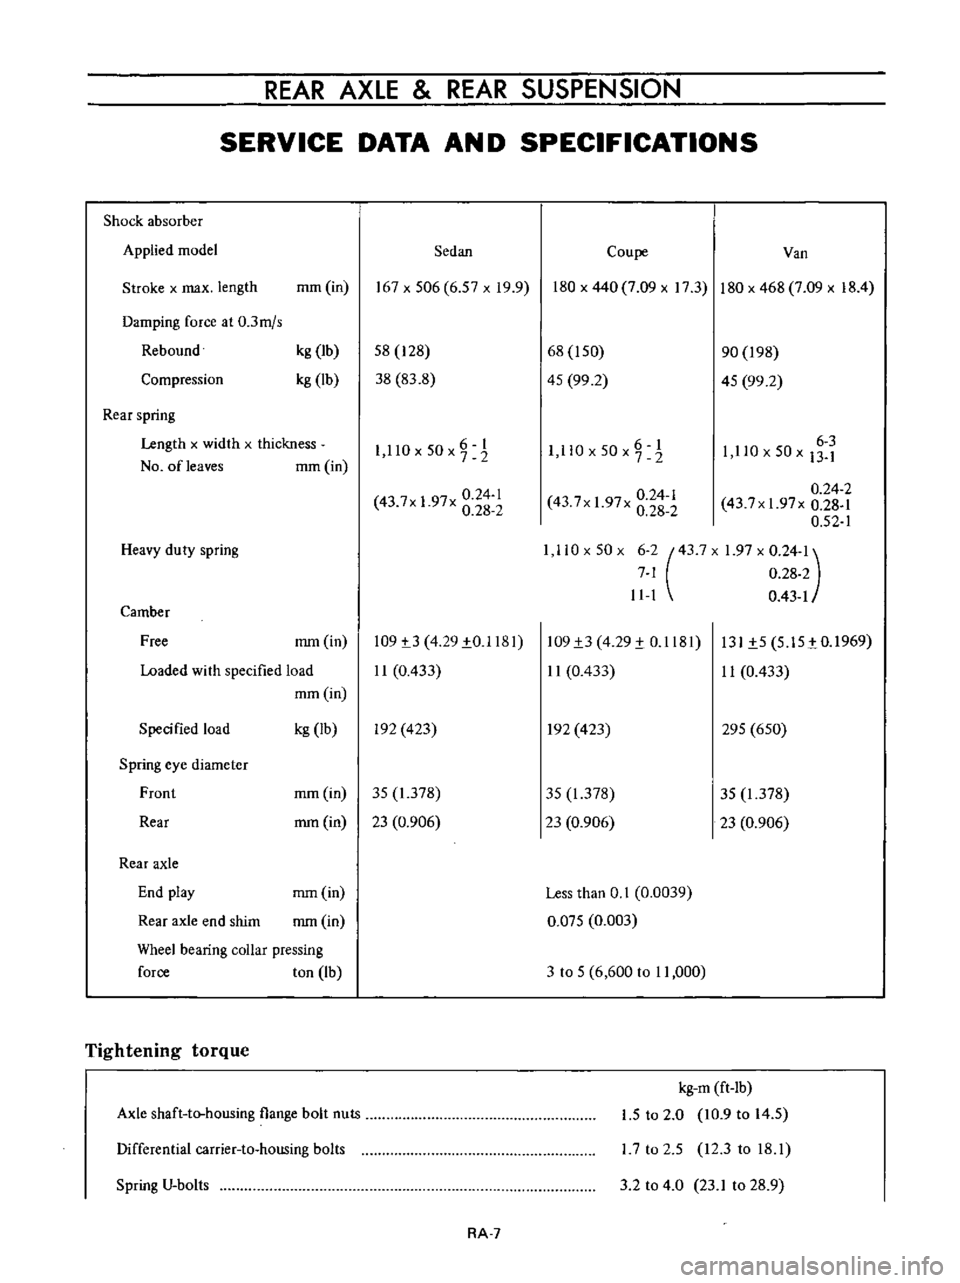
SERVICE
DATA
AN
D
SPECIFICATIONS
Shock
absorber
Applied
model
Sedan
Coupe
Van
Stroke
x
max
length
mm
in
167x506
6
57xI9
9
180
x
440
7
09
x
17
3
180
x
468
7
09
x
18
4
Damping
force
at
0
3mjs
Rebound
Compression
kg
Ib
kg
lb
58
128
38
83
8
68
I
50
45
99
2
90
198
45
99
2
Rear
spring
Length
x
widlh
x
thickness
NO
ofleaves
mm
in
6
I
1
llOx50x72
O
6
1
I
ll
x50x7
2
6
3
1
110
x
50
x
13
1
0
24
1
43
7x
1
97x
0
28
2
0
24
2
43
7xI
97x
0
28
1
0
52
1
1
110x50x
6
2
43
7X
1
97
x
0
24
1
7
1
0
28
2
11
1
0
43
1
0
24
1
43
7x
1
97x
0
28
2
Heavy
duty
spring
Camber
Free
mm
in
109
t3
4
29
1
0
1181
11
0
433
109
1
3
4
29
1
0
1181
11
0
433
131
1
5
5
15
tO
1969
11
0
433
Loaded
wi
th
specified
load
mm
in
Specified
load
kg
Ib
In
423
In
423
295
650
Spring
eye
diameter
Front
mm
in
35
1
378
35
1
378
35
1
378
Rear
mm
in
23
0
906
23
0
906
23
0
906
Rear
axle
End
play
mm
in
Less
than
0
1
0
0039
Rear
axle
end
shim
mm
in
0
Q75
0
003
Wheel
bearing
coUar
pressing
force
ton
Ib
3
to
5
6
600
to
11
000
Tightening
torque
Axle
shaft
to
housing
flange
bolt
nuts
kg
m
ft
lb
1
5
to
2
0
10
9
to
14
5
L7
to
2
5
12
3
to
18
1
Differential
carrier
to
housing
bolts
Spring
V
bolts
3
2
to
4
0
23
1
to
28
9
RA
7
Page 123 of 513
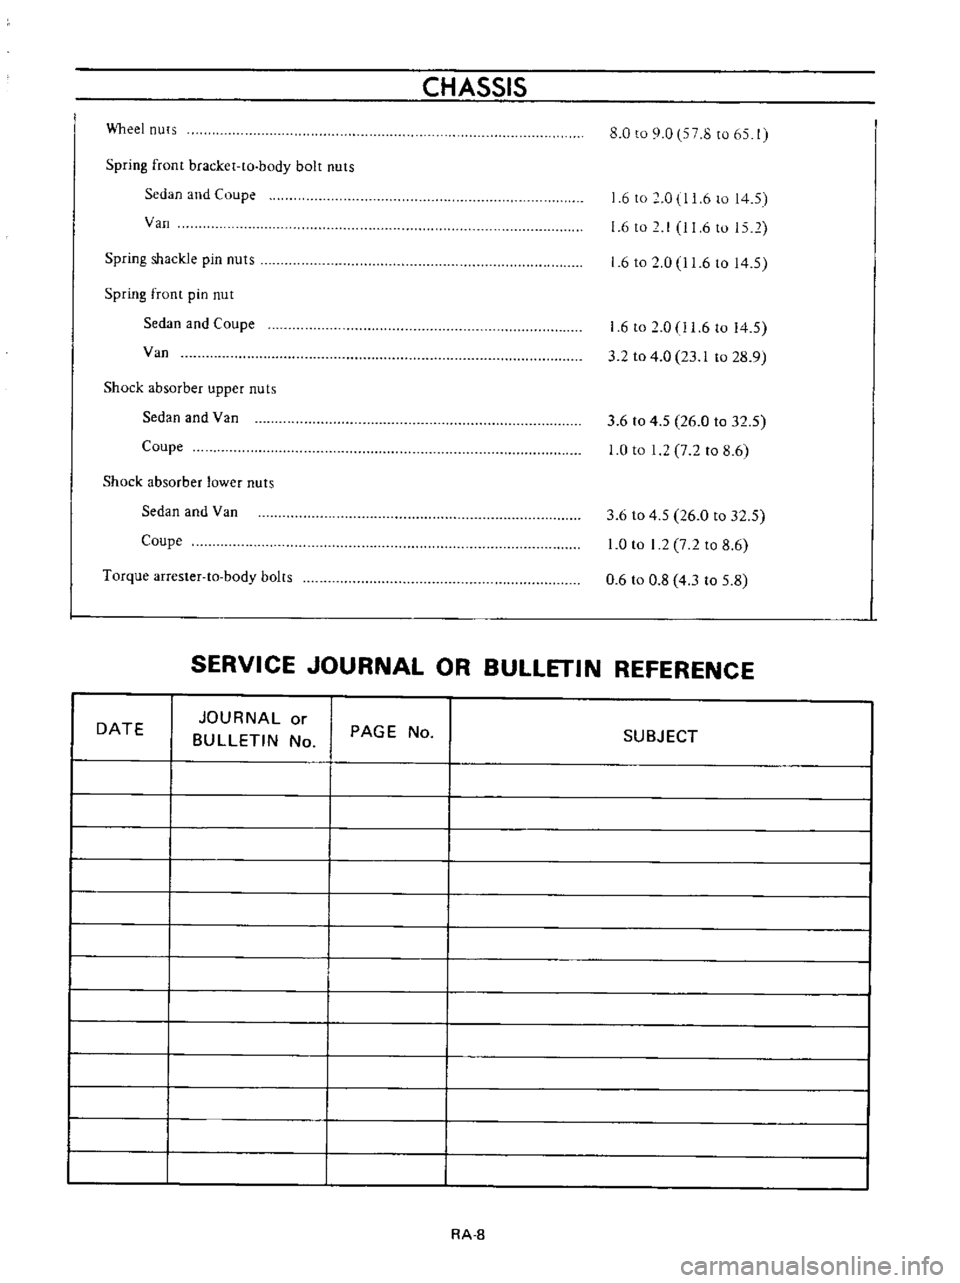
CHASSIS
Wheel
nuts
8
0
to
9
0
7
8
to
65
1
Spring
front
bracket
to
body
bolt
nuts
Sedan
and
Coupe
Van
6
to
0
1
6
to
14
5
6
to
I
11
6
to
15
2
Spring
shackle
pin
nuts
1
6
to
0
11
6
to
14
5
Spring
front
pin
nut
Sedan
and
Coupe
Van
6
to
2
0
1
6
to
14
5
3
2
to
4
0
23
1
to
28
9
Shock
absorber
upper
nuts
Sedan
and
Van
Coupe
3
6
to
4
5
26
0
to
32
5
0
to
1
7
2
to
8
6
Shock
absorber
lower
nuts
Sedan
and
Van
Coupe
3
6
to
4
5
26
0
to
32
5
0
to
I
2
7
2
to
8
6
0
6
to
0
8
4
3
to
5
8
Torque
arrester
to
body
bolts
SERVICE
JOURNAL
OR
BULLETIN
REFERENCE
DATE
JOURNAL
or
BULLETIN
No
PAGE
No
SUBJECT
RA
8
Page 124 of 513
r
jWW
5
jJ
S
L
l
J
J
DATSUN
1200
MODEL
8110
SERIES
I
NISSAN
I
NISSAN
MOTOR
CO
LTD
TOKYO
JAPAN
SECTION
BR
BRAKE
BRAKE
SERVICE
DATA
AND
SPECIFICATIONS
TROUBLE
DIAGNOSES
AND
CORRECTIONS
BR
1
BR
23
BR
24
GI
Page 126 of 513
CHASSIS
DESCRIPTION
The
Datsun
1200
series
new
models
adopt
a
hydraulic
brake
Dis
brake
or
two
leading
shoe
type
drum
brake
is
used
for
the
front
wheels
and
leading
trailing
shoe
type
drum
brake
is
used
for
the
rear
wheels
With
adoption
of
the
disc
brake
safety
at
high
speed
range
driving
is
further
improved
For
the
master
cylinder
either
single
type
or
tandem
type
is
used
There
are
two
types
of
tandem
type
master
cylinder
one
is
for
disc
brake
and
the
other
for
drum
brake
Under
the
standard
specifications
h0wever
the
tandem
type
master
cylinder
is
used
for
disc
brake
and
single
type
is
used
for
drum
brake
The
tandem
master
cylinder
provides
a
dual
brake
system
improving
safety
The
hand
brake
is
of
a
mechanical
type
which
brakes
the
rear
wheels
through
the
control
lever
and
steel
wire
The
control
lever
is
located
between
the
driver
and
assistant
seats
and
can
be
operated
easily
BRAKE
PEDAL
The
steering
colunm
bracket
supports
the
brake
pedaL
The
brake
pedal
is
instaUed
on
the
steering
column
bracket
with
a
fulcrum
pin
The
brake
pedal
arm
and
brake
master
cylinder
push
rod
are
joined
with
a
clevis
pin
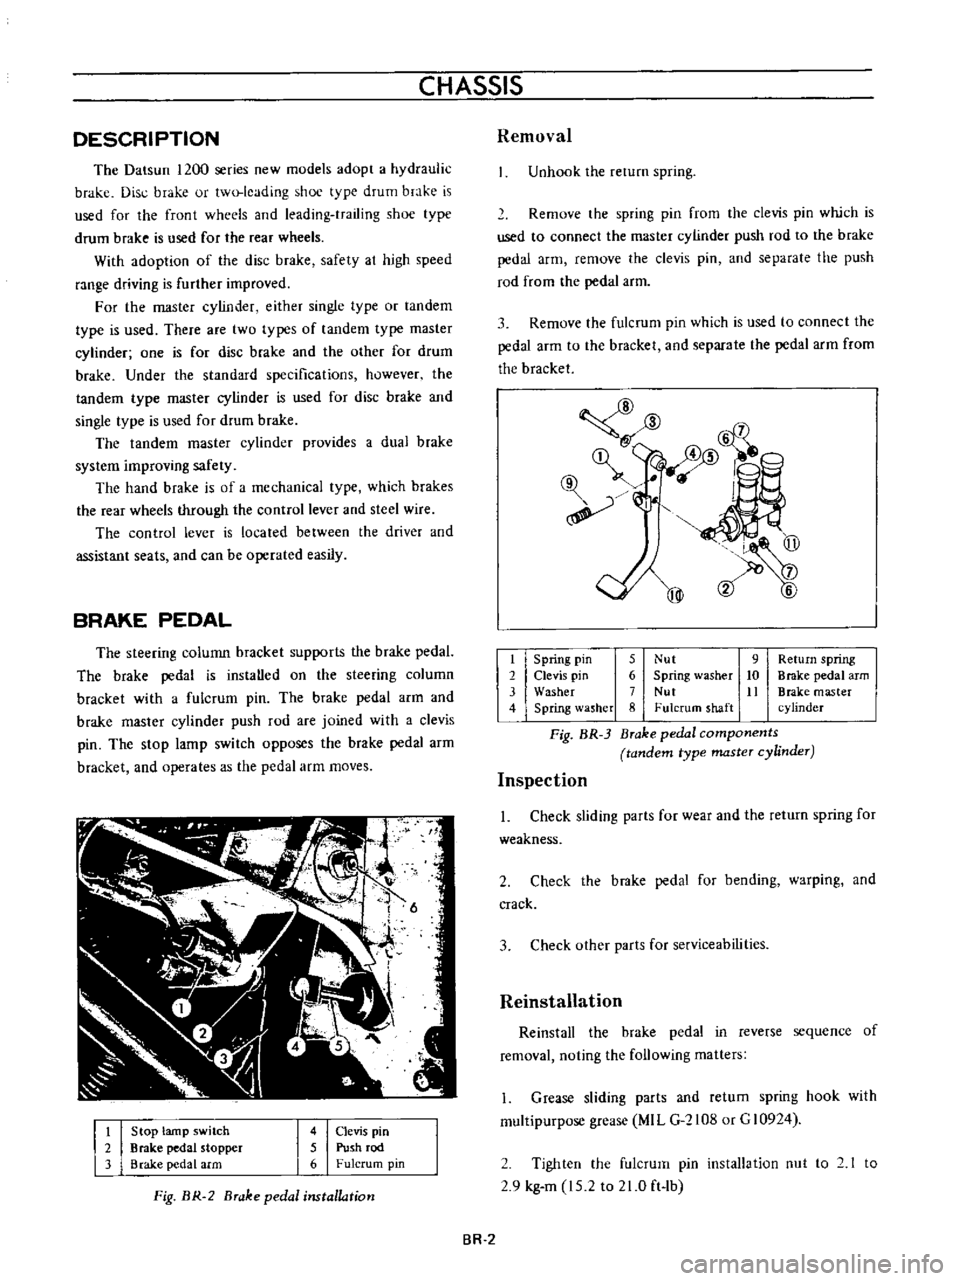
The
stop
lamp
switch
opposes
the
brake
pedal
arm
bracket
and
operates
as
the
pedal
arm
moves
t
2
3
Stop
lamp
switch
Brake
pedal
stopper
Brake
pedal
arm
4
Clevis
pin
5
Push
rod
6
Fulcrum
pin
Fig
BR
2
Brake
pedal
installation
Removal
Unhook
the
rerum
spring
Remove
the
spring
pin
from
the
clevis
pin
which
is
used
to
connect
the
master
cylinder
push
rod
to
the
brake
pedal
arm
remove
the
clevis
pin
and
separate
the
push
rod
from
the
pedal
arm
3
Remove
the
fulcrum
pin
which
is
used
to
connect
the
pedal
arm
to
the
bracket
and
separate
the
pedal
arm
from
the
bracket
@
mm
l6
qf
@
@
t
Spring
pin
5
Nut
9
Return
spring
2
Clevis
pin
6
Spring
washer
10
Brake
pedal
arm
3
Washer
7
Nut
It
Brake
master
4
Spring
lasher
8
Fulcrum
shaft
cylinder
Fig
BR
3
Brake
pedal
components
tandem
type
master
cylinder
Inspection
1
Check
sliding
parts
for
wear
and
the
return
spring
for
weakness
2
Check
the
brake
pedal
for
bending
warping
and
crack
3
Check
other
parts
for
serviceabilities
Reinstallation
Reinstall
the
brake
pedal
in
reverse
sequence
of
removal
noting
the
following
matters
1
Grease
sliding
parts
and
retum
spring
hook
with
multipurpose
grease
MIL
G
2108
or
G
10924
2
Tighten
the
fulcrum
pin
installation
nut
to
2
1
to
2
9
kg
m
15
2
to
21
0
ft
lb
BR
2
Page 146 of 513
CHASSIS
2
Upon
completion
of
the
adjustment
release
the
hand
brake
lever
and
make
sure
that
the
rear
wheels
are
not
braked
Normal
stroke
78
5
mm
3
091
in
6
notches
Limited
stroke
136
0
mm
5
35
in
10
notches
The
term
Stroke
means
height
from
the
standard
position
220
mm
8
7
in
above
the
hand
brake
lever
fulcrum
Note
Readjust
hand
brake
stroke
when
it
reaches
the
limited
stroke
136
mm
5
35
inl
10
notches
Bleeding
hydraulic
system
Bleeding
the
hydraulic
brake
system
deserves
much
attention
as
it
is
an
essential
factor
for
regular
service
brake
operation
As
a
matter
of
fact
during
the
brake
service
air
is
likely
to
creep
into
the
circuit
with
the
result
that
the
fluid
action
is
altered
and
the
brake
pedal
becomes
spongy
at
the
travel
end
Bleeding
should
be
carried
out
at
first
with
the
masler
cylinder
then
from
the
longest
line
from
the
master
cylinder
and
then
finish
up
with
the
shortest
Note
Always
clear
away
any
dirt
around
master
cylinder
reservoir
cover
before
removing
cover
for
any
reason
Never
depress
pedal
while
brake
drums
are
removed
unless
bleeder
valve
is
open
Top
up
the
reservoir
master
cylinder
with
fluid
of
the
recommended
type
2
Thoroughly
wipe
the
bleeder
screw
and
from
any
mud
or
dust
present
so
that
the
outlet
hole
is
free
from
foreign
matter
3
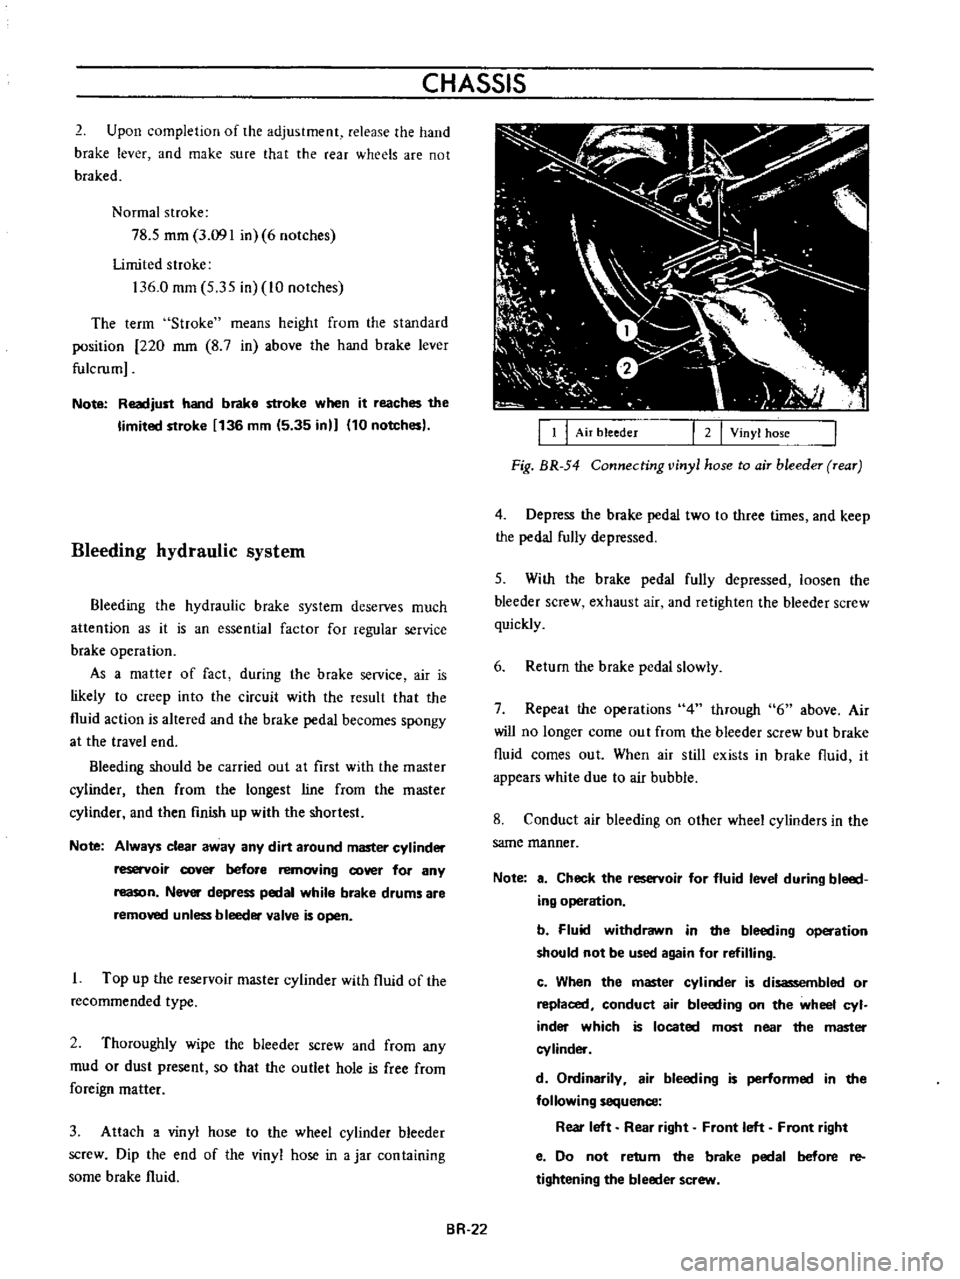
Attach
a
vinyl
hose
to
the
wheel
cylinder
bleeder
screw
Dip
the
end
of
the
vinyl
hose
in
a
jar
con
taining
some
brake
fluid
BR
22
I
I
I
Air
bleeder
I
2
I
Vinyl
hose
Fig
BR
54
Connecting
vinyl
hose
to
air
bleeder
rear
4
Depress
the
brake
pedal
two
to
three
times
and
keep
the
pedal
fully
depressed
5
With
the
brake
pedal
fully
depressed
loosen
the
bleeder
screw
exhaust
air
and
retighten
the
bleeder
screw
quickly
6
Return
the
brake
pedal
slowly
7
Repeat
the
operations
4
through
6
above
Air
will
no
longer
come
out
from
the
bleeder
screw
but
brake
fluid
comes
out
When
air
still
exists
in
brake
fluid
it
appears
white
due
to
air
bubble
8
Conduct
air
bleeding
on
other
wheel
cylinders
in
the
same
manner
Note
a
Check
the
reservoir
for
fluid
level
during
bleed
ing
operation
b
Fluid
withdrawn
in
the
bleeding
operation
should
not
be
used
again
for
refilling
c
When
the
master
cylinder
is
disassembled
or
replaced
conduct
air
bleeding
on
the
wheel
cyl
inder
which
is
located
most
near
the
master
cylinder
d
Ordinarily
air
bleeding
is
performed
in
the
following
sequence
Rear
left
Rear
right
Front
left
Front
right
e
Do
not
retum
the
brake
pedal
before
re
tightening
the
bleeder
screw
Page 147 of 513
BRAKE
SERVICE
DATA
AND
SPECIFICATIONS
Brake
pedal
Pedal
free
height
Full
stroke
of
pedal
head
Master
cylinder
mm
in
mm
in
141
5
t2
5
57
to
0787
120
4
72
17
5
11
16
Inner
diameter
of
master
cylinder
mm
in
Allowable
maximum
clearance
between
cylinder
and
piston
mm
in
Wheel
cylinder
Inner
diameter
of
wheel
cylinder
Front
drum
disc
Rear
front
disc
Allowable
maximum
clearance
between
cylinder
and
piston
Brake
drum
and
rotor
disc
Drum
brake
inner
diameter
Rotor
disc
outer
diameter
Rotor
thickness
Drum
inside
out
of
roundness
Max
allowable
drum
inner
diameter
Run
out
of
the
rotor
Max
allowable
rotor
thickness
Lining
dimensions
Front
drum
brake
Lining
width
x
thickness
x
length
Total
braking
area
0
13
0
0051
mm
in
mm
in
mm
in
mm
in
20
6
13
16
48
1
1
894
20
6
13
16
1746
11
16
mm
in
0
18
0
0071
mm
in
mm
in
mm
in
mm
in
203
2
8
00
212
5
837
9
5
03740
Below
0
Q2
0
0008
mm
in
mm
in
204
5
8
051
Below
0
03
0
0012
mm
in
8
4
03307
mm
in
cm2
sq
in
35
x
4
8
x
195
1
378
x
0
1890
x
7
68
273
423
BR
2J