Page 97 of 326

Problems with the seat heating
ProblemPossible causes/consequences andMSolutions
The seat heating has
switched off prematurely
or cannot be switched
on.The on-board voltage is too low because too many electrical consum-
ers are switched on.
XSwitch off electrical consumers that you do not need, such as the
rear window defroster or interior lighting.
Once the battery is sufficiently charged, the seat heating will switch
back on automatically.
Steering wheel
Important safety notes
GWARNING
You could lose control of your vehicle if you do the following while driving:
Radjust the driver's seat, head restraint,
steering wheel or mirrors
Rfasten the seat belt
There is arisk of an accident.
Adjust the driver's seat, head restraint,s teer-
ing wheel and mirror and fasten your seat belt before startin gthe engine.
GWARNING
Children could injure themselves if they
adjust the steering wheel. There is arisk of
injury.
When leaving the vehicle, always take the
SmartKey with you and lock the vehicle. Never
leave children unsupervised in the vehicle.
Adjusting the steering wheel
GWARNING
If the steering wheel is unlocked while the
vehicle is in motion, it could change position
unexpectedly. This could cause you to lose
control of the vehicle. There is arisk of an
accident.
Before startin goff, make sure the steering
wheel is locked. Never unlock the steering
wheel while the vehicle is in motion.
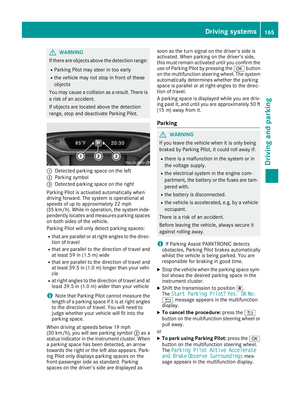
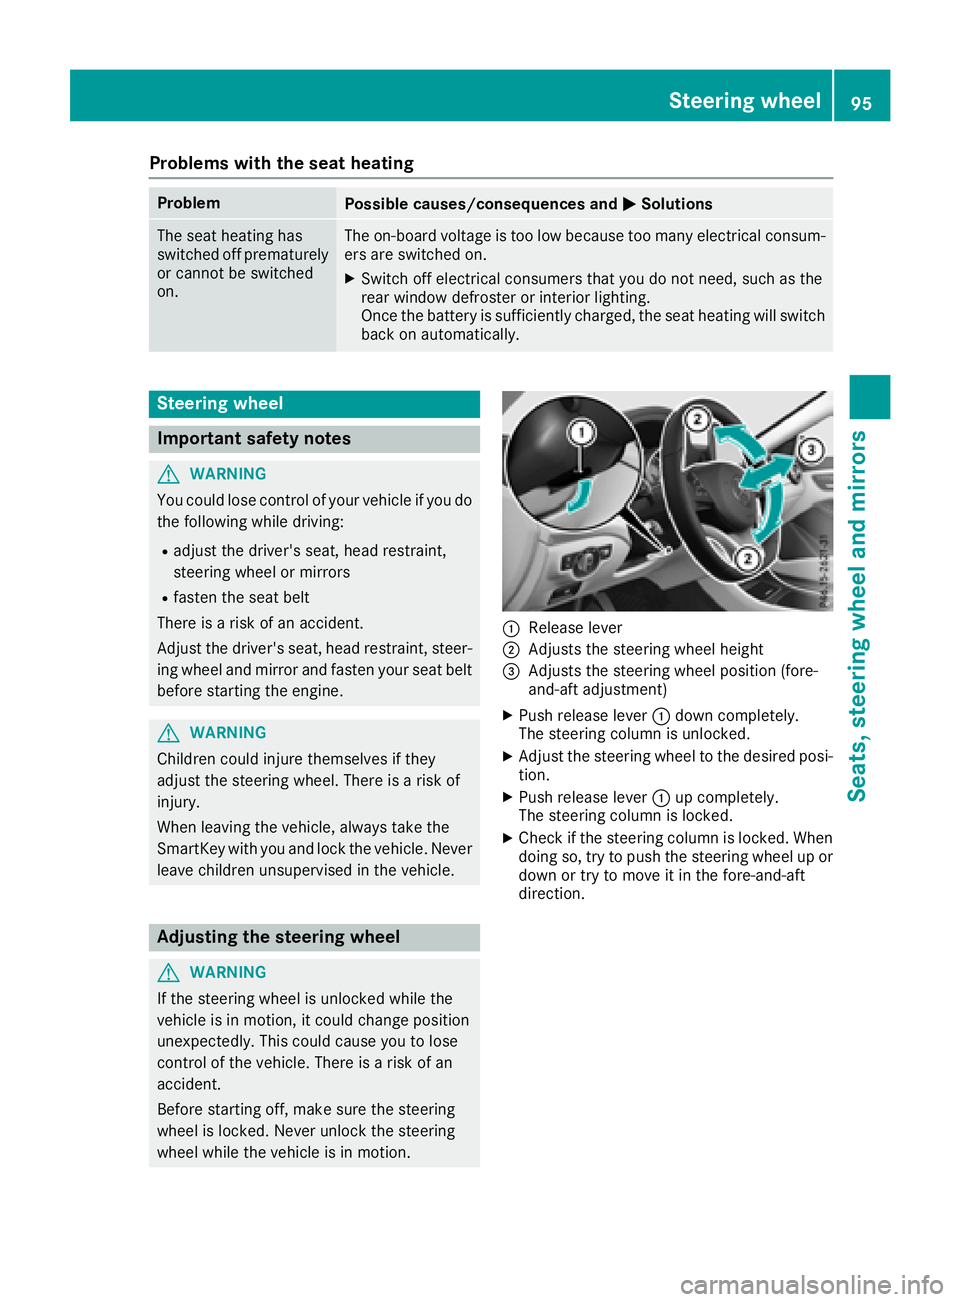
:Release lever
;Adjustst he steering wheel height
=Adjuststhe steering wheel position (fore-
and-aft adjustment)
XPush release lever :down completely.
The steering column is unlocked.
XAdjust the steering wheel to the desired posi-
tion.
XPush release lever :up completely.
The steering column is locked.
XCheck if the steering column is locked. When
doing so, try to push the steering wheel up or down or try to move it in the fore-and-aft
direction.
Steering wheel95
Seats, steering wheela nd mirrors
Z
Page 98 of 326

Mirrors
Rear-view mirror
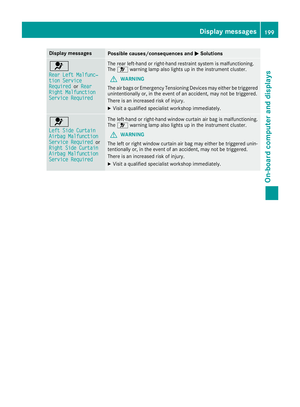
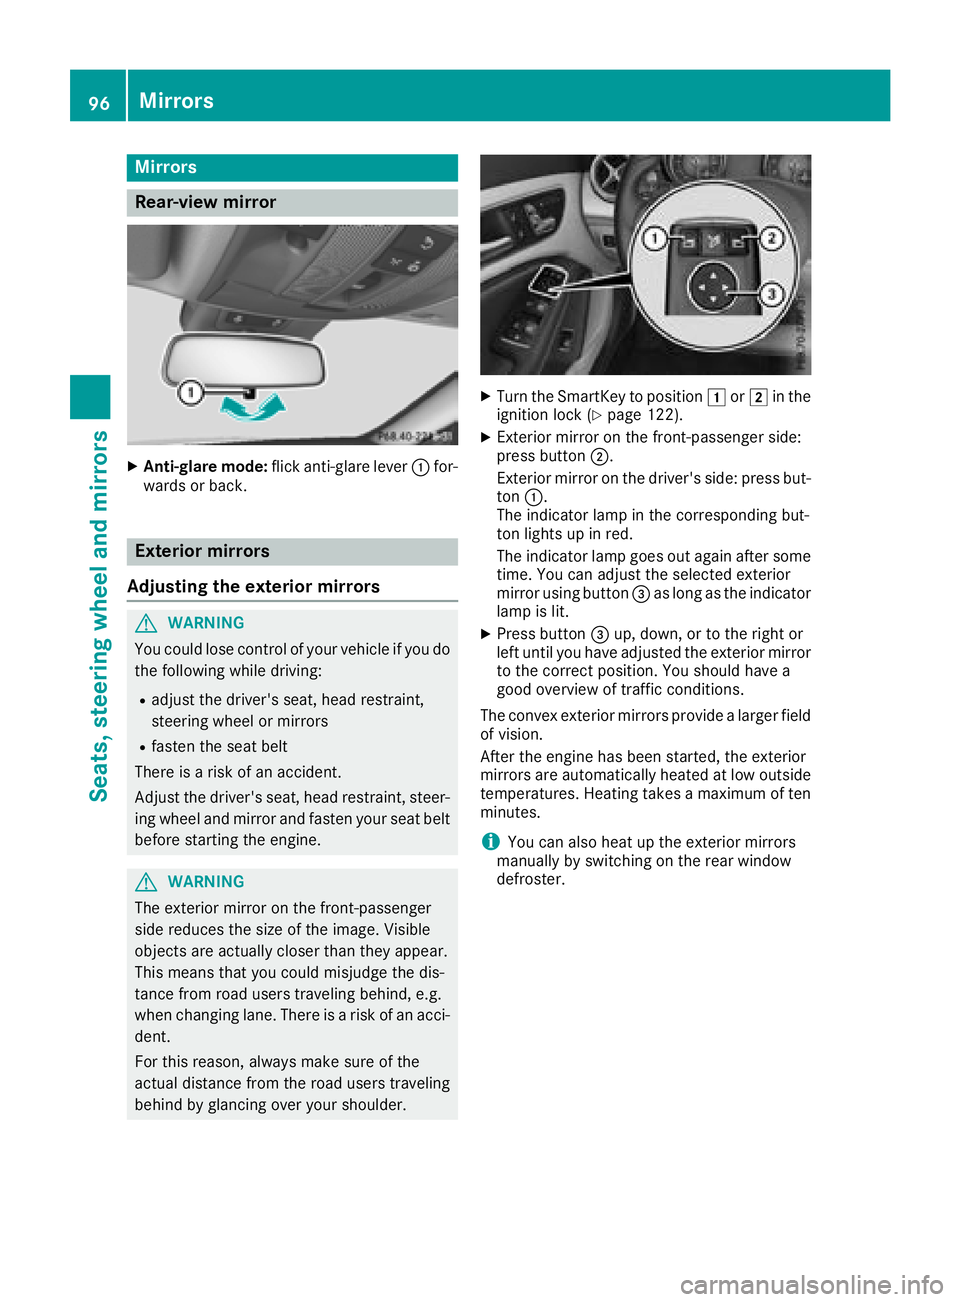
XAnti-glare mode:flick anti-glare lever :for-
wards or back.
Exterior mirrors
Adjusting the exterior mirrors
GWARNING
You coul dlose control of you rvehicleify ou do
the following while driving:
Radjust the driver's seat, headr estraint,
steering wheelorm irrors
Rfasten the seat belt
There is arisk of an accident.
Adjust the driver's seat, headr estraint, steer-
ing wheela nd mirror and fasten you rseat belt
before starting the engine.
GWARNING
The exterior mirror on the front-passenger
side reduces the size of the image. Visible
objects are actually closer than they appear.
This means that you coul dmisjudge the dis-
tance from road users traveling behind, e.g.
when changing lane .There is arisk of an acci-
dent.
For this reason, alway smake sure of the
actua ldistance from the road users traveling
behind by glancing over you rshoulder.
XTurn the SmartKey to position 1or2 in the
ignitio nlock (Ypage1 22).
XExterior mirror on the front-passenger side:
press button ;.
Exterior mirror on the driver's side:p ress but-
ton :.
The indicator lamp in the corresponding but-
ton lights up in red.
The indicator lamp goes out again after some
time. You can adjust the selected exterior
mirror using button =as long as the indicator
lamp is lit.
XPress button =up, down, or to the right or
left until you have adjusted the exterior mirror
to the correct position. You should have a
good overview of traffic conditions.
The convex exterior mirrors provide alarger field
of vision.
After the engine has been started, the exterior
mirrors are automatically heated at low outside
temperatures. Heating takes amaximu moften
minutes.
iYou can als oheatu pthe exterior mirrors
manually by switching on the rear window
defroster.
96Mirrors
Seats, steering wheel and mirrors
Page 99 of 326

Folding theexterior mirrors in or out
electrically
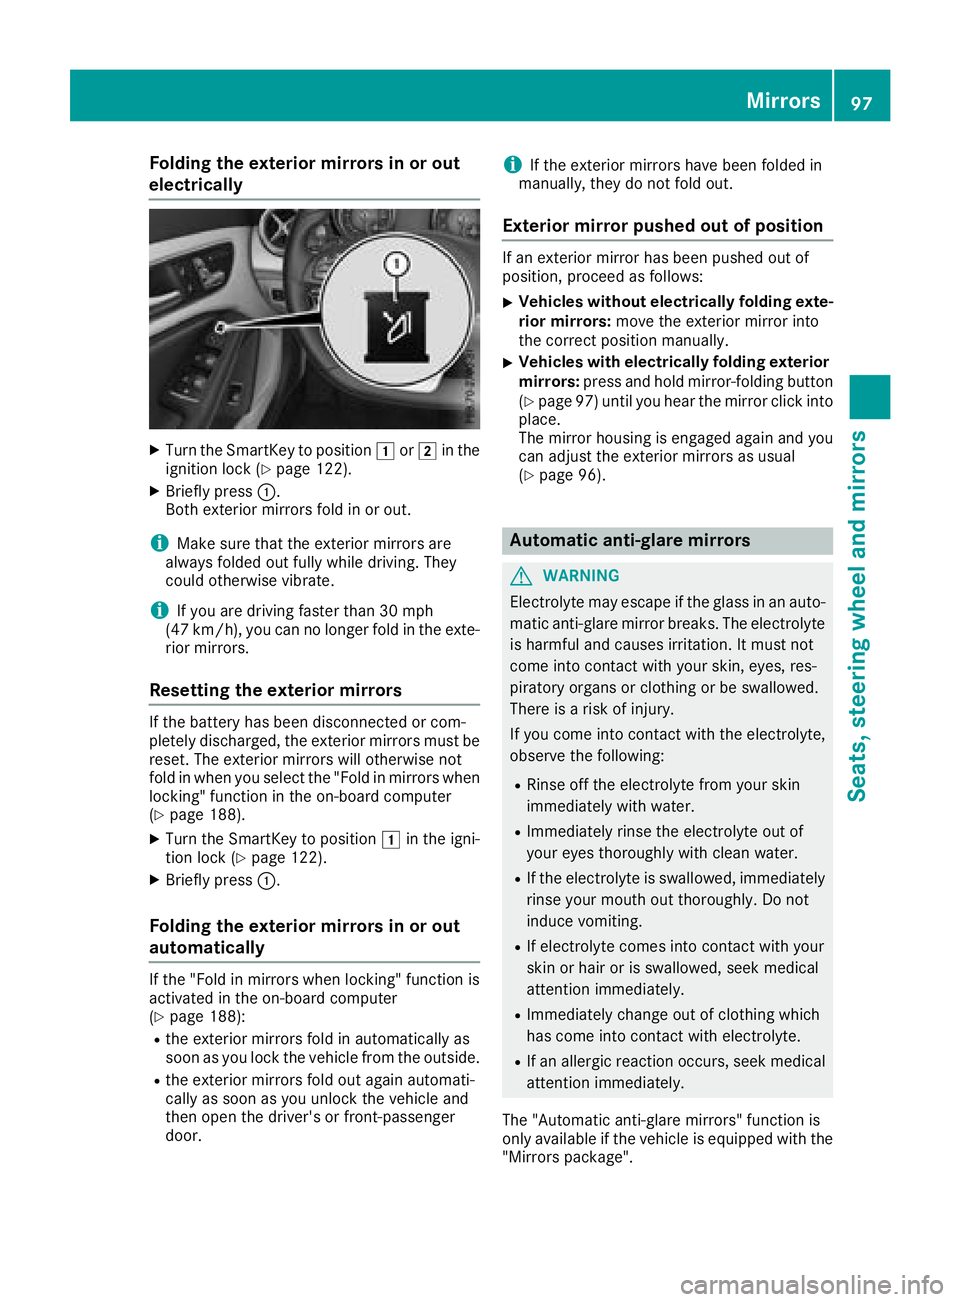
XTurn th eSma rtKey to position 1or2 in th e
ignition loc k(Ypage 122).
XBriefly press :.
Both exterio rmirror sfoldinoro ut.
iMak esure that th eexter iorm irror sare
always folded out fully while driving .They
could otherwise vibrate .
iIf you are driving fastertha n30m ph
(47 km/h), you can no longer fol dintheexte -
rio rm irrors.
Resetting th eexterior mirrors
If th ebattery has been disconnected or com-
pletely discharged, th eexter iorm irror smust be
reset .The exterio rmirror swill otherwise no t
fol dinw hen you select th e"Fold in mirror swhen
locking" function in th eon-bo ard computer
(
Ypage 188).
XTurn th eSmartKey to position 1in th eigni-
tion loc k(Ypage 122).
XBriefly press :.
Folding theexterior mirrors in or out
automatically
If th e"Fold in mirror swhen locking" function is
activated in th eon-bo ard computer
(
Ypage 188):
Rth ee xter iorm irror sfoldina utomatically as
soo nasy ou loc kthe vehicl efromt heoutside .
Rthee xter iorm irror sfoldo ut again automati-
call yass oonasy ou unlock th evehicl eand
then open th edriver' sorf ront-pa ssenger
door .
iIf theexter iorm irror shave been folded in
manually, they do no tfoldo ut.
Exterior mirror pushed out of position
If an exterio rmirror has been pushed out of
position ,procee dasfollows :
XVehicles without electricall yfolding exte-
rior mirrors :mov ethe exterio rmirror int o
th ec orre ct position manually.
XVehicles with electricall yfolding exterior
mirrors :press and hold mirror-foldin gbutto n
(
Ypage 97 )until yo uhearthe mirror click into
place.
The mirror housing is engaged agai nand you
can adjus tthe exterio rmirrors as usual
(
Ypage 96).
Automati canti-glare mirrors
GWARNING
Electrolyte maye scape if the glassinanauto-
matic anti-glare mirror breaks .The electrolyte
is harmfula nd causes irritation. It must not
come into contact with your skin, eyes, res-
piratory organs or clothing or be swallowed.
There is ariskofi njury.
If yo ucome into contact with the electrolyte,
observe the following:
RRinse off the electrolyte from your skin
immediatelyw ithw ater.
RImmediately rins ethe electrolyte outo f
your eyes thoroughl ywithc lean water.
RIf the electrolyte is swallowed, immediately
rins eyourm outh outt horoughly. Do not
induce vomiting.
RIf electrolyte comesi nto contact with your
skinorh airoriss wallowed, seekm edical
attentio nimmediately.
RImmediately change outofc lothing which
hasc ome into contact with electrolyte.
RIf an allergicr eactionoccurs, see kmedical
attentio nimmediately.
The "Automatic anti-glare mirrors"f unctionis
onlya vailable if the vehicl eisequippe dwitht he
"Mirrors package".
Mirrors97
Seats, steering wheel andmirrors
Z
Page 100 of 326

The rear-view mirror and the exterior mirror on
the driver's side automatically go into anti-glare
mode if:
Rthe ignition is switched on and
Rincident light from headlamps strikes the sen-
sor in the rear-view mirror
The mirrors do not go into anti-glare mode if
reverse gear is engaged or if the interior lighting
is switched on.
Parking position for the exterior mir-
ror on the front-passenger side
Setting and storing the parking position
You can set the front-passenger side exterior
mirror such that you can see the rear wheel on
that side as soon as you engage reverse gear.
You can store this position.
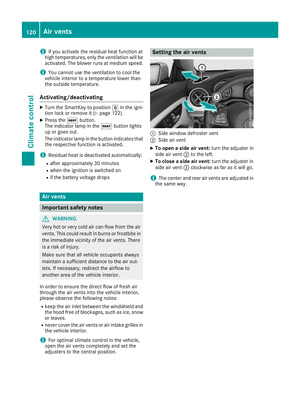
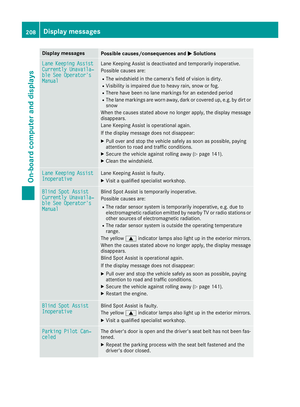
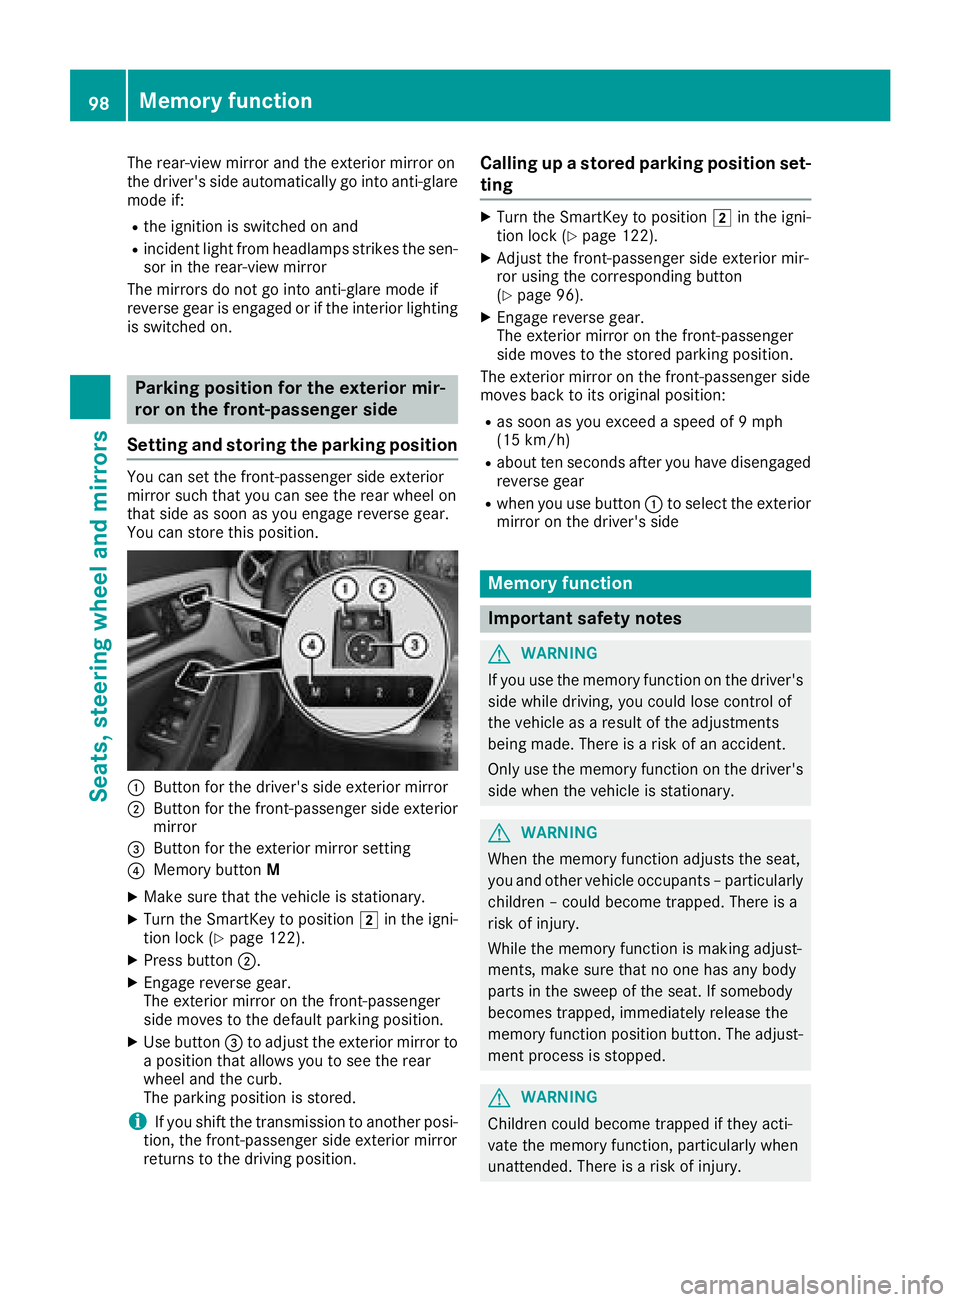
:Button for the driver's side exterior mirror
;Button for the front-passenger side exterior
mirror
=Button for the exterior mirror setting
?Memory button M
XMake sure that the vehicle is stationary.
XTurn the SmartKey to position 2in the igni-
tion lock (Ypage 122).
XPress button ;.
XEngage reverse gear.
The exterior mirror on the front-passenger
side moves to the default parking position.
XUse button=to adjust the exterior mirror to
ap osition that allows you to see the rear
wheel and the curb.
The parking position is stored.
iIf you shift the transmission to another posi-
tion, the front-passenger side exterior mirror
return stothe driving position.
Calling up astored parking position set-
ting
XTurn the SmartKey to position 2in the igni-
tion lock (Ypage 122).
XAdjust the front-passenger side exterior mir-
ror using the corresponding button
(
Ypage 96).
XEngage reverse gear.
The exterior mirror on the front-passenger
side moves to the stored parking position.
The exterior mirror on the front-passenger side
moves back to its original position:
Ras soon as you exceed aspeed of 9mph
(15 km/h)
Rabout ten seconds after you have disengaged
reverse gear
Rwhen you use button :to select the exterior
mirror on the driver's side
Memory function
Important safety notes
GWARNING
If you use the memory function on the driver's side while driving, you could lose control of
the vehicle as aresult of the adjustments
being made. There is arisk of an accident.
Only use the memory function on the driver's
side when the vehicle is stationary.
GWARNING
When the memory function adjusts the seat,
you and other vehicle occupants–p articularly
children –could become trapped. There is a
risk of injury.
While the memory function is making adjust-
ments, make sure that no one has any body
parts in the sweep of the seat. If somebody
becomes trapped, immediately release the
memory function position button .The adjust-
ment process is stopped.
GWARNING
Children could become trapped if they acti-
vate the memory function, particularly when
unattended. There is arisk of injury.
98Memory function
Seats, steering wheel and mirrors
Page 101 of 326

When leaving the vehicle, alwaystake the
SmartKey with you and lock the vehicle. Never
leave children unsupervised in the vehicle.
The memory function can be used at any time,
e.g. even when the SmartKey is not in the igni-
tion lock.
Storing settings
With the memory function, you can store up to
three differents ettings, e.g. for three different
people.
The following settings are stored as asingle
memory preset:
Rseat and backres tposition
Rdriver's side: position of the exterior mirrors
on the driver's and front-passenger sides
XAdjust the seat (Ypage 92).
XAdjust the exterior mirror on the driver's side
(Ypage 96).
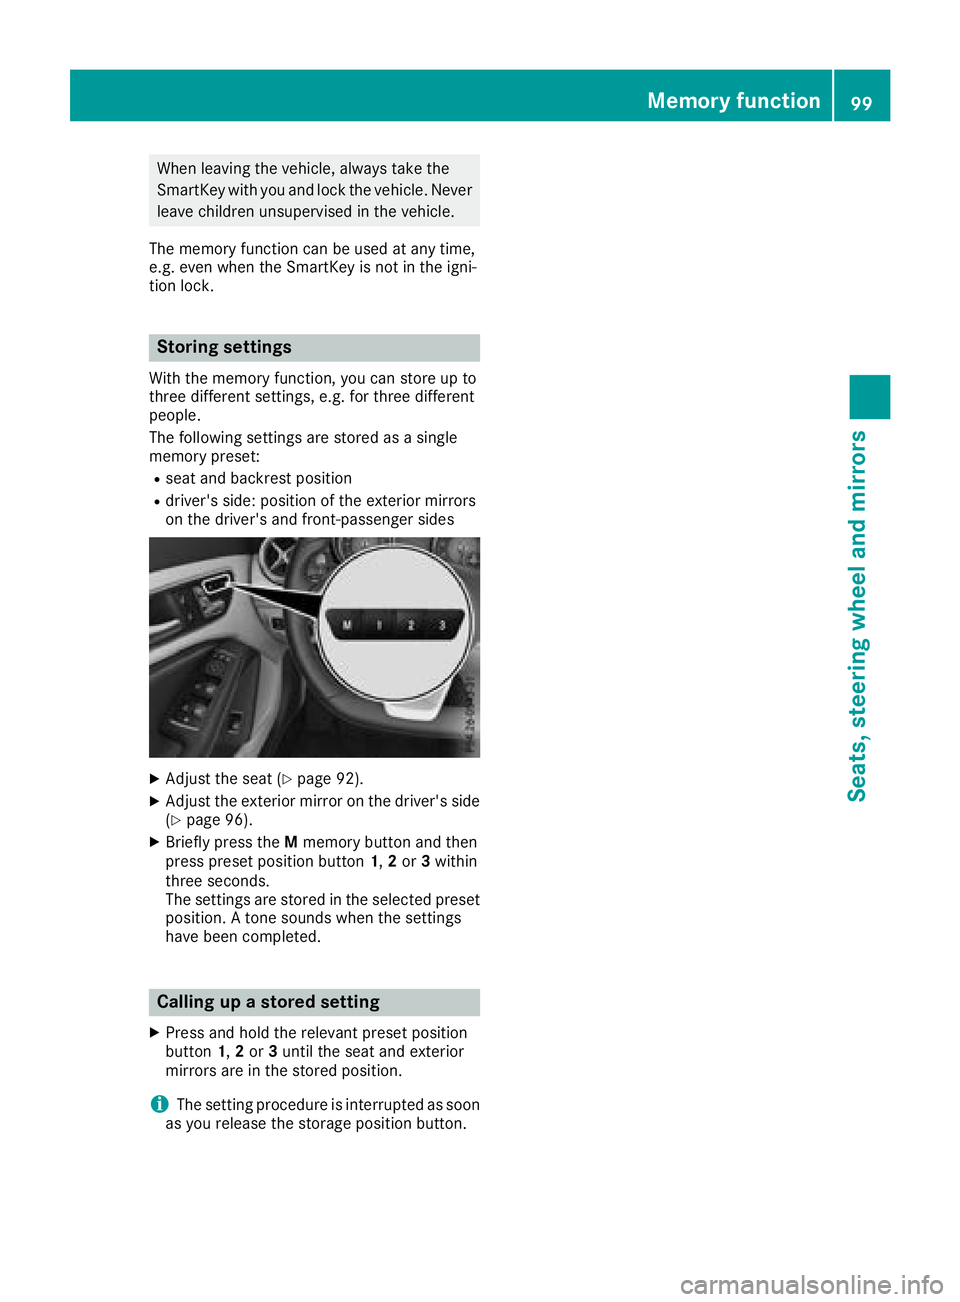
XBriefly press the Mmemory button and then
press preset position button 1,2or 3within
three seconds.
The settings are stored in the selected preset
position. Atones ounds when the settings
have been completed.
Calling up astored setting
XPress and hold the relevant preset position
button 1,2or 3until the seat and exterior
mirrors are in the stored position.
iThe setting procedure is interrupted as soon
as you release the storage position button.
Memoryf unction99
Seats, steering wheel and mirrors
Z
Page 102 of 326

Exteriorlighting
General notes
For reasonsofs afety, Mercedes-Ben zrecom-
mends that you driv ewith th elightss witched on
even durin gthe daytime. In somec ountries,
operatio noftheheadlamps varies due to legal
requirement sand self-imposedo bligations.
Settingthe exterio rlighting
Settin goptions
Exterior lighting can be set usingt he:
Rlight switch
Rcombinatio nswitch (Ypage 101)
Ron-board compute r(Ypage 187)
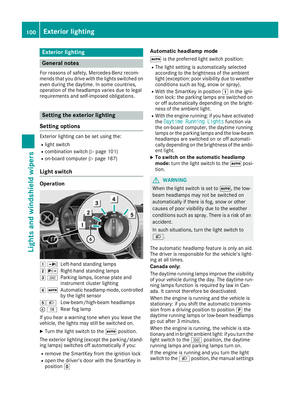
Light switch
Operation
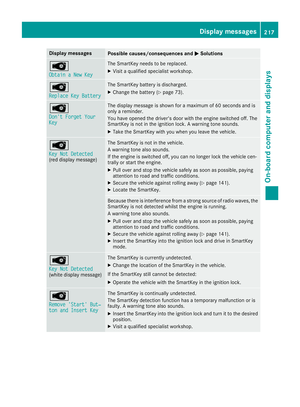
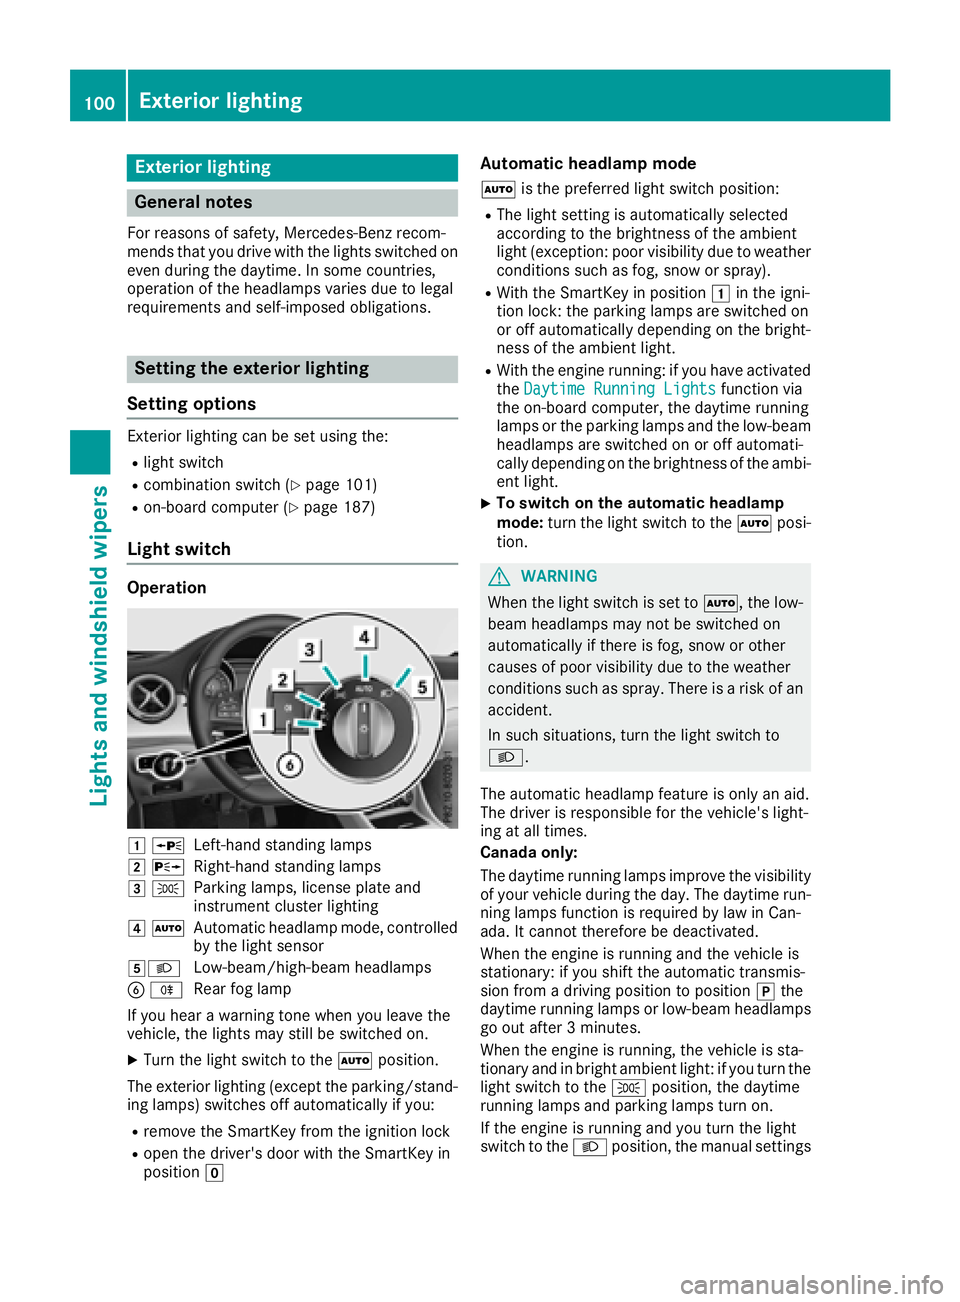
1WLeft-hands tanding lamps
2 XRight-hand standing lamps
3TParking lamps ,licens eplatea nd
instrumen tcluste rlighting
4 ÃAutomatic headlampm ode, controlled
by th elight sensor
5LLow-beam/high-beam headlamps
B RRear fog lamp
If you hear awarning tone when you leave the
vehicle ,the lightsm ay still be switched on.
XTurn thelight switch to the Ãposition.
The exteriorl ighting (excep tthe parking/stand-
ing lamps )switches off automaticall yifyou:
Rremove th eSmartKey from th eignition lock
Ropen th edriver'sd oor with th eSmartKey in
position g
Automatic headlamp mode
Ãis thepreferred light switch position:
RThe light settin gisautomaticall yselected
according to th ebrightnes softheambient
light (exception: poor visibilityd ue to weather
conditionss uchasfog,sno wors pray).
RWiththeSmartKey in position 1in th eigni-
tio nlock: th eparking lamps are switched on
or off automaticall ydependingont hebright-
nes soft heambient light.
RWitht heengine running: if you have activated
the DaytimeR unningLightsfunction via
th eo n-board computer, th edaytime running
lamps or th eparking lamps and th elow-beam
headlamps are switched on or off automati-
cally dependingont hebrightnes softheambi-
ent light.
XTo switch on th eautomatic headlamp
mode: turnthe light switch to the Ãposi-
tion.
GWARNING
When th elight switch is set to Ã,thelow-
beam headlamps may no tbeswitched on
automaticall yifthere is fog ,sno woro ther
causes of poor visibilityd ue to theweather
conditionss uchasspray. Thereisar isk of an
accident.
In suchs ituations,tur nt he light switch to
L.
The automatic headlampf eature is only an aid.
The driver is responsible for th evehicle's light-
ing at all times.
Canada only:
The daytime runnin glamps improve th evisibility
of your vehicle durin gthe day. The daytime run-
nin glamps function is required by law in Can-
ada. It canno tthe refore be deactivated.
When th eengine is runnin gand th evehicle is
stationary: if you shiftt heautomatic transmis-
sion from adriving position to position jthe
daytime runnin glamps or low-beam headlamps
go out after 3minutes.
When th eengine is running, th evehicle is sta-
tionar yand in bright ambient light:ify ou turnthe
light switch to the Tposition,t hedaytime
runnin glamps and parking lamps tur non.
If th eengine is runnin gand you tur nthe light
switch to the Lposition,t hemanual settings
100Exterior lighting
Lightsa nd windshield wipers
Page 103 of 326

take precedence overthe daytime running
lamps.
US Ao nly:
The daytime running lamps improve the visibility
of your vehicl eduringt he day. To do this, the
daytime running lamps functio nmustb e
switched on using the on-board computer
(
Ypage 187).
If the engine is running and yo uturnt he light
switch to the TorL position, the manual
setting stake precedence ove rthe daytime run-
ning lamps.
Low-beam headlamps
Even if the light sensord oesn ot detect thatiti s
dark, the parking lamps and low-bea mhead-
lamps switch on when the ignition is switched on
and the light switch is settot heL position.
Thi sisa particularly usefu lfun ctio nint he event
of rain and fog.
XTo switc honthe low-beam headlamps:
tur nthe SmartKeytop osition 2in the igni-
tio nlockors tart the engine.
XTurn the light switch to L.
The green Lindicator lamp in the instru-
ment clusterl ights up.
Rea rfog lamp
The rea rfog lamp improves visibility of your
vehicl efor the trafficb ehindint he event of thick
fog .Pleas etake note of the country-specific
regulations for the us eofrearfog lamps.
XTo switc honthe rear fogl amp:turnthe
SmartKeyint he ignition lock to position 2or
s
tart the engine.
XTurn the light switch to LorÃ.
XPress the Rbutton.
The yellow Rindicator lamp in the instru-
ment clusterl ights up.
XTo switc hoffthe rear fogl amp:press the
R button.
The yellow Rindicator lamp in the instru-
ment clusterg oeso ut.
iWhen the rea rfog lamp is switched on, the
cente rbrake lamp in the tai llam pswitches off
du etoal egalrequirement.
Parkin glamps
!If the battery charge is ver ylow ,the parking
lamps or standing lamps ar eautomatically
switched off to enabl ethe next engine start.
Alway sparky ourvehicl esafelya nd in awelllit area
,ina ccordance with the relevant legal
stipulations. Avoidu sing the Tparking
lamps ove raperiodofs everal hours. If pos-
sible, switch on the right-hand Xor left-
hand W standing lamps.
XTo switc hon:tur nthe light switch to T.
Th eg reen T indicator lamp in the instru-
ment clusterl ights up.
Standin glamps
Switching on the standing lamps ensures the
corresponding side of the vehicl eisillumin ated.
XTo switc honthe standin glamps: the
SmartKeyisn ot in the ignition lock or it is in
position gin the ignition lock.
XTurn the light switch to W(left-hand side of
the vehicle) or X(right-hand side of the
vehicle).
Combination switch
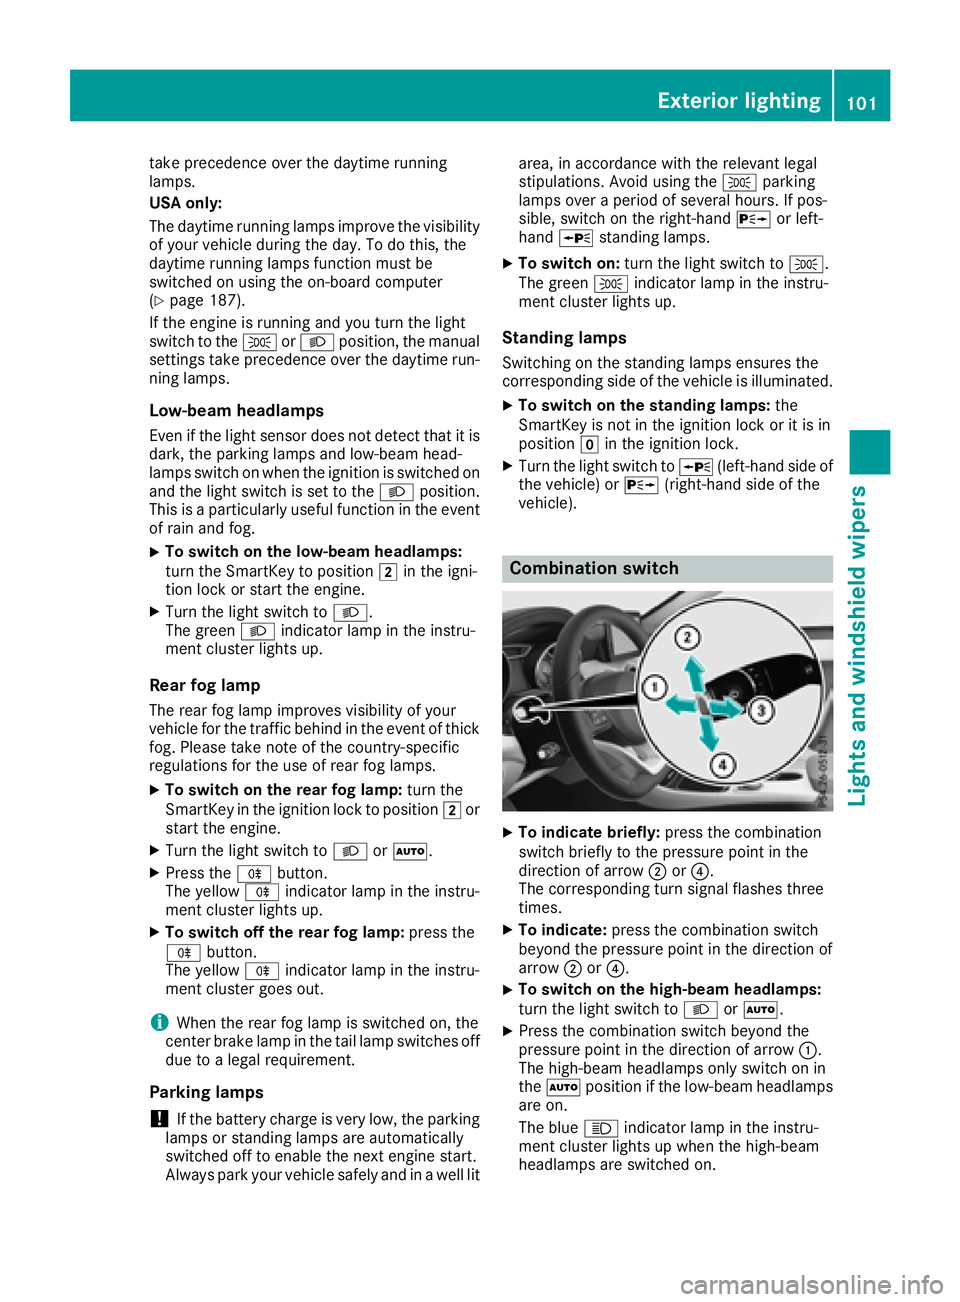
XTo indicate briefly: press the combination
switch briefl ytothe pressure point in the
directio nofarrow ;or?.
Th ec orresponding tur nsigna lflashe sthree
times.
XTo indicate: press the combinatio nswitch
beyond the pressure point in the directio nof
arrow ;or?.
XTo switc honthe high-beam headlamps:
tur nthe light switch to LorÃ.
XPress the combinatio nswitch beyond the
pressure point in the directio nofarrow :.
Th eh igh-beam headlamps onl yswitch on in
the à positio nifthe low-bea mheadlam ps
ar eo n.
Th eb lue K indicator lamp in the instru-
ment clusterl ights up when the high-beam
headlamps ar eswitched on.
Exterior lighting101
Lights and windshield wiper s
Z
Page 104 of 326

XTo switchoff the high-beam headlamps:
move the combinatio nswitch back to its nor-
malp osition.
The blue Kindicator lamp in the instru-
ment cluster goe sout.
Vehicles with Adaptive Highbeam Assist:
when Adaptive Highbeam Assist is active, it
controls activation and deactivation of the
high-bea mheadlamps (
Ypage 102).
XTo switc honthe high-beam flasher: pull
the combinatio nswitch in the direction of
arrow =.
Hazard warning lamps
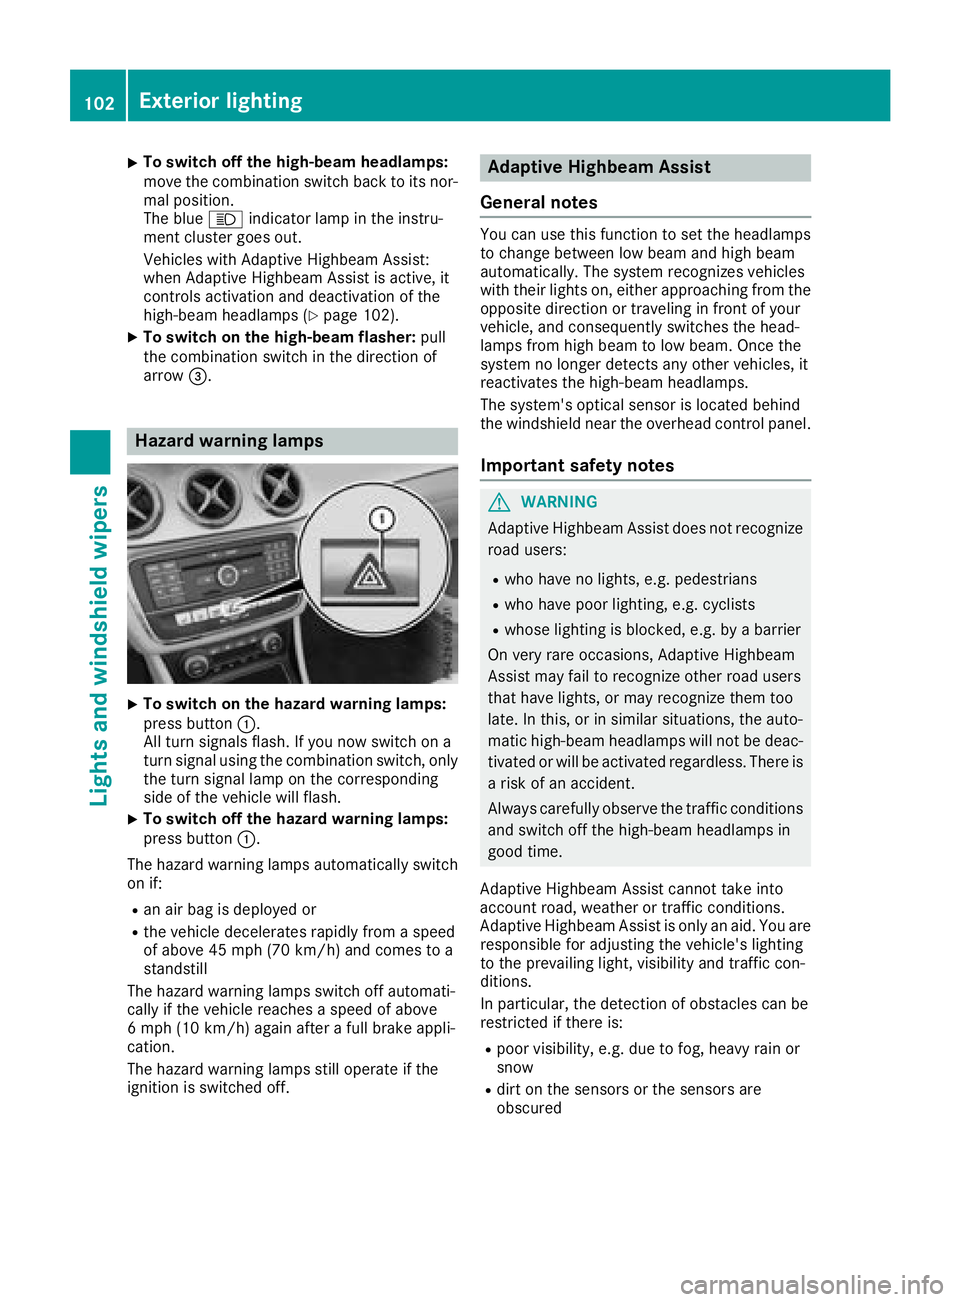
XTo switc honthe hazard warning lamps:
press button :.
All turn signals flash. If yo unow switch on a
turn signalu sing the combinatio nswitch ,only
the turn signall ampont he corresponding
side of the vehicl ewillf lash.
XTo switc hoff the hazard warning lamps:
press button :.
The hazard warning lamps automaticall yswitch
on if:
Ran ai rbag is deployed or
Rthe vehicl edecelerates rapidly from aspeed
of above 45 mph (70 km/h )and comestoa
standstill
The hazard warning lamps switch off automati-
cally if the vehicl ereachesas peed of above
6m ph (10 km/h )again afteraf ullb rake appli-
cation.
The hazard warning lamps stil lope rate if the
ignition is switched off.
Adaptiv eHighbeam Assist
General notes
Yo uc an us ethisf unctio ntoset the headlamps
to change between lo wbeama nd high beam
automatically. The system recognizes vehicles
with thei rlights on, either approaching from the
opposite direction or traveling in front of your
vehicle, and consequentlys witches the head-
lamps from high beam to lo wbeam. Once the
system no longer detects any otherv ehicles, it
reactivates the high-bea mheadlamps.
The system's optica lsensor is locate dbehin d
the windshield nea rthe overhead controlp anel.
Important safety notes
GWARNING
Adaptive Highbeam Assist does not recognize
roadu sers:
Rwh oh avenol ights ,e.g.p edes trians
Rwhoh avep oorlighting, e.g .cyclists
Rwhose lighting is blocked, e.g .byab arrier
On very rar eoccasions, Adaptive Highbeam
Assist mayf ailtor ecognize othe rroadu sers
thath avel ights ,orm ayrecognize them too
late. In this, or in similar situations, the auto-
matic high-bea mheadlamps will not be deac-
tivated or will be activate dregardless. There is
ar iskofana ccident.
Alway scarefull yobserve the traffic conditions
and switch off the high-bea mheadlamps in
goo dtime.
Adaptive Highbeam Assist canno ttake into
account road, weather or traffic conditions.
Adaptive Highbeam Assist is onlyana id.Y ou are
responsibl efor adjusting the vehicle's lighting
to the prevailing light, visibility and traffic con-
ditions.
In particular, the detection of obstacle scan be
restricte difthereis:
Rpoor visibility ,e.g.d ue to fog,h eavy rainor
snow
Rdirt on the sensors or the sensors are
obscured
102Exterior lighting
Lights and windshield wiper s