2018 MERCEDES-BENZ CLA COUPE load capacity
[x] Cancel search: load capacityPage 242 of 326

Cargo compartment enlargement
Important safety notes
GWARNING
If th erear bench seat/rear seat and seat
backres tare no tengaged they coul dfold for-
wards ,e.g.w hen braking suddenly or in the
event of an accident.
RThe vehicle occupant would thereby be
pushedi ntot he seat belt by th erear bench
seat/rear seat or by th eseat backrest. The
seat belt can no longer offer th eintended
leve lofp rotection and coul devenc ause
injuries.
RObject sorloads in th etrunk canno tbe
restraine dbytheseat backrest.
Thereisani ncreased ris kofinjury.
Before every trip, mak esure that th eseat
backrests and th erear bench seat/rear seat
are engaged.
!Before folding th ebackres tintherear com-
partmen tforwards ,makes ure that th erear
compartmen tarmres tand th ecupholder are
folded in. They may otherwise be damaged.
Observ ethe loadingg uidelines(
Ypage 237).
The left-hand and right-handr ear seat backrests
can be folded forwards separately to increase
th et runk capacity.
Folding th erears eat backres tforwards
and back
Folding th erears eat backrests forward
XFully insert th ebackres thead restraint sif
necessary (Ypage 93).
XMovet hedriver'sorf ront-passenger seat
forward if necessary.
XPull left-hand or right-handr elease handle;
of th eseat backres tforward.
Corresponding seat backrest :is released.
XFoldb ackrest :forward.
XMovet hedriver'sorf ront-passenger seat
back if necessary.
XInsertt heseat belt int oseat-belt holder :.
Folding therears eat backres tback
!Makes ure that th eseat belt does not
become trapped when folding th erear seat
backres tback .Otherwise, it coul dbedam-
aged.
XMovet hedriver'sorf ront-passenger seat
forward if necessary.
XFol dseat backrest :back until it engages.
Red locks tatus indicator ;is no longer visi-
ble.
XAdjust th ehead restraint sifnecessary
(Ypage 93).
XMovet hedriver'sorf ront-passenger seat
back if necessary.
240Stowage areas
Stowage and features
Page 244 of 326

!Mercedes-Benz recommends that you only
use roof carriers that have been tested and
approved for Mercedes-Benz vehicles. This
helps to prevent damage to the vehicle.
Position the load on the roof rack in such a
way that the vehicle will not sustain damage
even when it is in motion.
Depending on the vehicle equipment, ensure
that when the roof carrier is installed you can:
Ropen the panorama roof with power tilt/
sliding panel fully
Ropen the trunk lid fully
You will find information on the maximum roof
load in the "Technical data" section
(
Ypage 320).
An incorrectly secured roof carrier or roof load
may become detached from the vehicle. You
must therefore ensure that you observe the roof
carrier manufacturer's installation instructions.
Attaching the roof carrier
XOpen and fold the covers :upwards care-
fully in the direction of the arrow.
XOnly secure the roof carrier to the anchorage
points under covers :.
XObserve the manufacturer's installation
instructions.
Features
Cup holder
Important safety notes
GWARNING
The cup holder cannot hold acontainer secure
whilst traveling. If you use acup holder whilst
traveling, the container may be flung around
and liquid may be spilled. The vehicle occu-
pants may come into contact with the liquid
and if it is hot, they may be scalded. You may
be distracted from the traffic conditions and
you could lose control of the vehicle. There is
ar isk of an accident and injury.
Only use the cup holder when the vehicle is
stationary. Only use the cup holder for con-
tainers of the right size. Alwaysc lose the con-
tainer, particularlyift he liquid is hot.
GWARNING
If objects in the passenger compartment are
stowed incorrectly, they can slide or be
thrown around and hit vehicle occupants. In
addition, cupholders, open stowage spaces
and mobile phone brackets cannot always
retain all objects they contain. There is arisk
of injury, particularlyint he event of sudden
braking or asudden change in direction.
RAlwayss tow objects so that they cannot be
thrown around in such situations.
RAlwaysm ake sure that objects do not pro-
trude from stowage spaces, parcel nets or
stowage nets.
RClose the lockable stowage spaces before
starting ajourney.
RAlwayss tow and secure heavy, hard, poin-
ted, sharp-edged, fragile or bulky objects in
the trunk.
!Only use the cup holders for containers of
the right size and which have lids. The drinks
could otherwise spill.
Observe the loading guidelines (
Ypage 237).
The stowage compartmentsint he doors provide
space for bottles:
Rfront:c apacity up to 34 fl. oz. (1.0 l)
Rrear: capacity up to 17 fl. oz. (0.5 l)
242Features
Stowage and features
Page 273 of 326
.
XUse the TIREFIT kit (Ypage 272 )orremove it")
Vehicles withaTIREFI Tkit
:Tire inflation compressor
;Tire sealant fille rbottle
=Towing eye
XOpe nthe trunk lid.
XLiftthe trunk floor upwards (Ypage 241).
XUse the TIREFIT kit (Ypage 272 )orremove it.
Towing eye =is located under tire inflation
compressor :.
Vehicles with atire-chang etool kit
XOpen the trunk lid.
XLift the trunk floor upwards (Ypag e241).
XRemove the tire-change tool kit.
The tire-change tool kit contains:
RJack
RLug wrench
ROne pai rofgloves
RFolding wheelc hock
Flat tire
Preparing the vehicle
Yourvehiclem ay be equipped with:
RMOExtended tires (tires with run-flat proper-
ties) (Ypage271)
Vehiclep reparation is not necessary on vehi-
cles with MOExtended tires
RaT IREFIT kit (Ypag e270)
Vehicles equipped with MOExtended tires are
not equipped with aTIREFIT kit at the factory. It
is therefore recommended that you additionally
equip you rvehiclew ithaTIREFIT kit if you mount
tires that do not feature run-flat properties, e.g. winter tires.
ATIREFIT kit may be obtained from
aq ualified specialist workshop.
Information on changing and mounting wheels
(
Ypag e307).
XStop the vehicleons olid, non-slippery and
level ground ,asfar awa yaspossible from
traffic.
XSwitch on the hazard warning lamps.
XSecure the vehiclea gainst rolling away
(Ypag e141).
XIf possible, bring the front wheels into the
straight-ahead position.
XSwitch off the engine.
XVehicles without KEYLESS-GO: remove the
SmartKey from the ignitio nlock.
XVehicles with KEYLESS-GO start-function
or KEYLESS-GO: open the driver'sd oor.
The vehiclee lectronics are now in position
g.T his is the same as "Key removed".
XVehicles with KEYLESS-GO start-function
or KEYLESS-GO: remove the Start/Stop but-
ton from the ignitio nlock (
Ypag e122).
XMake sure that the engine cannot be started
via you rsmartphone (Ypag e83).
XMake sure that the passengers are not endan-
gered as they do so. Make sure that no one is
near the dange rarea while awhee lisb eing
changed .Anyone who is not directly assisting
in the wheelc hange should, for example,
stand behind the barrier.
XGet out of the vehicle. Pay attention to traffic
conditions when doing so.
XClose the driver'sd oor.
MOExtended tires (tires with run-flat
properties)
General notes
With MOExtended tires (tires with run flat char-
acteristics) ,you can continue to drive you rvehi-
cle even if there is atotal loss of pressure in one
or more tires. The affected tire must not show
any clearly visible damage.
You can recognize aMOExtended tire by the
MOExtended marking which appears on the
sidewal lofthe tire. You wil lfind this marking
next to the tire size designation, the load-bear-
ing capacity and the speedi ndex (
Ypage302).
MOExtended tires may be used only in conjunc-
tion with an activated tire pressure loss warning
Flat tire271
Breakdown assistance
Page 304 of 326
. Winter tires can reduce the
braking distance on snow-covered surfaces in
comparison with summer tires. The braking dis-
tance is stil")
Observe the legally required minimum tire tread
depth (Ypage 288). Winter tires can reduce the
braking distance on snow-covered surfaces in
comparison with summer tires. The braking dis-
tance is still much further than on surfaces that
are not icy or covered with snow. Take appro-
priate care when driving.
Further information on winter tires (M+S tires)
(
Ypage 289).
Temperature
GWARNING
The temperature grade for this tire is estab-
lished for atire that is properly inflated and
not overloaded.E xcessive speed, underinfla-
tion, or excessive loading, either separately or
in combination, can cause excessive heat
build-up and possible tire failure.
The temperature grades are A(the highest), B,
and C, representing the tire's resistance to the
generation of heat and its ability to dissipate
heat when tested under controlled conditions
on aspecified indoor laboratory test wheel. Sus-
tained high temperature can cause the material
of the tire to degenerate and reduce tire life, and
excessive temperature can lead to sudden tire
failure. The grade Ccorresponds to alevel of
performance which all passenger car tires must
meet under the Federal Motor Vehicle Safety
Standard No. 109. Grades BandArepresent
higher levels of performance on the laboratory
test wheel than the minimum required by law.
Tire labeling
Overview
:Uniform Tire Quality Grading Standards
(Ypage 306)
;Department of Transportation, Tire Identifi-
cation Number (Ypage 305)
=Maximum load rating (Ypage 304)
?Maximum tire pressures (Ypage 293)
AManufacturer
BTire material (Ypage 305)
CTire size designation, load-bearing capacity
and speed rating (Ypage 302)
DLoad index (Ypage 304)
ETire name
The markings described above are on the tire in
addition to the tire name (sales designation) and
the manufacturer's name.
iTire data is vehicle-specific and may deviate
from the data in the example.
Tire size designation, load-bearing
capacity and speed rating
GWARNING
Exceeding the stated tire load-bearing capa-
city and the approved maximum speed could
lead to tire damage or the tire bursting. There is ar isk of accident.
Therefore, only use tire types and sizes
approved for your vehicle model. Observe the
302All about wheels and tires
Wheels and tires
Page 305 of 326
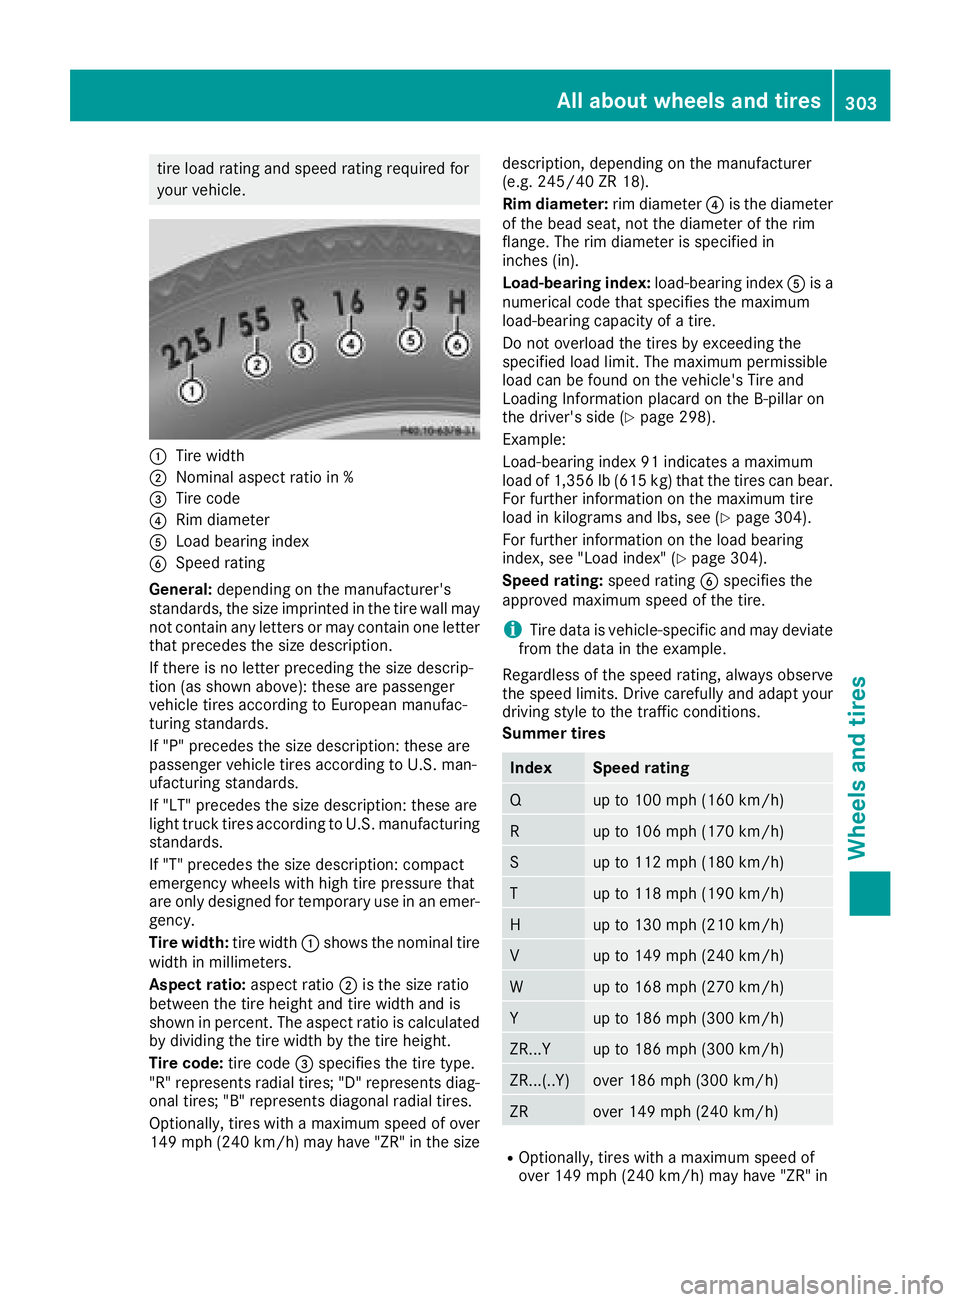
tire load rating and speedrating required for
your vehicle.
:Tire width
;Nomina laspec tratio in %
=Tire code
?Rimd iame ter
ALoadb earing index
BSpeed rating
General: depending on the manufacturer's
standards ,the size imprinted in the tire wall may
not contain any letters or mayc ontain one letter
thatp recedes the size description.
If there is no letter preceding the size descrip-
tio n(as shown above): these ar epassenger
vehicl etiresa ccording to Europea nmanufac-
turing standards.
If "P "precedes the size description: these are
passenge rvehicl etiresa ccording to U.S. man-
ufacturin gstandards.
If "LT" precedes the size description: these are
light truck tire saccording to U.S. manufacturing
standards.
If "T "precedes the size description: compact
emergency wheels with high tire pressure that
ar eo nlyd esig nedf or temporary us einanemer-
gency.
Tire width: tire width:shows the nominal tire
width in millimeters.
Aspec tratio: aspect ratio ;is the size ratio
between the tire height and tire width and is
shown in percent. The aspect ratio is calculated
by dividing the tire width by the tire height.
Tire code: tire code=specifie sthe tire type.
"R "r epresents radial tires; "D" represents diag-
ona ltire s; "
B" represents diagona
lradial tires.
Optionally ,tire sw itham aximum spee dofover
149 mph (240 km/h )mayhave "ZR" in the size description, depending on the manufacturer
(e.g. 245/40Z
R18).
Rim diameter: rim diameter?is the diameter
of the bead seat, not the diamete rofthe rim
flange .The ri mdiame teriss pecifie din
inches (in).
Load-bearin gind ex: load-bearing index Ais a
numerical cod ethats pecifie sthe maximum
load-bearing capacity of atire.
Do not overload the tire sbyexceeding the
specifie dloa dlimit .The maximu mpermissible
load can be found on the vehicle's Tire and
Loading Informatio nplacard on the B-pillar on
the driver's side (
Ypage 298).
Example:
Load-bearin gindex 91 indicates amaximum
load of 1,356 lb (61 5kg)thatt he tire scan bear.
For furtheri nformation on the maximum tire
load in kilograms and lbs, see(
Ypage 304).
For furtheri nformation on the load bearing
index, see" Loadindex" (
Ypage 304).
Speed rating: speedrating Bspecifie sthe
approved maximum spee dofthe tire.
iTire data is vehicle-specific and mayd eviate
fromt he data in the example.
Regardles softhe spee drating ,alway sobser ve
th
e spee dlimit s. Drive carefull yand adap tyou r
drivin gstyle to the trafficc onditions.
Summert ires
IndexSpeed rating
Qup to 100 mph (16 0km/h)
Rup to 106 mph (17 0km/h)
Sup to 112 mph (18 0km/h)
Tup to 118 mph (19 0km/h)
Hup to 130 mph (21 0km/h)
Vup to 149 mph (24 0km/h)
Wup to 168 mph (27 0km/h)
Yup to 186 mph (30 0km/h)
ZR...Yup to 186 mph (30 0km/h)
ZR...(..Y)ove r186 mph (300 km/h)
ZRove r149 mph (240 km/h)
ROptionally ,tire sw itham aximum spee dof
ove r149 mph (24 0km/h )mayhave "ZR" in
Alla bout wheels an dtires303
Wheel sand tires
Z
Page 308 of 326

Uniform TireQualityG rading Standards
Aunifor mstandard to grade the quality of tires
with regards to tread quality, tire traction and
temperature characteristics. The quality grad-
ing assessmentism ade by the manufacturer
following specification sfrom the U.S .govern-
ment .The ratings are molded int othe sidewall of
the tire.
Recommended tir epressures
The recommended tire pressure applies to the
tires mounted at the factory.
The Tire and Loading Information placard con-
tains the recommended tire pressures for cold
tires on afully loaded vehicle and for the maxi-
mum permissible vehicle speed.
The tire pressure table contains the recommen-
ded pressures for cold tires for various operat-
ing conditions, i.e. differingl oad and speed con-
ditions.
Increased vehicle weight due to optional
equipment
The combined weight of all standard and
optional equipment available for the vehicle,
regardless of whether it is actually installed on
the vehicle or not.
Rim
This is the part of the wheel on which the tire is
mounted.
GAWR (Gross Axle Weight Rating)
The GAWR is the maximum gross axle weight
rating. The actual load on an axle must never
exceed the gross axle weight rating. The gross
axle weight ratin gcan be found on the vehicle
identification plate on the B-pillar on the driver's
side.
Speed rating
The speed ratin gispart of the tire identification.
It specifies the speed range for which the tire is
approved.
GVW (Gross Vehicle Weight)
The gross vehicle weight includes the weight of
the vehicle includin gfuel, tools, the spare wheel,
accessories installed, occupants, luggage and
the drawbar noseweight ,ifapplicable. The gross
vehicle weight must not exceed the gross vehi-
cle weight ratin gGVWR as specified on the vehi-
cle identification plate on the B-pillar on the
driver'ss ide.
GVWR(Gross Vehicle Weight Rating)
The GVWR is the maximum permissible gross
weight of afully loaded vehicle (the weight of the
vehicle includin gall accessories, occupants,
fuel, luggage and the drawbar n
oseweight
,if
applicable). The gross vehicle weight ratin gis
specified on the vehicle identification plate on
the B-pillar on the driver'ss ide.
Maximum loaded vehicle weight
The maximum weight is the sum of:
Rthe curb weight of the vehicle
Rthe weight of the accessories
Rthe load limit
Rthe weight of the factory installed optional
equipment
Kilopascal (kPa)
Metric unit for tire pressure. 6.9 kPa corre-
sponds to1psi. Another unit for tire pressure is
bar. 100 kilopascals (kPa) are the equivalent of
1b ar.
Load index
In addition to the load-bearin gindex ,the load
index may also be imprinted on the sidewall of
the tire. This specifies the load-bearin gcapacity
more precisely.
Curb weight
The weight of avehicle with standard equipment
includin gthe maximum capacityoff uel, oil and
coolant .Italso includes the air-conditionin gsys-
tem and optional equipment if these are instal-
led in the vehicle, but does not include passen-
gers or luggage.
Maximum load rating
The maximum tire load is the maximum permis-
sible weight in kilogram sorlbs for which atire is
approved.
Maximum permissible tir epressure
Maximum permissible tire pressure for one tire.
Maximum load on one tire
Maximum load on one tire. This is calculated by
dividing the maximum axle load of one axle by
two.
306All about wheels and tires
Wheels and tires
Page 311 of 326
.
The folding wheel chock is an additional sa")
Securing the vehicle to prevent it from
rolling away
If your vehicle is equippedwithaw heel chock,i t
can be found in the tire-change tool kit
(
Ypage 270).
The folding wheel chock is an additional safety
measure to prevent the vehicle from rolling
away,f or example when changing awheel.
XFold both plates up :.
XFold out lower plate ;.
XGuide the lugs on the lower plate fully into the
openings in base plate =.
XPlace chocksorother suitable items under
the front and rear of the wheel that is diago-
nally opposite the wheel you wish to change.
Raising the vehicle
GWARNING
If you do not position the jack correctly at the
appropriate jackingp oint of the vehicle, the
jack could tip over with the vehicle raised.
There is arisk of injury.
Only position the jack at the appropriate jack-
ing point of the vehicle. The base of the jack
must be positioned vertically, directly under
the jackingp oint of the vehicle.
!Only position the jack at the appropriate
jackingp oint of the vehicle. Otherwise, you
could damage the vehicle.
Observe the following when raising the vehi-
cle:
RTo raise the vehicle, only use the vehicle-spe-
cific jack that has been tested and approved
by Mercedes-Benz. If used incorrectly, the
jack could tip over with the vehicle raised.
RThe jack is designed only to raise and hold the
vehicle for ashort time while awheel is being
changed. It must not be used for performing
maintenance work under the vehicle.
RAvoid changing the wheel on uphill and down-
hill slopes.
RBefore raising the vehicle, secure it from roll-
ing away by applying the parking brake and
insertingw heel chocks. Do not disengage the
parking brake while the vehicle is raised.
RThe jack must be placed on afirm, flat and
non-slip surface. On aloose surface, alarge,
flat, load-bearing underlay must be used. On a
slippery surface, anon-slip underlay must be
used, e.g. rubber mats.
RDo not use wooden blocks or similar objects
as ajack underlay. Otherwise, the jack will not
be able to achieve its load-bearing capacity
due to the restricted height.
RMake sure that the distance between the
underside of the tires and the ground does not
exceed 1.2 in (3 cm).
RNever place your hands and feet under the
raised vehicle.
RDo not lie under the vehicle.
RDo not start the engine when the vehicle is
raised.
RDo not open or close adoor or the trunk lid
when the vehicle is raised.
RMake sure that no persons are present in the
vehicle when the vehicle is raised.
Changing awheel309
Wheels and tires
Z
Page 322 of 326

Refrigerant instructionlabel
Example:refrigerant instruction label
:
Warning symbol
;Refrigerant filling capacity
=Applicabl estandards
?PAG oilp artn umber
AType of refrigerant
Warning symbol :advises yo uabout :
RPossible dangers
RHaving service work carrie doutataq uali fied
specialist workshop
Fillin gcapacities
ModelRefrigerant
Mercedes ‑AMG
vehicles23.6 ±0.4 oz
(670 ±10g )
Allo the rm odels22.9 ±0.4 oz
(650 ±10g )
ModelPAG oil
All models4.2 oz
(120 g)
Vehicle data
General notes
Please note that for the specified vehicled ata:
RThe heights specified may vary asaresul tof:
-Tires
-Load
-Condition of the suspension
-Optionale quipment
ROptionalequipment reduces the maximum
payload.
Dimensions and weights
Model:
Height when opened
Mercedes‑AM Gvehicles68.0 in
(1727 mm)
All other models68.3 in
(1737 mm)
Model
Vehicle width
including exterior
mirrors80.0 in (2032 mm)
Wheelbase106.3 in (2699 mm)
Turning radius36.1 ft (11.0 m)
Turning circle,
Mercedes-AMG
vehicles36.2 ft (11.04 m)
320Vehicle data
Technical data