2018 MERCEDES-BENZ CLA COUPE headlamp
[x] Cancel search: headlampPage 7 of 326

Information aboutService .............261
Resetting the service intervald is-
play. ............................................... 261
Service message ............................ 261
Specials ervice requirements ......... 261
ATA (Anti-Theft Alarm system)
Activating/deactivating ................... 68
Function ...........................................6 8
Switching off the alarm .................... 68
ATTENTIO NASSIS T
Activating/deactivating ................. 185
Displa ymessage ............................ 207
Function/note s............................. 171
Audi omenu( on-board computer) .... 182
Audi osystem
see separate operating instructions
Authorized Mercedes-Benz Center
see Qualifie dspecialist workshop
Authorized workshop
see Qualifie dspecialist workshop
AUTO lights
Displa ymessage ............................ 204
see Lights
Automatic car was h(care) ............... 262
Automatic engine start (ECO start/
stopf unction) .................................... 126
Automatic engine switch-off (ECO
start/stopf unction).......................... 126
Automatic headlamp mode .............. 100
Automatic transmission
Accelerator peda lposition ............. 133
Changing gea r............................... 133
DIREC TSELECT lever ..................... 130
Drive program. ............................... 134
Drive programd isplay .................... 130
Driving tip s.................................... 133
DYNAMIC SELECT button (all vehi-
cle se xcept Mercedes-AMGv ehi-
cles) ............................................... 128
DYNAMIC SELECT controller
(Mercedes-AMGv ehicles) .............. 129
Emergency running mode. ............. 138
Engaging drive position .................. 132
Engaging neutral ............................ 131
Engaging park position
(Mercedes-AMGv ehicles) .............. 132 Engaging park position automati-
cally ............................................... 131
Engaging reverse gea
r................... 131
Engaging the park position ............ 130 Holding the ve
hiclestationary on
uphill gradients .............................. 134
Kickdown. ...................................... 134
Manua lshifting .............................. 136
Oil temperature (on-board com-
puter, Mercedes-AMGv ehicles) ..... 188
Overview ........................................ 130
Problem (malfunction) ................... 138
Pulling away ................................... 125
Selector lever ................................ 132
Starting the engine ........................ 124
Steering wheelp addleshifters ...... 136
Transmission position display ........ 132
Transmission position display
(DIRECT SELECT lever) ................... 130
Transmission positions .................. 133
Automatic transmissio nemer-
gencym ode....................................... 138
B
Back button ....................................... 230
Backup lamp
Displa ymessage ............................ 203
BAS (Brake Assist System) ................. 61
Battery (SmartKey)
Checking .......................................... 73
Important safety notes .................... 73
Replacing ......................................... 73
Battery (vehicle)
Charging ........................................ 278
Displa ymessage ............................ 206
Important safety notes .................. 276
Jump starting ................................. 278
Belt
see Seatb elts
Bel twarning ......................................... 44
Blind SpotA ssist
Activating/deactivating (on-
board computer) ............................ 186
Displa ymessage ............................ 208
Notes/function .............................. 172
Bluetooth
®
Searching for amobilephone ........ 233
Index5
Page 13 of 326
Grade (gasoline) ............................ 316
Importantsafety note s................. .316
Problem (malfunction) .................. .140
Refueling ........................................ 138
Tank content/reserve fuel ............. 316
Fue lfiller flap
Opening ......................................... 139
Fue llevel
Calling up the range (on-board
computer) ...................................... 180
Fue ltank
Capacity ........................................ 316
Problem (malfunction) ................... 140
Fuses
Allocation chart .............................2 85
Before changing .............................2 84
Fuse box in the engine compart-
ment .............................................. 285
Fuse box in the front-passenger
footwell .......................................... 285
Important safety notes .................. 284
G
Garage door opener
Clearing the memory ..................... 254
General notes ................................ 252
Important safety notes .................. 252
Opening/closing the garage door .. 254
Problems whe nprogramming ........2 54
Programming (button in the rear-
view mirror) ................................... 252
Synchronizing the rolling code ....... 253
Gasoline ............................................. 316
Gear indicator (on-board com-
puter, Mercedes-AMG vehicles) ....... 188
Genuine parts ...................................... 24
Glove box ...........................................2 38
Google™L ocal Search
see also Digita lOperator's Man-
ua l..................................................2 29
H
Handbrake
see Parking brake
HANDS-FRE EACCES S.......................... 79 Hazard warning lamps
Display message ............................ 216
Switching on/off ........................... 102
Head restraints
Adjusting ......................................... 92
Adjusting (manually). ....................... 93
Adjusting (rear) ................................ 93
Headlamps
Fogging up ..................................... 103
see Automatic headlamp mode
Heating
see Climate control
High beam flasher .............................1 01
High-beam headlamps
Adaptive Highbeam Assist ............. 102
Display message ............................ 203
Replacing bulbs .............................1 06
Switching on/off ........................... 101
Hill start assist .................................. 125
HOLD function
Activating ....................................... 157
Activatio nconditions ..................... 157
Deactivating ................................... 157
Display message ............................ 207
Function/notes .............................1 57
Home address
see also Digita lOperator's Man-
ua l..................................................2 29
Hood
Closing ...........................................2 58
Display message ............................ 215
Important safety notes .................. 257
Opening ......................................... 257
Horn ...................................................... 32
Hydroplaning ..................................... 148
I
Ignitionlock
see Key positions
Immobilizer .......................................... 68
Indicator lamp
Replacing bulbs (rear) .................... 106
Indicator lamps
see Warning and indicator lamps
Indicators
see Turn signals
Index11
Page 14 of 326

Instrumentcluster
Overview .......................................... 33
Setting s......................................... 18 6
Warn inga nd indicator lamps ........... 33
Instrument cluster lighting .............. 176
Interior lighting
Control ...........................................1 04
Overview ........................................ 103
Reading lamp ................................. 103
iPod
®
see also Digita lOperator's Man-
ua l..................................................2 29
J
Jack
Storage location ............................ 270
Using ............................................. 309
Jump starting (engine) ......................278
K
Keyp ositions
Start/Stop button .......................... 122
KEYLESS-GO
Convenience closing feature ............ 83
Deactivation ..................................... 71
Locking ............................................ 71
Unlocking ......................................... 71
Kickdown
Driving tips ....................................1 34
Manual gearshifting ....................... 138
Kne ebag.............................................. 46
L
Lamps
see Warning and indicator lamps
Lane Keepin gAssist
Activating/deactivating (on-
board computer) ............................ 186
Display message ............................ 208
Function/informatio n.................... 174
Lan eTracking package ..................... 172
Lap time (RACETIMER) ...................... 189
LATCH-type (ISOFIX )child seat
anchors ................................................ 57
License plate lamp (display mes-
sage) ................................................... 203 Light senso
r(display message) ....... 204
Lights
Adaptive Highbeam Assist ............. 102
Automati cheadlamp mode. ........... 100
Fogged up headlamp s.................... 103
Hazard warning lamps ................... 102
Hig hbeamf lasher. ......................... 101
High-beam headlamp s................... 101
Light switch ................................... 100
Low-bea mheadlamp s.................... 101
Parking lamps ................................ 101
Rear fog lamp ................................ 101
Setting exterio rlighting ................. 100
Standing lamps .............................. 101
Switching the daytime running
lamps on/off( on-board com-
puter) ............................................. 187
Turn signal s................................... 101
Loadin gguidelines ............................ 237
Locking
see Central locking
Locking (doors)
Automati c........................................ 77
Emergency locking ........................... 77
From inside (central locking but-
ton) .................................................. 76
Locking centrally
see Central locking
Locking verification signal (on-
board computer) ............................... 187
Low-beam headlamps
Displa ymessage ............................ 202
Replacing bulb s............................. 105
Switching on/off. .......................... 101
Lumbar support
Adjusting the 4-wa ylum bars up-
por t.................................................. 93
M
M+S tires ............................................ 289
Malfunctio nmessage
see Displa ymessages
Matte finis h(clea ning instruc-
tions) .................................................. 264
mbrace
Call priority .................................... 248
Displa ymessage ............................ 197
12Index
Page 18 of 326
Remote controlGarag edooro pener ....................... 252
Programming (garag edoor
opener) .......................................... 252
Replacing bulbs
Brake lamp .................................... 106
High-beam headlamp s................... 106
Important safety notes .................. 104
Installing/removing the cover
(front wheela rch).......................... 105
Low-bea mheadlamp s.................... 105
Overview of bulb types .................. 104
Rear fog lamp ................................ 106
Turn signal s(front) ......................... 106
Turn signal s(rear) .......................... 106
Reporting safety defects .................... 28
Rescue card ......................................... 29
Reserve (fuel tank)
see Fuel
Reserve fuel
Displa ymessage ............................ 206
Warning lamp ................................. 224
see Fuel
Residual hea t(clim ate control) ........ 119
Restrain tsystem
Displa ymessage ............................ 198
Introduction ..................................... 40
Warning lamp ................................. 224
Warning lamp (function) ................... 41
Revers egear(selecto rlever )........... 132
Reversin gfeature
Roller sunblind ................................. 87
Sid ew indow s................................... 82
Roadside Assistance (breakdown) .... 26
Rolle rsunblind
Panorama roofw ithp ower tilt/
sliding panel ..................................... 87
Roo fcarrier ........................................ 241
Roo flinin gand carpets (cleaning
guidelines) ......................................... 268
Roo floa d( maximum) ........................ 320
Route guidance
see also Digital Operator's Man-
ual.................................................. 229S
Safety
Childre ninthe vehicl e..................... 54
see Occupant safety
Safety system
see Driving safety systems
SD card
Inserting ........................................ 235
Inserting/removing ........................ 235
Removing ....................................... 235
SD memory card
see also Digital Operator's Man-
ual.................................................. 229
Search &Send
see also Digital Operator's Man-
ua l.................................................. 229
Seat
Correct driver'ss eatposition ........... 90
Seat belts
Adjusting the height ......................... 44
Cleaning ......................................... 267
Correct usag e.................................. 43
Fastening ......................................... 44
Important safety guideline s............. 42
Introduction ..................................... 41
Releasing ......................................... 44
Warning lamp ................................. 218
Warning lamp (function) ................... 44
Seats
Adjusting (electrically) ..................... 92
Adjusting (manually) ........................ 91
Adjusting (Performance Seat) .......... 94
Adjusting the 4-wa ylum bars up-
por t.................................................. 93
Adjusting the headr estraint ............ 92
Cleaning the cover. ........................ 267
Folding the backrest( rear com-
partment) forwards/back .............. 240
Important safety notes .................... 90
Seath eating problem ...................... 95
Storing settings (memory func-
tion) ................................................. 99
Switching seath eating on/off......... 94
Securing cargo .................................. 241
Selecto rlever
Cleaning ......................................... 267
Sensors (cleaning instructions) ....... 265
16Index
Page 35 of 326

Instrumentcluster
FunctionPag e
:Speedometer wit hsegments176
Warning and indicator lamps:
L Low-beam headlamps101
T Parking lamp s101
K High-beam headlamps101
÷ ESP®22 1
Electric parking brak e
applie d(red)
F (USAonly)
! (Canada only)224
! Electric parking brak e
(yellow)22 4
· Distanc ewarning227
å ESP®OF F221
! ABSm alfunctioning220
Brake s219
$ (USAonly)
J (Canada only)
FunctionPage
;#! Turn signals101
=Multifunction display179
?Tachometer176
6 Restrain tsystem41
ü Seat belt no tfastene d218
M SPORT handlin gmode
(Mercedes-AM Gvehicles)222
R Rear fog lamp101
; CheckEngine22 4
h Tirep ressur emonitor228
ACoolan ttem perature gauge177
Warning and indicator lamps:
? Coolan ttoo hot/cold225
BFue llevel indicator
Warning and indicator lamps:
æ Reserve fuel224
Instrument cluster33
At ag lance
Page 100 of 326
The rear-view mirror and the exterior mirror on
the driver's side automatically go into anti-glare
mode if:
Rthe ignition is switched on and
Rincident light from headlamps strikes the sen-
sor in the rear-view mirror
The mirrors do not go into anti-glare mode if
reverse gear is engaged or if the interior lighting
is switched on.
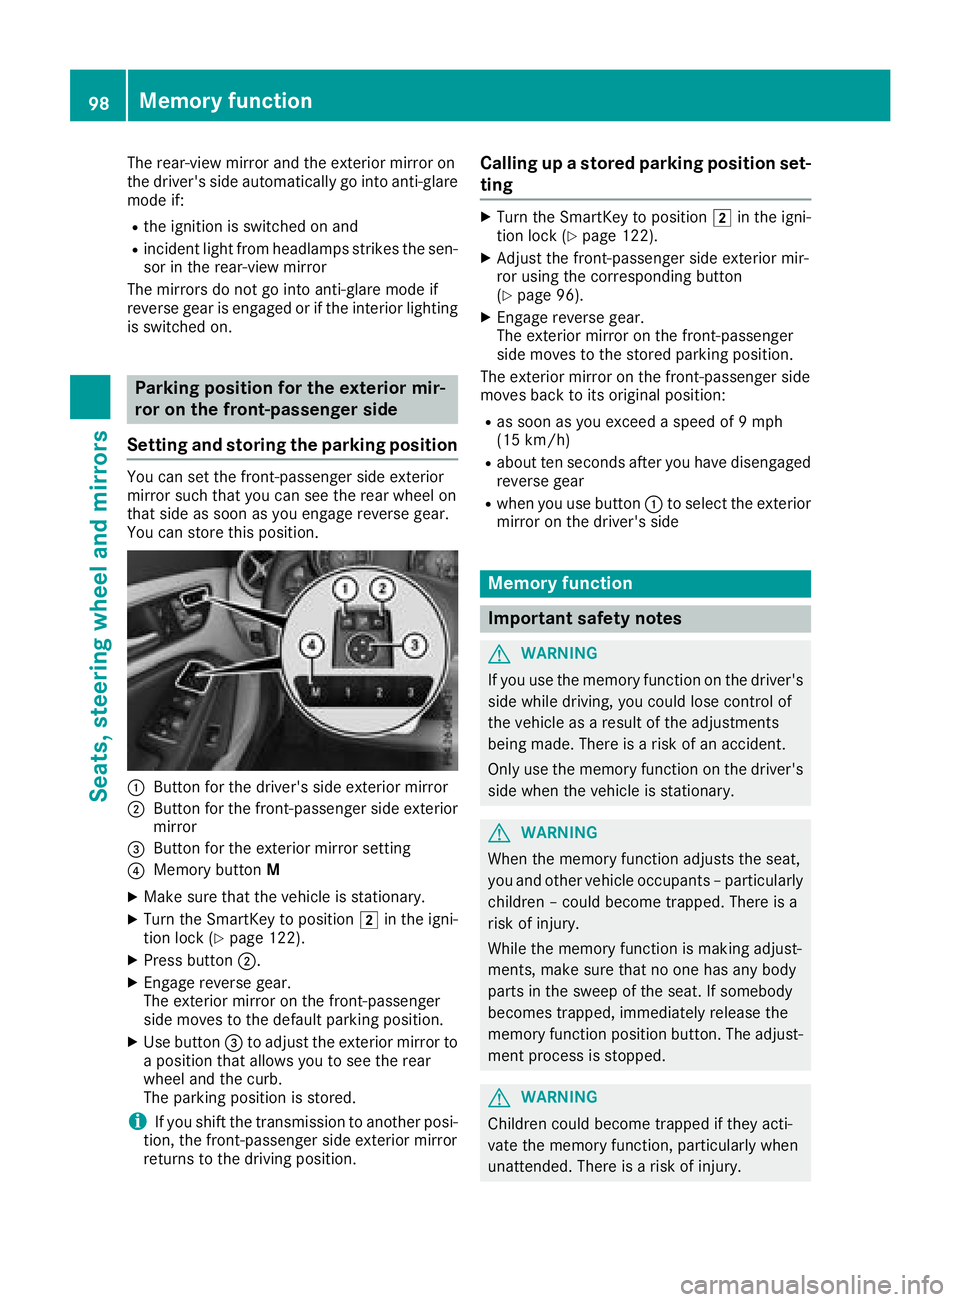
Parking position for the exterior mir-
ror on the front-passenger side
Setting and storing the parking position
You can set the front-passenger side exterior
mirror such that you can see the rear wheel on
that side as soon as you engage reverse gear.
You can store this position.
:Button for the driver's side exterior mirror
;Button for the front-passenger side exterior
mirror
=Button for the exterior mirror setting
?Memory button M
XMake sure that the vehicle is stationary.
XTurn the SmartKey to position 2in the igni-
tion lock (Ypage 122).
XPress button ;.
XEngage reverse gear.
The exterior mirror on the front-passenger
side moves to the default parking position.
XUse button=to adjust the exterior mirror to
ap osition that allows you to see the rear
wheel and the curb.
The parking position is stored.
iIf you shift the transmission to another posi-
tion, the front-passenger side exterior mirror
return stothe driving position.
Calling up astored parking position set-
ting
XTurn the SmartKey to position 2in the igni-
tion lock (Ypage 122).
XAdjust the front-passenger side exterior mir-
ror using the corresponding button
(
Ypage 96).
XEngage reverse gear.
The exterior mirror on the front-passenger
side moves to the stored parking position.
The exterior mirror on the front-passenger side
moves back to its original position:
Ras soon as you exceed aspeed of 9mph
(15 km/h)
Rabout ten seconds after you have disengaged
reverse gear
Rwhen you use button :to select the exterior
mirror on the driver's side
Memory function
Important safety notes
GWARNING
If you use the memory function on the driver's side while driving, you could lose control of
the vehicle as aresult of the adjustments
being made. There is arisk of an accident.
Only use the memory function on the driver's
side when the vehicle is stationary.
GWARNING
When the memory function adjusts the seat,
you and other vehicle occupants–p articularly
children –could become trapped. There is a
risk of injury.
While the memory function is making adjust-
ments, make sure that no one has any body
parts in the sweep of the seat. If somebody
becomes trapped, immediately release the
memory function position button .The adjust-
ment process is stopped.
GWARNING
Children could become trapped if they acti-
vate the memory function, particularly when
unattended. There is arisk of injury.
98Memory function
Seats, steering wheel and mirrors
Page 102 of 326
Exteriorlighting
General notes
For reasonsofs afety, Mercedes-Ben zrecom-
mends that you driv ewith th elightss witched on
even durin gthe daytime. In somec ountries,
operatio noftheheadlamps varies due to legal
requirement sand self-imposedo bligations.
Settingthe exterio rlighting
Settin goptions
Exterior lighting can be set usingt he:
Rlight switch
Rcombinatio nswitch (Ypage 101)
Ron-board compute r(Ypage 187)
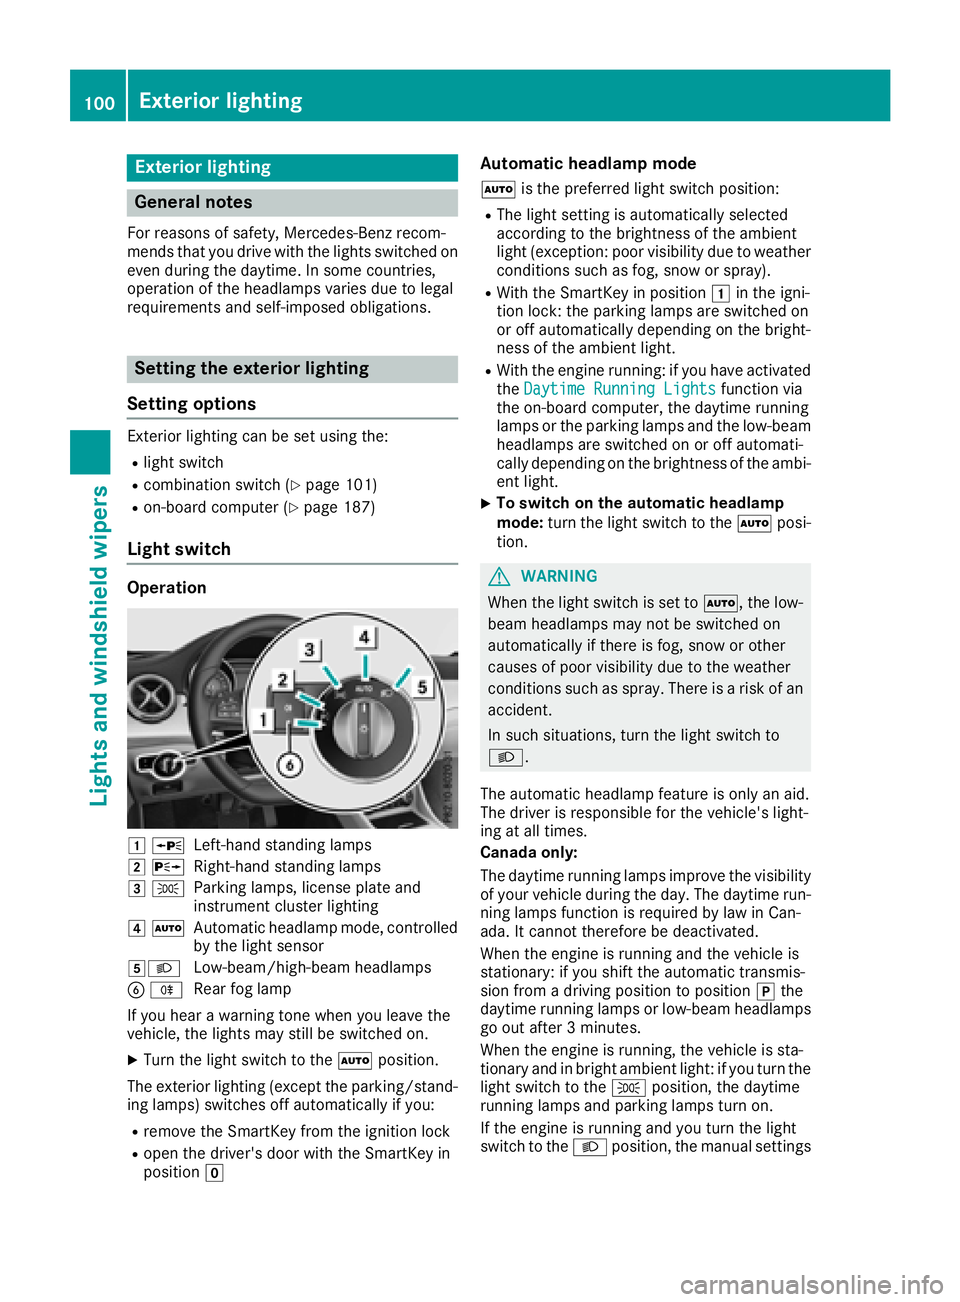
Light switch
Operation
1WLeft-hands tanding lamps
2 XRight-hand standing lamps
3TParking lamps ,licens eplatea nd
instrumen tcluste rlighting
4 ÃAutomatic headlampm ode, controlled
by th elight sensor
5LLow-beam/high-beam headlamps
B RRear fog lamp
If you hear awarning tone when you leave the
vehicle ,the lightsm ay still be switched on.
XTurn thelight switch to the Ãposition.
The exteriorl ighting (excep tthe parking/stand-
ing lamps )switches off automaticall yifyou:
Rremove th eSmartKey from th eignition lock
Ropen th edriver'sd oor with th eSmartKey in
position g
Automatic headlamp mode
Ãis thepreferred light switch position:
RThe light settin gisautomaticall yselected
according to th ebrightnes softheambient
light (exception: poor visibilityd ue to weather
conditionss uchasfog,sno wors pray).
RWiththeSmartKey in position 1in th eigni-
tio nlock: th eparking lamps are switched on
or off automaticall ydependingont hebright-
nes soft heambient light.
RWitht heengine running: if you have activated
the DaytimeR unningLightsfunction via
th eo n-board computer, th edaytime running
lamps or th eparking lamps and th elow-beam
headlamps are switched on or off automati-
cally dependingont hebrightnes softheambi-
ent light.
XTo switch on th eautomatic headlamp
mode: turnthe light switch to the Ãposi-
tion.
GWARNING
When th elight switch is set to Ã,thelow-
beam headlamps may no tbeswitched on
automaticall yifthere is fog ,sno woro ther
causes of poor visibilityd ue to theweather
conditionss uchasspray. Thereisar isk of an
accident.
In suchs ituations,tur nt he light switch to
L.
The automatic headlampf eature is only an aid.
The driver is responsible for th evehicle's light-
ing at all times.
Canada only:
The daytime runnin glamps improve th evisibility
of your vehicle durin gthe day. The daytime run-
nin glamps function is required by law in Can-
ada. It canno tthe refore be deactivated.
When th eengine is runnin gand th evehicle is
stationary: if you shiftt heautomatic transmis-
sion from adriving position to position jthe
daytime runnin glamps or low-beam headlamps
go out after 3minutes.
When th eengine is running, th evehicle is sta-
tionar yand in bright ambient light:ify ou turnthe
light switch to the Tposition,t hedaytime
runnin glamps and parking lamps tur non.
If th eengine is runnin gand you tur nthe light
switch to the Lposition,t hemanual settings
100Exterior lighting
Lightsa nd windshield wipers
Page 103 of 326
take precedence overthe daytime running
lamps.
US Ao nly:
The daytime running lamps improve the visibility
of your vehicl eduringt he day. To do this, the
daytime running lamps functio nmustb e
switched on using the on-board computer
(
Ypage 187).
If the engine is running and yo uturnt he light
switch to the TorL position, the manual
setting stake precedence ove rthe daytime run-
ning lamps.
Low-beam headlamps
Even if the light sensord oesn ot detect thatiti s
dark, the parking lamps and low-bea mhead-
lamps switch on when the ignition is switched on
and the light switch is settot heL position.
Thi sisa particularly usefu lfun ctio nint he event
of rain and fog.
XTo switc honthe low-beam headlamps:
tur nthe SmartKeytop osition 2in the igni-
tio nlockors tart the engine.
XTurn the light switch to L.
The green Lindicator lamp in the instru-
ment clusterl ights up.
Rea rfog lamp
The rea rfog lamp improves visibility of your
vehicl efor the trafficb ehindint he event of thick
fog .Pleas etake note of the country-specific
regulations for the us eofrearfog lamps.
XTo switc honthe rear fogl amp:turnthe
SmartKeyint he ignition lock to position 2or
s
tart the engine.
XTurn the light switch to LorÃ.
XPress the Rbutton.
The yellow Rindicator lamp in the instru-
ment clusterl ights up.
XTo switc hoffthe rear fogl amp:press the
R button.
The yellow Rindicator lamp in the instru-
ment clusterg oeso ut.
iWhen the rea rfog lamp is switched on, the
cente rbrake lamp in the tai llam pswitches off
du etoal egalrequirement.
Parkin glamps
!If the battery charge is ver ylow ,the parking
lamps or standing lamps ar eautomatically
switched off to enabl ethe next engine start.
Alway sparky ourvehicl esafelya nd in awelllit area
,ina ccordance with the relevant legal
stipulations. Avoidu sing the Tparking
lamps ove raperiodofs everal hours. If pos-
sible, switch on the right-hand Xor left-
hand W standing lamps.
XTo switc hon:tur nthe light switch to T.
Th eg reen T indicator lamp in the instru-
ment clusterl ights up.
Standin glamps
Switching on the standing lamps ensures the
corresponding side of the vehicl eisillumin ated.
XTo switc honthe standin glamps: the
SmartKeyisn ot in the ignition lock or it is in
position gin the ignition lock.
XTurn the light switch to W(left-hand side of
the vehicle) or X(right-hand side of the
vehicle).
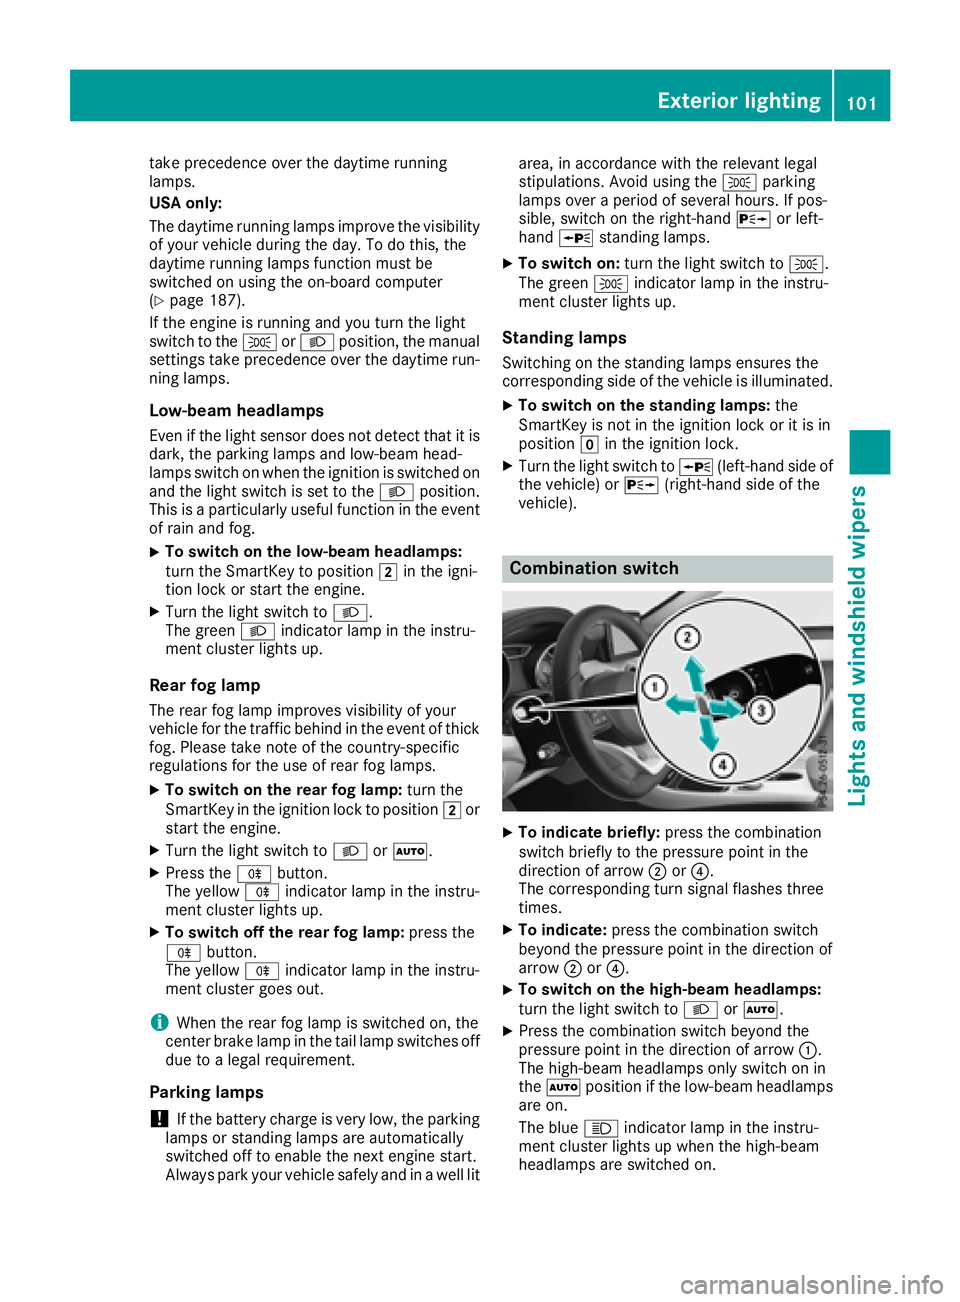
Combination switch
XTo indicate briefly: press the combination
switch briefl ytothe pressure point in the
directio nofarrow ;or?.
Th ec orresponding tur nsigna lflashe sthree
times.
XTo indicate: press the combinatio nswitch
beyond the pressure point in the directio nof
arrow ;or?.
XTo switc honthe high-beam headlamps:
tur nthe light switch to LorÃ.
XPress the combinatio nswitch beyond the
pressure point in the directio nofarrow :.
Th eh igh-beam headlamps onl yswitch on in
the à positio nifthe low-bea mheadlam ps
ar eo n.
Th eb lue K indicator lamp in the instru-
ment clusterl ights up when the high-beam
headlamps ar eswitched on.
Exterior lighting101
Lights and windshield wiper s
Z