2018 MERCEDES-BENZ CLA COUPE hood release
[x] Cancel search: hood releasePage 108 of 326
XInsert the new bulbinto bulbholder;.
XInsert bulbh older;and turn it clockwise.
XPress on housing cover :and turn it to the
right.
XReplace the cover in the front wheel housing
(Ypage 105).
High-beam headlamps/daytime run-
ning lamps/parking lamps and stand-
ing lamps (halogen headlamps)
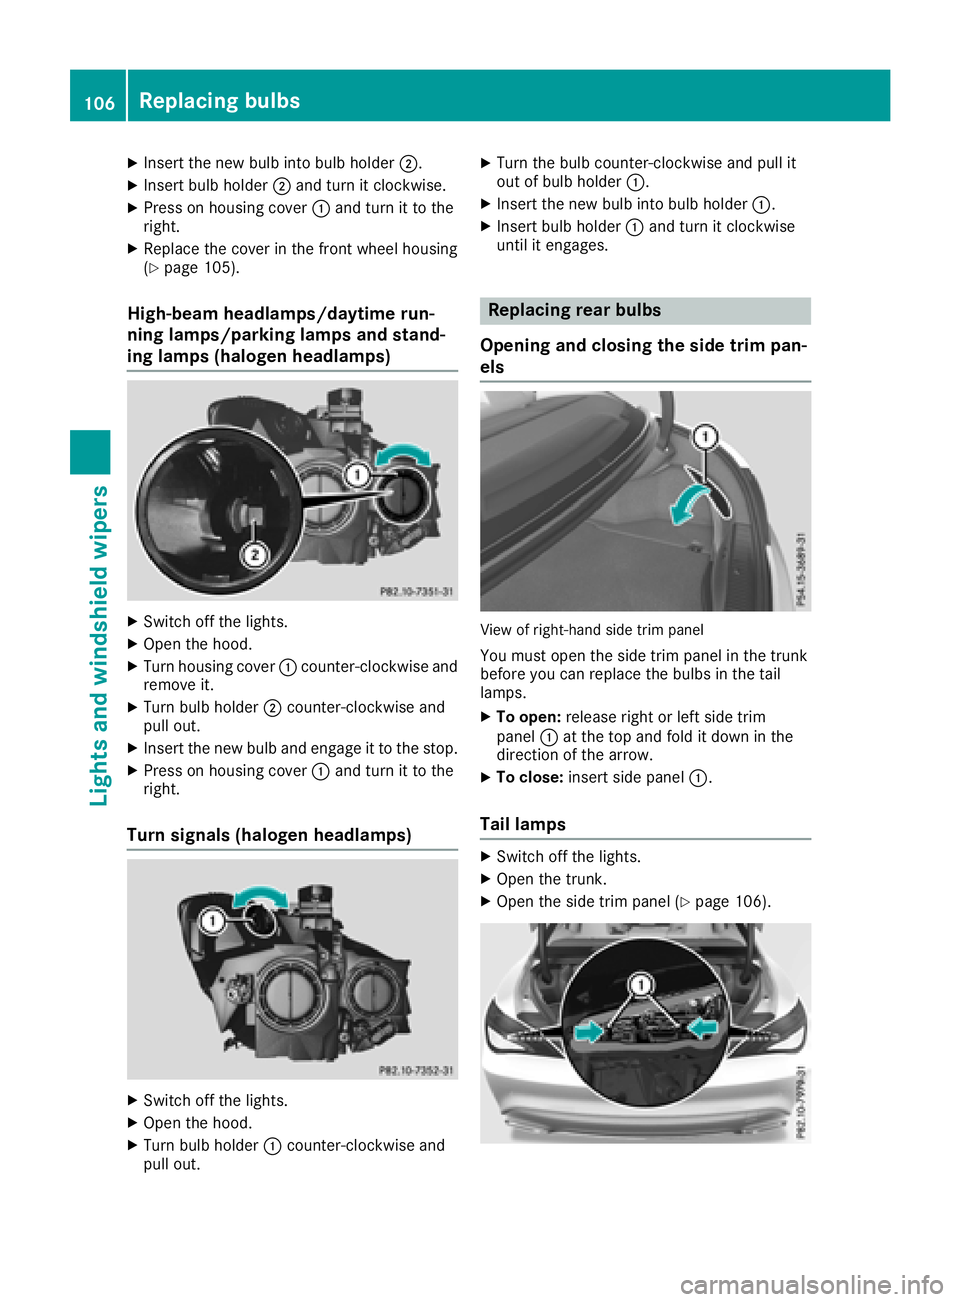
XSwitch off the lights.
XOpen the hood.
XTurn housing cover :counter-clockwise and
remove it.
XTurn bulbh older;counter-clockwise and
pullo ut.
XInsert the new bulba nd engage it to the stop.
XPress on housing cover :and turn it to the
right.
Turn signals (halogen headlamps)
XSwitch off the lights.
XOpen the hood.
XTurn bulbh older:counter-clockwise and
pullo ut.
XTurn the bulbc ounter-clockwise and pulli t
out of bulbh older:.
XInsert the new bulbi nto bulbholder:.
XInsert bulbh older:and turn it clockwise
until it engages.
Replacing rear bulbs
Openinga nd closing the side trim pan-
els
View of right-hand side trim panel
You must open the side trim panel in the trunk
before you can replace the bulbs in the tail
lamps.
XTo open: release right or left side trim
panel :at the top and fold it down in the
direction of the arrow.
XTo close: insert side panel :.
Tail lamps
XSwitch off the lights.
XOpen the trunk.
XOpen the side trim panel (Ypage 106).
106Replacing bulbs
Lights and windshield wipers
Page 110 of 326
Replacing the wiper blades
Important safety notes
GWARNING
If the windshield wiper sbegin to move while
yo ua re changing the wiper blades, yo ucould
be trapped by the wiper arm .There is arisko f
injury.
Alway sswitch off the windshield wiper sand
ignition before changing the wiper blades.
!To avoid damaging the wiper blades, make
sure that yo utouch only the wiper arm of the
wiper.
!Nevero pent he hoodifaw indshield wiper
arm hasb eenf olded away from the wind-
shield.
Neverf oldawindshield wiper arm withouta
wiper blad ebacko nto the windshield.
Holdt he windshield wiper arm firmly when
yo uc hange the wiper blade. If yo urelease the
windshield wiper arm withoutaw iper blade
and it falls onto the windshield ,the windshield
may be damaged by the force of the impact.
Mercedes-Benz recommendst hat youhave
the wiper blades changed at aquali fied spe-
cialist workshop.
Changin gthe windshield wiper blades
Removin gthe wiper blades
XVehicles without KEYLESS-GO or KEY-
LESS-GOs tart function: remove the Smart-
Key from the ignition lock.
XVehicles with KEYLESS-GO or KEYLESS-
GO start function: switch off the engine.
XFoldthe wiper arm away from the windshield.
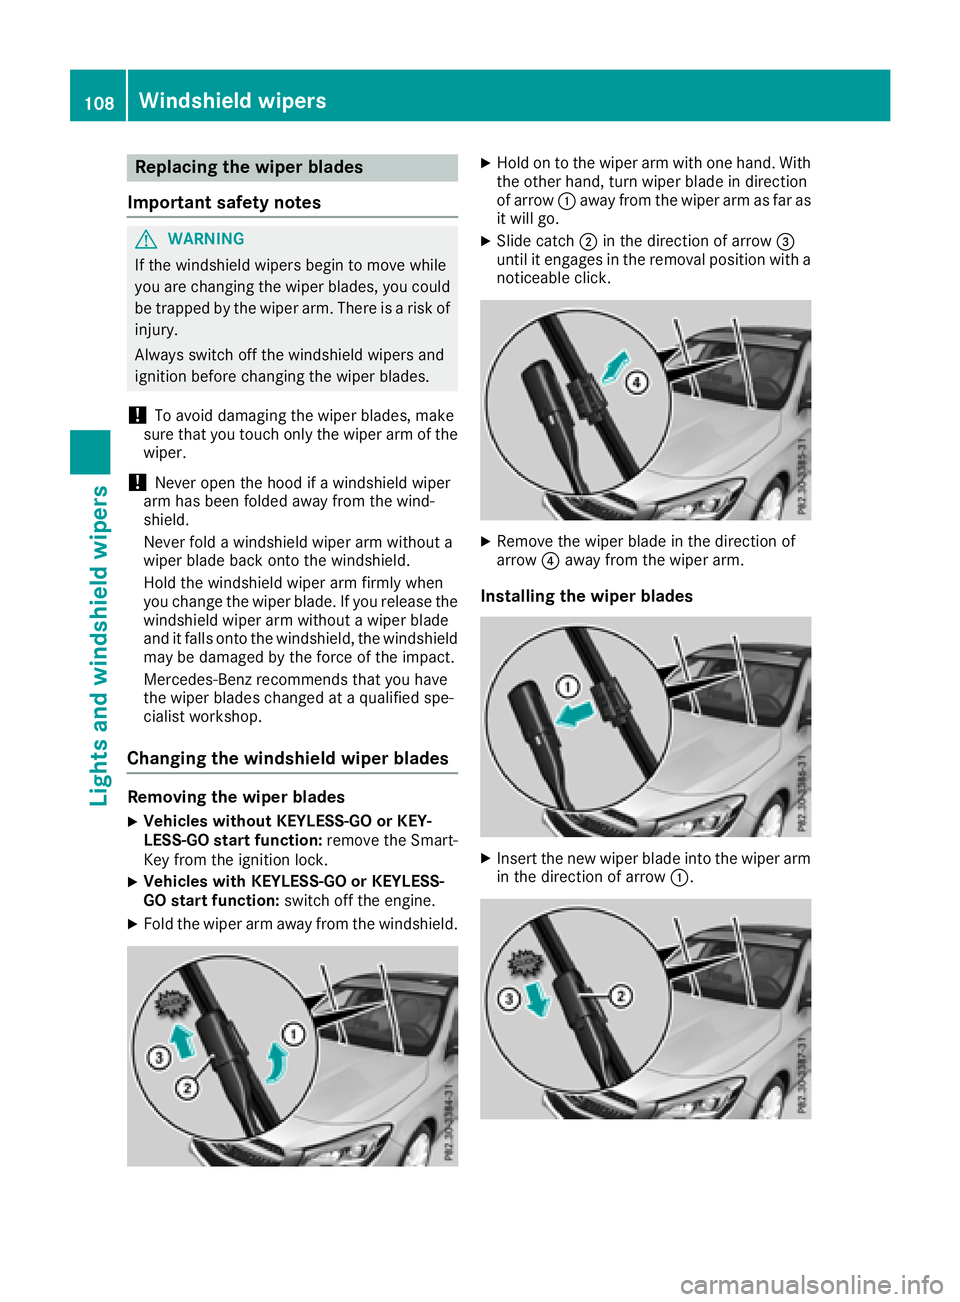
XHoldontot he wiper arm with one hand. With
the otherh and, turn wiper blad eindirection
of arrow :away from the wiper arm as far as
it will go.
XSlide catch ;in the direction of arrow =
unti lite ngages in the removal position with a
noticeable click.
XRemove the wiper blad einthe direction of
arrow ?away from the wiper arm.
Installing the wiper blades
XInsert the new wiper blad einto the wiper arm
in the direction of arrow :.
108Windshieldwipers
Lights and windshield wipers
Page 126 of 326
GWARNING
Flammable materials introduced through
environmental influence or by animals can
ignite if in contact with the exhaust system or
parts of the engine that heatu p. There isarisk
of fire.
Carry out regular checks to make sure that
there are no flammable foreignm aterials in
the engine compartment or in the exhaust
system.
General notes
During acold start, the engine runs at higher
speeds to enabl ethe catalytic converter to
reach its operating temperature. The sound of
the engine may change during this time.
Automatic transmission
XShift the transmission to position j
(Ypage1 30).
The transmission position display in the mul-
tifunction display shows P(
Ypage1 30).
iYou can start the engine in transmission
position jand i.
Starting procedure with the SmartKey
To start the engine using the SmartKey instead
of the Start/Stop button, pul lthe Start/Stop
button out of the ignitio nlock.
XTurn the SmartKey to position 3in the igni-
tion lock (Ypage1 22) and release it as soon
as the engine is running.
Starting procedure with the Start/Stop
button
The Start/Stop button can be used to start the
vehiclem anually without inserting the SmartKey
into the ignitio nlock. The Start/Stop button
must be inserted in the ignitio nlock and the
SmartKey must be in the vehicle. This mode for
starting the engine operates independently of
the ECO start/stop automatic engine start func-
tion.
You can start the engine if avalidS martKey is in
the vehicle. Switch off the engine and always
take the SmartKey with you when leaving the vehicle, even if you only leave it for
ashort time.
Pay attention to the important safety notes.
XDepress the brake pedala nd keep it
depressed.
XPress the Start/Stop button once
(Ypag e122).
The engine starts.
Starting procedure via smartphone
Observe the important safety notes on starting
the engine (Ypag e123).
You can als ostart you rengine via you rsmart-
phone from outside the vehicle. In this case, the
previousl yselected climate control setting is
activated. In this way you can cool or heat the
interior of the vehicleb efore starting the jour-
ney.
Only start the engine via you rsmartphone if it is
safe to start and run the engine where you rvehi-
cle is parked.
Observe the legals tipulations in the area where
you rvehicleisp arked.Engine start via smart-
phone may be limited to certain countries or
regions.
You can execute amaximu moftwo consecutive
starting attempts via you rsmartphone. If you
insert the SmartKey into the ignitio nlock, you
can carry out two more starting attempts.
Once you have started the engine, you can
switch the engine off via you rsmartphone at any
time.
You can only start the engine via you rsmart-
phone if:
Rthe SmartKey is in the ignitio nlock
Rpark position jis selected
Rthe accelerator pedalisn ot depressed
Rthe anti-theft alarm system is not activated
Rthe panicalarm is not activated
Rthe hazard warning lamp sare switched off
Rthe hood is closed
Rthe doors are closed and locked
Rthe windows and sliding sunroof are closed
Also make sure that:
Rthe fuel tank is sufficiently filled
Rthe starter battery is sufficiently charged
GWARNING
Limbs coul dbecrushedortrappe difthe
engine is started unintentionally during ser-
124Driving
Driving and parking
Page 127 of 326
vice or maintenance work. There isarisk of
injury.
Always secure the engine against uninten-
tional starting before carrying out mainte-
nance or repair work.
Make sure that the engine cannot be started via
you rsmartphone before carrying out mainte-
nance or repairs. You can prevent an engine
start via you rsmartphone, for example, if you:
Rswitch on the hazard warning lamps
Rdo not lock the doors
Ropen the hood
Pulling away
General notes
GWARNING
If the engine speedisa bove the idling speed
and you engage transmission position Dor R,
the vehiclec ould pullawa ysuddenly.T here is
ar isk of an accident.
When engaging transmission position Dor R,
alway sfirmly depress the brake pedala nd do
not simultaneously accelerate.
Depress the accelerator carefully when pulling
away.
The vehiclel ocks centrally once you have pulled
away. The locking knobs in the doors drop down.
You can open the doors from the insid eatany
time.
You can als odeactivate the automatic locking
feature (
Ypag e187).
It is possible to shift the transmission from posi-
tion jto the desired position only if you
depress the brake pedal. Only then can the
parking lock be deactivated.
All vehicles (except Mercedes-AMG vehi-
cles): if you do not depress the brake pedal, the
DIRECT SELECT lever can still be moved but the parking lock remains engaged.
Mercedes-AMG vehicles: if you do not depress
the brake pedal, the selector lever can still be
moved but the parking lock remains engaged.
At transmission flui dtemperatures below Ò4‡
(Ò20†), you can only shift out of position jinto another transmission position when the engine
is running.
iUpshifts take place at highere
ngine speeds
after acold start. This helpst he catalytic con-
verter to reach its operating temperature
more quickly.
Information on the automatic release of the
electric parking brake (
Ypag e143).
Hill start assist
Hill start assist helpsy ou when pulling away
forward or in reverse on an uphill gradient. It
holdst he vehiclef oras hort time after you have
removed you rfoot from the brake pedal. This
gives you enoug htime to move you rfoot from
the brake pedaltot he accelerator pedala nd to
depress it before the vehicleb egins to roll.
GWARNING
After ashort time, hill start assist wil lnolon-
ger brake you rvehiclea nd it coul droll away.
There is arisk of an accident and injury.
Therefore, quickly move you rfoot from the
brake pedaltot he accelerator pedal. Never
leave the vehiclew hen it is held by hill start
assist.
Hill start assist is not active if:
Ryou are pulling awa yonalevel road or on a
downhill gradient.
Rthe transmission is in position i.
Rthe electric parking brake is applied.
RESP®is malfunctioning.
Further information on holding the vehicles ta-
tionary on uphill gradients (
Ypag e134).
ECOs tart/stop function
Introduction
The ECO start/stop function switches the
engine off automatically if the vehicleiss topped
under certain conditions.
The engine starts automatically when the driver
wants to pul lawa ya gain. The ECO start/stop
function thereby helpsy ou to reduce the fuel
consumptio nand emissions of you rvehicle.
Driving125
Driving and parking
Z
Page 161 of 326
Conditions for activation
You can activateRACE START if:
Rthed oors, hood and th etrunk lid are closed.
Rthee ngineisr unningand th etransmission,
all-wheel driv eclutch and th eenginea re at
operatin gtem perature.
Rthes teering wheel is in th estraight-ahead
position.
Rth ev ehicle is stationar yand th ebrak epedal is
depressed (leftf oot).
Rthet ransmission is in position h.
Rdriveprogram S,S+ orRACE is selected
(Ypage 129)
Activating RACE START
XDepres sthe brak epedal withy our left foot
and keep it depressed.
XPull and hold boths teering wheel paddle shift-
ers.
XThe RACES TART Confirm: Paddle UPCancel:P addle DOWNmessage appearsi n
th em ultifunction display.
XRelease boths teering wheel paddle shifters.
iIf th eactivation conditionsa re no longer ful-
filled, RACE START is canceled. The RACE
START Not Possible See Operator'sManualmessage appearsinthemultifunction
display.
XTo cancel: pull theleft steering wheel paddle
shifte r(Ypage 136).
or
XTo confirm: pull therigh tsteering wheel pad-
dle shifte r(Ypage 136).
The RACESTARTAvailableDepressgaspedalmessage appearsint hemultifunction
display.
iIf you do no tdepress th eaccelerato rpedal
within afew seconds, RACE START is can-
celed. The multifunction display shows the
RACES TART Canceled
message.
XFully depress th eaccelerato rpedal.
The engines peedisincreased.
The RACE
STARTReleasebraketostartmessage appearsint hemultifunction display.
iIf you do no trelease th ebrak epedal within
as hort time, RACE START will be canceled. The multifunction display shows the
RACE
START Canceledmessage.
XTakeyour foo toff th ebrake, but keep the
accelerato rpedal depressed.
The vehicle pulls away at maximum acceler-
ation.
The RACE
STARTActivemessage appearsi n
th em ultifunction display.
RACE START is deactivate dwhen th evehicle
reaches aspeedofa pproximately 50 km/h.
RACE START is deactivate dimmediately if you
release th eaccelerato rpedal durin gRACE
START or if any of th eactivation conditionsa re
no longer fulfilled. The RACESTART Not Pos‐
sible See Operator'sM anualorRACESTART Canceledmessage appearsint hemul-
tifunctio ndisplay.
iIf RACE START is used repeatedly within a
short period of time, it is only available again
after th evehicle has been driven acertain
distance.
AMG adaptiv esport suspension sys-
tem
General notes
The electronicall ycontrolled damping system
work scontinuously. This improve sdriving
safety and ride comfort.
The damping is tuned individually to each wheel
and depends on:
Ryour driving style, e.g .sporty
Rther oad surface condition,e .g.b umps
Ryour individua lselectio nofSport orComfort
The suspension settin gisadjusted usingt he
correspondingb uttonint hecente rconsole.
iThe mod ecan also be set usingt heAMG
DYNAMIC SELECT controller (Ypage 129).
Eac htimey ou start th eenginew iththeSmart-
Key or th eStart/Sto pbutton, Comfort modeis
activated. For further informatio nabout starting
th ee ngine, see (
Ypage 125).
Driving systems159
Driving and parking
Z
Page 256 of 326
When indicator lamp:flashes green: pro-
gramming was successful. The next step is to
synchronize the rolling code.
XRelease button Bof remotec ontrolAof the
garage door drive.
If indicator lamp :lights up red: repeat the
programmingp rocess for the corresponding
button on the rear-view mirror. When doing
so, vary the distanc ebetween remotec ontrol
A and the rear-view mirror.
The required distanc ebetween remotec on-
trol Aand the integrated garage door opener
depends on the garage door drive system.
Several attempts might be necessary. You
should test every position for at least
25 seconds before trying another position.
Problems when programming
If you are experiencing problems programming
the integrated garage door opener on the rear-
view mirror, take not eofthe following instruc-
tions:
RCheck the transmitter frequenc yused by
garage door drive remotec ontrolAand
whether it is supported. The transmitter fre-
quency can usually be found on the back of
remotec ontrolAfor the garage door drive.
The integrated garage door opener is com-
patible with devices that have units which
operate in the frequenc yrange of 280 to
433 MHz.
RReplace the batteries in garage door remote
control A.This increases the likelihood that
garage door remotec ontrolAwill transmit a
stron gand precise signal to the integrated
garage door opener.
RWhen programming, hold remotec ontrolA
at varying distances and angles from but-
tons ;to? which you are programming. Try
various angles at adistanc ebetween 2and
8i nches (5to 20 cm) or at the same angle but
at varying distances.
RIf another remotec ontrolAis available for
the same garage door drive, repeat the same
programmings teps with this remotec ontrol
A.B eforep erforming these steps, make sure
that new batteries have been installed in
garage door drive remotec ontrolA.
RNote that some remotec ontrols only transmit
for alimited amount of time (the indicator
lamp on t
he remotec
ontrol goes out). Press button
Bon remotec ontrolAagain before
transmission ends.
RAlign the antenna cable of the garage door
opener unit. This can improve signal recep-
tion/transmission.
Opening/closing the garage door
After it has been programmed, the integrated
garage door opener performst he function of the
garage door system remotec ontrol. Please also
read the operating instruction sfor the garage
door system.
XTurn the SmartKey to position 2in the ignition
lock (Ypage 122).
XPress button ;,=or? which you have
programmed to operate the garage door.
Garage door system with afixed code: indi-
cator lamp :lights up green.
Garage door system with arolling code: indi-
cator lamp :flashes green.
The transmitter will transmit asignal as long
as the button is pressed. The transmission is
halted after amaximum of ten seconds and
indicator lamp :lights up yellow.
XPress button ;,=or? again if necessary.
Clearing the memory
Make sure that you clear the memory of the
integrated garage door opener before selling the
vehicle.
XTurn the SmartKey to position 2in the ignition
lock (Ypage 122).
XPress and hold buttons ;and ?.
The indicator lamp initially lights up yellow
and then green.
XRelease buttons ;and ?.
The memory of the integrated garage door
opener in the rear-view mirror is cleared.
254Features
Stowage and features
Page 260 of 326
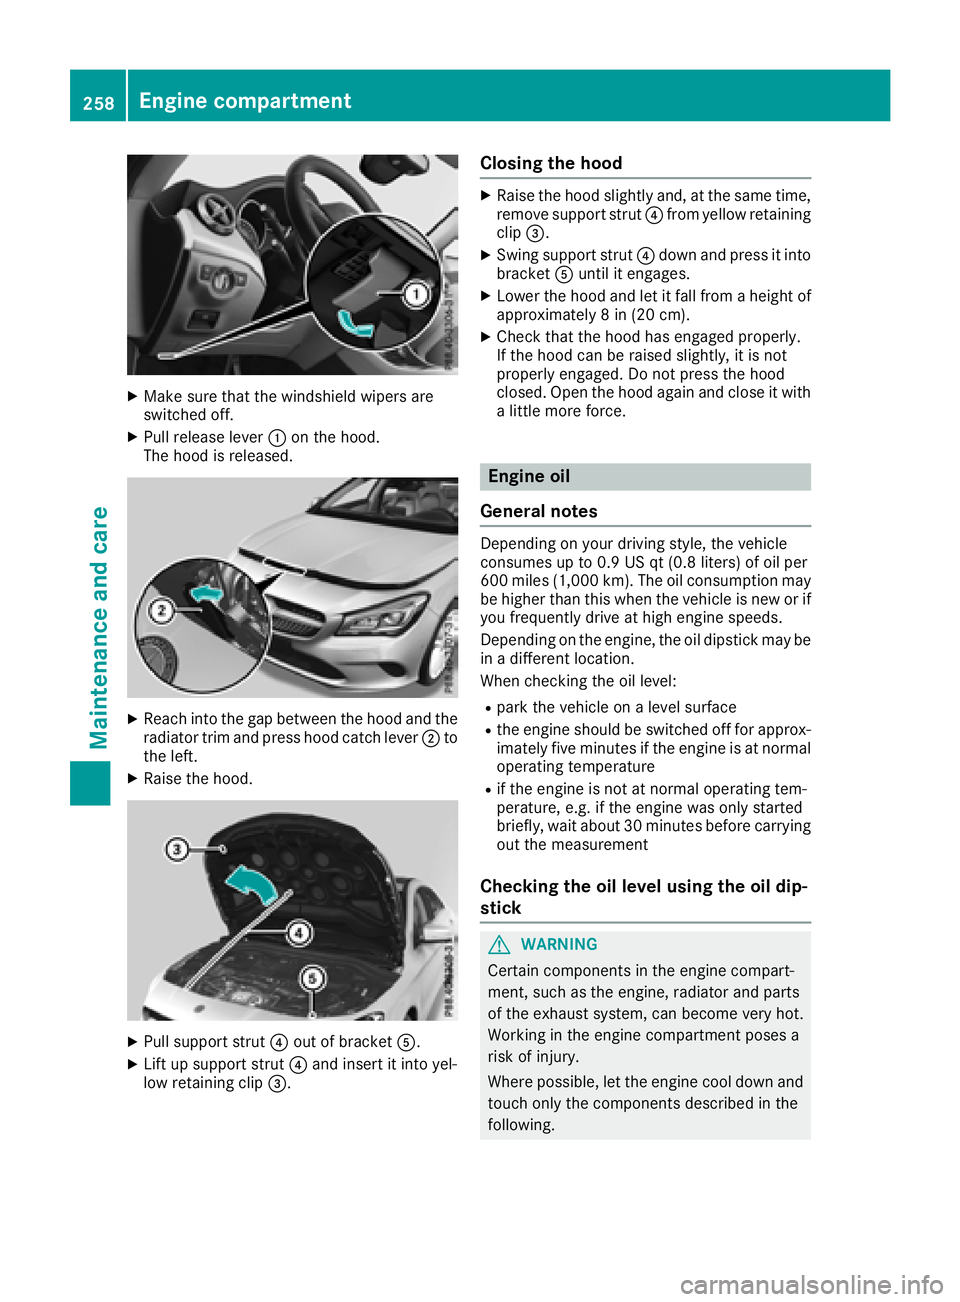
XMake sure that the windshield wipers are
switched off.
XPull release lever:on the hood.
The hood is released.
XReach into the gap between the hood and the radiator trim and press hood catch lever ;to
the left.
XRaise the hood.
XPull support strut ?out of bracket A.
XLift up support strut ?and insert it into yel-
low retaining clip =.
Closing the hood
XRaise the hood slightly and, at the same time,
remove support strut ?from yellow retaining
clip =.
XSwing support strut ?down and press it into
bracket Auntil it engages.
XLower the hood and let it fall from aheight of
approximately 8in(20 cm).
XCheck that the hood has engaged properly.
If the hood can be raised slightly, it is not
properly engaged. Do not press the hood
closed. Open the hood again and close it with
alittle more force.
Engine oil
General notes
Depending on your driving style, the vehicle
consumes up to 0.9 US qt (0.8 liters) of oil per
600 miles (1,000 km). The oil consumption may
be higher than this when the vehicle is new or if
you frequently drive at high engine speeds.
Depending on the engine, the oil dipstick may be
in ad ifferent location.
When checking the oil level:
Rpark the vehicle on alevel surface
Rthe engine should be switched off for approx-
imately five minutes if the engine is at normal
operating temperature
Rif the engine is not at normal operating tem-
perature, e.g. if the engine was only started
briefly, wait about 30 minutes before carrying
out the measurement
Checking the oil level using the oil dip-
stick
GWARNING
Certain components in the engine compart-
ment, such as the engine, radiator and parts
of the exhaust system, can become very hot.
Working in the engine compartmentp oses a
risk of injury.
Where possible, let the engine cool down and touch only the components described in the
following.
258Engine compartment
Maintenance and care
Page 287 of 326
Fuse box in theengine compartment
GWARNIN G
When th ehoodiso pen and th ewindshield
wiper sare set in motion ,you can be injured by
th ew iper linkage. Ther eisariskofi njury.
Always switch off th ewindshield wiper sand
th ei gnition before opening th ehood.
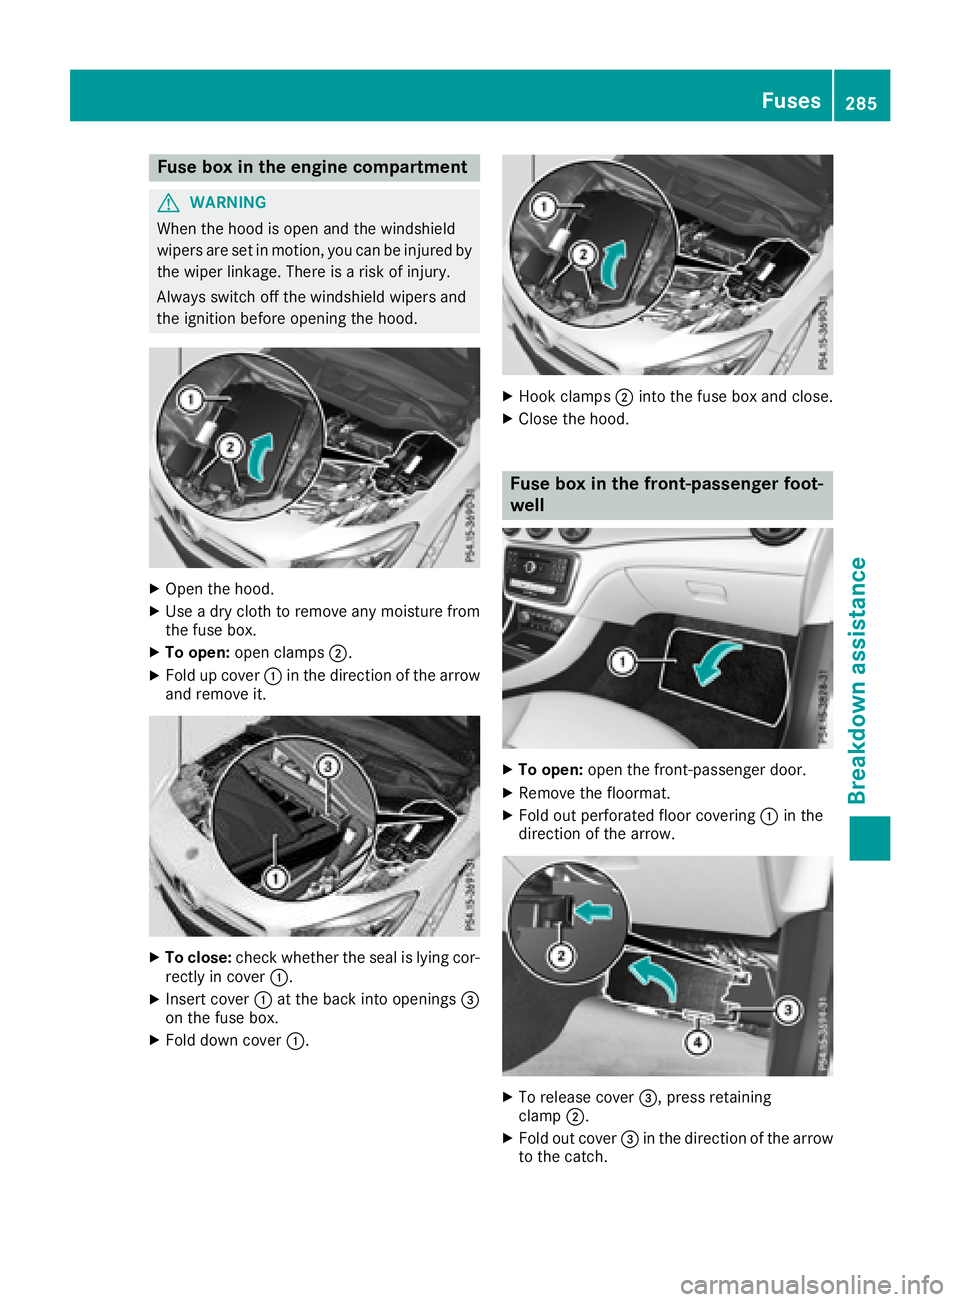
XOpen th ehood.
XUse adry cloth to remove any moisture from
th ef useb ox.
XTo open :open clamps ;.
XFold up cover :in th edirection of th earrow
and remove it .
XTo close:check whether th eseal is lyin gcor-
rectl yinc over :.
XInser tcover : at th ebacki ntoo pening s=
on th efuseb ox.
XFold down cover :.
XHook clamps;intot he fuseb ox and close.
XClose th ehood.
Fuse box in th efront-passenger foot-
well
XTo open :open th efront-pa ssenger door .
XRemove thefloormat.
XFold out perforate dfloor covering :in th e
direction of th earrow.
XTo release cover =,press retaining
clam p;.
XFold out cover =in th edirection of th earrow
to th ecatch .
Fuses285
Breakdown assistance
Z