Page 265 of 326

XDo not usehot water and do not wash the
vehicl eindirect sunlight.
XUse asofts po ngetoc lean.
XUseamildc leaning agent, such as acar
shampo oapproved by Mercedes-Benz.
XThoroughl yhosed ownthe vehicl ewithag en-
tle jet of water.
XDo not point the water jet directl ytowards the
ai ri nlet.
XUse plenty of water and rinse ou tthe sponge
frequently.
XRinse the vehicl ewithc lean water and dry
thoroughl ywithac hamois.
XDo not le tthe cleaning agent dry on the paint-
work.
Carefully remove al ldeposit sofroads alta s
soo naspossibl ew hend rivin ginw inter.
Powe rwashers
GWARNING
The water jet fromac ircular jet nozzle(dirt
blasters )can cause invisible exterio rdamag e
to the tire sorchassisc omponents. Compo-
nents damage dinthisw aymayf ailu nexpect-
edly .There is ariskofana ccident.
Do not us epower washers with circular jet
nozzles to clean the vehicle. Hav edamaged
tire sorc hassisc omponents replaced imme-
diately.
!Alway smaintain adistance of at least
11.8 in (30 cm )between the vehicl eand the
powe rwashern ozzle. Informatio nabout the
correct distance is availabl efromt he equip-
ment manufacturer.
Mov ethe powe rwashern ozzlearound when
cleaning your vehicle.
Do not ai mdirectl yata ny of the following:
RTires
RDoorg aps,roofgaps, joints, etc.
RElectrical components
RBattery
RConnectors
RLamps
RSeals
RTrim
RVentilatio nslots Damaged seals or electrical components can
lead to leaks or failures.
!Vehicles with decorative film: parts of your
vehicl earecovered with adecorative film.
Maintain adistance of at leas t27.5 in (70 cm)
between the parts of the vehicl ecovered with
the fil mand the nozzl eofthe high pressure
cleaner.
Informatio nabout the correct distance is
availabl efromt he eq uip
ment manufacturer.
Mov ethe powe rwashern ozzlearound when
cleaning your vehicle.
Cleanin gthe paintwork
!Do not affix:
Rstickers
Rfilms
Rmagnetic plate sorsimilar items
to painte dsurfaces .You could otherwise
damage the paintwork.
Scratches, corrosive deposits, area saffecte dby
corrosion and damage caused by inadequate
car ecanno talway sbec ompletel yrepaired .In
such cases, visit aquali fied specialis tworkshop.
XRemov edirti mmediately, where possible,
whil eavoidin grubbi ng too hard.
XSoakinsect remains with insect remove rand
rinse off the treated area safterwards.
XSoa kbirdd ropping swithw ater and rinse off
the treated area safterwards.
XRemov ecoolant, brake fluid ,tree resin, oils,
fuel sand greases by rubbing gently with a
cloth soaked in petroleu mether or lighter
fluid.
XUse tar remove rtoremove tar stains.
XUse silicone remove rtoremove wax.
If water no longe rforms "beads "onthe paint
surface, us ethe paint car eproducts recommen-
de da nd approved by Mercedes-Benz. Thi sisthe
cas eapproximately every threetof ivem onths,
depending on the climate conditions and the
car eproduct used.
If dirt hasp enetrated the paint surface or if the
paint hasb ecome dull ,the paint cleane rrecom-
mend ed a
nd approved by Mercedes-Benz
shoul dbeu sed.
Do not us ethese car eproducts in the sunoro n
the hoo dwhile the hoo dishot.
Care263
Maintenance and care
Z
Page 266 of 326

XUseasuitablet ouch-up stick, e.g. MB Touch-
Up Stick,tor epair slight damage to the paint-
work quickly and provisionally.
Mattef inish care
!Never polish the vehicle or the light alloy
wheels. Polishing causes the finish to shine.
!The following may cause the paint to
become shiny and thus reduce the matte
effect:
Rstrong rubbing of the paintwork with
unsuitablem aterials
Rfrequent use of automatic car washes
Rwashing the vehicle in direct sunlight
!Never use paint cleaner, buffing or polishing
products, or gloss preserver, e.g. wax, for the
purpose of paintwork care. These products
are only suitablef or high-gloss surfaces. Their
use on vehicles with matte paintwork leads to considerable surface damage or, more spe-
cifically,tos hiny, spotted areas.
Alwaysh ave paintwork repairs carried out at a
qualified specialist workshop.
!Do not use wash programs with ahot wax
treatment under any circumstances.
Observe these notes if your vehicle has aclear
matte finish. This will help you to avoid damage to the paintwork due to incorrect treatment.
These notes also apply to light alloy wheels with
ac lear matte finish.
The vehicle should ideally be washed by hand
using asoft sponge, car shampoo and plenty of
water.
Use only insect remover and car shampoo from
the range of approved Mercedes-Benz care
products.
Cleaning the vehiclep arts
Cleaning the wheels
GWARNING
The water jet from acircular jet nozzle (dirt
blasters) can cause invisible exterior damage
to the tires or chassis components. Compo-
nentsd amagedint his way may fail unexpect-
edly.T here is arisk of an accident.
Do not use power washers with circular jet
nozzles to clean the vehicle. Have damaged
tires or chassis componentsr eplaced imme-
diately.
!Do not use acidic wheel cleaning products
to remove brake dust. This could damage
wheel bolts and brake components.
!Do not park your vehicle for along period of
time directly after cleaning, particularlya fter
cleaning the wheel rim with wheel cleaner.
Wheel cleaner can lead to the increased cor-
rosion of the brake discs and pads. Therefore, drive for afew minutes after cleaning. By
heating up the brakes, the brake discs and
pads dry. The vehicle can then be parked for a
long period of time.
Cleaning the windows
GWARNING
You could become trapped by the windshield wipers if they start moving while cleaning the
windshieldorw iper blades. There is arisk of
injury.
Alwayss witch off the windshieldw ipers and
the ignition before cleaning the windshieldo r
wiper blades.
!Only fold the windshieldw ipers awayfrom
the windshieldw hen vertical. Otherwise, you
will damage the hood.
!Do not use dry cloths, abrasive products,
solvents or cleaning agents containing sol-
vents to clean the inside of the windows. Do
not touch the insides of the windows with
hard objects, e.g. an ice scraper or ring. There
is otherwise arisk of damaging the windows.
!Cleant he water drainage channels of the
windshielda nd the rear window at regular
intervals. Deposits such as leaves, petals and
pollen may under certain circumstances pre-
vent water from draining away. This can lead
to corrosion damage and damage to elec-
tronic components.
XCleant he inside and outside of the windows
with adamp cloth and acleaning product that
is recommended and approved by Mercedes-
Benz.
264Care
Maintenance and care
Page 267 of 326

Cleaning wiper blades
GWARNING
You coul dbecome trapped by th ewindshield
wipersift heys tart moving while cleanin gthe
windshield or wiper blades.T hereisarisko f
injury.
Always switch off th ewindshield wipersa nd
th ei gnition before cleanin gthe windshield or
wiper blades.
!Only fold th ewindshield wipersa way from
th ew indshield when vertical. Otherwise, you
will damaget hehood.
!Do no tpull th ewiper blade. Otherwise, the
wiper blade coul dbedamaged.
!Do notclean wiper blades to ooften and do
no trub them to ohard .Otherwise, th egraph-
ite coatin gcoul dbed amaged. This could
caus ewiper noise.
!Holdthe wiper arm securely when folding
back .The windshield coul dbedamaged if the
wiper arm smacks against it suddenly.
XFol dthe windshield wiper arm saway from the
windshield.
XCarefully clean th ewiper blades withad amp
cloth.
XFol dthe windshield wiper arm sback again
before switching on th eignition.
Cleaning th eexterior lighting
!Only use cleanin gagents or cleanin gcloths
whicha re suitable for plastic light lenses.
Unsuitable cleanin gagents or cleanin gcloths
coul dscratch or damag ethe plastic light len-
ses.
XClean th eplastic lenses of th eexteri or lights
withaw et sponge and amild cleanin gagent,
e.g .M ercedes-Ben zcar shampoo or cleaning
cloths.
Cleaning th emirror turn signals
!Only use cleanin gagents or cleanin gcloths
that are suitable for plastic lenses.U nsuitable
cleanin gagents or cleanin gcloth scould
scratch or damaget heplastic lenses of the
mirror tur nsignals.
XClean th eplastic lenses of th emirror tur nsig-
nals in th eexteri or mirror housing usingaw et
sponge and mild cleanin gagent, e.g.
Mercedes-Ben zcar shampoo or cleaning
cloths.
Cleaning th esensors
!If you clean th esensorsw ithapower
washer, mak esure that you keep adistance
of at least 11.8 in (30 cm)between the vehicl e
and th epower washer nozzle. Information
about th ecorrec tdistanc eisavailabl efrom
th ee quipment manufacturer.
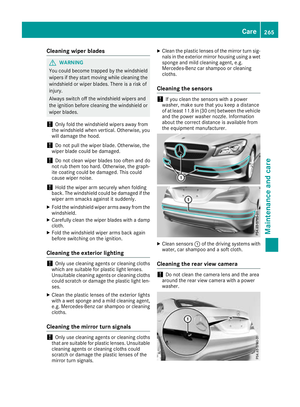
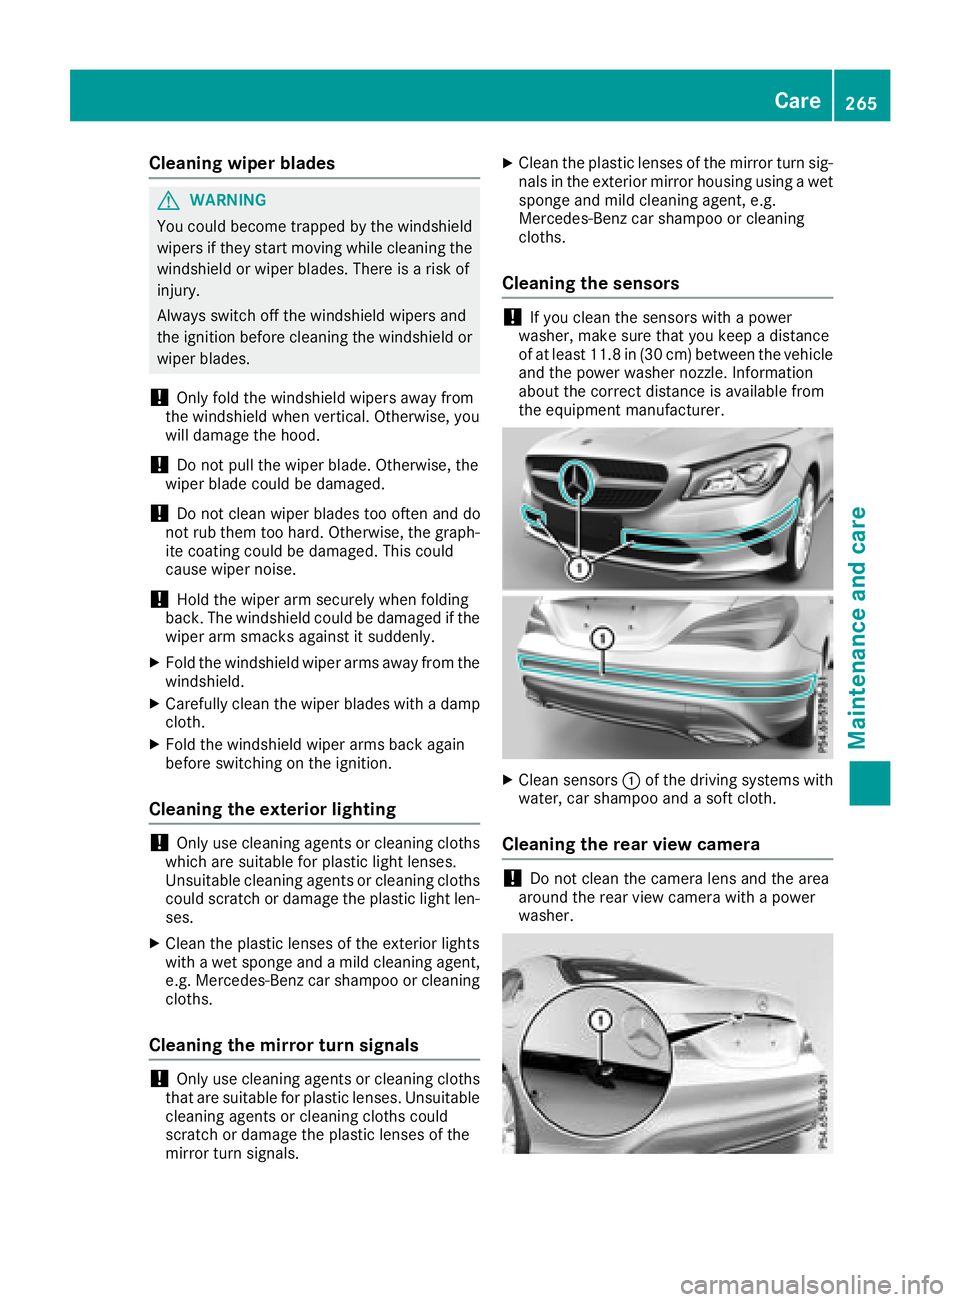
XClean sensors :of th edriving systems with
water, car shampoo and asoftc loth.
Cleaning th erearv iew camera
!Do no tclean th ecamera lensa nd thearea
aroun dthe rear view camera with apower
washer.
Care265
Maintenance and care
Z
Page 268 of 326

XMake sure that the vehicle is atastandstill
and the SmartKey is in key position 2in the
ignition lock.
XOpen the camera cover for cleaning via the
multimedia system (see the separate operat-
ing instructions).
XTo clean the rear view camera: use clear
water and asoft cloth to clean camera
lens :.
Cleaningt he exhaust pipes
GWARNING
The exhaust tail pipe and tail pipe trim can
become very hot. If you come into contact
with these parts of the vehicle, you could burn
yourself. There is arisk of injury.
Always be particularly careful around the
exhaust tail pipe and the tail pipe trim. Allow
these components to cool down before touch-
ing them.
!Do not clean the exhaust pipe with acid-
based cleaning agents, such as bathroom
cleaner or wheel cleaner.
!Mercedes-AMG vehicles with black exhaust
pipes: the black-chrome tailpipe finishers
should not be polished with achrome polish.
They will otherwise lose their black sheen. For
optimal care, the faceplates should be rubbed with alightly oiled cloth after every car wash.
Commercially available engine and care oils
are suitable for this.
For heavier soiling, you can apply afine paint-
work polish with amicrofiber cloth. Remove
the excess polish residue after polishing.
Impurities combined with the effectsofr oad grit
and corrosive environmental factors may cause
flash rust to form on the surface. You can
restore the original shine of the exhaust pipe by
cleaning it regularly,e specially in winter and
after washing.
XClean the exhaust pipe with acare product
tested and approved by Mercedes-Benz.
Interior care
Cleaningt he display
!For cleaning, do not use any of the following:
Ralcohol-based thinner or gasoline
Rabrasive cleaning agents
Rcommercially-availableh ousehold cleaning
agents
These may damage the display surface. Do
not put pressure on the display surface when cleaning. This could lead to irreparable dam-
age to the display.
XBefore cleaning the display,m ake sure that it
is switched off and has cooled down.
XClean the display surface using acommer-
cially available microfiber cloth and TFT/LCD
display cleaner.
XDry the display surface using adry microfiber
cloth.
Cleaningt he plastic trim
GWARNING
Care products and cleaning agents containing solvents cause surfaces in the cockpit to
become porous. As aresult, plastic parts may
come loose in the event of air bag deploy-
ment. There is arisk of injury.
Do not use any care products and cleaning
agents to clean the cockpit.
!Never attach the following to plastic surfa-
ces:
Rstickers
Rfilms
Rperfume oil container or similar
You could otherwise damage the plastic.
!Do not allow cosmetics, insect repellent or
sunscreen to come into contact with the plas-
tic trim. This maintains the high-quality look of
the surfaces.
XWipe the plastic trim with adamp, lint-free
cloth, e.g. amicrofiber cloth.
XHeavy soiling: use care and cleaning prod-
ucts recommended and approved by
Mercedes-Benz.
The surface may change color temporarily.
Wait until the surface is dry again.
266Care
Maintenance and care
Page 269 of 326

Cleaning thesteering wheel and gear or
selector lever
XThoroughlyw ipe withadamp cloth or use
leather car eagents that have been recom-
mended and approved by Mercedes-Benz.
Cleaning genuine wood and trim ele-
ments
!Do no tuse solvent-based cleanin gagents
suchast ar remover, wheel cleaners, polishes
or waxes. Thereiso therwise ariskofd amag-
ing th esurface.
!Do no tuse chrom epolishont rimp ieces.
The trim pieces have achrom elook but are
mostly made of anodized aluminum and can
lose their shineifc hrom epolishisu sed. Use
ad amp, lint-free cloth instead when cleaning
th et rimp ieces.
If th echrome-plated trim pieces are very
dirty, you can use achrom epolish. If you are
unsure as to whether th etrimp ieces are
chrome-plated or not, consult an authorized
Mercedes-Ben zCenter.
XWipe th ewoodent rima nd trim pieces witha
damp, lint-free cloth ,e.g.am icrofiber cloth.
XHeavy soiling: use careand cleanin gprod-
uct srecommended and approved by
Mercedes-Benz.
Cleaning th eseat covers
General notes
!Do no tuse am icrofiber cloth to clean covers
made out of real leather,a rtificial leather or
DINAMICA.Ifu sed often,these can damage
th ec over.
Notet hatregular car eisessential to ensure that
th ea ppearanc eand comfor tofthecovers is
retaine dovertime.
Genuine leather seat covers
!To retain th enatural appearanc eofthe
leather,o bservethe followingc leaning
instructions:
RClean genuine leather covers carefull ywith
ad amp cloth and then wipe th ecovers
down withad ry cloth.
RMakesure that th eleather does not
become soaked. It may otherwise become
roug hand cracked.
ROnly use leather car eagents that have
been tested and approved by Mercedes-
Benz. You can obtain these from aqualified
specialist workshop.
Leather is anatural product.
It exhibitsn atural surface characteristics, for
example:
Rdifferences in th etextur e
Rmarks caused by growth and injury
Rslightn uances of color
Thesea re characteristic sofleather and not
material defects.
Seat coversofo ther materials
!Observethe followingw hen cleaning:
Rclean artificial leather covers withac loth
moistene dwithas olution containing 1%
detergent( e.g. dish washingl iquid).
Rclean cloth covers witham icrofiber cloth
moistene dwithas olution containing 1%
detergent( e.g. dish washingl iquid). Rub
c
arefull yand always wipe entir eseat sec-
tions to avoid leaving visible lines. Leave
th es eat to dry afterwards. Cleaning results
dependont hetype of dirt and how longi t
has been there.
Rclean DINAMICA covers withad amp cloth.
Makes ure that you wipe entir eseat sec-
tions to avoid leaving visible lines.
Cleaning th eseat belts
GWARNING
Seat beltsc an become severely weakened if
bleached or dyed. This coul dcaus ethe seat
beltstot earorf ail, for instance, in th eevent of
an accident. This posesani ncreased riskof
injury or fatal injury.
Never bleachord ye theseat belts.
Care267
Maintenance and care
Z
Page 270 of 326
!Do not clean the seat belts using chemical
cleaning agents. Do not dry the seat belts by
heating at temperatures above 176 ‡(80 †)
or in direct sunlight.
XUse clean, lukewarm water and soaps olution.
Cleaning the headliner and carpets
XHeadliner:if it is very dirty,u seasoft brus hor
dry shampoo.
XCarpets: use the carpe tand textile cleaning
agents recommended and approved by
Mercedes-Benz.
268Care
Maintenancea nd care
Page 271 of 326

Where willIfind...?
Reflective safety jacket
Removing/replacing the reflective
safety jacket
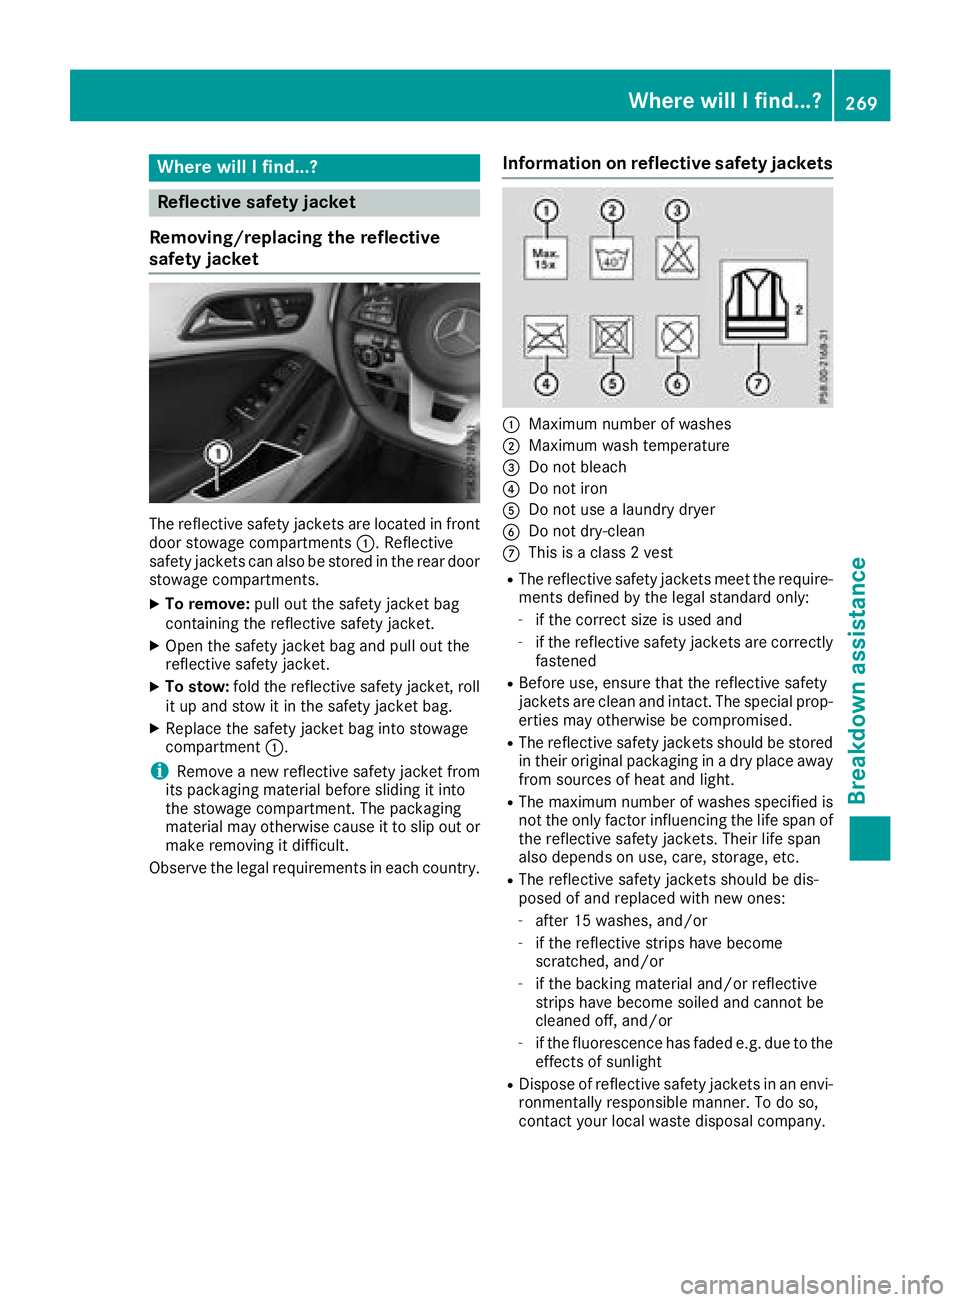
The reflective safety jackets are located in front
door stowage compartments :.Reflective
safety jackets can als obestored in the rear door
stowage compartments.
XTo remove: pullout the safety jacket bag
containing the reflective safety jacket.
XOpen the safety jacket bag and pul lout the
reflective safety jacket.
XTo stow: fold the reflective safety jacket, roll
it up and stow it in the safety jacket bag.
XReplace the safety jacket bag into stowage
compartment :.
iRemoveanew reflective safety jacket from
its packaging material before sliding it into
the stowage compartment. The packaging
material may otherwise caus eittoslipout or
make removing it difficult.
Observe the legalr equirements in each country.
Information on reflective safety jackets
:Maximum numberofwashes
;Maximum wash temperature
=Do not bleach
?Do not iron
ADo not use alaundry dryer
BDo not dry-clean
CThis is aclass2v est
RThe reflective safety jackets meet the require-
ments defined by the legals tandard only:
-if the correct size is usedand
-if the reflective safety jackets are correctly
fastened
RBefore use ,ensure that the reflective safety
jackets are cleana nd intact. The special prop-
erties may otherwise be compromised.
RThe reflective safety jackets should be stored
in their original packaging in adry place away
from sources of heata nd light.
RThe maximumnumbe rofwashes specified is
not the only factor influencing the life spano f
the reflective safety jackets. Theirl ife span
als od epends on use ,care, storage ,etc.
RThe reflective safety jackets should be dis-
posedofa nd replaced with new ones:
-after 15 washes, and/or
-if the reflective strips have become
scratched,and/or
-if the backing material and/or reflective
strips have become soiled and cannot be
cleaned off, and/or
-if the fluorescence has fade de.g. due to the
effects of sunlight
RDisposeofr eflective safety jackets in an envi-
ronmentall yresponsiblem anner. To do so,
contact you rlocalw aste disposal company.
Where will Ifind...?269
Breakdown assistance
Page 272 of 326

Warning triangle
Removing/replacing the warning trian-
gle
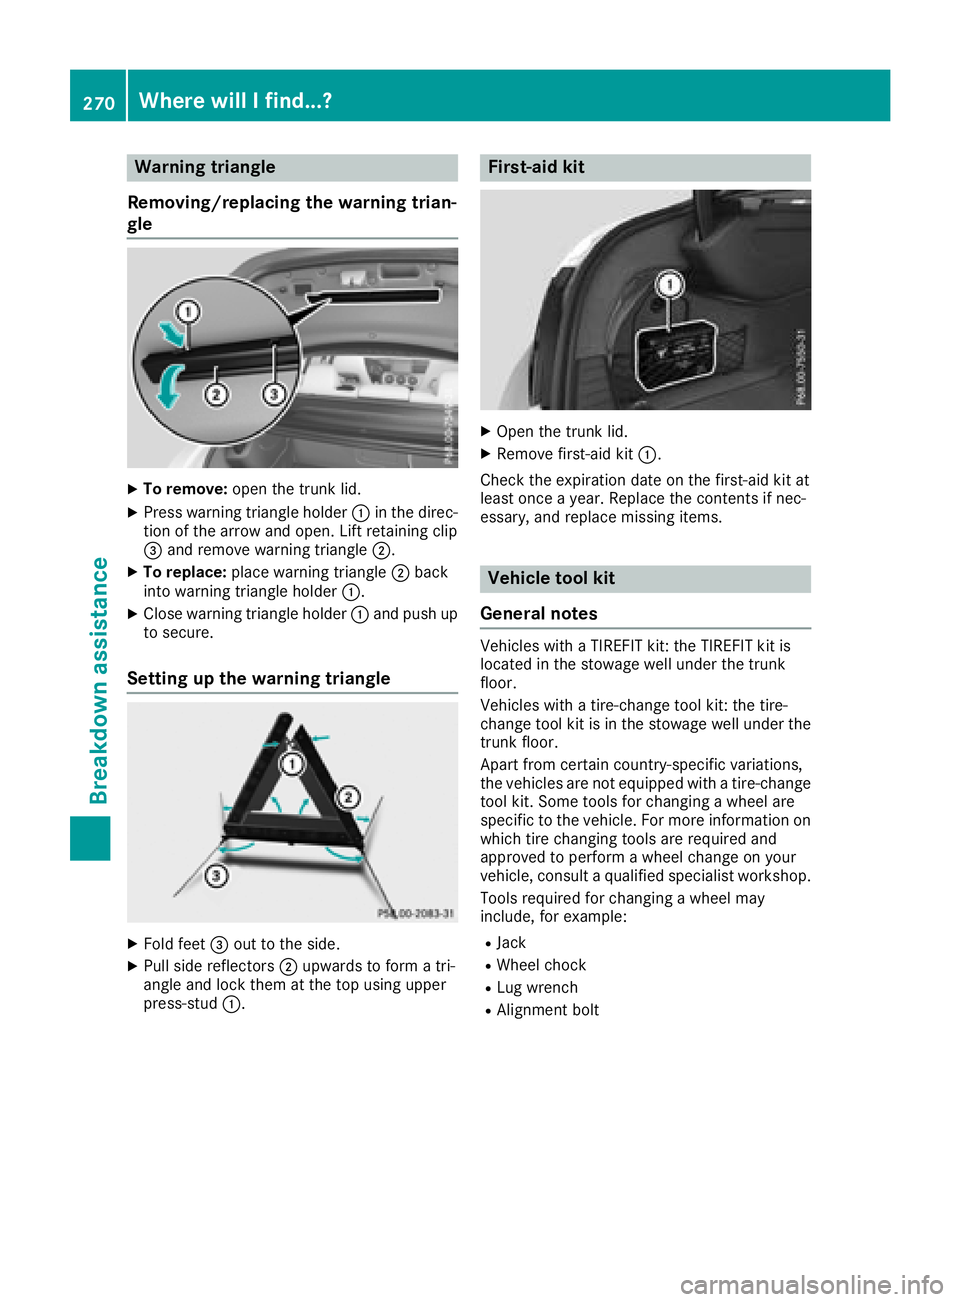
XTo remove: open the trunk lid.
XPress warning triangl eholder :in the direc-
tion of the arrow and open. Lift retaining clip
= and remove warning triangle ;.
XTo replace:place warning triangle ;back
into warning triangl eholder :.
XClose warning triangl eholder :and pus hup
to secure.
Setting up the warning triangle
XFold feet =out to the side.
XPullside reflectors ;upwards to form atri-
angl eand lock them at the top using upper
press-stud :.
First-aid kit
XOpen the trunk lid.
XRemove first-ai dkit:.
Check the expiration date on the first-ai dkit at
least once ayear. Replace the contents if nec-
essary, and replace missing items.
Vehicle tool kit
General notes
Vehicles with aTIREFIT kit: the TIREFIT kit is
located in the stowage wellu nder the trunk
floor.
Vehicles with atire-change tool kit: the tire-
change tool kit is in the stowage wellu nder the
trunk floor.
Apart from certain country-specificv ariations,
the vehicles are not equipped with atire-change
tool kit. Some tools for changing awheel are
specific to the vehicle. For more information on which tire changing tools are required and
approved to perform awheel change on your
vehicle, consul taqualified specialist workshop.
Toolsr equired for changing awheel may
include, for example:
RJack
RWheelc hock
RLug wrench
RAlignment bolt
270Where will Ifind...?
Breakdown assistance