Page 297 of 326
.
For information on the message display, refer to
the \"Checking the tire pressure electronically\"
section (
Ypage")
shown in theServ.menu of the multifunction
display, see illustration (example).
For information on the message display, refer to
the "Checking the tire pressure electronically"
section (
Ypage 296).
Important safety notes
GWARNING
Each tire, including the spare (if provided),
should be checked at least once every two
weeks when cold and inflated to the pressure recommended by the vehicle manufacturer
on the Tire and Loading Information placard
on the driver's door B-pillar or the tire pres-
sure label on the inside of the fuel filler flap. If
your vehicle has tires of adifferent size than
the size indicated on the Tire and Loading
Information placard or, if available, the tire
pressure label,y ou should determine the
proper tire pressure for those tires.
As an added safety feature, your vehicle has
been equipped with atire pressure monitoring
system (TPMS) that illuminates alow tire pres-
sure telltale when one or more of your tires
are significantly underinflated. Accordingly,
when the low tire pressure telltale lights up,
you should stop and check your tires as soon
as possible,a nd inflate them to the proper
pressure. Driving on asignificantly underin-
flated tire causes the tire to overheat and can
lead to tire failure.
Underinflation also reduces fuel efficiency
and tire tread life, and may affect the vehicle's
handling and stopping ability. Please note that the TPMS is not asubstitute for proper tire
maintenance, and it is the driver's responsi-
bility to maintain correct tire pressure, even if
underinflation has not reached the level to
trigger illumination of the TPMS low tire pres- sure telltale.
Your vehicle has also been equipped with a
TPMS malfunction indicator to indicate when
the system is not operating properly. The
TPMS malfunction indicator is combined with
the low tire pressure telltale. When the sys-
tem detects amalfunction, the warning lamp
will flash for approximately aminute and then
remain continuously illuminated. This
sequence will be repeated every time the vehi-
cle is started as long as the malfunction
exists. When the malfunction indicator is illu-
minated, the system may not be able to detect
or signal low tire pressure as intended.
TPMS malfunctions may occur for avariety of
reasons, including the installation of incom-
patible replacement or alternate tires or
wheels on the vehicle that prevent the TPMS
from functioningp roperly. Always check the
TPMS malfunction telltale after replacing one
or more tires or wheels on your vehicle to
ensure that the replacement or alternate Tires
and wheels allow the TPMS to continue to
function properly.
It is the driver's responsibility to set the tire
pressure to that recommended for cold tires
which is suitable for the operating situation
(
Ypage 290). Note that the correct tire pressure
for the current operating situation must first be
taught-in to the tire pressure monitor. If asub-
stantial loss of pressure occurs, the warning
threshold for the warning message is aligned to
the taught-in reference values. Restart the tire
pressure monitor after adjusting the pressure of
the cold tires (
Ypage 297). The current pres-
sures are saved as new reference values. As a
result, awarning message will appearift he tire
pressure drops significantly.
The tire pressure monitor does not warn you of
an incorrectly set tire pressure. Observe the
notes on the recommended tire pressure
(
Ypage 290).
The tire pressure monitor is not able to warn you
of as udden loss of pressure, e.g. if the tire is
penetrated by aforeign object. In the event of a
sudden loss of pressure, bring the vehicle to a
halt by braking carefully.A void abrupt steering
movements.
Tire pressure295
Wheels and tires
Z
Page 298 of 326

The tire pressure monitor hasayellow warning
lamp in the instrument cluster for indicating
pressure loss or amalfunction. Whether the
warning lamp flashes or lights up indicates
whether atire pressure is too low or the tire
pressure monitor is malfunctioning:
Rif the warning lamp is lit continuously, the tire
pressure on one or more tires is significantly
too low. The tire pressure monitor is not mal- functioning.
Rif the warning lamp flashes for around a
minute and then remains lit constantly, the
tire pressure monitor is malfunctioning.
In addition to the warning lamp, amessage
appears in the multifunction display.O bserve
the information on display messages
(
Ypage 211).
It may take up to ten minutes for amalfunction
of the tire pressure monitor to be indicated. A
malfunction will be indicated by the tire pres-
sure warning lamp flashing for approximately
one minute and then remaining lit. When the
malfunction has been rectified, the tire pressure
warning lamp goes out after afew minutes of
driving.
The tire pressure values indicated by the on-
board computer may differ from those meas-
ured at agas station with apressure gauge. The
tire pressures shown by the on-board computer
refer to those measured at sea level. At high
altitudes, the tire pressure values indicated by a
pressure gauge are higher than those shown by the on-board computer. In this case, do not
reduce the tire pressures.
The operation of the tire pressure monitor can
be affected by interferenc efrom radio transmit-
ting equipment (e.g. radio headphones, two-way
radios) that may be being operated in or near the vehicle.
Checking the tire pressur eelectroni-
cally
XMake sure that the SmartKey is in position 2
in the ignition lock (Ypage 122).
XPress =or; on the steerin gwheel to
select the Serv.menu.
XPress the9or: button to select
Tire Pressure.
XPress the abutton.
The current tire pressure of each tire is shown
in the multifunction display. If the vehicle was parked for longer than
20 minutes, the
Tire pressure will be
displayed after driving afew minutesmessage is shown.
After ateach-in process, the tire pressure mon-
itor automatically detect snew wheels or new
sensors. As long as aclear allocation of the tire
pressure value to the individual wheels is not
possible, the Tire
PressureMonitorActivemessage is shown instead of the tire pressure
display.The tire pressures are already being
monitored.
If an emergencys pare wheel is mounted, the
system may continue to show the tire pressure
of the wheel that has been removed for afew
minutes. If this occurs, notet hat the value dis-
played for the position where the spare wheel is
mounted is not the same as the current tire
pressure of the emergencys pare wheel.
Tire pressuremonitor warning mes-
sages
If the tire pressure monitor detect sapressure
loss in one or more tires, awarning message is
shown in the multifunction display.T he yellow
tire pressure warning lamp then lights up.
RIf the Please Correct Tire Pressuremessage appears in the multifunction display,
the tire pressure in at least one tire is too low.
The tire pressure must be corrected when the
opportunit yarises.
RIf the Check Tire Pressuremessage
appears in the multifunction display,t he tire
pressure in one or more tires has dropped
significantly. The tires must be checked.
RIf the TirePressureWarningTireFail‐uremessage appears, the tire pressure in one
or more tires has dropped suddenly. The tires
must be checked.
Observe the instructions and safety notes in the
display messages in the "Tires" section
(
Ypage 211).
If the wheel positions on the vehicle are rotated,
the tire pressures may be displayed for the
wrong positions for ashort time. This is rectified
after afew minutes of driving, and the tire pres-
sures are displayed for the correctp ositions.
296Tirepressure
Wheels and tires
Page 299 of 326

Restarting the tire pressure monitor
Whenyourestart the tire pressure monitor, all
existing warning messages are deleted and the
warning lamps go out. The monitor uses the cur-
rentlys et tire pressures as the reference values
for monitoring. In most cases, the tire pressure
monitor will automaticall ydetect the new refer-
ence value safteryou have changed the tire
pressure. However, yo ucan also set reference
value smanually as described here. The tire
pressure monitor then monitors the new tire
pressure values.
XSet the tire pressure to the value recommen-
ded for the corresponding driving situation on
the Tire and Loading Information placard on
the driver'ss ideB -pillar (
Ypage 290).
Yo uc an find more tire pressure value sfor
various operating conditions in the tire pres-
sure table inside the fue lfille rflap
(
Ypage 139).
XMake sure that the tire pressure is correct on
al lf ourw heels.
XMake sure that the SmartKey is in position 2
in the ignition lock (Ypage 122).
XPress =or; on the steering wheel to
select the Serv.menu.
XPress the9or: button to select
Tire Pressure.
XPress the abutton.
The multifunction display shows the current
tire pressure for each tire or the Tire pres‐
surewillbedisplayedafterdrivingafew minutesmessage.
XPress the :button.
The multifunction display shows the Use
Current PressuresasNew ReferenceValuesmessage.
If you wish to confirm the restart:
XPress the abutton.
The TirePress.MonitorRestartedmes-
sage appears in the multifunction display.
After driving for afew minutes, the system
checks whethert he current tire pressures are
within the specified range. The new tire pres-
sures are then accepted as reference values
and monitored.
If you wish to cance lthe restart:
XPress the %button.
The tire pressure value sstoredatt he last
restart will continu etobemonitored.
Radio type approval for the tire pres-
sure monitor
CountryRadio type approval number
USAFCC ID: MRXMW2433A
FCCIC ID:MRXGG4 Thisd evice
complies with part 15 of the FCC
rules and with license exempt
RSS standard sofIndustry Can-
ada. Operation is subject to the
following conditions .(1) This
device may not cause harmful
interference, and (2) Thisd evice
mus taccept any interference
received, including interference
that may cause undesired oper-
ation. Le present appareile st
conforme d'industrieC anada
applicables au xappereils radio
exempts de licence. L'exploita-
tion est authorisee au xdeuxc on-
ditions suivantes. (1) .L'appareil
ne doi tpas produire de brouil-
lage, et (2) L'autisatue rdel'ap-
pareild oita ccepter toutb rouil-
lage radioelectriqu esubi, meme
si le brouillag eest susceptible
d'e ncompromettre le fonc-
tionnement. WARNING:C hanges
or modifications not expressively
approved by the party responsi-
bl ef or compliance could voidt he
users authority to operate the
equipment. The term "IC:" before the radio certification number
only signifies Canad atechnical
specifications were met.
FCC ID:MRXMC34MA4 This
device complies with part 15 of
the FCC rules and with license
exempt RSS standard sofIndus-
try Canada. Operation is subject
to the following conditions .(1)
Thisd evice may not cause harm-
ful interference, and (2) This
device mus taccept any interfer-
ence receive d, i
ncluding interfer-
ence that may cause undesired
operation. Le present appareil
est conforme d'industrieC anada
applicables au xappereils radio
exempts de license .L'exploita-
tion est authorisee au xdeuxc on-
ditions suivantes. (1) .L'appareil
Tire pressure297
Wheel sand tires
Z
Page 300 of 326
 L'autisatuer de l'ap-
pareil doit accepter tout brouil-
lage radioelectrique subi, meme
si le brouillage est susc")
CountryRadio type approval number
ne doit pas produire de brouil-
lage, et (2) L'autisatuer de l'ap-
pareil doit accepter tout brouil-
lage radioelectrique subi, meme
si le brouillage est susceptible
d'en compromettre le fonc-
tionnement. WARNING: Changes
or modifications not expressively
approved by thepartyr esponsi-
ble for compliance could void the
users authorityt ooperate the
equipment .The ter m"IC:"b efore
th er adio certification number
onl ysignifies Canada technical
specifications were met.
CanadaIC: 2546A-MW2433A
IC:2546A-GG4 This devic ecom-
plies with part 15 of th eFCC
rules and with licens eexempt
RSS standards of Industry Can-
ada. Operatio nissubject to the
following conditions. (1) This
devic emay not cause harmful
interference, and (2) This device
must accept any interference
received ,includingi nterference
that may cause undesiredo per-
ation. Le present appareil est
conforme d'industrie Canada
applicables aux appereils radio
exemptsdel icense. L'exploita-
tio ne st authorisee aux deux con-
ditionss uivantes.(1). L'appareil
ne doit pas produire de brouil-
lage, et (2) L'autisatuer de l'ap-
pareil doit accepter tout brouil-
lage radioelectrique subi, meme
si le brouillage est susceptible
d'en compromettre le fonc-
tionnement. WARNING: Changes
or modifications not expressively
approved by th epartyr esponsi-
ble for compliance could void the
users authorityt ooperate the
equipment .The ter m"IC:"b efore
th er adio certification number
onl ysignifies Canada technical
specifications were met.
IC: 2546A-MC34MA4
Loading th evehicle
Instruction labels for tires and loads
GWARNING
Overloadedt ires can overheat,c ausing a
blowout.O verloadedt ires can also impair the
steeringa nd driving characteristic sand lead
to brakef ailure. Thereisar isk of accident.
Observe th eload rating of th etires. The load
rating must be at least half of th eGAWR of
your vehicle .Never overload th etires by
exceedingt hemaximum load.
Two instruction labels on your vehicle show the maximum possible load.
(1) The Tire and LoadingI nformation placar dis
on th eB-pillar on th edriver' sside. The Tire
and LoadingI nformation placar dshows the
maximum permissible number of occu-
pant sand th emaximum permissible vehicle
load. It also contain sdetails of th etires izes
and corresponding pressures for tires
mounted at th efactory.
(2) The vehicle identification plateisont heB-
pillar on th edriver' sside. The vehicle iden-
tification platei nformsyou of thegross
vehicle weight rating .Itismade up of the
vehicle weight,a ll vehicle occupants, the
fuel and th ecargo. You can also fin dinfor-
mation about th emaximum gross axle
weight rating on th efront and rear axle.
The maximum gross axle weight rating is
th em aximum weight that can be carried by
one axle (front or rear axle) .Never exceed
th em aximum load or th emaximum gross
axle weight rating for th efront or rear axle.
:B-pillar ,driver' sside
298Loading th evehicle
Wheels and tires
Page 301 of 326

Maximum permissible gross vehicle
weight rating
XSpecification for maximumgross vehicle
weight :is listed in the Tire and Loading
Informatio nplacard: "The combined weight of
occupants and cargo should never exceed
XXX kilograms or XXX lbs."
The gross weight of all vehicleo ccupants, load
and luggage must not exceed the specified
value.
iThe specifications shownont he Tire and
Loading Informatio nplacard in the illustration
are examples. The maximu mpermissible
gross vehiclew eight rating is vehicle-specific
and may differf rom that in the illustration.
You can find the vali dmaximu mpermissible
gross vehiclew eight rating for you rvehicleo n
the Tire and Loading Informatio nplacard.
Number of seats
Maximu mnumber of seats :indicates the
maximu mnumber of occupants allowedt o
travel in the vehicle. This information can be
found on the Tire and Loading Informatio nplac-
ard.
iThe specifications shownont he Tire and
Loading Informatio nplacard in the illustration
are examples. The number of seats is vehicle-
specific and can differf rom the details shown.
The number of seats in you rvehiclec an be
found on the Tire and Loading Information
placard.
Determiningt he correct load limit
Step-by-ste pinstructions
The following steps have been developed as
required of all manufacturers under Title 49,
Cod eofU .S. FederalR egulations, Part 575 pur-
suant to the "National Traffi cand Motor Vehicle
Safety Act of 1966".
XStep 1: Locate the statement "The combined
weight of occupants and cargo should never
exceed XXX kg or XXX lbs." on you rvehicle’s
Tire and Loading Informatio nplacard.
XStep 2: Determine the combined weight of
the drivera nd passengers that wil lberiding in
you rvehicle.
XStep 3: Subtract the combined weight of the
drivera nd passengers from XXX kilograms or
XXX lbs.
XStep 4: The resulting figure equals the avail-
abl eamount of cargo and luggage loadc apa-
city. For example, if the "XXX "amount equals
1400 lbs and there wil lbefive 150-lb pas-
sengers in you rvehicle, the amount of avail-
abl ecargo and luggage loadc apacity is
650 lbs (1400 -750 (5 x150) = 650 lbs).
XStep 5: Determine the combined weight of
luggage and cargo being loaded on the vehi-
cle. That weight may not safel yexceed the
available cargo and luggage loadc apacity cal-
culated in step 4.
Example:s teps1to3
The following table showse xamples on how to calculate total and cargo loadc apacities with varying
seating configurations and number and size of occupants. The following examples use aloadl imito f
Loading the vehicle299
Wheels and tires
Z
Page 302 of 326
.This is for illustration purposes only. Make sure you are using the actualload
limi tfor you rvehicle stated on you rvehicle's Tire and Loading Information placard (Ypag e298).
T")
1500 lbs (680 kg).This is for illustration purposes only. Make sure you are using the actualload
limi tfor you rvehicle stated on you rvehicle's Tire and Loading Information placard (Ypag e298).
The greater the combined weight of the occupants, the lower the maximu mluggage load.
Step 1
Example 1Example 2Example 3
Combinedm aximum
weight of occupants
and cargo (data from
the Tire and Loading
Information placard)1500 lbs (680 kg)1500 lbs (680 kg)1500 lbs (680 kg)
Step 2
Example 1Example 2Example 3
Number of peopl ein
the vehicle (drive rand
occupants)531
Distributionoft he
occupantsFront: 2
Rear: 3Front: 1
Rear: 2Front: 1
Weight of the occu-
pantsOccupant 1: 150 lbs
(68 kg)
Occupant 2: 180 lbs
(82 kg)
Occupant 3: 160 lbs
(73 kg)
Occupant 4: 140 lbs
(63 kg)
Occupant 5: 120 lbs
(54 kg)Occupant 1: 200 lbs
(91 kg)
Occupant 2: 190 lbs
(86 kg)
Occupant 3: 150 lbs
(68 kg)Occupant 1: 150 lbs
(68 kg)
Gross weight of all
occupants750 lbs (340 kg)540 lbs (245 kg)150 lbs (68 kg)
Step 3
Example 1Example 2Example 3
Permissiblel oad (maxi-
mum gross vehicle
weight rating from the
Tire and Loading Infor-
mation placard minus
the gross weight of all
occupants)1500 lbs (680 kg) Ò
750 lbs (340 kg) =
750 lbs (340 kg)1500 lbs (680 kg) Ò
540 lbs (245 kg)
=960 lbs (435 kg)1500 lbs (680 kg) Ò
150 lbs (68 kg) =
1350 lbs (612 kg)
Vehicle identification plate
Even if you have calculated the total cargo care-
fully,y ou should still make sure that the gross vehicle weight rating and the gross axle weight
rating are not exceeded. Detail
scan be found on
the vehicle identification plate on the B-pillar on
the driver's side of the vehicle (
Ypag e298).
300Loading the vehicle
Wheels and tires
Page 303 of 326
:the gross weight of the vehicle, all pas-
sengers, load and trailer load/noseweight (if
applicable) must not exceed the permissible
gross vehicle weight.")
Permissible Gross Vehicle Weight Rating
(GVWR):the gross weight of the vehicle, all pas-
sengers, load and trailer load/noseweight (if
applicable) must not exceed the permissible
gross vehicle weight.
Gross Axle Weight Rating (GAWR): the maxi-
mum permissible weight that can be carried by
one axle (front or rear axle).
To ensure that your vehicle does not exceed the
maximum permissible values (gross vehicle
weight and maximum gross axle weight rating),
have your loaded vehicle (including driver, occu-
pants, cargo, and full trailer load if applicable)
weighed on asuitable vehicle weighbridge.
All about wheelsa nd tires
Uniform Tire Quality Grading Stand-
ards
Overview of Tire Quality Grading Stand-
ards
Uniform Tire Quality Grading Standards are U.S. governments pecifications. Their purpose is to
provide drivers with uniform reliable information
on tire performance data. Tire manufacturers
have to grade tires using three performance fac-
tors: :tread wear grade, ;traction grade and
= temperature grade. These regulations do not
apply to Canada. Nevertheless, all tires sold in
North America are provided with the corre-
sponding quality grading markings on the side-
wall of the tire.
Quality grades can be found, where applicable,
on the tire sidewallb etween tread shoulder and
maximum section width. Example:
RTreadwear grade:
200
RTraction grade:AA
RTemperaturegrade:A
All passenger car tires must conformtot he stat-
utory safety requirements in addition to these
grades.
iThe actual values for tires are vehicle-spe-
cific and may deviate from the values in the
illustration.
Treadwear
The treadwear grade is acomparative rating
based on the wear rate of the tire when tested
under controlled conditionsonas pecified U.S.
governmentc ourse. For example, atire graded
150 would wear one and one-half times as well
on the governmentc ourse asatire graded 100.
The relative performance of tires depends upon the actual conditionsoft heir use, however, and
may depart significantly from the norm due to
variations in driving habits, service practices
and differences in road characteristics and cli-
mate.
Traction
GWARNING
The traction grade assigned to this tire is
based on straight-ahead braking traction
tests, and does not include acceleration, cor-
nering, hydroplaning, or peak traction char-
acteristics.
!Avoid wheelspin. This can lead to damage to
the drive train.
The traction grades –from highest to lowest –
are AA, A, Band C. Those grades represent the
tire's ability to stop on wet pavement as meas-
ured under controlled conditionsons pecified
governmentt est surfaces of asphalt and con-
crete. Atire marked Cmay have poor traction
performance.
The safe speed on awet, snow covered or icy
road is always lower than on dry road surfaces.
You should pay special attention to road condi-
tions when temperatures are around freezing
point.
Mercedes-Benzr ecommendsaminimum tread
depth of ãin (4 mm) on all four winter tires.
All about wheels and tires301
Wheels and tires
Z
Page 304 of 326
. Winter tires can reduce the
braking distance on snow-covered surfaces in
comparison with summer tires. The braking dis-
tance is stil")
Observe the legally required minimum tire tread
depth (Ypage 288). Winter tires can reduce the
braking distance on snow-covered surfaces in
comparison with summer tires. The braking dis-
tance is still much further than on surfaces that
are not icy or covered with snow. Take appro-
priate care when driving.
Further information on winter tires (M+S tires)
(
Ypage 289).
Temperature
GWARNING
The temperature grade for this tire is estab-
lished for atire that is properly inflated and
not overloaded.E xcessive speed, underinfla-
tion, or excessive loading, either separately or
in combination, can cause excessive heat
build-up and possible tire failure.
The temperature grades are A(the highest), B,
and C, representing the tire's resistance to the
generation of heat and its ability to dissipate
heat when tested under controlled conditions
on aspecified indoor laboratory test wheel. Sus-
tained high temperature can cause the material
of the tire to degenerate and reduce tire life, and
excessive temperature can lead to sudden tire
failure. The grade Ccorresponds to alevel of
performance which all passenger car tires must
meet under the Federal Motor Vehicle Safety
Standard No. 109. Grades BandArepresent
higher levels of performance on the laboratory
test wheel than the minimum required by law.
Tire labeling
Overview
:Uniform Tire Quality Grading Standards
(Ypage 306)
;Department of Transportation, Tire Identifi-
cation Number (Ypage 305)
=Maximum load rating (Ypage 304)
?Maximum tire pressures (Ypage 293)
AManufacturer
BTire material (Ypage 305)
CTire size designation, load-bearing capacity
and speed rating (Ypage 302)
DLoad index (Ypage 304)
ETire name
The markings described above are on the tire in
addition to the tire name (sales designation) and
the manufacturer's name.
iTire data is vehicle-specific and may deviate
from the data in the example.
Tire size designation, load-bearing
capacity and speed rating
GWARNING
Exceeding the stated tire load-bearing capa-
city and the approved maximum speed could
lead to tire damage or the tire bursting. There is ar isk of accident.
Therefore, only use tire types and sizes
approved for your vehicle model. Observe the
302All about wheels and tires
Wheels and tires
 1
1 2
2 3
3 4
4 5
5 6
6 7
7 8
8 9
9 10
10 11
11 12
12 13
13 14
14 15
15 16
16 17
17 18
18 19
19 20
20 21
21 22
22 23
23 24
24 25
25 26
26 27
27 28
28 29
29 30
30 31
31 32
32 33
33 34
34 35
35 36
36 37
37 38
38 39
39 40
40 41
41 42
42 43
43 44
44 45
45 46
46 47
47 48
48 49
49 50
50 51
51 52
52 53
53 54
54 55
55 56
56 57
57 58
58 59
59 60
60 61
61 62
62 63
63 64
64 65
65 66
66 67
67 68
68 69
69 70
70 71
71 72
72 73
73 74
74 75
75 76
76 77
77 78
78 79
79 80
80 81
81 82
82 83
83 84
84 85
85 86
86 87
87 88
88 89
89 90
90 91
91 92
92 93
93 94
94 95
95 96
96 97
97 98
98 99
99 100
100 101
101 102
102 103
103 104
104 105
105 106
106 107
107 108
108 109
109 110
110 111
111 112
112 113
113 114
114 115
115 116
116 117
117 118
118 119
119 120
120 121
121 122
122 123
123 124
124 125
125 126
126 127
127 128
128 129
129 130
130 131
131 132
132 133
133 134
134 135
135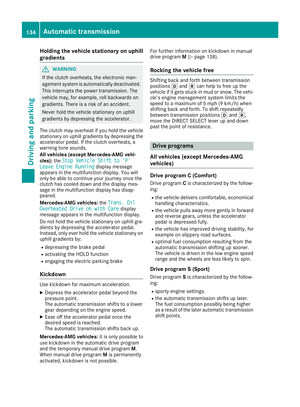 136
136 137
137 138
138 139
139 140
140 141
141 142
142 143
143 144
144 145
145 146
146 147
147 148
148 149
149 150
150 151
151 152
152 153
153 154
154 155
155 156
156 157
157 158
158 159
159 160
160 161
161 162
162 163
163 164
164 165
165 166
166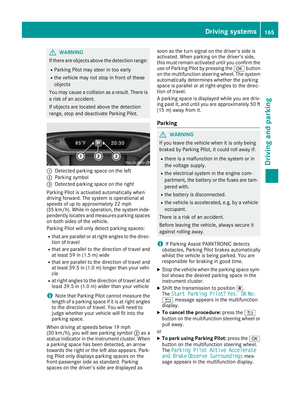 167
167 168
168 169
169 170
170 171
171 172
172 173
173 174
174 175
175 176
176 177
177 178
178 179
179 180
180 181
181 182
182 183
183 184
184 185
185 186
186 187
187 188
188 189
189 190
190 191
191 192
192 193
193 194
194 195
195 196
196 197
197 198
198 199
199 200
200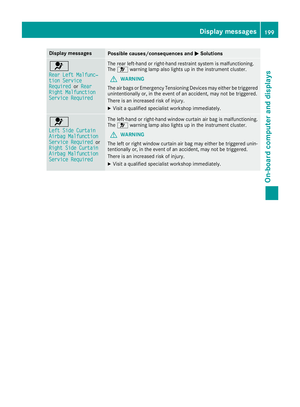 201
201 202
202 203
203 204
204 205
205 206
206 207
207 208
208 209
209 210
210 211
211 212
212 213
213 214
214 215
215 216
216 217
217 218
218 219
219 220
220 221
221 222
222 223
223 224
224 225
225 226
226 227
227 228
228 229
229 230
230 231
231 232
232 233
233 234
234 235
235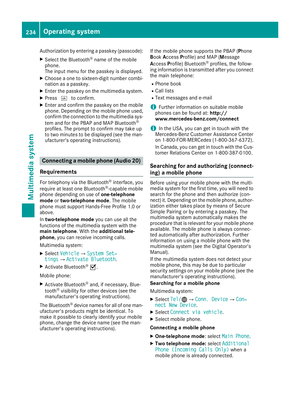 236
236 237
237 238
238 239
239 240
240 241
241 242
242 243
243 244
244 245
245 246
246 247
247 248
248 249
249 250
250 251
251 252
252 253
253 254
254 255
255 256
256 257
257 258
258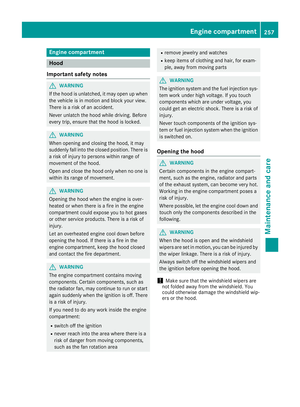 259
259 260
260 261
261 262
262 263
263 264
264 265
265 266
266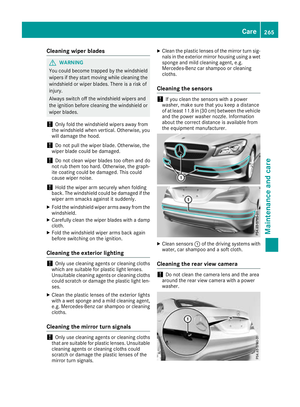 267
267 268
268 269
269 270
270 271
271 272
272 273
273 274
274 275
275 276
276 277
277 278
278 279
279 280
280 281
281 282
282 283
283 284
284 285
285 286
286 287
287 288
288 289
289 290
290 291
291 292
292 293
293 294
294 295
295 296
296 297
297 298
298 299
299 300
300 301
301 302
302 303
303 304
304 305
305 306
306 307
307 308
308 309
309 310
310 311
311 312
312 313
313 314
314 315
315 316
316 317
317 318
318 319
319 320
320 321
321 322
322 323
323 324
324 325
325