2018 MERCEDES-BENZ CLA COUPE wheel size
[x] Cancel search: wheel sizePage 21 of 326
Checkingmanually ........................ 293
Dis play message ............................ 211
Maximum ...................................... .293
Not reached (TIREFIT) .................... 274
Notes ............................................. 292
Reached (TIREFIT) .......................... 274
Recommended ............................... 290
Tire pressure los swarning system
General notes ................................ 293
Important safety notes .................. 294
Restarting ...................................... 294
Tire pressure monitor
Checking the tire pressure elec-
tronically ........................................ 296
Function/notes .............................2 94
General notes ................................ 294
Important safety notes .................. 295
Radio type approval for the tire
pressure monitor ........................... 297
Restarting ...................................... 297
Warning lamp ................................. 228
Warning message .......................... 296
TIREFIT kit .......................................... 272
Important safety notes .................. 272
Storage location ............................ 271
Tire pressure not reached .............. 274
Tire pressure reached .................... 274
Tires
Aspect ratio (definition) ................. 307
Averag eweight of the vehicle
occupants (definition) .................... 305
Bar (definition) ............................... 305
Changing awheel .......................... 307
Characteristics .............................. 305
Checking ........................................ 287
Curb weight (definition) ................. 306
Definition of terms ......................... 305
Direction of rotatio n...................... 308
Displa ymessage ............................ 211
Distribution of the vehicl eoccu-
pants (definition) ............................ 307
DOT (Department of Transporta-
tion) (definition) ............................. 305
DOT, T
ire Identification Number
(TIN) ............................................... 305
GAW R(GrossA xle Weight Rating)
(definition) ..................................... 306
Generaln otes ................................ 312 GV
W( GrossV ehicleWeight) (def-
inition) ........................................... 306
GVWR (GrossV ehicleWeight Rat-
ing )(de finition) .............................. 306
Important safety notes .................. 287
Increased vehicl eweigh tdue to
optionale quipment (definition) ...... 306
Information on driving .................... 287
Kilopascal( kPa)(de finition) ........... 306
Labeling (overview) ........................ 302
Loadb earing index (definition) ...... 307
Loadi ndex ..................................... 304
Loadi ndex (definition) ................... 306
M+S tire s....................................... 289
Maximu mloadona tire (defini-
tion) ............................................... 306
Maximu mloaded vehicleweigh t
(definition) ..................................... 306
Maximu mpermissibl etire pres-
sure (definition) ............................. 306
Maximu mtire load ......................... 304
Maximu mtire load (definition) ....... 306
MOExtended tire s.......................... 289
Optionale quipmentweight (defi-
nition) ............................................ 307
PSI (pounds pe rsquare inch )(de f-
inition) ........................................... 307
Replacing ....................................... 307
Service life ..................................... 288
Sidewal l(de finition) ....................... 307
Speed rating (definition) ................ 306
Storing ........................................... 308
Structure and characteristics
(definition) ..................................... 305
Summer tire s................................. 289
Temperature .................................. 302
TIN (Tire Identification Number)
(definition) ..................................... 307
Tire bead (definition) ...................... 307
Tire pressure (definition) ................ 307
Tire pressures (recommended )...... 306
Tire size (data )............................... 312
Tire size designation, load-beari ng
ca
pacity, speed rating .................... 302
Tire tread. ...................................... 288
Tire tread( definition) ..................... 307
Totall oadlim it (definition) ............. 307
Tractio n......................................... 301
Index19
Page 23 of 326

Lowering ........................................ 311
Maintenance .................................... 26
Parking foralong period. ............... 143
Pulling awa y................................... 125
Raising ........................................... 309
Reporting problems ......................... 28
Securing from rolling away ............ 309
Transporting .................................. 283
Unlocking (i nanemergency) ........... 77
Unlocking (SmartKey). ..................... 70
Vehicl edata. .................................. 320
Vehicl edata
Roof load (maximum) ..................... 320
Trunk load (maximum) ................... 320
Vehicl edimensions ........................... 320
Vehicl eemergencyl ocking ................ 77
Vehicl eidentificatio nnumber
see VIN
Vehicl eidentificatio nplate .............. 314
Vehicl etoolkit.................................. 270
Ventilation
Setting the vents ........................... 120
Video
Operating the DVD ......................... 183
see also Digital Operator's Man-
ual.................................................. 229
VIN
Seat. .............................................. 315
Type plate ...................................... 314
W
Warning and indicator lamps
ABS ................................................ 220
Active Brake Assist ........................ 227
Brakes ........................................... 219
Check Engine ................................. 224
Coolant .......................................... 225
Distance warning ........................... 227
ESP
®.............................................. 221
ESP®OFF ....................................... 222
Fue ltank ........................................ 224
Overview .......................................... 33
PASSENGER AIR BAG ...................... 41
Reserve fue l................................... 224
Restraint system ............................ 224
Seatb elt. ....................................... 218
SPORTh andling mode. .................. 222 Tire pressure monitor .................... 228
Warning triangle ................................ 270
Warranty .............................................. 25
Washer fluid
Displa ymessage ............................ 216
Weather display (COMAND)
see also Digital Operator's Man-
ual.................................................. 229
Wheel and tire combinations
Tires ............................................... 312
Wheel bolt tightenin gtorque ........... 311
Wheel chock ...................................... 309
Wheels
Changing awheel .......................... 307
Checking ........................................ 287
Cleaning ......................................... 264
Important safety notes .................. 287
Information on driving .................... 287
Interchanging/changing ................ 307
Mounting anew wheel. .................. 310
Removing awheel .......................... 310
Storing ........................................... 308
Tightening torque ........................... 311
Wheel size/tire size ....................... 312
Wheel sand tires
Changing awheel .......................... 308
Window curtai nair bag
Displa ymessage ............................ 199
Operation ......................................... 47
Windows
see Sid ewindows
Windshield
Defrosting ...................................... 117
Windshiel dwasher system
Adding washerf luid ....................... 260
Important safety notes .................. 319
Windshiel dwipers
Displa ymessage ............................ 216
Problem (malfunction) ................... 109
Replacing the wipe rblade s............ 108
Switching on/off. .......................... 107
Winter driving
Slippery roads urfaces ................... 148
Snow chains .................................. 290
Winter operation
Genera lnotes ................................ 289
Wi
nter tires
M+S tire s....................................... 289
Index21
Page 67 of 326

GWARNING
If ESP
®is malfunctioning, ESP®is unable to
stabilize the vehicle. Additionally, further driv-
ing safety systems are deactivated. This
increases the risk of skidding and an accident.
Drive on carefully.H ave ESP
®checked at a
qualified specialist workshop.
Vehicles without 4MATIC: when towing your
vehiclew ith the front axle raised, it is important
that you observe the notes on ESP
®
(Ypage2 82).
If the å ESP®OFF warning lamp lights up
continuously,E SP®is deactivated.
If the ÷ ESP®warning lamp and the å
warning lamp are lit continuously,E SP®is not
available due to amalfunction.
Observe the information on warning lamps
(
Ypage2 21) and display messages which may
be shownint he instrument cluster
(
Ypage1 92).
Only use wheels with the recommendedt ire
sizes. Only then wil lESP
®function properly.
Characteristics of ESP®
General information
If the ÷ ESP®warning lamp goes out before
beginning the journey ,ESP®is automatically
active.
If ESP
®intervenes, the ÷ESP®warning lamp
flashes in the instrument cluster.
If ESP
®intervenes:
XDo not deactivate ESP®under any circum-
stances.
XOnly depress the accelerator pedalasf ar as
necessary when pulling away.
XAdapt you rdriving style to sui tthe prevailing
road and weather conditions.
ECOs tart/stop function
The ECO start/stop function switches the
engine off automatically when the vehicles tops
moving. The engine starts automatically when
the driverw ants to pullawa ya gain. ESP
®
remains in its previousl yselected status. Exam-
ple: if ESP®was deactivated before the engine
was switched off, ESP®remains deactivated
when the engine is switched on again.
Deactivating/activating ESP®(except
Mercedes‑AMG vehicles)
Important safety notes
iObserve the "Important safety notes" sec-
tion (Ypage6 1).
You can select between the following states of
ESP
®:
RESP®is activated.
RESP®is deactivated.
GWARNING
If you deactivate ESP
®,E SP®no longer sta-
bilizes the vehicle. There is an increased risk
of skidding and an accident.
Only deactivate ESP
®in the situations descri-
bed in the following.
The spinning of the wheels results in acutting
action for better traction on looses urfaces.
It may be best to deactivate ESP
®in the follow-
ing situations:
Rwhen using snow chains
Rin deep snow
Ron sand or gravel
iActivate ESP®as soon as the situations
described above no longer apply.E SP®will
otherwise not be abl etostabilize the vehiclei f
the vehicles tarts to skid or awhee lstarts to
spin.
!Avoid spinning the drivenw heels for an
extended period with ESP®deactivated. You
coul dotherwise damage the drivetrain.
Deactivating/activating ESP®
You can deactivate or activate ESP®via the on-
board computer (Ypag e185).
ESP®deactivated:
The å ESP®OFF warning lamp in the instru-
ment cluster lights up.
ESP
®activated:
The å ESP®OFF warning lamp in the instru-
ment cluster goes out.
Driving safety systems65
Safety
Z
Page 98 of 326
Mirrors
Rear-view mirror
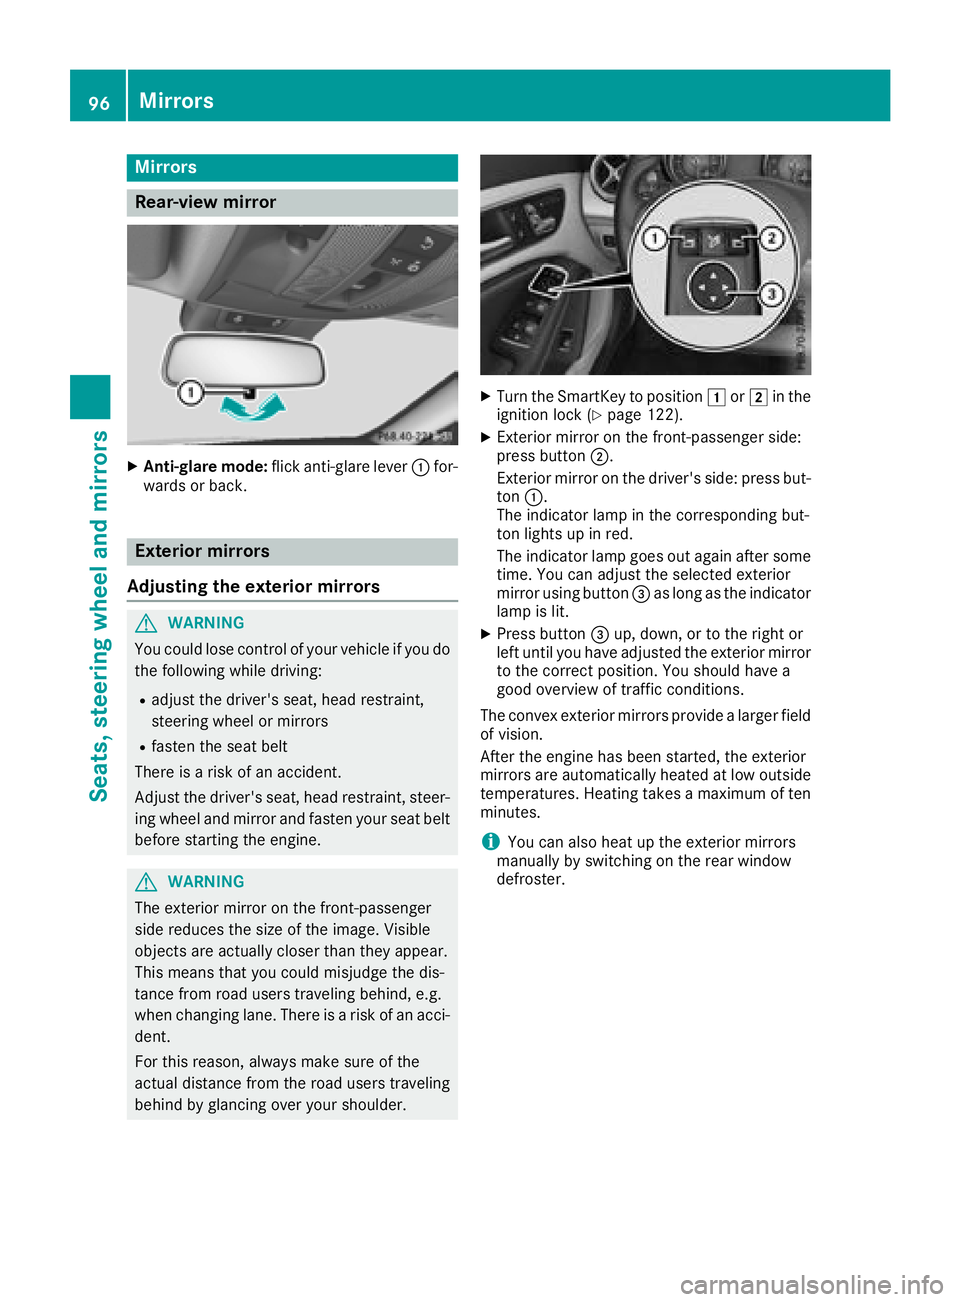
XAnti-glare mode:flick anti-glare lever :for-
wards or back.
Exterior mirrors
Adjusting the exterior mirrors
GWARNING
You coul dlose control of you rvehicleify ou do
the following while driving:
Radjust the driver's seat, headr estraint,
steering wheelorm irrors
Rfasten the seat belt
There is arisk of an accident.
Adjust the driver's seat, headr estraint, steer-
ing wheela nd mirror and fasten you rseat belt
before starting the engine.
GWARNING
The exterior mirror on the front-passenger
side reduces the size of the image. Visible
objects are actually closer than they appear.
This means that you coul dmisjudge the dis-
tance from road users traveling behind, e.g.
when changing lane .There is arisk of an acci-
dent.
For this reason, alway smake sure of the
actua ldistance from the road users traveling
behind by glancing over you rshoulder.
XTurn the SmartKey to position 1or2 in the
ignitio nlock (Ypage1 22).
XExterior mirror on the front-passenger side:
press button ;.
Exterior mirror on the driver's side:p ress but-
ton :.
The indicator lamp in the corresponding but-
ton lights up in red.
The indicator lamp goes out again after some
time. You can adjust the selected exterior
mirror using button =as long as the indicator
lamp is lit.
XPress button =up, down, or to the right or
left until you have adjusted the exterior mirror
to the correct position. You should have a
good overview of traffic conditions.
The convex exterior mirrors provide alarger field
of vision.
After the engine has been started, the exterior
mirrors are automatically heated at low outside
temperatures. Heating takes amaximu moften
minutes.
iYou can als oheatu pthe exterior mirrors
manually by switching on the rear window
defroster.
96Mirrors
Seats, steering wheel and mirrors
Page 273 of 326
Vehicles withaTIREFI Tkit
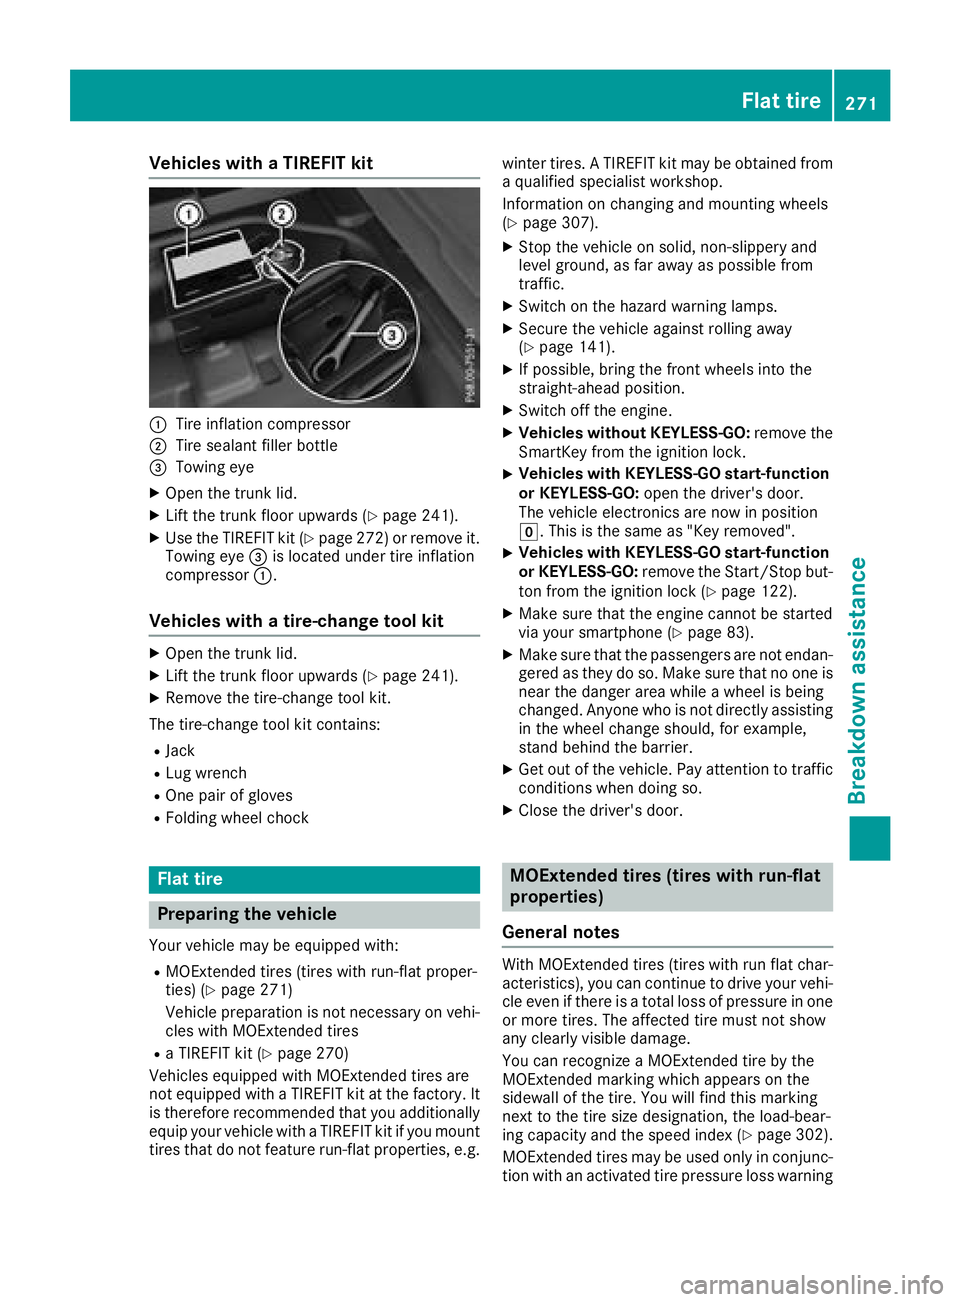
:Tire inflation compressor
;Tire sealant fille rbottle
=Towing eye
XOpe nthe trunk lid.
XLiftthe trunk floor upwards (Ypage 241).
XUse the TIREFIT kit (Ypage 272 )orremove it.
Towing eye =is located under tire inflation
compressor :.
Vehicles with atire-chang etool kit
XOpen the trunk lid.
XLift the trunk floor upwards (Ypag e241).
XRemove the tire-change tool kit.
The tire-change tool kit contains:
RJack
RLug wrench
ROne pai rofgloves
RFolding wheelc hock
Flat tire
Preparing the vehicle
Yourvehiclem ay be equipped with:
RMOExtended tires (tires with run-flat proper-
ties) (Ypage271)
Vehiclep reparation is not necessary on vehi-
cles with MOExtended tires
RaT IREFIT kit (Ypag e270)
Vehicles equipped with MOExtended tires are
not equipped with aTIREFIT kit at the factory. It
is therefore recommended that you additionally
equip you rvehiclew ithaTIREFIT kit if you mount
tires that do not feature run-flat properties, e.g. winter tires.
ATIREFIT kit may be obtained from
aq ualified specialist workshop.
Information on changing and mounting wheels
(
Ypag e307).
XStop the vehicleons olid, non-slippery and
level ground ,asfar awa yaspossible from
traffic.
XSwitch on the hazard warning lamps.
XSecure the vehiclea gainst rolling away
(Ypag e141).
XIf possible, bring the front wheels into the
straight-ahead position.
XSwitch off the engine.
XVehicles without KEYLESS-GO: remove the
SmartKey from the ignitio nlock.
XVehicles with KEYLESS-GO start-function
or KEYLESS-GO: open the driver'sd oor.
The vehiclee lectronics are now in position
g.T his is the same as "Key removed".
XVehicles with KEYLESS-GO start-function
or KEYLESS-GO: remove the Start/Stop but-
ton from the ignitio nlock (
Ypag e122).
XMake sure that the engine cannot be started
via you rsmartphone (Ypag e83).
XMake sure that the passengers are not endan-
gered as they do so. Make sure that no one is
near the dange rarea while awhee lisb eing
changed .Anyone who is not directly assisting
in the wheelc hange should, for example,
stand behind the barrier.
XGet out of the vehicle. Pay attention to traffic
conditions when doing so.
XClose the driver'sd oor.
MOExtended tires (tires with run-flat
properties)
General notes
With MOExtended tires (tires with run flat char-
acteristics) ,you can continue to drive you rvehi-
cle even if there is atotal loss of pressure in one
or more tires. The affected tire must not show
any clearly visible damage.
You can recognize aMOExtended tire by the
MOExtended marking which appears on the
sidewal lofthe tire. You wil lfind this marking
next to the tire size designation, the load-bear-
ing capacity and the speedi ndex (
Ypage302).
MOExtended tires may be used only in conjunc-
tion with an activated tire pressure loss warning
Flat tire271
Breakdown assistance
Page 274 of 326
system (Canadaonly) or tire pressure monitor
(USA only).
If ap ressure loss warning message appears
in the multifunction display:
Robserve the instructions in the displaym es-
sages (Ypage 211).
Rcheck the tire for damage
Rif driving on, observe the following notes
The driving distance possible in run-flat mode is
approximately 50 miles (80 km) when the vehi-
cle is partiallyl aden. When the vehicle is fully
laden it is approximately 19 miles (30 km).
In addition to the vehicle load, the driving dis-
tance possible depends upon:
Rvehicle speed
Rroad condition
Routside temperature
The driving distance possible in run-flat mode
may be reduced by extreme driving conditions
or maneuvers, or it can be increased through a
moderate style of driving.
The driving distance possible in run-flat mode is
counted from the moment the tire pressure loss
warning appears in the multifunction display.
You must not exceed amaximum speed of
50 mph (80 km/h).
When replacing one or all tires, please observe
the following specifications for your vehicle's
tires:
Rsize
Rtype and
Rthe "MOExtended" marking
If at ire has gone flat and cannot be replaced
with aMOExtended tire, astandard tire may be
used as atemporary measure. Make sure that
you use the proper size and type (summer or
winter tire).
Vehicles equipped with MOExtended tires are
not equipped with aTIREFIT kit at the factory. It
is therefore recommended that you additionally
equip your vehicle with aTIREFIT kit if you mount
tires that do not feature run-flat properties, e.g.
winter tires. ATIREFIT kit may be obtained from
aq ualified specialist workshop.
Important safety notes
GWARNING
When driving in emergency mode, the driving
characteristics deteriorate, e.g. when corner-
ing, accelerating quickly and when braking.
There is arisk of an accident.
Do not exceed the stated maximum speed.
Avoid abrupt steering and driving maneuvers, and driving over obstacles (curbs, potholes,
off-road). This applies in particular to aladen
vehicle.
Stop driving in emergency mode if:
Ryou hear banging noises.
Rthe vehicle starts to shake.
Ryou see smoke and smell rubber.
RESP®is intervenin gconstantly.
Rthere are tears in the sidewalls of the tire.
After driving in emergency mode, have the
wheel rims checked at aqualified specialist
workshop with regard to their further use. The
defective tire must be replaced in every case.
TIREFIT kit
Important safety notes
TIREFIT is atire sealant.
Only valid for USA: You can use TIREFIT to seal
punctures of up to 0.16 in (4 mm), particularly
those in the tire tread. You can use TIREFIT at
outside temperatures down to Ò4‡(Ò20 †).
GWARNING
In the following situations, the tire sealant is
unable to provide sufficient breakdown assis-
tance, as it is unable to seal the tire properly:
Rthere are cuts or punctures in the tire larger
than those mentioned above.
Rthe wheel rim is damaged.
Ryou have driven at very low tire pressures or on aflat tire.
There is arisk of an accident.
Do not drive the vehicle. Contact aqualified
specialist workshop.
GWARNING
The tire sealant is harmful and causes irrita-
tion. It must not come into contact with your
skin, eyes or clothing or be swallowed. Do not
272Flat tire
Breakdown assistance
Page 290 of 326
Checkwheelsand tires for damag eatleast once
am onth .Checkw heelsa nd tires after driving
off-road or on roug hroads. Damaged wheels
can caus ealoss of tir epressure. Pay particular
attentio ntodamagesucha s:
RCutsinthet ires
RPunctures inthet ires
RTearsint hetires
RBulges on tires
RDeformation or severe corrosiononw heels
Regularly check thetiret read dept hand the
conditio nofthetread across th ewhole widthof
th et ire(
Ypage 288). Ifnecessary, tur nthe
frontw heelstof ull lockino rder to inspectt he
inner sideof thetires urface.
All wheelsm ust haveavalvec ap to protect the
valv eagainst dirtand moisture. Do no tmount
anythingo ntot he valv eother than th estandard
valv ecap or other valv ecaps approved by
Mercedes-Ben zfor your veh icle.Don otuse any
other valv ecaps or systems ,e.g.t irep ressure
monitorin gsystems.
Regularly check thepressureofa llth et ires par-
ticularly priortol ongt rips. Adjus tthe tirep res-
sure as necessary (
Ypage 290).
Observ ethe note sont heemergenc yspare
wheel (
Ypage 312).
The servic elife of tires depends, amon gother
things, on th efollowin gfactors:
RDrivin gstyle
RTire pressure
RDistance covered
Notes on tir etread
GWAR NING
In suff icient tir etread will reduce tir etraction.
The tir eisnol ongerabletodissipat ewater.
This mean stha tonw et road surfaces ,the risk
of hydroplaning increases, inparticular where
speedisn otadapted to suit th edriving con-
dit ions. Thereisar iskofa cciden t.
If th et irep ressureist oohigh or to olow, tires
may exhibit diff erent levelsof wear at differ-
entl ocations on th etiret read. Thus,y ou
should regularly check th etread dept hand
th ec onditio noft hetread across th eentire
widt hofa lltires.
Minimum tir etread depthf or:
RSummer tires: âin(3 mm)
RM+S tires: ãin(4 mm)
For safety reasons, replace th etires before
th el egally prescribe dlimit for th eminimum
tir et read depthisr eached.
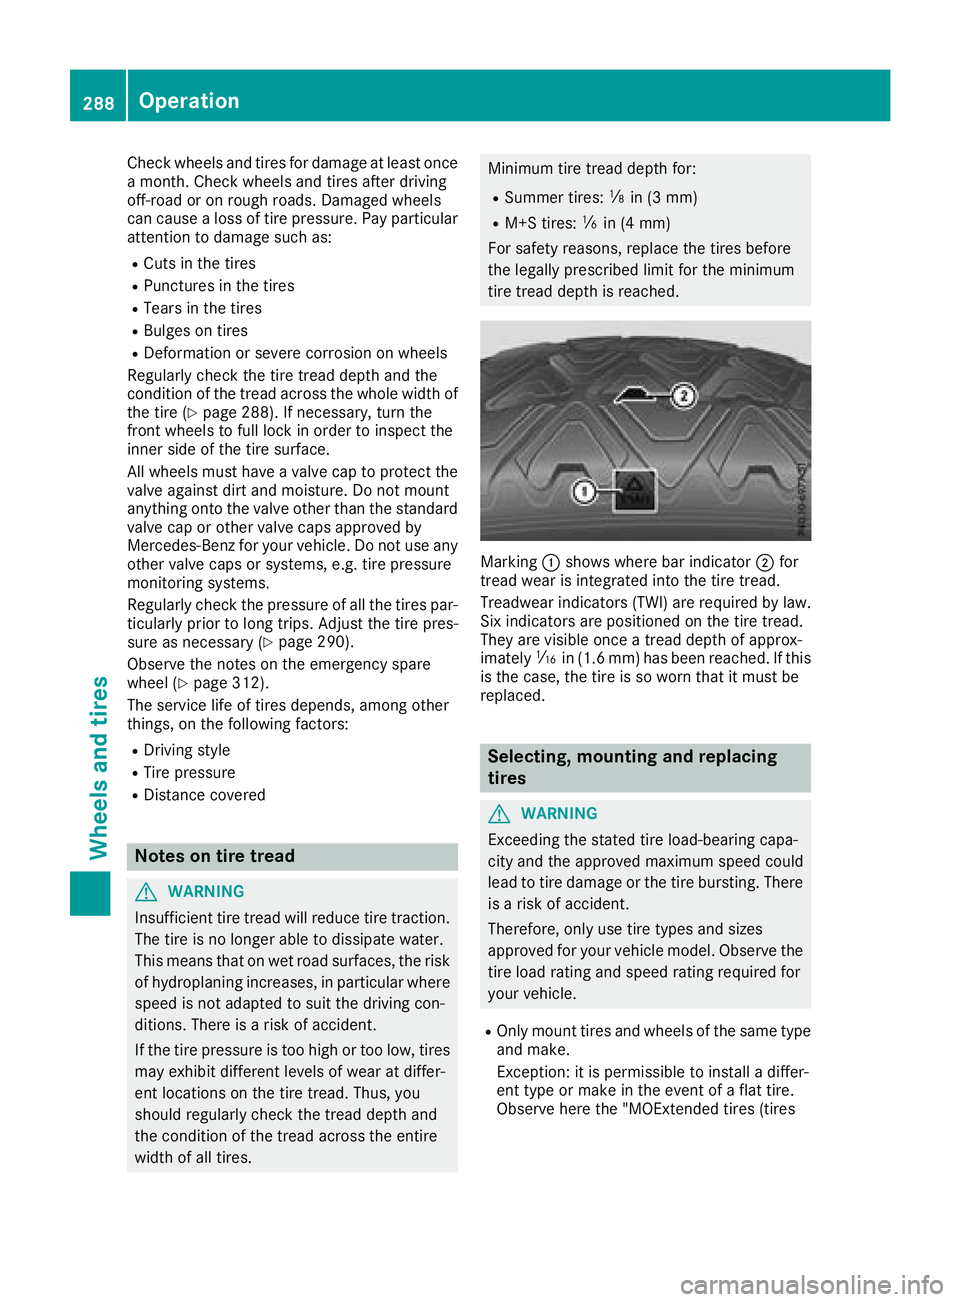
Marking:shows whereb ar indicator ;for
tread wear is integrate dintot he tiret read.
Treadwear indicators (TWI)a re requiredbylaw.
Six indicators are positione donthetiret read.
They are vis ibleonce atread depthofa pprox-
imately áin(1. 6m m) has been reached. Ifthis
is thec ase, th etireissow orn that it must be
replace d.
Selecting, mounting and replacing
tires
GWARNING
Exceedingt hestate dtirel oad-bearing capa-
cit ya nd th eapprove dmaximum speedc ould
lead to tir edamag eorthetireb ursting. There
is ar iskofa ccident.
Therefore, only use tiretype sand sizes
approve dfor your vehicle model. Observ ethe
tir el oad rating and speedr ating required for
your vehicle.
ROnly moun ttires and wheelsoft hesame type
and make.
Exception: itis permissible to install adiffer-
entt ype or mak eintheevent of aflat tire.
Observ eheret he"MOExtended tires (tires
288Operation
Wheels and tires
Page 292 of 326
When you have mounted the M+S tires:
XCheck the tire pressures (Ypage 290).
XRestart the tire pressure monitor (USA only)
(Ypage 297).
XRestart the tire pressure loss warning system
(Canada) (Ypage 294)
Snow chains
GWARNING
If snow chains are mounted on the rear
wheels, the snow chains could cause abrasion
to the vehicle body or to chassis components.
This could cause damage to the vehicle or the
tires. There is arisk of an accident.
To avoid hazardous situations:
Rnever mount snow chains on the rear
wheels
Ronly mount snow chains in pairs on the
frontw heels.
!On some tire sizes there is not enough space
for snow chains. To avoid damage to the vehi-
cle or tires, observe the "Wheel and tire com-
binations" section under "Tires and wheels".
For safety reasons, Mercedes-Benz recom-
mends that you only use snow chains that have
been specially approved for your vehicle by
Mercedes-Benz ,orare of acorresponding
standard of quality. For more information,
please contact aqualified specialist workshop.
If you inten dtomount snow chains, please bear
the following points in mind:
RSno wchains may not be mounted on all
wheel/tire combinations. Permissible wheel-
tire combinations (
Ypage 312).
ROnly use snow chains when driving on roads
completely covered by snow. Remove the
snow chains as soon as possible when you
come to aroad that is not snow-covered.
RLocal regulations may restrict the use of snow
chains. Observe the appropriate regulations if
you wish to mount snow chains.
RDo not exceed the maximum permissible
speed of 30 mph (50 km/h).
RNever use Parking Pilot when snow chains are
installed (Ypage 165). You may wish to deactivat
eESP
®when pulling
away with snow chains installed .You can
thereby allow the wheels to spin in acontrolled
manner, achieving an increased driving force
(cutting action).
RDeactivate ESP®(all vehicles except
Mercedes-AMG vehicles) (Ypage 65)
RDeactivate ESP®(Mercedes-AMG vehicles)
(Ypage 66)
Information about driving with an emergency
spare wheel (
Ypage 312).
Tirep ressure
Tirep ressure specifications
Important safety notes
GWARNING
Underinflated or overinflated tires pose the
following risks:
Rthe tires may burst, especially as the load
and vehicle speed increase.
Rthe tires may wear excessively and/or
unevenly, which may greatly impair tire
traction.
Rthe driving characteristics, as well as steer-
ing and braking, may be greatly impaired.
There is arisk of an accident.
Follow recommended tire inflation pressures
and check the pressure of all the tires includ-
ing the spare wheel:
Rmonthly, at least
Rif the load changes
Rbefore beginnin galong journey
Runder differento perating conditions, e.g.
off-road driving
If necessary, correct the tire pressure.
iThe data on the Tire and Loading Informa-
tion placard and tire pressure table shown
here are examples. Tire pressure specifica-
tions are vehicle-specific and may deviate
from the data shown here. The tire pressure
specifications that are valid for your vehicle
can be found on the Tire and Loading Infor-
290Tirep ressure
Wheels and tires