2018 MERCEDES-BENZ CLA COUPE tow bar
[x] Cancel search: tow barPage 170 of 326
for safe maneuvering and parking. Make sure
that there are no persons, animals or objects in
the maneuvering area while maneuvering and
parking in parking spaces.
Under the following circumstances, the rear
view camera willnot function, or wil lfunction in
al imited manner:
Rif the trunk lid is open
Rin heavy rain, snow or fog
Rat night or in very dark places
Rif the camera is exposedtov ery bright light
Rif the area is lit by fluorescent bulbs or LED
lighting (the display may flicker)
Rif there isasudden change in temperature,
e.g. when driving into aheated garage in win-
ter
Rif the camera lens is dirty or obstructed.
Observe the notes on cleaning
(
Ypag e265)
Rif the rear of you rvehicleisd amaged. In this
case, have the camera position and setting
checked at aqualified specialist workshop
The fieldofv ision and other functions of the rear
view camera may be restricted due to additional
accessories on the rear of the vehicle( e.g.
license plate holder, rear bicycle rack).
Activating/deactivating the rear view
camera
XTo activate: make sure that the SmartKey is
in position 2in the ignition lock.
XMake sure that the Activation byRgearfunction is selected in the multimedias ystem;
see the Digita lOperator's Manual.
XEngage reverse gear.
The area behind the vehicleiss hownwith
guide lines in the multimedias ystem display.
The image from the rear view camera is avail-
abl ethroughoutt he maneuvering process.
To deactivate: the rear view camera deacti-
vates if you shift the transmission to jor after
driving forwards ashort distance.
Messages in the multimedia system dis-
play
The rear view camera may show adistorted view
of obstacles, show them incorrectly or not at all.
The rear view camera does not show objects in
the following positions:
Rvery close to the rear bumper
Runder the rear bumper
Rin close range above the handl eonthe trunk
lid
!Objects not at ground levelm ay appear to
be further away than they actually are, e.g.:
Rthe bumper of aparked vehicle
Rthe drawbar of atrailer
Rthe bal lcoupling of atrailer tow hitch
Rthe rear section of an HGV
Ras lanted post
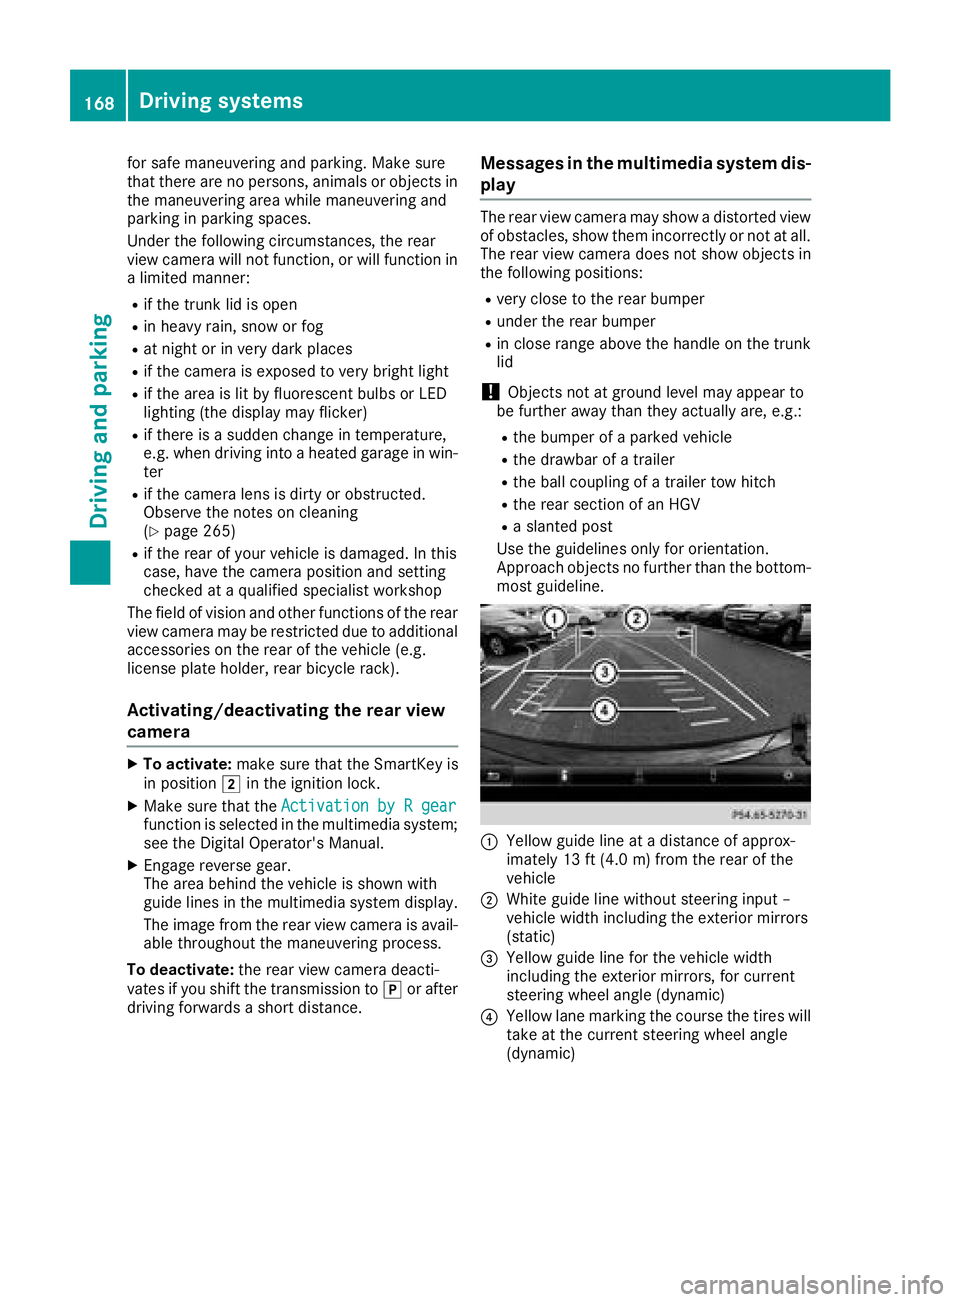
Use the guidelines only for orientation.
Approach objects no further than the bottom-
most guideline.
:Yellow guide line at adistance of approx-
imately 13 ft (4.0 m) from the rear of the
vehicle
;White guide line without steering input–
vehiclew idth including the exterior mirrors
(static)
=Yellow guide line for the vehiclew idth
including the exterior mirrors, for current
steering wheela ngle (dynamic)
?Yellow lane marking the course the tires will
take at the current steering wheela ngle
(dynamic)
168Driving systems
Driving and parking
Page 273 of 326
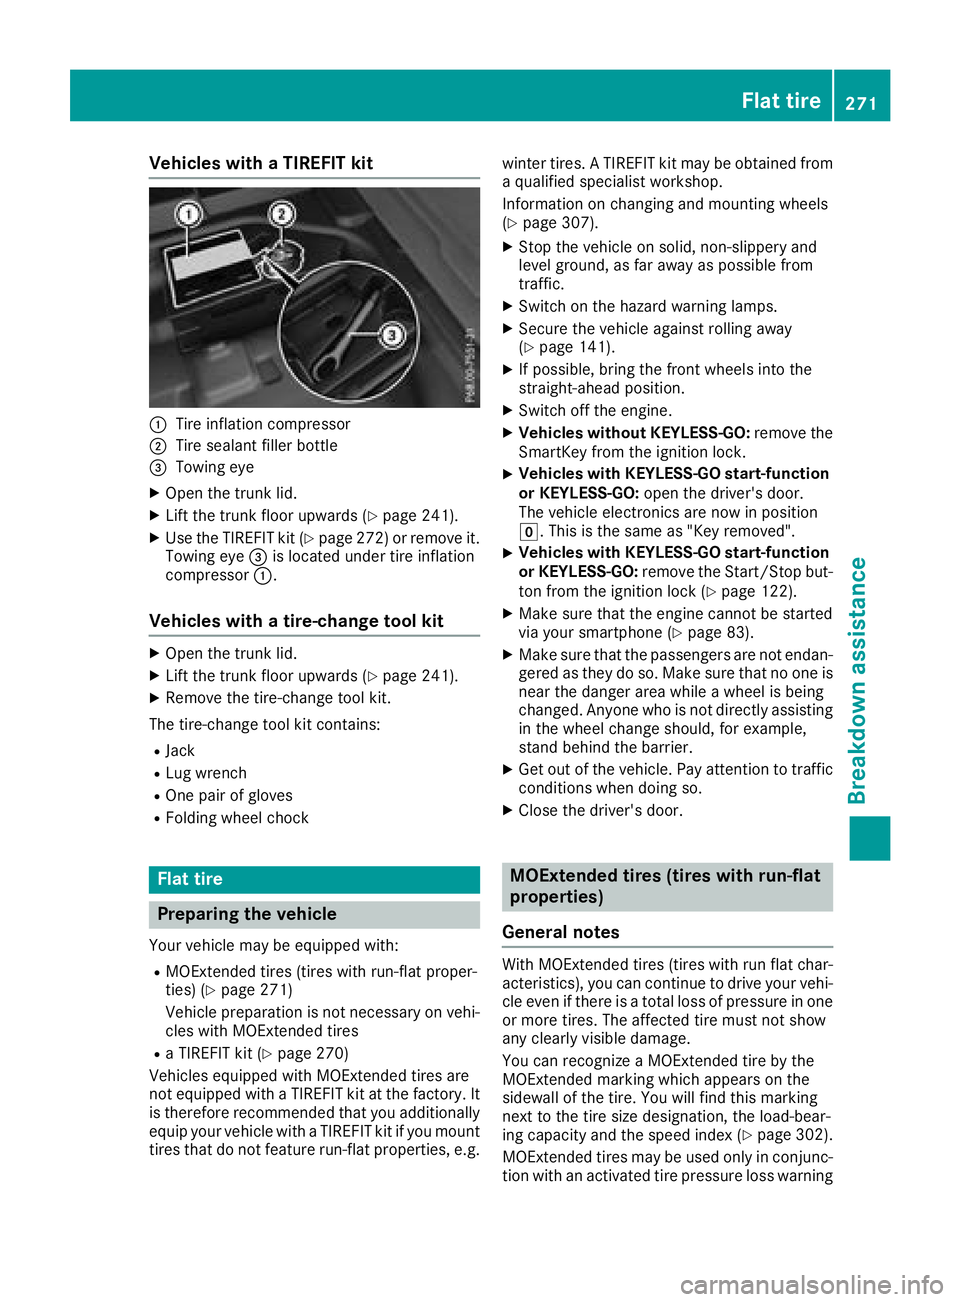
Vehicles withaTIREFI Tkit
:Tire inflation compressor
;Tire sealant fille rbottle
=Towing eye
XOpe nthe trunk lid.
XLiftthe trunk floor upwards (Ypage 241).
XUse the TIREFIT kit (Ypage 272 )orremove it.
Towing eye =is located under tire inflation
compressor :.
Vehicles with atire-chang etool kit
XOpen the trunk lid.
XLift the trunk floor upwards (Ypag e241).
XRemove the tire-change tool kit.
The tire-change tool kit contains:
RJack
RLug wrench
ROne pai rofgloves
RFolding wheelc hock
Flat tire
Preparing the vehicle
Yourvehiclem ay be equipped with:
RMOExtended tires (tires with run-flat proper-
ties) (Ypage271)
Vehiclep reparation is not necessary on vehi-
cles with MOExtended tires
RaT IREFIT kit (Ypag e270)
Vehicles equipped with MOExtended tires are
not equipped with aTIREFIT kit at the factory. It
is therefore recommended that you additionally
equip you rvehiclew ithaTIREFIT kit if you mount
tires that do not feature run-flat properties, e.g. winter tires.
ATIREFIT kit may be obtained from
aq ualified specialist workshop.
Information on changing and mounting wheels
(
Ypag e307).
XStop the vehicleons olid, non-slippery and
level ground ,asfar awa yaspossible from
traffic.
XSwitch on the hazard warning lamps.
XSecure the vehiclea gainst rolling away
(Ypag e141).
XIf possible, bring the front wheels into the
straight-ahead position.
XSwitch off the engine.
XVehicles without KEYLESS-GO: remove the
SmartKey from the ignitio nlock.
XVehicles with KEYLESS-GO start-function
or KEYLESS-GO: open the driver'sd oor.
The vehiclee lectronics are now in position
g.T his is the same as "Key removed".
XVehicles with KEYLESS-GO start-function
or KEYLESS-GO: remove the Start/Stop but-
ton from the ignitio nlock (
Ypag e122).
XMake sure that the engine cannot be started
via you rsmartphone (Ypag e83).
XMake sure that the passengers are not endan-
gered as they do so. Make sure that no one is
near the dange rarea while awhee lisb eing
changed .Anyone who is not directly assisting
in the wheelc hange should, for example,
stand behind the barrier.
XGet out of the vehicle. Pay attention to traffic
conditions when doing so.
XClose the driver'sd oor.
MOExtended tires (tires with run-flat
properties)
General notes
With MOExtended tires (tires with run flat char-
acteristics) ,you can continue to drive you rvehi-
cle even if there is atotal loss of pressure in one
or more tires. The affected tire must not show
any clearly visible damage.
You can recognize aMOExtended tire by the
MOExtended marking which appears on the
sidewal lofthe tire. You wil lfind this marking
next to the tire size designation, the load-bear-
ing capacity and the speedi ndex (
Ypage302).
MOExtended tires may be used only in conjunc-
tion with an activated tire pressure loss warning
Flat tire271
Breakdown assistance
Page 277 of 326
Ifat ire pressure of 200 kPa (2.0 bar/29 psi) has
been attained after ten minutes:
XSwitch off the tire inflation compressor.
XUnscrew the fillerh ose from the valve of the
faulty tire.
Note that tire sealant may escape when you
unscrew the fillerh ose.
XUSA only:Stow the tire sealant bottle and the
tire inflation compressor.
XPull away immediately.
XStop after driving for approximately ten
minutes and check the tire pressure with the
tire inflation compressor.
The tire pressure must now be at least
130 kPa (1.3 bar/19 psi).
GWARNING
If the required tire pressure is not reached
after driving for ashort period,t he tire is too
badlyd amaged. The tire sealant cannot repair
the tire in this instance. Damaged tires and a
tire pressure that is too low can significantly
impair the vehicle's braking and driving char-
acteristics. There is arisk of accident.
Do not continue driving. Contact aqualified
specialist workshop.
iUSA only: In cases such as the one men-
tioned above,c ontact an authorized
Mercedes-Benz Center. Or call
1-800-FOR-MERCedes (in the USA) or
1-800-387-0100 (in Canada).
XUSA only: Correct the tire pressure if it is still
at least 130 kPa (1.3 bar/19 psi). See the Tire
and Loading Information placard on the driv-
er's side B-pillarort he tire pressure table in
the fuel fillerf lap for values.
XTo increase the tire pressure: switch on the
tire inflation compressor.
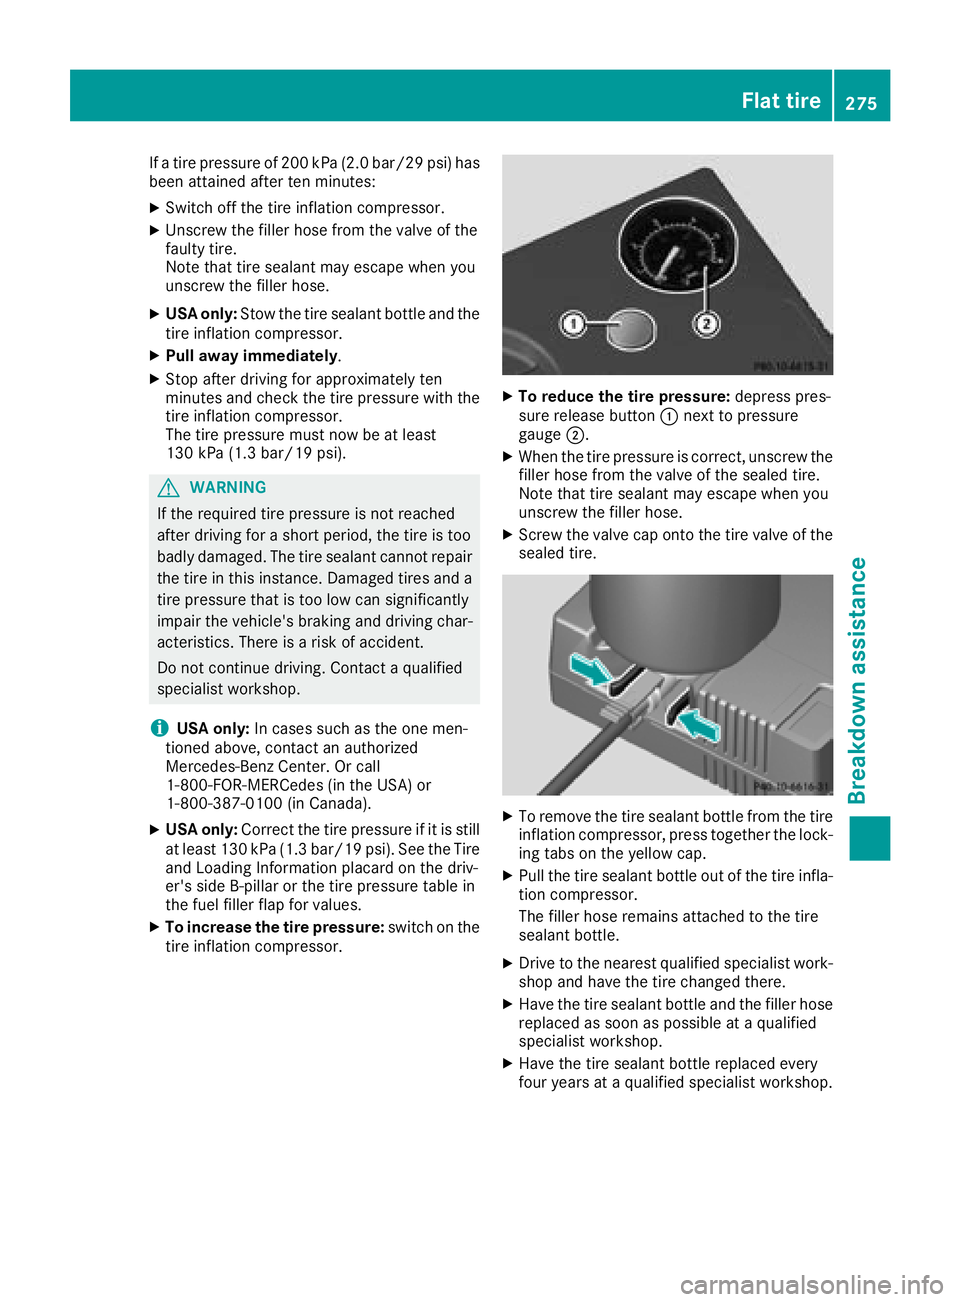
XTo reduce the tire pressure: depresspres-
sure release button :next to pressure
gauge ;.
XWhen the tire pressure is correct, unscrew the
fillerhose from the valve of the sealed tire.
Note that tire sealant may escape when you
unscrew the fillerh ose.
XScrew the valve cap onto the tire valve of the
sealed tire.
XTo remove the tire sealant bottle from the tire
inflation compressor, press together the lock-
ing tabs on the yellow cap.
XPullthe tire sealant bottle out of the tire infla-
tion compressor.
The fillerh ose remains attached to the tire
sealant bottle.
XDrive to the nearest qualifieds pecialist work-
shop and have the tire changed there.
XHave the tire sealant bottle and the fillerh ose
replaced as soon as possible at aqualified
specialist workshop.
XHave the tire sealant bottle replaced every
four years at aqualifieds pecialist workshop.
Flat tire275
Breakdowna ssistance
Z
Page 283 of 326
iJumper cablesand further informatio nregardingj ump-startin gcan be obtaine datany qualified
specialist workshop.
Towing and tow-starting
Important safety notes
GWARNING
Functionsr elevanttos afety are restricted or
no longer available if:
Rth ee ngine is no trunning.
Rtheb rakes ystem or th epower steering is
malfunctioning.
Rthere is amalfunctio ninthevoltage supply
or th evehicle's electrical system.
If your vehicle is beingt owed, muchm ore
force may be necessaryt osteer or brake.
Thereisar isk of an accident.
In such cases, use atow bar. Before towing,
makes ure that th esteering moves freely.
GWARNING
You can no longer steer th evehicle if the
steering wheel lockh as been engaged. There
is ar isk of an accident.
Always switch off th eignitio nwhen towing the
vehicle with atow cable or atow bar.
GWARNING
When towing or tow-startin ganother vehicle
and its weight is greater than th epermissible
gross weight of your vehicle ,the :
Rthet ow ing eye could detach itself
Rthev ehicle/trailer combinatio ncould roll-
over.
Thereisar isk of an accident.
When towing or tow-startin ganother vehicle,
its weight shouldn otbe greater than th eper-
missible gross weight of your vehicle.
Details on th epermissible gross vehicle weight
of your vehicle can be foun donthevehicle iden-
tification plate(
Ypage 314).
!When Activ eBrake Assist,D istance Pilot
DISTRONIC or th eHOLDfunction is activated, th
ev ehicle brakes automatically in certain
situations.
To avoid damage to th evehicle ,deactivate
these systems in th efollowing or similar sit-
uations:
Rwhen towing th evehicle
Rin th ecar wash
!Makes ure that th eelectric parking brak eis
released. If th eelectric parking brakeisf aulty,
visitaq ualifiedspecialist workshop.
!Only secure th etow rope or to wbar at the
towing eyes. Otherwise, th evehicle coul dbe
damaged.
!Do no tuse th etow ing eyes for recoveryp ur-
posesast hisc oul dd amage th evehicle .Ifin
doubt,r ecover th evehicle with acrane.
!When towing ,pull away slowly and
smoothly. If th etractive power is to ohigh,t he
vehicle scoul dbed amaged.
!The vehicle can be towed amaximum of
30 miles (50km ). The towing speed of 30 mph
(50km/h) must no tbeexceeded.
If th evehicle has to be towed moret han
30 miles (50km), th efront axle must be raised
or th eentire vehicle raiseda nd transported.
!Do nottow with sling-type equipment .This
coul ddamage th evehicle.
!When towing vehicle swith KEYLESS-GO,
use th ekey instead of th eStart/Sto pbutton.
Otherwise, th eautomatic transmission may
shifttop ositionPwhen th edriver' sorf ront-
passenger door are opened, whichc ouldlead
to damage to th etransmission.
!Vehicles with automatic transmission must
no tbes tarted by tow-starting. This coul doth-
erwis edamage th etransmission.
It is bette rtohave th evehicle transported than
to have it towed away.
If th evehicle can no longer be driven because of
an accidentorb reakdown,you have thefollow-
ing options:
RTransportin gthe vehicle.
Towing and tow-starting281
Breakdown assistance
Z
Page 284 of 326
Asarule, yous houl dhavet he vehicl etrans-
ported.
RTowing the vehicl ewithat ow ropeort ow bar.
Onlyt ow the vehicl einexceptionalc ases.
The battery must be connected and charged.
Otherwise, you:
Rcanno tturn the SmartKeytop osition2in
the ignition lock.
Rcanno trelease the electri cparking brake.
Rcanno tshift the transmission to position i.
The functio nofthe electri cparking brake and
the parking lock is dependent on the on-board
voltage.
If the on-board voltag eislowor if ther eisasys-
tem malfunction:
Rthe electri cparking brake mayn ot be applied
in certain circumstances ,or
Rit maynol ongerbep ossibl etos hift the trans-
mission to position j
Switch off non-essentia lconsumers, e.g .the
radio.
Disar mthe automatic locking feature before the
vehicl eistowed (
Ypage 187). Yo ucould other-
wise be locked outw henp ushing or towing the
vehicle.
Installing/removin gthe towin geye
Installing the towin geye
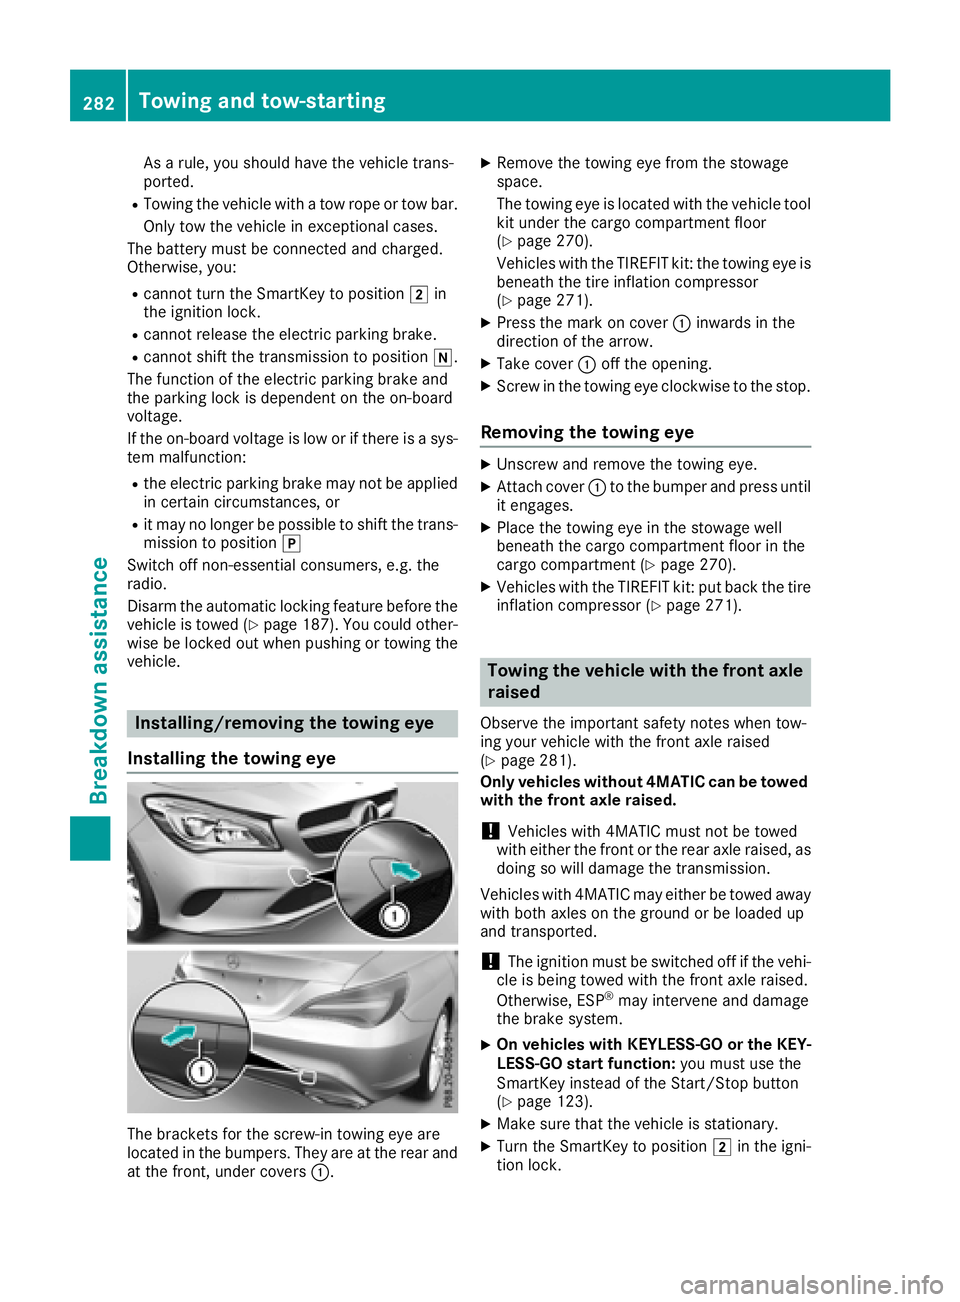
The brackets for the screw-i ntowing ey eare
locate dinthe bumpers. The yareat the rea rand
at the front, under covers :.
XRemove the towing eyefrom the stowage
space.
The towing ey eislocate dw itht he vehicl etool
kit under the cargo compartment floor
(
Ypage 270).
Vehicles with the TIREFIT kit: the towing ey eis
beneath the tire inflation compressor
(
Ypage 271).
XPress the mark on cover :inwards in the
direction of the arrow.
XTake cover :off the opening.
XScrew in the towing ey eclockwise to the stop.
Removing the towin geye
XUnscrew and remove the towing eye.
XAttach cover :to the bumpe rand press until
it engages.
XPlace the towing ey einthe stowag ewell
beneath the cargo compartment floor in the
cargo compartment (
Ypage 270).
XVehicles with the TIREFIT kit: pu tbackt he tire
inflation compressor (Ypage 271).
Towin gthe vehicle with the fron taxle
raised
Observ ethe important safety notes when tow-
ing your vehicl ewitht he front axl eraised
(
Ypage 281).
Only vehicle swithou t4MATIC can be towed
with the fron taxler aised.
!Vehicles with 4MATIC must not be towed
with either the front or the rea raxler aised, as
doing so will damage the transmission.
Vehicles with 4MATIC maye ither be towed away
with both axles on the ground or be loaded up
and transported.
!The ignition must be switched off if the vehi-
cle is being towed with the front axl eraised.
Otherwise, ESP
®mayi ntervene and damage
the brake system.
XOn vehicle swithK EYLESS -GO or the KEY-
LESS-GO start function: youm ustu se the
SmartKeyi nsteadofthe Start/Stop button
(
Ypage 123).
XMake sure thatt he vehicleisstationary.
XTurn the SmartKeytop osition 2in the igni-
tio nlock.
282Towin gand tow-starting
Breakdo wn assis tance
Page 313 of 326
bolts to come loose. Asaresult, you could
lose awheel while driving .There is arisk of
accident.
Never oil or grease wheel bolts. In the event of
damage to the threads, contact aqualified
specialist workshop immediately. Have the
damaged wheel bolts or hub threads
replaced/renewed. Do not continue driving.
GWARNING
If you tighten the wheel bolts or wheel nuts
when the vehicle is raised, the jack could tip
over. There is arisk of injury.
Only tighten the wheel bolts or wheel nuts
when the vehicle is on the ground.
Always pay attention to the instructions and
safety notes in the "Changing awheel" section
(
Ypage 307).
Only use wheel bolts that have been designed
for the wheel and the vehicle. For safety rea-
sons, Mercedes-Benz recommends that you
only use wheel bolts which have been approved for Mercedes-Benz vehicles and the respective
wheel.
!To preventd amage to the paintwork, hold
the wheel securely against the wheel hub
while screwingint he first wheel bolt.
XClean the wheel and wheel hub contact sur-
faces.
XPlace the new wheel on the wheel hub and
push it on.
XTighten the wheel bolts until they are finger-
tight.
Lowering the vehicle
GWARNING
The wheels could work loose if the wheel nuts and bolts are not tightened to the specified
tightenin gtorque. There is arisk of accident.
Have the tightenin gtorque immediately
checked at aqualified specialist workshop
after awheel is changed.
XPlace the ratchet wrenc hontot he hexagon
nut of the jack so that the letters ABare visi-
ble.
XTurn the ratchet wrenc huntil the vehicle is
onc eagain standing firmly on the ground.
XPlace the jack to one side.
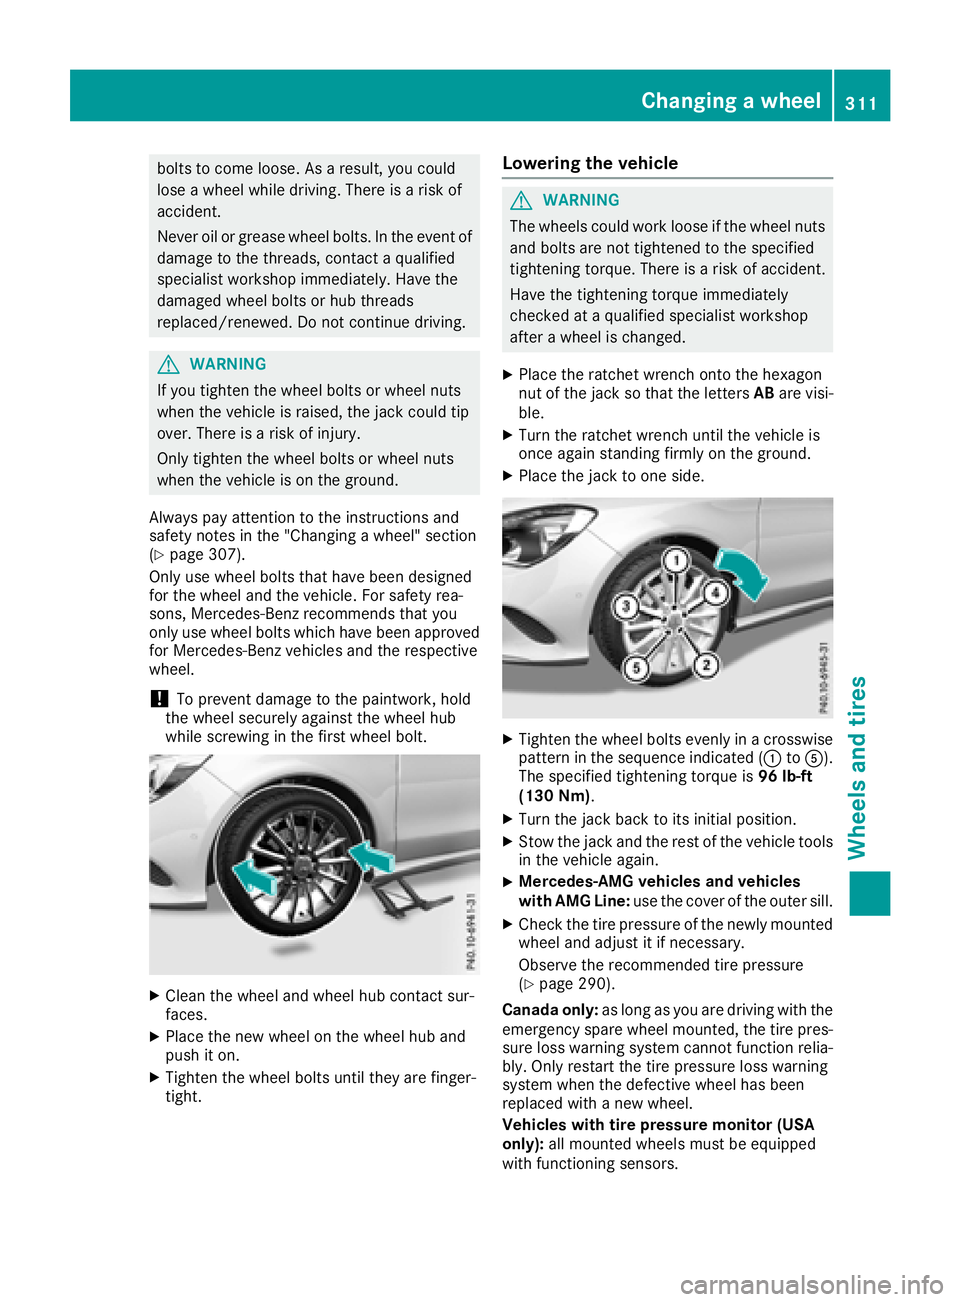
XTighten the wheel bolts evenly in acrosswise
pattern in the sequence indicated (: toA).
The specified tightenin gtorque is 96 lb-ft
(130 Nm) .
XTurn the jack back to its initial position.
XStow the jack and the rest of the vehicle tools
in the vehicle again.
XMercedes-AMG vehicles and vehicles
with AMG Line: use the cover of the outer sill.
XCheck the tire pressure of the newly mounted
wheel and adjust it if necessary.
Observe the recommended tire pressure
(
Ypage 290).
Canadao nly:as long as you are driving with the
emergency spare wheel mounted, the tire pres-
sure loss warning system cannot function relia-
bly. Only restart the tire pressure loss warning
system when the defective wheel has been
replaced with anew wheel.
Vehicles with tir epressure monitor (USA
only): all mounted wheels must be equipped
with functioning sensors.
Changing awheel311
Wheels and tires
Z