2018 MERCEDES-BENZ CLA COUPE hood open
[x] Cancel search: hood openPage 13 of 326
Grade (gasoline) ............................ 316
Importantsafety note s................. .316
Problem (malfunction) .................. .140
Refueling ........................................ 138
Tank content/reserve fuel ............. 316
Fue lfiller flap
Opening ......................................... 139
Fue llevel
Calling up the range (on-board
computer) ...................................... 180
Fue ltank
Capacity ........................................ 316
Problem (malfunction) ................... 140
Fuses
Allocation chart .............................2 85
Before changing .............................2 84
Fuse box in the engine compart-
ment .............................................. 285
Fuse box in the front-passenger
footwell .......................................... 285
Important safety notes .................. 284
G
Garage door opener
Clearing the memory ..................... 254
General notes ................................ 252
Important safety notes .................. 252
Opening/closing the garage door .. 254
Problems whe nprogramming ........2 54
Programming (button in the rear-
view mirror) ................................... 252
Synchronizing the rolling code ....... 253
Gasoline ............................................. 316
Gear indicator (on-board com-
puter, Mercedes-AMG vehicles) ....... 188
Genuine parts ...................................... 24
Glove box ...........................................2 38
Google™L ocal Search
see also Digita lOperator's Man-
ua l..................................................2 29
H
Handbrake
see Parking brake
HANDS-FRE EACCES S.......................... 79 Hazard warning lamps
Display message ............................ 216
Switching on/off ........................... 102
Head restraints
Adjusting ......................................... 92
Adjusting (manually). ....................... 93
Adjusting (rear) ................................ 93
Headlamps
Fogging up ..................................... 103
see Automatic headlamp mode
Heating
see Climate control
High beam flasher .............................1 01
High-beam headlamps
Adaptive Highbeam Assist ............. 102
Display message ............................ 203
Replacing bulbs .............................1 06
Switching on/off ........................... 101
Hill start assist .................................. 125
HOLD function
Activating ....................................... 157
Activatio nconditions ..................... 157
Deactivating ................................... 157
Display message ............................ 207
Function/notes .............................1 57
Home address
see also Digita lOperator's Man-
ua l..................................................2 29
Hood
Closing ...........................................2 58
Display message ............................ 215
Important safety notes .................. 257
Opening ......................................... 257
Horn ...................................................... 32
Hydroplaning ..................................... 148
I
Ignitionlock
see Key positions
Immobilizer .......................................... 68
Indicator lamp
Replacing bulbs (rear) .................... 106
Indicator lamps
see Warning and indicator lamps
Indicators
see Turn signals
Index11
Page 34 of 326
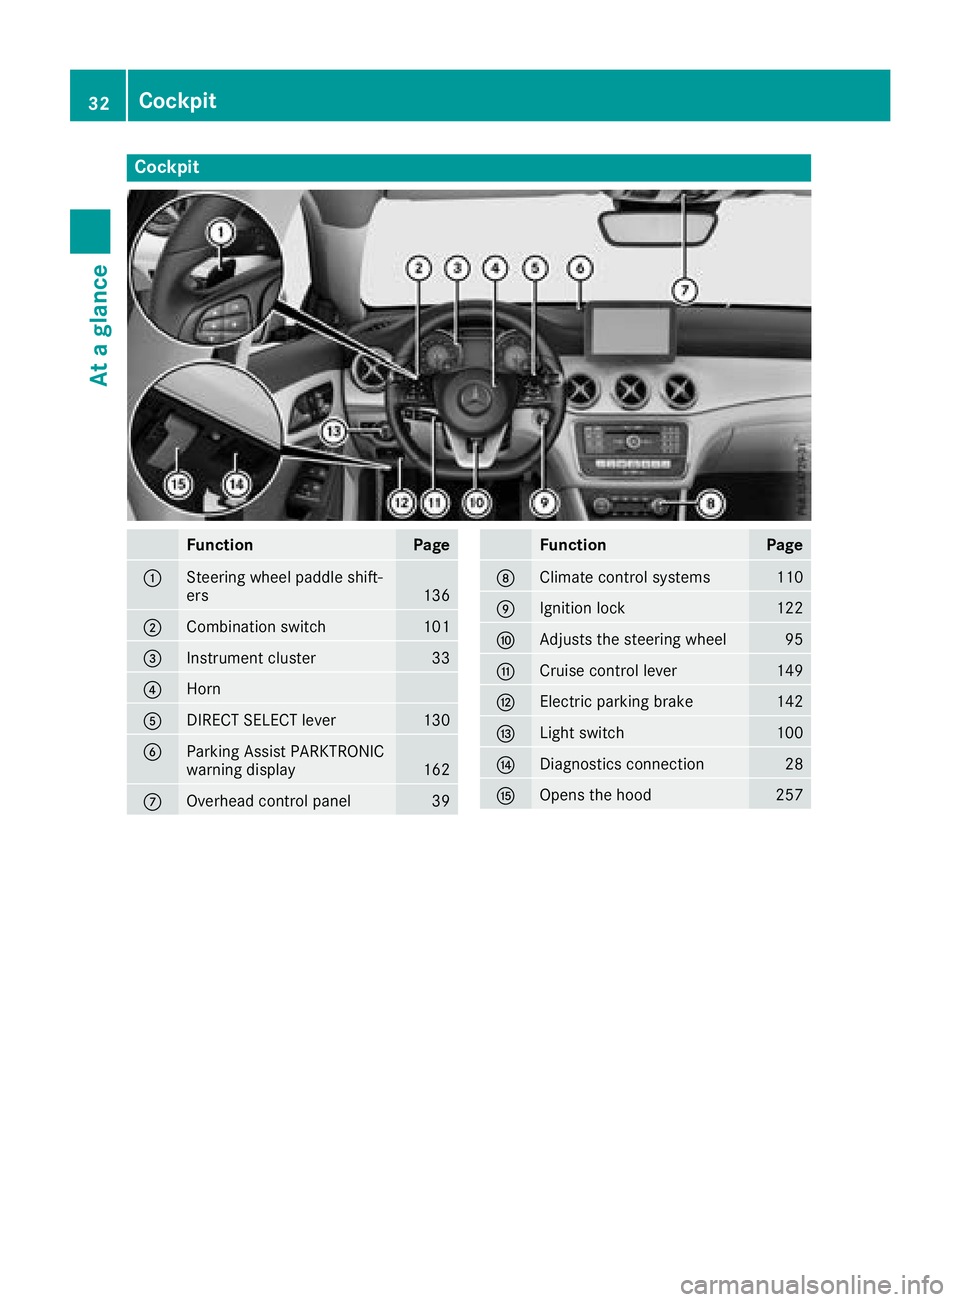
Cockpit
FunctionPage
:Steering wheel paddle shift-
ers136
;Combination switch101
=Instrumentcluster33
?Horn
ADIRECT SELECT lever130
BParking Assist PARKTRONIC
warning display162
COverhead control panel39
FunctionPage
DClimatecontrol systems110
EIgnition lock122
FAdjusts th esteering wheel95
GCruis econtrol lever149
HElectric parking brake142
ILights witch100
JDiagnostics connection28
KOpenst hehood257
32Cockpit
Atag lance
Page 70 of 326

You should therefore adapt your drivingstyle
to the differenth andlingcharacteristics. Have
the brakes ystemchecked at aqualified spe-
cialist workshop.
Please observet he information on warnin gand
indicator lamps (
Ypage 220)
(
Ypage 220) as well as on display messages
(Ypage 194).
ADAPTIVE BRAKE
ADAPTIVE BRAKE enhances braking safetya nd
offers increased braking comfort.Ina ddition to
the braking function ,ADA PTIVE BRAKE also has
the HOLDf unction (
Ypage 157) and hill start
assist (Ypage 125).
STEER CONTROL
Genera linformation
STEER CONTROL helps you by transmitting a
noticeable steeringf orcetothe steeringw heel
in the direction required for vehicle stabilization.
This steeringa ssistanceisprovided in particular
if:
Rboth right wheels or both left wheels are on a
wet or slippery road surfacew hen you brake
Rthe vehicle begins to skid
Important safetynotes
iObserve the "Importan tsafetyn otes" sec-
tion (Ypage 61).
No steeringa ssistanceisprovided from STEER
CONTROL, if:
RESP®is malfunctioning
Rthe steeringism alfunctioning
If ESP®is malfunctioning, you will be assisted
further by the electrical power steering.
Protection against theft
Immobilizer
The immobilizer prevent syour vehicle from
being started without the correctS martKey.
XTo activatewith theSmartKey: remove the
SmartKey from the ignition lock.
XTo activatew ith KEYLESS-GO start-func-
tion or KEYLESS-GO: switchthe ignition off
and open the driver's door.
XTo deactivate: switchont he ignition.
When leaving the vehicle, always tak ethe
SmartKey with you and lock the vehicle. Anyone
can star tthe engin eifavalid SmartKey has been
left inside the vehicle.
iThe immobilizer is always deactivate dwhen
you star tthe engine.
In the eventt hat the engin ecannot be started
(yet the vehicle's battery is charged), the sys-
tem is not operational. Contact an authorized
Mercedes-Ben zCenter or call
1-800-FOR-MERCedes (in the USA )or
1-800-387-0100( in Canada).
ATA (anti-theft alarms ystem)
XTo arm:lock the vehicle with the SmartKe yor
KEYLESS-GO.
Indicator lamp :flashes. The alarm system
is armed after approximately 15 seconds.
XTo disarm: unlock the vehicle with the Smart-
Key or KEYLESS-GO.
or
XInsert the SmartKe yintot he ignition lock.
Av isual and audible alarm is triggered if the
alarm system is armed and you open:
Rad oor
Rthe vehicle with the mechanical key
Rthe trun klid
Rthe hood
68Protection against theft
Safety
Page 108 of 326
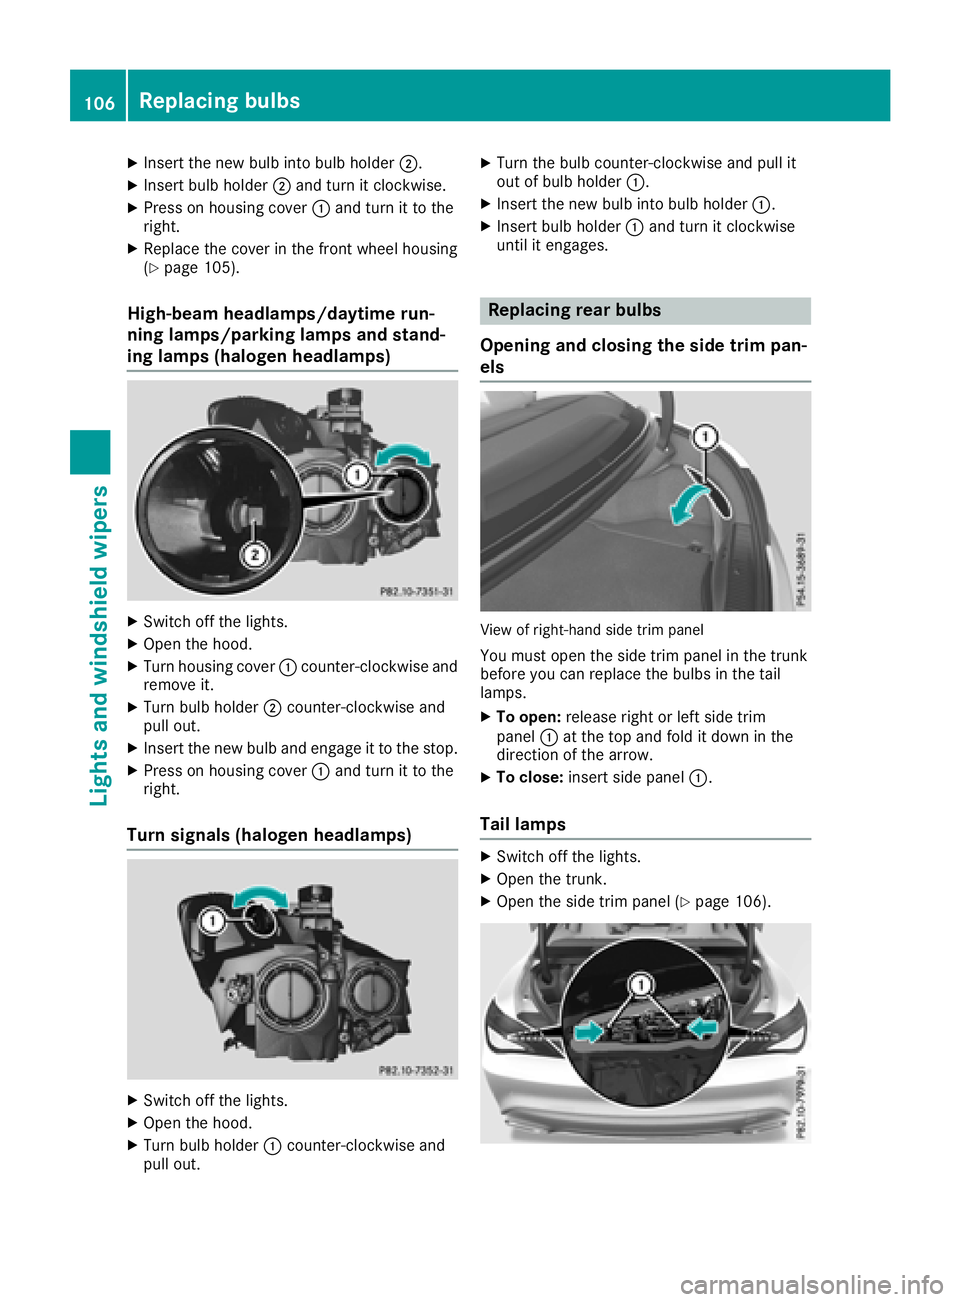
XInsert the new bulbinto bulbholder;.
XInsert bulbh older;and turn it clockwise.
XPress on housing cover :and turn it to the
right.
XReplace the cover in the front wheel housing
(Ypage 105).
High-beam headlamps/daytime run-
ning lamps/parking lamps and stand-
ing lamps (halogen headlamps)
XSwitch off the lights.
XOpen the hood.
XTurn housing cover :counter-clockwise and
remove it.
XTurn bulbh older;counter-clockwise and
pullo ut.
XInsert the new bulba nd engage it to the stop.
XPress on housing cover :and turn it to the
right.
Turn signals (halogen headlamps)
XSwitch off the lights.
XOpen the hood.
XTurn bulbh older:counter-clockwise and
pullo ut.
XTurn the bulbc ounter-clockwise and pulli t
out of bulbh older:.
XInsert the new bulbi nto bulbholder:.
XInsert bulbh older:and turn it clockwise
until it engages.
Replacing rear bulbs
Openinga nd closing the side trim pan-
els
View of right-hand side trim panel
You must open the side trim panel in the trunk
before you can replace the bulbs in the tail
lamps.
XTo open: release right or left side trim
panel :at the top and fold it down in the
direction of the arrow.
XTo close: insert side panel :.
Tail lamps
XSwitch off the lights.
XOpen the trunk.
XOpen the side trim panel (Ypage 106).
106Replacing bulbs
Lights and windshield wipers
Page 122 of 326

iIf you activate the residual heat function at
high temperatures, only the ventilation willb e
activated. The blower runs at mediums peed.
iYou cannot use the ventilation to cool the
vehicle interior to atemperature lowert han
the outsidet emperature.
Activating/deactivating
XTurn the SmartKey to position gin the igni-
tion lock or remove it (Ypage 122).
XPress the Ìbutton.
The indicator lamp in the Ìbutton lights
up or goes out.
The indicator lamp in the button indicates that
the respective function is activated.
iResidualh eat is deactivated automatically:
Rafter approximately 30 minutes
Rwhen the ignition is switched on
Rif the battery voltage drops
Air vents
Important safety notes
GWARNING
Very hot or very cold air can flow from the air
vents. This could resultinb urns or frostbite in
the immediate vicinity of the air vents. There
is ar isk of injury.
Make sure that all vehicle occupants always
maintain asufficient distance to the air out-
lets. If necessary ,redirect the airflow to
another area of the vehicle interior.
In order to ensure the direct flow of fresh air
through the air vents into the vehicle interior,
please observe the following notes:
Rkeep the air inlet between the windshield and
the hood free of blockages, such as ice, snow or leaves.
Rnever cover the air vents or air intake grilles in
the vehicle interior.
iFor optimal climate control in the vehicle,
open the air vents completely and set the
adjusters to the central position.
Setting the air vents
:Side window defroster vent
;Side air vent
XTo open aside air vent: turn the adjuster in
side air vent ;to the left.
XTo close aside air vent: turn the adjuster in
side air vent ;clockwise as far as it willg o.
iThe center and rear air vents are adjusted in
the same way.
120Airv ents
Climate control
Page 127 of 326
vice or maintenance work. There isarisk of
injury.
Always secure the engine against uninten-
tional starting before carrying out mainte-
nance or repair work.
Make sure that the engine cannot be started via
you rsmartphone before carrying out mainte-
nance or repairs. You can prevent an engine
start via you rsmartphone, for example, if you:
Rswitch on the hazard warning lamps
Rdo not lock the doors
Ropen the hood
Pulling away
General notes
GWARNING
If the engine speedisa bove the idling speed
and you engage transmission position Dor R,
the vehiclec ould pullawa ysuddenly.T here is
ar isk of an accident.
When engaging transmission position Dor R,
alway sfirmly depress the brake pedala nd do
not simultaneously accelerate.
Depress the accelerator carefully when pulling
away.
The vehiclel ocks centrally once you have pulled
away. The locking knobs in the doors drop down.
You can open the doors from the insid eatany
time.
You can als odeactivate the automatic locking
feature (
Ypag e187).
It is possible to shift the transmission from posi-
tion jto the desired position only if you
depress the brake pedal. Only then can the
parking lock be deactivated.
All vehicles (except Mercedes-AMG vehi-
cles): if you do not depress the brake pedal, the
DIRECT SELECT lever can still be moved but the parking lock remains engaged.
Mercedes-AMG vehicles: if you do not depress
the brake pedal, the selector lever can still be
moved but the parking lock remains engaged.
At transmission flui dtemperatures below Ò4‡
(Ò20†), you can only shift out of position jinto another transmission position when the engine
is running.
iUpshifts take place at highere
ngine speeds
after acold start. This helpst he catalytic con-
verter to reach its operating temperature
more quickly.
Information on the automatic release of the
electric parking brake (
Ypag e143).
Hill start assist
Hill start assist helpsy ou when pulling away
forward or in reverse on an uphill gradient. It
holdst he vehiclef oras hort time after you have
removed you rfoot from the brake pedal. This
gives you enoug htime to move you rfoot from
the brake pedaltot he accelerator pedala nd to
depress it before the vehicleb egins to roll.
GWARNING
After ashort time, hill start assist wil lnolon-
ger brake you rvehiclea nd it coul droll away.
There is arisk of an accident and injury.
Therefore, quickly move you rfoot from the
brake pedaltot he accelerator pedal. Never
leave the vehiclew hen it is held by hill start
assist.
Hill start assist is not active if:
Ryou are pulling awa yonalevel road or on a
downhill gradient.
Rthe transmission is in position i.
Rthe electric parking brake is applied.
RESP®is malfunctioning.
Further information on holding the vehicles ta-
tionary on uphill gradients (
Ypag e134).
ECOs tart/stop function
Introduction
The ECO start/stop function switches the
engine off automatically if the vehicleiss topped
under certain conditions.
The engine starts automatically when the driver
wants to pul lawa ya gain. The ECO start/stop
function thereby helpsy ou to reduce the fuel
consumptio nand emissions of you rvehicle.
Driving125
Driving and parking
Z
Page 179 of 326
There isashort delay before achange in outside
temperature appears in the multifunction dis-
play.
Coolant temperature gauge
GWARNING
Opening the hood when the engine is over-
heated or when there is afire in the engine
compartment could expose you to hot gases
or other service products. There is arisk of
injury.
Let an overheated engine cool down before
opening the hood. If there is afire in the
engine compartment,k eep the hood closed
and contact the fire department.
!Ad isplay message is shown if the coolant
temperature is too high.
If the coolant temperature is over 248 ‡
(120 †), do not continue driving. The engine
will otherwise be damaged.
The coolant temperature gage is in the instru-
ment cluster on the right-hand side (
Ypage 33).
The Hmarking in the coolant temperature gauge
corresponds to acoolant temperature of
approximately 248 ‡(120 †).
Under normal operating conditions and at the
correctc oolant level, the coolant temperature
gauge may rise to the Hmarking.
Operating the on-board computer
Overview
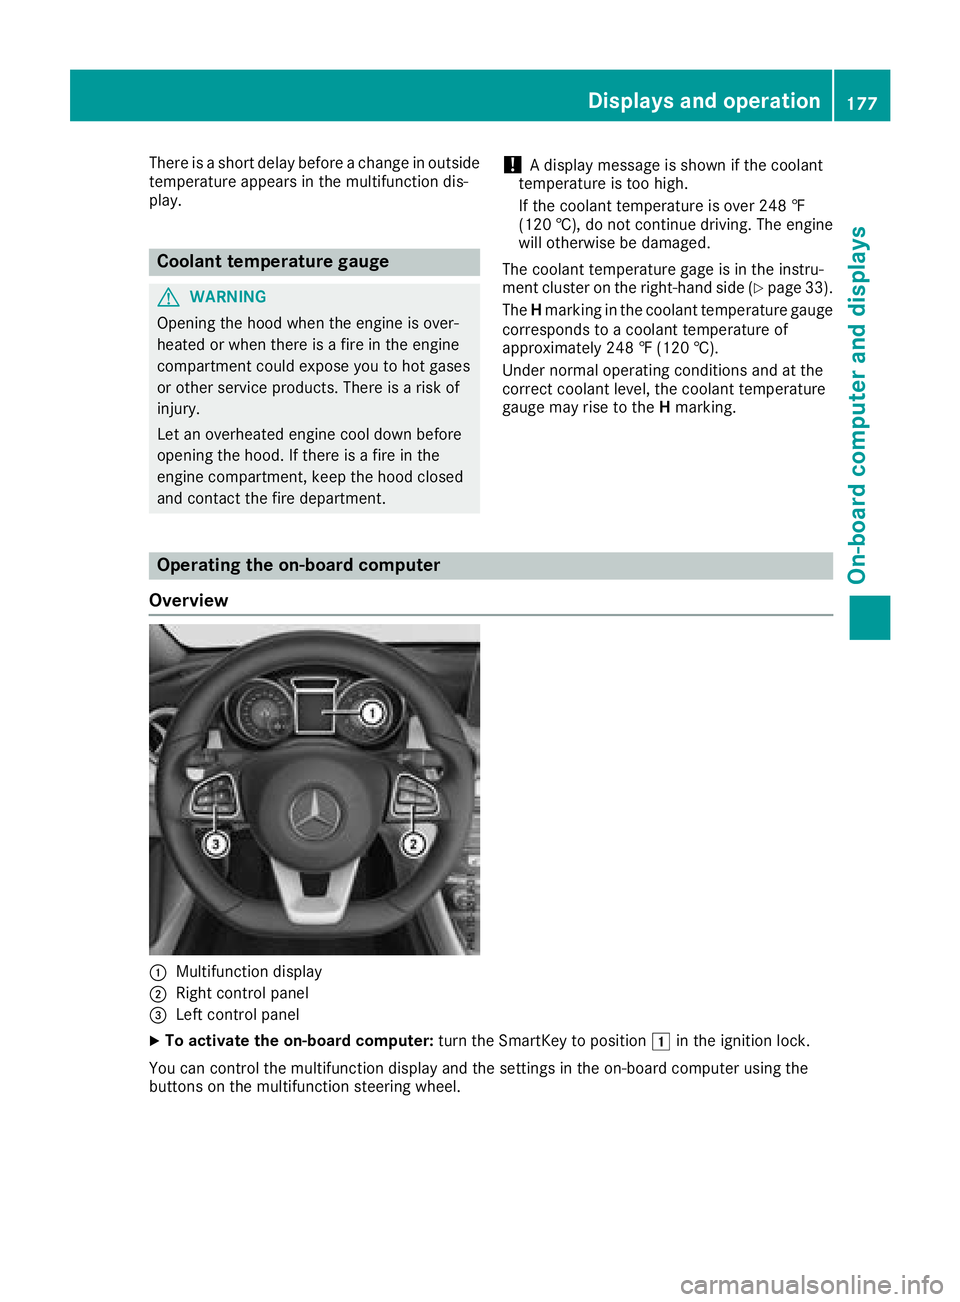
:Multifunction display
;Right control panel
=Left control panel
XTo activatet he on-board computer: turn the SmartKey to position 1in the ignition lock.
You can control the multifunction display and the settings in the on-board computer using the
button sonthe multifunction steerin gwheel.
Displays and operation177
On-board computer and displays
Z
Page 207 of 326
Engine
Display messagesPossible causes/consequences andMSolutions
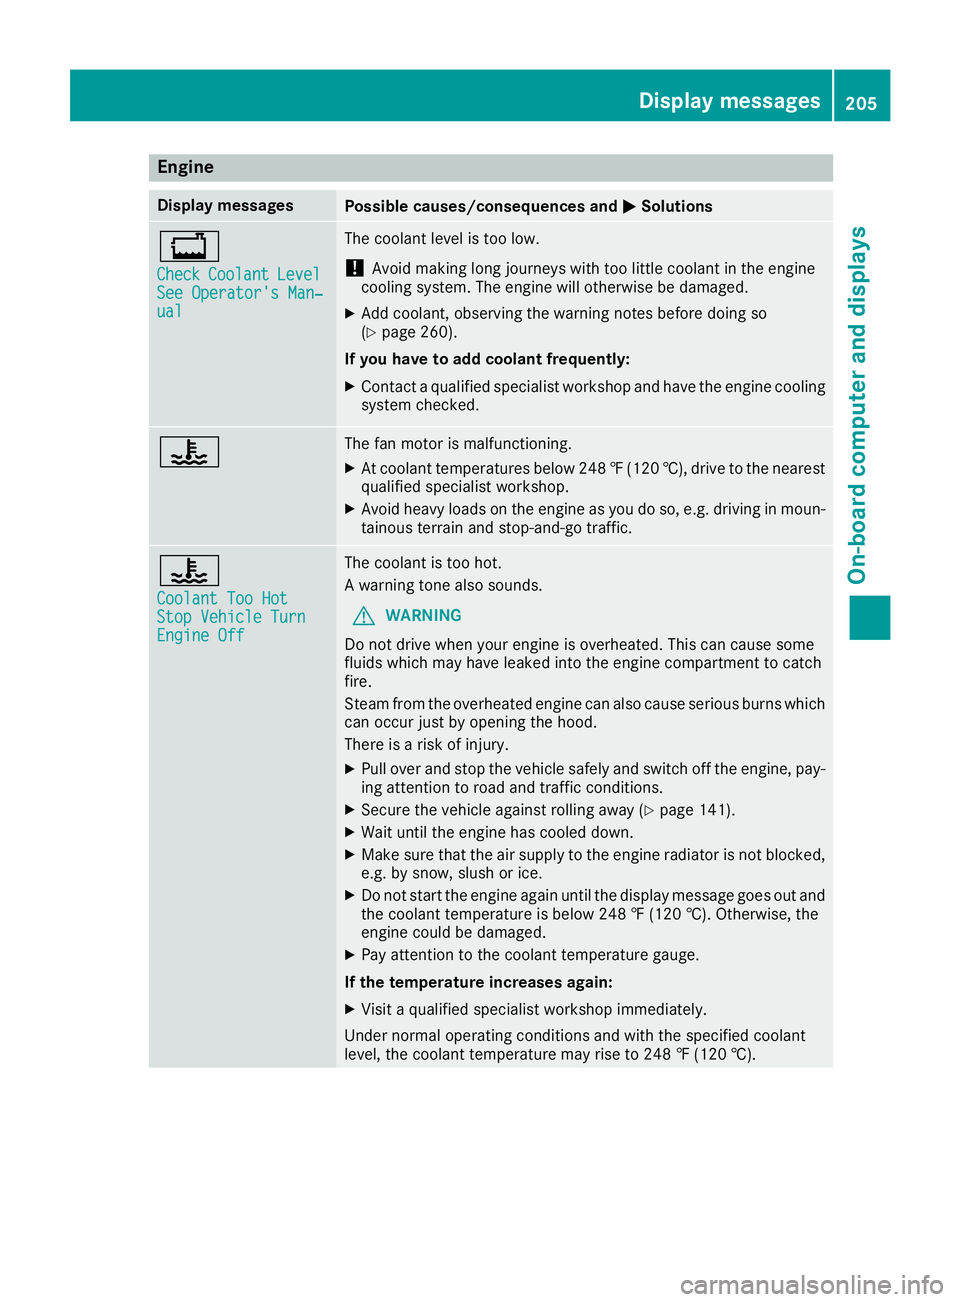
+
CheckCoolantLevelSee Operator'sMan‐ual
The coolant levelistoolow.
!Avoid making longj ourneys with to olittle coolant in th eengine
cooling system. The engine will otherwise be damaged.
XAdd coolant ,observing th ewarning note sbefore doings o
(Ypage 260).
If you have to ad dcoolan tfrequently:
XContac taqualified specialist workshop and have th eengine cooling
system checked.
?The fan motor is malfunctioning.
XAt coolant temperatures below 24 8‡(120 †), drive to the nearest
qualified specialist workshop.
XAvoid heavy loads on the engine as you do so, e.g. driving in moun-
tainou sterrai nand stop-and-go traffic.
?
CoolantT oo HotStop VehicleT urnEngine Off
The coolant is too hot.
Awarning tone also sounds.
GWARNING
Do not drive whe nyoure ngine is overheated. This can cause some
fluids which may have leaked into the engine compartment to catch
fire.
Steam from the overheated engine can also cause serious burns which
can occur just by opening the hood.
There is arisk of injury.
XPul lover and stop the vehicle safely and switch off the engine, pay-
ing attention to road and traffic conditions.
XSecure the vehicle against rolling away (Ypag e141).
XWai tuntil the engine has cooledd own.
XMake sure that the airsupply to the engine radiator is not blocked,
e.g. by snow, slush or ice.
XDo not start the engine again until the displaym essage goes out and
the coolant temperature is below 248 ‡(120 †). Otherwise, the
engine coul dbedamaged.
XPay attention to the coolant temperature gauge.
If the temperature increase sagain:
XVisitaq ualified specialist workshop immediately.
Under normal operating conditions and with the specified coolant
level, the coolant temperature may rise to 248 ‡(120 †).
Display messages205
On-board computer and displays
Z