2018 MERCEDES-BENZ CLA COUPE buttons
[x] Cancel search: buttonsPage 20 of 326

Start-off assistActivating ....................................... 158
Important safety notes .................. 158
Start/Stop button
Removing ....................................... 123
Starting the engine ........................ 124
Start/stop function
see ECO start/stop function
Starting (engine) ................................ 123
STEER CONTROL ..................................6 8
Steering
Display message ............................2 16
Steering assistant STEE RCON-
TROL
see STEER CONTROL
Steering wheel
Adjusting (manually). ....................... 95
Butto noverview ............................... 34
Buttons (on-board computer) ......... 177
Cleaning ......................................... 267
Important safety notes .................... 95
Paddle shifters ............................... 136
Steering whee lpaddle shifters ........ 136
Stopwatch (RACETIMER) ................... 189
Stowag ecom partments
Armrest (front) ............................... 238
Armrest (under )............................. 239
Center console .............................. 238
Center console (rear) ..................... 239
Cu ph olders ................................... 242
Eyeglasses compartment ............... 238
Glove box ....................................... 238
Important safety information ......... 237
Mapp ockets .................................. 239
Stowag enet ................................... 239
Stowag enet....................................... 239
Stowag ewellb enea th the trunk
floor .................................................... 241
Summert ires..................................... 289
Sun visor ............................................ 243
Suspension setting
AMG adaptive sport suspension
system ........................................... 159
Switchin gair-recirculatio nmode
on/off ................................................. 119
Switchin gonmediam ode
Via the device list .......................... 235T
Tachometer ........................................ 176
Tail lamps
Displa ymessage ............................ 203
see Lights
Tank
see Fue ltank
Tank content
Fuelgauge ....................................... 33
Technical data
Capacities ...................................... 315
Information .................................... 313
Tires/wheels ................................. 312
Vehicl edata. .................................. 320
Telephone
Accepting acall( multifunction
steering wheel) .............................. 184
Authorizing amobilephone (con-
necting) ......................................... 233
Authorizing amobil ephone via the
device manager (connecting) ......... 234
Connecting amobilephone
(device manager )........................... 234
Connecting amobilephone (gen-
erali nformation) ............................ 233
Displa ymessage ............................ 216
Introduction ................................... 183
Menu (on-board computer) ............ 183
Numbe rfrom the phone boo k........ 184
Redialing ........................................ 184
Rejecting/ending acall. ................ 184
see also Digital Operator's Man-
ua l.................................................. 229
Temperature
Coolant .......................................... 177
Coolant (on-board computer,
Mercedes-AMGv ehicles) ............... 188
Engine oil( on-board computer,
Mercedes-AMGv ehicles) ............... 188
Outsid etemperature ...................... 176
Setting (climate control )................ 116
Transmission oil( on-board com-
puter, Mercedes-AMGv ehicles) ..... 188
Through-loadin gfeature ................... 239
Timing (RACETIMER) ......................... 189
Tire pressure
Calling up (on-board computer) ..... 294
18Index
Page 41 of 326
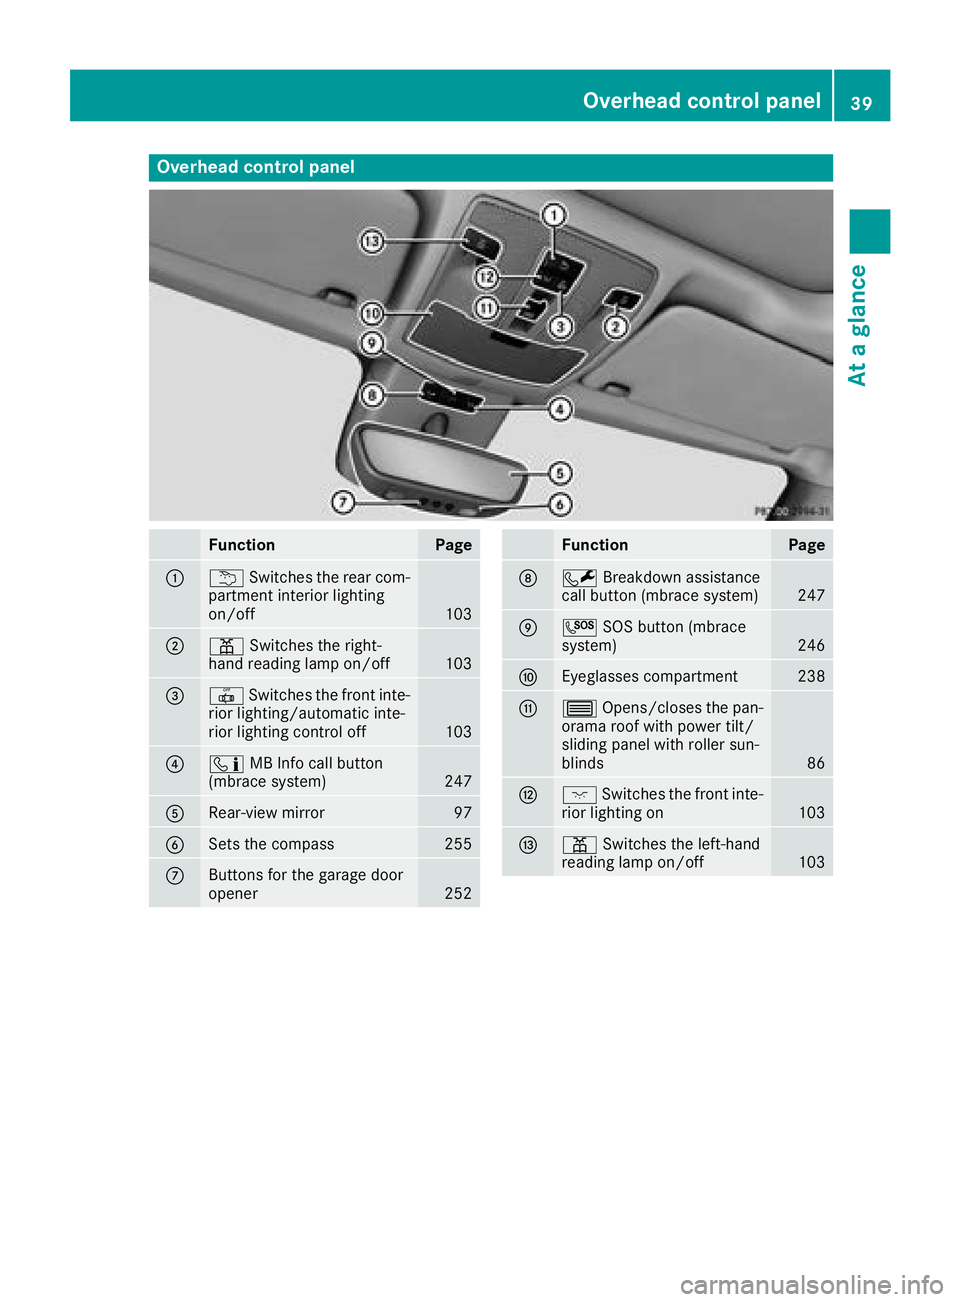
Overheadcontrol panel
FunctionPage
:u Switches the rear com-
partmen tinterior lighting
on/off
103
;p Switches the right-
hand reading lamp on/off103
=| Switches the fronti nte-
rior lighting/automatic inte-
rior lighting control off
103
?ï MB Inf ocall button
(mbrace system)247
ARear-view mirror97
BSetst he compass255
CButtons for the garage door
opener252
FunctionPage
DFBreakdown assistance
call button (mbrace system)247
EG SOS button (mbrace
system)246
FEyeglasses compartment238
G3 Opens/closes the pan-
orama roof with power tilt/
sliding panel with roller sun-
blinds
86
Hc Switches the fronti nte-
rior lighting on103
Ip Switches the left-hand
reading lamp on/off103
Overhea dcontrol panel39
Atag lance
Page 62 of 326
GWARNING
If the child restraint system is subjected to
direct sunlight, parts may get very hot. Chil-
dren may burn themselves on these parts,
particularl yonthe metal parts of the child
restraint system. There is arisk of injury.
If you leave the vehicle, taking the child with
you ,alway sensure that the child restraint
system is not exposedtod irect sunlight. Pro-
tect it with ablanket, for example. If the child
restraint system has been exposedtod irect
sunlight, let it cool downb efore securing the
child in it. Never leave children unattended in
the vehicle.
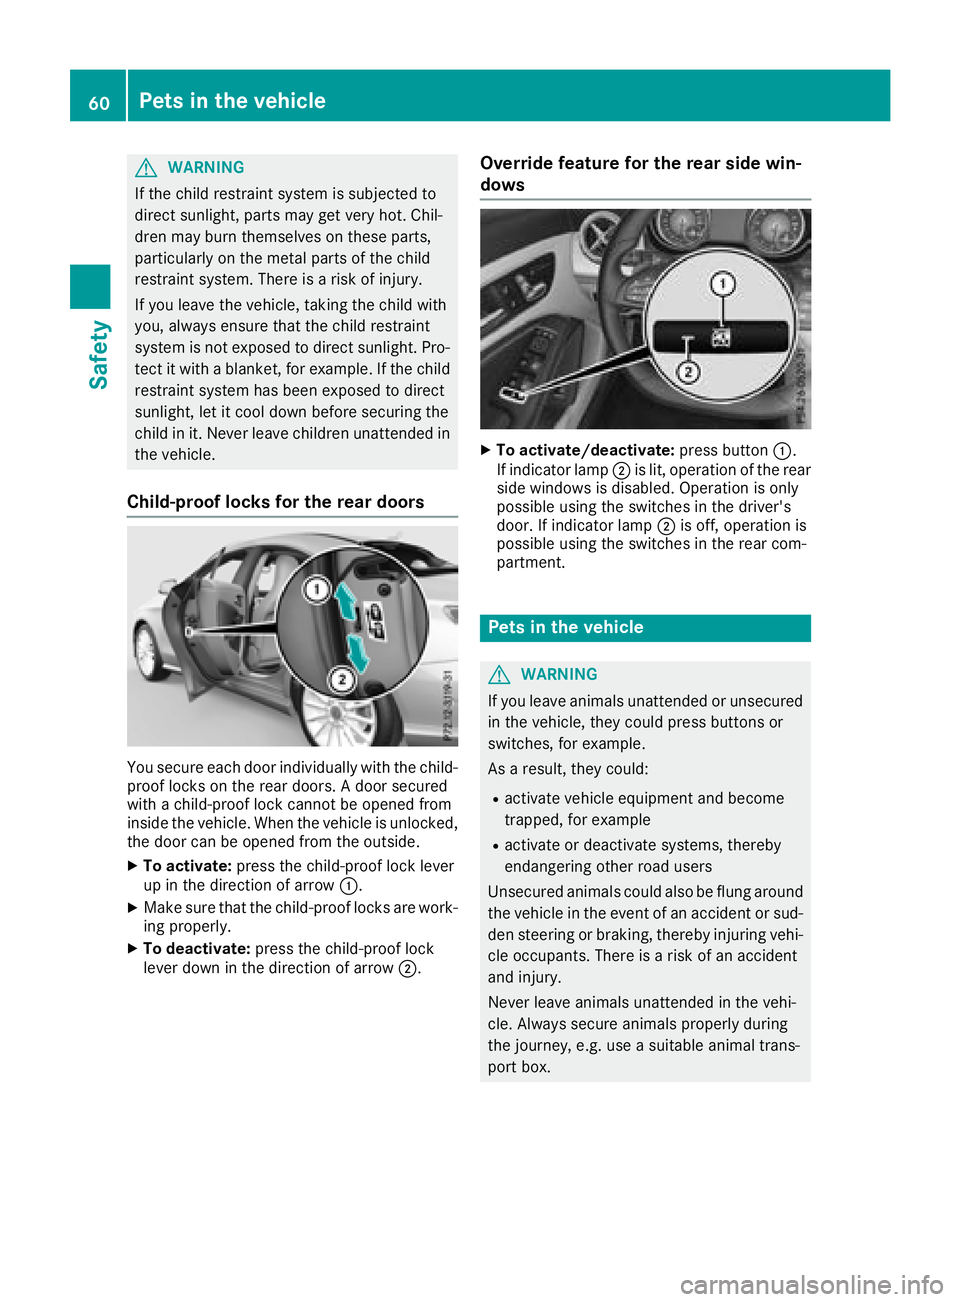
Child-proof locks for the rear doors
You secure each door individually with the child-
proof locks on the rear doors. Adoor secured
with achild-proof lock cannot be opened from
insid ethe vehicle. When the vehicleisu nlocked,
the door can be opened from the outside.
XTo activate: press the child-proof lock lever
up in the direction of arrow :.
XMake sure that the child-proof locks are work-
ing properly.
XTo deactivate: press the child-proof lock
leverd ownint he direction of arrow ;.
Override feature for the rear side win-
dows
XTo activate/deactivate: press button:.
If indicator lamp ;is lit, operation of the rear
side windows is disabled. Operation is only
possible using the switches in the driver's
door. If indicator lamp ;is off, operation is
possible using the switches in the rear com-
partment.
Pets in the vehicle
GWARNING
If you leave animals unattended or unsecured
in the vehicle, they coul dpress buttons or
switches, for example.
As aresult, they could:
Ractivate vehiclee quipment and become
trapped, for example
Ractivate or deactivate systems ,thereby
endangering other road users
Unsecure danimals coul dalsobef lung around
the vehicleint he event of an accident or sud-
den steering or braking, thereby injuring vehi-
cle occupants. There is arisk of an accident
and injury.
Never leave animals unattended in the vehi-
cle. Always secure animals properly during
the journey ,e.g. use asuitable anima ltrans-
port box.
60Pets in the vehicle
Safety
Page 74 of 326

Changing thesettings of th elocking
system
You can chang ethe settings of th elockin gsys-
tem. This mean sthato nlyt he driver'sd oor and
th ef uel fille rflap are unlocked when th evehicle
is unlocked. This is useful if you frequently travel
on your own.
XTo change th esetting: pressand hold the
% and& buttons simultaneouslyf or
approximately six seconds until th ebattery
indicator lamp flashes twice (
Ypage 73).
If th esettin goft helockin gsystem is changed
within th esignal range of th evehicle ,pressing
the & or% button:
Rlocks or
Runlock sthe vehicle
The SmartKey no wfunctionsasf ollows:
XTo unlock:pressthe % buttononce.
XTo unlock centrally: pressthe % button
twice.
XTo lock centrally: pressthe & button.
The KEYLESS-GO function is changed as fol-
lows:
XTo unlock th edriver's door: touch theinner
surface of th edoor handle on th edriver's
door.
XTo unlock centrally: touch theinner surface
of th edoor handle on th efront-pa ssenger
door or th erear door.
XTo lock centrally: touch theouter sensor
surface on oneoft hedoor handles.
XTo restor ethe factor ysettings: pressand
hold the %and& buttons simultane-
ously for approximately six seconds until the
battery check lamp flashes twi ce
(
Ypage 73).
Mechanica lkey
General notes
If th evehicle can no longer be locke dor
unlocked witht heSmartKey or KEYLESS-GO,
use th emechanical key.
If you use th emechanical ke ytou nlock and
open th edriver'sd oor or th etrunk lid, th eanti-
theft alarm system will be triggered (
Ypage 68). Therea
re several ways to tur noff th ealarm:
XTo deactivat ethe alarm with th ekey: press
the % or& buttonont hekey.
or
XInsertt heSmartKey int othe ignition lock.
or
XTo deactivat ethe alarm with KEYLESS-GO:
pres sthe Start/Sto pbutto nint heignition
lock. The SmartKey must be in th evehicle.
or
XLockoru nlock thevehicle usingK EYLESS-
GO. The SmartKey must be outside th evehi-
cle.
If you unlock th evehicle usingt hemechanical
key, th efuel fille rflap will no tbeunlocked auto-
matically.
XTo unlock th efuelfille rflap: insert the
SmartKey int othe ignition lock.
Removing th emechanica lkey
XPush release catch :in th edirection of the
arrow and at th esame tim eremove mechan-
ical key ;from th eSmartKey.
For further informatio nabout:
RUnlockin gthe driver'sd oor (Ypage 77)
RUnlockingthe trunk (Ypage 81)
RLockin gthe vehicle (Ypage 77)
Insertin gthe mechanica lkey
XPush mechanical key ;completely int othe
SmartKey until it engages and release
catch :is back in its basic position.
72SmartKey
Opening and closing
Page 75 of 326
SmartKey battery
Important safety notes
GWARNING
Batteries contain toxic and corrosive substan- ces. If batteries are swallowed, it can result in
severe health problems. There is arisk of fatal
injury.
Keep batteries out of the reach of children. If
ab attery is swallowed, seek medical attention
immediately.
The SmartKey batteries contain perchlorate
material, which may require special handling
and regard for the environment. National guide-
lines must be observed during disposal. In Cal-
ifornia, see www.dtsc.ca.gov/
HazardousWaste/Perchlorate/index.cfm.
Mercedes-Benz recommends that you have the
battery replaced at aqualified specialist work-
shop.
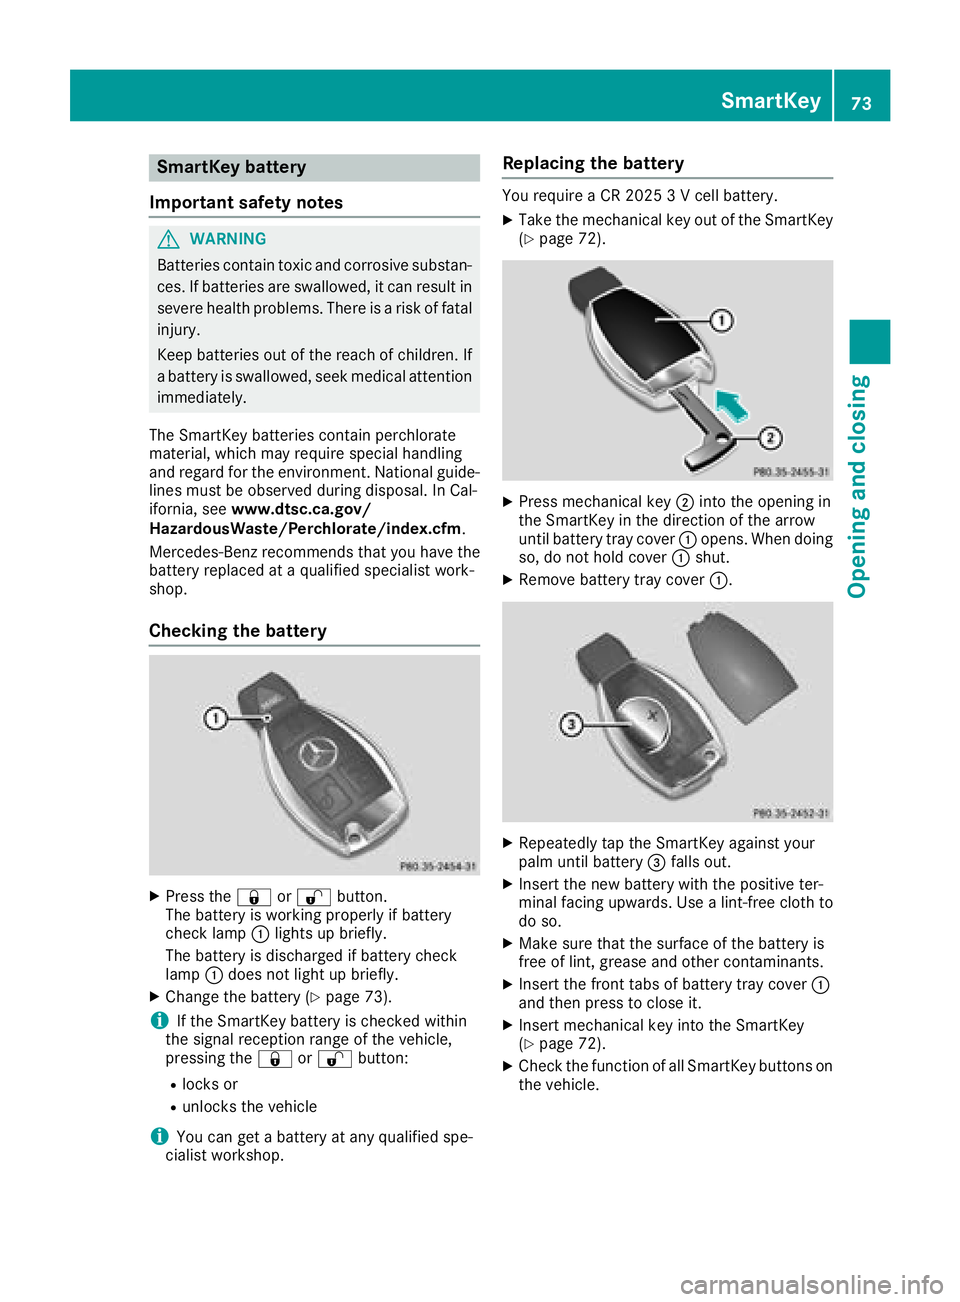
Checking the battery
XPress the &or% button.
The battery is working properly if battery
check lamp :lights up briefly.
The battery is discharged if battery check
lamp :does not light up briefly.
XChange the battery (Ypage 73).
iIf the SmartKey battery is checked within
the signal reception range of the vehicle,
pressing the &or% button:
Rlocks or
Runlocks the vehicle
iYou can get abattery at any qualified spe-
cialist workshop.
Replacing the battery
You require aCR20253Vc ell battery.
XTake the mechanical key out of the SmartKey
(Ypage 72).
XPress mechanical key ;into the opening in
the SmartKey in the direction of the arrow
until battery tray cover :opens. When doing
so, do not hold cover :shut.
XRemove battery tray cover :.
XRepeatedly tap the SmartKey against your
palm until battery=falls out.
XInsert the new battery with the positive ter-
minal facing upwards. Use alint-free cloth to
do so.
XMake sure that the surface of the battery is
free of lint, grease and other contaminants.
XInsert the front tabs of battery tray cover :
and then press to close it.
XInsert mechanical key into the SmartKey
(Ypage 72).
XCheck the function of all SmartKey buttons on
the vehicle.
SmartKey73
Opening and closing
Z
Page 79 of 326

Meanwhile, the fuel filler flap will not be locked
or unlocked.
You cannot unlock the vehicle centrally from the
inside if the vehicle has been locked with the
SmartKey or KEYLESS-GO.
You can openadoor from inside the vehicle
even if it has been locked. You can open the rear
doors from inside the vehicle unless they are
secured by the child-proof lock (
Ypage 60).
If the vehicle has previously been locked with
the SmartKey from the outside, opening adoor
from the inside will trigger the anti-theft alarm
system. Switch off the alarm (
Ypage 68).
If al ocked door is opened from the inside, the
previous unlock status of the vehicle will be
taken into consideration if:
Rthe vehicle was locked using the locking but-
ton for the central locking, or
Rif the vehicle was locked automatically
The vehicle will be fully unlocked if it had previ-
ously been fully unlocked. If only the driver's
door had been previously unlocked, only the
door which has been opened from the inside is
unlocked.
Automatic lockingf eature
XTo deactivate:press and hold button :for
approximately five seconds until atone
sounds.
XTo activate: press and hold button ;for
approximately five seconds until atone
sounds.
If you press one of the two buttons and do not
hear atone, the relevant settin ghas already
been selected.
The vehicle is locked automatically when the
ignition is switched on and the wheels are turn-
ing. You could therefore lock yourself out if:
Rthe vehicle is being pushed
Rthe vehicle is being towed
Rthe vehicle is on
aroller dynamometer
You can also switch the automatic locking func-
tion on and off using the on-board computer
(
Ypage 187).
Unlocking the driver's door (mechan-
ical key)
If the vehicle can no longer be locked or
unlocked with the SmartKey or KEYLESS-GO,
use the mechanical key.
If you use the mechanical key to unlock and
open the driver's door, the anti-theft alarm sys-
tem will be triggered. Switch off the alarm
(
Ypage 68).
XTake the mechanical key out of the SmartKey
(Ypage 72).
XInsert the mechanical key into the lock of the
driver's door as far as it will go.
XTurn the mechanical key counter-clockwise
as far as it will go to position 1.
The door is unlocked.
XTurn the mechanical key back and remove it.
XInsert mechanical key into the SmartKey
(Ypage 72).
Locking the vehicle (mechanical key)
If the vehicle can no longer be locked with the
SmartKey or KEYLESS-GO, use the mechanical
key.
XOpen the driver's door.
XClose the front-passenger door, the rear
doors and the trunk lid.
Doors77
Opening and closing
Z
Page 93 of 326
motion. This could cause you to lose control ofthe vehicle. There is arisk of an accident.
Always make sure that the driver'ss eat is
engagedb efore starting the vehicle.
GWARNING
You could lose control of you rvehicleify ou do
the following while driving:
Radjust the driver'ss eat, head restraint,
steering wheelorm irrors
Rfasten the seat belt
There is arisk of an accident.
Adjust the driver'ss eat, head restraint, steer-
ing wheela nd mirror and fasten you rseat belt
before starting the engine.
GWARNING
If you adjust the seat height carelessly,y ou or
other vehicleo ccupants could be trappeda nd
thereby injured. Children in particular could
accidentally press the electricals eat adjust-
ment buttons and become trapped. There is a
risk of injury.
Whilem oving the seats, make sure that your
hands or other body parts do not get under the
lever assembly of the seat adjustment sys-
tem.
!To avoidd amage to the seats and the seat
heating, observe the following information:
Rkeep liquid sfrom spilling on the seats. If
liquid is spilled on the seats, dry them as
soon as possible.
Rif the seat covers are damp or wet, do not
switch on the seat heating. The seat heat-
ing should als onot be used to dry the seats.
Rclean the seat covers as recommended;
see the "Interior care" section.
Rdo not transport heavy loads on the seats.
Do not place sharp objects on the seat
cushions, e.g. knives, nail sortools. The
seats should only be occupied by passen-
gers, if possible.
Rwhen the seat heating is in operation, do
not cover the seats with insulating materi-
als ,e.g. blankets, coats, bags ,seat covers,
child seats or booster seats.
!Make sure that there are no objects in the
footwellu nder or behind the seats when mov-
ing the seats back. There is arisk that the
seats and/or the objects could be damaged.
iFurther related subjects:
Rcargo compartment enlargement (folding
down the rear seats) (Ypage 240)
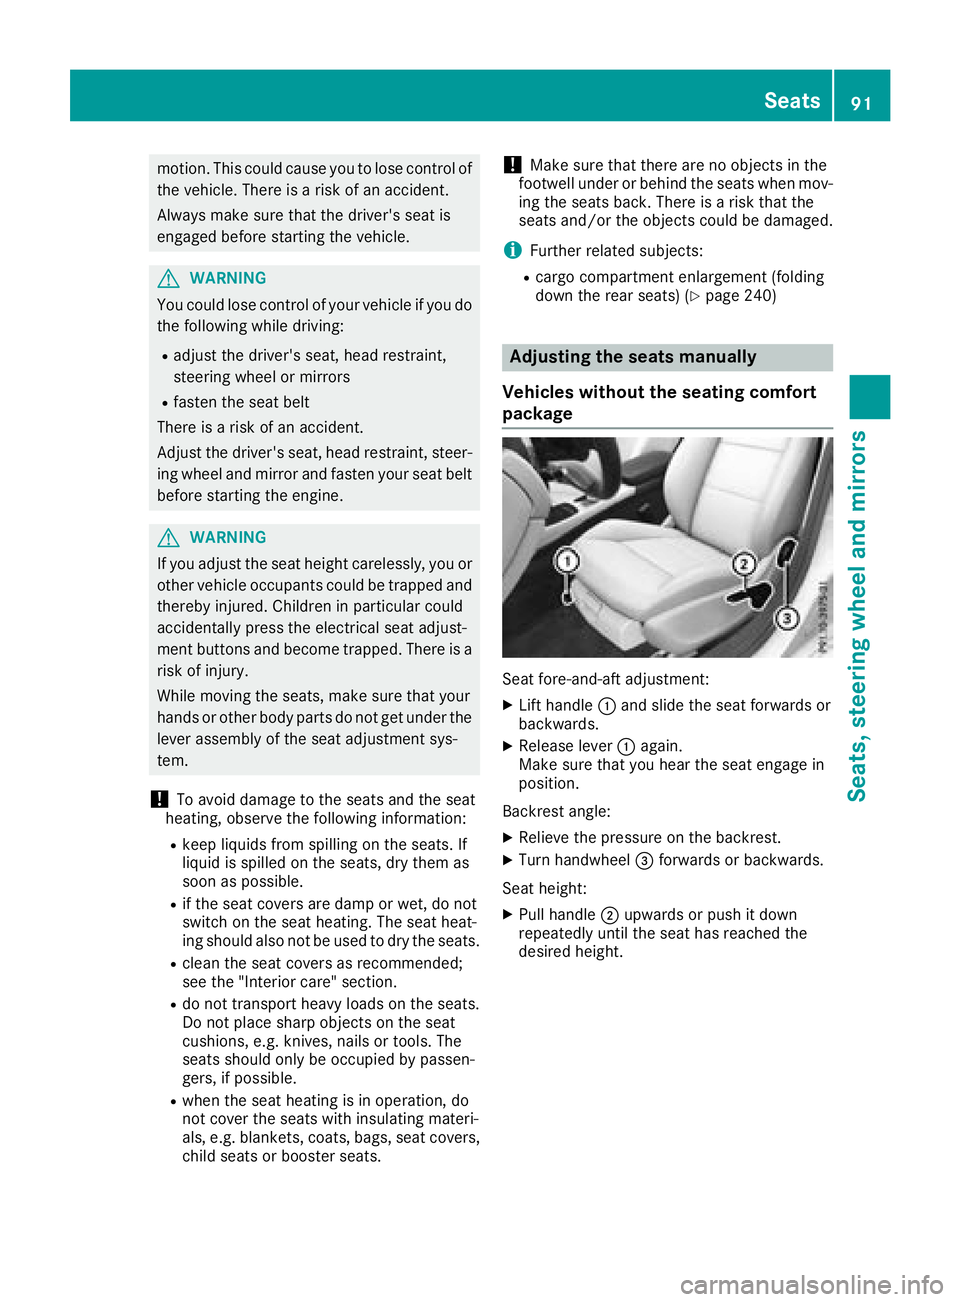
Adjusting the seats manually
Vehicles without the seating comfort
package
Seat fore-and-aft adjustment:
XLift handle :and slidet he seat forwards or
backwards.
XRelease lever :again.
Make sure that you hear the seat engage in
position.
Backrest angle:
XRelieve the pressure on the backrest.
XTurn handwheel =forwards or backwards.
Seat height:
XPullh andle ;upwards or push it down
repeatedly until the seat has reachedt he
desired height.
Seats91
Seats, steering wheel and mirrors
Z
Page 116 of 326
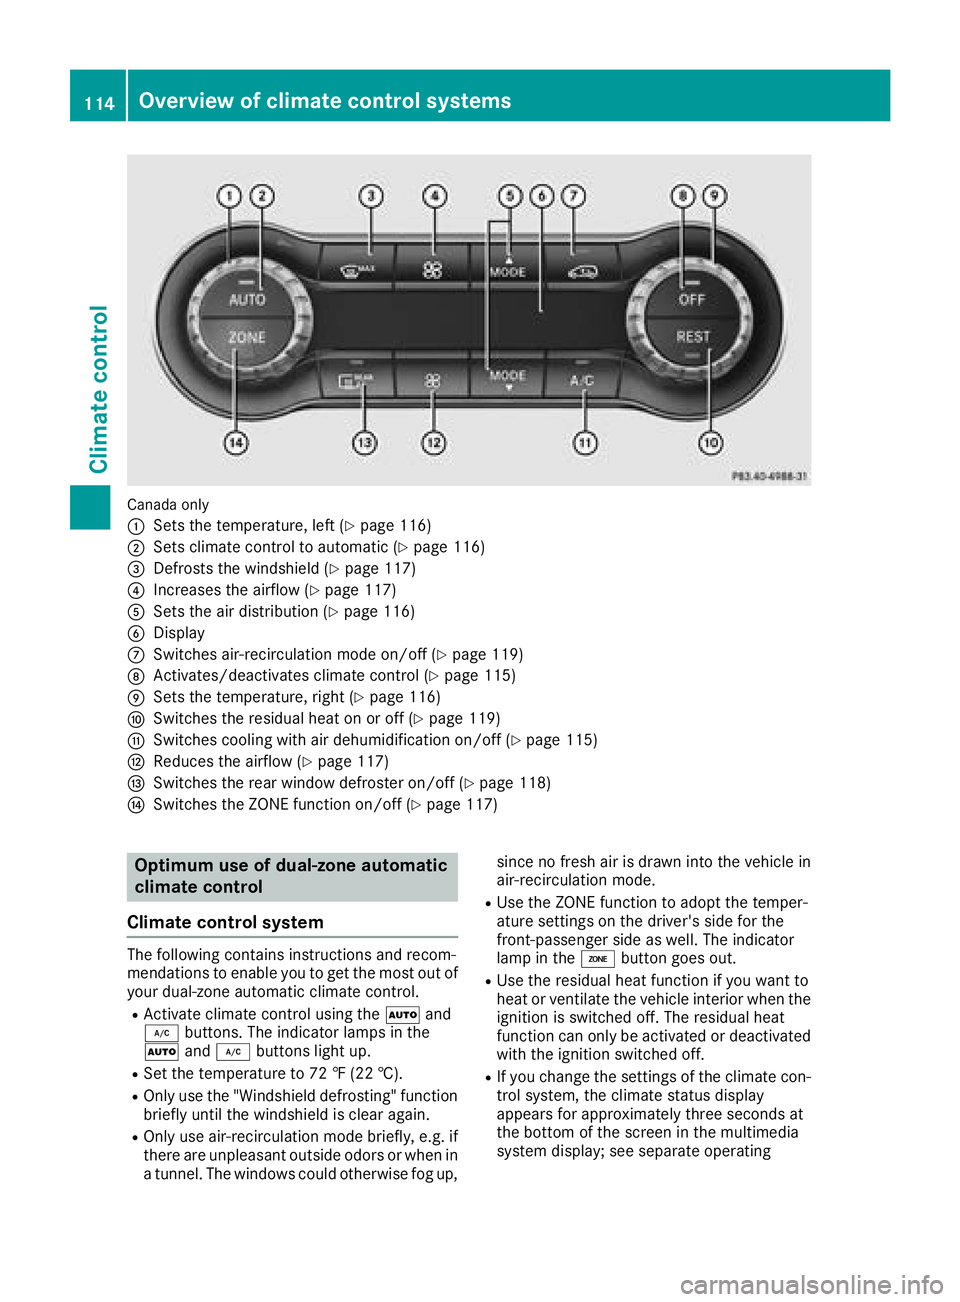
Canada only
:
Setsthe temperature, left (Ypage 116)
;Set sclimate control to automatic (Ypage 116)
=Defrostst hewindshield (Ypage 117)
?Increases th eairflow (Ypage 117)
ASet sthe air distribution (Ypage 116)
BDisplay
CSwitches air-recirculatio nmode on/of f(Ypage 119)
DActivates/deactivate sclimate control (Ypage 115)
ESet sthe temperature, righ t(Ypage 116)
FSwitches theresidual heat on or off (Ypage 119)
GSwitches cooling with air dehumidification on/of f(Ypage 115)
HReduces theairflow (Ypage 117)
ISwitches th erear window defroster on/of f(Ypage 118)
JSwitches theZONE function on/of f(Ypage 117)
Optimumuse of dual-zone automatic
climat econtrol
Climat econtrol system
The followingc ontainsinstructionsa nd recom-
mendationstoe nable you to get th emosto ut of
your dual-zone automatic climate control.
RActivate climate control usingt heà and
¿ buttons. The indicator lamps in the
à and¿ buttonsl ight up.
RSet thetem peratur eto72‡( 22 †).
ROnly use th e"Windshield defrosting "function
briefly until th ewindshield is clear again.
ROnly use air-recirculatio nmode briefly, e.g .if
there are unpleasanto utside odorsorwhen in
at unnel .The windows coul dotherwise fog up, since no fresh air is drawn int
othe vehicle in
air-recirculatio nmode.
RUse th eZONE function to adopt th etem per-
atur esettings on th edriver'ss ide for the
front-passenger side as well. The indicator
lamp in the ábutton goes out.
RUse th eresidual heat function if you want to
heat or ventilate th evehicle interiorw hen the
ignition is switched off .The residual heat
function can only be activated or deactivated
with th eignition switched off.
RIf you chang ethe settings of th eclimate con-
trol system, th eclimate status display
appearsf or approximately three seconds at
th eb otto moft hescreen in th emultimedia
system display; see separate operating
114Overview of climate control systems
Climate control