2018 MERCEDES-BENZ CLA COUPE buttons
[x] Cancel search: buttonsPage 119 of 326

iYou can also activate several air distribution
settings simultaneously. To do this ,press
multiple air distribution buttons .The air is
the ndirected through various vents.
iRegardless of the air distribution setting,
airflow is always directed through the side air
vents. The side air vents can only be close dif
the adjusters are turned clockwise until they
engage.
Setting th eair distribution
XTurn the SmartKey to position 2in the igni-
tion lock (Ypage 122).
XPress one or more of the P,O, ¯
buttons.
The corresponding indicator lamp lightsu p
briefly.
Dual-zone automatic climate control
Air distribution settings
¯ Directsair through the defroste rvents
P Directsair through the center and side air
vents
O Directsair through the footwell air vents
S Directsair through the center ,side and
footwell vents
b Directsair through the defroster, center
and side air vents
a Directsair through the defroste rand
footwell vents
_ Directsair through the defroster, center,
side and footwell vents
iRegardless of the air distribution setting,
airflow is always directed through the side air
vents. The side air vents can only be close dif
the adjusters are turned clockwise until they
engage.
Setting th eair distribution
XTurn the SmartKey to position 2in the igni-
tion lock (Ypage 122).
XPress the ÉorË button repeatedly
until the desired symbol appears in the dis-
play.
Setting th eairflow
Air-conditioning system
XTurn the SmartKey to position 2in the igni-
tion lock (Ypage 122).
XTo increase or reduce: turn controlAcoun-
ter-clockwise or clockwise (Ypage 111).
Dual-zone automatic climate control
XTurn the SmartKey to position 2in the igni-
tion lock (Ypage 122).
XTo increase or reduce: press theKor
I button.
Switching th eZONEf unction on/off
This function is only available with dual-zone
automatic climat econtrol.
XTo activate: press theábutton.
The indicator lamp in the ábutton lights
up.
The temperature settin gfor the driver's side
is not adopte dfor the front-passenger side.
XTo deactivate: press theábutton.
The indicator lamp in the ábutton goes
out.
The temperature settin gfor the driver's side
is adopte dfor the front-passenger side.
Defrosting th ewindshield
Genera lnotes
You can use this function to defrost the wind-
shield or to clear afoggedupw indshield and
side windows.
iYou should only selectt he "Windshield
defrosting" function until the windshield is
clear again.
Switching th e"Windshield defrosting"
function on or off
XTurn the SmartKey to position 2in the igni-
tion lock (Ypage 122).
XTo activate: press the¬button.
The indicator lamp in the ¬button lights
up.
Operating th eclimat econtrol systems117
Climat econtrol
Page 181 of 326
~RRejects or endsacall
RExit sthe telephon ebook/redial memory
6RMakes or accept sacall
RSwitches to th eredial memory
Multifunction display
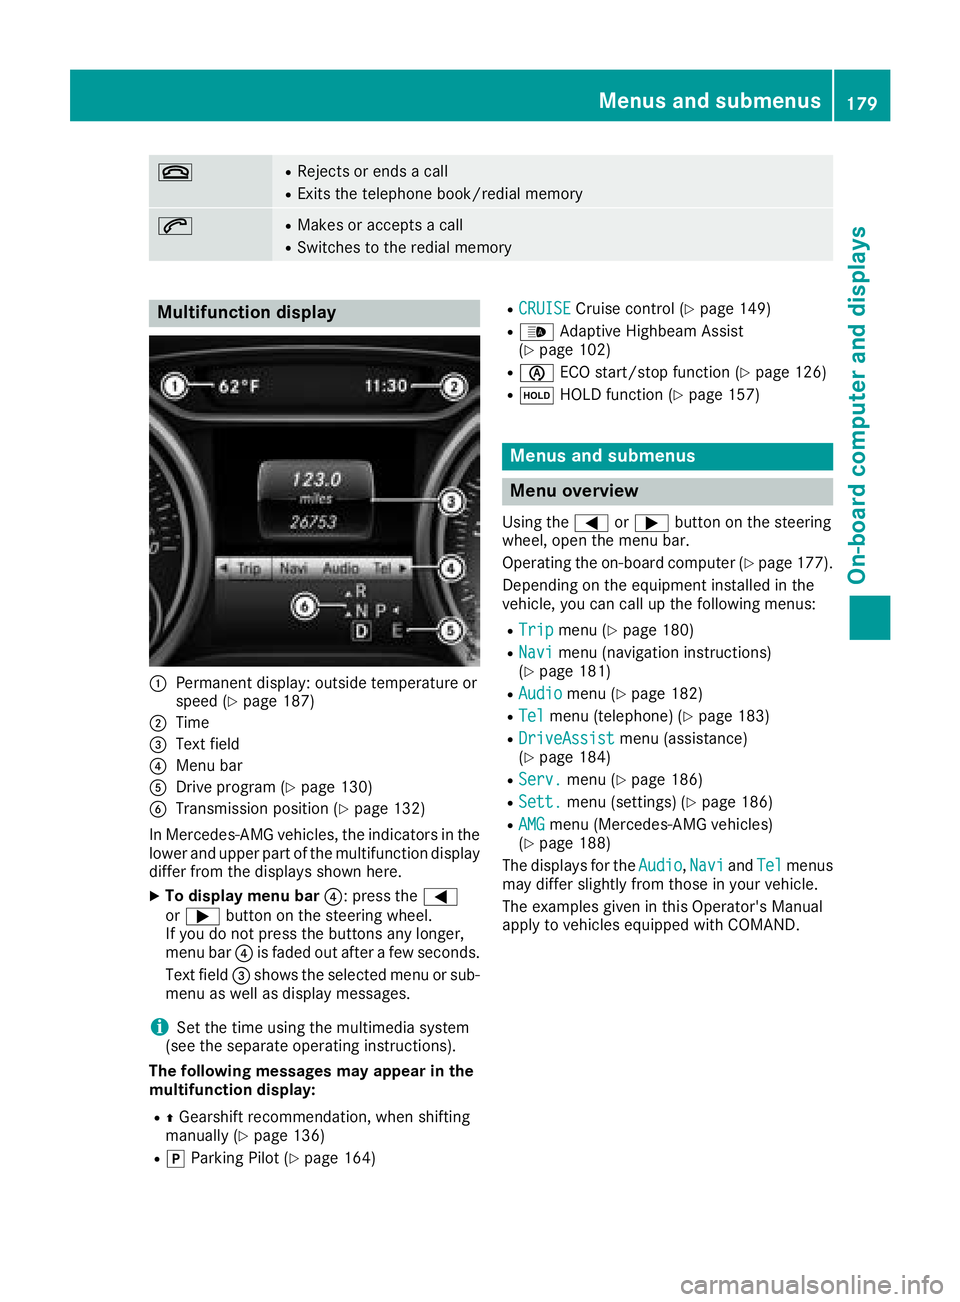
:Permanen tdisplay: outside temperature or
spee d(Ypage 187)
;Time
=Textfield
?Men ubar
ADrive program (Ypage 130)
BTransmissionposition (Ypage 132)
In Mercedes-AM Gvehicles, th eindicators in th e
lower and upper part of th emultifunction display
differ from th edisplays shown here.
XTo displa ymenub ar?:p ress th e=
or ; buttonont hesteering wheel.
If you do no tpress th ebuttons any longer ,
men ubar? is fade dout after afew seconds.
Tex tfield =shows th eselected men uorsub-
men uasw ell as display messages.
iSetthe time usin gthe multimedia system
(see th eseparat eoperating instructions).
Th ef ollowing messages ma yappearint he
multifunction display:
RZ Gearshif trecommendation ,when shifting
manually (Ypage 136)
RjParking Pilot (Ypage 164)
RCRUISECruisecontro l(Ypage 149)
R_ Adaptive Highbeam Assist
(Ypage 102)
Rè ECO start/sto pfunction (Ypage 126)
RëHOLD function (Ypage 157)
Menusand submenus
Menu overview
Using th e= or; buttonont hesteering
wheel, open th emenub ar.
Operating th eon-bo ard computer (
Ypage 177).
Dependin gontheequipmen tinstalled in th e
vehicle, you can call up th efollowin gmenus:
RTri pmen u(Ypage 180)
RNavimen u(navigation instructions)
(Ypage 181)
RAudiomen u(Ypage 182)
RTelmenu(telephone) (Ypage 183)
RDriveAssistmenu(assistance)
(Ypage 184)
RServ.men u(Ypage 186)
RSett.menu(settings) (Ypage 186)
RAMGmenu(Mercedes-AM Gvehicles)
(Ypage 188)
The displays for th eAudio
,Nav iand Telmenus
may differ slightly from those in your vehicle.
The examples given in this Operator's Manual
apply to vehicles equipped wit hCOMAND .
Menusa nd submenus179
On-boardcomputer and displays
Z
Page 247 of 326
Your attention must always be focused on the
traffic conditions. Only use the cigarettelighter
when road and traffic condition spermit.
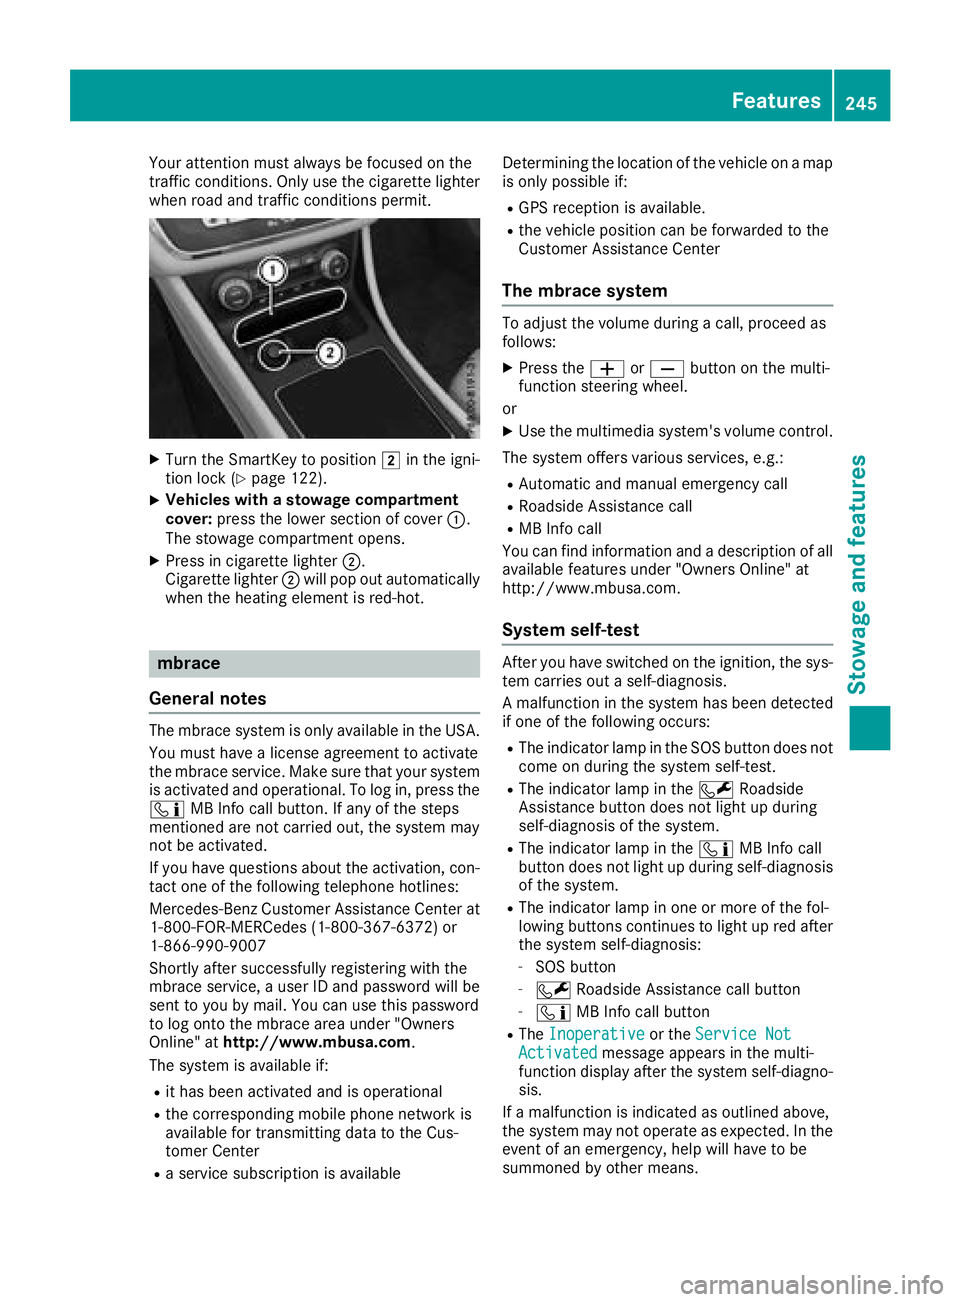
XTurn the SmartKey to position 2in the igni-
tion lock (Ypage 122).
XVehicles with astowag ecompartment
cover: press the lower section of cover :.
The stowage compartmento pens.
XPress in cigarettelighter ;.
Cigarette lighter ;will pop out automatically
when the heatin gelementisr ed-hot.
mbrace
Genera lnotes
The mbraces ystemiso nly available in the USA.
You must have alicense agreement to activate
the mbraces ervice. Make sure that your system
is activate dand operational. To log in, press the
ï MB Inf ocall button. If any of the steps
mentioned are not carried out, the syste mmay
not be activated.
If you have questions about the activation, con-
tac tone of the followingt elephone hotlines:
Mercedes-Ben zCustomer Assistance Center at
1-800-FOR-MERCedes (1-800-367-6372) or
1-866-990-9007
Shortly afte rsuccessfully registeringw ith the
mbraces ervice,auser ID and password will be
sent to you by mail. You can use this password
to log ont othe mbracea rea under "Owners
Online" at http://www.mbusa.com.
The syste misavailable if:
Rit has been activate dand is operational
Rthe corresponding mobile phonen etwork is
available for transmitting data to the Cus-
tomer Center
Ras ervice subscription is available Determining the location of the vehicle on
amap
is only possible if:
RGPS receptio nisavailable.
Rthe vehicle position can be forwarded to the
Customer Assistance Center
Them brace system
To adjust the volume during acall, proceed as
follows:
XPress the WorX button on the multi-
function steeringw heel.
or
XUse the multimedia system's volume control.
The syste moffers various services, e.g.:
RAutomatic and manual emergenc ycall
RRoadside Assistance call
RMB Inf ocall
You can findi nformation and adescription of all
available features under "Owner sOnline" at
http://www.mbusa.com.
System self-test
After you have switched on the ignition, the sys-
tem carries out aself-diagnosis.
Am alfunction in the syste mhas been detected
if one of the followingo ccurs:
RThe indicator lamp in the SOS button does not
com eond uring the syste mself-test.
RThe indicator lamp in the FRoadside
Assistance button does not light up during
self-diagnosis of the system.
RThe indicator lamp in the ïMB Inf ocall
button does not light up during self-diagnosis
of the system.
RThe indicator lamp in one or more of the fol-
lowing buttons continues to light up red after
the syste mself-diagnosis:
-SOS button
-F Roadside Assistance call button
-ïMB Inf ocall button
RThe Inoperativeor the Service NotActivatedmessagea ppears in the multi-
function display afte rthe syste mself-diagno-
sis.
If am alfunction is indicated as outlined above,
the syste mmay not operatease xpected. In the
eventofane mergency, help will have to be
summoned by other means.
Features245
Stowage and features
Z
Page 254 of 326
Currently inactiveareas can beactivated bytext
message.
Triggering th evehicle alarm
Witht hisf unction,y ou can triggert heveh icle's
panic alarm via text message. An alarm sounds
and th eexteri or lighting flashes. Dependin gon
th es etting, th epanic alarm lastsf iveort ensec-
onds. Afterwards, th ealarm switches off.
Garage door opener
General notes
The HomeLink®garag edoor opener integrated
in ther ear-view mirror allowsyou to operate up
to three different door and gates ystems.
Use th eintegrate dgarag edoor opener only on
garag edoorst hat:
Rhave safety stop and revers efeatures and
Rmee tcurren tU.S.federal safety standards
Once programed, th eintegrate dgarag edoor
opener inther ear-view mirror willassumet he
function of th egarag edoor system' sremote
control. Pleasea lso read theoperatin ginstruc-
tions for th egarag edoor system.
When programmin gagaragedoor opener, park
th ev ehicle outside theg arage. Do no tleave the
enginer unningwhile programming.
Certain garag edoor drives are incompatib le
wit hthe integrate dgarag edoor opener. Ifyou
have difficult yprograming th eintegrate dgarage
door opener, contact aMercedes-Ben zService
Center.
Alternatively, you can call th efollowin gtele-
phonea ssistance services:
RUSA:Mercedes-Ben zCustomerA ssistance
Cente rat1-800-FOR -MERCe des
RCanada: CustomerS erviceat
1-800-387-0100
RHomeLink®hotlin e1-800-355-351 5(free of
charge)
Morei nformatio nonHomeLink
®and/or com-
patible product sisalso availab leonlin eat
http:/ /www. homelin k.com.
Notes on the declaration of conformity
(
Ypage 27).
USA: FCC ID: CB2HMIHL4
Canada: IC: 279B-HMIHL4
Important safety notes
GWARNING
When you operate or program the garag edoor
with the integrated garag edoor opener, per-
sons in the range of movement of the garage
door can become trapped or struck by the
garag edoor. There is arisk of injury.
When using the integrated garag edoor
opener, always make sure that nobody is
within the range of movement of the garage
door.
GWARNING
Combustion engines emit poisonouse xhaust
gases such as carbon monoxide. Inhaling
these exhaust gases leadstop oisoning. There
is ar isk of fatal injury. Therefore never leave
the engine running in enclosed spaces with-
out sufficient ventilation.
Programming
Programming the buttons
Pay attention to the "Important safety notes"
(Ypage 252).
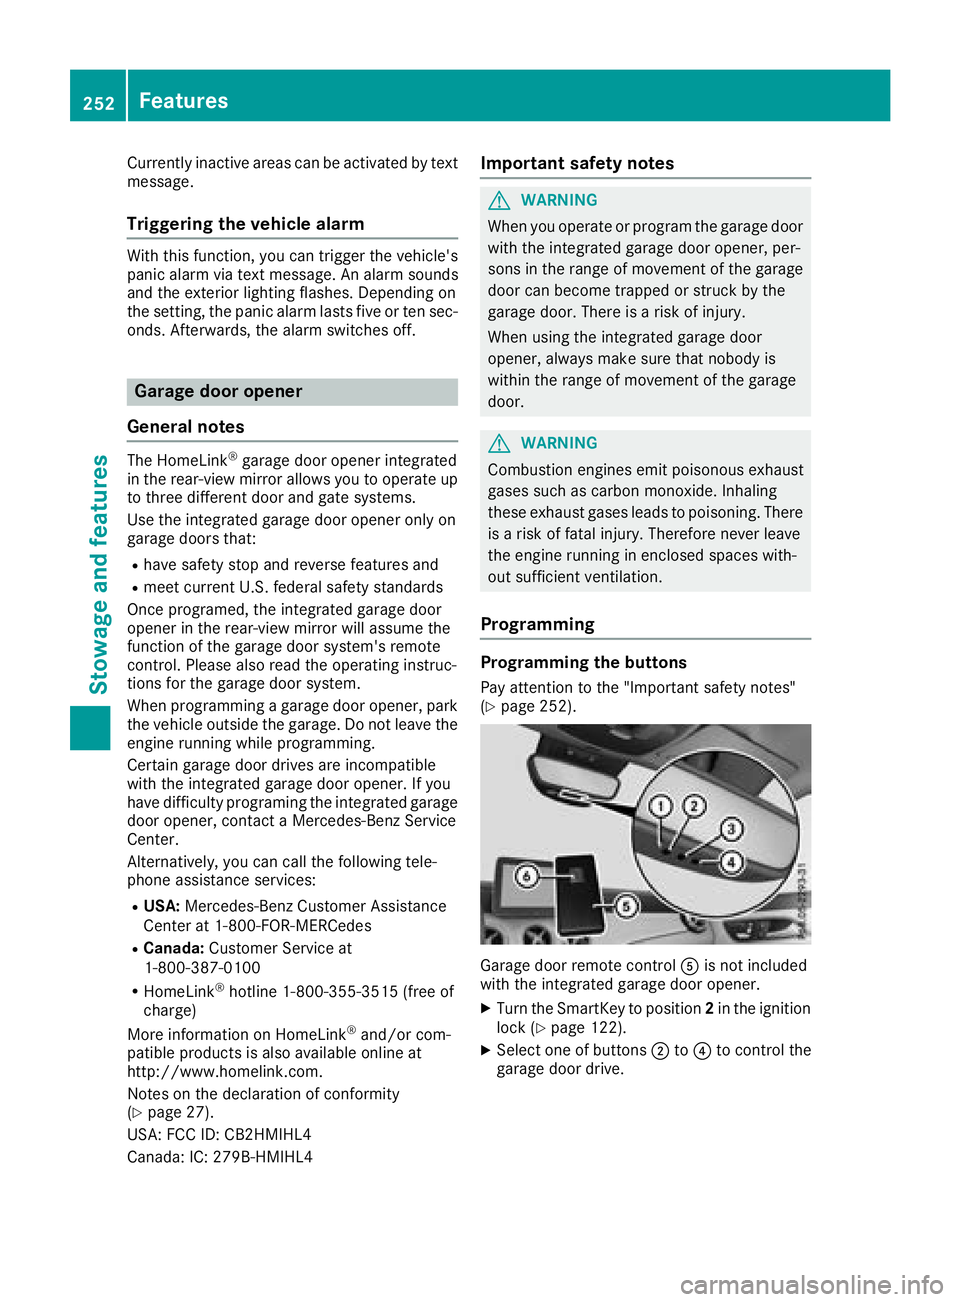
Garage door remote control Ais not included
with the integrated garag edoor opener.
XTurn the SmartKey to position 2in the ignition
lock (Ypage 122).
XSelect one of buttons ;to? to control the
garag edoor drive.
252Features
Stowage and features
Page 255 of 326
XTo start program mode:press and holdone
of buttons ;to? on the integrated garage
door opener.
The garag edooro penerisn ow in program
mode. After ashort time ,indicator lamp :
lights up yellow.
Indicato rlam p: lights up yellow as soona s
button ;,=or? is stored for the first time.
If the selecte dbutton hasa lready been pro-
gramed,i ndicator lamp :will onlyl ight up
yellow afte rten seconds have elapsed.
XReleas ebutton ;, =or?.I ndicator
lamp :flashesy ellow.
XTo program the remote control: point
garag edoorremote control Atoward sbut-
tons ;to? on the rear-view mirror at adis-
tance of 2to8in(5t o20c m).
XPress and hol dbutton Bon remote control
A unti lindicator lamp :lights up green.
Whe nindicator lamp :lights up green: pro-
gramming is finished.
Whe nindicator lamp :flashesg reen: pro-
gramming wa ssuccessful. The next step is to
synchronize the rolling code(
Ypage 253).
XReleas ebutton Bon remote control Afor
the garag edoord rive system.
If indicator lamp :lights up red:r epeatthe
programing procedur efor the corresponding
button on the rear-view mirror. Whe ndoing
so, var ythe distance between remote control
A and the re
ar-view mirror.
The required distance between remote con-
trol Aand the integrated garag edooropener
depends on the garag edoord rive system.
Several attempts might be necessary.Y ou
shoul dtest every positio nfor at least
25 seconds before trying another position.
Synchronizin gthe rolling code
Paya ttentio ntothe "Important safety notes"
(Ypage 252).
If the garag edoors ystem uses arolling code,
yo uw illa lsoh avetos ynchronize the garage
door system with the integrated garag edoor
opene rinthe rear-view mirror. To do thisy ouwill
nee dtou sethe programming button on the door
drive controlp anel.T he programming button
maybel ocate dind ifferent place sdepen ding on
the manufacturer. It is usuall yloc ate dont he
door drive uni tonthe garag eceiling.
Familiarize yoursel fwitht he garag edoord rive
operating instructions, e.g .under "Program- ming additional remote controls", before carry-
ing outt
he following steps.
Your vehicl emustbew ithinr each of the garage
door or gate opene rdrive. Make sure thatn ei-
ther your vehicl enor any persons/objects are
present withint he sweepofthe door or gate.
XTurn the SmartKey to position 2in the ignition
lock (Ypage 122).
XGe toutof the vehicle.
XPress the programming button on the door
drive unit.
Usually ,you now have 30 seconds to initiate
the next step.
XGe tinto the vehicle.
XPress previously programed button ;,=
or ? on the integrated garag edooro pener
repeatedly and in quick succession unti lthe
door closes.
The rolling codes ynchronizatio nist hen com-
plete.
Note sonp rogrammin gthe remote con-
trol
Canadia nradio frequency laws require a"break"
(o ri nterruption) of the transmission signals
afte rbroadcasting for afew seconds. Therefore,
thes esignals mayn ot last long enough for the
integrated garag edooro pener. The signalisn ot
detectedd uring programming. Comparable with
Canadia nlaw ,someU .S. garag edooro peners
also feature a"break".
Proceedasf ollows:
Rif youliveinC anada
Rif yo uhaved ifficultie sprogramming the
garag edooro pener(regardless of where you
live) as yo ufollo wthe programming steps.
XPress and hol done of buttons ;to? on the
integrated garag edooro pener.
After ashort time ,indicator lamp :lights up
yellow.
XReleas ethe button.
Indicato rlam p: flashesy ellow.
XPress button Bof garag edoorre mote con-
trol Afor two seconds, then release it for two
seconds.
XPress button Bagai nfor two seconds.
XRepeat thiss equence on button Bof remote
control Aunti lindicator lamp :lights up
green.
Whe nindicator lamp :lights up green: pro-
gramming is finished.
Features253
Stowag eand featur es
Z
Page 256 of 326
When indicator lamp:flashes green: pro-
gramming was successful. The next step is to
synchronize the rolling code.
XRelease button Bof remotec ontrolAof the
garage door drive.
If indicator lamp :lights up red: repeat the
programmingp rocess for the corresponding
button on the rear-view mirror. When doing
so, vary the distanc ebetween remotec ontrol
A and the rear-view mirror.
The required distanc ebetween remotec on-
trol Aand the integrated garage door opener
depends on the garage door drive system.
Several attempts might be necessary. You
should test every position for at least
25 seconds before trying another position.
Problems when programming
If you are experiencing problems programming
the integrated garage door opener on the rear-
view mirror, take not eofthe following instruc-
tions:
RCheck the transmitter frequenc yused by
garage door drive remotec ontrolAand
whether it is supported. The transmitter fre-
quency can usually be found on the back of
remotec ontrolAfor the garage door drive.
The integrated garage door opener is com-
patible with devices that have units which
operate in the frequenc yrange of 280 to
433 MHz.
RReplace the batteries in garage door remote
control A.This increases the likelihood that
garage door remotec ontrolAwill transmit a
stron gand precise signal to the integrated
garage door opener.
RWhen programming, hold remotec ontrolA
at varying distances and angles from but-
tons ;to? which you are programming. Try
various angles at adistanc ebetween 2and
8i nches (5to 20 cm) or at the same angle but
at varying distances.
RIf another remotec ontrolAis available for
the same garage door drive, repeat the same
programmings teps with this remotec ontrol
A.B eforep erforming these steps, make sure
that new batteries have been installed in
garage door drive remotec ontrolA.
RNote that some remotec ontrols only transmit
for alimited amount of time (the indicator
lamp on t
he remotec
ontrol goes out). Press button
Bon remotec ontrolAagain before
transmission ends.
RAlign the antenna cable of the garage door
opener unit. This can improve signal recep-
tion/transmission.
Opening/closing the garage door
After it has been programmed, the integrated
garage door opener performst he function of the
garage door system remotec ontrol. Please also
read the operating instruction sfor the garage
door system.
XTurn the SmartKey to position 2in the ignition
lock (Ypage 122).
XPress button ;,=or? which you have
programmed to operate the garage door.
Garage door system with afixed code: indi-
cator lamp :lights up green.
Garage door system with arolling code: indi-
cator lamp :flashes green.
The transmitter will transmit asignal as long
as the button is pressed. The transmission is
halted after amaximum of ten seconds and
indicator lamp :lights up yellow.
XPress button ;,=or? again if necessary.
Clearing the memory
Make sure that you clear the memory of the
integrated garage door opener before selling the
vehicle.
XTurn the SmartKey to position 2in the ignition
lock (Ypage 122).
XPress and hold buttons ;and ?.
The indicator lamp initially lights up yellow
and then green.
XRelease buttons ;and ?.
The memory of the integrated garage door
opener in the rear-view mirror is cleared.
254Features
Stowage and features