2018 MERCEDES-BENZ CLA COUPE reset
[x] Cancel search: resetPage 7 of 326

Information aboutService .............261
Resetting the service intervald is-
play. ............................................... 261
Service message ............................ 261
Specials ervice requirements ......... 261
ATA (Anti-Theft Alarm system)
Activating/deactivating ................... 68
Function ...........................................6 8
Switching off the alarm .................... 68
ATTENTIO NASSIS T
Activating/deactivating ................. 185
Displa ymessage ............................ 207
Function/note s............................. 171
Audi omenu( on-board computer) .... 182
Audi osystem
see separate operating instructions
Authorized Mercedes-Benz Center
see Qualifie dspecialist workshop
Authorized workshop
see Qualifie dspecialist workshop
AUTO lights
Displa ymessage ............................ 204
see Lights
Automatic car was h(care) ............... 262
Automatic engine start (ECO start/
stopf unction) .................................... 126
Automatic engine switch-off (ECO
start/stopf unction).......................... 126
Automatic headlamp mode .............. 100
Automatic transmission
Accelerator peda lposition ............. 133
Changing gea r............................... 133
DIREC TSELECT lever ..................... 130
Drive program. ............................... 134
Drive programd isplay .................... 130
Driving tip s.................................... 133
DYNAMIC SELECT button (all vehi-
cle se xcept Mercedes-AMGv ehi-
cles) ............................................... 128
DYNAMIC SELECT controller
(Mercedes-AMGv ehicles) .............. 129
Emergency running mode. ............. 138
Engaging drive position .................. 132
Engaging neutral ............................ 131
Engaging park position
(Mercedes-AMGv ehicles) .............. 132 Engaging park position automati-
cally ............................................... 131
Engaging reverse gea
r................... 131
Engaging the park position ............ 130 Holding the ve
hiclestationary on
uphill gradients .............................. 134
Kickdown. ...................................... 134
Manua lshifting .............................. 136
Oil temperature (on-board com-
puter, Mercedes-AMGv ehicles) ..... 188
Overview ........................................ 130
Problem (malfunction) ................... 138
Pulling away ................................... 125
Selector lever ................................ 132
Starting the engine ........................ 124
Steering wheelp addleshifters ...... 136
Transmission position display ........ 132
Transmission position display
(DIRECT SELECT lever) ................... 130
Transmission positions .................. 133
Automatic transmissio nemer-
gencym ode....................................... 138
B
Back button ....................................... 230
Backup lamp
Displa ymessage ............................ 203
BAS (Brake Assist System) ................. 61
Battery (SmartKey)
Checking .......................................... 73
Important safety notes .................... 73
Replacing ......................................... 73
Battery (vehicle)
Charging ........................................ 278
Displa ymessage ............................ 206
Important safety notes .................. 276
Jump starting ................................. 278
Belt
see Seatb elts
Bel twarning ......................................... 44
Blind SpotA ssist
Activating/deactivating (on-
board computer) ............................ 186
Displa ymessage ............................ 208
Notes/function .............................. 172
Bluetooth
®
Searching for amobilephone ........ 233
Index5
Page 19 of 326

Service centersee Qualified specialist workshop
Service Center
see Qualified specialist workshop
Service menu (on-board com-
puter) .................................................. 186
Service message
see ASSYST PLUS
Service products
Brake fluid .....................................3 18
Coolant (engine) ............................ 318
Engine oil ....................................... 317
Fuel ................................................ 315
Important safety notes .................. 315
Refrigerant (air-conditioning sys-
tem) ............................................... 319
Washer fluid ................................... 319
Settingt he air distribution ...............116
Settingt he airflow ............................ 117
Settingt he date/time format
see also Digita lOperator's Man-
ua l..................................................2 29
Settingt he language
see also Digita lOperator's Man-
ua l..................................................2 29
Settingt he time
see also Digita lOperator's Man-
ua l..................................................2 29
Settings
Factory (on-board computer) ......... 188
On-board computer ....................... 186
SETUP (on-board computer,
Mercedes-AMG vehicles) .................. 188
Side impact air bag .............................4 7
Side marker lamp (display mes-
sage) ................................................... 204
Side windows
Cleaning ......................................... 264
Conveniencec losing feature ............ 83
Convenienceo pening feature ..........8 3
Important safety information ........... 81
Opening/closing .............................. 82
Problem( malfunction) .....................8 4
Resettin g......................................... 84
Reversin gfeature ............................ .82 SIRIUS
services
see also Digit al Operator's Man-
ual .................................................. 229
Sliding sunroof
see Panorama roof with power
tilt/sliding panel
SmartKey
Changing the battery ....................... 73
Changing the programming .............7 2
Checkin gthe battery ...................... .73
Convenience closingf eature ............ 83
Convenience opening feature .......... 83
Display message ............................ 216
Door central locking/unlocking ...... .70
Important safety notes .................... 70
KEYLESS-GO start function .............. 71
Loss .................................................7 4
Mechanical key ................................ 72
Positions (ignition lock) ................. 122
Problem (malfunction) ..................... 74
Starting the engine ........................ 124
SmartKey positions (ignition lock) .. 122
Smartphone
Starting the engine ........................ 124
SMS
see also Digital Operator's Man-
ual .................................................. 229
Snow chains ...................................... 290
Sound
Switching on/off ........................... 230
Special seat belt retractor .................. 55
Specialist workshop ............................28
Speed, controlling
see Cruise control
Speedometer
Activating/deactivating the addi-
tional speedometer ........................ 187
Digital ............................................ 181
In the Instrument cluster ................. 33
Segments. ..................................... 176
Selectingt he display unit ...... ......... 186
SPORT handling mode
Deactivating/activat
ing
(Mercedes-AMG vehicles) ................6 6
Warning lamp ................................. 222
Standing lamps
Display message ............................2 03
Switching on/off ........................... 101
Index17
Page 22 of 326
Traction (definition)....................... 307
Tread wear .....................................3 01
Uniform Tire Quality Grading
Standard s...................................... 301
Uniform Tire Quality Grading
Standard s(definition) .................... 306
Weari ndicator (definition) ............. 307
Wheelr im (definition) .................... 306
see Flat tire
Top Tether ............................................ 57
Tow-starting
Emergency engine starting ............ 284
Important safety notes .................. 281
Installing the towing eye. ............... 282
Removing the towing eye. ..............282
Towing atrailer
ESP
®(ElectronicS tability Pro-
gram) ............................................... 67
Towing away
Important safety guidelines ........... 281
Installing the towing eye. ............... 282
Notes for 4MATIC vehicles ............ 284
Removing the towing eye. ..............282
Transporting the vehicle ................ 283
With both axle sonthe ground ....... 283
With front axle raised ..................... 282
Towing eye ......................................... 270
Traffic reports
see also Digita lOperator's Man-
ua l..................................................2 29
Transmission
see Automatic transmission
Transmission position display
(DIRECT SELEC Tlever) ......................1 30
Transporting the vehicle .................. 283
Trim pieces (cleaning instruc-
tions) ..................................................2 67
Trip computer (on-board com-
puter) ..................................................1 80
Trip odometer
Calling up ....................................... 180
Resetting (on-board computer) ...... 181
Trunk
Emergency release .......................... 81
Emergency release button ...............8 1
Important safety notes .................... 78 Opening (automaticall
yfrom out-
side) .................................................7 9
Opening (from outside the vehi-
cle, HANDS-F REE ACCESS) ...
........... 79
Opening automaticallyf rom
inside ............................................... 80
Opening/closing (manually from
outside) ............................................ 78
Trunk lid
Display message ............................2 15
Opening dimensions ......................3 20
Trunk load (maximum) ......................320
Turn signals
Display message ............................ 202
Replacing bulbs (front) ................... 106
Switching on/off ........................... 101
Two-way radio
Frequencies ................................... 313
Installatio n..................................... 313
Transmissiono utput (maximum ).... 313
Type identification plate
see Vehicle identification plate
U
UnlockingEmergency unlocking ....................... 77
From insid ethe vehicle (central
unlocking button) .............................7 6
Upshifti ndicator (on-boardc om-
puter, Mercedes-AMG vehicles) .......188
USB devices
Connecting to the MediaI nter-
face ............................................... 236
V
Vanity mirror (in the sun visor) ........244
Vehicle
Correct use ...................................... 28
Data acquisition ............................... 29
Display message ............................ 213
Equipment ....................................... 25
Individua lsettings .......................... 186
Limited Warranty .............................2 9
Loading .......................................... 298
Locking (in an emergency) ............... 77
Locking (SmartKey) .......................... 70
20Index
Page 30 of 326
Diagnostics connection
The diagnosticsconnectio nisonlyi ntende dfor
th ec onnectio nofdiagnostic equipmen tata
qualified specialis tworkshop .
GWARNING
If you connec tequipmen ttoadiagnostic s
connection in th evehicle, it may affec tthe
operation of vehicle systems .Asaresult,the
operatin gsafet yofthe vehicle could be affec -
ted. There is ariskofana ccident.
Only connec tequipmen ttoadiagnostic scon-
nection in th evehicle, whic hisapproved fo r
your vehicle by Mercedes-Benz.
GWARNING
Objects in th edriver's footwell can restric tthe
peda ltra ve loro bstruct adepressed pedal.
The operatin gand road safet yofthe vehicle is
jeopardized. There is ariskofana ccident.
Mak esuret hata ll objects in th evehicle are
stowed correctly, and that they canno tenter
th ed river's footwell. Install th efloormat s
securely and as specifie dinorder to ensur e
sufficien tclearanc efor thep edals. Do no tuse
loose floormat sand do no tplac efloormat son
to pofo neanother.
!If th eengineiss witched of fand equipmen t
on th ediagnostic sconnectio nisused,the
starter battery may discharge.
Connectin gequipmen ttothediagnostic scon-
nection can lead to emission smonitor ingi nfor -
mation bein greset ,for example. Thi smay lead
to th evehicle failin gtomeetthe requirements of
th en exte mission stestd urin gthe main inspec-
tion .
Qualified specialist workshop
An authorized Mercedes-Ben zCente risaq uali-
fie ds pecialis tworkshop .Ithas th eneces sary
specialis tkno wledge ,too ls and qualification sto
correctl ycarry out th eworkr equire donyour
vehicle. Thi sisespecially th ecasef or wor krel-
evant to safety.
Observ ethe note sint heMaintenance Booklet .Always hav
ethe followin gworkc arrie dout at an
authorized Mercedes-Ben zCenter:
Rwor krelevant to safet y
Rserviceand maintenance wor k
Rrepair work
Ralterations, installation wor kand modifica-
tion s
Rworkone lectronic component s
Correct use
If you remov eany warnin gstickers, you or oth-
ers could fail to recogniz ecertai ndangers.
Leave warnin gsticker sinposition .
Observ ethe followin ginformati on when drivin g
your vehicle:
Rth es afet ynotes in this manual
Rtechnical dat afor thev ehicle
Rtraffic rule sand regulation s
Rlaws and safet ystandard spertainin gtomotor
vehicles
Problem swithy ourv ehicle
If you should experience aproblem wit hyour
vehicle, particularly on ethaty ou believe may
affec tits saf eoperation ,weurgey ou to contact
an authorized Mercedes-Ben zCente rimmedi-
ately to hav ethe problem diagnosed and recti -
fied. If th eproblem is no tresolved to your sat -
isfaction ,please discus sthe problem again wit h
an authorized Mercedes-Ben zCente ror,if nec-
essary, contact us at on eofthefollowin g
addresses.
In th eUSA
Customer Assistanc eCente r
Mercedes-Ben zUSA,LLC
3M ercedes Drive
Montvale, NJ 07645-0350
In Canad a
Customer Relation sDepartmen t
Mercedes-Ben zCanada, Inc.
98 Vanderhoo fAvenu e
Toronto ,Ontar io M4 G4C9
Reporting safet ydefect s
USAo nly:
28Operating safety
Introduction
Page 84 of 326
body becomes trapped, release the switch or
pull the switch to close the side window again.
GWARNING
While closingt he side windows, body parts in
the closinga rea could become trapped. There
is ar isk of injury.
When closingm ake sure that no parts of the
body are in the closinga rea. If somebody
becomes trapped, release the switch or press
the switch to open the side window again.
GWARNING
If children operate the side windows they
could become trapped, particularly if they are left unsupervised. There is arisk of injury.
Activat ethe override feature for the rear side
windows. When leaving the vehicle, always
take the SmartKey with you and lock the vehi-
cle. Never leave children unsupervised in the
vehicle.
Side window reversing feature
The side windows are equipped with an auto-
matic reversing feature. If asolid objec tblocks
or restrictsas ide window from traveling
upwards during the automatic closingp rocess,
the side window opens again automatically. Dur-
ing the manual closingp rocess, the side window
only opens again automatically after the corre-
spondin gswitch is released. The automatic
reversing feature is only an aid and is no substi-
tute for your attention when closingas ide win-
dow.
GWARNING
The reversing feature does not react:
Rto soft,l ight and thin objects, e.g. small fin-
gers
Rwhile resetting
This means that the reversing feature cannot
prevents omeoneb eing trapped in these sit-
uations. There is arisk of injury.
Make sure that no body parts are in close
proximity during the closingp rocedure. If
someonebecomes trapped, press the switch
to open the side window again.
Opening and closing the side win-
dows
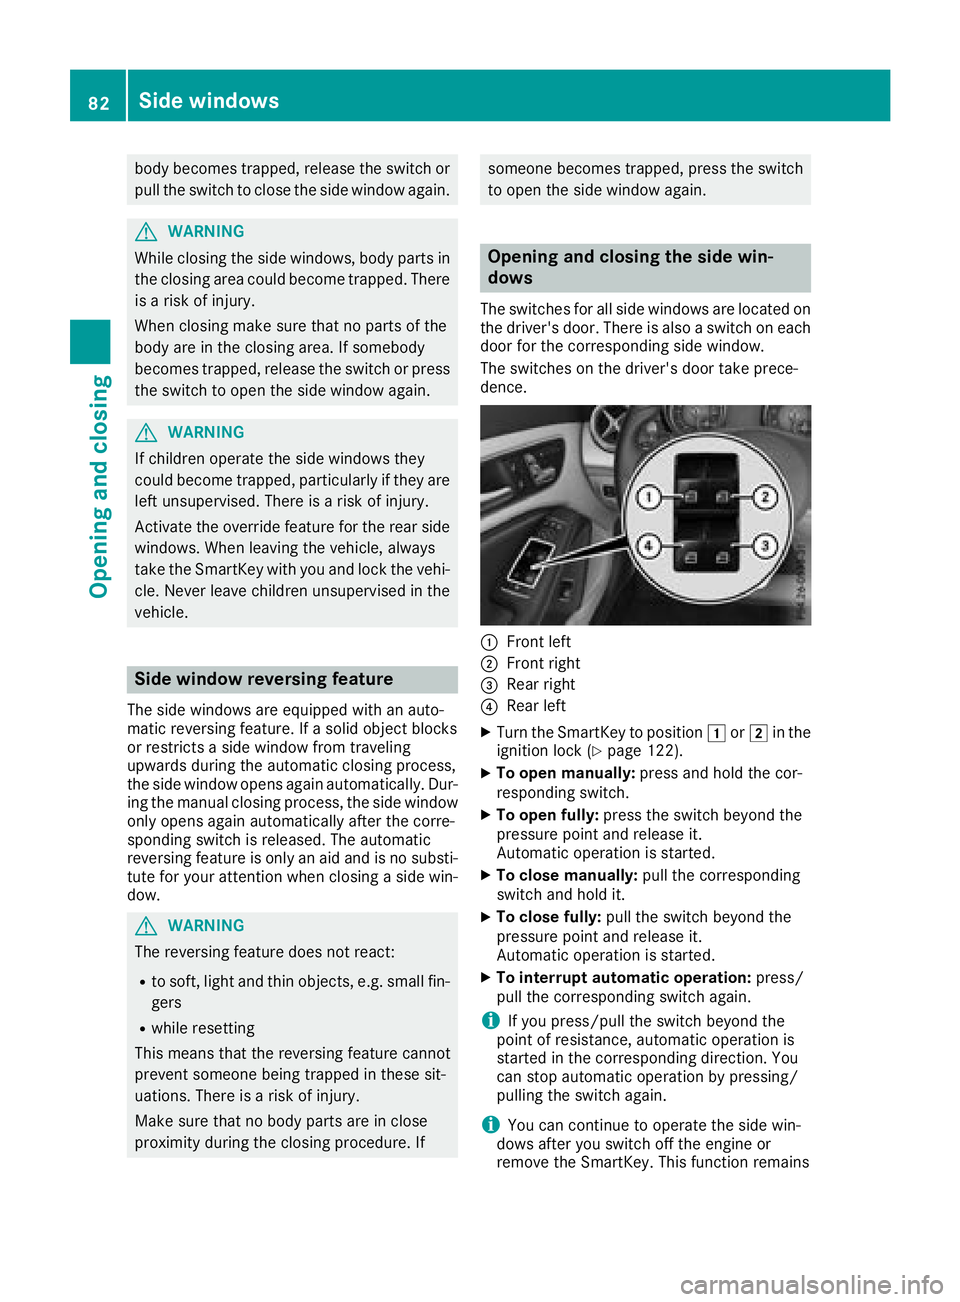
The switches for all side windows are located on the driver'sd oor. There is also aswitch on each
door for the correspondin gside window.
The switches on the driver'sd oor take prece-
dence.
:Frontl eft
;Frontr ight
=Rear right
?Rear left
XTurn the SmartKey to position 1or2 in the
ignition lock (Ypage 122).
XTo open manually: press and hold the cor-
responding switch.
XTo open fully: press the switch beyond the
pressure point and release it.
Automatic operation is started.
XTo close manually: pull the corresponding
switch and hold it.
XTo close fully: pull the switch beyond the
pressure point and release it.
Automatic operation is started.
XTo interrupt automatic operation: press/
pull the correspondin gswitch again.
iIf you press/pull the switch beyond the
point of resistance, automatic operation is
started in the correspondin gdirection. You
can stop automatic operation by pressing/
pulling the switch again.
iYou can continue to operate the side win-
dows after you switch off the engin eor
removet he SmartKey. This function remains
82Side windows
Opening and closing
Page 86 of 326
On vehicles withapanorama roof with power
tilt/sliding panel:
XPress and hold the &button againu ntil the
roller sunblind of the panorama roof with
power tilt/sliding panel closes.
XTo interruptc onvenienceclosing:release
the & button.
Using KEYLESS-GO
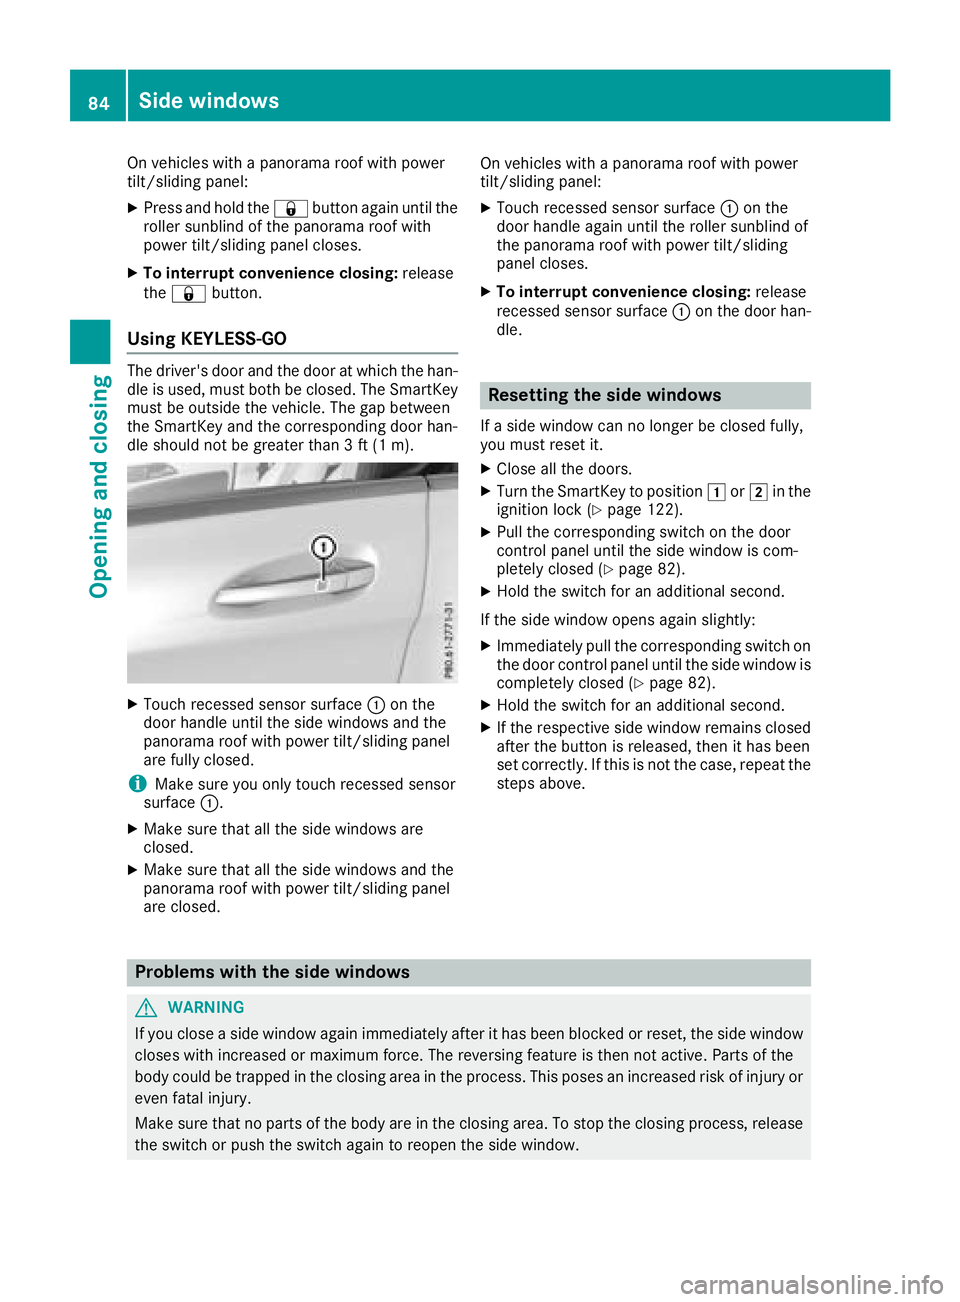
The driver's door and the door at which the han-
dle is used, must both be closed. The SmartKey
must be outside the vehicle. The gap between
the SmartKey and the corresponding door han-
dle should not be greater than 3ft(1m).
XTouch recessed sensor surface :on the
door handle until the side windows and the
panorama roof with power tilt/sliding panel
are fully closed.
iMake sure you only touch recessed sensor
surface :.
XMake sure that all the side windows are
closed.
XMake sure that all the side windows and the
panorama roof with power tilt/sliding panel
are closed. On vehicles with
apanorama roof with power
tilt/sliding panel:
XTouch recessed sensor surface :on the
door handle againu ntil the roller sunblind of
the panorama roof with power tilt/sliding
panel closes.
XTo interruptc onvenienceclosing:release
recessed sensor surface :on the door han-
dle.
Resetting the side windows
If as ide window can no longer be closed fully,
you must reset it.
XClose all the doors.
XTurn the SmartKey to position 1or2 in the
ignition lock (Ypage 122).
XPull the corresponding switch on the door
control panel until the side window is com-
pletely closed (
Ypage 82).
XHold the switch for an additional second.
If the side window opens agains lightly:
XImmediately pull the corresponding switch on
the door control panel until the side window is
completely closed (
Ypage 82).
XHold the switch for an additional second.
XIf the respective side window remains closed
after the button is released,t hen it has been
set correctly. If this is not the case, repeat the
steps above.
Problems with the side windows
GWARNING
If you close aside window againi mmediately after it has been blocked or reset, the side window
closes with increased or maximum force. The reversing feature is then not active. Parts of the
body could be trapped in the closing area in the process. This poses an increased risk of injury or
even fatal injury.
Make sure that no parts of the body are in the closing area. To stop the closing process, release
the switch or push the switch againtor eopen the side window.
84Side windows
Opening and closing
Page 88 of 326
sure fluctuations in the vehicle interior.
Change the position of the sliding sunroof or
openaside window slightly to reduce or elim-
inate these noises.
Sliding sunroof reversing feature
In the following section, the term "sliding sun-
roof" refers to the panorama roof with power
tilt/sliding panel.
The sliding sunroof is equipped with an auto-
matic reversing feature. If asolid object blocks
or restrictst he sliding sunroof during the closing
process, the sliding sunroof opens againa uto-
matically.H owever, the automatic reversing
feature is only an aid and does not relieve you of
the responsibility of paying attention when clos-
ing the sliding sunroof.
GWARNING
The reversing feature does not react:
Rto soft, light and thin objects, e.g. small fin-
gers
Rover the last 1/6 in (4 mm) of the closing
movement
Rduring resetting
Rwhen closing the sliding sunroof againm an-
ually immediately after automatic reversing
This means that the reversing feature cannot
prevent someone being trapped in these sit-
uations. There is arisk of injury.
Make sure that no body parts are in close
proximity during the closing procedure.
If somebody becomes trapped:
Rrelease the switch immediately,o r
Rpress the switch in any direction during the
automatic closing process
The closing process is stopped.
Operating the panoramar oof with
power tilt/sliding panel
Opening and closing
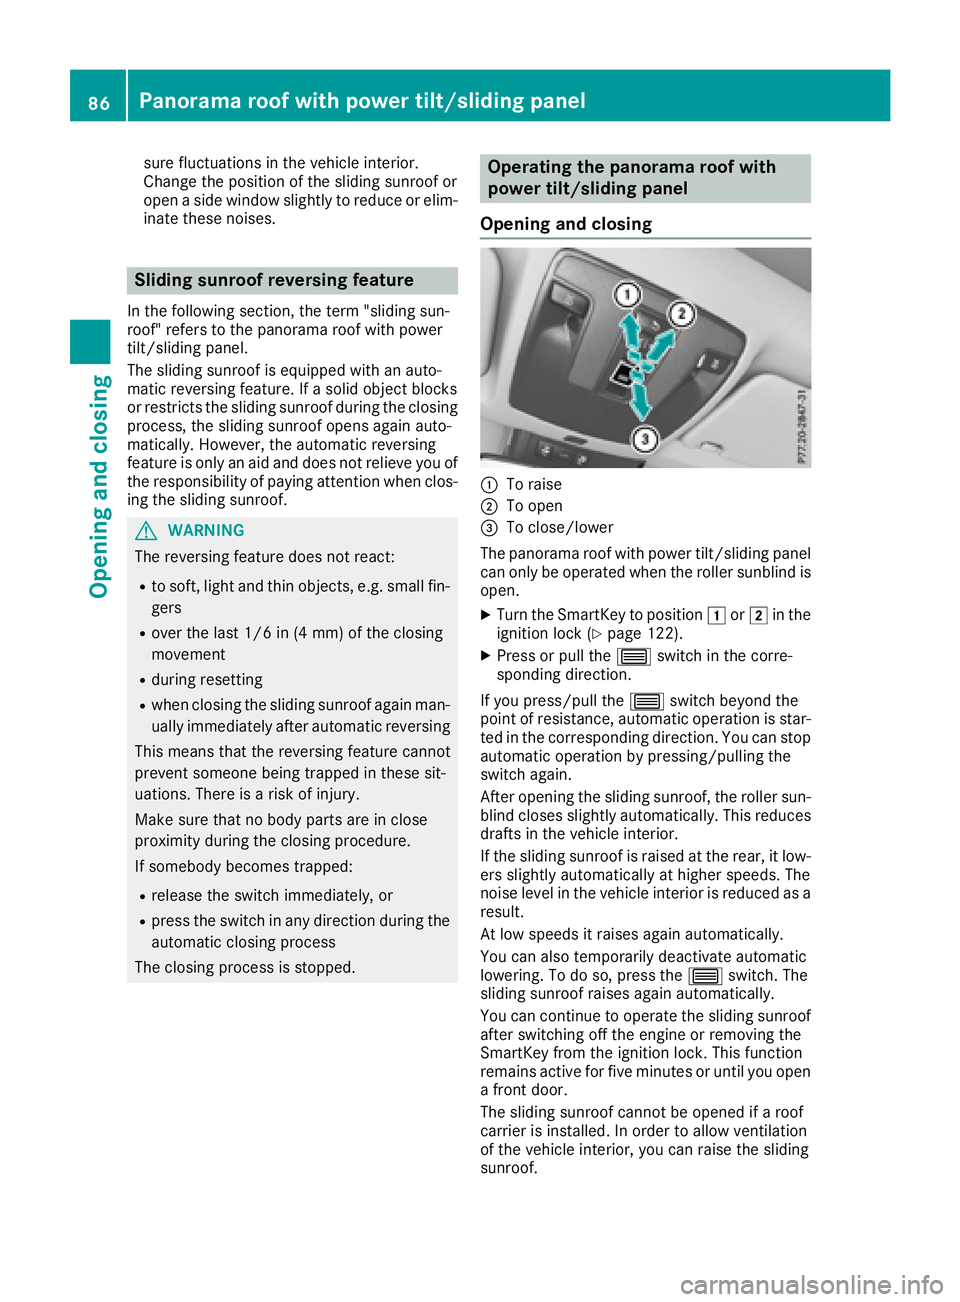
:To raise
;To open
=To close/lower
The panorama roof with power tilt/sliding panel
can only be operated when the roller sunblind is
open.
XTurn the SmartKey to position 1or2 in the
ignition lock (Ypage 122).
XPress or pull the 3switch in the corre-
sponding direction.
If you press/pull the 3switch beyond the
point of resistance, automatic operation is star-
ted in the corresponding direction. You can stop
automatic operation by pressing/pulling the
switch again.
After opening the sliding sunroof, the roller sun-
blind closes slightly automatically. This reduces
drafts in the vehicle interior.
If the sliding sunroof is raised at the rear, it low-
ers slightly automatically at higher speeds. The
noise level in the vehicle interior is reduced as a
result.
At low speeds it raises againa utomatically.
You can also temporarily deactivate automatic
lowering. To do so, press the 3switch. The
sliding sunroof raises againa utomatically.
You can continue to operate the sliding sunroof
after switching off the engine or removing the
SmartKey from the ignition lock. This function
remains active for five minutes or until you open
af ront door.
The sliding sunroof cannot be opened if aroof
carrier is installed. In order to allow ventilation
of the vehicle interior, you can raise the sliding
sunroof.
86Panoramar oof with power tilt/sliding panel
Opening and closing
Page 90 of 326
Opening and closing
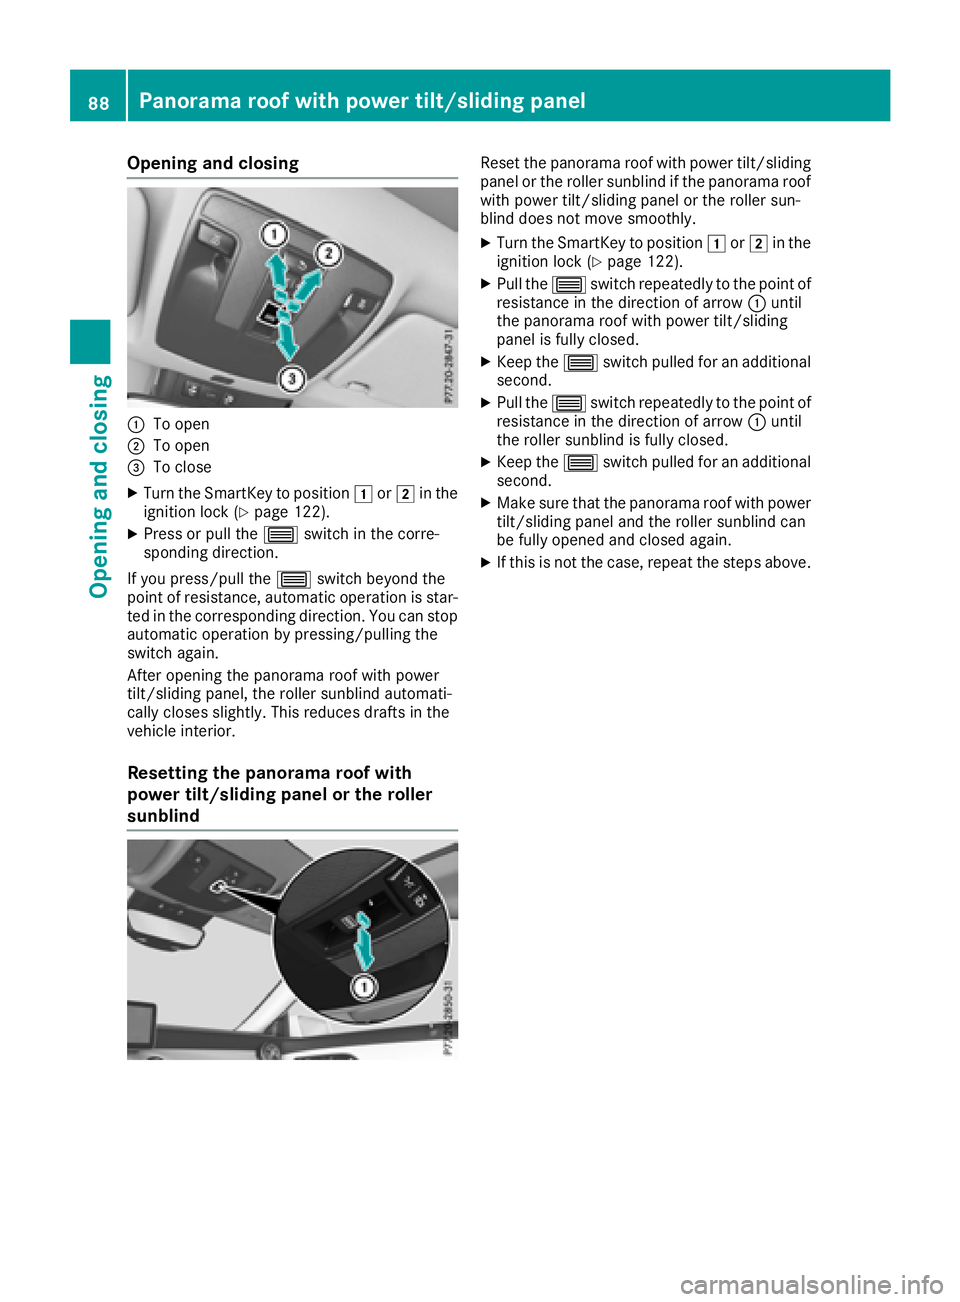
:To open
;To open
=To close
XTurn the SmartKey to position1or2 in the
ignition lock (Ypage 122).
XPress or pull the 3switch in the corre-
spondin gdirection.
If you press/pull the 3switch beyond the
point of resistance, automatic operation is star-
ted in the correspondin gdirection. You can stop
automatic operation by pressing/pulling the
switch again.
After opening the panorama roof with power
tilt/sliding panel, the roller sunblind automati-
cally closes slightly. This reduces drafts in the
vehicle interior.
Resetting the panorama roof with
power tilt/sliding panel or the roller
sunblind
Reset the panorama roof with power tilt/sliding
panel or the roller sunblind if the panorama roof with power tilt/sliding panel or the roller sun-
blind does not move smoothly.
XTurn the SmartKey to position 1or2 in the
ignition lock (Ypage 122).
XPull the 3switch repeatedly to the point of
resistance in the direction of arrow :until
the panorama roof with power tilt/sliding
panel is fully closed.
XKeep the 3switch pulled for an additional
second.
XPull the 3switch repeatedly to the point of
resistance in the direction of arrow :until
the roller sunblind is fully closed.
XKeep the 3switch pulled for an additional
second.
XMake sure that the panorama roof with power
tilt/sliding panel and the roller sunblind can
be fully opened and closed again.
XIf this is not the case, repeat the steps above.
88Panorama roof with power tilt/sliding panel
Opening and closing