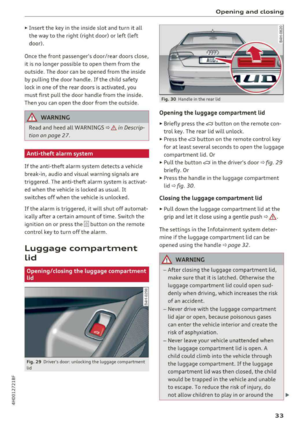
Page 177 of 356

u. co .... N
" N .... 0 0 :c '
Route inf o
When t he f unction is switc hed On , the three up
coming turns and the calc ulated distance and ar
rival tim e are shown in th e Infota inm ent disp lay
dur ing route gu idanc e@
¢ pag e 171 , fig. 184 .
The cu rrent s treet t raveled, upcoming maneu
ve rs, traffic information or points of interes t on
the current ro ute are a lso displayed.
The next tu rn is d isp layed at the bottom of the
tab le.
Automatic zoom
On : the map scale is adapted automat ically de
pending on t he type of road being traveled on
(expressway, h ighway , other roads) so t hat you
a lways have an optimal overv iew of the road
a h ead . When there are upcom ing ma neuvers, t he
scale is automatically reduced to prov ide a better
detai led view.
Inter section : when ro ut e g uidance is active, t he
map temporarily zooms in to a detailed scale
when there are upcoming mane uvers so that you
can see the route better .
Off: the map sca le yo u have chosen is kept in
stead.
Gas station message
When th is function is sw itched On , a message
appears when t he fue l gauge goes below the re
serve mar king. Conf irming th is message displays
a list of gas stations in the area. When a gas s ta
tion is se lected, route g uidance from the c urrent
ve hicle position is calc ulated .
Speed limit display *l)
The max imum speed limits for expressways ,
hi ghways and ma in streets can be switched
On -/
Off if they are stored in the navig ation da ta .
Voice guidance
The vo ice gu idance prompts can be Complete or
Shortened . When Off is selected , no vo ice gu id
a n ce is given.
l ) O nly applie s to vehicl es withou t ca mer a-b as ed speed li mit
d is pla y.
Na vigation
Nav igation prompts can be g iven by pressing the
~ button.
Voice guidance on during call
Nav igat ion p rompts can be sw itc hed on ~ or off
dur ing a phone call.
Deleting la st destinations
The destinations you have e ntered last are auto
matically stored . T hey ca n be deleted ind iv idually
o r all at once .
Presentation mode
The Demo mode helps you to effective ly plan and
display a route by showing map contents or route
criter ia . You ca n
Set starting point when you
would l ike to calculate a route start ing from a lo
cat ion other than t he veh icle position. Start
D emo mode to sim ulate the route g uidance.
(D Tips
Fo r safety reasons, the route s imulation in
demo mode is deact ivated while dr iv in g.
Route settings
Applies to: ve hicles w ith navigation system
.,. Select: !NAV ! button> Rout e control butt on.
Route list
The route list is v is ible only when route gu idance
is active and conta ins i nformat ion regard ing the
r oute , the names of the streets a nd the length of
t h e ro ute sect ions. O n longer ro ute sect ions, ad
di tional info rmat ion may be d isp layed such as
poss ib le i nte rchanges w hen driving on express
ways.
Avoid route from here
D ete rmining th e le ngth of the route to b e
avoided :
turn the contro l knob to t he left o r
r ig ht.
When route guida nce is active and the
Standard
map view( ¢ page 171) is switched on, the ca lcu
lated ro ute is avo ided fo r the d istance you have
..,
175
Page 178 of 356

Navigation
specified, if possible. The navigation system cal
culates an a lternative route.
The route to be avoided that you ha ve ente red
applies only to the current route and must be set
again, if needed.
The areas you have se lected to avoid w ill appear
with red and white shading on the map.
0) Tips
If the MMI does not calculate an alternative
route, that means there is none available.
Accessing traffic
information
Auto rerouting (traffic)
A pp lies to: ve hicles w ith navigation system an d Sirius (satel
li te radi o)
By receiving traffic information from the TMC or
satellite - depend ing on ava ilability -the MMI cal
culates an optim ized route and the possible t ime
saved for the current route guidance. You can de
cide yourse lf wh ich route you would like to use.
Traffic information (TMC)
App lies to: ve hicles w ith naviga tion system and Sirius (satel
li te ra dio)
TMC traffic reports can be shown in the Infotain
ment display using Sirius* (satellite radio).
Fig. 188 Access ing TMC traff ic informa tion
~ Se lect: IIN FOI button .
The last active Info menu is shown in the Info
tainment display. To open the list with TMC traf
fic information
c:tv fig. 188, press the I IN FO I but
ton again in the
Info menu .
176
Reception of traffic information is indicated by
the
TMC symbol in the status line:
TMC symbol Meaning
TMC stations are avai lable
Displayed and dynamic navigation is
switched
On c:tv page 17 4.
TMC stations are not availa-
Is gra yed o ut ble and dynamic navig ation
i s sw itched
On.
Not disp layed Auto
rerouting is switched
Off.
- Opening a detailed view of traffic information :
select and confirm the traffic information from
the list .
- Opening the next traffic information : select
and confirm
Display next report.
- Showing the selected traffic information on
the map :
select and confirm Show on map . The
shaded line shows the street and the length of
the traff ic jam .
-Displaying the next traffic information on the
map :
press the cont rol knob aga in.
- Having traffic information read out : press the
Read control button.
Traffic information display
@Colored warning symbols: traffic incidents on
your route are shown in the upper sect ion of the
li st and are sorted according to distance.
Warning symbols with.::->: avoided traffic inci
dents.
@ Grayed out warning symbols: traffic incidents
that are not on your route. They are sorted ac
cording to road type (expressway, highway, other
road), country and name.
(D Tips
-Critical traffic information, s uch as warn
ings about wrong -way drivers, is automati
cally disp layed. To hide the traffic informa
t ion, press the
I BACK I button or the control
knob.
- TMC traffic reports are not available in Can
ada. For more information, please contact
S ir ius Canada .
Page 179 of 356

u. co .... N
" N .... 0 0 :c '
-Traffic reports are shown in the drive r infor
mation system disp lay and can be selected
by turning the left thumbwheel.
Other settings
~ Select : IINFO I button> Settings control button .
Traffic report
Traffic informati on that refers to an active desti
nation is given as a spoken announcement when
t he function is sw itched
On.
Troubleshooting
Applies to: vehicles with navigation system
Problem Solution Navigation
Music volume during nav. prompts
T urn the On/Off knob to the rig ht or l eft to the
adjust the vol ume during traffic reports .
Favorites that were a lready stor -
The favorites in th e pub lic MMI directory are visible for a ll users in
ed are no longer displayed.
the vehicle.
If a cell phone is connected, both the favorites from the private
d irectory and the favorites stored as public are displayed.
If you want to make a favorite available for al l users, it must be
stored in the public MM I directory. A favorite in the pr ivate di rec-
tory must be marked as one of the
Shared contacts if you want it
to be ava ilable for a ll users .
177
Page 180 of 356

Radio
Radio
Accessing the radio
The radio supports the FM, AM and Sirius* (satel
lite radio) bands. By means of an HD Radio re
ceiver, you also receive radio stations on the FM
and AM band in digital format.
F ig. 1 89 FM stat ion lis t (H D Ra dio)
SIR IUS ~ ..
A
006 60s Hits Linking
(
007
70s Hits Linking ----~-- ---·
Linking _
008 80s Hits
009 ThePulse Linking
010 Bridge Linking
011 Radio 1 Linking
•
:fiv,cJ t• 3G,t1l l
F ig . 19 0
Sir iu s st ati on l ist
.,. Se lect: the I RADIO I button.
After se lecting the r ad io, the last menu th at was
open is displayed.
- Showing the station li st : p ress the I RADIO I
button aga in. The receivab le s tat ions are shown
o n a ra d io s ta tion lis t
c:> fig. 189 and can be se
lected direct ly.
- Selecting a station : select and confirm a sta
tion from the s tation list. FM/ A M stations that
can be received by digital radio are marked with
the HD
symbol @ c:> fig. 189 . If reception quali
ty declines, the radio automat ica lly switches to
the analog FM/AM stat ion. Dig ital FM HD Rad io
stations may contain multiple additional sta
tions* . The available additional stations* are
listed unde r the radio station . When you leave
the reception a rea, additional stations* that
178
cannot be received are marked w ith a symbol
@ c:>fig.189 .
-Quick storing from the station list : select and
confirm a station from the station list. Press
and hold the control knob until
Store station
name
here appears in the presets list. Select
and confirm the des ired presets location.
- Select ing a stored station : press the Presets
control b utton . Select and conf irm a station
from the presets list.
- Select ing the frequen cy band : press the Band
control button. Select and conf irm the desired
band.
Or : press the !RADIO I button repeated ly
until the des ired frequency band appears in the
tit le line
c:> fig . 189 .
-Updating the station list : select and confirm
Update station list . The station lists in the FM
and Sir ius* bands are updated automatically . If
the last station that was play ing is no longer
avai lab le after the stat ion list is updated, sta
t ion 18 4 is played au tomatically.
If there is a loss of radio signal (Sir ius*), t he fol
lowing system informat ion may display in the
station list:
LINKING : the tuner is current ly not receiving a
sate llite
s ignal @<=:> fig. 190.
ANTENNA : the antenna is not ready. For addi
tional information, contact an author iz ed Audi
dealer or authorized Audi Service Fac il ity .
The system information turns off when the radio
stations are rece ived again .
@ Tips
- HD Radio reception is not available in Cana
da.
- Con tact the Sirius * prov ider if you wo uld like
to receive satellite p rogramm ing .
- T hat stations in the AM station list are s till
displayed after you leave t he reception area.
There is no longer any reception .
- B uildings, tunnels, bridges, open areas, oth
er veh icles or objects on the veh icle roof can
affect reception.
- Sate llite radio is not availab le in Alaska and
Hawaii.
Page 181 of 356

u. co .... N
" N .... 0 0 :c '
Radio functions
Fig . 19 1 Radio mai n fu nctio ns
.,. Se lect: t he I RADIO I b utt on> Functions con trol
bu tton.
The fo llow ing funct io ns can be selected, depend
in g o n the band that is selected:
(D Save station /Store channel
The selected stat ion is stored in the next empty
position in the presets list
c::> page 179 . Select
a n d confi rm the desired p resets loca tion.
@ Seek down /Seek up (FM , AM)
The prev ious 1<111 or next ~I receivable station is se
lected .
Or: press the arrow keys on the MMI con
tro l pane l
lt> I.
Previous channel /N ex t channel (Siriu s*)
The prev ious 1<111 o r next ~I channel is selecte d. Or:
press the ar row keys on the MMI contro l pane l
lt>I.
@ Manual search
The fre quency bars are disp laye d. Select and con
firm the desired freq uency .
Manual search (Sirius*)
Select a nd confi rm the desired cha nnel from the
Sir ius frequen cy ba nd* .
@ Scan
All stations are played for several seconds each .
® Information (FM)/Info (Sirius*)
The rad io text (such as station name, art ist o r ti
tle) is show n in the I nfotai nment display, de
pending on availability.
Radio
@ Information window
Va rious informa tion about the se lec ted stat ion
(s uch as t he s ta tion name, ensemble o r program
type) is displaye d, depending on availability.
(j) Presets
T he presets list can co nta in up to SO stations
from all fre quency bands .
-Storing stations : select the Presets control
button >
Save station name . The selected sta
t ion is s to red in t he nex t emp ty pos it ion in the
p rese ts lis t. Sele ct an d confi rm the des ire d pre
se ts lo cati on .
-Selecting a stored station : press the Presets
cont rol b utt on . Se lec t a nd con firm a stat ion
from t he p rese ts lis t.
Or : press the ar row keys
on the MMI cont rol panel
(lt> I).
-Moving stored stations : press the Presets con
t rol button. Se lect and confirm the s tat ion
from the station list and then
Move station
name .
Select and confi rm the desired presets
location.
Other settings
.,. Select: the I RADIO I button > Settings control
button.
T he following se tt ings ca n be selected depend ing
on the band that is selected ( FM, AM, Si rius *):
HD Radio* (FM/AM )
You can swi tch HD Radio reception o n or off.
HD station information* (FM /AM)
Requirement: HD Radio reception must be
switched on.
When the funct io n is switched on, va rious in fo r
mation about the t itle that is c urrent ly playing
(such as artist or a lbum) is disp layed, depending
o n ava ilab ility.
Station names (FM )
-Variable : scro lli ng text t ransmitte d by the FM
stat ions is shown in the Infotainment system
disp lay .
-Fixed : scrolling text transmitted by the FM sta
tions is not shown in the Infota inment system
.,..
179
Page 182 of 356

Radio
display. Only the curren t sec tion of the sc roll
ing text is displayed .
-Off : scr oll ing text tra nsmi tte d b y the F M sta
tions is not shown in the Infotainment display .
Scro lling text from HD stations is shown in the
Infotainment display.
Show channel information (Sirius*)
If tr ack info rm at ion is ava ilable fo r the cur rent ti
t le (such as a rtist or album), i t will be d isp layed
i n a pop -up win dow if this function is act ivated .
Station sorting (Sirius*)
- Channel number:
the sta tio ns are sorted in as
c ending ord er acc ording to their ch annel num
b er.
- Channel name : the stations a re listed in alpha
be tica l o rd er.
- Category and channel number: the stations are
so rted acc ordin g to their ca tegory a nd then ac
cordi ng to their ch annel number.
-Category and channel name : the sta tions are
sor ted a cco rdin g to their ca tegory a nd then ac
cording to their s ta tion name .
Troubleshooting
Problem Solution Category filter (Sirius*)
The s
tations shown in the st ation list c an be fil
te red by yo ur persona l pre ferences and b y pro
g ram type . The program cate gories that you can
se lect depen d on w hat is offere d by your provid
e r. Se lect the
Deact ivate category filter option to
deact ivate all filte r opt ions and disp lay all ava ila
ble stations in the sate llite station list.
Receiver serial number (Sirius*)
The elect ronic se rial num ber (ES N) is disp layed .
The number is requ ired w hen logg ing in to Si r
i us *.
Deleting presets
Require ment: a sta tion mus t be s to re d in th e
p resets list ¢ page
179 .
Store d sta ti ons can be dele ted Individually or All
at once .
A station with poo r reception is no Sto
re the station ahead of time and then se lect it from the pre -
longer disp laye d in the station list
sets list
later (z) <=>page 179, fig. 191 .
once you switch to a diff erent sta-
t io n.
180
Page 183 of 356

u. co .... N
" N .... 0 0 :c '
Media drives and
connections
Introduction
There are various media drives and connections
ava ilable i n the MMI. For example, you can play
aud io/video* f iles through the Jukebox, or you
can connect a portable device to the Audi music in te rface* a nd ope rate it throug h the MM I.
Notes
General information
Media and format restr ictions :
the MMI (includ
ing the SD card reader and the USB storage de
vice connect ion*) was tested w ith a var iety of
products and media on the market. However,
there may be cases where ind iv idual devices or
media and aud io/video files* may not be recog
niz ed, may play o nly w it h rest rictio ns, o r may no t
p lay at a ll.
The MM I media dr ives do not suppo rt W indows
M edia Audio 9 Vo ice, W indows Media Aud io 9
L oss less and Windows Media
9 Pr ofessional for
mats .
Digital Rights Management : please note that
the audio/v ideo* fi les are subject to copy right
p rotection.
The med ia drives do not play f iles that are pro
tected by DRM and that are ident ified w ith the
symbo l
i'.D.
Data se curity : Never store important data on the
memory cards, the Jukebox, CDs/DVDs or porta
b le aud io devices . Audi is not responsib le for
damaged or lost fi les and med ia.
Loading times : the more files/fo lders/playlists
that are on a storage medium, the longer it will
take to load the aud io/v ideo* fi les . Audi recom
mends us ing storage med ia that o nly conta in a u
d io/video files*. To de cre ase the time it takes to
l oad audio/v ideo f iles*, c reate subfo lders ( for ex
ample, for the a rtist o r album). The loading time
will also increase when importing fi les .
Additional information : when playing, aud io
fi les are a utomatica lly displayed with any addi -
Media drives and conn ection s
tiona l information t hat is stored (such as t he ar
tist, track and a lbum cover) . If this information is
not avai lab le on t he storage medium, the MMI
will check Gracenote . However, in some cases,
the addit ional information may not be d isplayed .
Restricted functionality : if functionality is re
stricted, reset the
Media setting s to the factory
defau lt settings
¢ page 207.
Reset the Jukebox to the factory defa ult settings
if functiona lity is
restricted ¢ page 207.
Fo r i nforma tion abo ut the p roper ties of support
ed med ia an d file forma ts , see
¢ page 187 .
(UJ) Note
Always fo llow the information fo und in ¢ (i} in
Wi -Fi
hot spo t on page 161.
CD/DVD operation
CD /DVD and format re striction s:
the functiona li
ty of individ ua l storage media may be limited due
to the va riety of b lank CDs/DVDs avai lab le and
the various capacities. Audio CDs or video DVDs
with copy protection, CDs/DVDs that do not con
form to the standard and mult i sess ion CDs may
have l imited playback or may not play at all. Audi
r ecommends finaliz ing the reco rding process
whe n creat ing mult isess ion C Ds. Mult isess ion is
not supported for DV Ds.
Handling CD s/DVDs and the DVD drive : to en
su re good, high-quality sound reproduction and
to prevent damage to the dr ive or d isc read ing er
r ors, always s to re CDs/DVDs in a protective
s leeve and do no t expose t hem to direct s unligh t.
Do
not u se :
- Damaged, dirty o r sc ratched CDs/ DVDs
- Single CDs/DVDs (3 inch/8 cm d iame ter)
- CD/DVDs tha t are not round
- CDs/DVDs w ith labe ls
- Protective rings
- Clean ing CDs
Thermal protection switch : CD/DV D playback
may be tempora rily unavai lab le if o uts ide tem
peratu res are extremely hot or co ld . A t hermal
181
Page 184 of 356

Media dri ve s and connection s
protection switch is installed to protect the CD/
DVD and the laser.
L a se r d evice s: laser dev ices are d iv ided into safe
ty classes 1 to 4 in accordance with DIN IEC 76
(CO) 6/VDE 0837 . The various types of audio
equipment installed conform to safety class
1.
The laser uses so little power or is sh ielded so
there is no danger when it is used correctly.
De vice co ver: do not remove the cover from the
device . The device does not contain any parts that
the owner can repair.
SD card reader
The SD cord readers ore located behind the cover
in the center console.
Fig. 192 Inserting the SD card
- In serting the SD card : slide the SD card into
the card reade r
slo t(!) w ith the label fac ing up
(contact surfaces facing down)
r:!> fig. 192 . The
angled corner of the SD card must point toward
the right front. Then push the SD card into the
slot unt il it clicks into place.
- Remo ving the SD ca rd: press briefly on the SD
card. The card is re leased.
The S D card reader is started and operated
through the MMI
r::;,poge 190.
A WARNING
The card reader must a lways be closed while
driving for safety reasons.
CD Note
On ly use one-piece SD cards. If adapter cards
(SD cards with more than one piece) are used,
the card could fa ll out of the adapter when
182
driving because of vibrat ions . Individua l
pieces could then become stuck in the drive
and impa ir the functionality.
(D Tips
A lways keep the SD card in a suitable case to
protect it from dirt, dust particles and other
damage .
DVD drive
The DVD drive is located behind the cover inside
the center console.
Fig . 193 DVD d rive
- Loading a CD /DVD : slide the CD/DVD stra ight
into the DVD s lot @ with the label fac ing up
¢ fig. 193 .
-Eject ing a CD /DVD : press the b utton (D .
The CD/DVD is pulled in again automat ica lly if it
is not removed from the DVD slot w ith in approx i
mately ten seconds after ejecting it.
The DVD drive is started and operated through
the MMI
r::;,poge 190 .
CD Note
-Never force a CD/DVD into the drive. The
CD/DVD is pulled in automatically.
- Do not insert CDs/DVDs with labels into the
drive . Labe ls can come loose from the CD/
DVD and damage the drive.
@ Tips
The CD/DVD playback is not ensured with au
dio fi les that have a high data rate .