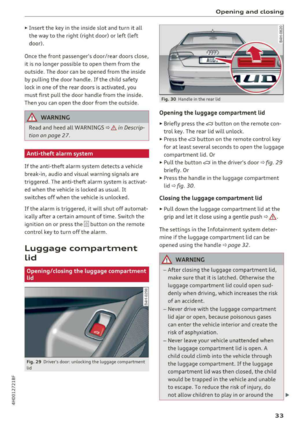
Page 153 of 356

u. co .... N
" N .... 0 0 :c '
Requirement: the re must be a call in prog ress .
.,. Select t he Options contro l button.
-Making an additional call : select Additional
call > Directory
or a call list> an entry in th e
list.
-Accepting an incoming call when there is an
active call and a call on hold :
select Accept.
T he act ive ca ll is replaced with the incoming
call.
Addit ional functions incl ude:
Mute : if you se lect and confirm this function, the
other person on the phone cannot hea r you. You
can hear the other person .
Hold call/Resume on-hold call : you can put an
active phone call on ho ld and resume it.
On hold
a n d the durat io n of the phone ca ll is shown in the
Infotainment d isp lay .
Swap call : you can alte rnate betwee n two phone
calls at the same time . One of the calls w ill be on
h o ld.
End call ends the active phone call. A phone
call that is on hold stays on ho ld and can be re
sumed using t he
Options control button and Re
sume on-hold call .
Join conference :
a party on hold and up to five ac
tive parties (depending on t he network) ca n be
added to a confe re nce cal l. To make an add itiona l
call , put all pa rticipan ts in the c urren t confe rence
call on hold using
Hold conference . Press the Op ·
tions
con trol butt on. Se lec t a nd confi rm Addi·
tional call
and sele ct a phone numbe r from the
Call list or the Directory , or selec t Enter number.
To add this party to the confe re nce call, select
Join conference . With Resume , all pa rtic ipants
a re ta ke n off hold .
Show conference members
shows all participants .
(D Tips
-To be notified of an incoming call during a
phone ca ll, the Call waiting function in y our
cell phone must be switched on when us ing
the handsfree p rofile
( Handsfree ).
- The display of an incoming phone call in the
Infotainment system d isp lay may still be
v is ibl e fo r a few seconds de pending on the
cell phone in use. I f you use the
Replace or
Telephone
Decline fu nctions in the MMI while the dis
play is still visib le, the active phone call may
end .
Emergency call functions
Applies to: vehicles with telephone
Requirement: a cell phone must be connected to
t h e M MI
¢ page 147.
.,. Sele ct: !T EL! bu tton > Enter number > En ter
emergency call number (for example, 911)
>
OK.
.,. Setting an automatic emergency call* : select
the
!TEL! button> Settings cont rol button >
Telephone settings > Automatic emergency
call .
A WARNING
-
-Becaus e you r phone wor ks with radio sig
n al s, a con nection cannot be gua ranteed un
de r all circumst ances. Do not rely o n only
your ph one when i t co me s to e ssen tia l com
m unicat ion (such as a medi cal emergen cy) .
- Always f ollow t he in stru ctions given by the
emergen cy personnel dur ing an emergency
call and on ly end the ca ll when they instruct
you to do so .
{D Tips
Emer gen cy n umb ers are not the same every
where . Find out wh ich emer gen cy number is
used in your cur rent loca tion .
151
Page 154 of 356

Telephone
Opening the directory
Applies to: vehicles with telephone
After connecting the cell phone, the contacts in
it are automatically imported into the
/\1/\11.
Fig. 169 Contact list
.,. Select: the ITEL! button> Directory .
- Selecting a contact :
select and confirm a con
tact from the directory. The address card is dis
played.
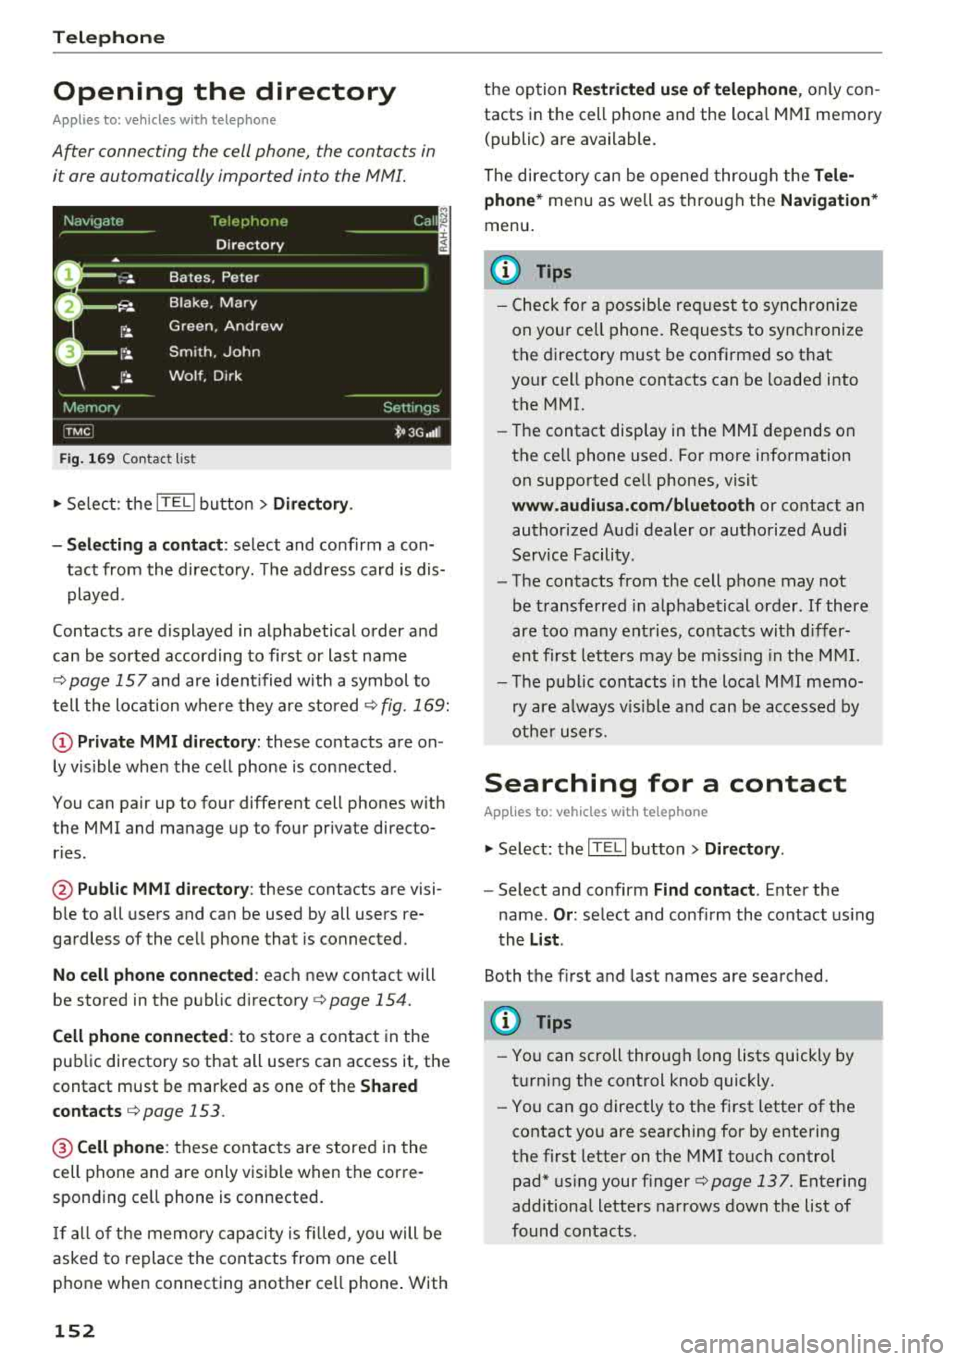
Contacts are displayed in alphabetical order and
can be sorted according to first or last name
¢page 157 and are ident ified with a symbol to
tell the location where they are stored
¢ fig . 169:
(D Private MMI directory: these contacts are on
ly vis ible when the cell phone is connected .
You can pair up to four different cell phones with
the MMI and manage up to four private directo
ries .
@Public MMI directory: these contacts are visi
ble to all users and can be used by all users re
gardless of the cell phone that is connected.
No cell phone connected : each new contact will
be stored in the public
directory ¢ page 154.
Cell phone connected : to store a contact in the
public directory so that all users can access it, the
contact must be marked as one of the
Shared
contacts
¢ page 153 .
@Cellphone : these contacts are stored in the
cell phone and are only visible when the corre
sponding ce ll phone is connected.
If all of the memory capacity is filled, you will be
asked to replace the contacts from one cell
phone when connecting another ce ll phone . With
152
the option Restricted use of telephone , only con
tacts in the cell phone and the loca l MMI memory
(public) are available.
The directory can be opened through the
Tele
phone*
menu as we ll as through the Navigation*
menu.
(D Tips
- Check for a possib le req uest to synch ronize
on your ce ll phone. Requests to synchronize
the directory must be confirmed so that
your cell phone contacts can be loaded into
the MMI.
- Th e contact disp lay in the MMI depends on
the ce ll phone used. For more information
on supported ce ll phones, visit
www.audiusa.com/bluetooth or contact an
authorized Audi dealer or authorized Audi
Service Facility.
- The contacts from the cell phone may not
be transferred in alphabetical order . If there
are too many entries, contacts with differ
ent first letters may be missing in the MMI.
- The publ ic contacts in the local
MMI memo
ry are always vis ible and can be accessed by
other users.
Searching for a contact
Applies to: vehicles with telephone
.,. Select: the ITELI button > Directory .
-Select and confirm Find contact. Enter the
name .
Or: select and conf irm the contact using
the
List .
Both the first and last names are searched.
(D Tips
- You can scroll through long lists quickly by
turning the control knob quickly.
- You can go directly to the first letter of the
contact you are searching for by entering
the first letter on the MMI touch control
pad* using your
finger¢ page 137. Entering
additional letters narrows down the list of
found contacts .
Page 155 of 356

lL t:0 ....
"' ......
"' .... 0 0 :c '
Using contacts
Applies to: veh icles wit h te lephone
Fig. 170 Calling a con tact
Fig. 171 Selec ting a destina tion
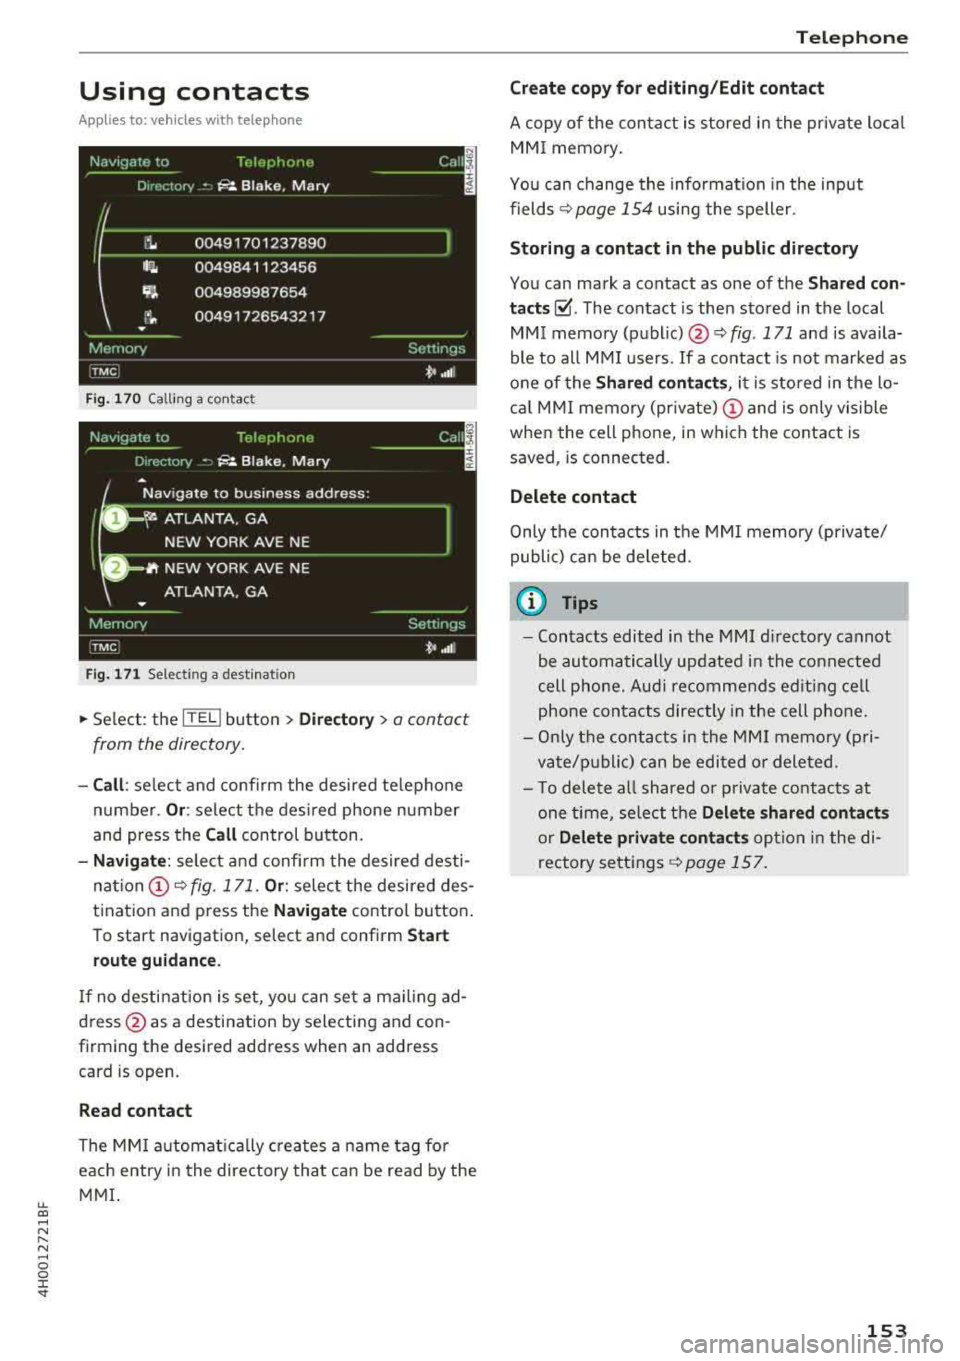
.,. Select : the ITEL ! button > Directory> a contact
from the directory.
- Call : select and confirm the desired telephone
number.
Or : select the desired phone number
and press the
Call control button.
-Navigate: select and confirm the desired desti
nation (!)¢ fig. 171. Or: select the desired des
tination and press the
Navigate control button.
To start navigation, select and confirm
Start
route guidance.
If no destination is set, you can set a mailing ad
dress @as a destination by selecting and con
firming the desired address when an address
card is open.
Read contact
The MMI automatically creates a name tag for
each entry in the directory that can be read by the
MMI.
Telephone
Create copy for editing/Edit contact
A copy of the contact is stored in the private local
MMI memory.
You can change the information in the input
fields
¢ page 154 using the speller.
Storing a contact in the public directory
You can mark a contact as one of the Shared con
tacts~ -The contact is then stored in the local
MMI memory
(public) @¢ fig. 171 and is availa
ble to all MMI users. If a contact is not marked as
one of the
Shared contacts, it is stored in the lo
cal MMI memory (private)
(D and is only visible
when the cell phone, in which the contact is saved, is connected.
Delete contact
Only the contacts in the MMI memory (private/
public) can be deleted.
u) Tips
- Contacts edited in the MMI directory cannot
be automatically updated in the connected
cell phone. Audi recommends editing cell
phone contacts directly in the cell phone .
- Only the contacts in the MMI memory (pri
vate/public) can be edited or deleted .
- To delete all shared or private contacts at
one time, select the
Delete shared contacts
or Delete private contacts option in the di
rectory settings
r::!;> page 157.
153
Page 156 of 356

Telephone
Importing and exporting
contacts
Applies to: ve hicles with telep hone
Contacts in vCard format( . vcf) can be imported
into the directory or e xported.
r·~, J'.' J, j) I· l,
Memory
TPlephor1f-~
Import phone book
Importing phone book. please wait. ..
If~ Contacts: 10
f ~ Contacts: 5
i ., ~
Memory
iTMC I
Settings
D ~ i, .. ,i:
F ig . 1 72 Im port ing t he p hone book man ually
Req uiremen t: an SD ca rd must be in the SD card
reader
c:> page 182 or a USB storag e dev ice must
be co nnec ted to t he A udi musi c in terface
c:> page 18 6 .
.. Se lect: the IT EL! bu tton > Directory > Memory
contro l but to n.
- Import ing contacts from a storage device: : se
lect and confirm Import contacts > SD card 1 ,
SD card
2 or USB storage device > desired con
tacts
> Import .
- Exporting contacts to a storage device :
select
and co nfirm
Export contacts > SD card or USB
storage device
> desired con ta cts > Export .
- Selecting all contacts at once for import or ex
port :
select a nd confi rm Import contacts /Ex
port conta ct s
> SD card or USB storage device
> All c o ntrol but ton > Import /Export .
- Importing the phon e book manually :
select
and co nfirm
Refresh directory . The symbo l (D
c:> fig. 1 72 ap pears in t he st atus line in the Info
tainment display as long as the contacts are be
ing imported from the ce ll phone.
To ma ke it eas ier to fi nd a con ta ct, yo u can fi lter
the co nta cts accor ding to their s to ra ge lo cation
(Vehicle , Telephone or All ) using the Memo ry
used
function.
154
@ Tips
- The imported contacts are stored in the lo
cal memory of the directory .
- A max imum of 100 contacts can be impo rt
ed. Yo u can check the directory memory ca
pacity at any time
c:> page 155.
- Never save important data on SD cards or
USB storage devices. A udi is not responsible
for damaged or lost files and media .
- Refe r to the notes in the chapter
About
Audi connect
c:> page 163.
Storing a new contact
Applies to: vehicles with telephone
Fig. 173 Storing a new contact
.,. Sele ct: the IT ELI bu tton > Directory > New con -
tact .
Last name/First name
E nter the last name and first name usi ng the
speller.
Telephone numbers
You can store up to f ive telephone number s in an
address card. You can a lso ass ign a
Type (Busi
ness
or Private ) as well as a Category (Landline ,
Cell
or Fa x) for eac h pho ne numbe r. You can a lso
u se
Save as default number to set a freq uent ly
u sed phone n umbe r as the def ault numbe r. T h at
n umbe r is then d isp laye d firs t in t he open ad
dress card .
Yo u can impor t a phone nu mber from t he call
lis ts (s uch as
Dialed number s) into the addre ss
c ar d using the
New number fu nct ion and the List
contro l bu tto n. ""
Page 157 of 356

u. co .... N
" N .... 0 0 :c '
Business destination/Private destination
Two navigation des tina tions, Private /Business ,
can be assigned to e ach con tact. Yo u can access
the stored navigation destinations in the
Naviga
tion
menu using the Route guidance control but
ton
c> page 170.
A sto red pr ivate/business m ailing address is a u
tomatically downloaded into the
Address inp ut
fiel d for eac h nav igation destinat io n. You ca n
sto re these eas ily as navigation destinations us
i n g
Set address .
You can find t he next rest sto p, gas stat io n, Aud i
dea le r or hospita l unde r the
Top categories menu
item . The
Point of inte rest men u item contains
addit io nal submenus that yo u can use to c reate
n av igation desti nat ions. For more in fo rmat io n
a bout the submenus, refe r to
c> page 168 .
Business mailing address/Private mailing
address
You can spec ify a busi ness and private address in
a n add ress ca rd . With the
Delete mailing ad
dress
fu nction, you can dele te the busi ness or
pr iva te address .
St ructured addresses from a cell p hone that have
in fo rmation regard ing cou ntry, ZIP code , city a nd
s treet name ca n be impo rted directly in to the di
r ectory.
(0 Tips
- Th e public contac ts in the local MM I memo
r y are always visibl e and can be accessed by
other use rs.
- Th e new con tact w ill be s tored in th e memo
r y in th e di re ctory that is currently b eing
us ed.
- Th e imp orti ng of n ew address es d epends on
th e cell p hone.
- Up to 100 con tac ts can be stor ed in memory
i n a p riva te or p ublic directory.
- Contacts edited in t he MM I dir ectory cannot
b e a utomat ically updat ed in the connect ed
ce ll phone. Audi recommends editing cell
p hone conta cts d irec tly in t he ce ll p hone.
Telephone
Name tags
Applies to: veh icles w ith telephone
The MMI automatically creates a name tag for
each contact in the directory. You can also assign
up to 50 personal name tags for contacts using
th e voice recognition system .
.. Select: the ITELI button >Directory > Settings
cont rol button .
-Playing personal name tags : select and con
firm
Read name tags > contact from the list.
-Deleting name tags : select and confirm Delete
name tags > Delete individually /Delete all
>
Yes .
(D Tips
-You can only ass ign and store pe rsona l
name tags using the vo ice recogn it ion sys
tem.
- You can only delete pe rsonal name tags you
hav e recorded.
Memory capacity
Applies to: veh icles w ith telephone
.. Select: t he ITE LI button >Directory > Memory
cont rol b utton > Memory capacity .
The Memory capacity fo r each directo ry and for
t h e e nti re memo ry is d isp layed .
Yo u ca n ma nage up to 5, 000 co ntact s with the
dire ctory. Yo u can load up to 2 ,00 0 co ntacts
from your cell phone into each private di re ctory .
In ad dition to this, you can store up to 1 00 pri
vate contacts an d up to 100 public contacts into
the MMI memory .
Additional settings
Telephone settings
Applies to: veh icles w ith te lep hone
.. S ele ct: th e ITE LI butt on > Settings co ntrol but -
t on.
~
155
Page 158 of 356

Telephone
Call options
Automati c redial :
when the func tion is swit che d
On , a phone number w ill be au toma tic ally re
d ia le d up to five times if it is busy. Automatic re
d ia l can be canceled with
End call . The function is
only active when the network gives a b usy signa l.
Auto answer : when the func tion is sw itched On ,
in com ing ca lls are automatically answered afte r
a br ief time.
Three-way conference (GSM)
- On :
you can answe r an incoming call while an
othe r ca ll i s in progress by selecting
Accept.
The fi rst call is put on hold. Using the Hold op
ti on, yo u can a lso put an act ive c all on hold and
sta rt another c all or a conference c all.
-Off : you ca n replace a call w it h an incom ing c all
b y se lec ting
Replace. Yo u can ig no re an in com
i n g ca ll using the
Decline opt ion . You cannot
p ut an active ca ll on ho ld o r sta rt a new ca ll.
Telephone settings
Volume settings
1> : fo r the Ringtone volume /
Phone call volume ,
see ~ page 2 06.
Voicemail number : the voicemail number can be
e nte red o r edi ted in t he
Number input field using
t he speller. Whe n a vo icemail numb er is store d,
t he vo icemail c an b e ac ces se d w ith
the ® sym
bol in the spe ller . T he
Delete voicemail number
function deletes the sto red voicemai l num ber .
Invert call lists : the phone nu mbers i n the call
lis ts ar e sorte d ac cordin g to t he time the call
t oo k place. When the f unc tion is swi tched
On ,
the so rting o rde r is reverse d.
Bluetooth
Bluetooth:
the MMI Bluetoo th fun ctio n can be
sw itche d
On or Off . The Blu etoo th symbol @
~page 139, fig. 15 8 appe ars in t he Infotain
men t displ ay when the f unct ion is swi tched
on.
Visible:
t he visibili ty of the MMI in cell p hones o r
i n Bl ueto oth a udio players can be swit ched
On or
Off . When Auto is sele cted, the MMI will rem ain
visib le for cell phones or a Bluetooth audio player
1> Depen ds on th e co nnecte d cell p ho n e.
156
fo r about five m inu tes when the ve hicle is sta
tiona ry and t he ignition is switched on. The visi
b ility sw itches o ff after that . However, it is still
poss ib le to establish a B luetooth connection with
ce ll phones o r devices that have already been
paired when the vis ibility is switched off . The visi
bility of the MMI automatically swi tc h es
Off
wh en audio fi les a re bei ng played using a con
n ecte d B lueto oth aud io player to avoi d pro ble m s
du rin g pla yb ack .
Bluetooth audio player : th e Bluetooth audio
player
func tion mu st be switche d On to be ab le
to sele ct the
Bluetooth audio player as the
sou rce in t he
Media menu. S w itch the Bluetooth
audio player
f unc tion Off if you are no t usi ng i t
to preven t mal func tions in the
Telephone or Me
dia
men us.
Find Bluetooth devices: the sys te m s ear ches for
and lists Bluetoot h devices tha t ar e with in range .
Bonded Bluetooth devices : the B luetoot h devic e s
co nn ect ed t o the MMI are lis ted. The cur rentl y
c on necte d B luetooth device is la be le d wi th t he
Bl uetoot h sym bol. T o dele te con nect ed Blue
tooth devices in dividua lly, se lect t he dev ice a nd
d elete it with t he
Delete Bluetooth device func
tion. To disconnect or connect pa ired cell phones
i ndivid ua lly, select the B luetooth dev ice and
c h ange the p rofile us ing t he
Connect fu nct ion
wh ile t he vehicle is s tat io na ry . U se
Disconnect to
d isco nnect th e paire d Bluetooth dev ice.
Known Bluetooth devices : up to 50 known devi
ces can be listed . T hese Bluetooth dev ices may no
l onger be in range when search ing to connect .
Bluetooth name : the Bluetooth name of t he M MI
(fo r example, "AUDI MMI 2613") is shown and
can be cha nged .
Delete Bluetooth devices : all connected Blue
tooth devices can be deleted by confirming with
Yes.
Wi-Fi settings
S ee ~ page 161.
Page 159 of 356

u. co .... N
" N .... 0 0 :c '
Connection s
See ¢page 162.
(QJ) Note
Tele ph on e
Sort order
Yo u can so rt the contacts in your directo ry alpha
be tica lly according to
La st n am e/ Fir st name.
Always follow the info rmat io n found in ¢(@ in
Wi-Fi hotspot on page 161.
Show shared contacts
You can show or hide the public contacts . With
Y es, all the contacts in the local M MI memory
(public) are shown, and with
No , th ey are hidde n. @ Tips
- Several cell phones can be pa ired to the
MM I, but only one cell phone can be act ively
con nected.
Delete priv ate contacts /Delete shared
contacts
You can delete al l pr ivate contacts in the local
memo ry using t he
Del ete private conta ct s fu nc
t ion. Yo u can de lete the p ublic contacts in the lo
ca l memory using the
Dele te shared contacts
function .
-
To de lete all connected Bluetooth devices,
t h e
Bluetooth funct ion can be reset to t he
factory settings¢
page 207.
Directory settings
Applies to: vehicles with telephone
~ Select: th e [fill bu tton > Dir ectory > Settings
contro l button .
Troubleshooting
Applies to: vehicles with telephone
Problem Solution
Pairing
the cell phone to the MMI Check if the Bluetooth visibility on the cell phone and MMI is
failed. switched on. For some cell phones, the visibility turns off auto-
mat ically after a short period.
Or: restart your cell phone.
For more information on this, refer to the user gu ide for your cell
phone.
After pairing,
not all contact s/no Avoid using special characters in names .
contacts are loaded in the MMI. Avoid using contact groups.
Certa in
t e lephon e function s are The te lephone fu nct ions depend o n the cell phone service p rovider
grayed out o r not avai lab le. and the cell p hone you are using. You can ob tain more info rma -
tion from your cell phone se rvice provide r, in your cell phone user
guide or in the database for mobi le devices at
ww w.audiusa.com /
bluetooth .
157
Page 160 of 356

Audi connect
Audi connect Introduction
A pp lies to: ve hicles w ith Audi co nnect
With Audi connect services, online information is
transmitted and integrated directly in the vehi
cle.
A mobi le end dev ice can be used to access the In
ternet through a Wi-Fi hotspot, either when the
vehicle is stationary or from the rear seat when
the vehicle is in motion.
A separate Aud i connect SIM card provided by
Audi connect is used to access Audi connect se rv
ices .
A WARNING
- To reduce the risk of an accident, on ly use
Audi connect serv ices when road and traff ic
condit ions permit. Read and follow the
guidelines prov ided
in c:> page 135 .
-Use the Audi connect serv ices w ith a Wi-Fi
hotspot o nly in the rear seat when the veh i
cle is in mot ion or only when the vehicle is
stationary to reduce the risk of an accident .
@ Note
Audi connect is designed for use only with the
prov ided Audi SIM card. Audi AG is not liable
for the consequences of using other SIM
cards.
(D Tips
Read and follow the notes about Audi con
nect before starting it
c:>page 163 .
Setup
Requirements for Audi connect
An Internet connection is required to use Audi
connect. The following requirements must be
met to establish a connection:
- You must be in an area that is covered by your
provider.
- Your Audi S IM card must be inserted in the
MM I SIM card reader
c:>page 158.
158
-
-A data connection must be configured for Audi
connect services
c:> page 162.
Using the SIM card reader
App lies to: vehicles wit h Audi connect
Audi multimedia
Fig. 174 Insert ing the Aud i SIM ca rd, actua l size of t he
Aud i SIM card
Requirements
The vehicle must be stationary and the ignition
must be switched on.
Inserting the Audi SIM card
~ .... :c .. a:
.,. Slide the Aud i SIM card into the card reader
slot with the label facing up (contact surface
facing down)
c:> fig . 174 . The angled corner of
the Audi SIM card must be at the left front cor
ner. Then push the Audi SIM card into the slot
until it clicks into place .
.,. To connect to the Internet automatically in the
future, select and then confirm Yes.
.,. To establish a data connection for Audi con
nect, confirm the message that appears wit h
Yes .
After connecting successfully
After co nn ectin g successfully, the signa l strength
is indicated in the Infotainment display status
..,.