Page 201 of 356

lL t:0 ....
"' ......
"' .... 0 0 :c '
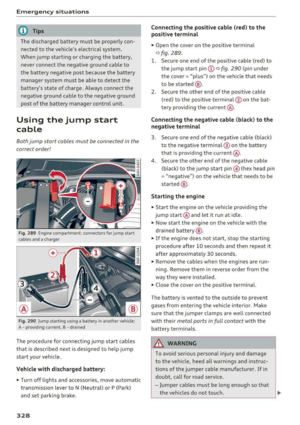
Labeling the wirele ss h eadphone s
-Attach the supplied label CD or @ ¢ fig. 208 on
the inside of the lef t/right wire less head
phones .
L abeling the w ireless headphones:
CD W ireless headphones label (paired with the
left RSE disp lay)
@ Wireless headphones labe l (paired with the
right RSE display)
Switching w irel ess headphones on /off
- Swit ching on : to switch the wireless head
phones on, p ress the On/ Off
button
¢ fig. 207 on the right earp iece (R) for approxi
mately
3 sec ond s and release it once the LED
@ starts blinking. The light @will blink s lowly
once the connection to the wireless head phones has been established .
-Sw itching off : to switch the wireless head
phones off, press and hold the On/Off button
CD until the LED @turns off.
The wireless headphones switch off automatical ly about five minutes after the RSE switches off .
Disconnect wireless headphones
You can delete the pairing between the w ireless
h eadphones and the RS E if yo u need to switch
out the headphones o r change the pairing.
- Se lect :
IM ENU I button > Setup RSE cont rol but
ton
> Head set > Delet e wirele ss heads et.
& WARNING
- F or safety reasons, as the dr iver, only use
the headphones when the vehicle is station ary to reduce the risk of a crash.
- When driving, store the headphones secure
ly so that they do not move around in the
vehicle interior when bra king or in a crash .
- Maintai n a mode rate vo lume leve l when lis
tening to audio playback through the head
phones. Continuo us expos ure to extreme
volume levels may result in loss of hear ing.
(D Tips
- If the wireless headphones were already
paired, the connection to the headphones
-
Rear Seat Entertainment
wi ll be reestablished after switc hing the
RSE on if the headphones are switched on.
- The RSE on ly supports wireless headphones
from an authorized Audi dealer .
- Audio/video output through the wire less
headphones stops during the pai ring proc
ess.
- The pairing process must be done separate
ly for the left and right wireless head
phones. The wire less headphones are as
signed to the left or right RSE display de
pending on the side of the RSE control unit
where you started the pairing process . The
pairing between the w ireless headp hones
and the left/right RSE display is ident ified
w ith a label.
- Volume that is too high or too low is auto
matically adjusted to a p reset leve l when
the wireless headphones are connected .
Charging and changing the battery
Applies to: vehicles with Rear Seat Entertainment
If the light on the wireless headphones turns
red, the batteries are low and need to be charg
ed or replaced.
F ig . 209 Co nn ectio n fo r th e charg ing cab le /battery co m
pa rt me nt
- Charging the battery : connect the charging ca
ble to the connection
CD ¢ fig. 209 on the bo t
t om s ide of the left ea rpiece (L). Then con nect
the charging cable to the cigarette lighter */12
Volt socket* in the rear center console.
Or :
charge the battery for the wireless headp hones
w ith the min i USB adapter cable th rough the
Aud i mus ic interface
¢ page 186.
- Ch anging th e batterie s: turn the cover@
¢ fig. 209 on the left earpiece (L) to the left/ IJI,,-
199
Page 202 of 356

Rear Seat Ent ertainm ent
right and change the batteries as labeled in the
battery compartm ent . Then attach the cover
back on to the left earpiece
(L).
You can ident ify t he charge status of the battery
q table on page 200 based on the blinking
speed of the LED in the charging cable conn ec
tion
CD q fig. 209.
Blinking fre- Charge status
quency
Blinking The batteries are cha rging.
Rema ins on The batte ries are charged .
Blinking An error occurred while charg-
quickly ing.
A WARNING
- Do not use damaged rechargeable batteries .
T his increases the r isk of an explos ion.
- The headphones can become warm when
the batteries a re charg ing and increase the
risk of injury .
- Do not charge standard batteries with the
charg ing cable. This increases t he risk of an
exp losion .
- Be careful when using the c igarette lighter .
I n attentive or unsupe rvised use of the c iga
rette lighte r can cause burns.
- T he ciga rette lighter/sockets and any elec
t rical accessor ies connected to t hem func
t ion only whe n the ign ition is sw itched on.
U sing the ciga rette lighter/sockets o r elec
trical accessories incorrect ly can lead to se
rious injuries or cause a fire. To reduce the
risk of in juries, never leave children unat
tended in the vehicle with the vehicle key.
@ Note
- Do not charge the batteries in the wireless headphones when the engine is not run
ning . This will dra in the vehicle battery .
- For wireless headphones, on ly use batteries
that are approved for that type of device,
for example NiMH batteries with a mini
mum capacity of 550 mAh in AAA size that
are suitable for quick charging .
200
@ For the sake of the environment
Batteries contain polluting substances. They
must be disposed of us ing methods that w ill
not harm the env ironment. Do not dispose of
them in househo ld trash.
(D Tips
The charging time for t he included rechargea
ble batter ies is approximate ly three to four
hours and may increase by approximately 25
percent if the batter ies are in use while charg
ing .
Headphones connected by cable
App lies to: vehicles with Rear Seat Entertainment
The headphone connec tions are located on the
RS E control unit.
Fig . 21 0 Co nn ect in g wir ed h eadpho nes
.,. Insert t he headphone connecto r into the left or
right jack
CD q fig . 210 on the RSE control pan
el.
The unit is eq uipped w ith 3.5 mm stereo jacks .
The w ireless headphones sw itch off automat ical
l y about f ive minutes after the cable headphones
a re connected.
(D Tips
Volume that is too h igh or too low is auto
mat ica lly adjusted to a preset level whe n the
wired headphones are connected.
Page 203 of 356

Media drives/
connections
Overview
A pp lies to: ve hicles with Rea r Seat E nte rtainment
The RS£ media drives are Located above the
pass-through behind a blind. Slide the blind up
ward to open the RS£ media drives .
Fig. 211 RSE media drives
Fig. 212 Audi music interface
RSE media drive overview c:> fig. 211:
@ Eject button
@ DVD slot
© SD card reader
The RSE Audi music interface
c:> fig. 212 is locat
ed in the storage compartment under the center
armrest@c:> page 194, fig . 201. You can con
nect a portable audio device (such as an iPod or
USB storage dev ice) to the Audi music interface
usi ng a special adapter cable*.
CD Interface on Audi music interface
@ Jack for connecting to the Audi music inter-
~ face ....
~ ® Adapter cable* (such as iPod adapter cable*) N
§ @ iPod jack on the iPod adapter cable*
:c '
Rear Seat Entertainment
@ iPod
T he RSE media dr ives and the Audi music in ter
face are sta rted and operated through the RSE.
The design and properties of the RSE media
drives are the same as the MMI drives. You can
find detailed information on
c:> page 181.
(D Tips
- The DVD changer* is located in the vehi cle
glove compartment . For more information
on the DVD changer*, refer
tor=;, page 182.
-You can only access the DVD changer* in the
MMI through the RSE. The other MMI media
drives are not availab le from the rear of the
vehicle.
Navigation
Opening navigation
App lies to: vehicles wi th Rear Sea t E nterta inment and naviga
t ion syste m
Fig. 213 Na vigat io n ma in funct ions (RSE)
.,. Select: the I MENU I button> Navigation .
After selecting Navigation, the last menu that
was open is displayed.
-Displaying navigation functions: press the
Route guidance control button.
The following functions are available for planning
a destination:
CD Enter po int of interest
@ Load last destination
® Enter a destination using an address
@ Open the map/use a destination from the
map
201
Page 204 of 356

Rear Seat Ent ertainm ent
® Searching for a destination online l)
The route is calcu lated based on var ious route cri
ter ia. To set the cr iteria , you must first plan a
destination and then display the ro ute in the RSE
disp lay using th e
Show route function . When you
transf er a planned dest ination to th e MMI using
the
Send d estin ation to the dri ver function, th e
cr it er ia are trans fer red automat ica lly.
A planned destination is shown in the RSE display in whi te and act ive route guidance is marked in
b lue .
Displaying a rout e
The planned destination and the distance to the
destination/ar rival time are displayed on t he
map. The route is calcu lated based on the current
ve hicle location and can be updated.
To disp lay act ive route gu idance on the map, se
lect the
Route guid anc e control button > Ex it
r o ut e displa y.
Send destination to the dri ver
To start route gu idance fo r a planned route, t he
destination must be transferred to the M MI. If
t he
D est ination s are set to Co nfirm in the MM I
se tup
men u ¢pag e 197, the destination m ust be
confirmed before transferring to t he MMI.
(D Tips
- The display of nav iga tion f unct ions is
sync hronized to both RS E disp lays.
- Refer to the notes i n the chapter
About
Audi c onnect
¢ page 163.
- The conte nt, scope and p roviders of offe red
A udi con nect se rvices may vary.
- The navigat ion functions match those in t he
MM I to a large extent. Fo r mo re informa
tion, refer to
¢ page 166 .
-The functions for the on line Street V iew
c::!;> page 160 can also be used in t he RS E
while dr iv ing.
- If
On request is selected fo r the data con
nect ion in the
Da ta connection menu
¢ page 162, rece iving data packets, s uch as
1> Applies t o ve hicl es w it h A udi co nnec t
202
weat her information, must be confirmed in
the MMI.
Accessing traffic information
Applies to: vehicles with Rear Seat Entertainment and naviga·
tion system
.,. Select: the I MENU I button > Info.
- Op ening a d etail ed view of traffic inf orm ation :
select and confirm the traffic informa tion from
the list.
- Op ening th e ne xt tr affic rep ort : se lect and
confirm
Show n ex t re port .
© Tips
For more information on accessing traff ic in
fo rmation, refer
to ¢ page 176 .
Accessing Audi connect services
Applies to: vehicles with Rear Seat Entertainment, navigation
system and Audi connect
Requirement: the requirements for Aud i connect
se rvices must be met
¢ page 158 .
.,. Select: the I MENU I button> Audi connect > the
desired Audi connect service .
-Fo r ex ample , d is pl ay w eathe r info rm ation : se
lect and confirm
Weather . Selec t and confirm
the desired search area:
Imm edi ate v ici nity /Vi
cinity of de stin ation /stopo ver or In new city .
Enter a location and confirm the input with OK.
(D Tips
-Refer to the notes in the chapter About
Audi
conn ect ¢ page 163 .
-Additional information about access ing Audi
connect services can be found under
¢ page 158 .
Entertainment systems
Listening to the radio
Applies to: vehicles with Rear Seat Entertainment
.,. Sele ct: th e I RADIO I button.
Page 205 of 356

u. co .... N
" N .... 0 0 :c '
The radio functions match those in the MMI. For
more information on the
Radio menu, refer to
¢ page 178.
You can store a separate presets list in the RSE
that may contain up to 50 stations from all fre
quency bands. You can a lso display the station
name for the se lected radio station or change the
station sorting separately in both RSE disp lays.
Playing media
Applies to: vehicles with Rear Seat Entertainment
"'Select : I MEDIAi button .
The med ia functions match those in the MMI to a
large extent. For more information on the
Media
menu, refer to Q page 190.
Possible sources are:
(D Jukebox
@ SD card reader
@ DVD drive
© DVD changer*
® Audi music interface (such as iPod, USB or ex
ternal audio/video input)
Different functions are availab le depending on
the active source and the medium inserted.
(D Tips
- The Album browser function is not available
in the RSE .
- The copy and delete process cannot be
started simultaneous ly when accessing the
Jukebox from both systems at the same
time.
Video playback information
Playback combinations
Applies to: vehicles with Rear Seat Entertainment
When se lecting the same video source, both
sound and picture w ill play through both RSE dis
plays.
Rear Seat Entertainment
If different video sources are started on both RSE
displays, on ly certain picture/sound playback
combinations are possible and they depend on
the selected video sources.
Complete output format (sound and video
image) on both RSE displays
Select a video DVD as the first video source in the
DVD drive and then the following source:
- DVD changer*
- Aud i music interface with AV adapter cable*/
iPod adapter cab le plus*
Playing only sound on the second RSE
display
T he re is only sound output fo r the second video
source if you :
- Start a video DVD in the DVD drive as the first
source and select a video file from the Jukebox
or the SD card as the second source .
- Sta rt a video fi le from the Jukebox as the first
source, and select a video file from the SD card
or from the Aud i music interface using an AV
adapter cable* /USB adapter cable" /iPod adapt
er cab le plus* as the second source and vice
versa .
- Start a video DVD/video file in the DVD chang
er * as the first source, and select a video file
from the Jukebox, SD card or from the Audi mu
sic interface using an AV adapter cable*/USB
adapter cable*/iPod adapter cable plus* as the
second source .
No picture/sound playback on the second
RSE display
If a video file from the Jukebox, from an SD card
or from the Audi music interface w ith the USB
adapter cable* is already playing on one RSE d is
play, p layback of a v ideo DVD in the DVD drive on
the other RSE display is not possible.
203
Page 206 of 356

Rear Seat Entertainment
Troubleshooting
Applie s to: ve hicles w ith Rea r Sea t Ent erta inmen t
Problem Solution
RSE control panel:
the RSE will Check the parenta l control settings ¢page 197 in the MMI.
not turn on .
Wireless h eadphone s: the connec -Sw itch the wireless headphones off and back on . When switching
tion status for the wireless head- them on, make sure to press and ho ld the On/Off
button(!) (D
phones is incorrect ¢ table on ¢page 198, fig . 207 on the right earpiece (R) for approximate ly
page 198. 3 seconds and then re lease the button as soon as the light @ be-
gins blinking
¢ page 198, fig. 207.
Wireless headphones : th e left/ You can dete rm ine the pa iring between t he wire less headphones
r ight w ireless headphones were and the left/ right RSE display us ing the label on the inside of the
swi tched. left/right w ireless headphones ¢
page 198, fig. 208 . Make sur e
you are only connecting the wireless headphones that are allocat -
ed to that RSE display.
Wireles s headphones : no func- Check if the wireless headphones were paired initia lly to the RSE
tion.
¢ page 198.
Or: the batte ries must be char ged or replaced ¢ page 199.
Wireless headphones : a connec- Switch the wireless headphones off and back on .
t io n could not be made.
204
Page 207 of 356

System settings
Setting the time and
date
You can set the clock time manually or using the
CPS .
Fig. 214 Setting a time zone
.,. Select : the I MENU ! button > the upper left Time
control button (D c> fig. 214 .
Time source
GPS
vi: the Time and Date are set by GPS based
on the
Time zone that was se lected manually. Al
ways remember to set the new
Time zone in the
MMI when the vehicle enters a different time
zone.
Manual : you can set the Time and Date manually
using the respective function . Press the control
knob. Set the
Time or the Date manually by turn
ing and pressing the control knob .
Automatic daylight saving time*
When daylight sav ing time is sw itched On, the
time is moved forward or back automatically by
one hour when daylight saving time begins or
ends.
Manual daylight saving time
When this function is switched On, an hour is
added to the set
Time.
Time zone
When selecting the appropriate time zone, a
~ sampling of countries in this zone will be listed. ....
"" ......
"" .... 0 0 :c '
System settings
Time format
If you select 24h , the clock will display, for ex
amp le,
13:00. If you select AM/PM , the clock
will display, for example,
1:00 PM.
Date format
If you se lect DD.MM , the date will display, for ex
amp le,
31 .12 . If you select MM/DD , the date
will display, for example,
12/31.
Adjusting the sound
The sound distribution and volume of the MMI
can be adjusted individually . The settings depend
on vehicle equipment.
Fig. 215 Sound settings
Fig. 216 Adjusting the balance/fader
.,. Select: !TONEI button .
(!)GALA*/ DSP* / DSP [BOSE]*/ DSP [Bang
& Olufsen]*
- GALA (Speed-dependent volume increase)*:
select and confirm Active/Inactive for the ad
justment of playback volume to the level of
noise inside the vehicle .
-Sound focus (adjusting the sound distribu
tion) *:
select and confirm All (symmetrical
205
Page 208 of 356

System settings
sound di stribu tion)/ Driver (sound dis tribution
aime d towa rd the d river) or
All /Front /Rear.
- Surround level* :
you can a dju st the vo lume of
t h e sur round effect by tu rning the contro l
k no b.
-AudioPilot (dynamic road noise compensa
tion)* :
select and confirm Active /Inactive.
When t he f unct io n is act ive, the vo lume is auto
matically ad justed depending on t he leve l o f
noise ins ide the ve hicle.
- Sound focus * (adjusting the sound distribu
tion ):
select and confi rm All (symmet rical
sound d istr ibutio n)/ Movie (optima l so und dis
tribution fo r playing a
movie)/ Front/Rear .
- Volume balancing *:
the dynamic road noise
compensation ca n be ad justed by turning the
contro l knob.
@ Subwoofer* I @ Bass/ @Treble
You can a djust the Subwoofer *, Bass and Treble
sett ings by turning the contro l kno b. The
cha nged settings only apply fo r the aud io so urce
that is active at the t ime . This allows you to ad
jus t th e sound se tt in gs for eac h aud io so urce sep
ara tely.
® Balance/Fader (sound focus)
- Adjusting the sound distribution using the
MMI touch :
move your finger on the MMI t ouch
contro l pane l in the des ired d irec tion.
Adjusting the system
volume
.,. Se le ct: the IMENU ! butto n> Tone .
Navigation* control button
Voice guidance volume /Music volume during
nav. prompts:
vol ume o f navigation prompts
d ur ing ac tive ro ute g uidance . Mu sic volume dur
i n g nav iga tion prom pts mea ns tha t th e vol ume
of audio playb ack is te m porar ily lowered whe n
t he p arkin g sys tem or v oic e gu idance i s act ive.
Voice guidance: se e ¢page 175.
Voice guidance during call : see ¢ page 175.
206
Telephone* control button
Ringtone volume /Phone call volume :
you ca n
adjus t the sele cte d r ing tone vo lume or call vol
u me by tu rnin g the cont ro l knob. The
Phone call
volume
can on ly be adjusted durin g a call.
Systems control button
Speech dialog system volume :
you can adju st
th e vol ume o f th e ann ounc emen ts by tur ning the
contro l kno b.
MMI touch volume *: the vo lu m e of the MM I
tou ch pro mpts can be adjus ted by tur ning the
c on tro l k no b.
Other settings
.,. Sele ct: th e I M ENU I button > MMI setup contro l
bu tton.
Language
The language can be changed fo r the Info ta in
men t display, t he dr iver i nfo rm ation system dis
play, voice guid ance* and t he voice recogn itio n
sys te m* .
En glish, French and Spanish are ava ila bl e.
Measurement units
The following meas urement u nits ca n be set in
the Infotainment d isp lay a nd dr iver info rmat ion
system.
- Speed (mph o r km/ h)
- Distance (miles o r kilomete rs)
- Temperature (°For 0
( )
-Fuel consumption (l/l0 0km, mpg (US), mpg
(U K) or k m/l)
- Volume (lite rs, ga llons ( UK) o r gallo ns (US))
Speech dialog system
App lies to : vehicles wi th voice recog nitio n syste m
Display speech commands : th e d isplay of poss i
ble commands dur ing vo ice input can be switc h
ed
On or Off .
Short dialog :
prompts in a s horter format can be
switc hed
On or Off .
Input signal :
the beep input signa l dur ing a dia-
l og can be switc hed
On or Off. ..,.