Page 57 of 356

lL t:0 ....
'"" ......
'"" .... 0 0 :c '
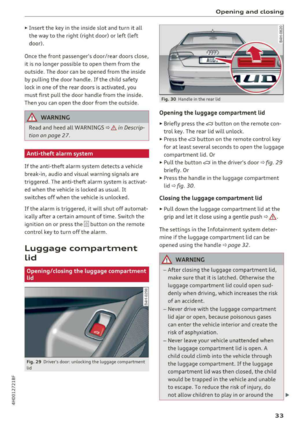
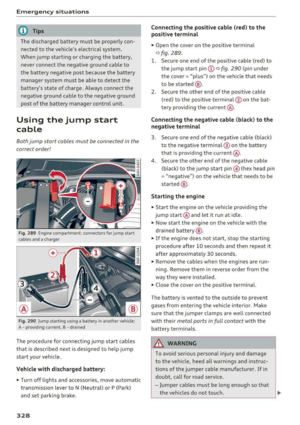
The following seat settings@are possible:
Mas sag e function * -select the Wave, Pul se ,
Str etc h, Lumbar or Should er
massage type or
off . You can adjus t the intensity of each massage
from 1 through 5. You can switch the selected
massage on/off using the
button @¢ page 54,
fig. 60.
Safety belt h eight adju stment * -adjust the safe
ty belt up or down
¢ page 224.
Upper ba ckre st * -angle the upper area of the
backrest forward or back.
Lumbar support -you can adjust the lumbar sup
port up/down and to be stronger/weaker.
Si de sec tion seat * -you can increase/decrease
the latera l support in the seat us ing the side bol
sters at the seat surface and the backrest.
Uppe r th igh support " -you can increase/de
crease the upper thigh support.
(D Tips
-The massage function" switches off auto
matically after approx imately 10 minutes.
-In vehicles with the recl ining rear seat, only
the seat belt height and thigh support can be adjusted on the front passenger seat us
i ng the multifunction button.
-The air in the s ide bo lsters" is released as
soon as the driver's door opens. This makes
i s possible to enter and exit the vehicle
more comfortably. As soon as you start driv
i ng t he ve hicle, the s ide bolsters fill.
S eats and storag e
Front center armrest
Applies to veh icles w it h a front center armrest
There is a storage compartment under the arm
rest.
F ig. 62 Cockpit: center armrest
Fig. 63 Cockpit: divided center armrest •
Opening the storage compartment
.,. Press the button -arrow -and move the armrest
upward .
Adjusting the d ivided center armrest*
.,. To adjust the armrest forward and up, press the
button -ar row- and pull the armrest into the
desi red pos it ion at the same time .
.,. To br ing the arm rest into the rest ing position,
press the button -arrow- and s lide the armrest
downward.
55
Page 58 of 356

Seats and storage
Rear seats
Adjusting the rear seats
Applies to: vehicles w ith power adj ustable rear seats
F ig. 64 Passenger side rear seat : seat ad justment buttons
F ig. 65 Rear doo r: memory function buttons
Adjusting lumbar support
.,. To adjust the curvature of the lumbar support,
press the button @to the left/right .
.,. To adjust the height of the lumbar support,
press the button@upward/downward.
Adjusting the head restraint angle
.,. To adjust the head restraint so that it is more
vertical/more angled, press the button @ for
ward/back.
Adjusting the seat position
.,. To adjust the seat forward/back, press the but
ton © forward/back .
.,. To move the seat up/down, press the button©
upward/downward.
Adjusting the massage function*
.,. T o adjust the "pulsating" /"wave" massage
function, press the button ® to the left/right .
The massage function is at its strongest level
when three L EDs in the button turn on.
56
.,. To red uce the massage leve l, press the ® but
ton again.
.,. To switch the massage function off, press the
button repeatedly until the LED turns off.
Adjusting the reclining position
.,. To adjust the reclining position, press and hold
the button ® until the seat reaches its end po
sition .
.,. Applies to vehicles with reclining seat*: if you
select the reclining position, the front passeng
er's seat moves forward and the backrest re
clines . Depending on the last setting, the leg
support may fold out at the same time . The
front passenger's seat can no longer be used in
the reclining position
¢.&_ .Yo u can adjust the
leg support or fold the display forward in the
reclining position.
Selecting the standard seat position
.,. To adjust the standard seat position, press and
hold the
button (!) until the seat reaches its
end position .
.,. App lies to veh icles w ith reclin ing seat*: if you
select the standard seat position, the front pas
senger's seat moves back into the normal posi
tion, the head restraint moves to the upright
position and the leg support folds
inward¢.&_ .
Adjusting the display*
.,. To tilt the dis play forward/back, press and hold
the left/right button @until the disp lay reach
es the desired position .
.,. Applies to vehicles with reclin ing seat*: to
ma intain a clear view of the road when the seat
is in the reclining posit ion, press and hold the
right button @until the display has folded for
ward. Make sure the driver has a clear view of
the exter ior mirrors .
If so, confirm the quest ion
in the Infotainment system with
Yes . If you an
swe r
No or do not respond to the question, the
display will return to the upright position.
Adjusting the leg support (vehicles with
reclining seat*)
Requireme nt: th e reclining position must be se-
l ected
¢ page 56. .,..
Page 59 of 356

lL t:0 ....
"' " "' .... 0 0 :c '
.,. To fo ld t he leg suppo rt out/ in, press and ho ld
the left/right button @ unti l the leg support
reaches the desired position.
.,. To angle the leg support so that it is more up
right/more recl ined or to move it forward/back,
adjusting the front passenger's seat according
ly .
Adjust ing the f ront pa ssenge r's seat
.,. Make s ure that the front passenger's seat ad
justment is switched on in the Infotainment system
c:> page 58.
.,. To activate the front passenger's seat adjust
ment, press the button ®·
.,. To adjust the front passenger's seat forward/
back, press the butto n© forward/back.
.,. To move the front p assenger's seat up/down,
press the button © upward/downwa rd.
.,. To adjust the front passenger's seat back rest so
that is more upright/more reclined, press the
button ®forward/back.
.,. Applies to vehicles with reclining seat*: to ad
just the reclining/standard seat position, press and hold the button
@ /(D until the front pas
senger's seat reaches its end posit ion .
,&. WARNING
-The power seats can also be adjusted w hen
the igni tion is switched
o ff. For this reason,
children should never be left unattended in
the vehicle beca use they cou ld be injured.
-Be careful whe n adj usting the sea t. Unsu
pervised or c areless seat adjustment can
pinch fingers or hands ca using injur ies .
-Applies to vehicles with reclining seat* :
-Do not use the front passenger's seat for
seating when it is in the recl ining posit ion.
This inc reases the risk of ser ious injury or
death.
-Never adjust the reclining position when
the front passenger's seat is occupied .
This inc reases the risk of injury.
-Do not tilt the display if the driver's v iew
of the right exterio r mirror w ill be ob
s tructed .
-Make sure the area between the leg sup
port and the front passenger's seat back-
S eats and storag e
rest is clear before fo ld ing the leg support
in so that you are not p inched.
(D Tips
-T he massage function switches off auto
matically after approximate ly 10 minutes .
-If you cannot adjust the reclining seat* or
the front passenger's seat from the rear, it
is possib le that:
-the front passenger's seat memory func
tion is switched
off c:> page 59, or
-the child safety lock is switched on (the ~
button c:> page 3 7 or the r ight t button
c:> page 37 is tu rned on in the d river's
door), or
-the front passenger seat adj ustment is
switched
off in the Infota inment system
c:>page 58 .
Massage function remote control
Appl ies to: vehicles wit h reclinin g seat an d massa ge function
Fig . 66 Remote control: recli ning seat massage funct ions
T he remote controls are located in the rear cen
te r console
c:> page 62, fig. 72 . The massage
func tion is only ava ilable when the igni tion is
swi tched on.
.,. To open the remote co ntro l compartment,
press the left b utton and fold the center arm
rest upwa rd.
.,. To adjus t the massage type, press the app ropr i
ate
button @-@ . The LED in the button turns
on.
.,. To adjust the speed/i ntens ity, tu rn the thumb
wheel@I® . The LEDs indicate the speed/in
tensity.
.,. Press the selected massage type again to
sw itch the massage function
off .
57
Page 60 of 356

Seats and stor age
Massage types
@ -Wave
@-Pulsating
© - Stretch
@-Lumbar
(D Tips
-The massage function switches off a uto
matically after approx imately 10 minutes.
- If you activate a massage type again, the
l ast selected intensity and speed w ill be
se
lected.
Comfort settings
A pp lies to: ve hicles w ith comfo rt seats in t he rea r
You con also apply several settings for the rear
using the Infotainment system in the cockpit .
.. Select in the MMI: I CAR j function button> Car
s y stem s
control but ton > Vehicle s etting s>
Seats > Rea r seat s.
Approa ch norma l position
-with this funct ion,
the o ute r rear seats and the front passenger's
seat are moved to the facto ry setting.
Ea sy se at entry -the Easy s eat entry makes it
possible to enter and exit the rea r seats comfort
ab ly. If the function is sw itched on, the rear seat
automatically moves all the way back when the
corresponding door is opened.
Pa ss e nge r seat adju stment * -if the funct ion is
sw itched on in the Infotainment system, the
front p assenger's seat can also be adjusted from
the rear seat using the
¢ page 56, fig. 64 but
tons.
The front passenger's seat cannot be adjusted, if
-the front passenger's seat memory function is
switched off
c:> page 59 .
-the~ button turns on in the driver's door
c:> poge 37 .
-The r ight l±l button turns on in vehicles with
power chi ld safety locks*
c:> poge 37 .
58
Head restraints
Adjusting the head restraints
Fig. 67 Comfort head restraint : adjusting the s ide bolsters
Fig. 68 Outer rea r seat : adjust ing the head restrain t
Adjust the head restraints so the upper edge is as
even as possible w ith the top of your head. If that
i s not possib le, try to adjust as close to th is posi
t ion as poss ible.
Adjusting the front head restraints
.. To adjust the he ight of the front head re
straints, pull/press the button ©
c:> page 54,
fig . 60
up/down.
.. To adjust the side bolste rs*, push the s ide bo l
s t ers in to the desired position
c:> fig . 67.
.. Vehicles with reclini ng seat*: grab the head re
s t rai nt a t the sides with both hands and s lide
the head restraint up/down unti l it clic ks into
place.
Adjusting the rear head restraints
The center head rest raint in the rear is not ad
just able. When passengers r ide in the outer rea r
seats, ra ise these head restraints up to the top
position
c:> ,&. . .,._
Page 61 of 356

u. co .... N
" N .... 0 0 :c '
~ To move t he head restraint up, ho ld it at the
sides with both hands and slide it upward unti l
you fee l it click into place.
~ To move the head restraint down, press the
button (small
arrow)¢ fig. 68 and slide the
head restraint downward.
A WARNING
Always read and follow the applicab le wa rn
ings
¢page 211.
Memory function
Description
Applies to: vehicles with memory function
-
Using the memory function, you can quickly and
eas ily store a personal seat profile for the driver
and front passenger as well as for the outer rear
seats* and recall the settings. The memory func
tion is controlled us ing the remote control key
and the memory buttons in the drive r's/front
passenger's door and in the rea r doo rs*.
The driver's seat profile is stored again and as
signed to the remote control key each time the
ve hicle is locked. When you open the door, the
seat profi le is automat ica lly reca lled. If two pea-
Remote control
key
Driver
Seat X
Hea d rest raint X
Steering wheel* X
Sa fety belt* X
Both exterior mirrors* X
Remote control key
Applies to: vehicles with memory function
The functio n must be switched on so that the
d river's seat p rofile will be assig ned to t he re
mote cont rol key w hen locking the vehicle .
~ Select: the ICARI function button > Car systems
contro l bu tton > Vehicl e setting s > Driver' s
s eat > Remo te control ke y > On.
Seat s and sto rag e
(D Tips
To prevent the head restraints from running
i nto the headline, they are automatically
moved forward or upward when the seat is
adjusted.
ple use the vehicle, it is recommended that each
person always uses the ir "own" remote control
key.
T wo seat profiles can be stored using the memo
ry buttons in the driver's/front passenger's door
respectively, and one seat profile can be stored in
each of the rear doors*. Once they are stored,
these seat profiles can be selected at any time.
The following sett ings are stored:
Memory button
Driver Front passenger Outer rear seats*
X X X
X X
X X X
X
(D Tips
If yo u do not wish to have t he seat profi le for
another dr iver assigned to the remote cont rol
key, sw itch the memory function
off in the In
fotai nment system or using the
!O FF ! button
¢page 60.
59
Page 62 of 356

Seats and storage
Memory buttons
Applies to: vehicles with memory funct ion
F ig. 69 Drive r's door : mem ory fu nctio n bu ttons
The memory buttons are located in the driver's
door, front passenger 's door and in the rear
doors* .
Switching the memory function on/off
• Press the IOFFI button to switch the memory
funct ion on/off . The LED in the button turns on
when the memory function is off . Seat profiles
are neither stored nor recalled.
Storing a seat profile
• Press the ISETI button . When the word SET
lights up, the memory is ready to store set
tings.
• Now press a memory button briefly. A tone
confirms that the sett ings were stored .
Accessing a seat profile
• If the driver's door is open and the ignit ion is
switched off, press the memory button .
• If the driver's door is closed or the ignit ion is
switched on, press and hold the memory but
ton until the seat adjustment is complete .
A WARNING
-For safety reasons, the seat setting can only
be recalled when the vehicle is stationary,
otherwise there is a risk of an accident.
- If necessary , you can stop the recall process
by pressing the
!OF FI button or any memory
button.
60
Adjusting the front passenger's seat in the Infotainment system
Applies to: vehicles with memory function
The driver con move the front passenger 's seat
into various positions.
Adjusting the front passenger's seat from
the driver's seat
• Select: the ICARI function button> Car systems
control button > Vehicle settings > Seats >
Front passenger's seat> Adjust seat position .
• You can now adjust the front passenger's seat
using the driver's seat buttons
~ page 54,
fig. 60.
Align with driver's seat
• To transfer the settings from the driver's seat
to the front passenger's seat, select: the
!CAR I
function button > Car systems control button >
Vehicle settings > Seats > Front passenger 's
seat > Align with driver's seat.
• Press and hold the control knob until the ad
justing process is complete.
(D Tips
The lumbar support and upper thigh support
settings are not transferred when aligning
the front passenger's seat with the driver's
seat.
Page 63 of 356

lL t:0 ....
"' ......
"' .... 0 0 :c '
12 volt sockets
Applies to: veh icles with sockets
Fig . 70 Side compartment in luggag e compartment: 12
volt socket•
Fig. 71 Example of a rear center console: 12 volt socket
The 12-volt sockets can be used for electrical ac
cessories. The power consumption at the outlet
must not exceed 120 watts.
There is an additional 12 volt socket in the center
console
¢page 63, fig . 75.
_&, WARNING
The sockets and the electrical accessories con
nected to them only funct ion when the igni
tion is switched on. Incorrect usage can lead
to ser ious injuries or burns. To reduce the risk
of injuries, never leave children unattended i n
the vehicle with the vehicle key.
(D Note
- Never connect any accessories that provide
power (such as solar panels or battery
charger for the vehicle battery) to the ciga
rette lighter. They can damage the vehicle
electrical system .
- To reduce the risk of damage to the sockets,
on ly use plugs that fit correct ly .
Seats and storage
115 volt socket
Applies to: vehicles with 115 volt socket
T he 115 volt socket can be used when the igni
tion is switched on
¢ .&. . When you push the con
nector all the way into the socket, the child safe
ty mechanism re leases and current flows through
the socket.
Connectable devices
Electrica l devices can be connected to the 115
volt socket in the vehicle. The device connected
to the socket must not use more than 150 watts
of power (300 watts peak power). Check the
power usage of the connected device on the type
label.
LED on the socket
-The socket is ready for use when the LED is
green.
- There is a malfunction if the LED is blinking red.
The socket will switch off automatically due to
overcurrent or overheating. The socket will
switch on again automatically after a cool
down period. Any devices that are connected
and sw itched on w ill act ivate aga in automati
cally¢ .&.
_&, WARNING
- The sockets and the electrical accessories
connec ted to them only f unction when the
ignit ion is switched on. Incorrect usage can
lead to serious injuries o r burns. To reduce
the risk of injuries, never leave children un
attended in the vehicle with the vehicle key.
- If devices or connectors that are heavy (for
example a power supply unit) are attached
d ire ctly to the socket, the holder can be
come damaged, wh ich increases the risk of
injury.
-To reduce the risk of fatal injury, store all
connected devices securely when driving so
that they do not
move around inside the ve
h icle when braking or if involved a crash.
- To reduce the risk of fatal injury, do not spill
any fluids on the socket. Should any mo is-
ture enter the socket, make sure that it has
~
61
Page 64 of 356

Seats and stor age
dried out complete ly before using the
socket again .
-Devices connected to the vehicle behave dif
ferent ly than when they are connected to a
regu lar power supply. Therefore, connected
devices can become hot dur ing operation,
wh ich can increase the risk of injury .
-There is a risk of injury when using adapters
and extension cords, because the child safe
ty on t he socket is switched off and the
socket is powered w ith current .
-To reduce the risk of fatal injury, do not in
sert any conductive objects, such as knitting
need les, into the contacts on the socket.
-T o reduce the risk of injury, switch off any
connected electr ical devices if the socket
has switched off d ue to overheating.
(D Note
- Also read the operating manuals for the
connected dev ices .
- Do not connect any lamps that contain neon
tubes . Due to technical reasons, this can
cause malf unct ions in the lamp .
- Do not connect any 230 volt dev ices to the
115 volt socket . The device can be dam
aged . Check the permitted voltage of the
device accord ing to the type label.
- With some power supply units, such as for
l aptops, switching them on disables the
in
teg rated ove rcur rent shutdown . In this
case, disconnec t the power s upply un it from
the electrical equipment and reconnect
af
ter approximately 10 seconds .
(D Tips
-Devices that are not shie lded or devices ne ar
the rear w indow antenna can ca use mal
functions in the radio, TV area or in the vehi
cle electrical system .
- T he functions on some devices may be limit
ed d ue to the low power output (wattage).
62
Full-Length center
console
Overview
Applies to: vehicles with full-length center co nsole
F ig. 72 Rea r: ful l-leng th center console
@ -115 Volt socket c:;, page 61
®-Cup ho lder c:;, page 63
© -12 Volt socket c:;, page 61
@ -Fo ld ing t able* c:;, page 63
© -ce nter armrest and storage compartments:
to open the deep compartment, press the right b utton and fold the center a rmrest upward. To
open the compa rtment for the massage function
remote cont rol*
c:;, page S 7 and for the tele
phone*, press the left button and fold the center
armrest upward.