Page 185 of 340

Radio band select button:
Push the button to change the band as
follows:
AM →DAB →FM →AM
If another audio source is playing when the FM·AM
button is pushed, the audio source playing will auto-
matically be turned off and the last radio station
played will begin playing.
Radio tuning:
When in radio mode, the radio can be tuned using
the touch screen. To bring up the visual tuner, touch
the [Tune] key on the lower part of the screen. A
screen appears with abar running from low fre-
quencies on the left to high frequencies on the right.
One of the following operations can be used for tun-
ing.
• Touching the bar on the screen
• Touching [ ]/[ ]o nt
he screen
• Turning the /Scroll dial
To return to the regular radio display screen, touch
the [OK] key.
Station List:
When in FM or DAB (where fitted) mode, touch [FM
List] or [DAB List] to display the station lists. Seek/Track buttons:
When in radio mode, push the Seek/Track buttons
to tune from low to high or high to low frequencies
and to stop at the next broadcasting station. Station memory keys:
Up to six stations can be stored for AM band, and
up to twelve stations can be stored for each of the
other bands.
1. Choose the radio band using the but-
ton.
2. Tune to the desired station using manual or seek tuning. Touch and hold any of the desired station
memory keys until abeep sound is heard.
For FM and DAB (where fitted), touch the [7-12]
key to display the 7-12memory keys.
3. The channel indicator will then come on and the sound will resume. Programming is now com-
plete.
DAB operation:
In the DAB mode, the following operation keys and
information are available.
• DAB List:
Touch to display the available station list.
• TA:
Touch this key to turn on and off the TA (Traffic
Announcement) mode. When turned on,
received TA will interrupt the audio source that is
playing. •
Extra chan.:
The [Extra chan.] key will allow access to extra
stations transmitted within the group of the cur-
rently selected station. If extra stations are not
available within the group, the key will not oper-
ate.
• Radio text:
Radio text is shown on the DAB main screen
underneath the DAB station name. This displays
radio programme and song information as deter-
mined by the DAB station.
EAS in EAS test (displayed on the screen as aPTY
name) is an abbreviation of Emergency Alert Sys-
tem.
Occasionally, in areas of poor DAB signal strength,
the full station name in the DAB List and DAB main
screen might be distorted. In this situation it may still
be possible to listen to the particular radio station, at
ar educed level of sound quality, but this is not al-
ways possible. This may also be shown in the ve-
hicle information display.
CD player operation
Loading disc:
Insert aCDi nto the slot with the label side facing
up. The CD will be guided automatically into the slot
and will start playing. If the radio is already playing,
it will automatically turn off, and the CD will start
playing.
Display screen, heater and air conditioner, and audio system 4-53
Page 186 of 340

CAUTION
Do not force the compact disc into the slot. This
could damage the player. CD button:
When the CD button is pushed with the system off
and the CD loaded, the system will turn on and the
CD will start to play.
When the CD button is pushed with aCDloaded
while the radio playing, the radio will turned off and
the CD will start to play. Seek/Track button:
When the or button is pushed for more
than 1.5 seconds while the CD is being played, the
CD will play while fast forwarding or rewinding.
When the button is released, the CD will return to
normal play speed.
When the or button is pushed for less
than 1.5 seconds while the CD is being played, the
next track or the beginning of the current track on
the CD will be played. Push the button several times
to skip through the tracks on the CD. If the last track
on aCDiss kipped, the first track on the disc will
play. If the last track in afolder of an MP3 CD is
skipped, the first track of the next folder will play.
CD/MP3/WMA display mode:
While listening to aCDoranMP3/WMA CD, cer-
tain text may be displayed (when aCDencoded
with text is being used). Depending on how the CD or MP3/WMA CD is encoded, the text is displayed
listing the artist, album and song title. Operation
keys are also displayed on the screen.
Mix:
Touching the [Mix] key while an CD or MP3 CD is
playing will alternate the random play pattern as fol-
lows:
(CD)
(Normal)
→Mix →(Normal)
(CD with compressed audio files)
(Normal) →Random Folder →Random All →(Nor-
mal)
Repeat:
Touching the [Repeat] key while an CD or MP3 CD
is playing will alternate the repeat play pattern as fol-
lows:
(CD)
(Normal) →Repeat →(Normal)
(CD with compressed audio files)
(Normal) →Repeat Track →Repeat Folder →(Nor-
mal)
Browse:
Touch the [Browse] key to display the titles on the
CD in list format. Touch the title of asong in the list
to begin playing that song. If an MP3 CD is playing,
touching the [Browse] key will also list the folders
on the disc. Touch the [Folder Up] key to view the lists in the upper layer. Follow the procedure for
selecting asong with the touch screen to choose a
folder. Disc eject button:
When the Disc eject button is pushed while aCDis
loaded, the CD will be ejected.
If the CD is not removed within 10 seconds, the CD
will be reloaded.
USB (Universal Serial Bus) Connection
Port WARNING
Do not connect, disconnect or operate the USB
device while driving. Doing so can be adistrac-
tion. If distracted you could lose control of your
vehicle and cause an accident or serious injury.
CAUTION
• Do not force the USB device into the USB
port. Inserting the USB device tilted or up-
side-down into the port may damage the port.
Make sure that the USB device is connected
correctly into the USB port.
• Do not grab the USB port cover (where fitted)
when pulling the USB device out of the port.
This could damage the port and the cover.
• Do not leave the USB cable in
aplace where
it can be pulled unintentionally. Pulling the
cable may damage the port.
4-54 Display screen, heater and air conditioner, and audio system
Page 187 of 340

General notes for USB use:
Refer to your device manufacturer’s owner informa-
tion regarding the proper use and care of the de-
vice.
The audio system operates when the ignition switch
is placed in the ONorACC position.
The USB port is located on the lower part of the
instrument panel. See “USB (Universal Serial Bus)
connection port” earlier in this section. Connect a
USB memory device into the connection port. The
USB memory device will be activated automatically.
USB main operation:
If another audio source is playing and aUSB memory
device is inserted, push the AUX button until the
screen on the display changes to the USB memory
mode.
If the system has been turned off while the USB
memory device was playing, push the Power/VOL-
UME dial to restart the USB memory device.
Touch the name of asong on the screen to begin
playing that song.
USB screen operation:
While files on aUSB memory device are playing,
the play pattern can be altered so that songs are
repeated or played randomly. Mix:
Touching the [Mix] key on the screen while aUSB
memory device is playing will alternate the random
play pattern as follows:
(Normal) →Random Folder →Random All →(Nor-
mal)
Repeat:
Touching the [Repeat] key on the screen while a
USB memory device is playing will alternate the re-
peat play pattern as follows:
(Normal) →Repeat Track →Repeat Folder →(Nor-
mal)
Browse:
Touch [Browse] key to display USB interface. Se-
lect the songs you wish to play by touching the item
on the screen. Seek/Track buttons:
Push the Seek/Track (rewind) button while an audio
file on the USB memory device is playing to return
to the beginning of the current track. Push the but-
ton several times to skip backward several tracks.
Push the Seek/Track (fast forward) button while an
audio file on the USB memory device is playing to
advance one track. Push the button several times to
skip forward several tracks. if the last track on the
USB memory device is skipped, the first track of the
next folder is played. iPod player operation
Connecting iPod:
Connect the iPod to the USB connection port using
the USB cable that came with your iPod.
The USB port is located on the lower part of the
instrument panel. See “USB (Universal Serial Bus)
connection port” earlier in this section.
If your iPod supports charging via
aUSB connec-
tion, its battery will be charged while connected to
the vehicle with the ignition switch placed in the ON
or ACC position.
Compatibility:
The following models are compatible:
• iPod 5th Generation (firmware version 1.2.3 or
later)
• iPod Classic (firmware version 1.1.1 or later)
• iPod Touch (firmware version 2.0.0 or later)*
• iPod nano
-1st generation (firmware version
1.3.1 or later)
• iPod nano
-2nd generation (firmware version
1.1.3 or later)
• iPod nano
-3rd generation (firmware version
1.1.3 or later)
• iPod nano
-4th generation (firmware version
1.0.4 or later)
• iPod nano
-5th generation (firmware version
1.0.1 or later)
Display screen, heater and air conditioner, and audio system 4-55
Page 188 of 340

*S
ome features of this iPod may not be fully func-
tional.
Make sure that your iPod firmware is updated to the
version indicated above.
iPod main operation:
If the system has been turned off while the iPod was
playing, pushing the Power/VOLUME dial will start
the iPod.
If another audio source is playing and aiPod is con-
nected, push the AUX button until the screen on the
display changes to the iPod mode.
Refer to your device manufacturer’s owner informa-
tion regarding the proper use and care of the de-
vice.
Interface operation:
The interface for iPod operation shown on the vehi-
cle’s audio system display screen is similar to the
iPod interface. Use the touch screen, BACK button
or the /Scroll dial to navigate the menus
on the screen. When the iPod is playing, touch the [Menu] key to
bring up the iPod interface.
Depending on the iPod model, the following items
may be available on the menu list screen. For further
information about each item, see the iPod Owner’s
Manual.
• Playlists
• Artists
• Albums
• Genres
• Songs
• Composers
• Audiobooks
• Podcasts
Scrolling menus:
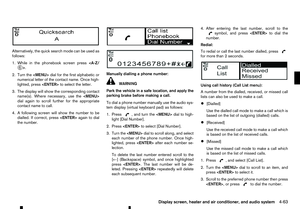
While navigating long lists of artists, albums or songs
in the music menu, it is possible to scroll the list by the first character in the name. To activate character
indexing, touch the [A-Z] key in the upper right cor-
ner of the screen. Turn the /Scroll dial to
choose the number or letter to jump to in the list and
then push the /Scroll dial.
If no character is selected after thirty seconds, the
display returns to normal.
Random and repeat play mode:
While the iPod is playing, the play pattern can be
altered so that songs are repeated or played ran-
domly.
Mix:
Touching the [Mix] key on the screen while an iPod
is playing will alternate the random play pattern as
follows:
(Normal) →Shuffle Songs →(Normal)
Repeat:
Touching the [Repeat] key on the screen while an
iPod is playing will alternate the repeat play pattern
as follows:
(Normal) →Repeat Song →(Normal) Seek/Track buttons:
Push the or button to skip backward or
forward one track.
Push and hold the or button for 1.5 sec-
onds while at
rack is playing to reverse or fast for-
ward the track being played. The track plays at an JVH0680XZ
JVH0681XZ
4-56 Display screen, heater and air conditioner, and audio system
Page 189 of 340

increased speed while reversing or fast forwarding.
When the button is released, the track returns to
normal play speed.
Bluetooth® audio player operation
If you have acompatible Bluetooth® audio device
that is capable of playing audio files, the device can be connected to the vehicle’s audio system so that
the audio files on the device play through the vehi-
cle’s speakers
Bluetooth® trademark:
m Bluetooth®
is
at rademark
owned by Bluetooth SIG, Inc.
and licensed to Robert Bosch
GmbH.
Connecting Bluetooth® audio:
To connect your Bluetooth® audio device to the
vehicle, follow the procedure below:
1. Push the button.
2. Select the [Telephone &Bluetooth] key. 3. Select the [Pair New Device] key.
4. The system acknowledges the command and
asks you to initiate connecting from the phone
handset. The connecting procedure of the mo-
bile phone varies according to each mobile phone
model. See the Bluetooth® device Owner’s
Manual for details.
Bluetooth® audio player main operation:
To switch to the Bluetooth® audio mode, push the
AUX button repeatedly until the Bluetooth® audio
mode is displayed on the screen.
The controls for the Bluetooth® audio are displayed on the screen.
AUX device player operation
The AUX input jack is located on the lower part of
the instrument panel. See “AUX (Auxiliary) input
jack” earlier in this section. The AUX audio input
jack accepts any standard analog audio input such
as from aportable cassette tape/CD player, MP3
player or laptop computer.
RENAULT strongly recommends using astereo mini
plug cable when connecting your music device to
the audio system. Music may not play properly when
am onaural cable is used. button:
To switch to the AUX mode, push the AUX button
until the AUX mode is selected while the ignition
switch is placed in the ONorACC position. For details, see the separately provided
Touchscreen Navigation Owner’s Manual.
JVH0682XZ
Example NAA1687
TOUCHSCREEN NAVIGATION
(where fitted)
Display screen, heater and air conditioner, and audio system 4-57
Page 190 of 340

AUDIO CONTROL
➀ Tuning buttons (Type A)/Tuning switch
(Type B)
➁ Volume buttons Tuning/track select switch
Push the switch to select
achannel, or track.
• Preset station change (radio mode)
Push the up/down scrolling button ( ,
or )f
or less than 1.5 seconds to select one
of the preset radio stations.
• Seek tuning (radio mode)
—where fitted
Push the up/down scrolling button ( ,
or )f
or more than 1.5 seconds to seek for
the next or previous radio station.
• Track up/down (CD, iPod, USB memory or Blue-
tooth audio* mode)
—*:where fitted
–P ush the up/down scrolling button ( ,
or )f
or less than 1.5 seconds to
select the next track or to return to the begin-
ning of the present track. Push (up/down)
several times to skip through or skip back the
tracks.
–P ush the up/down scrolling button ( ,
or )f
or more than 1.5 seconds to
select the next folder or the previous folder.
Volume control buttons
Push the volume control button (+ or−)toi ncrease
or decrease the volume. PHONE CONTROL BUTTONS
➀
Volume down button
➁ Volume up button
➂ Phone accept button
➃ Phone decline button
Steering wheel phone control buttons
The hands-free mode can be operated using the
controls on the steering wheel.
Volume control buttons:
The volume control buttons allow you to adjust the
volume of the speakers by pushing the <+>or<−>
buttons ➀and
➁.
Phone buttons:
The < > ,or<
> buttons
➂and
➃allow
you to:
• Accept an incoming call by pressing the
< >
button. NAA1533
Type A
NIC3125
Type B NIC3126
STEERING WHEEL SWITCH FOR AUDIO CONTROL (where fitted)
4-58 Display screen, heater and air conditioner, and audio system
Page 191 of 340

•
Reject an incoming call by pressing the
< >
button during the incoming call.
• End an active call by pushing the
< >
button
once.
• Redial the last outgoing call by pressing the
< >
button for more than
2seconds. BLUETOOTH
®MOBILE PHONE
FEATURE WARNING
Whilst
driving, using the mobile phone is ex-
tremely dangerous because it significantly im-
pairs your concentration and diminishes your re-
action capabilities to sudden changes on the
road, and it may lead to afatal accident. This
applies to all phone call situations such as when
receiving an incoming call, during aphone con-
versation, when calling through the phone book
search, etc.
CAUTION
Certain country jurisdictions prohibit the use of
the mobile phone in the car without hands-free
support.
This chapter provides information about the hands-
free phone system using aBluetooth
®connection.
Bluetooth
®is aw ireless radio communication stan-
dard. This system offers ahands-free facility for your
mobile telephone to enhance driving comfort.
In order to use your mobile phone with the Blue-
tooth
®of the audio system, the mobile phone must
first be setup. For details, see “BLUETOOTH®
settings” later in this section. Once it has been
setup, the hands-free mode is automatically acti-
vated on the registered mobile phone (via Blue-
tooth
®)w hen it comes into range. An
otification message appears on the audio display
when the phone is connected, when an incoming
call is being received, as well as when acall is initi-
ated.
When acall is active, the audio system, microphone
(located in the ceiling in front of the rear view mir-
ror), and steering wheel switches enable hands-free
communication.
If the audio system is in use at the time, the radio,
CD, iPod, USB audio, Bluetooth audio or AUX
source mode will be muted and will stay muted until
the active call has ended.
The Bluetooth
®system may not be able to connect
with your mobile phone for the following reasons:
• The mobile phone is too far away from the ve-
hicle.
• The Bluetooth
®mode on your mobile phone has
not been activated.
• Your mobile phone has not been paired with the
Bluetooth
®system of the audio unit.
• The mobile phone does not support Bluetooth
®
technology (BT Core v2.0).
NOTE
• For models with Audio with Navigation sys-
tem see the separately provided Owner’s
Manual.
• For details, see your mobile phone’s Owner’s
Manual.
BLUETOOTH® HANDS-FREE PHONE SYSTEM (without navigation system
and colour display)
Display screen, heater and air conditioner, and audio system 4-59
Page 192 of 340

•
For assistance with your mobile phone inte-
gration, please visit your local approved
dealer.
➀ Phone button
➁