2017 RENAULT ALASKAN child lock
[x] Cancel search: child lockPage 9 of 340

1.
Bonnet (P. 3-17)
2. Windscreen wipers and washers
—S
witch operation (P. 2-34)
—W iper blade replacement (P. 8-16)
—W indow washer fluid (P. 8-11)
3. Sunroof*1 (P. 2-42)
4. Windows (P. 2-36) 5.
Roof rail*1 (P. 2-41)
6. Child safety rear door locks*1 (P. 3-5)
7. Doors
—K
eys (P. 3-2)
—D oor locks (P. 3-4)
—R emote keyless entry system*1 (P. 3-6)
—R emote Control Key system*1 (P. 3-7)
—S ecurity system*1 (P. 3-15) 8.
Outside rearview mirrors (P. 3-25)
9. Side turn signal lights
—B
ulb replacement (P. 8-23)
10. Tyres
—T
yres and wheels (P. 8-26)
—F lat tyre (P. 6-2)
—S pecifications (P. 9-4)
—F our-Wheel Drive (4WD)*1 (P. 5-32)
11. Headlights and turn signal lights
—S
witch operation (P. 2-31)
—B ulb replacement (P. 8-21)
12. Headlight cleaner*1
—O
peration (P. 2-35)
13. Front fog lights*1 or Daytime running lights*1
—S
witch operation (P. 2-33, P. 2-31)
—B ulb replacement (P. 8-23)
14. Towing eye*2 (P. 6-13)
*1: where fitted
*2: The layout illustrated is for the Right-Hand
Drive (RHD) model. On the Left-Hand Drive
(LHD) model, the towing eye is located on the
opposite side. NIC3080
EXTERIOR FRONT
Illustrated table of contents0-3
Page 20 of 340
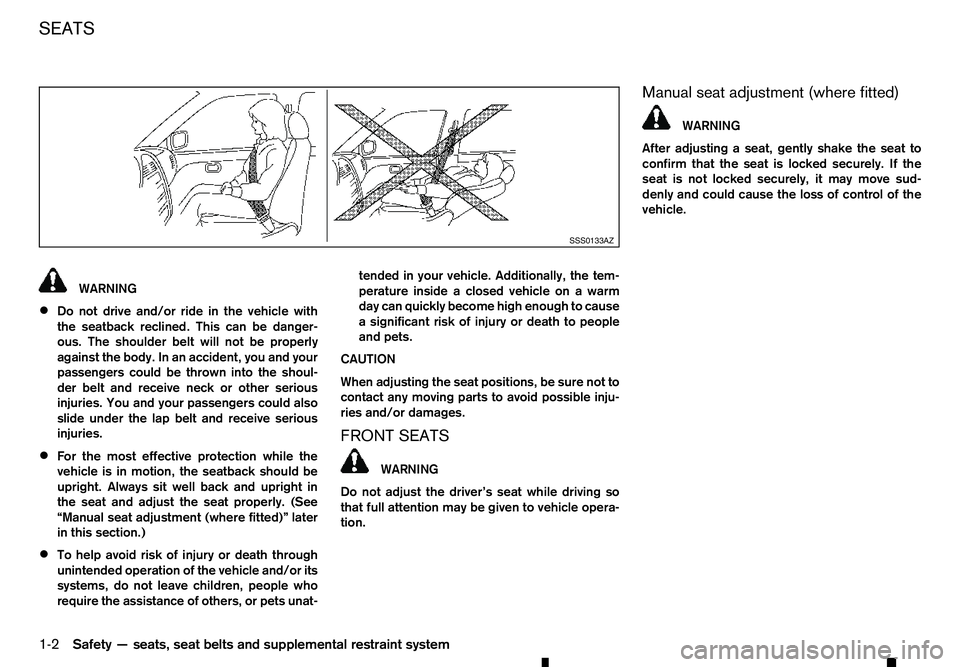
WARNING
• Do not drive and/or ride in the vehicle with
the seatback reclined. This can be danger-
ous. The shoulder belt will not be properly
against the body. In an accident, you and your
passengers could be thrown into the shoul-
der belt and receive neck or other serious
injuries. You and your passengers could also
slide under the lap belt and receive serious
injuries.
• For the most effective protection while the
vehicle is in motion, the seatback should be
upright. Always sit well back and upright in
the seat and adjust the seat properly. (See
“Manual seat adjustment (where fitted)” later
in this section.)
• To help avoid risk of injury or death through
unintended operation of the vehicle and/or its
systems, do not leave children, people who
require the assistance of others, or pets unat- tended in your vehicle. Additionally, the tem-
perature inside
aclosed vehicle on awarm
day can quickly become high enough to cause
as ignificant risk of injury or death to people
and pets.
CAUTION
When adjusting the seat positions, be sure not to
contact any moving parts to avoid possible inju-
ries and/or damages.
FRONT SEATS WARNING
Do not adjust the driver’s seat while driving so
that full attention may be given to vehicle opera-
tion. Manual seat adjustment (where fitted) WARNING
After adjusting
aseat, gently shake the seat to
confirm that the seat is locked securely. If the
seat is not locked securely, it may move sud-
denly and could cause the loss of control of the
vehicle. SSS0133AZ
SEATS
1-2
Safety —seats, seat belts and supplemental restraint system
Page 21 of 340

Forward and backward:
1. Pull up the adjusting lever ➀.
2. Slide the seat to the desired position.
3. Release the adjusting lever to lock the seat in position.
Reclining:
CAUTION
When moving the seats forward or backward, or
returning arear-reclined seatback to its upright
position, make sure you hold onto the seatback
while operating. If the seatback is not held, the
seat or seatback will move suddenly and could
cause injury.
1. Pull up the adjusting lever ➁.
2. Tilt the seatback to the desired position.
3. Release the adjusting lever to lock the seatback in position. The reclining feature allows the adjustment of the
seatback for occupants of different sizes to help
obtain the proper seat belt fit. (See “Fastening seat
belts” later in this section.)
The seatback may be reclined to allow occupants to
rest when the vehicle is parked.
Seat lifter (where fitted):
Pull up or push down the adjusting lever ➂to ad-
just the seat height until the desired position is
achieved.
Power seat adjustment (where fitted) WARNING
Never leave children or adults who would nor-
mally require the support of others alone in the
vehicle. Pets should not be left alone either. They
could unknowingly activate switches or controls,
or move the vehicle, and inadvertently become
involved in aserious accident and injure them-
selves. Operating tips:
• The power seat motor has an auto-reset over-
load protection circuit. If the motor stops during
the seat adjustment, wait 30 seconds, then reac-
tivate the switch.
• To avoid discharge of the battery, do not operate
the power seats for
along period of time when
the engine is not running. JVR0392XZ
Safety —seats, seat belts and supplemental restraint system
1-3
Page 24 of 340
WARNING
• Never allow anyone to ride on the rear seats
when they are in the fold-up position. Use of
this area by passengers without proper re-
straints could result in serious injury or death
in an accident or sudden stop.
• When folding or returning the rear seat, be
careful not to squeeze your finger between
the seat cushion and the body side.
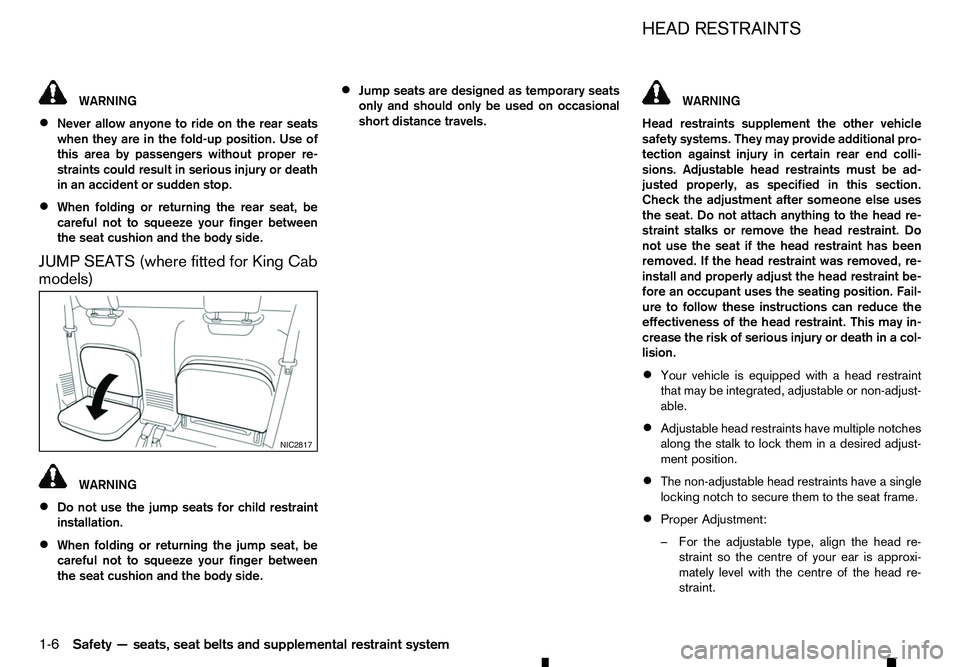
JUMP SEATS (where fitted for King Cab
models) WARNING
• Do not use the jump seats for child restraint
installation.
• When folding or returning the jump seat, be
careful not to squeeze your finger between
the seat cushion and the body side. •
Jump seats are designed as temporary seats
only and should only be used on occasional
short distance travels. WARNING
Head restraints supplement the other vehicle
safety systems. They may provide additional pro-
tection against injury in certain rear end colli-
sions. Adjustable head restraints must be ad-
justed properly, as specified in this section. Check the adjustment after someone else uses
the seat. Do not attach anything to the head re-
straint stalks or remove the head restraint. Do
not use the seat if the head restraint has been
removed. If the head restraint was removed, re-
install and properly adjust the head restraint be-
fore an occupant uses the seating position. Fail-
ure to follow these instructions can reduce the
effectiveness of the head restraint. This may in-
crease the risk of serious injury or death in acol-
lision.
• Your vehicle is equipped with
ahead restraint
that may be integrated, adjustable or non-adjust-
able.
• Adjustable head restraints have multiple notches
along the stalk to lock them in
adesired adjust-
ment position.
• The non-adjustable head restraints have
asingle
locking notch to secure them to the seat frame.
• Proper Adjustment:
–F
or the adjustable type, align the head re-
straint so the centre of your ear is approxi-
mately level with the centre of the head re-
straint. NIC2817 HEAD RESTRAINTS
1-6 Safety —seats, seat belts and supplemental restraint system
Page 33 of 340
must install
afront-facing child restraint sys-
tem in the front seat, see “Installation on front
passenger’s seat” later in this section.
• Never install
arear-facing child restraint sys-
tem on the front passenger’s seat when the
front passenger’s air bag is active. Supple- mental front-impact air bags inflate with great
force. Arear-facing child restraint system
could be struck by the supplemental front-im-
pact air bags in an accident and could seri-
ously injure or kill your child.
• Do not install
achild restraint in the jump seats
(where fitted for King Cab model). These
seats are not suitable for child restraint instal-
lation.
• Adjustable seatbacks should be positioned to
fit
ac hild restraint system, but as upright as
possible. see “Installation on rear outboard
seats” later in this section and “Child restraint
installation using three-point type seat belt”
later in this section.
• If the seat belt in the position where
achild
restraint system is installed requires alocking
clip and if it is not used, injuries could result
from achild restraint system tipping over dur-
ing normal vehicle braking or cornering.
• After attaching
achild restraint system, test it
before you place the child in it. Tilt it from side
to side. Try to tug it forward and check if it is
held securely in place. The child restraint sys-
tem should not move more than 25 mm (1 in). If the restraint is not secure, tighten the belt
as necessary, or install the restraint in another
seat and test it again.
• Check the child restraint system in your ve-
hicle to be sure that it is compatible with the
vehicle’s seat belt system.
• If
ac hild restraint system is not anchored
properly, the risk of achild being injured in a
collision or asudden stop greatly increases.
• Improper use of
achild restraint system can
increase the risk or severity of injury for both
the child and other occupants in the vehicle.
• Always use an appropriate child restraint sys-
tem. An improperly installed child restraint
system could lead to serious injury or death in
an accident.
• When the child restraint system is not in use,
keep it secured with the ISOFIX and i-Size
child restraint system or
aseat belt to prevent
it from being thrown around in case of asud-
den stop or accident.
RENAULT recommends that infants and small chil-
dren be seated in achild restraint system. You
should choose achild restraint system that fits your
vehicle and always follow the manufacturer’s in-
structions for installation and use. In addition, there
are many types of child restraint systems available
for larger children that should be used for maximum
protection. CAUTION
Remember that
achild restraint system left in a
closed vehicle can become very hot. Check the
seating surface and buckles before placing your
child in achild restraint system.
UNIVERSAL CHILD RESTRAINTS FOR
FRONT SEAT AND REAR SEATS (for
Europe)
NOTE
Child restraints approved to UN Regulation No.
44 or No. 129 are clearly marked with the catego-
ries such as Universal, Semi-universal or ISOFIX.
When selecting any child restraint, keep the follow-
ing points in mind:
• Choose
achild restraint that complies with the
latest European safety standard, UN Regulation
No. 44 or No. 129.
• Place your child in the child restraint and check
the various adjustments to be sure the child re-
straint is compatible with your child. Always fol-
low all of the recommended procedures.
• Check the child restraint in your vehicle to be
sure it is compatible with vehicle’s retention sys-
tem.
• Refer to the tables later in this section for
alist of
the recommended fitment positions and the ap-
proved child restraints for your vehicle.
Safety —seats, seat belts and supplemental restraint system 1-15
Page 42 of 340
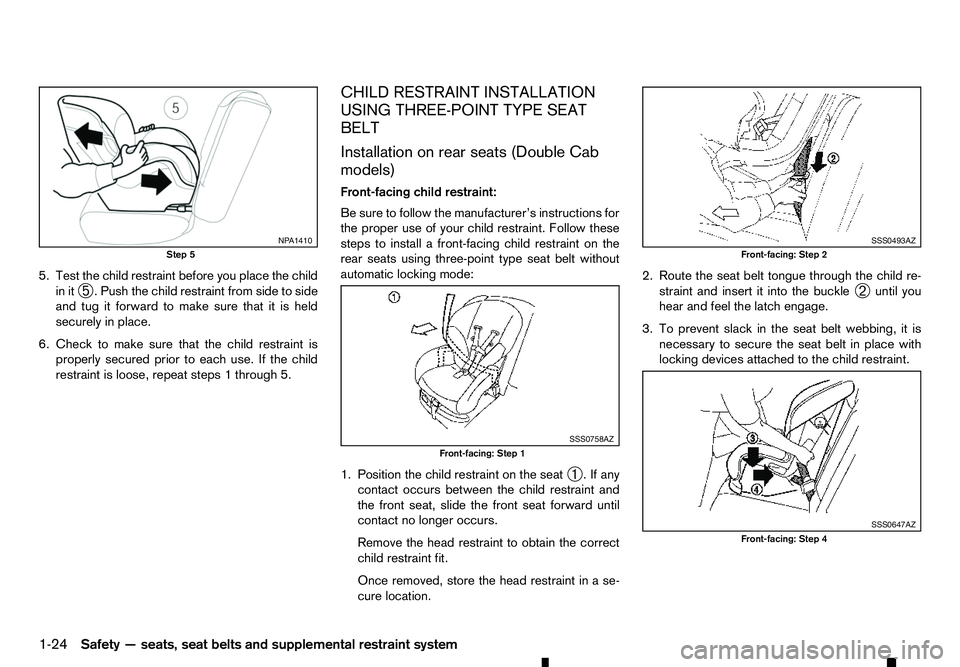
5. Test the child restraint before you place the child
in it ➄.P
ush the child restraint from side to side
and tug it forward to make sure that it is held
securely in place.
6. Check to make sure that the child restraint is properly secured prior to each use. If the child
restraint is loose, repeat steps 1through 5. CHILD RESTRAINT INSTALLATION
USING THREE-POINT TYPE SEAT
BELT
Installation on rear seats (Double Cab
models)
Front-facing child restraint:
Be sure to follow the manufacturer’s instructions for
the proper use of your child restraint. Follow these
steps to install
afront-facing child restraint on the
rear seats using three-point type seat belt without
automatic locking mode:
1. Position the child restraint on the seat ➀.Ifa
ny
contact occurs between the child restraint and
the front seat, slide the front seat forward until
contact no longer occurs.
Remove the head restraint to obtain the correct child restraint fit.
Once removed, store the head restraint in ase-
cure location. 2. Route the seat belt tongue through the child re-
straint and insert it into the buckle ➁until you
hear and feel the latch engage.
3. To prevent slack in the seat belt webbing, it is necessary to secure the seat belt in place with
locking devices attached to the child restraint. NP A1410
Step 5 SSS0758AZ
Front-facing: Step 1 SSS0493AZ
Front-facing: Step 2
SSS0647AZ
Front-facing: Step 4
1-24 Safety —seats, seat belts and supplemental restraint system
Page 43 of 340
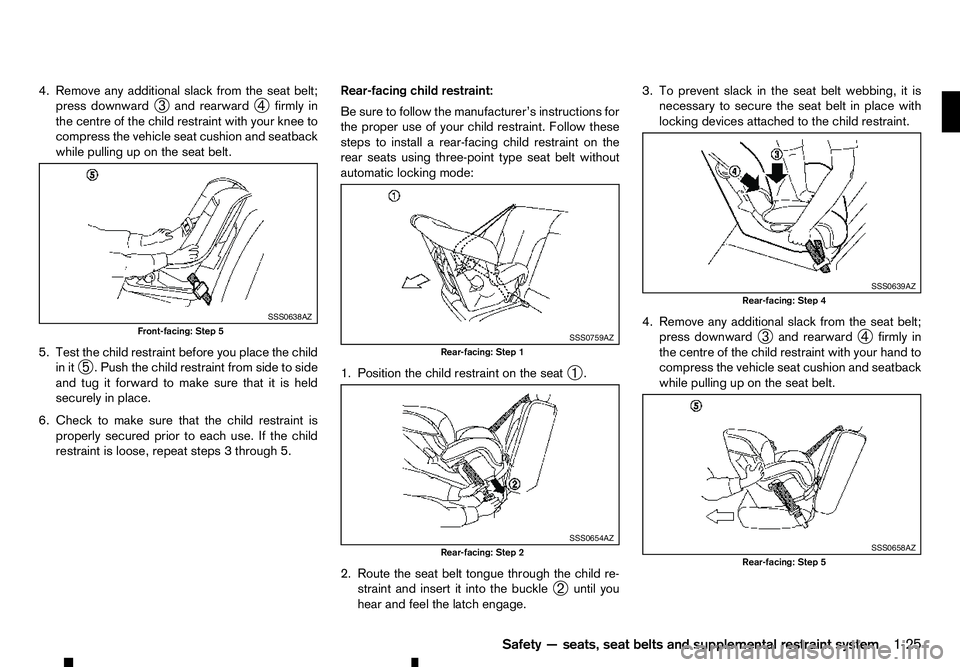
4. Remove any additional slack from the seat belt;
press downward ➂and rearward
➃firmly in
the centre of the child restraint with your knee to
compress the vehicle seat cushion and seatback
while pulling up on the seat belt.
5. Test the child restraint before you place the child in it ➄.P
ush the child restraint from side to side
and tug it forward to make sure that it is held
securely in place.
6. Check to make sure that the child restraint is properly secured prior to each use. If the child
restraint is loose, repeat steps 3through 5. Rear-facing child restraint:
Be sure to follow the manufacturer’s instructions for
the proper use of your child restraint. Follow these
steps to install
arear-facing child restraint on the
rear seats using three-point type seat belt without
automatic locking mode:
1. Position the child restraint on the seat ➀.
2. Route the seat belt tongue through the child re- straint and insert it into the buckle ➁until you
hear and feel the latch engage. 3. To prevent slack in the seat belt webbing, it is
necessary to secure the seat belt in place withlocking devices attached to the child restraint.
4. Remove any additional slack from the seat belt; press downward ➂and rearward
➃firmly in
the centre of the child restraint with your hand to
compress the vehicle seat cushion and seatback
while pulling up on the seat belt. SSS0638AZ
Front-facing: Step 5
SSS0759AZ
Rear-facing: Step 1
SSS0654AZ
Rear-facing: Step 2 SSS0639AZ
Rear-facing: Step 4
SSS0658AZ
Rear-facing: Step 5
Safety —seats, seat belts and supplemental restraint system 1-25
Page 45 of 340

Front-facing child restraint:
Be sure to follow the child restraint manufacturer’s
instructions for the proper use of your child restraint.
Follow these steps to install afront-facing child re-
straint on the front passenger’s seat using three-
point type seat belt without automatic locking mode:
If you must install afront-facing child restraint sys-
tem on the front seat, follow these steps:
j A Air bag switch
j B Left Hand Drive models
j C Right Hand Drive models
The front passenger air bag can be turned off with
the front passenger air bag switch j
Al ocated in-
side the glove box. 1. Turn off the front passenger air bag by inserting
the emergency/mechanical key into the front pas-
senger air bag switch jAa nd turning it to the
OFF position, see “Mechanical key” in the
“3. Pre-driving checks and adjustments” section
and “Front passenger air bag status light (where
fitted)” later in this section. Place the ignition
switch in the ONposition and make sure that the
front air bag status light on the centre con-
sole illuminates. 2. Move the seat to the rearmost position
➁.
3. Remove the head restraint ➂when
aforward
facing child restraint is to be fitted.
Store the head restraint in asafe place.
Be sure to reinstall the head restraint when-
ever the child restraint is removed (see “Head
restraints” earlier in this section).
4. Position the child restraint in the seat ➃.
5. Route the seat belt tongue through the child re- straint and insert it into the buckle ➄until you
hear and feel the latch engage.
To prevent slack in the seat belt webbing, it is
necessary to secure the seat belt in place with
locking devices attached to the child restraint. NP A1411 NP A1412
NIC2428
Steps 2and 3 NIC2429
Front-facing: Step
4and 5
Safety —seats, seat belts and supplemental restraint system 1-27