Page 121 of 340

WARNING
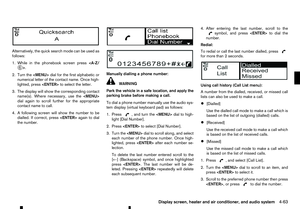
• The bonnet must be closed and latched se-
curely before driving. Failure to do so could
cause the bonnet to fly open and result in an
accident.
• Never open the bonnet if steam or smoke is
coming from the engine compartment to
avoid injury.
OPENING BONNET
1. Pull the bonnet lock release handle➀located
below the instrument panel until the bonnet
springs up.
2. Locate the lever ➁in between the bonnet and
grille and push the lever with your fingertips.
3. Raise the bonnet.
4. Remove the support rod and insert it into the slot ➂.
Hold the coated parts j
Aw hen removing or re-
setting the support rod. Avoid direct contact with
the metal parts, as they may be hot immediately
after the engine has been stopped. CLOSING BONNET
1. While supporting the bonnet, return the support
rod to its original position.
2. Slowly lower the bonnet to about 20 to 30 cm (8 to 12 in) above the bonnet lock, then let it drop.
3. Make sure it is securely latched. NIC3101
BONNET
Pre-driving checks and adjustments
3-17
Page 122 of 340

WARNING
• Fuel is extremely flammable and highly explo-
sive under certain conditions. You could be
burned or seriously injured if it is misused or
mishandled. Always stop the engine and do
not smoke or allow open flames or sparks
near the vehicle when refuelling.
• Fuel may be under pressure. Turn the cap a
half of
aturn, and wait for any “hissing” sound
to stop to prevent fuel from spraying out and
possibly causing personal injury. Then remove
the cap.
• Use only an original equipment type fuel filler
cap as
areplacement. It has abuilt-in safety
valve needed for proper operation of the fuel
system and emission control system. An in-
correct cap can result in aserious malfunc-
tion and possible injury. OPENING FUEL FILLER LID
Fuel filler lid opener switch
To open the fuel filler lid, push the fuel filler lid opener
switch located on the lower side of the instrument
panel.
To lock the fuel filler lid, close the lid until it securely
locks. FUEL FILLER CAP
Type A
The fuel filler cap is
aratcheting type. Turn the cap
anticlockwise ➀to remove. Tighten the cap clock-
wise ➁until ratchet clicks, more than twice, after
refuelling.
Put the fuel filler cap on the cap holder j
Aw hile
refuelling.
CAUTION
If fuel is spilled on the vehicle body, flush it away
with water to avoid paint damage. NIC2736 JVP021 1XZ
FUEL FILLER LID AND CAP
3-18
Pre-driving checks and adjustments
Page 123 of 340
Type B
To open the fuel filler cap, turn the key anticlockwise
➀ .
Turn the fuel filler cap anticlockwise ➁after the
cap is unlocked. The fuel filler cap is
ascrew-on ratcheting type.
After refuelling, tighten the cap clockwise until more
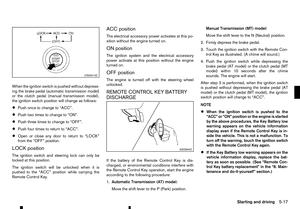
than 2ratcheting clicks are heard. The fuel filler cap
locks automatically when it is tightened.
The AdBlue® filler lid➀is located on the right
hand side of the vehicle.
OPENING AdBlue® FILLER LID
To open the AdBlue® filler lid, push the AdBlue®
filler lid slightly and release.
To close the AdBlue® filler lid, close the lid until it
securely locks in place. JVP0370XZ NDI1684
NDI1646
AdBlue® FILLER LID AND CAP
Pre-driving checks and adjustments 3-19
Page 124 of 340

LOCKING AdBlue® FILLER LID
The AdBlue® filler lid is locked and unlocked using
the Keyless Entry System, see “Remote Control Key
system (where fitted)” earlier in this section for addi-
tional details.
AdBlue® FILLER CAP
The AdBlue® filler cap is anon-ratcheting type. Turn
the cap anticlockwise ➀to remove. Tighten the
cap clockwise ➁until tight.
CAUTION
If AdBlue® is spilled on the vehicle body, flush it
away with water to avoid paint damage. WARNING
• While driving, never allow anyone to ride in
the cargo area. Abrupt braking or stopping
could lead to personal injury or death.
• Do not drive the vehicle with the tailgate down.
• Properly secure all cargo with ropes or straps
to help prevent it from sliding or shifting. In a
sudden stop or collision, unsecured cargo
could cause personal injury.
TAILGATE
Locking or unlocking tailgate
(where fitted)
To lock the tailgate, insert the key to the tailgate key
cylinder and turn the key clockwise ➀.
To unlock the tailgate, turn the key anticlockwise ➁ . For Remote Control Key equipped models, see
“Mechanical key” earlier in this section for removing
the mechanical key.
Opening the tailgate
To open the tailgate, pull the tailgate handle ➀and
lower the tailgate. The support wires will hold the
gate open.
• The weight of the cargo load must be evenly dis-
tributed over both the front and the rear axles.
• All cargo should be securely fastened with ropes
or straps to prevent it from shifting or sliding
within the vehicle. WARNING
• Do not drive the vehicle with the tailgate down.
• While driving, never allow anyone to ride in
the cargo area. Abrupt braking or stopping
could lead to personal injury or death. NDI1647
SP A2696Z NP A1529
CARGO BED (where fitted)
3-20 Pre-driving checks and adjustments
Page 125 of 340

Closing the tailgate
When closing the tailgate, make sure that the latches
or levers are securely locked.
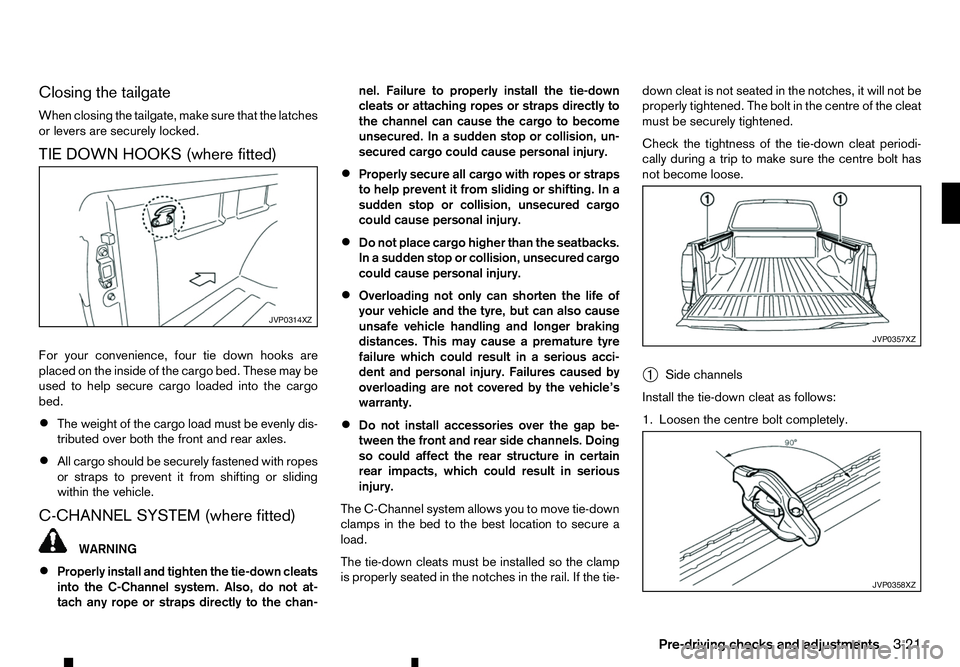
TIE DOWN HOOKS (where fitted)
For your convenience, four tie down hooks are
placed on the inside of the cargo bed. These may be
used to help secure cargo loaded into the cargo
bed.
• The weight of the cargo load must be evenly dis-
tributed over both the front and rear axles.
• All cargo should be securely fastened with ropes
or straps to prevent it from shifting or sliding
within the vehicle.
C-CHANNEL SYSTEM (where fitted) WARNING
• Properly install and tighten the tie-down cleats
into the C-Channel system. Also, do not at-
tach any rope or straps directly to the chan- nel. Failure to properly install the tie-down
cleats or attaching ropes or straps directly to
the channel can cause the cargo to become
unsecured. In
asudden stop or collision, un-
secured cargo could cause personal injury.
• Properly secure all cargo with ropes or straps
to help prevent it from sliding or shifting. In a
sudden stop or collision, unsecured cargo
could cause personal injury.
• Do not place cargo higher than the seatbacks.
In
as udden stop or collision, unsecured cargo
could cause personal injury.
• Overloading not only can shorten the life of
your vehicle and the tyre, but can also cause
unsafe vehicle handling and longer braking
distances. This may cause
apremature tyre
failure which could result in aserious acci-
dent and personal injury. Failures caused by
overloading are not covered by the vehicle’s
warranty.
• Do not install accessories over the gap be-
tween the front and rear side channels. Doing
so could affect the rear structure in certain
rear impacts, which could result in serious
injury.
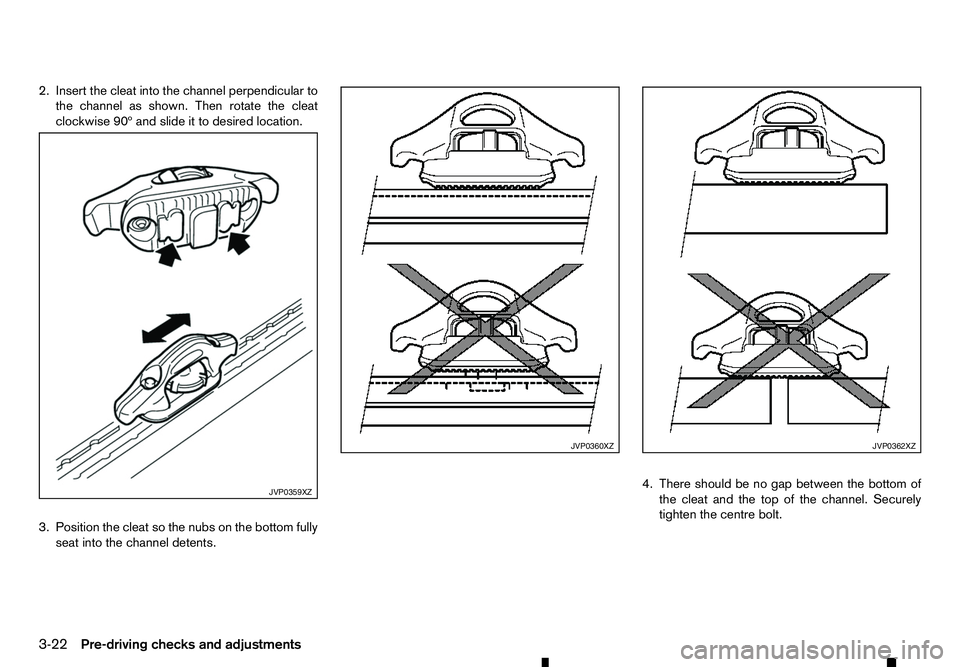
The C-Channel system allows you to move tie-down
clamps in the bed to the best location to secure a
load.
The tie-down cleats must be installed so the clamp
is properly seated in the notches in the rail. If the tie- down cleat is not seated in the notches, it will not be
properly tightened. The bolt in the centre of the cleat
must be securely tightened.
Check the tightness of the tie-down cleat periodi-
cally during
atrip to make sure the centre bolt has
not become loose.
➀ Side channels
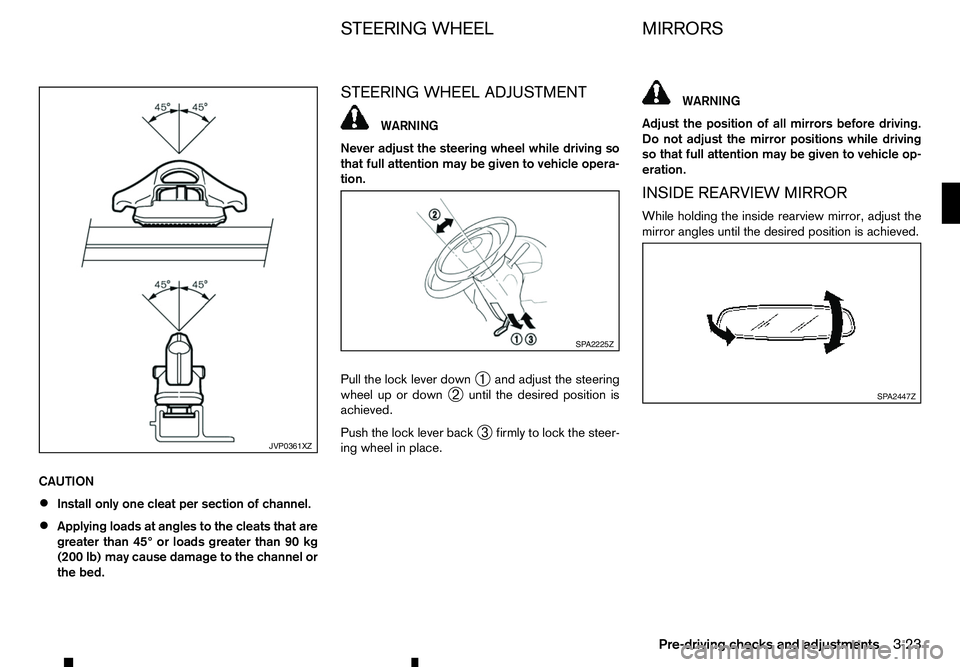
Install the tie-down cleat as follows:
1. Loosen the centre bolt completely. JVP0314XZ
JVP0357XZ
JVP0358XZ
Pre-driving checks and adjustments
3-21
Page 126 of 340
2. Insert the cleat into the channel perpendicular to
the channel as shown. Then rotate the cleat
clockwise 90º and slide it to desired location.
3. Position the cleat so the nubs on the bottom fully seat into the channel detents. 4. There should be no gap between the bottom of
the cleat and the top of the channel. Securely
tighten the centre bolt. JVP0359XZ JVP0360XZ JVP0362XZ
3-22 Pre-driving checks and adjustments
Page 127 of 340
CAUTION
•
Install only one cleat per section of channel.
• Applying loads at angles to the cleats that are
greater than 45° or loads greater than 90 kg
(200 lb) may cause damage to the channel or
the bed. STEERING WHEEL ADJUSTMENT WARNING
Never adjust the steering wheel while driving so
that full attention may be given to vehicle opera-
tion.
Pull the lock lever down ➀and adjust the steering
wheel up or down ➁until the desired position is
achieved.
Push the lock lever back ➂firmly to lock the steer-
ing wheel in place. WARNING
Adjust the position of all mirrors before driving.
Do not adjust the mirror positions while driving
so that full attention may be given to vehicle op-
eration.
INSIDE REARVIEW MIRROR
While holding the inside rearview mirror, adjust the
mirror angles until the desired position is achieved. JVP0361XZ SP A2225Z
SP A2447Z
STEERING WHEEL
MIRRORS
Pre-driving checks and adjustments 3-23
Page 128 of 340

Manual anti-glare type
Pull the adjusting lever ➀when the glare from the
headlights of the vehicle behind you obstructs your
vision at night.
Push the adjusting lever ➁during the day for the
best rearward visibility. Automatic anti-glare type
The inside rearview mirror is designed so that it
automatically changes reflection according to the
intensity of the headlights of the vehicle following
you.
The anti-glare system will be automatically turned on
when you push the ignition switch to the
ONposi-
tion.
When the system is turned on, the indicator light
j Bw ill illuminate and excessive glare from the head-
lights of the vehicle behind you will be reduced.
Push the switch
jAf or3s econds to make the
inside rearview mirror operate normally and the indi-
cator light will turn off. Push the switch again
for 3s
econds to turn the system on.
Do not hang any objects on the mirror or apply
glass cleaner. Doing so will reduce the sensitivity
of the sensor j
C, resulting in improper opera-
tion. Automatic anti-glare type with Reversing
Camera (where fitted)
For further details about the reversing camera
j
A, see “Reversing Camera (where fitted)” in the
“4. Display screen, heater and air conditioner, and
audio system” section.
The inside rearview mirror is designed so that it
automatically changes reflection according to the
intensity of the headlights of the vehicle following
you.
The anti-glare system will be automatically turned on
when you push the ignition switch to the ONposi-
tion.
When the system is turned on, the indicator light j Bw ill illuminate and excessive glare from the head-
lights of the vehicle behind you will be reduced.
Push the button
jCt oturn the system on or
off SP A2143Z
SP A2162Z
NP A1097
3-24 Pre-driving checks and adjustments