2017 RENAULT ALASKAN height adjustment
[x] Cancel search: height adjustmentPage 21 of 340

Forward and backward:
1. Pull up the adjusting lever ➀.
2. Slide the seat to the desired position.
3. Release the adjusting lever to lock the seat in position.
Reclining:
CAUTION
When moving the seats forward or backward, or
returning arear-reclined seatback to its upright
position, make sure you hold onto the seatback
while operating. If the seatback is not held, the
seat or seatback will move suddenly and could
cause injury.
1. Pull up the adjusting lever ➁.
2. Tilt the seatback to the desired position.
3. Release the adjusting lever to lock the seatback in position. The reclining feature allows the adjustment of the
seatback for occupants of different sizes to help
obtain the proper seat belt fit. (See “Fastening seat
belts” later in this section.)
The seatback may be reclined to allow occupants to
rest when the vehicle is parked.
Seat lifter (where fitted):
Pull up or push down the adjusting lever ➂to ad-
just the seat height until the desired position is
achieved.
Power seat adjustment (where fitted) WARNING
Never leave children or adults who would nor-
mally require the support of others alone in the
vehicle. Pets should not be left alone either. They
could unknowingly activate switches or controls,
or move the vehicle, and inadvertently become
involved in aserious accident and injure them-
selves. Operating tips:
• The power seat motor has an auto-reset over-
load protection circuit. If the motor stops during
the seat adjustment, wait 30 seconds, then reac-
tivate the switch.
• To avoid discharge of the battery, do not operate
the power seats for
along period of time when
the engine is not running. JVR0392XZ
Safety —seats, seat belts and supplemental restraint system
1-3
Page 22 of 340
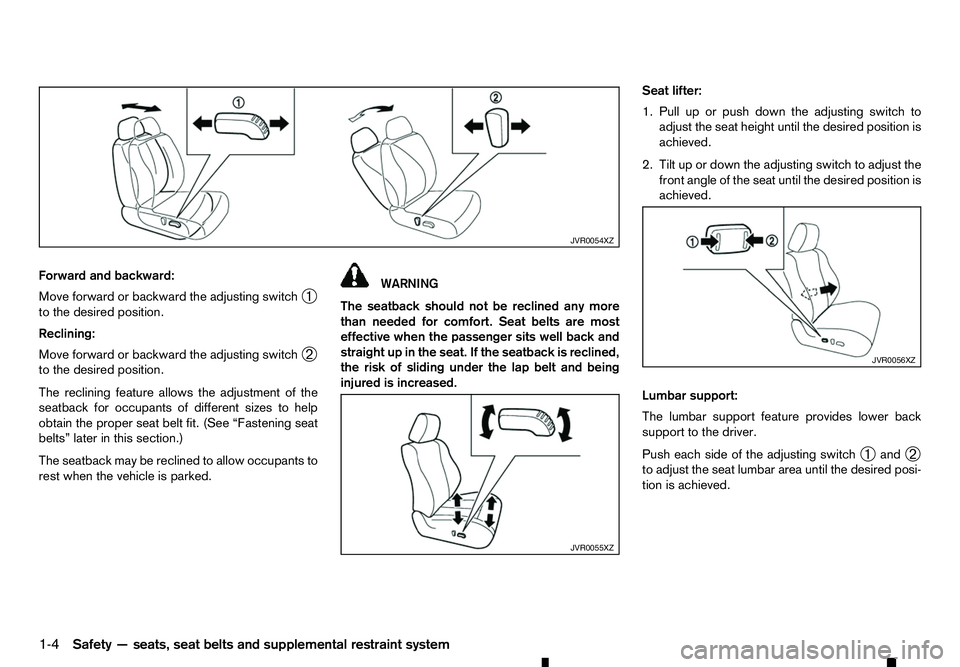
Forward and backward:
Move forward or backward the adjusting switch ➀
to the desired position.
Reclining:
Move forward or backward the adjusting switch ➁
to the desired position.
The reclining feature allows the adjustment of the
seatback for occupants of different sizes to help
obtain the proper seat belt fit. (See “Fastening seat
belts” later in this section.)
The seatback may be reclined to allow occupants to
rest when the vehicle is parked. WARNING
The seatback should not be reclined any more
than needed for comfort. Seat belts are most
effective when the passenger sits well back and
straight up in the seat. If the seatback is reclined,
the risk of sliding under the lap belt and being
injured is increased. Seat lifter:
1. Pull up or push down the adjusting switch to
adjust the seat height until the desired position is
achieved.
2. Tilt up or down the adjusting switch to adjust the front angle of the seat until the desired position is
achieved.
Lumbar support:
The lumbar support feature provides lower back
support to the driver.
Push each side of the adjusting switch ➀and
➁
to adjust the seat lumbar area until the desired posi-
tion is achieved. JVR0054XZ
JVR0055XZ JVR0056XZ
1-4 Safety —seats, seat belts and supplemental restraint system
Page 30 of 340
THREE-POINT TYPE SEAT BELTS
Fastening seat belts WARNING
The seatback should not be in
areclined position
any more than needed for comfort. Seat belts are
most effective when the passenger sits well back
and straight up in the seat.
1. Adjust the seat. (See “Manual seat adjustment
(where fitted)” earlier in this section.)
2. Slowly pull the seat belt out of the retractor and insert the tongue into the buckle until you hear
and feel the latch engage.
• The retractor is designed to lock during a
sudden stop or on impact.
Aslow pulling
motion permits the seat belt to move, and
allows you some freedom of movement in
the seat. •
If the seat belt cannot be pulled from its
fully retracted position, firmly pull the belt
and release it. Then smoothly pull the belt
out of the retractor.
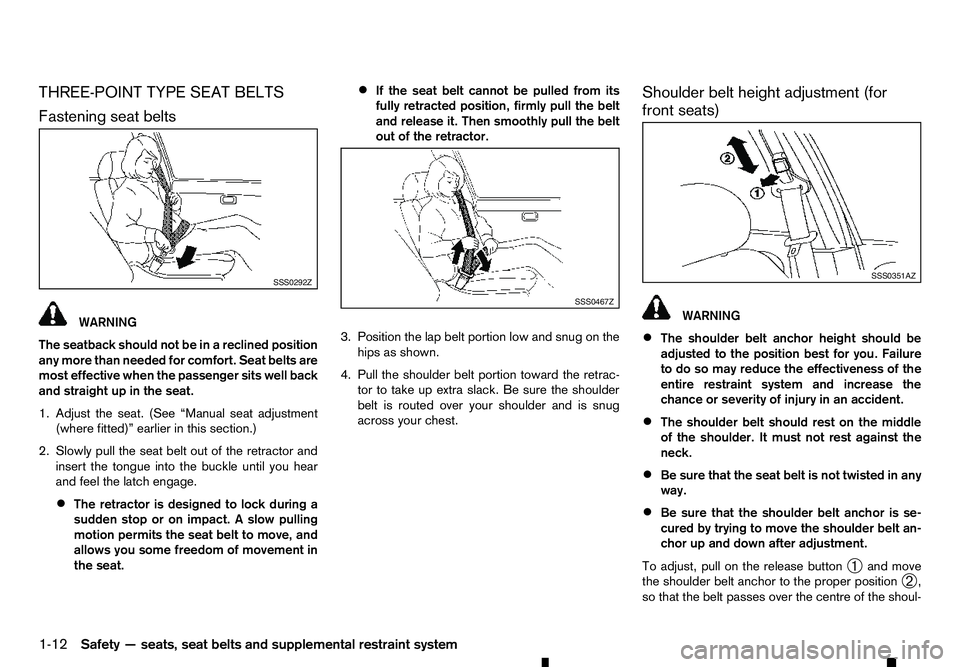
3. Position the lap belt portion low and snug on the hips as shown.
4. Pull the shoulder belt portion toward the retrac- tor to take up extra slack. Be sure the shoulder
belt is routed over your shoulder and is snug
across your chest. Shoulder belt height adjustment (for
front seats) WARNING
• The shoulder belt anchor height should be
adjusted to the position best for you. Failure
to do so may reduce the effectiveness of the
entire restraint system and increase the
chance or severity of injury in an accident.
• The shoulder belt should rest on the middle
of the shoulder. It must not rest against the
neck.
• Be sure that the seat belt is not twisted in any
way.
• Be sure that the shoulder belt anchor is se-
cured by trying to move the shoulder belt an-
chor up and down after adjustment.
To adjust, pull on the release button ➀and move
the shoulder belt anchor to the proper position ➁,
so that the belt passes over the centre of the shoul- SSS0292Z
SSS0467Z SSS0351AZ
1-12 Safety —seats, seat belts and supplemental restraint system
Page 35 of 340
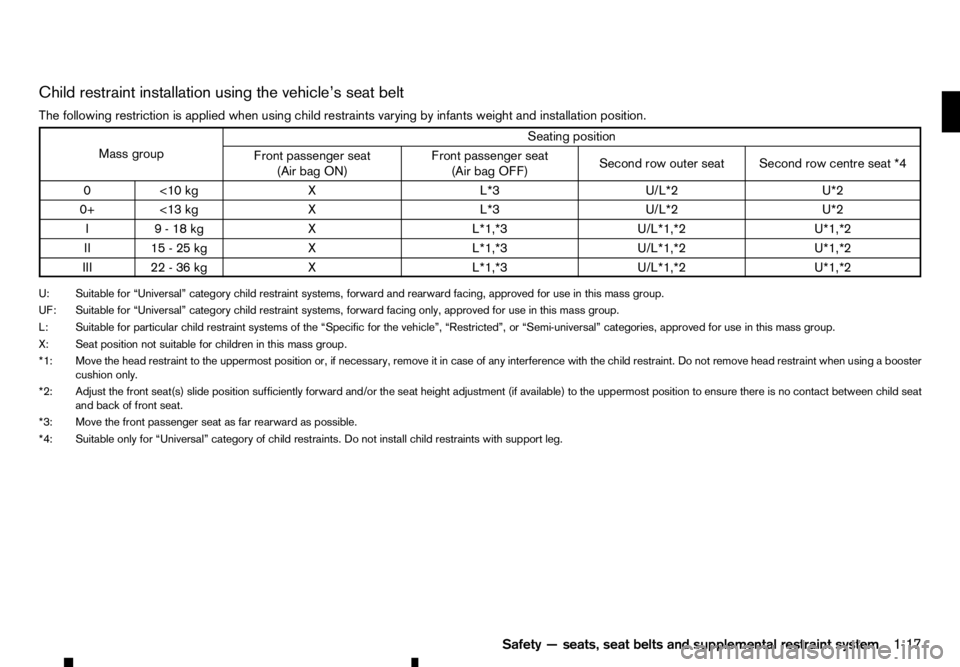
Child restraint installation using the vehicle’s seat belt
The following restriction is applied when using child restraints varying by infants weight and installation position. Mass group
Seating position
Front passenger seat (Air bag ON) Front passenger seat
(Air bag OFF) Second row outer seat Second row centre seat *4
0< 10 kg XL *3U/L*2 U*2
0+ <13 kg XL *3U/L*2 U*2
I9 -18kgX L*1,*3U/L*1,*2 U*1,*2
II 15 -25kgX L*1,*3U/L*1,*2 U*1,*2
III 22 -36kgX L*1,*3U/L*1,*2 U*1,*2
U: Suitable for “Universal” category child restraint systems, forward and rearward facing, approved for use in this mass group.
UF: Suitable for “Universal” category child restraint systems, forward facing only, approved for use in this mass group.
L: Suitable for particular child restraint systems of the “Specific for the vehicle”, “Restricted”, or “Semi-universal” categories, approved for use in this mass group. X: Seat position not suitable for children in this mass group.
*1: Move the head restraint to the uppermost position or, if necessary, remove it in case of any interference with the child restraint. Do not remove head restraint when using abooster
cushion only.
*2: Adjust the front seat(s) slide position sufficiently forward and/or the seat height adjustment (if available) to the uppermost position to ensure there is no contact between child seat and back of front seat.
*3: Move the front passenger seat as far rearward as possible.
*4: Suitable only for “Universal” category of child restraints. Do not install child restraints with support leg.
Safety—seats, seat belts and supplemental restraint system 1-17
Page 36 of 340
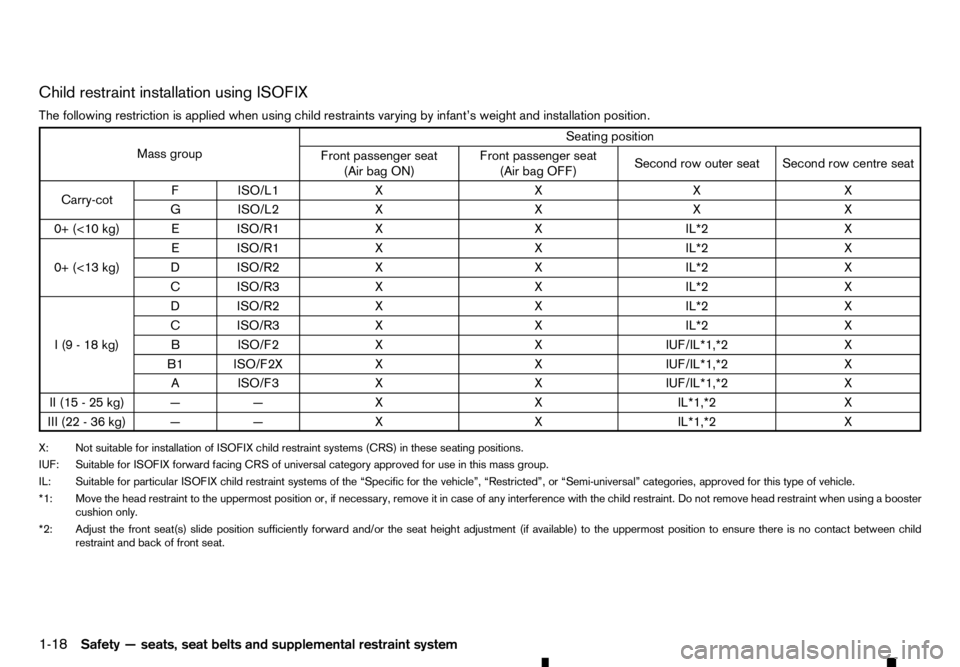
Child restraint installation using ISOFIX
The following restriction is applied when using child restraints varying by infant’s weight and installation position. Mass group
Seating position
Front passenger seat (Air bag ON) Front passenger seat
(Air bag OFF) Second row outer seat Second row centre seat
Carry-cot FI
SO/L1 XX XX
GI SO/L2 XX XX
0+ (<10 kg) EISO/R1 XX IL*2X
0+ (<13 kg) EI
SO/R1 XX IL*2X
DI SO/R2 XX IL*2X
CI SO/R3 XX IL*2X
I(9-18k g) DI
SO/R2 XX IL*2X
CI SO/R3 XX IL*2X
BI SO/F2 XX IUF/IL*1,*2X
B1 ISO/F2X XX IUF/IL*1,*2X
AI SO/F3 XX IUF/IL*1,*2X
II (15 -25kg) —— XX IL*1,*2X
III (22 -36kg) —— XX IL*1,*2X
X: Not suitable for installation of ISOFIX child restraint systems (CRS) in these seating positions.
IUF: Suitable for ISOFIX forward facing CRS of universal category approved for use in this mass group.
IL: Suitable for particular ISOFIX child restraint systems of the “Specific for the vehicle”, “Restricted”, or “Semi-universal” categories, approved for this type of vehicle.
*1: Move the head restraint to the uppermost position or, if necessary, remove it in case of any interference with the child restraint. Do not remove head restraint when using abooster
cushion only.
*2: Adjust the front seat(s) slide position sufficiently forward and/or the seat height adjustment (if available) to the uppermost position to ensure there is no contact between child restraint and back of front seat.
1-18 Safety —seats, seat belts and supplemental restraint system
Page 37 of 340
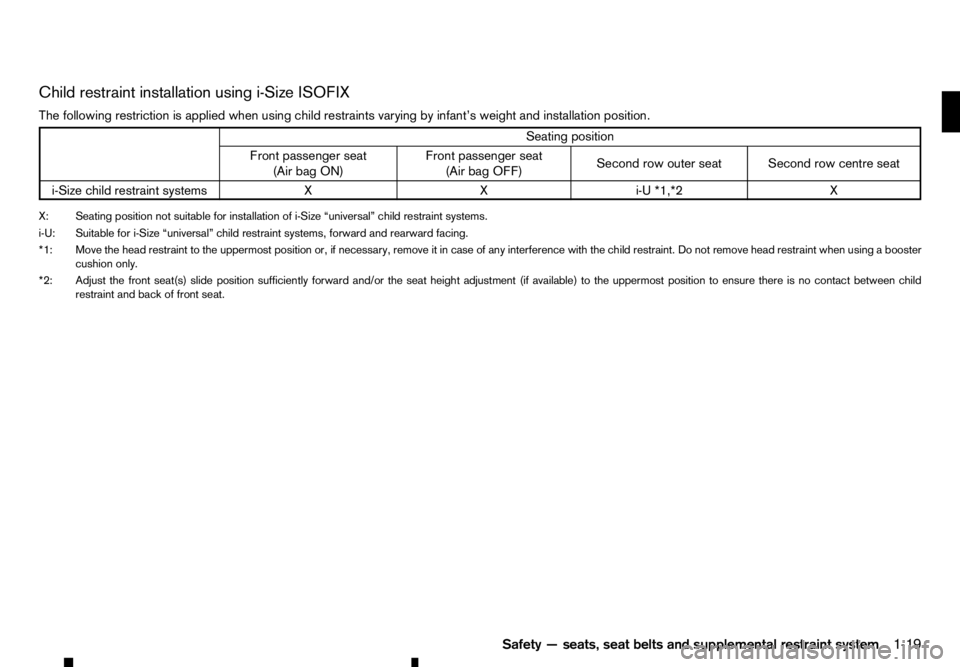
Child restraint installation using i-Size ISOFIX
The following restriction is applied when using child restraints varying by infant’s weight and installation position. Seating position
Front passenger seat (Air bag ON) Front passenger seat
(Air bag OFF) Second row outer seat Second row centre seat
i-Size child restraint systems XX i-U *1,*2X
X: Seating position not suitable for installation of i-Size “universal” child restraint systems.
i-U: Suitable for i-Size “universal” child restraint systems, forward and rearward facing.
*1: Move the head restraint to the uppermost position or, if necessary, remove it in case of any interference with the child restraint. Do not remove head restraint when using abooster
cushion only.
*2: Adjust the front seat(s) slide position sufficiently forward and/or the seat height adjustment (if available) to the uppermost position to ensure there is no contact between child restraint and back of front seat.
Safety—seats, seat belts and supplemental restraint system 1-19