Page 297 of 340

Replacing halogen headlight bulb
The halogen headlight is asemi-sealed beam type
which uses replaceable headlight (halogen) bulbs.
They can be replaced from inside the engine com-
partment without removing the headlight assembly.
CAUTION
High-pressure halogen gas is sealed inside the
bulb. The bulb may break if the glass envelope is
scratched or the bulb is dropped.
1. Disconnect the battery negative cable.
2. Disconnect the electrical connector from the
rear end of the bulb.
3. Pull off the rubber cap
➀.
4. Push and turn the retaining pin
➁to loosen it.
5. Remove the headlight bulb. Do not shake or
rotate the bulb when removing it.
6. Install the new bulb in the reverse order of
removal.
CAUTION
• When handling the bulb, do not touch the
glass envelope.
• Use the same number and wattage as origi-
nally installed:
Halogen headlight model
High/low beam bulb: 60W/55W (H4)
• Do not leave the bulb out of the headlight
reflector for
along period of time as dust, moisture and smoke may enter the headlight
body and affect the performance of the head-
light.
Aiming adjustment is not necessary if only the bulbs
are replaced. When aiming adjustment is neces-
sary, contact an approved dealer or qualified work-
shop.
EXTERIOR LIGHTS Item
Wattage (W)
Front turn signal 21
Clearance light (Halogen
headlight models) 5
Clearance light and daytime
running light (LED headlight
models)* LED
Front fog light (where fitted) 55
Daytime running light (where
fitted for halogen headlight
models) 19
Side turn signal light (on the
front wing) (where fitted) 5
Rear combination light Turn signal 21
Stop/tail 21/5
Reverse 21
Number plate light 5
High-mounted stop light (where fitted)* LED
*: See an approved dealer or qualified workshop
for replacement. JVM0470XZ
Maintenance and do-it-yourself
8-21
Page 298 of 340
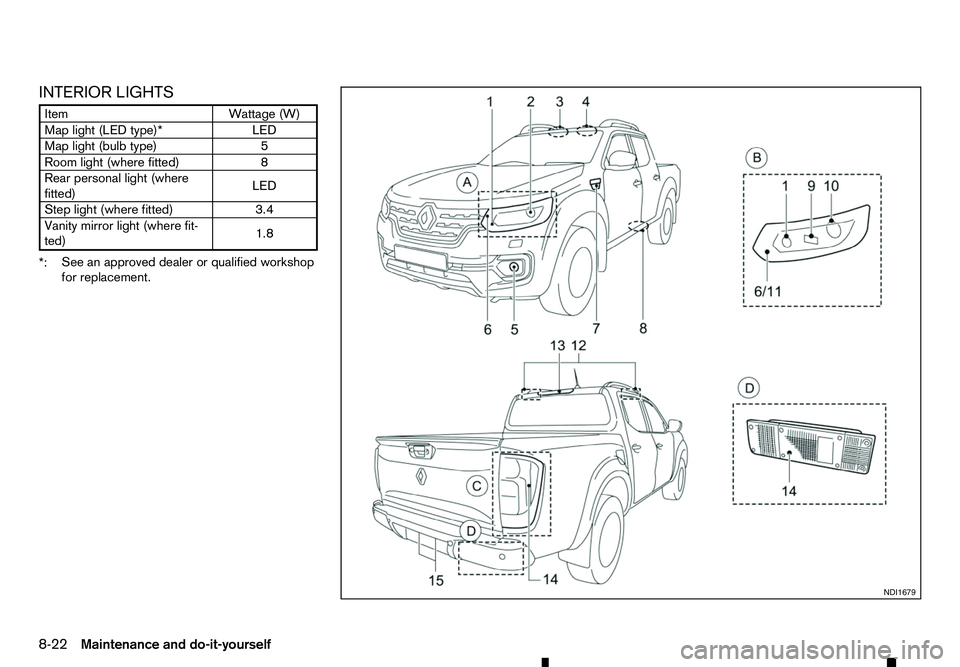
INTERIOR LIGHTS
Item
Wattage (W)
Map light (LED type)* LED
Map light (bulb type) 5
Room light (where fitted) 8
Rear personal light (where
fitted) LED
Step light (where fitted) 3.4
Vanity mirror light (where fit-
ted) 1.8
*: See an approved dealer or qualified workshop
for replacement. NDI1679
8-22 Maintenance and do-it-yourself
Page 299 of 340
LIGHT LOCATIONS
1. Front turn signal light
2. Headlight (halogen type)
3. Map light
4. Room light (where fitted)
5. Front fog light (where fitted) or Daytime run-
ning light (where fitted for halogen headlight
model)
6. Clearance light
7. Side turn signal light (where fitted)
8. Step light (where fitted)
9. Headlight (high beam) (LED type)
10. Headlight (low beam) (LED type)
11. Daytime running light (LED type)
12. Rear personal light (where fitted)
13. High-mounted stop light (where fitted)
14. Rear combination light (Turn signal/Stop/Tail/
Reverse)
15. Number plate light
j A: Halogen headlight model
j B: LED headlight model
j C: Models with cargo bed
j D: Models without cargo bed Replacement procedures
m
:
REMOVE
m :
INSTALL All
other lights are either type A, B, C,
DorE.When
replacing abulb, first remove the lens and/or cover. SDI2306 NDI1681
Front turn signal light
NDI1680
Clearance light (bulb type)
Maintenance and do-it-yourself 8-23
Page 300 of 340
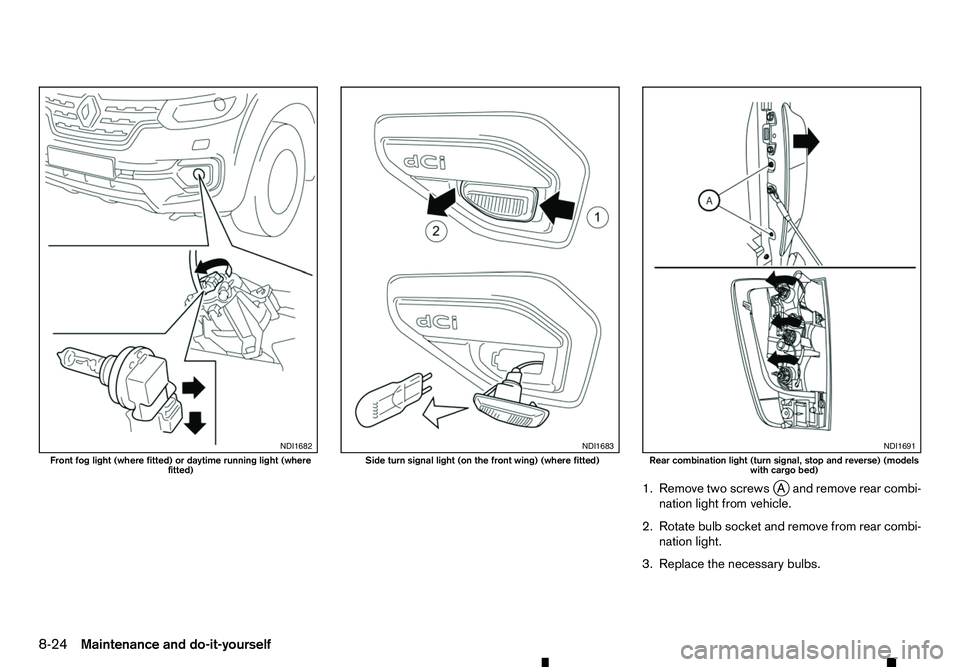
1. Remove two screws
jAa nd remove rear combi-
nation light from vehicle.
2. Rotate bulb socket and remove from rear combi- nation light.
3. Replace the necessary bulbs. NDI1682
Front fog light (where fitted) or daytime running light (where
fitted) NDI1683
Side turn signal light (on the front wing) (where fitted)
NDI1691
Rear combination light (turn signal, stop and reverse) (models
with cargo bed)
8-24 Maintenance and do-it-yourself
Page 301 of 340
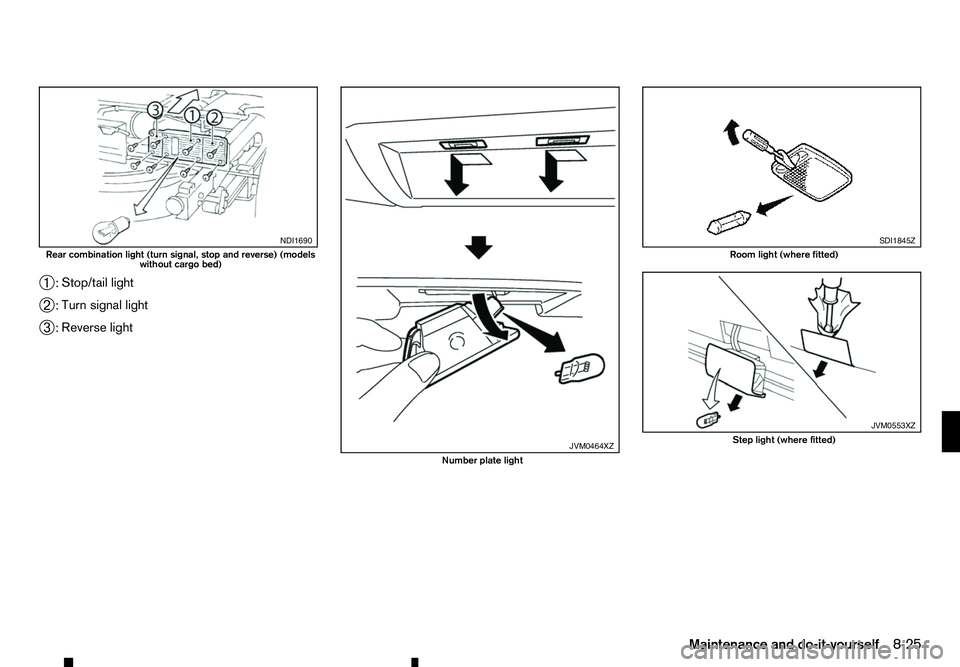
➀
:
Stop/tail light
➁ :
Turn signal light
➂ :
Reverse light NDI1690
Rear combination light (turn signal, stop and reverse) (models
without cargo bed) JVM0464XZ
Number plate light SDI1845Z
Room light (where fitted)
JVM0553XZ
Step light (where fitted)
Maintenance and do-it-yourself 8-25
Page 302 of 340

If you have
aflat tyre, see “Flat tyre” in the “6. In
case of emergency” section.
TYRE INFLATION PRESSURE
Periodically check the pressure of the tyres, includ-
ing the spare. An incorrect tyre pressure may ad-
versely affect tyre life and vehicle handling. The tyre
pressure should be checked when tyres are COLD.
Tyres are considered COLD after the vehicle has
been parked for 3ormore hours, or driven less than
1.6 km (1 mile). COLD tyre pressures are shown on
the tyre placard.
Insufficient pressure can lead to an overheating of
the tyre and subsequent internal damage. At high
speeds, this could result in tread separation and
even bursting of the tyre.
TYPES OF TYRES
CAUTION
When changing or replacing tyres, be sure all
four tyres are of the same type (that is, summer,
all season or snow) and construction. An ap-
proved dealer or qualified workshop may be able
to help you with information about tyre type, size,
speed rating and availability.
Replacement tyres may have alower speed rating
than the factory equipped tyres, and they may not
match the potential maximum vehicle speed. Never
exceed the maximum speed rating of the tyre. All season tyres
RENAULT specifies all season tyres on some mod-
els to provide good performance all year, including
snowy and icy road conditions. All season tyres are
identified by ALL SEASON and/or M&S on the tyre
sidewall. Snow tyres have better snow traction than
all season tyres and may be more appropriate in
some areas.
Summer tyres
RENAULT specifies summer tyres on some models
to provide superior performance on dry roads. Sum-
mer tyre performance is substantially reduced in
snow and ice. Summer tyres do not have the tyre
traction rating M&S on the tyre sidewall.
If you plan to operate your vehicle in snowy or icy
conditions, RENAULT recommends the use of snow
or all season tyres on all four wheels.
Snow tyres
If snow tyres are needed, it is necessary to select
tyres equivalent in size and load rating to the original
equipment tyres. If you do not, it can adversely af-
fect the safety and handling of your vehicle.
Generally, snow tyres have lower speed ratings than
factory equipped tyres and may not match the po-
tential maximum vehicle speed. Never exceed the
maximum speed rating of the tyre. If you install snow
tyres, they must be the same size, brand, construc-
tion and tread pattern on all four wheels.
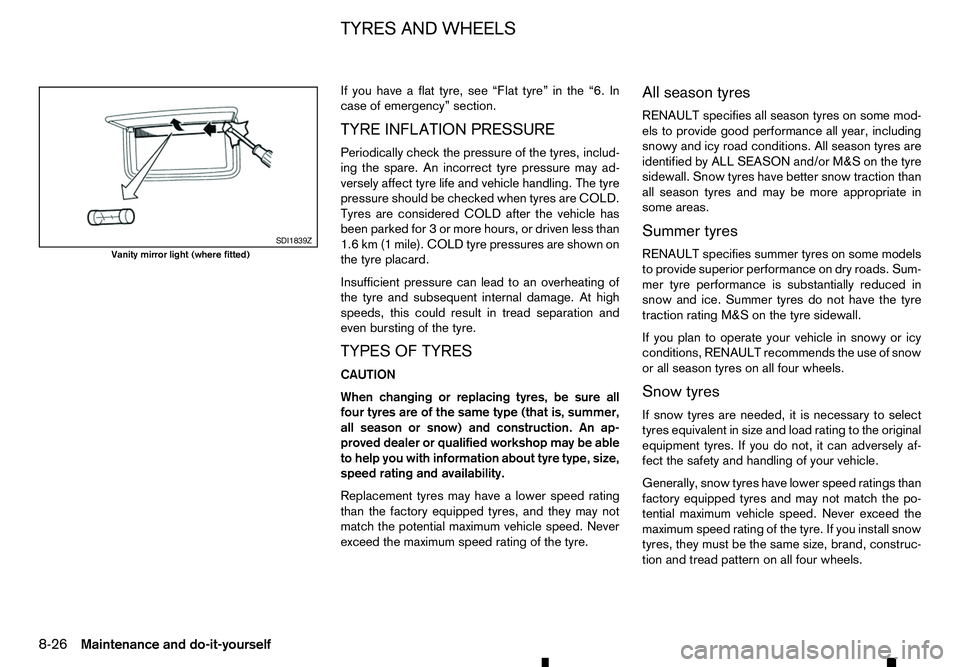
SDI1839Z
Vanity mirror light (where fitted)
TYRES AND WHEELS
8-26 Maintenance and do-it-yourself
Page 303 of 340

For additional traction on icy roads, studded tyres
may be used. However, some states and provinces
prohibit their use. Check local, state and provincial
laws before installing studded tyres. Skid and trac-
tion capabilities of studded snow tyres on wet or dry
surfaces may be poorer than that of non-studded
snow tyres.
Four-Wheel Drive (4WD) model
CAUTION
• Always use tyres of the same type, size, brand,
construction (bias, bias-belted or radial), and
tread pattern on all four wheels. Failure to do
so may result in
acircumference difference
between tyres on the front and rear axles
which will cause excessive tyre wear and may
damage the transmission, transfer case and
differential gears.
• ONLY use spare tyres specified for the 4WD
model.
If excessive tyre wear is found, it is recommended
that all four tyres be replaced with tyres of the same
size, brand, construction and tread pattern. The tyre
pressure and wheel alignment should also be
checked and corrected as necessary. Contact an
approved dealer or qualified workshop. TYRE CHAINS
Use of tyre chains may be prohibited according to
location. Check the local laws before installing tyre
chains. When installing tyre chains, make sure that
they are of proper size for the tyres on your vehicle
and are installed according to the chain manufactur-
er’s instructions.
Use chain tensioners when recommended by the
tyre chain manufacturer to ensure
atight fit. Loose
end links of the tyre chains must be secured or
removed to prevent the possibility of whipping ac-
tion damage to the wings or underbody. If possible,
avoid fully loading your vehicle when using tyre
chains. In addition, drive at areduced speed. Oth-
erwise, your vehicle may be damaged and/or ve-
hicle handling and performance may be adversely
affected.
Tyre chains must be installed only on the rear
wheels and not on the front wheels.
Do not drive with tyre chains on paved roads which
are clear of snow. Driving with chains in such condi-
tions can cause damage to the various mechanisms
of the vehicle due to some overstress. TYRE ROTATION
RENAULT recommends that tyres be rotated every
5,000 km (3,000 miles) for Four-Wheel Drive (4WD)
or every 10,000 km (6,000 miles) for Two-Wheel
Drive (2WD) model. However, the timing for tyre
rotation may vary according to your driving habits
and the road surface conditions. (See “Flat tyre” in
the “6. In case of emergency” section for the tyre
replacement.)
WARNING
• After rotating the tyres, adjust the tyre pres-
sure.
• Retighten the wheel nuts when the vehicle
has been driven for 1,000 km (600 miles) (also
in cases of
aflat tyre, etc.).
• Do not include the spare tyre in tyre rotation. SDI1662Z
Maintenance and do-it-yourself
8-27
Page 304 of 340

•
Incorrect tyre selection, fitting, care or main-
tenance can affect vehicle safety with risk of
accident and injury. If in doubt, consult an
approved dealer or qualified workshop or the
tyre manufacturer.
TYRE WEAR AND DAMAGE
➀ :W
ear indicator
➁ :W
ear indicator location mark
Tyres should be periodically inspected for wear,
cracking, bulging or objects caught in the tread. If
excessive wear, cracks, bulging or deep cuts are
found, the tyre should be replaced immediately.
The original tyres have abuilt-in tread wear indica-
tor. When the wear indicator is visible, the tyre
should be replaced.
Improper service of aspare tyre may result in seri-
ous personal injury. If it is necessary to repair the
spare tyre, contact an approved dealer or qualified
workshop. TYRE AGE
Never use
atyre over six years old, regardless of
whether it has been used or not.
Tyres degrade with age as well as with the vehicle
usage. Have your tyres checked and balanced often
by arepair shop or, if you prefer, an approved dealer
or qualified workshop.
CHANGING TYRES AND WHEELS WARNING
Do not install
adeformed wheel or tyre even if it
has been repaired. Such wheels or tyres could
have structural damage and could fail without
warning.
When replacing atyre, use the same size, speed
rating and load carrying capacity as originally
equipped. (See “Tyres and wheels” in the “9. Tech-
nical information” section for recommended types
and sizes of tyres and wheels.) The use of tyres
other than those recommended or the mixed use of
tyres of different brands, construction (bias, bias-
belted, or radial), or tread patterns can adversely
affect the ride, braking, handling, ground clearance,
body-to-tyre clearance, snow chain clearance,
speedometer calibration, headlight aim and bumper
height. Some of these effects may lead to accidents
and could result in serious personal injury.
If the wheels are changed for any reason, always
replace with wheels which have the same offset
dimension. Wheels of adifferent offset could cause
early tyre wear, possibly degraded vehicle handling characteristics and/or interference with the brake
discs/drums. Such interference can lead to
decreased braking efficiency and/or early brake
pad/shoe wear.
WHEEL BALANCE
Unbalanced wheels may affect vehicle handling and
tyre life. Even with regular use, wheels can get out
of balance. Therefore, they should be balanced as
required.
SPARE TYRE
Conventional spare tyre (where fitted)
As tandard tyre (the same size as the road wheels)
is supplied with your vehicle.
Temporary spare tyre (where fitted)
The temporary spare tyre is adifferent size from the
road wheels.
Temporary spare tyres can be distinguished as fol-
lows:
—T yre and wheel size differs from the four mounted
tyres and wheels.
—T here is alabel in the wheel with aspeed limita-
tion.
In order to avoid malfunction adhere to the follow-
ing:
• Never drive at speeds above 80 km/h (50 MPH).
• Drive with special caution when
atemporary
spare wheel is mounted. SDI1663Z
8-28 Maintenance and do-it-yourself