Page 257 of 340
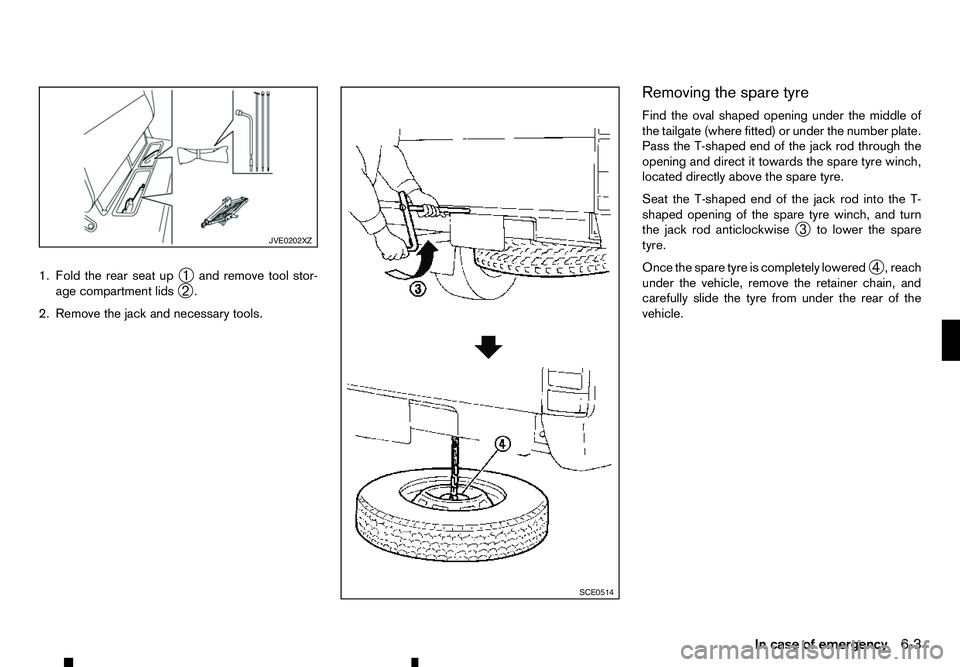
1. Fold the rear seat up
➀and remove tool stor-
age compartment lids ➁.
2. Remove the jack and necessary tools. Removing the spare tyre
Find the oval shaped opening under the middle of
the tailgate (where fitted) or under the number plate.
Pass the T-shaped end of the jack rod through the
opening and direct it towards the spare tyre winch,
located directly above the spare tyre.
Seat the T-shaped end of the jack rod into the T-
shaped opening of the spare tyre winch, and turn the jack rod anticlockwise ➂to lower the spare
tyre.
Once the spare tyre is completely lowered ➃,r
each
under the vehicle, remove the retainer chain, and
carefully slide the tyre from under the rear of the
vehicle. JVE0202XZ
SCE0514
In case of emergency
6-3
Page 258 of 340

CAUTION
When storing the wheel, be sure to mount the
wheel horizontally. Securing awheel that is in a
tilted position as illustrated may cause looseness
and dropping of the wheel while driving. Lower
the wheel on to the ground again, and make sure that the hanging plate is properly set. Hang the
wheel again and make sure that the wheel is
held horizontally, then store the wheel.
Blocking wheels WARNING
Be sure to block the appropriate wheel to pre-
vent the vehicle from moving, which may cause
personal injury.
Place suitable blocks ➀at both the front and back
of the wheel diagonally opposite the flat tyre j
Ato
prevent the vehicle from moving when it is jacked
up.
Removing tyre WARNING
• Be sure to read and follow the instructions in
this section.
• DO NOT GET UNDER
AVEHICLE THAT IS
SUPPORTED BY AJACK. •
Never use
ajack which was not provided with
your vehicle.
• The jack, which is provided with your vehicle,
is designed only to lift your vehicle during a
tyre change.
• Never jack up the vehicle at
alocation other
than the jack-up point that is specified.
• Never lift the vehicle more than necessary.
• Never use blocks on or under the jack.
• Never start or run the engine while the vehicle
is on the jack. The vehicle may move sud-
denly, and this may cause an accident.
• Never allow passengers to remain in the ve-
hicle while the tyre is off the ground.
• Be sure to read the caution label attached to
the jack body before using.
Removing the wheel cap (where fitted):
Remove the centre wheel cap ➀as illustrated. SCE0982Z MCE0001DZ
SCE0139HZ
6-4 In case of emergency
Page 259 of 340
Jacking up vehicle:
j A For front wheel
j B For rear wheel
1. Place the jack directly under the jack-up points jA jBa sillustrated.
The jack should be placed on firm level
ground. 2. Loosen each wheel nut, anticlockwise, one or
two turns with the wheel nut wrench.
Do not remove the wheel nuts until the tyre is
off the ground.
3. Install the assembled jack rod into the jack as shown.
4. Carefully raise the vehicle until the clearance be- tween the tyre and ground is achieved.
5. To lift the vehicle, securely hold the jack lever and rod with both hands and turn the jack lever.
Removing tyre:
1. Remove the wheel nuts.
2. Remove the damaged tyre.
CAUTION
The tyre is heavy. Be sure that your feet are clear
from the tyre and use gloves as necessary to
avoid injury. NCE480 NCE130Z
In case of emergency
6-5
Page 260 of 340

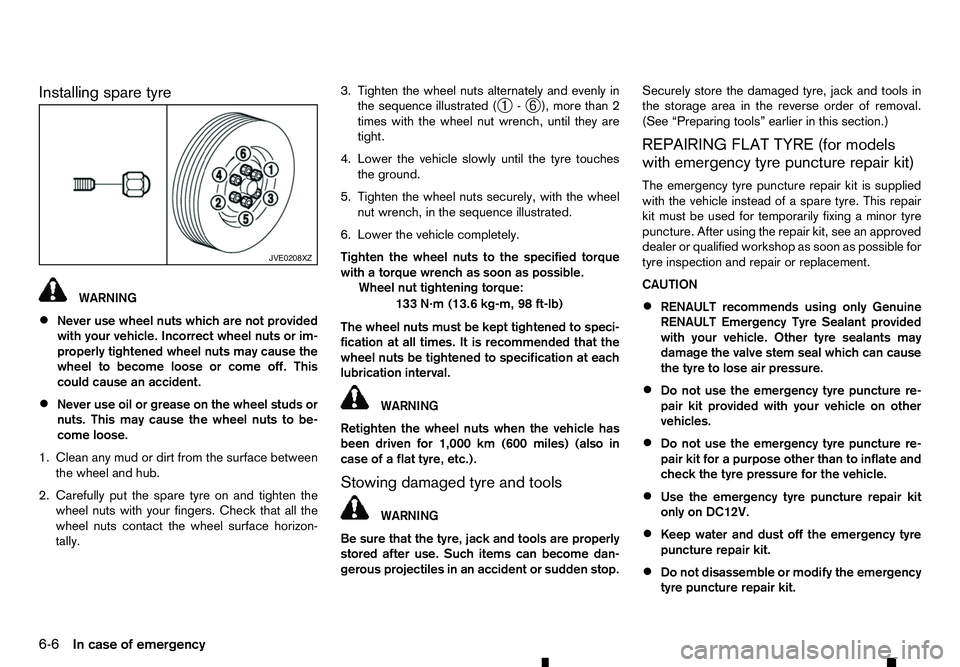
Installing spare tyre
WARNING
• Never use wheel nuts which are not provided
with your vehicle. Incorrect wheel nuts or im-
properly tightened wheel nuts may cause the
wheel to become loose or come off. This
could cause an accident.
• Never use oil or grease on the wheel studs or
nuts. This may cause the wheel nuts to be-
come loose.
1. Clean any mud or dirt from the surface between the wheel and hub.
2. Carefully put the spare tyre on and tighten the wheel nuts with your fingers. Check that all the
wheel nuts contact the wheel surface horizon-
tally. 3. Tighten the wheel nuts alternately and evenly in
the sequence illustrated ( ➀-
➅ ), more than 2
times with the wheel nut wrench, until they are
tight.
4. Lower the vehicle slowly until the tyre touches the ground.
5. Tighten the wheel nuts securely, with the wheel nut wrench, in the sequence illustrated.
6. Lower the vehicle completely.
Tighten the wheel nuts to the specified torque
with atorque wrench as soon as possible.
Wheel nut tightening torque:
133 N·m (13.6 kg-m, 98 ft-lb)
The wheel nuts must be kept tightened to speci-
fication at all times. It is recommended that the
wheel nuts be tightened to specification at each
lubrication interval. WARNING
Retighten the wheel nuts when the vehicle has
been driven for 1,000 km (600 miles) (also in
case of aflat tyre, etc.).
Stowing damaged tyre and tools WARNING
Be sure that the tyre, jack and tools are properly
stored after use. Such items can become dan-
gerous projectiles in an accident or sudden stop. Securely store the damaged tyre, jack and tools in
the storage area in the reverse order of removal.
(See “Preparing tools” earlier in this section.)
REPAIRING FLAT TYRE (for models
with emergency tyre puncture repair kit)
The emergency tyre puncture repair kit is supplied
with the vehicle instead of aspare tyre. This repair
kit must be used for temporarily fixing aminor tyre
puncture. After using the repair kit, see an approved
dealer or qualified workshop as soon as possible for
tyre inspection and repair or replacement.
CAUTION
• RENAULT recommends using only Genuine
RENAULT Emergency Tyre Sealant provided
with your vehicle. Other tyre sealants may
damage the valve stem seal which can cause
the tyre to lose air pressure.
• Do not use the emergency tyre puncture re-
pair kit provided with your vehicle on other
vehicles.
• Do not use the emergency tyre puncture re-
pair kit for
apurpose other than to inflate and
check the tyre pressure for the vehicle.
• Use the emergency tyre puncture repair kit
only on DC12V.
• Keep water and dust off the emergency tyre
puncture repair kit.
• Do not disassemble or modify the emergency
tyre puncture repair kit. JVE0208XZ
6-6 In case of emergency
Page 261 of 340

•
Do not galvanise the emergency tyre punc-
ture repair kit.
• Do not use the emergency tyre puncture re-
pair kit under the following conditions. Con-
tact an approved dealer or qualified workshop
or professional road assistance.
–w
hen the sealant has passed its expiration
date (shown on the label attached to the
bottle)
–w hen the cut or the puncture is approxi-
mately 6mm(0.25 in) or longer
–w hen the side of the tyre is damaged
–w hen the vehicle has been driven with a
considerable loss of air from the tyre
–w hen the tyre is completely displaced in-
side or outside the rim
–w hen the tyre rim is damaged
–w hen two or more tyres are flat Getting emergency tyre puncture repair
kit
Take the emergency tyre puncture repair kit from its
storage position under the left rear seat. The repair
kit consists of the following items:
➀
Tyre sealant bottle
➁ Air compressor
➂ Speed restriction sticker
NOTE
For models with the emergency tyre puncture
repair kit, aspare tyre, jack and rod are not
equipped as standard. These parts are dealer
options. Contact an approved dealer or qualified
workshop about obtaining these parts. See
“Changing flat tyre (for models with spare tyre) ”
earlier in this section for usage of jacking tools
and tyre replacement. Before using emergency tyre puncture
repair kit
• If any foreign object (for example,
ascrew or
nail) is embedded in the tyre, do not remove it.
• Check the expiration date of the sealant (shown
on the label attached to the bottle). Never use a
sealant whose expiration date has passed.
Repairing tyre WARNING
Observe the following precautions when using
the emergency tyre puncture repair kit.
• Swallowing the compound is dangerous. Im-
mediately drink as much water as possible
and seek prompt medical assistance.
• Rinse well with lots of water if the compound
comes into contact with skin or eyes. If irrita-
tion persists, seek prompt medical attention.
• Keep the repair compound out of the reach of
children.
• The emergency repair compound may cause
am
alfunction of the tyre pressure sensors
(where fitted) and cause the low tyre pres-
sure warning light (where fitted) to illuminate.
Have the tyre pressure sensor replaced as
soon as possible. NCE483
In case of emergency
6-7
Page 262 of 340

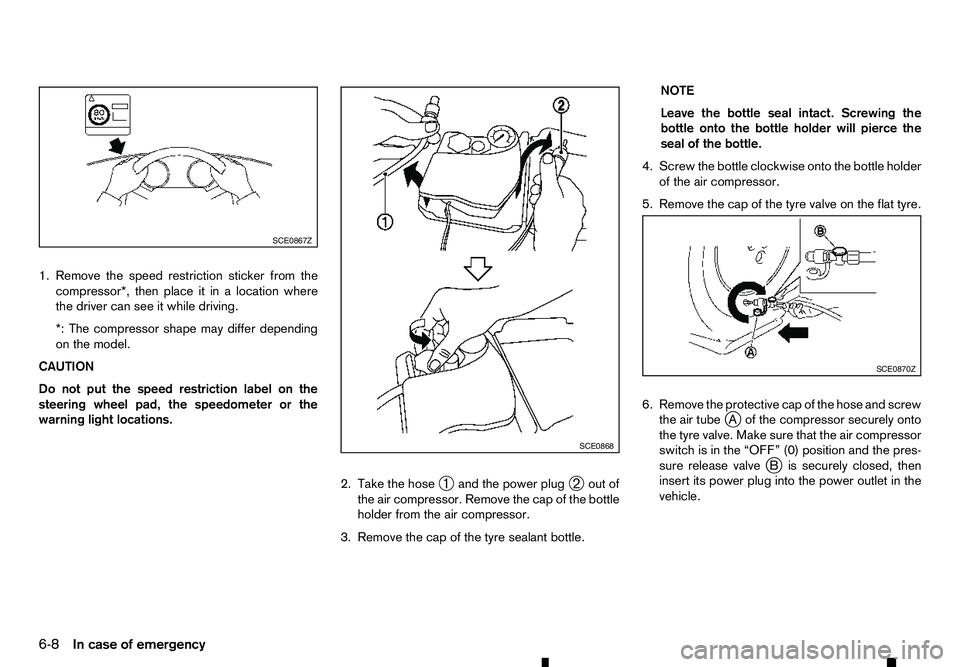
1. Remove the speed restriction sticker from the
compressor*, then place it in alocation where
the driver can see it while driving.
*: The compressor shape may differ depending
on the model.
CAUTION
Do not put the speed restriction label on the
steering wheel pad, the speedometer or the
warning light locations.
2. Take the hose➀and the power plug
➁out of
the air compressor. Remove the cap of the bottle holder from the air compressor.
3. Remove the cap of the tyre sealant bottle. NOTE
Leave the bottle seal intact. Screwing the
bottle onto the bottle holder will pierce the
seal of the bottle.
4. Screw the bottle clockwise onto the bottle holder of the air compressor.
5. Remove the cap of the tyre valve on the flat tyre.
6. Remove the protective cap of the hose and screw the air tube j
Ao fthe compressor securely onto
the tyre valve. Make sure that the air compressor
switch is in the “OFF” (0) position and the pres-
sure release valve j
Bi ssecurely closed, then
insert its power plug into the power outlet in the
vehicle. SCE0867Z
SCE0868 SCE0870Z
6-8 In case of emergency
Page 263 of 340

NOTE
Use the power socket located on the lower
part of the cockpit ➀.
7. Check the specified tyre pressure on the tyre placard that is affixed to the driver’s side centre
pillar.
8. Place the ignition switch in the ACC position. Then turn the compressor switch to the ON (−)
position and inflate the tyre up to the pressure
that is specified on the tyre placard affixed to the
driver’s side centre pillar if possible, or to the
minimum of 180 kPa (1.8 bar, 26 psi), for tyre
205R16 250 kPa (2.5 bar, 36 psi). Turn the air
compressor off briefly in order to check the tyre
pressure with the pressure gauge.
If the tyre is inflated to higher than the specified
pressure, adjust the tyre pressure by releasing
air with the pressure release valve. The cold tyre
pressures are shown on the tyre placard affixed
to the driver’s side centre pillar. WARNING
To avoid serious personal injury while using
the emergency tyre puncture repair kit.
• Securely tighten the compressor hose to
the tyre valve. Failure to do so can cause
the sealant to spray into the air and get
into your eyes or on your skin.
• Do not stand directly beside the damaged
tyre while it is being inflated because of
the risk of rupture. If there are any cracks
or bumps, turn the compressor off imme-
diately.
CAUTION
• Do not operate the compressor for more
than 10 minutes. If the tyre pressure does
not increase to the specified pressure
within 10 minutes, the tyre may be seri-
ously damaged and the tyre cannot be re-
paired with this tyre repair kit. Contact an
approved dealer or qualified workshop.
9. When the tyre pressure is at the specified value, close the pressure release valve and turn the air
compressor off. If the pressure cannot be in-
flated to the specified value, the air compressor
can be turned off at the minimum of 180 kPa (1,8
bar, 26 psi) for tyre 205R16 250 kPa (2,5 bar, 36
psi). Remove the power plug from the power
outlet and quickly remove the hose from the tyre
valve. Attach the protective cap and valve cap.
Properly stow the emergency tyre puncture re-
pair kit in the storage location. WARNING
To avoid serious personal injury when stowing
the emergency tyre puncture repair kit, keep the
sealant bottle screwed into the compressor. Fail-
ure to do so can cause the sealant to spray into
the air and get into your eyes or on the skin.
10. Immediately drive the vehicle for 10 minutes or
3–10 km (2–6 miles) (if the road situation al-lows) at aspeed of 80 km/h (50 MPH) or less.
11. After driving 10 km (6 miles), or 10 minutes, screw the air tube of the air compressor se-
curely onto the tyre valve. Check the tyre pres-
sure with the pressure gauge.
The temporary repair is completed if the tyre
pressure does not drop.
Make sure the pressure is adjusted to the pres-
sure that is specified on the tyre placard before
driving.
If the tyre pressure drops under 130 kPa (19
psi):
The tyre cannot be repaired with this tyre punc-
ture repair kit. Contact an approved dealer or quali-
fied workshop.
If the tyre pressure is 130 kPa (19 psi) or more
but less than the specified pressure:
Turn the compressor switch to the ON (−) position
and inflate the tyre up to the specified pressure.
Then repeat the step from 8. NCE479
In case of emergency
6-9
Page 264 of 340

If the pressure drops again,
the tyre cannot be
repaired with this tyre puncture repair kit. Con-
tact an approved dealer or qualified workshop.
When the tyre pressure is the specified
pressure:
The temporary repair is completed.
See an approved dealer or qualified workshop for
the repair/replacement as soon as possible.
After repairing tyre
See an approved dealer or qualified workshop for
tyre repair or replacement and for anew tyre seal-
ant bottle and hose, as soon as possible.
CAUTION
• Before driving, ensure tyre is adjusted to rec-
ommended inflation pressure as indicated on
vehicle placard. Monitor tyre pressure until
sealed tyre is replaced.
• Do not drive the vehicle at speeds faster than
50 MPH (80 km/h), and the damaged tyre
must be replaced as quickly as possible
(within
amaximum driving distance of 200 km
(120 miles)). You must not continue to drive if
heavy vibrations, unsteady steering behaviour
or noises should occur while driving.
• Immediately after using Emergency Tyre Seal-
ant to repair
aminor tyre puncture, take your
vehicle to an approved dealer or qualified
workshop to inspect, and repair or replace
the tyre. The Emergency Tyre Sealant cannot
permanently seal apunctured tyre. Continu- ing operation of the vehicle without
aperma-
nent tyre repair can lead to acrash.
• If you used Emergency Tyre Sealant to repair
am
inor tyre puncture, your approved dealer
or qualified workshop will also need to re-
place the TPMS sensor in addition to repair-
ing or replacing the tyre.
• RENAULT recommends using only RENAULT
Genuine Emergency Tyre Sealant provided
with your vehicle. Other tyre sealants may
damage the valve stem seal which can cause
the tyre to lose air pressure. WARNING
• Incorrect jump starting can lead to
abattery
explosion. The battery explosion may result in
severe injury or death. It may also result in
damage to the vehicle. Be sure to follow the
instructions in this section.
• Explosive hydrogen gas is always present in
the vicinity of the battery. Keep all sparks and
flames away from the battery.
• Always wear suitable eye protection and re-
move rings, bracelets, and any other jewellery
whenever working on or near
abattery.
• Never lean over the battery while jump start-
ing.
• Never allow battery fluid to come into contact
with eyes, skin, clothes or the vehicle’s
painted surfaces. Battery fluid is
acorrosive
sulphuric acid which can cause severe burns.
If the fluid comes into contact with anything,
immediately flush the contacted area with
plenty of water.
• Keep the battery out of the reach of children.
• The booster battery must be rated at 12 volts.
Use of an incorrectly rated battery will dam-
age your vehicle.
• Never attempt to jump start
afrozen battery.
It could explode and cause serious injury.
JUMP STARTING
6-10 In case of emergency