2017 RENAULT ALASKAN tailgate
[x] Cancel search: tailgatePage 105 of 340

3
Pre-driving checks and adjustments
Pre-driving checks and adjustments
Keys ........................................................................V
3-2 Key (where fitted) ............................................... 3-2
Anti-Theft System (ATS*) key (where fitted) ........ 3-2
Remote Control Key (where fitted) ...................... 3-2
Doors ...................................................................... 3-4 Locking with key ................................................. 3-4
Opening with inside door handle ......................... 3-4
Locking with power door lock switch .................. 3-4
Rear access doors (King Cab models)................ 3-5
Child safety rear door locks (Double Cab
models) .............................................................. 3-5
Remote keyless entry system (where fitted) .............. 3-6
Using remote keyless entry system ..................... 3-6
Remote Control Key system (where fitted) ............... 3-7
Remote Control Key operating range .................. 3-9
Using Remote Control Key system ...................... 3-9
Battery saver system........................................... 3-10
Warning and audible reminders .......................... 3-11
Troubleshooting guide ........................................ 3-12
Using remote keyless entry system ..................... 3-14
Hazard indicator and horn operation.................... 3-15
Security system (where fitted) .................................. 3-15
Theft warning system (where fitted)..................... 3-15 Anti-Theft System (ATS) ..................................... 3-16
Bonnet..................................................................V
... 3-17 Opening bonnet.................................................. 3-17
Closing bonnet ................................................... 3-17
Fuel filler lid and cap ................................................ 3-18
Opening fuel filler lid ........................................... 3-18
Fuel filler cap ...................................................... 3-18
AdBlue® filler lid and cap ........................................ 3-19 Opening AdBlue® filler lid .................................. 3-20
Locking AdBlue® filler lid ................................... 3-20
AdBlue® filler cap .............................................. 3-20
Cargo bed (where fitted).......................................... 3-20 Tailgate .............................................................. 3-20
Tie down hooks (where fitted) ............................. 3-21
C-Channel system (where fitted) ......................... 3-21
Steering wheel......................................................... 3-23 Steering wheel adjustment .................................. 3-23
Mirrors..................................................................... 3-23 Inside rearview mirror ......................................... 3-23
Outside rearview mirrors..................................... 3-25
Vanity mirror (where fitted) .................................. 3-26
Parking brake .......................................................... 3-26
Page 107 of 340

2.
Mechanical key (inside Remote Control Key)
(2)
3. Key number plate (1) WARNING
• The Remote Control Key transmits radio
waves that can adversely affect medical elec-
tric equipment.
• If you have
apacemaker, you should contact
the medical equipment manufacturer to ask if
it will be affected by the Remote Control Key
signal.
Your vehicle can only be driven with the Remote
Control Keys which are registered to your vehicle’s
Remote Control Key system components and Anti-
Theft System (ATS*) components. As many as 4
Remote Control Keys can be registered and used
with one vehicle. The new keys must be registered
by an approved dealer or qualified workshop prior
to use with the Remote Control Key system and
ATS of your vehicle. Since the registration process
requires erasing all memory in the Remote Control
Key system components when registering new keys,
be sure to take all Remote Control Keys that you
have to an approved dealer or qualified workshop.
*: Immobilizer
CAUTION
• Be sure to carry the Remote Control Key with
you. Do not leave the vehicle with the Remote
Control Key inside. •
Be sure to carry the Remote Control Key with
you when driving. The Remote Control Key is
ap
recision device with abuilt-in transmitter.
To avoid damaging it, please note the follow-
ing.
–T he Remote Control Key is water resistant;
however, wetting may damage the Remote
Control Key. If the Remote Control Key
gets wet, immediately wipe until it is com-
pletely dry.
–D onot bend, drop or strike it against an-
other object.
–I fthe outside temperature is below -10°C
(14°F), the battery of the Remote Control
Key may not function properly.
–D onot place the Remote Control Key for
an extended period in aplace where tem-
peratures exceed 60°C (140°F).
–D onot change or modify the Remote Con-
trol Key.
–D onot use amagnet key holder.
–D onot place the Remote Control Key near
equipment that produces amagnetic field
such as aTV, audio equipment and per-
sonal computers.
–D onot allow the Remote Control Key to
come into contact with water or salt water,
and do not wash it in awashing machine.
This could affect the system function. •
If
aR emote Control Key is lost or stolen,
RENAULT recommends erasing the ID code
of that Remote Control Key. This will prevent
the Remote Control Key from unauthorised
use to unlock the vehicle. For information re-
garding the erasing procedure, please con-
tact an approved dealer or qualified work-
shop.
Mechanical key
To remove the mechanical key, release the lock knob
on the back of the Remote Control Key.
To install the mechanical key, firmly insert it into the
Remote Control Key until the lock knob returns to
the lock position.
Use the mechanical key to lock or unlock the doors
and tailgate (where fitted). (See “Doors” later in this
section and “Tailgate” later in this section.) SP A2033Z
Pre-driving checks and adjustments 3-3
Page 124 of 340

LOCKING AdBlue® FILLER LID
The AdBlue® filler lid is locked and unlocked using
the Keyless Entry System, see “Remote Control Key
system (where fitted)” earlier in this section for addi-
tional details.
AdBlue® FILLER CAP
The AdBlue® filler cap is anon-ratcheting type. Turn
the cap anticlockwise ➀to remove. Tighten the
cap clockwise ➁until tight.
CAUTION
If AdBlue® is spilled on the vehicle body, flush it
away with water to avoid paint damage. WARNING
• While driving, never allow anyone to ride in
the cargo area. Abrupt braking or stopping
could lead to personal injury or death.
• Do not drive the vehicle with the tailgate down.
• Properly secure all cargo with ropes or straps
to help prevent it from sliding or shifting. In a
sudden stop or collision, unsecured cargo
could cause personal injury.
TAILGATE
Locking or unlocking tailgate
(where fitted)
To lock the tailgate, insert the key to the tailgate key
cylinder and turn the key clockwise ➀.
To unlock the tailgate, turn the key anticlockwise ➁ . For Remote Control Key equipped models, see
“Mechanical key” earlier in this section for removing
the mechanical key.
Opening the tailgate
To open the tailgate, pull the tailgate handle ➀and
lower the tailgate. The support wires will hold the
gate open.
• The weight of the cargo load must be evenly dis-
tributed over both the front and the rear axles.
• All cargo should be securely fastened with ropes
or straps to prevent it from shifting or sliding
within the vehicle. WARNING
• Do not drive the vehicle with the tailgate down.
• While driving, never allow anyone to ride in
the cargo area. Abrupt braking or stopping
could lead to personal injury or death. NDI1647
SP A2696Z NP A1529
CARGO BED (where fitted)
3-20 Pre-driving checks and adjustments
Page 125 of 340

Closing the tailgate
When closing the tailgate, make sure that the latches
or levers are securely locked.
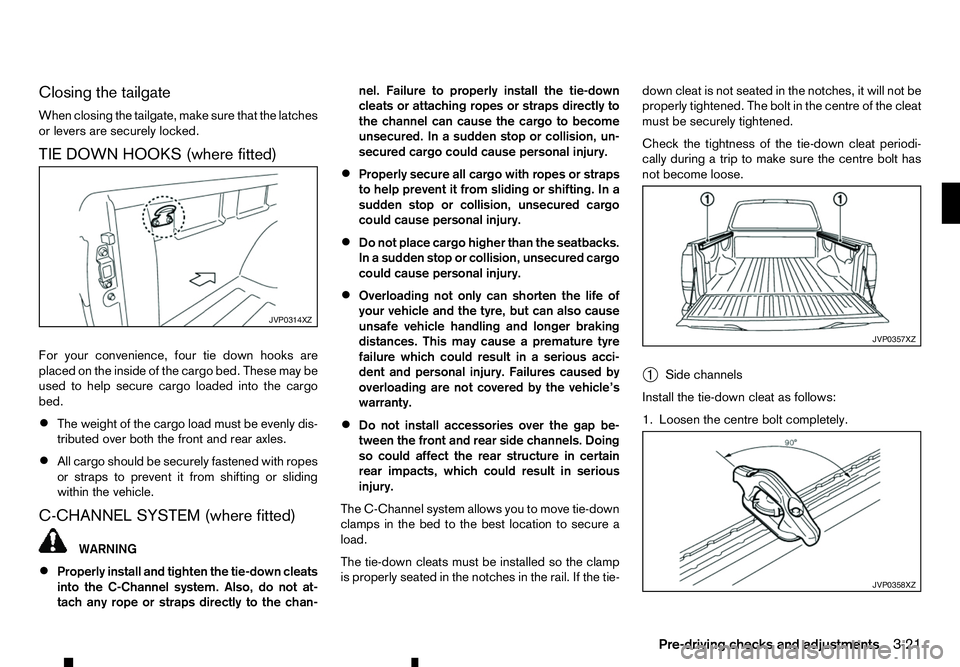
TIE DOWN HOOKS (where fitted)
For your convenience, four tie down hooks are
placed on the inside of the cargo bed. These may be
used to help secure cargo loaded into the cargo
bed.
• The weight of the cargo load must be evenly dis-
tributed over both the front and rear axles.
• All cargo should be securely fastened with ropes
or straps to prevent it from shifting or sliding
within the vehicle.
C-CHANNEL SYSTEM (where fitted) WARNING
• Properly install and tighten the tie-down cleats
into the C-Channel system. Also, do not at-
tach any rope or straps directly to the chan- nel. Failure to properly install the tie-down
cleats or attaching ropes or straps directly to
the channel can cause the cargo to become
unsecured. In
asudden stop or collision, un-
secured cargo could cause personal injury.
• Properly secure all cargo with ropes or straps
to help prevent it from sliding or shifting. In a
sudden stop or collision, unsecured cargo
could cause personal injury.
• Do not place cargo higher than the seatbacks.
In
as udden stop or collision, unsecured cargo
could cause personal injury.
• Overloading not only can shorten the life of
your vehicle and the tyre, but can also cause
unsafe vehicle handling and longer braking
distances. This may cause
apremature tyre
failure which could result in aserious acci-
dent and personal injury. Failures caused by
overloading are not covered by the vehicle’s
warranty.
• Do not install accessories over the gap be-
tween the front and rear side channels. Doing
so could affect the rear structure in certain
rear impacts, which could result in serious
injury.
The C-Channel system allows you to move tie-down
clamps in the bed to the best location to secure a
load.
The tie-down cleats must be installed so the clamp
is properly seated in the notches in the rail. If the tie- down cleat is not seated in the notches, it will not be
properly tightened. The bolt in the centre of the cleat
must be securely tightened.
Check the tightness of the tie-down cleat periodi-
cally during
atrip to make sure the centre bolt has
not become loose.
➀ Side channels
Install the tie-down cleat as follows:
1. Loosen the centre bolt completely. JVP0314XZ
JVP0357XZ
JVP0358XZ
Pre-driving checks and adjustments
3-21
Page 139 of 340

j
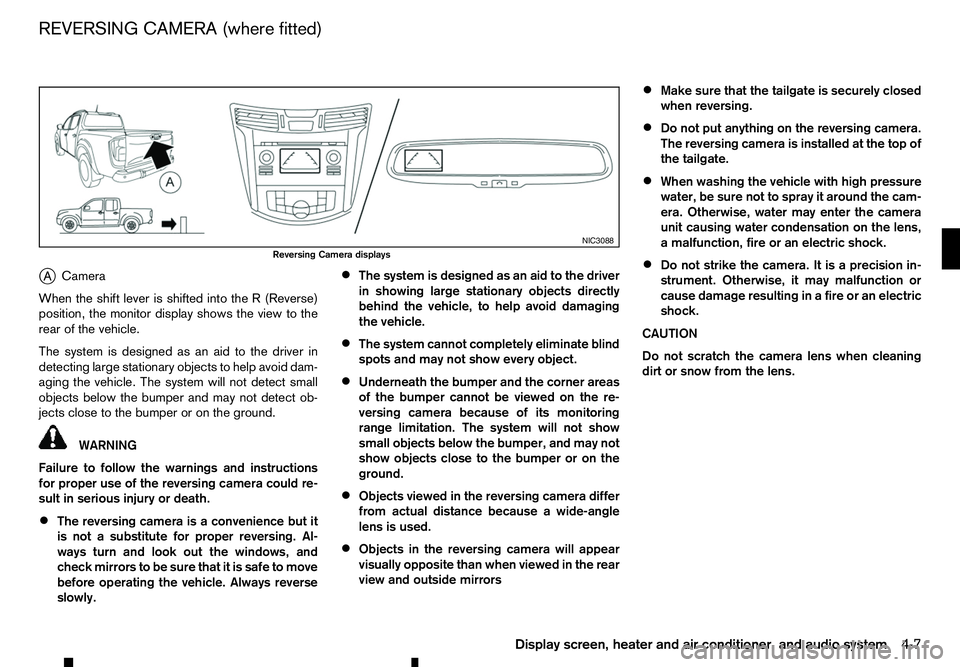
A Camera
When the shift lever is shifted into the
R(Reverse)
position, the monitor display shows the view to the
rear of the vehicle.
The system is designed as an aid to the driver in
detecting large stationary objects to help avoid dam-
aging the vehicle. The system will not detect small
objects below the bumper and may not detect ob-
jects close to the bumper or on the ground. WARNING
Failure to follow the warnings and instructions
for proper use of the reversing camera could re-
sult in serious injury or death.
• The reversing camera is
aconvenience but it
is not asubstitute for proper reversing. Al-
ways turn and look out the windows, and
check mirrors to be sure that it is safe to move
before operating the vehicle. Always reverse
slowly. •
The system is designed as an aid to the driver
in showing large stationary objects directly
behind the vehicle, to help avoid damaging
the vehicle.
• The system cannot completely eliminate blind
spots and may not show every object.
• Underneath the bumper and the corner areas
of the bumper cannot be viewed on the re-
versing camera because of its monitoring
range limitation. The system will not show
small objects below the bumper, and may not
show objects close to the bumper or on the
ground.
• Objects viewed in the reversing camera differ
from actual distance because
awide-angle
lens is used.
• Objects in the reversing camera will appear
visually opposite than when viewed in the rear
view and outside mirrors •
Make sure that the tailgate is securely closed
when reversing.
• Do not put anything on the reversing camera.
The reversing camera is installed at the top of
the tailgate.
• When washing the vehicle with high pressure
water, be sure not to spray it around the cam-
era. Otherwise, water may enter the camera
unit causing water condensation on the lens,
am
alfunction, fire or an electric shock.
• Do not strike the camera. It is
aprecision in-
strument. Otherwise, it may malfunction or
cause damage resulting in afire or an electric
shock.
CAUTION
Do not scratch the camera lens when cleaning
dirt or snow from the lens. NIC3088
Reversing Camera displays
REVERSING CAMERA (where fitted)
Display screen, heater and air conditioner, and audio system4-7
Page 144 of 340

With the ignition switch in the ON position, push the
(Reverse) position to operate the 360° Camera. The
monitor displays various views of the position of the
vehicle.
NOTE
At first operation, the corner lines are blinking
yellow for about 3seconds. This is not amalfunc-
tion but areminder to be cautious.
Available views:
• Bird’s-eye View
The surrounding view of the vehicle.
• Front-side View
The view around and ahead of the front passen-
ger’s side wheel.
• Front view
The view to the front of the vehicle.
• Rear view
The view to the rear of the vehicle.
The system is designed as an aid to the driver in
situations such as slot parking or parallel parking. There are some areas where the system will not
show objects. When in the front or the rear view dis-
play, an object below the bumper or on the ground
may not be viewed
➀.W
hen in the bird’s-eye view,
at all object near the seam of the camera viewing
areas will not appear in the monitor ➁. WARNING
• The 360° Camera is intended for day time use.
Do not use the system in bad light conditions.
• The 360° Camera is
aconvenience feature. It
is not asubstitute for proper vehicle opera-
tion because it has areas where objects can-
not be viewed. The four corners of the vehicle
in particular, are blind spots where objects do
not appear in the bird’s-eye, front or rear
views. Always look out the windows and check
to be sure that it is safe to move. The driver is
always responsible for safety during parking
and other manoeuvres.
• Do not use the 360° Camera with the outside
mirror in the stored position, and make sure
that the tailgate is securely closed when op-
erating the vehicle using the 360° Camera.
• The distance between objects viewed on the
360° Camera differs from the actual distance.
• The cameras are installed on the front grille,
the outside mirrors and above the rear num-
ber plate. Do not put anything on the cam-
eras.
• When washing the vehicle with high-pressure
water, be sure not to spray it around the cam-
eras. Otherwise, water may enter the camera
unit causing water condensation on the lens,
am alfunction, fire or an electric shock. NAA1864
4-12 Display screen, heater and air conditioner, and audio system
Page 257 of 340

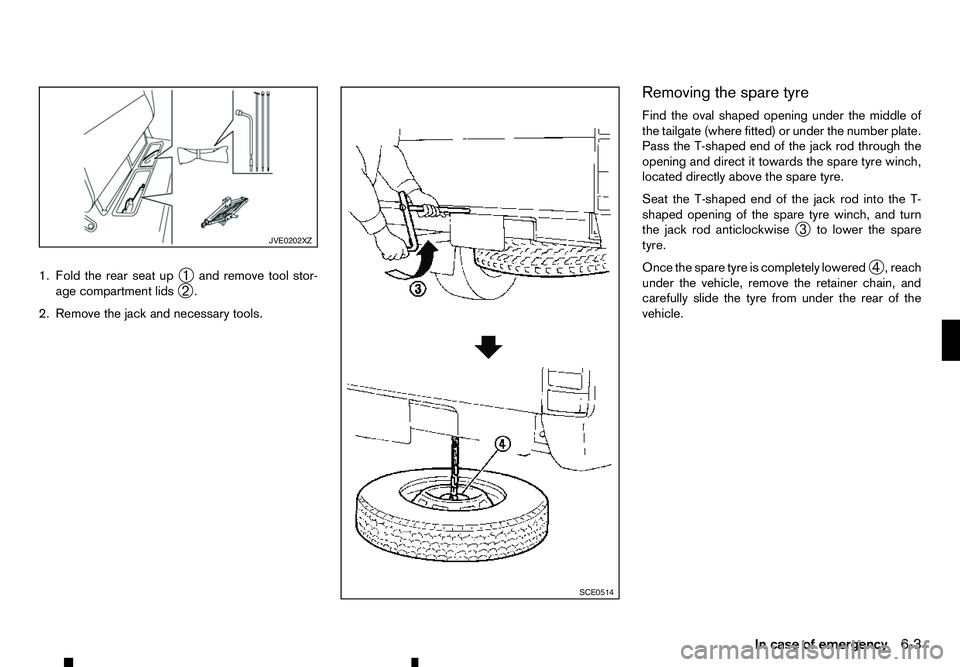
1. Fold the rear seat up
➀and remove tool stor-
age compartment lids ➁.
2. Remove the jack and necessary tools. Removing the spare tyre
Find the oval shaped opening under the middle of
the tailgate (where fitted) or under the number plate.
Pass the T-shaped end of the jack rod through the
opening and direct it towards the spare tyre winch,
located directly above the spare tyre.
Seat the T-shaped end of the jack rod into the T-
shaped opening of the spare tyre winch, and turn the jack rod anticlockwise ➂to lower the spare
tyre.
Once the spare tyre is completely lowered ➃,r
each
under the vehicle, remove the retainer chain, and
carefully slide the tyre from under the rear of the
vehicle. JVE0202XZ
SCE0514
In case of emergency
6-3
Page 278 of 340

Some day-to-day and regular maintenance is essen-
tial to maintain your vehicle’s good mechanical con-
dition, as well as its emission and engine perfor-
mance.
It is the owner’s responsibility to make sure that the
specified maintenance, as well as general mainte-
nance, is performed.
As the vehicle owner, you are the only one who can
ensure that your vehicle receives the proper mainte-
nance care.
SCHEDULED MAINTENANCE
For your convenience, the required scheduled main-
tenance items are described and listed in aseparate
Warranty Information and Maintenance booklet. You
must refer to that booklet to ensure that necessary
maintenance is performed on your vehicle at regular
intervals.
GENERAL MAINTENANCE
General maintenance includes those items which should be checked during normal day-to-day opera-
tion of the vehicle. They are essential if your vehicle
is to continue to operate properly. It is your respon-
sibility to perform these procedures regularly as pre- scribed.
Performing general maintenance checks requires
minimal mechanical skill and only afew general au-
tomotive tools.
These checks or inspections can be done by your-
self, aqualified technician, or if you prefer, your
approved dealer or qualified workshop. WHERE TO GO FOR SERVICE
If maintenance service is required or your vehicle
appears to malfunction, have the systems checked
and tuned by an authorised approved dealer or
qualified workshop.
During normal day-to-day operation of the vehicle,
general maintenance should be performed regularly
as prescribed in this section. If you detect any un-
usual sounds, vibrations or smells, be sure to check
for the cause or have an approved dealer or quali-
fied workshop do it promptly. In addition, you should
notify an approved dealer or qualified workshop if
you think that repairs are required.
When performing any checks or maintenance work,
closely observe “Maintenance precautions” later in
this section.
EXPLANATION OF GENERAL
MAINTENANCE ITEMS
Additional information on the following items with
“*” is found later in this section.
Outside vehicle
The maintenance items listed here should be per-
formed from time to time, unless otherwise speci-
fied.
Doors and bonnet:
Check that all doors and the bonnet operate
smoothly as well as the tailgate. Also make sure that
all latches lock securely. Lubricate if necessary.
Make sure that the secondary latch keeps the bon-
net from opening when the primary latch is released.
When driving in areas using road salt or other cor-
rosive materials, check lubrication frequently.
MAINTENANCE REQUIREMENTS
GENERAL MAINTENANCE
8-2 Maintenance and do-it-yourself