Page 41 of 268
. There are three buttons for this in
the vehicle headliner that can be in used in p lace
of up to three hand-he ld transmitters.
T")
M N
ci LL co
rl I.O
"' N
"' rl
(Home link). There are three buttons for this in
the vehicle headliner that can be in used in p lace
of up to three hand-he ld transmitters.
To operate systems using the garage door open er, the three buttons in the roof head liner must
be programmed first.
A WARNING
Make sure no people or objects are in the im
mediate v icin ity of the eq uipment when us ing
or programm ing the garage door opener . Peo
ple can be injured and objects can be dam
aged if they are caugh t in the equipment.
{!) Tips
-For security reasons, we recommend that
you clear the programmed buttons before
se lling the vehicle .
- For additional informat ion about Homelink,
v is it www.homelink .com.
- Fo r Declarat ion of Compliance to United
States FCC and Industry Canada regulations
¢ page 251.
Operation
App lies to vehicles: with garage door opener (Homelink)
Fig. 33 Hea dlin er: co ntro l un it
Requirement : The b uttons in the roof headliner
must be programmed
¢ page 39 or
¢ page 40 and the vehicle must be within
range of the system, such as the garage door
opener .
.,. Press the button to open the garage door. The
LED @blinks or tu rns on .
.,. Press the button again to close the garage
doo r.
Open ing and clo sing
(D Tips
To open or close the garage door, press the
button, but do not hold it for longer than 10 seconds or the garage door opener module
will sw itch to programming mode.
Programming the buttons (version A)
Applies to vehicles: with garage door opener (Homelink)
You can program both fixed code and rolli ng code
systems usi ng this procedure .
Programming or reprogramming buttons
.,. Switch the ignit ion on.
.,. Press and hold the button in the roof headliner
¢ page 39, fig. 33 that you would like to pro
gram fo r at least 10 seconds . Or
.,. Select:
!CAR I function button> Car systems*
cont ro l button > Vehicle setting s > Garage
door opener > Program garage door open er.
If
t his pa th is no t avai lable, program t he b utton
as desc ribed in version B
¢ page 40.
.,. Follow the i nstr uctions in the MMI.
Erasing button programming
T he programmed b uttons cannot be erased ind i
vidually. They m ust all be e rased together. Repro
gram the bu ttons if necessary .
.,. Select:
!CARI function button> Car syst em s*
cont ro l but to n > Vehicle setting s > Garag e
door open er > Clear program setting s > Yes.
Displaying the version /status /country code
.,. Select: !CARI function button > Car system s*
contro l button > V ehicle s etting s > Garage
door opener > Ver sion information .
(D Tips
-Programm ing throug h the MMI* is not pos
sible with all infotainment systems. If this
is the case, program the but to ns as descri
bed i n vers ion B
¢ p age 4 0.
- The req uir ed dis tanc e betwee n th e hand
transm itter an d the Home link mod ule in
t he radiator grille¢
page 40, fig. 34 de
pen ds on t he system tha t you are program
m ing.
39
Page 42 of 268

Opening and closing
- Depending on the model of the system, you
may need to release the button on the re
mote contro l during pr ogramm ing and
press it again. Hold each pos it ion you try for
at l east 15 seconds before trying another
position . Keep the t urn signals o n your veh i
cle in view when do ing t his.
- After programmi ng the garage door ope ner,
i t may be necessary to synchronize the mo
tor w ith the system . Refe r to the manufac
ture r's instructions .
Programming the buttons (version B )
Applies to vehicles : with garage door opener (Homelink)
F ig . 3 4 Distance betwee n th e ra di ato r grille a nd the ha nd
tra nsm itt er
Programming the button : Part 1 with the
c ontr ols
1. Sw itch the ignition on .
2. Press and hold bot h outer buttons in the roof
headliner ¢
page 39, fig. 33 until the LED @
turns off complete ly (after about 20 sec
onds) . Th is p rocedure clears the sta ndard co
des that w ere se t at the factory and does
not
need to be repeated aga in to p rog ram th e
o ther bu ttons.
3. Brie fly press the bu tto n on the roof he adliner
that yo u wou ld like to program.
4. Wai t unti l the LED @ begins to b link quickly.
Prog ramming mode is active for 5 minutes .
5 . Move in front of your ve hicle while ho lding
the original remote contro l for the system
that would like to program to a button in the
roof headli ner .
40
Programming the button: Part 2 at the
radiator grille
6. Hold the remote control up to the radiator
gri lle on your vehicle¢
fig. 34.
7. Press and ho ld the remote control unt il the
tu rn s ignals on your vehicle blink. This may
take up to 30 seconds.
8 . If the eme rgency flashers blink th ree times,
the p rogramming was su ccessf ul. If the
eme rgency flas hers only b link one t ime, t he
5 m in ute time limit for the pr ogr amming has
ende d or the progr amming was not s uccess
ful. Repeat the programmi ng from the third
step, or try changing the distance to the radi
ator grille .
9. If the garage door or other system does not
open us ing the buttons in the roof headliner
even though the prog ramming was success
ful , the system may use a rolling code i n
ste ad of a fixed code .
Rolling code program
ming
m ust be perfo rmed ¢ page 41.
The other two b uttons in the roof headliner can
be p rogrammed acco rding to th e inst ruct ions
above . Beg in with the thir d step.
Erasing button programming
The programmed b uttons cannot be erased ind i
vidually . They m ust all be erased together . Repro
gram the buttons if necessary .
.. Switch the ignit ion on.
.. Press and hold both outer buttons in the roof
head liner until the LED @ turns off completely
(after about 20 seconds) .
Reprogramming the button s
.. Switch the ignition on .
.. To reprogram an individua l butto n, press and
hold the button unt il the LED @ starts to flash
quickly (after about 10 seconds) . Release the
button immed ia tely . Programm ing mode is ac
t iv e fo r 5 m inutes.
.,. Cont inue with t he fifth ste p.
@ Tips
- Programming using the buttons in th e r oof
hea dliner is no t poss ible wit h all In fotain
m ent s yst ems. If this is th e ca se, pr ogr am
Page 43 of 268
 ..,.,
N ..,., ,....,
the buttons as described in version A
¢ page 39.
- The required distance between the hand
transmitter and the Homelink module in
the")
M N
ci u.. co ,...., \!) ..,.,
N ..,., ,....,
the buttons as described in version A
¢ page 39.
- The required distance between the hand
transmitter and the Homelink module in
the radiator grille¢ fig. 34 depends on the
system that you are programm ing.
- Depending on the model of the system, you
may need to release the button on the re
mote control during programm ing and
press it again. Hold each posit ion you try for
at least 15 seconds before trying another
pos ition. Keep the turn signals on your veh i
cle in view when doing this.
Rolling code programming
Appl ies to vehicles: with garage door opener (Homelink)
Rolling code programming is also needed for
some systems.
Identifying a rolling code
~ Press and ho ld the button in the roof head liner
that was already programmed .
~ Watch the LED@ Q page 39, fig. 33. If the LED
blinks quickly, the systems (such as a garage
door) is equ ipped with a rolling code.
~ Program the rolling code as fo llows:
Activating the motor unit in a system
~ locate the programming button on the sys
tem's motor unit . The exact location and color
of the button may vary depending on the brand
of the system .
~ Press the programm ing button on the garage
doo r opener motor unit (this will us uall y acti
vate an "ind icator" on the moto r unit). You now
have approximately
30 seconds to prog ram the
button in the roof headliner.
Programming the button in the roof
headliner
~ Press and ho ld the previously programmed but
ton in the roof headliner for 2 seconds .
~ To end rolling code programming, press and
ho ld the button aga in for 2 seconds.
~ With some systems, the button may need to be
pressed a th ird time to end the programming
process .
Opening and closing
After programming , the system should detect
the signal and begin moving when the button in
the roof head liner is pressed. Now you may pro
gram the other buttons as needed.
{!) Tips
- The rolling code can be programmed more
quickly and more easily with the help of a
second person.
- If you have difficulty programming the roll
ing code, referring to the user guide for the
system may help.
41
Page 44 of 268

Power top
Power top
Automatic power top
General information
The power top opens and closes automatically.
The entire power top is stored in the power top
compartmen t. The powe r top may be opened or
closed at speeds up to 30 mph
(SO km/h).
Under normal conditions, the power top is wind
and waterp roof. In rare cases, smal l droplets of
water may form under extreme weather cond i
tions such as torrential or pro longed rain. That is
norma l and no cause for concern .
Follow the care instructions to keep the roof from
leaking and to maintain its appearance over time
¢ page 184, Care and cleaning . Also observe the
following:
- Only open and store the power top when it is
clean and dry. Sharp d irt part icles can cause
damage to the rear window and the power top .
If the power top is stored when damp, dents
can form. If left stored for a long period of
time, mildew and other damage can develop.
- Do not leave the power top open for several
weeks or the creases in it may become discol
ored .
- Remove ice and snow before opening the power
top. Do not use any sharp edged objects to re move ice and snow or the power top could be
scratched or damaged. The rear window may be cleared with a standard ice scraper .
- Do not open the power top when temperatures
are below 32 °F
(0 °() . The fabric used in the
power top loses its elastic ity when tempera
tures are be low freezing.
42
Opening /closing the power top
Fig. 35 Center co nsole : power top sw itch
.. Switch the ignition on .
.. To open/close the power top, pull/press and
hold the~ button during the entire process .
Th-f!.-) indicator light turns on.
- when the power top opens/closes or
- if the power top did not open/close completely.
Th.,
14 indicator light in the instrument cluster
turns off when the power top is completely open/
closed.
The
II light will blink if the power top cannot be
opened/closed
¢ page 44 .
.&_ WARNING
- When operating the power top, make sure
the function is not affected by wind or other
factors and that it does not interfere with
other drivers .
- N ever drive when the powe r top is not
locked co rrectly. The wind from driving
could cause the power top to open. This can
result in inj uries and damage to the vehicle .
- Make sure no one wi ll be injured by the pow
er top supports and othe r moving parts
when opening and closing the top.
- The head space in the rear is reduced when
the power top opens and closes . Make sure
the passengers in the rear are far enough
away from the power top to reduce the risk
of injury.
- When operat ing the power top, visibility to
the rear is limited. Avoid operating the top
while driving in reverse .
Page 45 of 268

M N
ci LL co
rl I.O
"' N
"' rl
(D Note
-To prevent damage to the power top:
- do not store any objects in the powe r top
compartment.
- make sure the re is enough space above
the vehicle when open ing or closing the
power top.
- To reduce the risk of damage, make su re
there are no fragile objects within the stor
age bay's range of motion.
(D Tips
- To prevent the battery from draining, do not
open or close the power top repeatedly
when the engine is switched off.
- A message will appear in the instrument cluster display if there is a power top ma l
funct ion
~ page 44.
- The power top can also be operated manual
l y if there is a malfunct ion ¢
page 46,
Power top emergency operation. The cause
of the malfunction should be corrected by
an a uthorized Audi dea ler or authorized re
pair facility as soon as possible.
- The vehicle is not protected from the weath
er or from unauthorized entry if the vehicle
is left parked with the power top open. Lock
any objects you are leaving in the vehicle in
the luggage compartment. Close the power
top before leaving the vehicle.
- The side windows lower slightly automati
cally when opening/closing the power top.
Power top convenience opening/closing
F ig . 36 Remote control key: buttons
Power top
Fig. 37 Turning the key to open and close
Convenience opening with the driver 's door
lock
-0
0
0 ... m
"" Press the@ button on the remote control key to
un loc k the vehicle .
.,. Turn the key once in the driver's door lock to
the opening position @¢
fig. 3 7.
.,. Turn the key to the opening position again
wi thin two seco nds and hold it there until the
power top opens completely.
Conv enience closing with th e dri ver's door
lo ck
.,. Turn the key once in the driver's door lock to
the closing position@¢
fig. 37.
.,. Turn the key to the closing position aga in with
in t wo se cond s
and hold it there unt il the pow
er top closes completely.
Releasing the key stops the opening or closing
process
i mm ed ia te ly .
A WARNING
Read and follow the important safety precau
tions
c:> .&. in Opening/closing the power top
on page 42.
4 3
Page 46 of 268

Power top
Variable power top storage bay
Fig. 38 Luggage compartment: t he va riable power top
storage bay is lowered
Fig. 39 Luggage compartment: emergency release lever
fo r th e va riable power top storage bay
The variab le power top storage bay lowers auto
mat ically when the powe r top opens. To reduce
the risk of damage, make s ure there are no frag
ile objects w ith in the sto rag e bay's range of mo
t ion.
Raising the power top storage bay
• Press the trim i n the direction of the arrow to
raise the variable power top storage bay
<=> fig . 38.
Lower ing the power top storage bay
manually (emergency operation)
• Open the left s ide tr im and press t he re lease
lever dow n to lower the variable power top
storage bay¢
fig. 39 .
The variab le power top sto rage bay can be ra ised
when the
pow er top is closed . This provides more
cargo space in the luggage compa rtment.
The
opened power top is stored in the storage
bay and protected. The power top bay cannot be ra ised when the power top is ope n. The cargo
area in the l uggage compa rtment is smaller
44
when the powe r top is open than when it is
closed.
Messages
Convertible top Please close trunk
This message ap pears in the instr ument cl uster
display if the luggage compartment lid is not
closed w hen ope rating the power top. Close the
lu ggage compartment lid.
Convertible top storage box not lowered. Plea se
remo ve obstacle
This message ap pears w hen the power to p stor
age bay is not lowe red whe n ope ning t he power
top.
If t h e power top storage bay is b locked by
o bj ects in t he luggage compartment, remove t he
ob jects that are in the way. If the power top stor
age bay is st ill not lowered automatica lly, you can
lower it manually ¢
page 44.
Convertible top Cannot be used
This message ap pears if the power top ca nnot
o pen or clo se au tomat ically because of safety
reasons or if there is a mal func tion . T he follow
i ng ca uses are possible:
- Vehicle speed too high: The automatic power
t op is deac tiva ted for sa fe ty reasons if the vehi
cle speed is too high . Reduce t he vehi cle speed
an d try closing/opening the power top again .
-Battery voltage too low: The automa tic powe r
top is deactivated i f the battery charge level is
too low. You can open/close the power top
aga in after starting the engine.
- Rollover protection active: If the powe r top
runs continuously for a long per iod of time, the
overload protection will activate for appro xi
mate ly 15 to 30 minutes. You can open/close
the power top again after that¢ &.
-Malfunction: Failure of system components is
one poss ible cause for ma lf u nction. The power
top can be operated manually
c:> page 46.
Convertible top not secure
This mess age ap pears and a w arning tone soun ds
if the power top is not comp letely closed/open
and t he vehicle speed is above 50 km/h. Reduce
ll>
Page 47 of 268

M N
ci LL co
rl I.O
"' N
"' rl
the vehicle speed and try closing/opening the
power top again.
A WARNING
Never drive when the power top is not locked
correctly. The wind from dr iving could cause
the power top to open . This can result in inju
r ie s and damage to the vehicle .
Wind deflector
Applies to vehicles: with wind de flecto r
The wind deflector reduces turbulence in the pas
senger compartment and makes driving more comfortable .
Fig. 40 Rear of the ve hicle : inser ting the wind d eflecto r (1)
Fig. 41 Rear of the vehicle : insert ing th e wind deflecto r (2 )
The wind deflector is located in the luggage com
partment in a storage bag* or under the cargo
floor cover .
Inserting and positioning the wind deflector
.,. Open the rear door on the passenger's side.
.. Remove the wind deflector from the luggage
compartment and fold it apart once. The wind
deflector is installed in the correct position
when the long side is toward the front and the
wind deflector frame is at the top.
Power top
.,. Insert both pins on the wind deflector @
Q
fig. 40 on the driver's side in the mounts in
the s ide trim.
.. Fold the handle @upward and lift the center of
the wind deflector up slightly®¢
fig. 41 .
.,. Guide the wind deflector into the mounts on
the passenger's side@) and press lightly in the
center of the wind deflector ® unti l the handle
locks in place.
" Raise the wind deflector completely.
Removing the wind deflector
" Fold the wind deflector frame back .
" Fold the handle@Q
fig. 40 upward and lift the
center of the wind def lector up slightly ®
Qfig.41 .
.. Remove the wind deflector from the mounts in
the side trim on the passenger side .
.. Pull the wind deflector out of the mounts on
the driver side and lift it out .
.. Fold the wind deflector together and store it
securely .
A WARNING
--Do not use the wind deflector to secure car
go.
- Be careful when installing so you do not
p inch your fingers.
- Pay attention to traffic when install ing the
wind deflector. Install the wind deflector
from the side of the veh icle that is farthest
from traffic.
Q) Note
Do not lean against the vehicle when instal
ling the w ind deflector. Hard objects and dec
orations on clothing such as belt buckles can
scratch the paint .
(D Tips
-The wind deflector works best when all of
the windows are rolled up while driving .
- Only store the wind deflector in the storage
bag* when it is dry.
45
Page 48 of 268

Power top
Power top emergency
operation
General information
The power top can be closed manually if there is
a malfunction .
• Set the parking brake .
• Open the windows.
• Switch the ignition off.
• To reduce pressu re in the power top hydrau lics,
pull the~ button for approximately 10 to 15
seconds
¢ page 42, fig. 35 .
Only close the power top manual ly in an emer
gency . Have a second person help yo u. Drive to an
authorized Audi dealer or author ized repair facili
ty immediately to have the malf unction correct
ed.
A WARNING
- There is a risk of pinching your hands or in
juring other people during all steps in the power top emergency operation process.
- Make sure all w indows are open during
emergency operation.
- Do not hold the power top supports or
other moving parts.
- Never dr ive when the power top is not
locked correct ly. The wind from driv ing
could cause the power top to open . This can
result in injuries and damage to the vehicle.
(1) T ips
The vehicle headliner is not clipped in and the
power top compa rtment cover is not locked
after using the power top emergency opera
tion procedure. Drive to an authorized Audi
dea ler or authorized repa ir facility immed iate
ly to have the malfunction corrected.
46
.
Step 1 : Releasing the power top storage
bay lid
Fig. 42 Luggage compartme nt: release lever
Fig. 43 Luggage compartme nt: side tr im
• Open the luggage compartment lid.
• Reach with you r finger into the gap behind the
t rim near the center of the vehicle¢
fig. 42.
• Press the release lever down to release the
power top compartment cover.
• Open the left side trim and press the yellow lev
er in the direction of the arrow ¢
fig. 43.
• Remove the emergency release key (hex key)
from the left side trim®¢
fig. 43.
• Open the right side tr im and press the yellow
lever in the direction of the arrow .
 1
1 2
2 3
3 4
4 5
5 6
6 7
7 8
8 9
9 10
10 11
11 12
12 13
13 14
14 15
15 16
16 17
17 18
18 19
19 20
20 21
21 22
22 23
23 24
24 25
25 26
26 27
27 28
28 29
29 30
30 31
31 32
32 33
33 34
34 35
35 36
36 37
37 38
38 39
39 40
40 41
41 42
42 43
43 44
44 45
45 46
46 47
47 48
48 49
49 50
50 51
51 52
52 53
53 54
54 55
55 56
56 57
57 58
58 59
59 60
60 61
61 62
62 63
63 64
64 65
65 66
66 67
67 68
68 69
69 70
70 71
71 72
72 73
73 74
74 75
75 76
76 77
77 78
78 79
79 80
80 81
81 82
82 83
83 84
84 85
85 86
86 87
87 88
88 89
89 90
90 91
91 92
92 93
93 94
94 95
95 96
96 97
97 98
98 99
99 100
100 101
101 102
102 103
103 104
104 105
105 106
106 107
107 108
108 109
109 110
110 111
111 112
112 113
113 114
114 115
115 116
116 117
117 118
118 119
119 120
120 121
121 122
122 123
123 124
124 125
125 126
126 127
127 128
128 129
129 130
130 131
131 132
132 133
133 134
134 135
135 136
136 137
137 138
138 139
139 140
140 141
141 142
142 143
143 144
144 145
145 146
146 147
147 148
148 149
149 150
150 151
151 152
152 153
153 154
154 155
155 156
156 157
157 158
158 159
159 160
160 161
161 162
162 163
163 164
164 165
165 166
166 167
167 168
168 169
169 170
170 171
171 172
172 173
173 174
174 175
175 176
176 177
177 178
178 179
179 180
180 181
181 182
182 183
183 184
184 185
185 186
186 187
187 188
188 189
189 190
190 191
191 192
192 193
193 194
194 195
195 196
196 197
197 198
198 199
199 200
200 201
201 202
202 203
203 204
204 205
205 206
206 207
207 208
208 209
209 210
210 211
211 212
212 213
213 214
214 215
215 216
216 217
217 218
218 219
219 220
220 221
221 222
222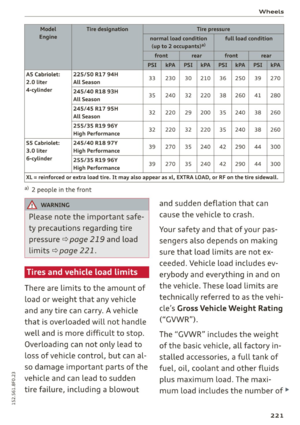 223
223 224
224 225
225 226
226 227
227 228
228 229
229 230
230 231
231 232
232 233
233 234
234 235
235 236
236 237
237 238
238 239
239 240
240 241
241 242
242 243
243 244
244 245
245 246
246 247
247 248
248 249
249 250
250 251
251 252
252 253
253 254
254 255
255 256
256 257
257 258
258 259
259 260
260 261
261 262
262 263
263 264
264 265
265 266
266 267
267