Page 65 of 268

M N
ci LL co
rl I.O
"' N
"' rl
Memory function
Description
Applies to vehicles: with memory function
The memory function allows you to quick ly and
eas ily store and recall personal seating profiles
for the driver. The memo ry function is operated
through the master key and the memory buttons
in the driver's door.
The driver's seating profile is stored and assigned
to the master key each time the veh icle is locked.
When you open the door, the seat profile is auto
matically recalled. If two people use one vehicle,
it is recommended that each person always uses
"their own" master key.
Up to 2 seat profiles can be stored in the memory
buttons in the driver's door. Once they are stored,
these seat profiles can be selected at any time .
I n addition to the driver's seat settings, you can
also store and access the exterior mirror adjust ment settings* using the remote control key or
memory button.
Remote control key
Applies to vehicles: with seat memory
To assign the driver's seat settings to the remote
control key when locking the vehicle, the function
must be activated in the radio or
MM!*
• Select: I CARI function button > Seat adjust·
ment > Driver's seat > Remote control key
>
on .Or
• Select: ~IC _A _ R~I function button> Car systems*
control button > Vehicle settings > Seats >
Driver's seat> Remote control key> On .
(D Tips
If you do not want another driver's settings to
be assigned to the remote key, switch off the
memory function using the radio or
MMI* or
the
I ON/OFF I button ~ page 63.
Seats and storage
Memory buttons
Applies to vehicles: with seat memory
Fig. 73 Driver's door: memory func tion buttons
The memory buttons are located in the driver's
door.
Switching the memory function on/off
.,. Press the ION/OFF ! button to switch the memo
ry function on/off. The word
OFF lights up when
the memory function is switched off. Seat pro
files are neither stored nor recalled .
Storing a seat profile
.,. Press the ISETI button. When the word SET
lights up, the memory is ready to store set
tings.
• Press a memory button
(ill or [II) briefly. A tone
confirms that the settings were stored.
Accessing a seat profile
.,. If the driver's door is open and the ignition is
switched off, press the memory button .
.,. If the driver's door is closed or the ignition is
switched on, press and hold the memory but
ton until the seat adjustment is complete.
.8, WARNING
- For safety reasons, the seat setting can only
be recalled when the vehicle is stationary -
otherwise you risk having an accident.
- In an emergency the recall procedure can be
cancelled by pressing the
ION/OFF I switch or
by tapping the memory buttons.
63
Page 66 of 268

Seats and storag e
Ashtray
Fig. 74 Center console: ashtray
Open ing /closing
.,. To open the ashtray, slide the cover up
~fig. 74 .
.,. To close the ashtray, press down on the cover.
Empt ying th e asht ray
.,. To remove the insert, slide the latch to the right
c> fig. 74 -arrow- .
.,. To i nstall the insert, press it down into the
mount.
,&. WARNING
-
Never put waste paper in the ashtray. Hot
ashes or other hot objects in the ashtray could
se t waste paper on fire.
Cigarette Lighter
Fig. 75 Fr ont center console: cigarette l ighte r
.,. Press the cigarette lighter in .
.,. Remove the cigarette lighter when it pops out .
64
,&. WARNING
The cigarette lighter on ly wo rks when the ig
n ition is switched o n. Incorrect usage can lead
to serious injuries or burns. For this reason,
ch ildren shou ld never be left unattended in
the vehicle because th is increases the risk of
i nju ry.
(D Note
The c igarette lighter can be damaged if you
connect electrical accesso ries to it .
Storing
General overview
,&. WARNING
-Always remove objects from the instr ument
panel. Any items not put away cou ld slide
around i nside the vehicle wh ile driving or
when acce lerat ing o r when app ly ing the
brakes or when driving around a corner .
- When you are dr iving make sure that any
thing you may have placed i n the center con
sole or other storage locations cannot fall
out into the footwells. In case of s udden
brak ing you would not be able to brake or
accelerate.
Page 67 of 268

M N
ci LL co
rl I.O
"' N
"' rl
(upholder
Fig. 76 Center console: front cupholder
Fig. 77 (upholder• in the rear
Front beverage holders
.. You can accommodate two beverages in thi s
storage ¢
fig. 76.
A maximum of two beverages can be placed in
the rear beverage holders* .
A WARNING
Spilled hot liquid can cause an accident and
personal injury.
- Never carry any beverage containers with
hot liquids, such as hot coffee or hot tea, in
the vehicle while it is moving. In case of an
accident, sudden braking or other vehicle
movement, hot liquid could spill, causing
scalding burns. Spilled hot liquid can also
cause an accident and personal injury.
- Use only soft cups in the cupholder. Hard
cups and glasses can cause injury in an acci
dent.
- Never use the cupholder or adapter as an
ashtray -risk of fire.
Seats and storage
(D Note
Only drink containers with lids should be car
ried in the cupholder. Liquid could spill out
and damage your vehicle's electronic equip
ment or stain the upholstery, etc.
Glove compartment
The glove compartment is illuminated and can
be locked.
Fig. 78 Glove compart ment
.. To open the glove compartment, pull the han
dle in the direction of the arrow ¢
fig. 78 and
sw ing the cover down to open .
.. To close the glove compartment, push the
glove compartment lid upward until the lock
engages.
The glove compartment can be locked using the
mechanical key¢
page 31.
On the right side in the glove compartment is a
holder with the key body into which the emergen
cy key must be clipped to be able to start the ve
hicle.
A WARNING
To reduce the risk of personal injury in an acci
dent or sudden stop, always keep the glove
compartment closed while driving.
Luggage compartment
General information
A WARNING
-
Read and follow the important safety precau
tions on ¢
page 118, Storing cargo correctly.
65
Page 68 of 268

Seats and storag e
Enlarging the luggage compartment
The backrests can be folded forward either sepa
rately or together .
Fig . 79 Luggage compartment: release lever
Folding the backre st forward
• Pul l the release lever in the d irect ion of the ar-
row to fold the backrest fo rward.
Folding the backrest back into the up right
position
• Fo ld the backrest back up again until it latches
securely ¢,&. .
& WARNING
- The backrest must be securely latched in po
sition so that no items contained in the lug
gage compartment can slide forward upon
sudden braking.
-Always check whether the latch is fu lly en
gaged by pulling the seatback forward.
- Never allow safety be lts to become dam
aged by being caught in door or seat hard
ware.
- Torn or frayed safety belts can tear and
damaged belt hardware can break in a crash.
Inspect the belts per iodically. Belts showing
damage to webbing, bindings, buckles, or
retractors must be rep laced .
(D Note
Slide the belt guide on the outs ide safety belt
all the way up before folding the backrest
back forward. Make sure the seat belt is not
pinched or damaged when the rear seat bac k
rest if fo lded bac k. Other objects shou ld be
66
removed from the rear seat bench to protect
the seatback from damage.
Tie-downs
The luggage compartment is equipped with four
tie-down rings to secure luggage and other
items.
Fig . 8 0 Luggag e compartme nt: tie-downs
• Secure objects using elastic cords attached to
the t ie-downs
c:> fig . 80 .
• Read and heed all WARN INGS ¢ page 118,
Storing cargo correctly.
Page 69 of 268

M N
ci LL co
rl I.O
"' N
"' rl
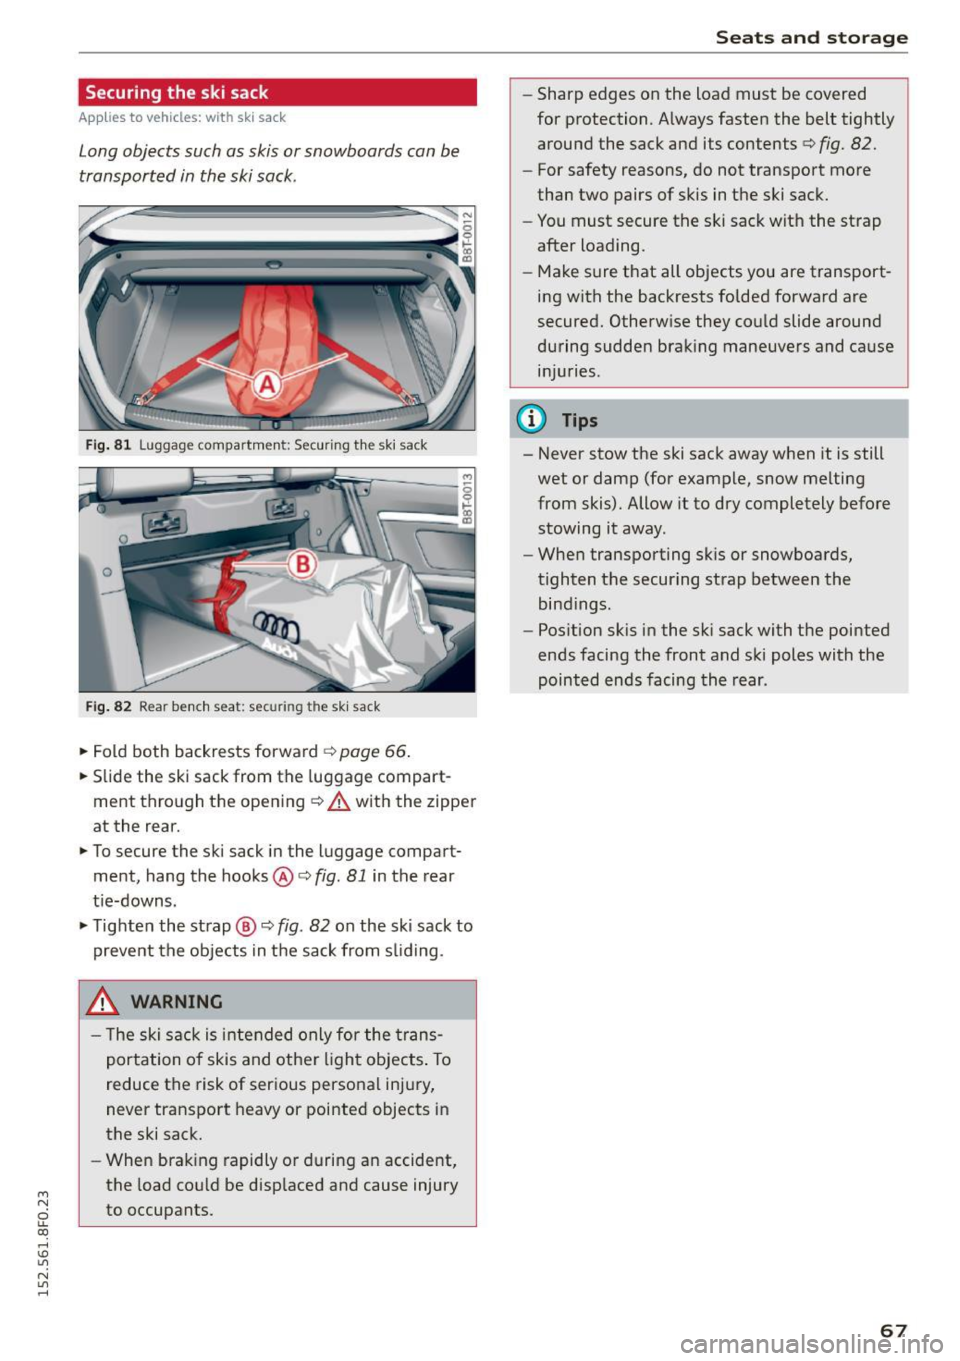
Securing the ski sack
Applies to vehicles: with sk i sack
Long objects such as skis or snowboards can be
transported in the ski sack.
Fig. 81 L uggage compartment: Securing th e sk i sack
Fig. 82 Rear bench seat: securi ng the ski sac k
~ Fold both backrests forward c> page 66.
~ Slide the ski sack from the luggage compart
ment through the opening
¢ A with the zipper
at the rear.
~ To secure the ski sack in the l uggage compart
ment, hang the hooks@c>
fig. 81 in the rear
tie-downs.
~ Tighten the strap @ c> fig. 82 on the ski sack to
prevent the objects in the sack from sliding .
_& WARNING
- The ski sack is intended only for the trans
portation of skis and other light objects. To
reduce the risk of serious personal injury,
never transport heavy or pointed objects in
the ski sack.
- When braking rapidly or during an accident,
the load could be displaced and cause injury
to occupants.
Seats and storage
- Sharp edges on the load must be covered
for protection. Always fasten the belt tightly
around the sack and its contents c>
fig. 82.
-For safety reasons, do not transport more
than two pairs of skis in the ski sack.
- You must secure the ski sack with the strap
after loading.
- Make sure that all objects you are transport
ing with the backrests folded forward are
secured. Otherwise they could slide around
during sudden braking maneuvers and cause injuries .
@ Tips
-Never stow the ski sack away when it is still
wet or damp (for example, snow melting
from skis). Allow it to dry completely before
stowing it away.
- When transporting sk is or snowboards,
tighten the securing strap between the bindings.
- Position skis in the ski sack with the pointed
ends facing the front and ski poles with the
pointed ends facing the rear .
67
Page 70 of 268

Warm and cold
Warm and cold Climate control system
Description
The climate control system warms, cools and
adds humidity to the air in the vehicle interior. It
is the most effective when the windows and pow
er top are closed.
If there is a build-up of heat in
side the vehicle , ventilation can help to speed up
the cooling process.
In all heating mode functions except
defrost, the
blower only switches to a higher speed once the
engine coolant has reached a certain tempera
ture.
Condensation from the cooling system can drip
and form a puddle of water under the vehicle.
This is normal and does not mean there is a leak.
Pollutant filter
The pollutant filter removes pollutants such as
dust and pollen from the air.
The air pollutants filter must be changed at the
intervals specified in your Warranty & Mainte
nance booklet, so that the air conditioner can
properly work.
If you drive your vehicle in an area with high air pollution , the filter may need to be changed
more frequently than specified in your Audi War
ranty
& Maintenance booklet. If in doubt, ask
your authorized Audi Service Advisor for advice.
Key coded settings
The climate control settings are automatically
stored and assigned to the remote control key
that is in use . These settings are different when
the power top is open or closed.
_& WARNING
Reduced visibility is dangerous and can cause
accidents.
68
- For safe driving it is very important that all
windows be free of ice, snow and condensa
tion.
- Completely familiarize yourself with the
proper use and function of the heating and
ventilation system and especially how to de
fog and defrost the windows .
- Never use the windshield wiper/washer sys
tem in freezing weather until you have
warmed the windshield first, using the heat
ing and ventilation system . The washer solu
tion may freeze on the windshield and re
duce visibility .
(U;) Note
- If you suspect that the air conditioner has
been damaged, switch the system off to
avoid further damage and have it inspected
by a qualified dealership.
- Repairs to the Audi air conditioner require
special technical knowledge and special
tools. Contact an authorized Audi dealer for
assistance.
@ For the sake of the environment
By reducing the amount of fuel you use, you
also reduce the amount of pollutants emitted
into the air.
(D Tips
- Keep the air intake slots (in front of the
windshield) free from ice, snow and debris in order to maintain the proper function of
the climate control system.
- The energy management system may switch
the seat heating* or rear window defroster
off temporarily. These systems are available
again as soon as the energy balance has
been restored.
- Air escapes through vents under the rear
window. When placing items of clothing on
the luggage compartment cover, ensure
that the openings are not covered.
Page 71 of 268

Warm and cold
Operation
We recommend pressing the !AUTO I button and setting the temperature to 72 °F (22 °C).
Fig. 83 Automatic cl imate control system: control
Fig. 84 3-zone del ux e automatic climate controt•: controls
Press the buttons to turn the functio ns on or off.
Use the dials to adjust the temperature, the
b lower speed and the air distrib ution . The LED in
a button will light up when the function is
switched on. The settings are displayed for a few
seconds in the radio or MMI* display.
In vehicles with a 3-zone del uxe automat ic cl i
mate control systems*, the dr iver and front pas
senger side can be adjusted separately. The set·
tings are also disp layed in the climate control
M system display. N
ci LL co
rl I.O
"' N
"' rl
IOFF I Switching the climate control system
on/off
The i OFF i button switches the climate contro l
system on or off. It also sw itches on when you
press the knob. Airflow from outside is blocked
when the climate control system is switched off.
IA/Cl Switching cooling mode on/off
The air is not coo led and humidity is not removed
when cool ing mode is switched off. This can
cause fog on the windows . The cooling mode is
switched off automatically at low outside tern· peratures. .,.
69
Page 72 of 268

Warm and cold
l= I Swit ching recir culation m ode on /off
In recirculation mode, the air ins ide the vehicle is
circu lated and filtered . This prevents the unfil
tered air outside the vehicle from entering the
ve hicle interior . We recommend switching recir
culation mode on when driving through a tunne l
or when sitting in traffic
c:> ,&. .
The IAU TOI button or lllll> F RONT I button switches
recirculation mode off .
IAUTOI Switching automatic mode on
Automatic mode ma inta ins a constant tempera
ture inside the vehicle. A ir temperature, airflow
and ai r distribution are controlled automatica lly .
Adjusting th e tempe ratur e
Temperatures between 60 °F (+16 °C) and 84 °F
( + 28 °C) can be set. Outside of this range,
LO or
HI will appear in the cl imate control system dis
p lay. At both of these settings, the climate con
trol system r uns continuously at maximum cool
i n g or heating power. There is no temperat ure
regulation.
~ Ad justing the airflow
You can adjust the a irf low manually to su it yo ur
needs . To have the airf low regulated automatica l
ly, press the
IAUTO I button .
~ Adjusting the air distribution
You can manually se lect the vents where the air
will flow. To have the air distr ibution reg ulated
automatically , press the
!AUTO ! button.
QJ Adjusting seat h eating *
Pressing the button sw itches the seat heating on
at the h ighest setting (level 3) . The LEDs indicate
the tempe ratu re leve l. To reduce the tempe ra
ture, press the button again . To switch the seat
heating off, press the button repeatedly unt il the
L ED turns off .
Afte r 10 minutes, the seat heat ing automat ica lly
sw itches from level 3 to leve l 2.
~ Adjust ing seat ventilation*
Pressing the button switches the seat ventilation
on at the highest setting (level 3) . The LEDs indi-
70
cate the ventilation level. To reduce the ventila
tion level, press the button again. To switch the
seat ventilation off , press the button repeatedly
u nt il the LED turns off .
I@ FRONT I Switch the defro ste r on /off
The w indshield and side windows are defrosted
or cleared of condensation as q uickly as possib le.
The maximum amount of air f lows mainly from
the vents below the windshield. Recirculation
mode switches off. The temperature should be
set to 72 °F (22 °C) or h igher. The temperature is
controlled automat ically.
The
! AUTO ! button switches the defroster off.
lliil REAR I Switch ing rear window he ater on /
off
The rear window heater on ly operates when the
engine is runn ing . It switches off automatically
after a few minutes, depending on the outside
temperature.
To prevent the rear window heater from switch ing off automatically, press and hold the
I Cliil REARI
button for more than 2 seconds. This remains
stored until the ignit ion is switched off.
Air vents
You can open and close the center and rear air
vents using the th umbwhee ls . The levers adjust
the d irection of the airflow from the vents.
In vehicles with a 3-zone deluxe automa tic cli
mate control system*, you can adjust the air tem
perature in the rear by turning the thumbwhee l
toward the red side to make it warmer or toward
the blue side to make it cooler.
A WARNING
- Do not use the recircu lation for extended
periods of time. The windows could fog up
since no fresh air can enter the vehicle. If
the wi ndows fog up, press the air rec ircula
tion button again immed iate ly to sw itch off
the air recirc ulation func tion or selec t de
frost.
- I ndivid ua ls w ith red uced sensitivity to pain
or tempera ture could develop burns when
using the seat heating f unction . To reduce
-