2012 MERCEDES-BENZ SL ROADSTER change time
[x] Cancel search: change timePage 482 of 637
All the tracks on the medium are played in
random order (e.g. track 3, 8, 5 etc.).
R Random track list
Random track list (MP3 mode only)
You will hear the tracks in the current play-
list or currently active folder (including all
subfolders) in random order.
i The
Normal track sequence
Normal track sequence option is
automatically selected when you change
the disc you are currently listening to or
when you select a different medium. If an
option is selected, it remains selected after COMAND Online is switched on or off.
Notes on MP3 mode General notes
Depending on the volume and format of the
MP3 data, the length of time required for
reading the data may increase.
Permissible data carriers
R CD-R and CD-RW
R DVD-R and DVD-RW
R DVD+R and DVD+RW
R SD memory card
R USB storage device
Permissible file systems R ISO 9660/Joliet standard for CDs
R UDF for audio and video DVDs
R FAT16, FAT32 and NTFS for SD memory
card and USB storage media
Multi-session CDs
For multi-session CDs, the content of the first session determines how COMAND Online will process the CD. COMAND Online plays only
one session and gives priority to the audio CD
session.
If possible, only play CDs on COMAND Online that have been written in one session.
File structure of a disc
When you create a disc with compressed
music files, the tracks can be organised in
folders. A folder may also contain subfolders. The disc may contain no more than eight
directory levels. Files beyond the eighth level
will not be recognised by the system.
i COMAND Online loads up to 15,000
tracks from the SD memory card or USB
storage medium.
Track and file names
When you create a disc with compressed
music files, you can assign names to the
tracks and folders.
COMAND Online uses these names accord-
ingly for the display. Folders that contain data other than MP3 or WMA tracks are not dis-
played by COMAND Online.
If MP3 or WMA files are stored in the root
directory itself, the root directory will also be
treated as a folder. COMAND Online will then show the name of the root directory as the
folder name.
You should observe the following when
assigning track names:
R track names must have at least one char-
acter.
R track names must have the extension
"mp3" or "wma".
R there must be a full stop between the track
name and the extension.
Example of a correct track name:
"Track1.mp3".
Permissible formats
COMAND supports the following formats:
R MPEG1 Audio Layer 3 (MP3)
R Microsoft Windows Media Audio V8 and V9
(WMA) without copy protection
Microsoft Windows Media Audio V2, V7, V8 and V9 (WMA)
R additional music files in AAC format with
the file extensions .aac, .mp4, .m4a
and .m4b, but not copy-protected iTunes
music files with the extension .m4p.
i If, in addition to MP3 files, there are other
music files in these audio formats stored on Audio
479COMAND Online Z
Page 487 of 637
MUSIC REGISTER
General notes !
Retain the original music files in a secure
location. An error in COMAND Online might result in the loss of the music files stored in
the MUSIC REGISTER. Mercedes-Benz is
not liable for any loss of data.
You can store music files in a compressed
format in the MUSIC REGISTER (Y page 485).
The memory has a capacity of 10 GB.
Switching to the MUSIC REGISTER MUSIC REGISTER basic display
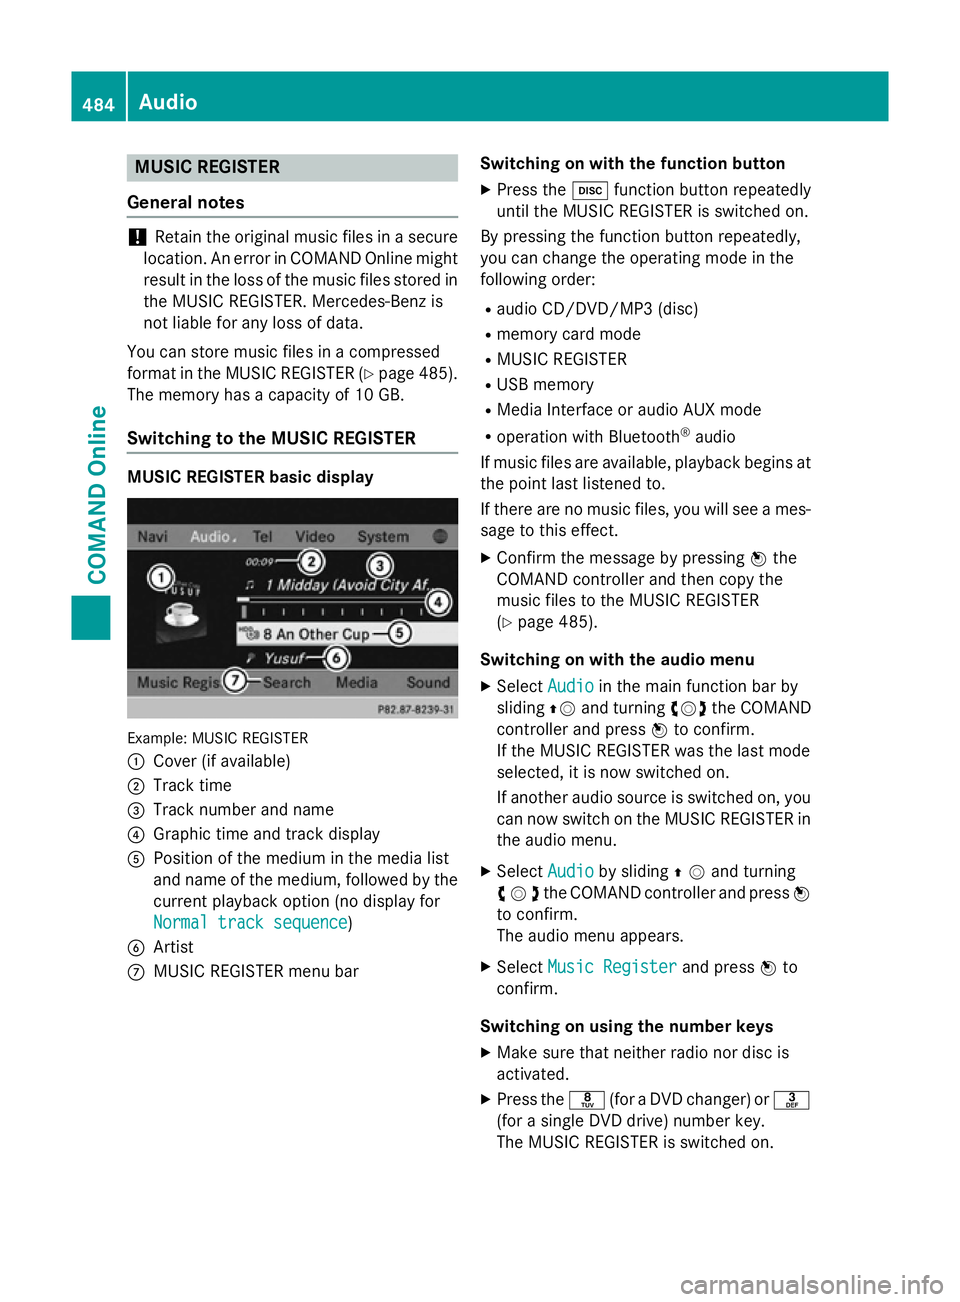
Example: MUSIC REGISTER
:
Cover (if available)
; Track time
= Track number and name
? Graphic time and track display
A Position of the medium in the media list
and name of the medium, followed by the
current playback option (no display for
Normal track sequence Normal track sequence)
B Artist
C MUSIC REGISTER menu bar Switching on with the function button
X Press the hfunction button repeatedly
until the MUSIC REGISTER is switched on.
By pressing the function button repeatedly,
you can change the operating mode in the
following order:
R audio CD/DVD/MP3 (disc)
R memory card mode
R MUSIC REGISTER
R USB memory
R Media Interface or audio AUX mode
R operation with Bluetooth ®
audio
If music files are available, playback begins at the point last listened to.
If there are no music files, you will see a mes- sage to this effect.
X Confirm the message by pressing Wthe
COMAND controller and then copy the
music files to the MUSIC REGISTER
(Y page 485).
Switching on with the audio menu
X Select Audio Audioin the main function bar by
sliding ZVand turning cVdthe COMAND
controller and press Wto confirm.
If the MUSIC REGISTER was the last mode
selected, it is now switched on.
If another audio source is switched on, you
can now switch on the MUSIC REGISTER in
the audio menu.
X Select Audio
Audio by sliding ZVand turning
cVdthe COMAND controller and press W
to confirm.
The audio menu appears.
X Select Music Register
Music Register and pressWto
confirm.
Switching on using the number keys
X Make sure that neither radio nor disc is
activated.
X Press the r(for a DVD changer) or m
(for a single DVD drive) number key.
The MUSIC REGISTER is switched on. 484
AudioCOMAND Online
Page 491 of 637
Operation with Bluetooth
®
audio
Preconditions for the Bluetooth ®
audio
device Bluetooth
®
audio mode requires a Blue-
tooth ®
-capable audio device. Observe the
information in the Bluetooth ®
audio device's
operating instructions.
Before using Bluetooth ®
audio mode, you
should check your Bluetooth ®
audio device
for the following:
R Bluetooth ®
audio profile
The Bluetooth ®
audio device must support
the A2DP and AVRCP Bluetooth ®
audio
profiles.
R Bluetooth ®
visibility
Certain Bluetooth ®
audio devices require
more than simply activating the Bluetooth ®
function. In addition, your device must be
made "visible" to other devices.
R Bluetooth ®
device name
This device name is predetermined but can
usually be changed. To make a clear selec-
tion of the Bluetooth ®
device possible,
Mercedes-Benz recommends that you cus-
tomise the device name.
i A2DP (
Advanced AudioDistribution
Profile): Bluetooth ®
audio profile for audio
data transmission
AVRCP (Audio VideoRemote Control
Profile): Bluetooth ®
audio profile for audio
data playback
i Not all Bluetooth ®
audio devices available
on the market are equally suitable.
Information on suitable Bluetooth ®
audio
devices and on connecting Bluetooth ®
audio devices to COMAND Online:
R is available from your Mercedes-Benz
Service Centre
R or visit the website http://
www.mercedes-benz.com/connect X
Activate Bluetooth ®
and Bluetooth ®
visibil-
ity on the Bluetooth ®
audio device.
Preconditions in COMAND Online X
Activate the Bluetooth ®
function in
COMAND Online (Y page 313).
Connecting Bluetooth ®
audio devices General notes
Before using your Bluetooth
®
audio device
with COMAND Online for the first time, you
will need to authorise it.
When you authorise a new Bluetooth ®
audio
device, it is connected automatically. Con-
nection involves first searching for a Blue-
tooth ®
audio device and then authorising it.
You can authorise up to fifteen Bluetooth ®
devices.
i If you authorise a mobile phone that sup-
ports Bluetooth ®
audio, the A2DP and
AVRCP Bluetooth ®
audio profiles are con-
nected automatically.
The mobile phone is then entered:
R in the Bluetooth ®
telephone list
(Y page 391)
R in the Bluetooth ®
device list
(Y page 489)
Mercedes-Benz recommends authorising a mobile phone in Bluetooth ®
telephony
(Y page 391). 488
AudioCOMAND Online
Page 495 of 637
Using the Bluetooth
®
audio basic display
X Connect Bluetooth ®
audio devices
(Y page 488)
or
X Reconnect the Bluetooth ®
audio device
(Y page 490).
COMAND Online activates the Bluetooth ®
audio device. The basic display appears
and the device starts playing.
Using the function button
X Press the hfunction button one or more
times.
By pressing the function button repeatedly,
you can change the operating mode in the
following order:
R audio CD/DVD/MP3 (disc)
R memory card mode
R MUSIC REGISTER
R USB memory
R Media Interface or audio AUX mode
R operation with Bluetooth ®
audio
Using the media list X Select Bluetooth audio
Bluetooth audio in the media list
by turning cVdthe COMAND controller
and press Wto confirm (Y page 474).
COMAND Online activates the connected
device. You will see a message to this
effect. The basic display then appears.
Starting/stopping playback X
To start playback: selectÌby sliding
VÆ and turning cVdthe COMAND con-
troller and press Wto confirm.
Playback starts. Éis selected.
X To stop playback: selectÉby turning
cVd the COMAND controller and press W
to confirm.
A message appears. Ìis selected. X
To continue playback: selectÌby
turning cVdthe COMAND controller and
press Wto confirm.
A message appears. Éis selected.
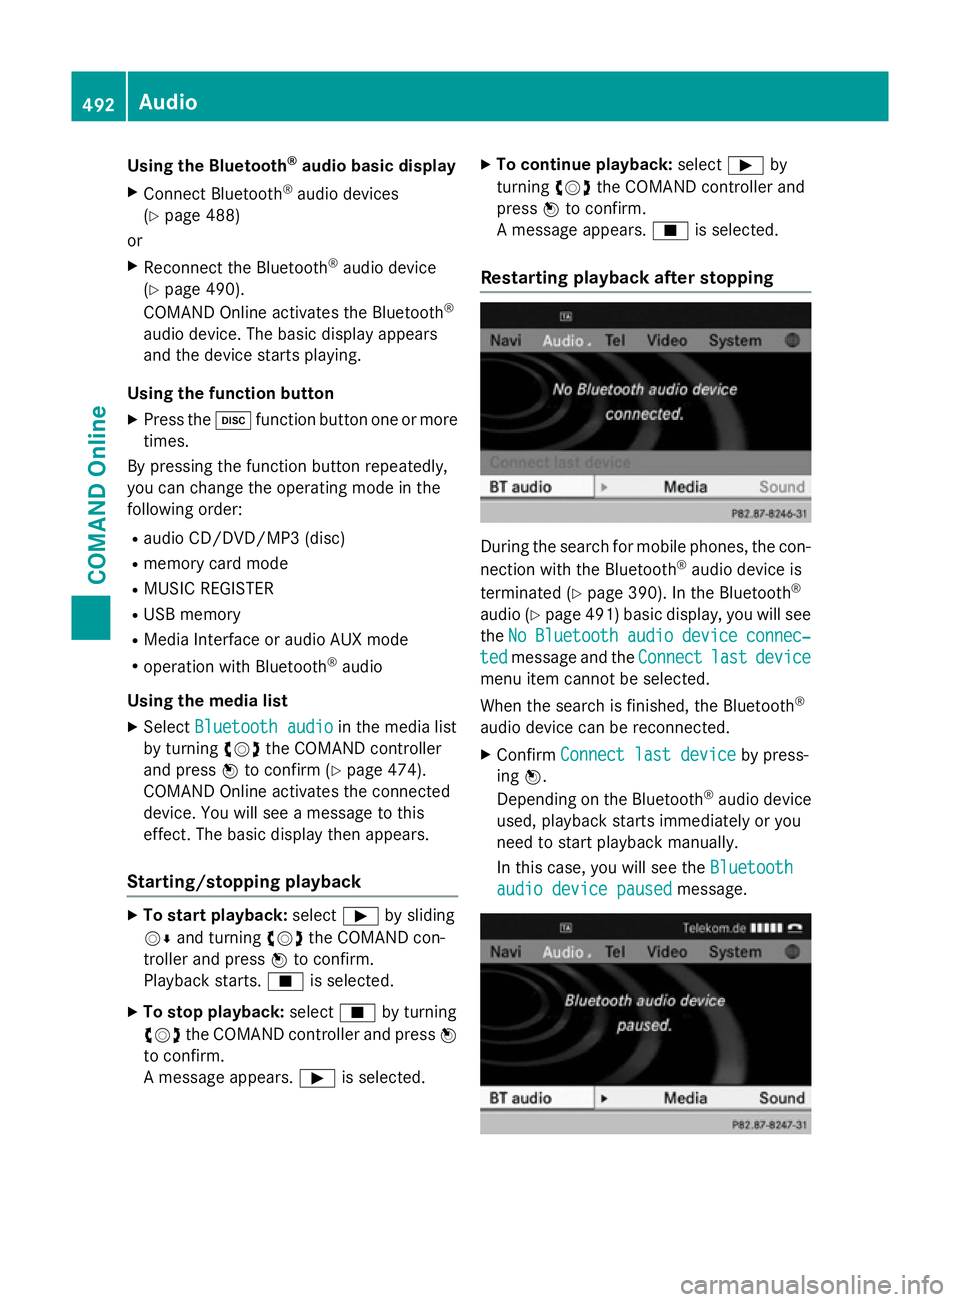
Restarting playback after stopping During the search for mobile phones, the con-
nection with the Bluetooth ®
audio device is
terminated (Y page 390). In the Bluetooth ®
audio (Y page 491) basic display, you will see
the No NoBluetooth
Bluetooth audio
audiodevice
device connec‐
connec‐
ted
ted message and the Connect
Connectlast
lastdevice
device
menu item cannot be selected.
When the search is finished, the Bluetooth ®
audio device can be reconnected. X Confirm Connect last device
Connect last device by press-
ing W.
Depending on the Bluetooth ®
audio device
used, playback starts immediately or you
need to start playback manually.
In this case, you will see the Bluetooth Bluetooth
audio device paused
audio device paused message.492
AudioCOMAND Online
Page 498 of 637
Applications (Apps) that are activated on
the connected device may lead to malfunc-
tions.
i Connecting a fully discharged iPod ®
or
MP3 player can result in an extended initi-
alisation period.
Error messages appear while the device is
being activated if:
R the connected device is not supported
(External device unavailable External device unavailable mes-
sage).
R the connected device consumes too much
power.
R the Media Interface connection is faulty.
R a mass storage device (e.g. USB memory
stick or USB hard drive) is connected to the Media Interface.
In this case the Please connect the Please connect the
device to the other USB port
device to the other USB port mes-
sage appears.
i The separate USB connection ensures
quick access and expanded media content
options.
i Information is available at any Mercedes-
Benz Service Centre.
Disconnecting an iPod ®
X Press the release buttons on iPod ®
plug ;
and pull the iPod ®
cable from the iPod ®
,
see the separate cable kit instructions.
Switching to Media Interface mode General notes
In extreme cases, starting up individual func-
tions can take up to several minutes; this
depends on the external device and its con-
tent (e.g. video podcasts).
Only use the original software to save files on
iPods ®
or MP3 players. Otherwise, some or all
functions may not be available. Switching on automatically
X Connect an external device (Y page 494).
COMAND Online activates the device (if
connected via the iPod ®
connector or USB
socket). The basic display then appears.
Switching on with the function button
The external device is connected to the Media Interface.
X Press the hfunction button one or more
times.
By pressing the function button repeatedly,
you can change the operating mode in the
following order: R audio CD/DVD/MP3 (disc)
R memory card mode
R MUSIC REGISTER
R USB memory
R Media Interface or audio AUX mode
R operation with Bluetooth ®
audio
Switching on using a number key
X Press the inumber key (for a DVD
changer) or the onumber key (for a
single DVD drive) number key.
This selects the connected external audio
device directly.
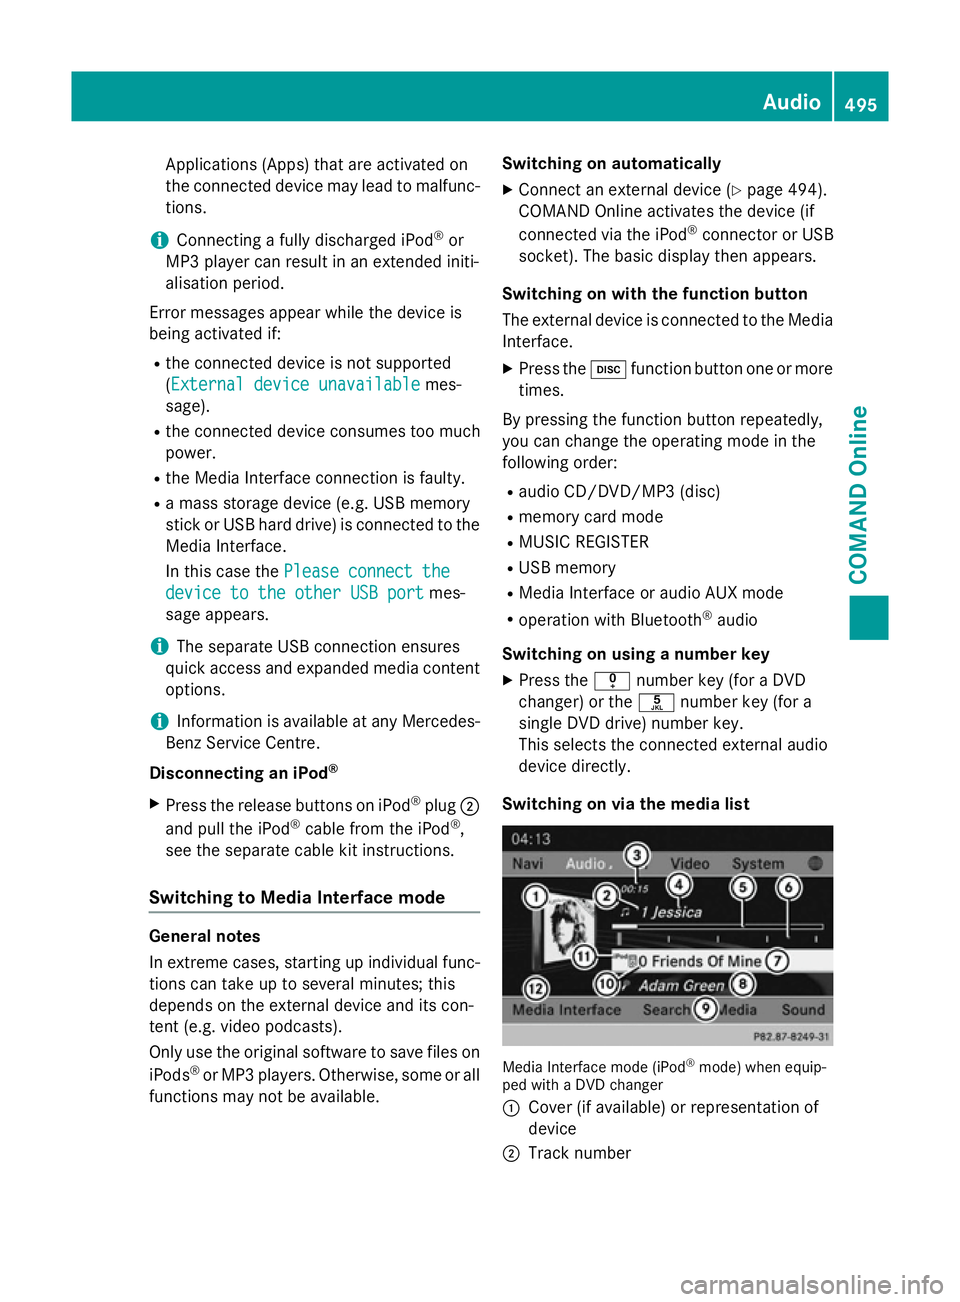
Switching on via the media list Media Interface mode (iPod
®
mode) when equip-
ped with a DVD changer
: Cover (if available) or representation of
device
; Track number Audio
495COMAND Online Z
Page 499 of 637
=
Elapsed track time (also in format
00:00:00 for audio books)
? Track name
A Graphic time display
B Track position in playlist
C Album name (if available)
D Artist (if available)
E Music search
F Position in the media list
G Data medium type
H Playback options
X Select the entry under position 0 (DVD
changer) or position 5 (single DVD drive) in
the media list by turning cVdthe COMAND
controller and press Wto confirm
(Y page 474).
COMAND Online activates the connected
device. You will see a message to this
effect. The basic display then appears.
If no device is connected, you will see the
Media Interface
Media Interface entry instead of a
device name.
The type of device connected is indicated by
the corresponding symbol for iPod ®
(iPhone ®
) or MP3 player.
The current playback option is shown with a
symbol behind album name (no display for
Normal track sequence Normal track sequence) (Y page 499).
i If the device connected does not contain
any playable tracks, a message appears to
this effect.
Selecting music files Note
COMAND Online displays the data stored on
the iPod
®
, iPhone ®
or MP3 player according
to the file structure used in the respective
medium. Selecting by skipping to a track
X To skip forwards or back to a track: turn
cVd the COMAND controller when the dis-
play/selection window is active.
or
X Press the EorF button.
The skip forward function skips to the next track. The skip back function skips to the
beginning of the current track if the track
has been playing for more than eight sec-
onds. If the track has been playing for less
than eight seconds, it skips to the start of
the previous track. If you have selected a
playback option other than Normal Normaltrack
track
sequence
sequence, the track sequence is random.
X On the multifunction steering wheel:
switch to Media Interface mode in
COMAND Online (Y page 495).
X On the multifunction steering wheel, press
the = or; button to select the
Audio
Audio menu.
X Press the 9or: button briefly.
If you hold down the 9or: button,
the system scrolls through the list more
quickly. Not all media players support this
function.
If track information is available on the
media player, the multifunction display
shows the number and name of the track.
Selecting using the number keypad X To make an entry: press thelbutton.
An input menu appears. The number of
characters available for input depends on
the number of stored tracks.
X To enter a track number: press a number
key, e.g. q.
The digit is entered in the first position in
the input line.
i COMAND Online will ignore and not dis-
play an invalid digit. 496
AudioCOMAND Online
Page 501 of 637
i
Reading:
if the media content of the con-
nected device is being read, this is indica-
ted on the upper right by a symbol. When
reading has ended, the categories Select
Select
by cover
by cover andKeyword Search Keyword Search are avail-
able.
Depending on the connected device and
the size of the media content, reading may
take several minutes. When the device is
next started or reconnected, the advanced
functions will be quickly available.
However, if you change the media content
on your iPod ®
/iPhone ®
, it has to be read
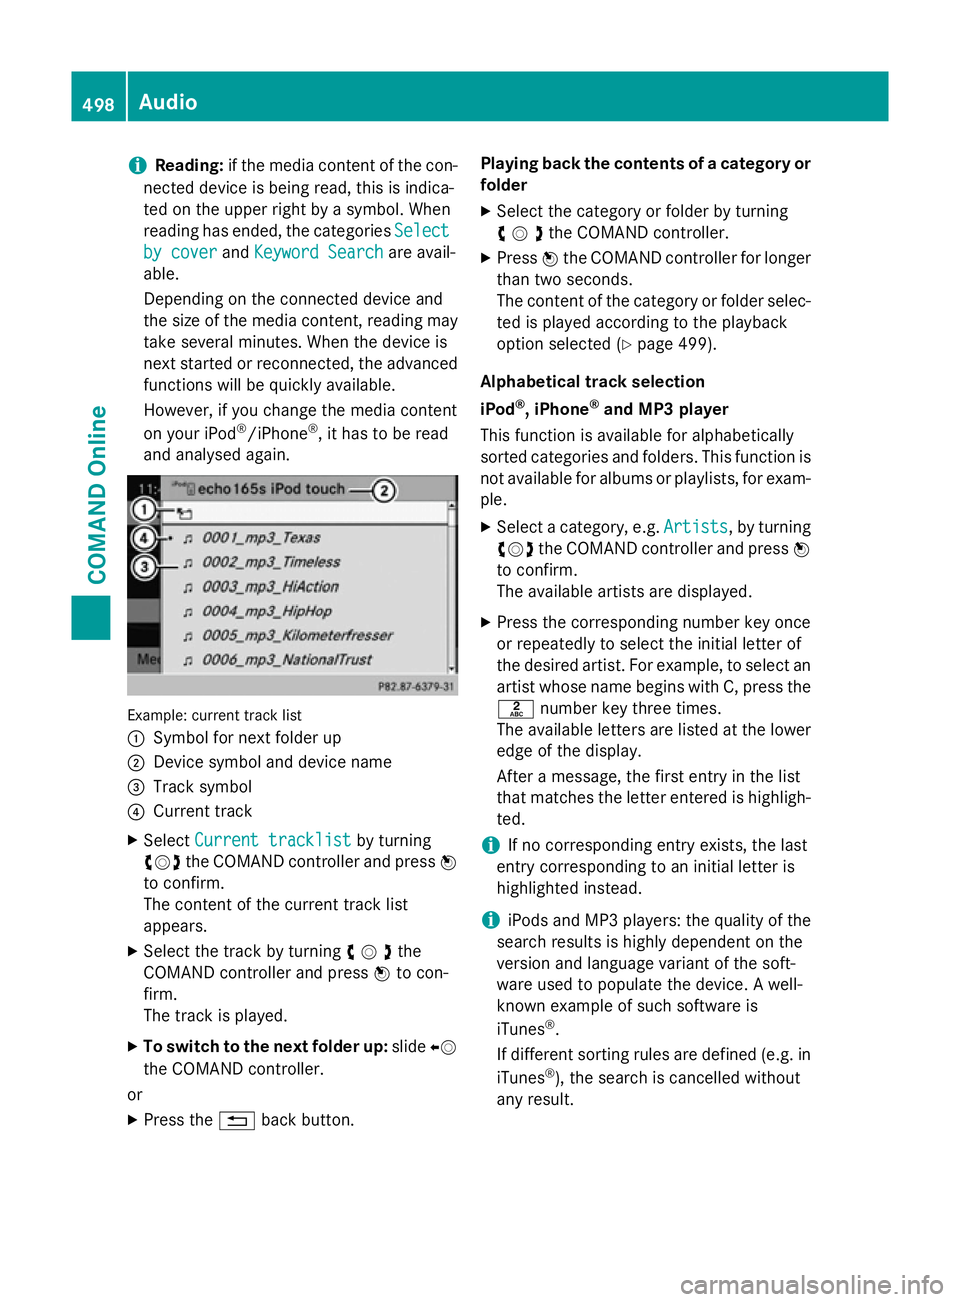
and analysed again. Example: current track list
:
Symbol for next folder up
; Device symbol and device name
= Track symbol
? Current track
X Select Current tracklist Current tracklist by turning
cVd the COMAND controller and press W
to confirm.
The content of the current track list
appears.
X Select the track by turning cVdthe
COMAND controller and press Wto con-
firm.
The track is played.
X To switch to the next folder up: slideXV
the COMAND controller.
or
X Press the %back button. Playing back the contents of a category or
folder
X Select the category or folder by turning
cVdthe COMAND controller.
X Press Wthe COMAND controller for longer
than two seconds.
The content of the category or folder selec-
ted is played according to the playback
option selected (Y page 499).
Alphabetical track selection
iPod ®
, iPhone ®
and MP3 player
This function is available for alphabetically
sorted categories and folders. This function is not available for albums or playlists, for exam-
ple.
X Select a category, e.g. Artists
Artists, by turning
cVd the COMAND controller and press W
to confirm.
The available artists are displayed.
X Press the corresponding number key once
or repeatedly to select the initial letter of
the desired artist. For example, to select an
artist whose name begins with C, press the l number key three times.
The available letters are listed at the lower
edge of the display.
After a message, the first entry in the list
that matches the letter entered is highligh-
ted.
i If no corresponding entry exists, the last
entry corresponding to an initial letter is
highlighted instead.
i iPods and MP3 players: the quality of the
search results is highly dependent on the
version and language variant of the soft-
ware used to populate the device. A well-
known example of such software is
iTunes ®
.
If different sorting rules are defined (e.g. in iTunes ®
), the search is cancelled without
any result. 498
AudioCOMAND Online
Page 503 of 637
Special considerations when using MP3
players
Up to 8 directory levels with up to 1,000
tracks per directory are supported.
Do not use USB extension leads or adapters. They can impair functionality.
i DRM (Digital Rights Management) protec-
ted files are not supported by the Media
Interface. Audio AUX mode
Notes on audio AUX mode The varying volumes of external audio sour-
ces can mean that system messages (e.g.
traffic and navigation announcements) are
played at a noticeably increased volume. If
necessary, deactivate the system messages
or adjust their volume manually.
You can connect an external audio source
(AUX) to COMAND Online.
Depending on the vehicle model series the
connection is made via a jack in the storage
compartment in the centre console or via the
USB port (Y page 472).
If COMAND Online is equipped with a Media
Interface, external audio sources are connec-
ted using the cable set provided. The cable
set then replaces the audio AUX socket. The
connections for the Media Interface are loca- ted in the stowage compartment in the centre
console.
i You can find more information on the
Internet at http://www.mercedes-
benz.com/connect and in the "Media
Interface mode" section (Y page 494).
Switching to audio AUX mode Switching on with the function button
The external device is connected to the audio
AUX input.
X Press the hfunction button one or more
times. By pressing the function button repeatedly,
you can change the operating mode in the
following order:
R audio CD/DVD/MP3 (disc)
R memory card mode
R MUSIC REGISTER
R USB memory
R Media Interface or audio AUX mode
R operation with Bluetooth ®
audio
Switching on with the audio menu
When you connect an external audio source,
audio AUX is not selected automatically.
X Select Audio
Audio in the main function bar by
sliding ZVand turning cVdthe COMAND
controller and press Wto confirm.
If AUX mode was the last mode selected, it
will now be active.
If another audio source is switched on, you
can now switch to audio AUX mode in the
audio menu.
X Select Audio
Audio usingZVand press Wto
confirm.
The audio menu appears.
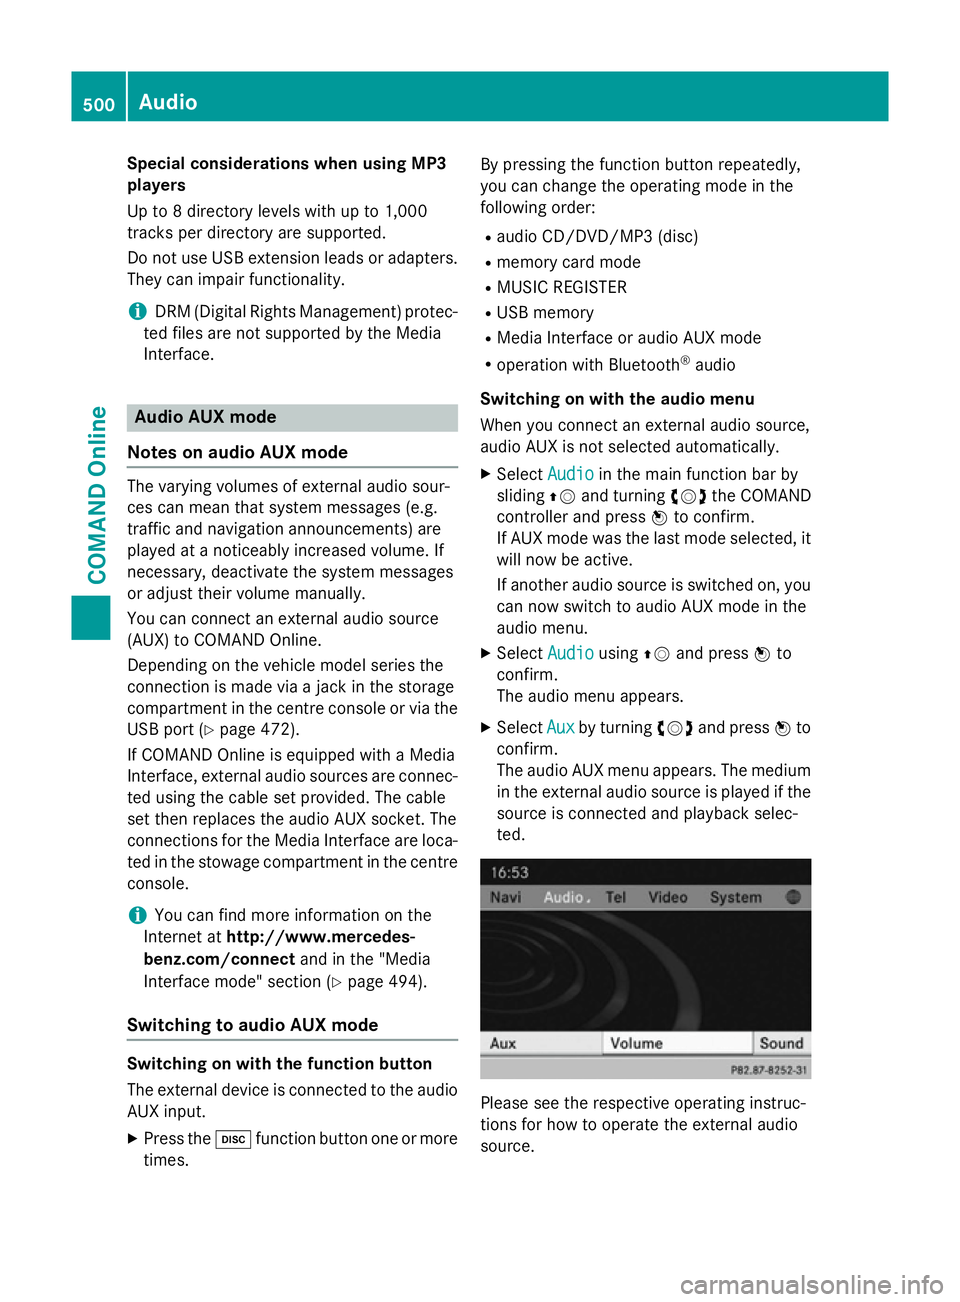
X Select Aux Auxby turning cVdand press Wto
confirm.
The audio AUX menu appears. The medium in the external audio source is played if the
source is connected and playback selec-
ted. Please see the respective operating instruc-
tions for how to operate the external audio
source.500
AudioCOMAND Online