2012 MERCEDES-BENZ SL ROADSTER change time
[x] Cancel search: change timePage 358 of 637
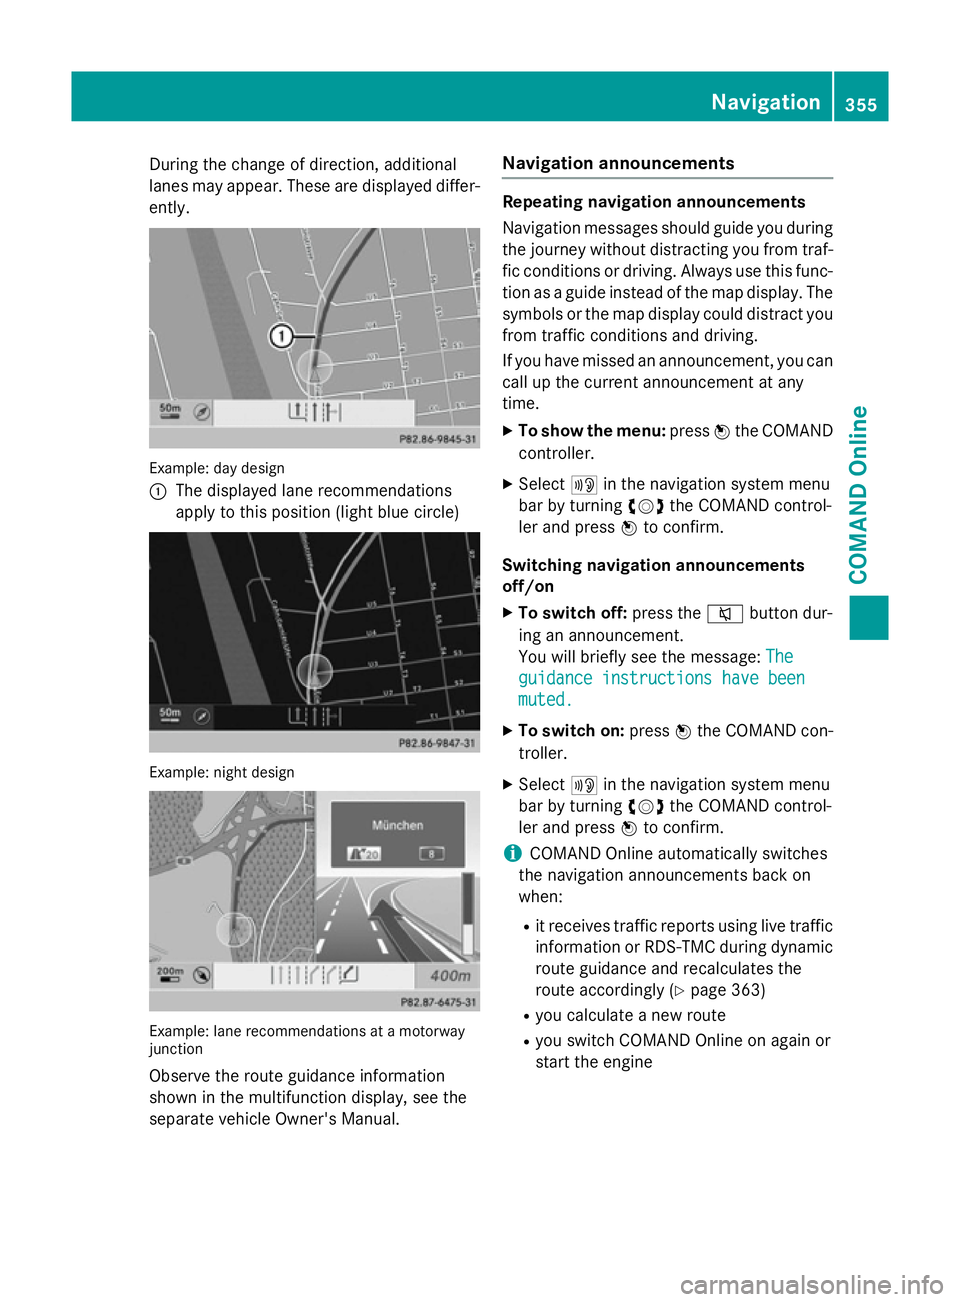
During the change of direction, additional
lanes may appear. These are displayed differ-
ently. Example: day design
:
The displayed lane recommendations
apply to this position (light blue circle) Example: night design
Example: lane recommendations at a motorway
junction
Observe the route guidance information
shown in the multifunction display, see the
separate vehicle Owner's Manual. Navigation announcements Repeating navigation announcements
Navigation messages should guide you during
the journey without distracting you from traf- fic conditions or driving. Always use this func-
tion as a guide instead of the map display. The
symbols or the map display could distract you from traffic conditions and driving.
If you have missed an announcement, you can call up the current announcement at any
time.
X To show the menu: pressWthe COMAND
controller.
X Select +in the navigation system menu
bar by turning cVdthe COMAND control-
ler and press Wto confirm.
Switching navigation announcements
off/on X To switch off: press the8button dur-
ing an announcement.
You will briefly see the message: The The
guidance instructions have been guidance instructions have been
muted. muted.
X To switch on: pressWthe COMAND con-
troller.
X Select +in the navigation system menu
bar by turning cVdthe COMAND control-
ler and press Wto confirm.
i COMAND Online automatically switches
the navigation announcements back on
when:
R it receives traffic reports using live traffic
information or RDS-TMC during dynamic
route guidance and recalculates the
route accordingly (Y page 363)
R you calculate a new route
R you switch COMAND Online on again or
start the engine Navigation
355COMAND Online Z
Page 371 of 637
cVd
COMAND controller and press Wto
confirm.
X Select Read traffic messages auto‐
Read traffic messages auto‐
matically
matically and pressWto confirm.
The function is switched on Oor off ª,
depending on the previous status. Destination memory
Home address (My address) Entering the home address via address
entry
X Proceed as described under "Adopting an
address book entry as a home address"
(Y page 368). Confirm My Address
My Address by
pressing W.
X To enter the home address for the first
time: confirm New entry
New entry by pressing W.
X To change the home address: select
Change
Change in the menu showing the home
address by turning cVdthe COMAND con-
troller and press Wto confirm.
X Confirm New entry
New entry by pressing W.
X In both cases, enter the home address as a
destination, e.g. as a town, street and
house number (Y page 327). Then, save the
home address (Y page 330).
Adopting an address book entry as a
home address
X To switch to navigation mode: press the
Ø button.
X To show the menu: pressWthe COMAND
controller.
X Select Destination
Destination in the navigation sys-
tem menu bar by turning cVdthe
COMAND controller and press Wto con-
firm.
X Select From memory
From memory and pressWto con-
firm.
You will see the destination memory list
either with the character bar (option 1) or
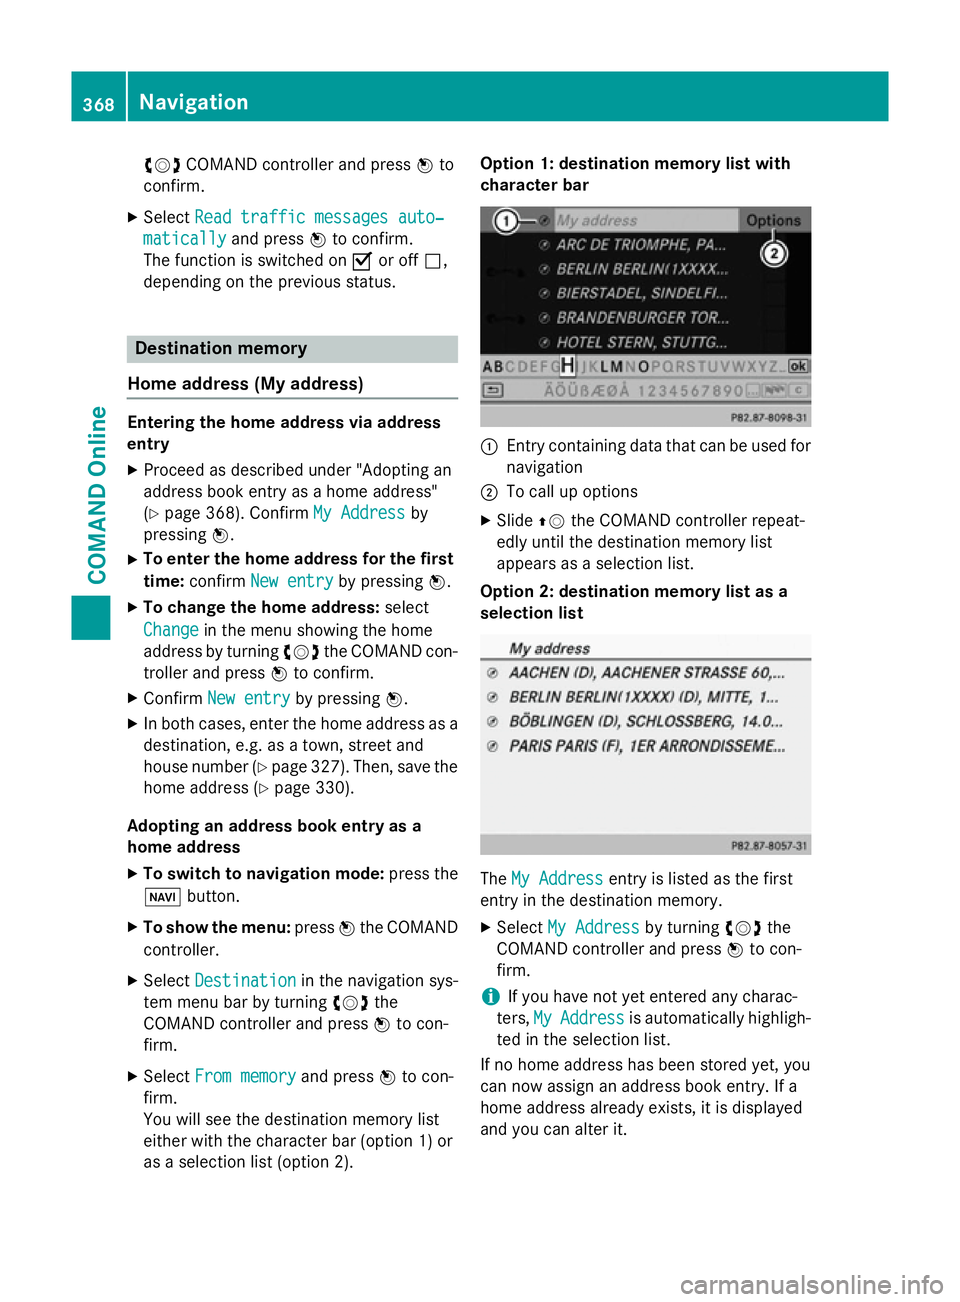
as a selection list (option 2). Option 1: destination memory list with
character bar
:
Entry containing data that can be used for
navigation
; To call up options
X Slide ZVthe COMAND controller repeat-
edly until the destination memory list
appears as a selection list.
Option 2: destination memory list as a
selection list The
My Address My Address entry is listed as the first
entry in the destination memory.
X Select My Address
My Address by turningcVdthe
COMAND controller and press Wto con-
firm.
i If you have not yet entered any charac-
ters, My MyAddress
Address is automatically highligh-
ted in the selection list.
If no home address has been stored yet, you
can now assign an address book entry. If a
home address already exists, it is displayed
and you can alter it. 368
NavigationCOMAND Online
Page 372 of 637
i
If you select
New entry
New entry, you are also
offered the option of entering the home
address for the first time. You can then
save the home address without having to
start route guidance.
X To enter the home address for the first
time: select Assign to address book
Assign to address book
entry entry and press Wto confirm.
X Select Home
Home,Work
WorkorNot
Not classified
classified and
press Wto confirm.
X To change the home address: select
Change
Change and press Wto confirm.
X Select Assign to address book entry
Assign to address book entry
and press Wto confirm.
i If you select
New entry
New entry, you are also
offered the option of changing the home
address by entering an address. You can
then save the home address without having
to start route guidance.
X Select Home Home,Work
WorkorNot
Not classified
classified and
press Wto confirm.
In both cases, you will see the address book either with the character bar or as a selec-
tion list.
X Select the address book entry
(Y page 413).
X To select: pressWthe COMAND control-
ler.
If there is no existing home address,
COMAND Online saves the entry. You will
see a message and then the address menu
with the selected address. Start
Start is high-
lighted automatically.
If a home address has already been stored,
you will see a prompt asking you whether
the My Address
My Address entry should be overwrit-
ten.
X Select Yes YesorNo
No and press Wto confirm.
If you select Yes
Yes, COMAND Online over-
writes the destination. You will see a mes-
sage and then the address menu with the
selected address. Start Startis highlighted
automatically.
If you select No No, the list will appear again. Selecting the home address for route
guidance
X Proceed as described under "Selecting a
destination from the destination memory"
(Y page 332).
Saving a destination General notes
This function also stores the destination in
the address book.
When the address book is full, no destinations
can be saved in the destination memory. You
must first delete address book entries
(Y page 413).
After destination entry
X The destination has been entered and is
shown in the address entry menu
(Y page 326).
X Select Save Saveby sliding VÆand turning
cVd the COMAND controller and press W
to confirm.
You can now select storing options
(Y page 370).
During route guidance
X To show the menu: pressWthe COMAND
controller.
X Select Destination Destination in the navigation sys-
tem menu bar by turning cVdthe
COMAND controller and press Wto con-
firm.
X Select Save
Savedestination
destination and pressWto
confirm.
You can now select storing options
(Y page 370).
From the list of previous destinations
X To show the menu: pressWthe COMAND
controller.
X Select Destination Destination in the navigation sys-
tem menu bar by turning cVdthe
COMAND controller and press Wto con-
firm. Navigation
369COMAND Online Z
Page 386 of 637
the engine running in enclosed spaces with-
out sufficient ventilation.
Introduction
The digital maps generated by the map soft-
ware become outdated in the same way as
conventional road maps. Optimal route guid-
ance can only be provided by the navigation
system in conjunction with the most up-to-
date map software.
Information about new versions of the digital map can be obtained from a Mercedes-Benz
Service Centre. You can have the digital mapupdated there with a DVD, or you can update
it yourself.
In some countries, it is possible to update the map data for COMAND Online free of charge
for a period of 3 years. Information on the
availability of this service for your vehicle can be obtained from your Mercedes-Benz Ser-
vice Centre. If the free update is not available
in your country, please read the "Updating
process" section.
Entitlement to the free update
For the first three years after your vehicle is
registered, you are entitled to all available
updates to the map software for
COMAND Online. They are usually installed
during a regular vehicle service. After this
period, you can purchase further updates
from your Mercedes-Benz Service Centre.
The free updates relate to the vehicle and not
to an individual. If there is a change of own-
ership within 3 years of first registration, the
new owner is entitled to the map software
updates.
Availability of free updates
Enter your e-mail address at http://
www.mercedes-benz-accessories.com/
comand-infomail. You will receive a one-off e- mail containing information on how to updatethe map software. Please also visit http://
www.mercedes-benz-accessories.com/
navigation-updates to find out if map soft- ware updates for your vehicle are available at
your Mercedes-Benz partner.
Updating at the Mercedes-Benz Service
Centre
If an update for your map software is availa-
ble, you will receive it free of charge at your
Mercedes-Benz Service Centre during your
vehicle's annual service. You can arrange a
separate appointment for this at your
Mercedes-Benz Service Centre on request.
The update is performed only by a Mercedes- Benz Service Centre for European map data.
The map software is not provided on a data
medium.
Carrying out the update yourself
i The update process may take some time
(over an hour), depending on the size of the
digital map. During this time, you will only
be able to switch on radio mode and to
accept incoming calls. The update will be
completed more quickly if the vehicle is
stationary.
If you start the update with the engine
switched off and the starter battery has
insufficient power, COMAND Online may
automatically switch off. This preserves the battery. If this occurs, restart the update
with the engine running.
X Insert the DVD:
R in the single DVD drive (Y page 469)
R in the DVD changer (Y page 469)
COMAND Online checks whether the digi-
tal map on the DVD is compatible with the
navigation system and system software.
A prompt then appears asking if you want
to install the database. Versions of the
database currently installed and the data-
base that is to be installed are displayed.
X Select Yes
Yes orNo No and press Wto confirm.
After selecting Yes
Yes, an activation code
must be entered when installing a database
for the first time. You will receive the acti-
vation code when you buy the navigation
DVD. Navigation
383COMAND Online Z
Page 392 of 637
R
if the Bluetooth ®
function is switched off on
the mobile phone while you are using Blue-
tooth ®
interface telephony
R if the mobile phone is not logged into a
mobile phone network
i The telephone automatically tries to log
on to a network. If no network is available,
you may not be able to make a 999or112
emergency call. If you attempt to make an
outgoing call, the No
No service service message will
appear for a short while.
If you switch COMAND Online off during a call in hands-free mode, the call will be termina-
ted. You can prevent this as follows:
X Switch the mobile phone to private mode
before switching off COMAND Online (see
the mobile phone operating instructions).
999 or 112 emergency call The following conditions must be fulfilled in
order to make a 999or112 emergency call:
R the mobile phone must be switched on
R a network must be available
R a valid and operational SIM card must be
inserted in the mobile phone
R the PIN must have been entered
If you are unable to make an emergency call,
you must arrange rescue measures yourself.
i The
999 or112 emergency call number is
a public service. Any misuse is punishable
by law. Telephony via the Bluetooth
®
inter-
face
Conditions For telephony via COMAND Online's Blue-
tooth
®
interface, a Bluetooth ®
-capable
mobile phone is required. On COMAND Online
X Activate the Bluetooth ®
function in
COMAND Online (Y page 313).
On the mobile phone X Switch on the mobile phone and enter the
PIN when prompted to do so (see the
mobile phone operating instructions).
X Activate Bluetooth ®
functions and, if nec-
essary, Bluetooth ®
visibility on the mobile
phone (see the mobile phone operating
instructions).
The battery of the mobile phone should
always be kept sufficiently charged in order to prevent malfunctions.
In preparation for telephoning via the Blue-
tooth ®
interface, you should check the fol-
lowing items on your mobile phone (see the
mobile phone operating instructions):
R Hands-Free Profile
The mobile phone must support Hands-
Free Profile 1.0 or above.
R Bluetooth ®
visibility
On certain mobile phones, the device itself must be made "visible" to other devices, as
well as activating the Bluetooth ®
function
(see the mobile phone operating instruc-
tions).
This visibility is for restricted periods of
time on some mobile phones.
R Bluetooth ®
device name
Every Bluetooth ®
device has a Bluetooth ®
device name. This device name is freely
definable, but can be identical for all devi-
ces from the same manufacturer. It is
therefore recommended that you change
this name so that you can easily recognise
your mobile phone (see the mobile phone
operating instructions).
i Not all mobile phones available on the
market are equally suitable. Further infor-
mation on suitable mobile phones and
mobile phone brackets can be obtained at
your Mercedes-Benz Service Centre or on Telephone
389COMAND Online Z
Page 406 of 637
Searching with the number keypad
You determine the first letter of the entry you
are looking for with the first character you
enter.
X Press the corresponding number keys in
rapid succession.
More information on entering characters
using the number keypad (direct entry)
(Y page 305).
Directly from the list
You can switch to the list at any time during
character entry.
X Slide VZthe COMAND controller repeat-
edly or press and hold Wuntil the charac-
ter bar disappears.
or X Select¬and press Wto confirm.
X To select an entry: turncVdthe
COMAND controller until the desired entry is highlighted and press Wto confirm.
To select a phone number: theGsymbol
indicates that an entry contains more than
one phone number.
X Select a phone book entry with the G
symbol and press Wto confirm.
The sub-entries appear. The Gsymbol
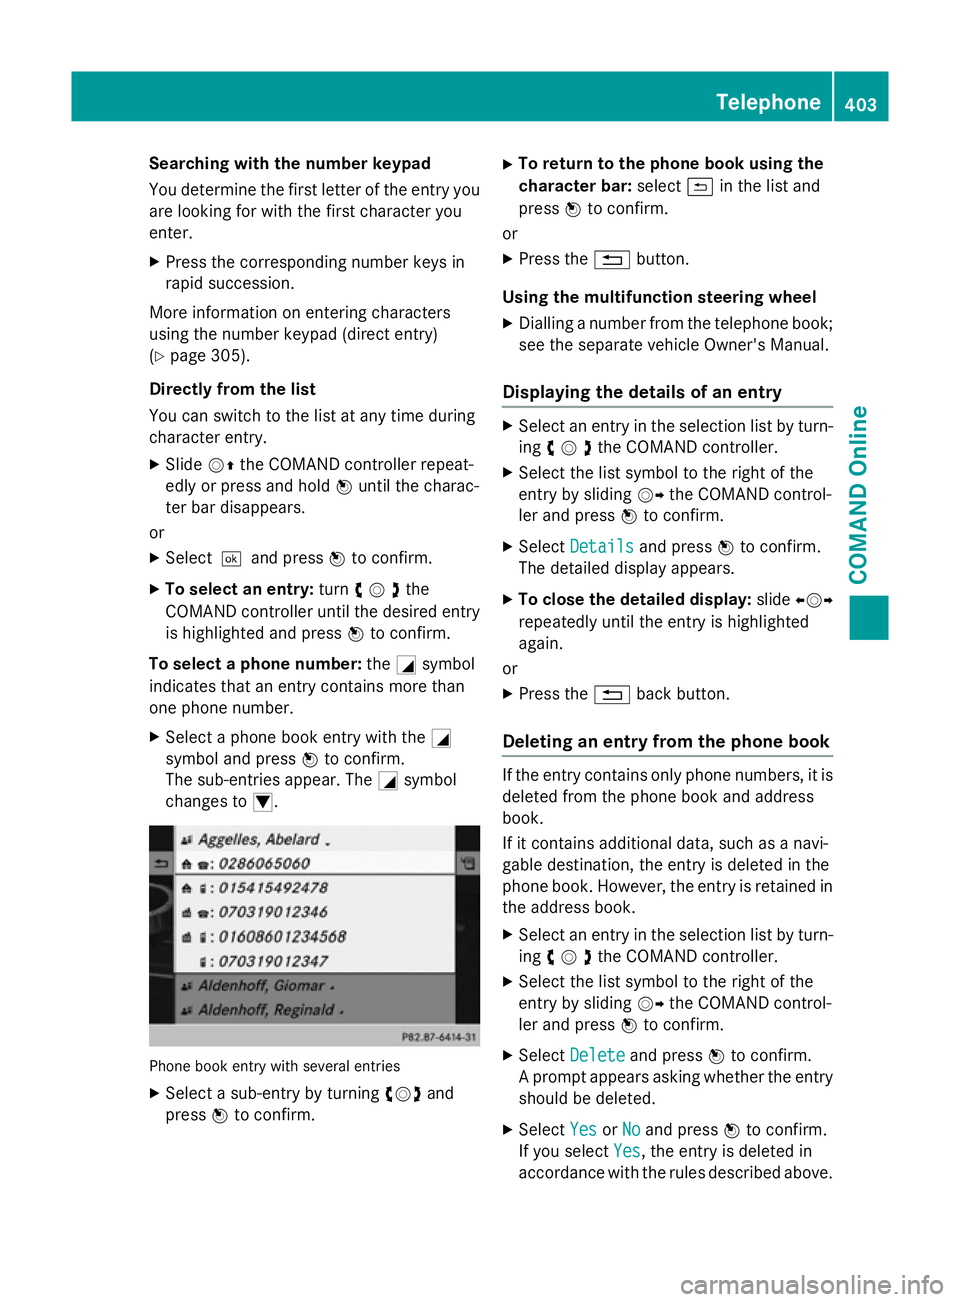
changes to I. Phone book entry with several entries
X Select a sub-entry by turning cVdand
press Wto confirm. X
To return to the phone book using the
character bar: select&in the list and
press Wto confirm.
or
X Press the %button.
Using the multifunction steering wheel
X Dialling a number from the telephone book;
see the separate vehicle Owner's Manual.
Displaying the details of an entry X
Select an entry in the selection list by turn-
ing cVdthe COMAND controller.
X Select the list symbol to the right of the
entry by sliding VYthe COMAND control-
ler and press Wto confirm.
X Select Details Details and press Wto confirm.
The detailed display appears.
X To close the detailed display: slideXVY
repeatedly until the entry is highlighted
again.
or
X Press the %back button.
Deleting an entry from the phone book If the entry contains only phone numbers, it is
deleted from the phone book and address
book.
If it contains additional data, such as a navi-
gable destination, the entry is deleted in the
phone book. However, the entry is retained in
the address book.
X Select an entry in the selection list by turn-
ing cVdthe COMAND controller.
X Select the list symbol to the right of the
entry by sliding VYthe COMAND control-
ler and press Wto confirm.
X Select Delete Delete and press Wto confirm.
A prompt appears asking whether the entry
should be deleted.
X Select Yes
YesorNo
No and press Wto confirm.
If you select Yes
Yes, the entry is deleted in
accordance with the rules described above. Telephone
403COMAND Online Z
Page 419 of 637
X
Enter the destination address
(Y page 326)
X Start route guidance.
The navigable address is added to the
address book entry automatically.
i This will provide you with an address book
entry that is suitable for navigation. Once
you have altered the address data in the
address entry menu, the altered address in
the navigation system will be used the next
time the system is started instead of the
postal address. Therefore always ensure
that the destination address is indeed the
required destination when navigation
starts from the address book.
Voice tags Introduction
You can enter voice tags via LINGUATRONIC
(see the separate operating instructions).
Once you have assigned a voice tag to an
address book entry, you can vocally call up
this entry and dial a phone number, for exam-
ple. You can add one voice tag per address
book entry.
Adding or changing a voice tag
X Search for an address book entry with or
without a voice tag (¦) (Y page 413).
X Select the list symbol to the right of the
entry by sliding VYthe COMAND control-
ler and press Wto confirm.
X Select Voice
Voice tag tagand press Wto confirm.
X Select Add
Add orChange
Change and press Wto con-
firm.
Subsequent operation is voice-controlled.
LINGUATRONIC guides you through the
dialogues.
Deleting a voice tag
X Search for an address book entry with a
voice tag (Y page 413).
X Select the list symbol to the right of the
entry by sliding VYthe COMAND control-
ler and press Wto confirm. X
Select Voice
Voice tag tagand press Wto confirm.
X Select Delete
Delete and press Wto confirm.
A deletion prompt appears.
X Select Yes
Yes orNo
No and press the 9button to
confirm.
If you select Yes Yes, COMAND Online deletes
the voice tag.
If you select No No, the process will be cancel-
led.
Listening to a voice tag X Search for an address book entry with a
voice tag (Y page 413).
X Select the list symbol to the right of the
entry by sliding VYthe COMAND control-
ler and press Wto confirm.
X Select Voice Voice tag tagand press Wto confirm.
X Select Listen
Listen and press Wto confirm.
You hear the voice tag.
Importing phone book entries This function allows you to store phone book
entries from the mobile phone in the address
book.
Possible sources are:
R the mobile phone
R the memory card
R the USB device
R the Bluetooth ®
interface
Imported phone book entries are indicated in
the phone book by different symbols
(Y page 402).
X Search for an entry in the phone book on
the mobile phone d(Ypage 402).
X Select the list symbol to the right of the
entry by sliding VYthe COMAND control-
ler and press Wto confirm.
X Select Save entry
Save entry and pressWto con-
firm.
The Data saved Data saved message appears. The
phone book entry is now saved as an
address book entry. 416
TelephoneCOMAND Online
Page 424 of 637
settings remain stored on the module. If
you wish to change the module, you have to remove it first. The module does not need
to be deactivated to do this. Deactivation is only useful if you do not intend to use the
module again with COMAND Online.
Telephone module with Bluetooth ®
(SAP profile) in SIM card mode Inserting a SIM card
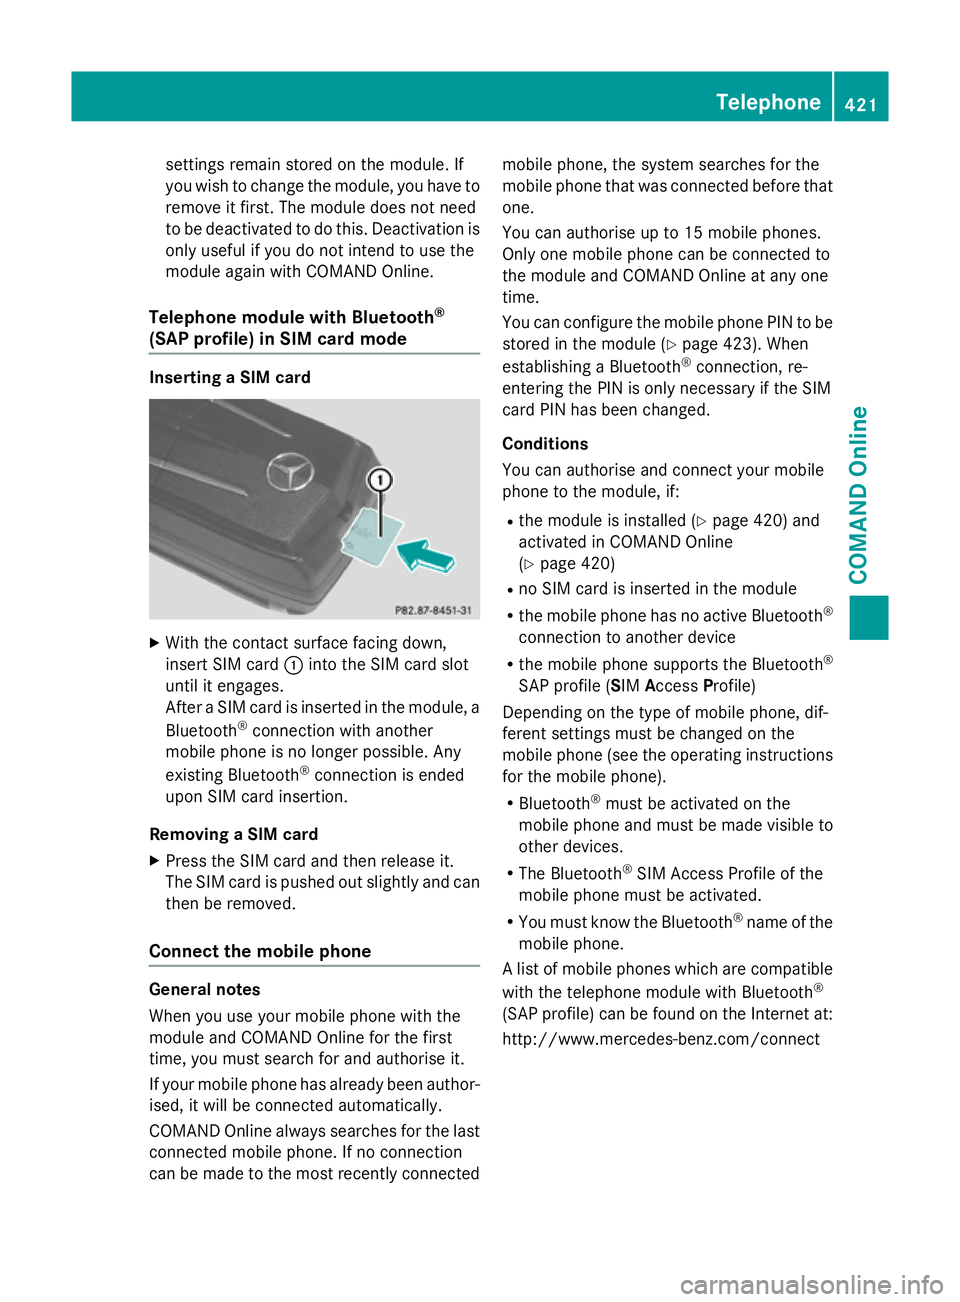
X
With the contact surface facing down,
insert SIM card :into the SIM card slot
until it engages.
After a SIM card is inserted in the module, a
Bluetooth ®
connection with another
mobile phone is no longer possible. Any
existing Bluetooth ®
connection is ended
upon SIM card insertion.
Removing a SIM card X Press the SIM card and then release it.
The SIM card is pushed out slightly and can then be removed.
Connect the mobile phone General notes
When you use your mobile phone with the
module and COMAND Online for the first
time, you must search for and authorise it.
If your mobile phone has already been author-
ised, it will be connected automatically.
COMAND Online always searches for the last connected mobile phone. If no connection
can be made to the most recently connected mobile phone, the system searches for the
mobile phone that was connected before that
one.
You can authorise up to 15 mobile phones.
Only one mobile phone can be connected to
the module and COMAND Online at any one
time.
You can configure the mobile phone PIN to be stored in the module (Y page 423). When
establishing a Bluetooth ®
connection, re-
entering the PIN is only necessary if the SIM
card PIN has been changed.
Conditions
You can authorise and connect your mobile
phone to the module, if:
R the module is installed (Y page 420) and
activated in COMAND Online
(Y page 420)
R no SIM card is inserted in the module
R the mobile phone has no active Bluetooth ®
connection to another device
R the mobile phone supports the Bluetooth ®
SAP profile (SIM AccessProfile)
Depending on the type of mobile phone, dif-
ferent settings must be changed on the
mobile phone (see the operating instructions
for the mobile phone).
R Bluetooth ®
must be activated on the
mobile phone and must be made visible to
other devices.
R The Bluetooth ®
SIM Access Profile of the
mobile phone must be activated.
R You must know the Bluetooth ®
name of the
mobile phone.
A list of mobile phones which are compatible with the telephone module with Bluetooth ®
(SAP profile) can be found on the Internet at:
http://www.mercedes-benz.com/connect Telephone
421COMAND Online Z