2012 MERCEDES-BENZ SL ROADSTER interior lights
[x] Cancel search: interior lightsPage 13 of 637
Cup holder
Centre console .............................. 548
Important safety notes .................. 548 D
DAB radio (Digital Audio Broad-
casting) Selecting a station ........................ .464
see Radio
Dashboard lighting
see Instrument cluster lighting
Data
see Technical data
Data carrier ................................ 479, 484
Audio DVD ..................................... 479
MUSIC REGISTER ........................... 484
Data modem mode
Telephone with Bluetooth® (SAP
profile) .......................................... .423
Data roaming
Telephone module with Blue-
tooth® (SAP profile) ..................... .424
Daytime driving lights
Display message ............................ 257
Function/notes ............................ .127
Switching on/off (on-board com-
puter) ............................................. 239
Declarations of conformity ................. 33
Delayed switch-off
Exterior lighting (on-board com-
puter) ............................................. 241
Interior lighting .............................. 241
Delete button ..................................... 297
Destination ........................................ 370
Assigning a destination to an
address book entry ........................ 370
Destination (navigation)
Displaying information ................... 358
Entering a destination by address .. 326
Entering a destination using the
map ............................................... 333
Entering a POI ................................ 338
Entering using geo-coordinates ..... 334
Entering using Mercedes-Benz
Apps .............................................. 335
Saving ............................................ 369 Selecting from the destination
memory ......................................... 332
Selecting from the list of last des- tinations ......................................... 333
Selecting storage options .............. 370
Storing after destination entry ....... 369
Storing during route guidance ....... 369
Destination memory (navigation)
Deleting an entry ........................... 371
Entering/saving your home
address .......................................... 330
Previous destinations .................... 372
Diagnostics connection ......................33
Dialling a number (telephone) .......... 397
Digital speedometer .........................232
Digital teletext (MHEG-5) .................. 508
Digital TV channels ........................... 506
Programme preview ....................... 506
Dipped-beam headlamps
Display message ............................ 255
Setting for driving abroad (sym-
metrical) ........................................ 126
Setting for driving on the right/
left ................................................. 240
Switching on/off ........................... 127
Disc
CD/DVD ........................................ 480
MP3 ............................................... 479
DISC button
Activating audio CD/DVD or MP3mode ............................................. 472
Activating Bluetooth® Audio ......... 492
Switching on the Media Interface .. 495
Switching to the MUSIC REGIS-
TER ................................................ 484
Display
Selecting the design ..................... .310
Display message
Driving systems ............................ .260
KEYLESS-GO .................................. 272
Display messages
ASSYST PLUS ................................ 566
Calling up (on-board computer) ..... 247
Engine ............................................ 258
General information ....................... 247
Hiding (on-board computer) ........... 247
Key ................................................ 272 10
Index
Page 54 of 637
their seat belts correctly at all times, even if
the vehicle is equipped with airbags. The air-
bags are not deployed in all types of acci-
dents. For example, if the protective capacity of correctly fastened seat belts is not
increased by deploying the airbags, the air-
bags will not deploy.
Airbag deployment only provides increased
protection if the seat belt is worn correctly.
The seat belt helps, firstly, to keep the vehicle occupant in the best position in relation to the
airbag. Secondly, in a head-on collision, for
example, the seat belt restricts movement of
the vehicle occupant towards the point of
impact. SRS (Supplemental Restraint System)
Introduction SRS consists of:
R the 6 SRS warning lamp
R airbags
R the airbag control unit with crash sensors
R belt tensioners
R belt force limiters
SRS reduces the risk of vehicle occupants
coming into contact with parts of the vehi-
cle's interior in the event of an accident. It can
also reduce the forces to which vehicle occu- pants are subjected during an accident.
SRS warning lamp G
WARNING
If SRS is malfunctioning, restraint system
components may be triggered unintentionally
or might not be triggered at all in the event of
an accident with a high rate of vehicle decel-
eration. There is an increased risk of injury,
possibly even fatal.
Have SRS checked and repaired immediately
at a qualified specialist workshop.
SRS functions are checked regularly when
you switch on the ignition and when the engine is running. Therefore, malfunctions
can be detected in good time.
The
6 SRS warning lamp in the instrument
cluster lights up when the ignition is switched on. It goes out no later than a few seconds
after the engine is started.
The SRS components are in operational read-
iness when the 6SRS warning lamp goes
out while the engine is running.
A malfunction has occurred if:
R the 6 SRS warning lamp does not light
up when the ignition is switched on
R the engine is running and the 6SRS
warning lamp does not go out after a few
seconds
R the engine is running and the 6SRS
warning lamp lights up again
Triggering of belt tensioners and air-
bags During the first stage of a collision, the airbag
control unit evaluates important physical
data relating to vehicle deceleration or accel-
eration, such as:
R duration
R direction
R magnitude
Based on the evaluation of this data, the air-
bag control unit triggers the belt tensioners in the first stage.
If there is an even higher rate of vehicle decel-
eration or acceleration in a longitudinal direc- tion, the front airbags are also deployed.
Your vehicle has adaptive, two-stage front air- bags. The airbag control unit evaluates vehi-
cle deceleration or acceleration in the event
of a collision. In the first deployment stage,
the front airbag is filled with enough propel-
lant gas to reduce the risk of injuries. The
front airbag is fully deployed if a second
deployment threshold is reached within a few
milliseconds.
The belt tensioner and airbag triggering
thresholds are variable and are adapted to the Occupant safety
51Safety Z
Page 56 of 637
passenger seat. The
4PASSENGER
AIRBAG OFF indicator lamp must be con-
tinuously lit.
If you secure a forward-facing child
restraint system to the front-passenger
seat, you must move the front-passenger
seat as far back as possible.
R make sure there are no heavy or sharp-
edged objects in the pockets of clothing.
R do not lean forwards, e.g. over the cover of
the driver's/front-passenger front airbag,
particularly when the vehicle is in motion.
R do not put your feet on the dashboard.
R only hold the steering wheel on the outside.
This allows the airbag to be fully deployed.
You could be injured if the airbag is
deployed and you are holding the inside of
the steering wheel.
R do not lean on the doors from inside the
vehicle.
R make sure that there are no people, ani-
mals or objects between the vehicle occu-
pants and the area where the airbags are
deployed.
R do not place any objects between the seat
backrest and the door.
R do not hang any hard objects, for example,
coat hangers, on the grab handles or coat
hooks.
R do not attach accessories, e.g. cup holders,
to the doors.
It is not possible to rule out a risk of injury
being caused by an airbag, due to the high
speed at which the airbag must be deployed. G
WARNING
If you modify the airbag covers or affix
objects, e.g. stickers to them, the airbags may
no longer function as intended. There is an
increased risk of injury.
Never modify the airbag covers and do not
affix any objects to them.
The airbag installation locations are identified
by the AIRBAG symbol. G
WARNING
Unsuitable seat covers may obstruct or even
prevent deployment of the airbags integrated into the seats. The airbags may then fail to
protect the vehicle occupants as intended.
Operation of the automatic child seat recog-
nition may also be impaired. There is an
increased risk of injury, possibly even fatal.
Use only seat covers which have been specif-
ically approved for the respective seat by
Mercedes-Benz.
You should only use seat covers that have
been approved for your vehicle by Mercedes-
Benz. The seat covers must have a special
tear seam for sidebags. Otherwise, the side-
bags cannot deploy correctly and therefore
cannot provide the intended protection in the event of an accident. G
WARNING
After the driver's airbag has been deployed,
the airbag parts are hot. There is a risk of
injury.
Do not touch the airbag parts. Have deployed airbags replaced immediately at a qualified
specialist workshop.
Airbag deployment slows down and restricts
the movement of the vehicle occupants.
If the airbags are deployed, you will hear a
bang, and a small amount of powder may also be released. Only in rare cases will the bang
affect your hearing. The powder that is
released generally does not constitute a
health hazard and does not indicate that thereis a fire in the vehicle. The powder may cause
short-term breathing difficulties to persons
suffering from asthma or other pulmonary
conditions. In order to prevent potential
breathing difficulties, you should leave the
vehicle as soon as it is safe to do so. You can also open the window to allow fresh air to
enter the vehicle interior. The 6SRS warn-
ing lamp lights up.
i After an airbag has been deployed, have
the vehicle towed to the nearest qualified Occupant safety
53Safety Z
Page 64 of 637
enter the vehicle interior. The
6SRS warn-
ing lamp lights up.
If the seat belt is also fitted with a belt force
limiter and this is triggered, the force exerted by the seat belt on the vehicle occupant is
reduced.
The belt force limiters are synchronised with
the front airbags. They take on a part of the
deceleration force, resulting in the force exer- ted on the occupant being distributed over a
greater area. Child restraint systems
Important safety notes
G
WARNING
To reduce the risk of serious or even fatal
injury to the child in the event of a sudden
change in direction, braking or an accident:
R children less than 1.50 m tall and under
twelve years of age must always be secured
in special child restraint systems on the
front-passenger seat. This is necessary
because the seat belts are not designed for
children.
R if you secure a forward-facing child
restraint system to the front-passenger
seat, you must move the front-passenger
seat as far back as possible. When doing so,
ensure that the shoulder belt strap from the
belt outlet on the vehicle is routed towards
the front to the shoulder belt guide on the
child restraint system.
R children must never travel sitting on the lap
of another occupant. Due to the forces
which occur in the event of a sudden
change of direction, heavy braking or an
accident, it would not be possible to
restrain the child. The child could be thrown against parts of the vehicle interior and be
seriously or even fatally injured. G
WARNING
If the child restraint system is incorrectly fit-
ted on the seat position suitable for this pur- pose, it cannot perform its intended protec-
tive function. In the event of an accident,
sharp braking or a sudden change in direction,
the child may not be held securely. There is an
increased risk of serious or even fatal injuries.
Observe the manufacturer's installation
instructions and the correct use for the child
restraint system. Make sure that the entire
surface of the child restraint system is resting
on the seat surface. Never place objects
under or behind the child restraint system,
e.g. cushions. Only use child restraint sys-
tems with the original cover designed for
them. Only replace damaged covers with gen- uine covers. G
WARNING
If the child restraint system is fitted incor-
rectly or is not secured, it can come loose in
the event of an accident, heavy braking or a
sudden change in direction. The child
restraint system could be thrown about, strik- ing vehicle occupants. There is an increased
risk of injury, possibly even fatal.
Always fit child restraint systems properly,
even if they are not being used. Make sure
that you observe the child restraint system
manufacturer's installation instructions. G
WARNING
Child restraint systems or their securing sys-
tems that have been damaged or subjected to a load in an accident cannot perform their
intended protective function. In the event of
an accident, sharp braking or a sudden
change in direction, the child may not be held securely. There is an increased risk of serious
or even fatal injuries.
Immediately replace child restraint systems
that have been damaged or subjected to a
load in an accident. Have the child restraint
securing systems checked in a qualified spe-
cialist workshop before fitting a child restraint
system again. Child restraint systems
61Safety Z
Page 83 of 637
The alarm is not switched off, even if you
close the open door that has triggered it, for
example. Tow-away protection
Function An audible and visual alarm is triggered if your
vehicle's angle of inclination is altered while
tow-away protection is primed. This can occur
if the vehicle is jacked up on one side, for
example.
Activating X
Make sure that:
R the doors are closed
R the boot lid is closed
Only then is the tow-away protection
primed.
X Lock the vehicle with the key or KEYLESS-
GO.
Tow-away protection is primed after
approximately 30 seconds.
Deactivating X
To switch off: unlock the vehicle with the
key or KEYLESS-GO.
Tow-away protection is switched off auto-
matically.
Deactivating X
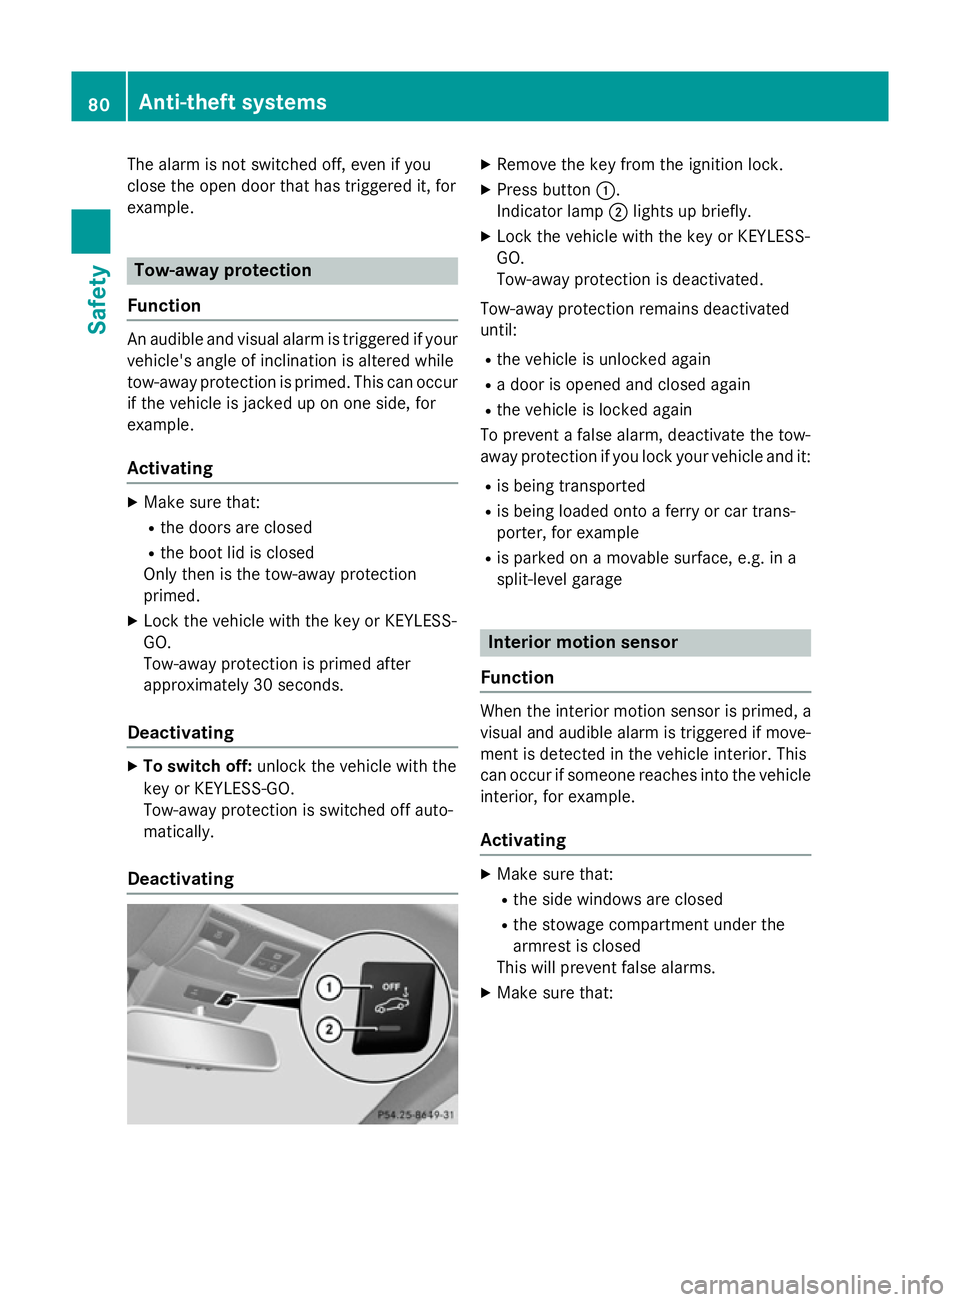
Remove the key from the ignition lock.
X Press button :.
Indicator lamp ;lights up briefly.
X Lock the vehicle with the key or KEYLESS-
GO.
Tow-away protection is deactivated.
Tow-away protection remains deactivated
until: R the vehicle is unlocked again
R a door is opened and closed again
R the vehicle is locked again
To prevent a false alarm, deactivate the tow-
away protection if you lock your vehicle and it:
R is being transported
R is being loaded onto a ferry or car trans-
porter, for example
R is parked on a movable surface, e.g. in a
split-level garage Interior motion sensor
Function When the interior motion sensor is primed, a
visual and audible alarm is triggered if move-
ment is detected in the vehicle interior. This
can occur if someone reaches into the vehicle interior, for example.
Activating X
Make sure that:
R the side windows are closed
R the stowage compartment under the
armrest is closed
This will prevent false alarms.
X Make sure that: 80
Anti-theft systemsSafety
Page 128 of 637
Useful information
............................126
Exterior lighting ................................ 126
Interior lighting ................................. 134
Replacing bulbs ................................. 135
Windscreen wipers ...........................135 125Lights and windscreen wipers
Page 137 of 637
Interior lighting
Overview of interior lighting
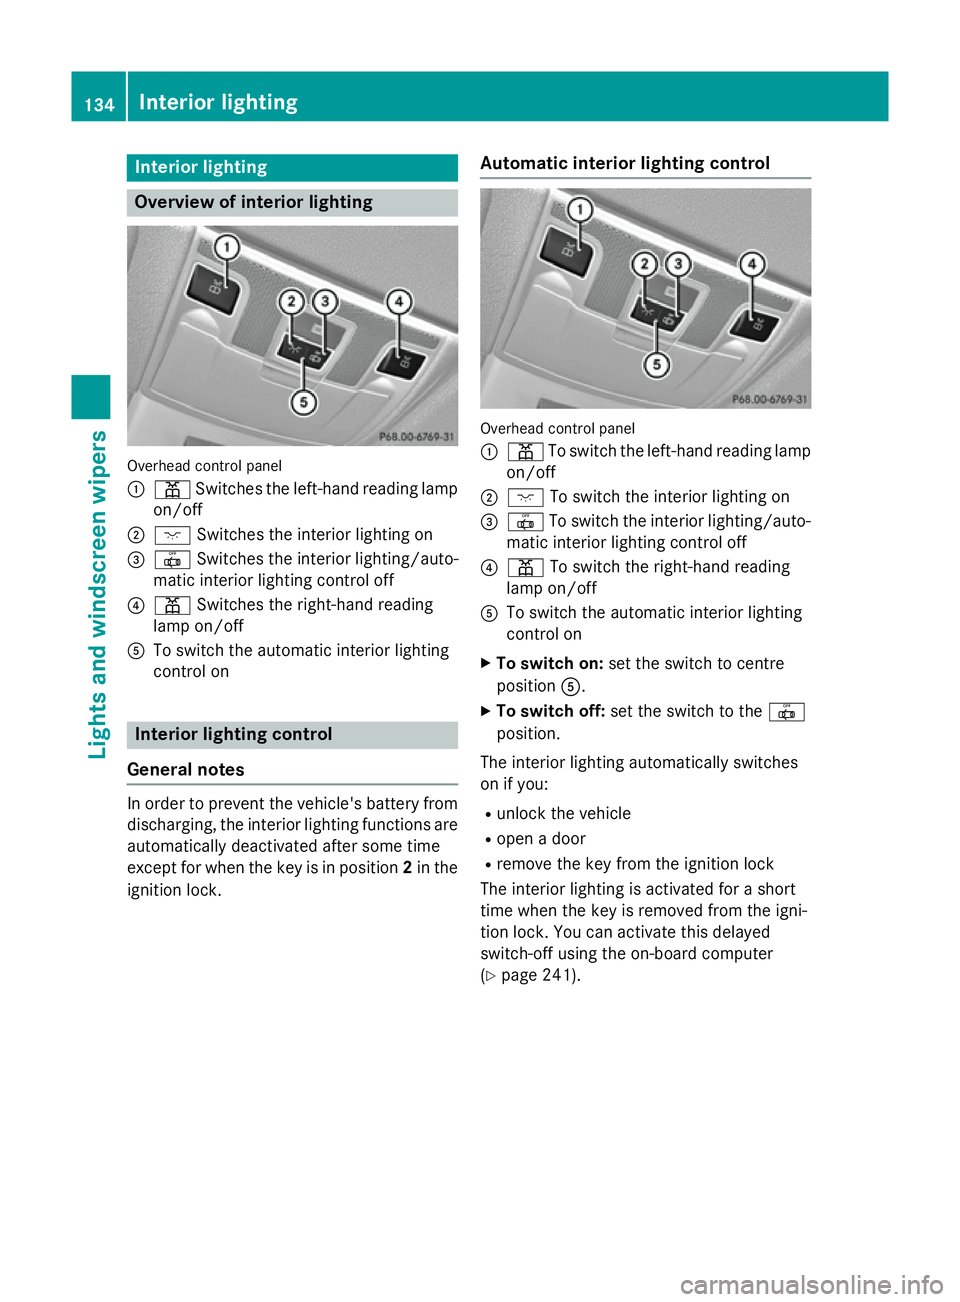
Overhead control panel
:
p Switches the left-hand reading lamp
on/off
; c Switches the interior lighting on
= | Switches the interior lighting/auto-
matic interior lighting control off
? p Switches the right-hand reading
lamp on/off
A To switch the automatic interior lighting
control on Interior lighting control
General notes In order to prevent the vehicle's battery from
discharging, the interior lighting functions are
automatically deactivated after some time
except for when the key is in position 2in the
ignition lock. Automatic interior lighting control Overhead control panel
:
p To switch the left-hand reading lamp
on/off
; c To switch the interior lighting on
= | To switch the interior lighting/auto-
matic interior lighting control off
? p To switch the right-hand reading
lamp on/off
A To switch the automatic interior lighting
control on
X To switch on: set the switch to centre
position A.
X To switch off: set the switch to the |
position.
The interior lighting automatically switches
on if you:
R unlock the vehicle
R open a door
R remove the key from the ignition lock
The interior lighting is activated for a short
time when the key is removed from the igni-
tion lock. You can activate this delayed
switch-off using the on-board computer
(Y page 241). 134
Interior lightingLights and windscreen wipers
Page 138 of 637
Manual interior lighting control
X
To switch the interior lighting on: set the
switch to the cposition.
X To switch the interior lighting off: set the
switch to the |or (if the door is closed)
to the centre position.
X To switch the reading lamps on/off:
press the pbutton. Crash-responsive emergency lighting
The interior lighting is activated automatically
if the vehicle is involved in an accident.
X To switch off the crash-responsive
emergency lighting: press the hazard
warning lamp button.
or X Lock and then unlock the vehicle using the
key. Replacing bulbs
G
DANGER
Xenon bulbs are under high voltage. You can
get an electric shock if you remove the cover
of the xenon bulb and touch the electrical
contacts. There is a risk of fatal injury.
Never touch the parts or the electrical con-
tacts of the xenon bulb. Always have work on the xenon bulbs carried out at a qualified spe- cialist workshop.
The front and rear lamps of your vehicle are
equipped with either xenon or LED bulbs. Do
not replace the bulbs yourself. Contact a
qualified specialist workshop which has the
necessary specialist knowledge and tools to
carry out the work required.
Bulbs and lamps are an important aspect of
vehicle safety. You must therefore make sure
that these function correctly at all times.
Have the headlamp setting checked regularly. Windscreen wipers
Switching the windscreen wipers on/
off
! Do not operate the windscreen wipers
when the windscreen is dry, as this could
damage the wiper blades. Moreover, dust
that has collected on the windscreen can
scratch the glass if wiping takes place when the windscreen is dry.
If it is necessary to switch on the wind-
screen wipers in dry weather conditions,
always operate them using washer fluid.
! If the windscreen wipers leave smears on
the windscreen after the vehicle has been
washed in an automatic car wash, this may
be due to wax or other residue. Clean the
windscreen with washer fluid after an auto- matic car wash.
! Intermittent wiping with rain sensor: due
to optical influences and the windscreen
becoming dirty in dry weather conditions,
the windscreen wipers may be activated
inadvertently. This could damage the wind- screen wiper blades or scratch the wind-
screen.
For this reason, you should always switch
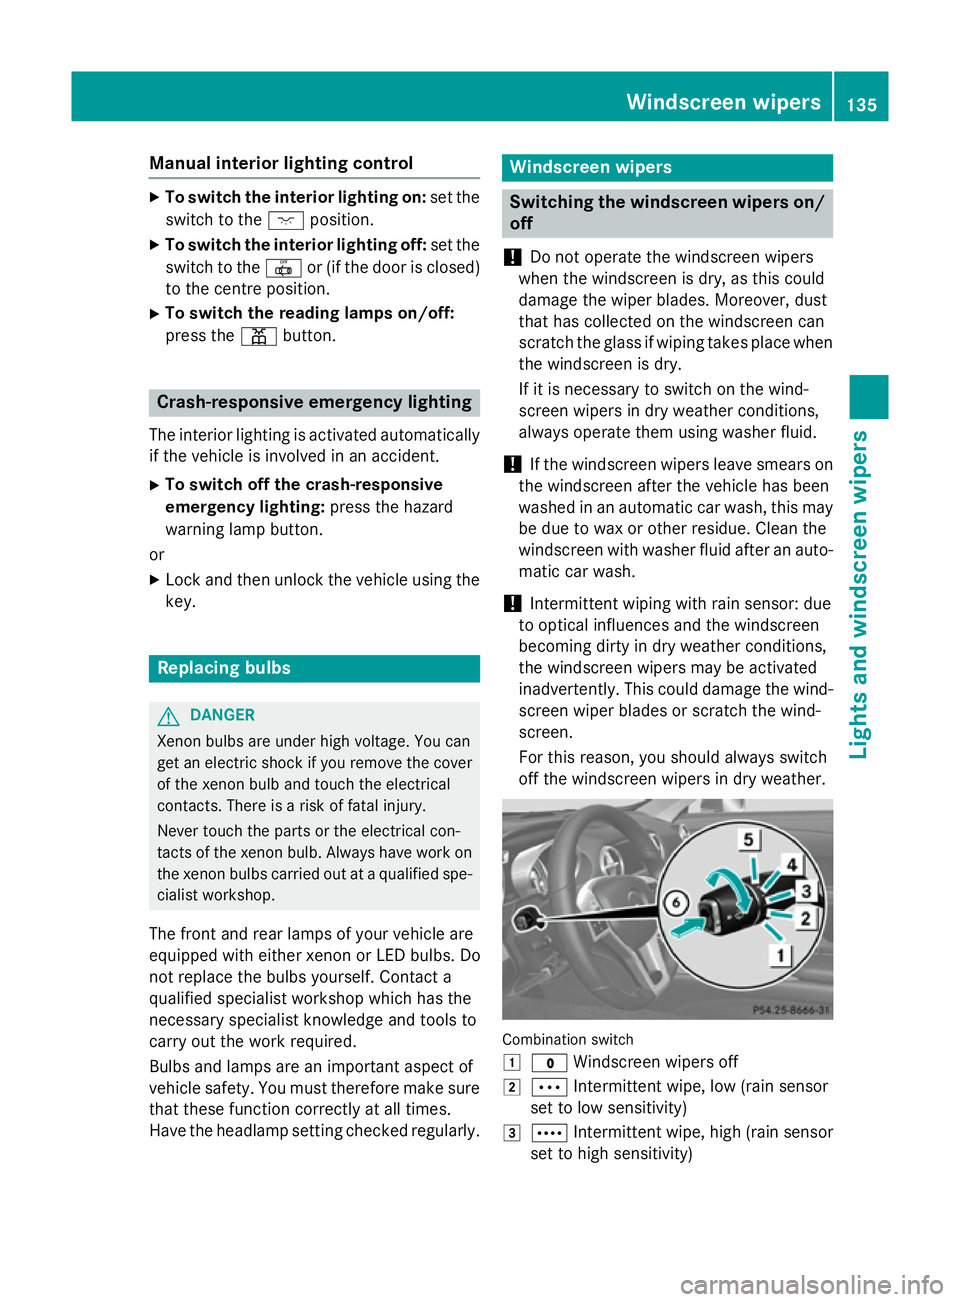
off the windscreen wipers in dry weather. Combination switch
1
$ Windscreen wipers off
2 Ä Intermittent wipe, low (rain sensor
set to low sensitivity)
3 Å Intermittent wipe, high (rain sensor
set to high sensitivity) Windscreen wipers
135Lights and windscreen wipers Z