2012 MERCEDES-BENZ SL ROADSTER tire size
[x] Cancel search: tire sizePage 31 of 637
Further options .............................. 509
Information about the current pro-
gramme ......................................... 506
Operating (on-board computer) ..... 235
Picture setting s.............................. 502
Programme preview ....................... 506
Reception quality ........................... 502
Selecting channels (COMAND
Online) ........................................... 503
Selecting channels (Rear Seat
Entertainment System) .................. 532
Selecting language and subtitles ... 509
Setting the reception regio n.......... 507
Showing/hiding the menu ............. 503
Showing/hiding the navigation
menu ............................................. 503
Sound settings (balance, bass,
treble) ............................................ 299
Storing channels (COMAND
Online) ........................................... 505
Storing channels (Rear Seat
Entertainment System) .................. 533
Switching on .................................. 502
Teletext .......................................... 508
Two-way radio
Frequencies ................................... 620
Installation ..................................... 620
Transmission output (maximum) .... 620
Type identification plate
see Vehicle identification plate
Tyre pressure
Calling up (on-board computer) ..... 602
Display message ............................ 267
Important safety notes .................. 602
Not reached (TIREFIT) .................... 581
Reached (TIREFIT) .......................... 581
Recommended ............................... 600
Tyre pressure loss warning
General notes ................................ 601
Important safety notes .................. 601
Restarting ...................................... 601
Tyre pressure monitor
Checking the tyre pressure elec-
tronically ........................................ 603
Function/note s............................. 602
General notes ................................ 602
Important safety notes .................. 602 Radio type approval for the tyre
pressure monitor ........................... 605
Restarting ...................................... 604
Warning lamp ................................. 284
Warning message .......................... 604
Tyres
Changing a whee l.......................... 605
Checking ........................................ 597
Direction of rotation ...................... 605
Display message ............................ 267
Important safety notes .................. 596
M+S tyre s...................................... 598
MOExtended tyre s......................... 598
Overview ........................................ 596
Replacing ....................................... 605
Service life ..................................... 597
Storing ........................................... 606
Summer tyre s................................ 598
Tyre size (data) .............................. 610
Tyre tread ...................................... 597
Wheel and tyre combinations ........ 612
see Flat tyre U
Umbrella holder ................................. 545
Unlocking
Emergency unlocking ....................... 93
From inside the vehicle (central
unlocking button) ............................. 92
Updating the digital map .................. 382
USB
see Media Interface V
Vanity mirror (in sun visor) .............. 549
Variable SPEEDTRONIC
see SPEEDTRONIC
Vehicle
Correct use ...................................... 34
Data acquisition ....................... 35, 287
Display message ............................ 269
Electronics ..................................... 620
Equipment ....................................... 32
Implied warranty .............................. 35
Individual settings .......................... 239
Leaving parked up ......................... 178 28
Index
Page 220 of 637
Night View Assist Plus
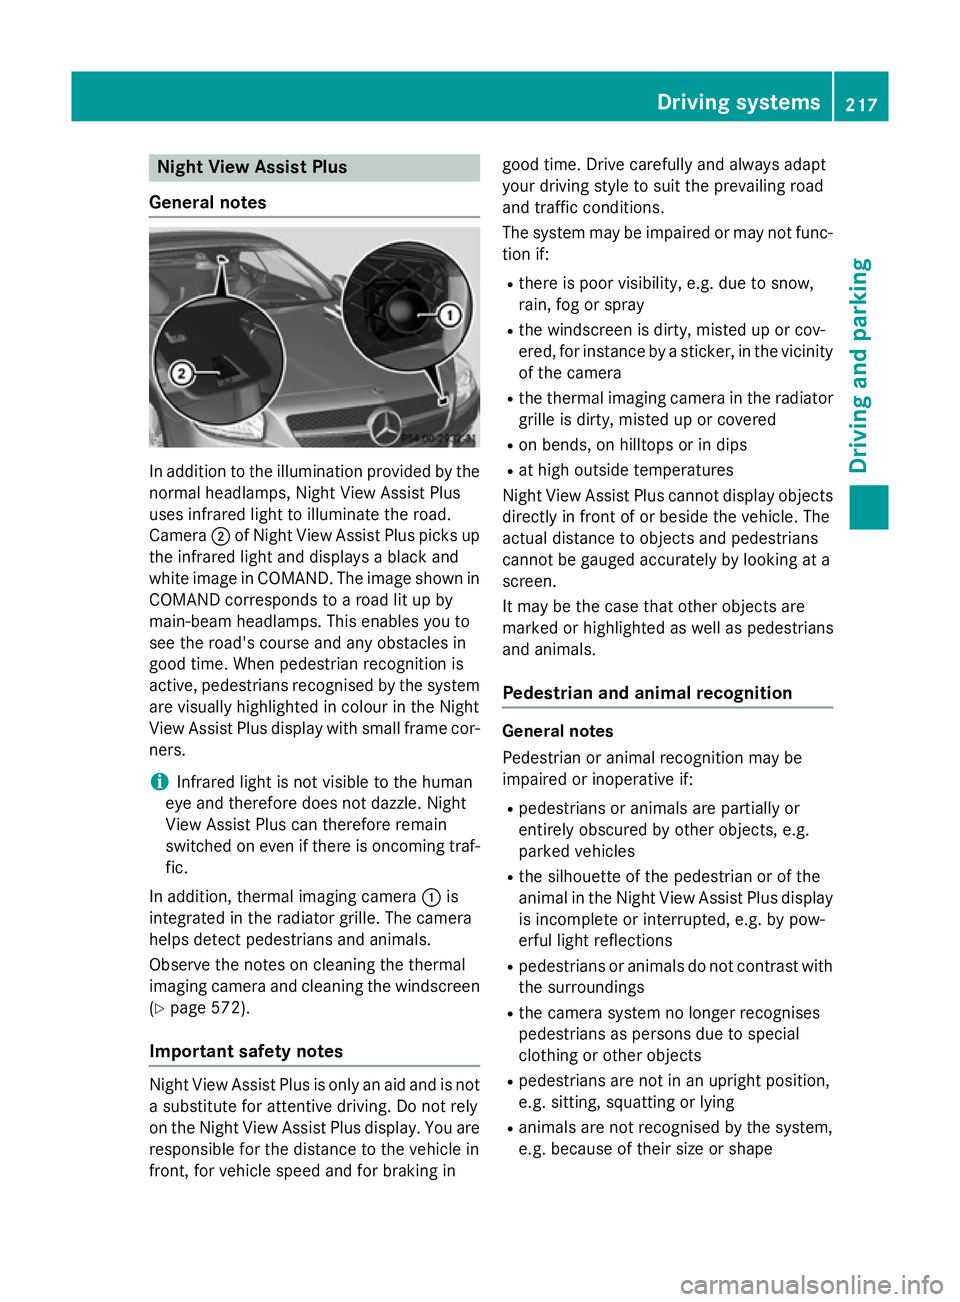
General notes In addition to the illumination provided by the
normal headlamps, Night View Assist Plus
uses infrared light to illuminate the road.
Camera ;of Night View Assist Plus picks up
the infrared light and displays a black and
white image in COMAND. The image shown in COMAND corresponds to a road lit up by
main-beam headlamps. This enables you to
see the road's course and any obstacles in
good time. When pedestrian recognition is
active, pedestrians recognised by the system are visually highlighted in colour in the Night
View Assist Plus display with small frame cor-
ners.
i Infrared light is not visible to the human
eye and therefore does not dazzle. Night
View Assist Plus can therefore remain
switched on even if there is oncoming traf- fic.
In addition, thermal imaging camera :is
integrated in the radiator grille. The camera
helps detect pedestrians and animals.
Observe the notes on cleaning the thermal
imaging camera and cleaning the windscreen (Y page 572).
Important safety notes Night View Assist Plus is only an aid and is not
a substitute for attentive driving. Do not rely
on the Night View Assist Plus display. You are
responsible for the distance to the vehicle in
front, for vehicle speed and for braking in good time. Drive carefully and always adapt
your driving style to suit the prevailing road
and traffic conditions.
The system may be impaired or may not func-
tion if:
R there is poor visibility, e.g. due to snow,
rain, fog or spray
R the windscreen is dirty, misted up or cov-
ered, for instance by a sticker, in the vicinity of the camera
R the thermal imaging camera in the radiator
grille is dirty, misted up or covered
R on bends, on hilltops or in dips
R at high outside temperatures
Night View Assist Plus cannot display objects
directly in front of or beside the vehicle. The
actual distance to objects and pedestrians
cannot be gauged accurately by looking at a
screen.
It may be the case that other objects are
marked or highlighted as well as pedestrians
and animals.
Pedestrian and animal recognition General notes
Pedestrian or animal recognition may be
impaired or inoperative if:
R pedestrians or animals are partially or
entirely obscured by other objects, e.g.
parked vehicles
R the silhouette of the pedestrian or of the
animal in the Night View Assist Plus display
is incomplete or interrupted, e.g. by pow-
erful light reflections
R pedestrians or animals do not contrast with
the surroundings
R the camera system no longer recognises
pedestrians as persons due to special
clothing or other objects
R pedestrians are not in an upright position,
e.g. sitting, squatting or lying
R animals are not recognised by the system,
e.g. because of their size or shape Driving systems
217Driving and parking Z
Page 551 of 637
Problems with the loading aid
Problem
Possible causes/consequences and
M
MSolutions It is no longer possible
to lower the stowed
roof in the boot using
the loading aid. You cannot close the boot any more.
X Call a qualified specialist workshop. Stowage well under the boot floor
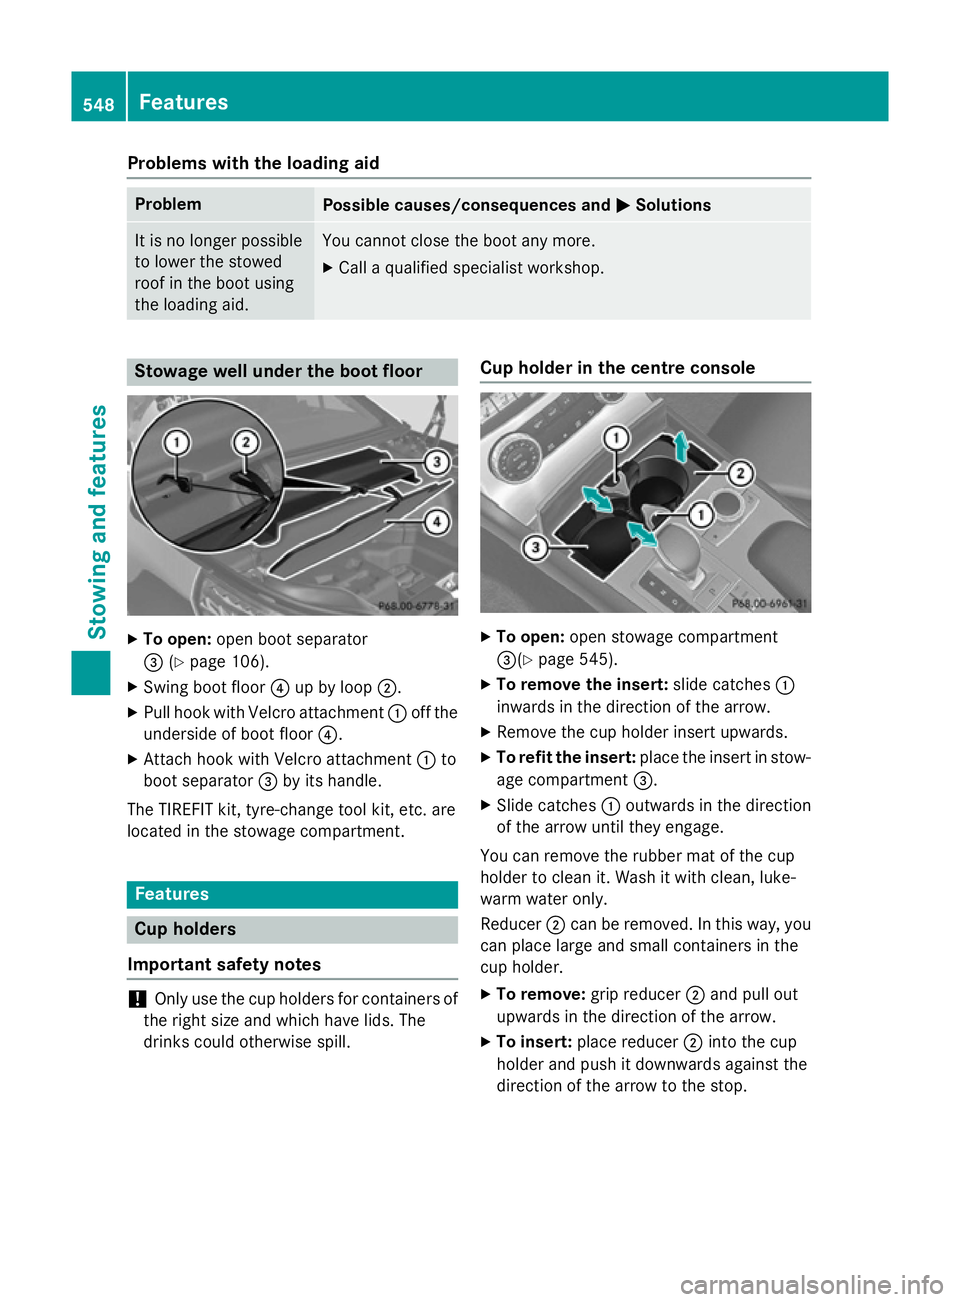
X
To open: open boot separator
= (Ypage 106).
X Swing boot floor ?up by loop ;.
X Pull hook with Velcro attachment :off the
underside of boot floor ?.
X Attach hook with Velcro attachment :to
boot separator =by its handle.
The TIREFIT kit, tyre-change tool kit, etc. are
located in the stowage compartment. Features
Cup holders
Important safety notes !
Only use the cup holders for containers of
the right size and which have lids. The
drinks could otherwise spill. Cup holder in the centre console
X
To open: open stowage compartment
=(Y page 545).
X To remove the insert: slide catches:
inwards in the direction of the arrow.
X Remove the cup holder insert upwards.
X To refit the insert: place the insert in stow-
age compartment =.
X Slide catches :outwards in the direction
of the arrow until they engage.
You can remove the rubber mat of the cup
holder to clean it. Wash it with clean, luke-
warm water only.
Reducer ;can be removed. In this way, you
can place large and small containers in the
cup holder.
X To remove: grip reducer ;and pull out
upwards in the direction of the arrow.
X To insert: place reducer ;into the cup
holder and push it downwards against the
direction of the arrow to the stop. 548
FeaturesStowing and features
Page 582 of 637
You can recognise MOExtended tyres by the
MOExtended marking which appears on the
tyre wall. You will find this marking next to the
tyre size designation, the load-bearing capa-
city and the speed index.
MOExtended tyres may only be used in con-
junction with an activated tyre pressure loss
warning system or tyre pressure monitor.
If the pressure loss warning message
appears in the multifunction display:
R observe the instructions in the display mes-
sages (Y page 267).
R check the tyre for damage
R if driving on, observe the following notes
The maximum driving distance is approx-
imately 80 km when the vehicle is partially
laden and approximately 30 km when the
vehicle is fully laden.
In addition to the vehicle load, the driving dis- tance possible depends upon:
R speed
R road condition
R outside temperature
The driving distance possible in run-flat mode may be reduced by extreme driving condi-
tions/manoeuvres, or it can be increased
through a moderate style of driving.
The maximum permissible distance which
can be driven in run-flat mode is counted from
the moment the tyre pressure loss warning
appears in the multifunction display.
You must not exceed a maximum speed of
80 km/h.
i When replacing one or all tyres, make
sure that you use only:
R the tyre size specified for the vehicle and
R tyre(s) marked "MOExtended"
If a tyre has gone flat and cannot be
replaced with an MOExtended tyre, a
standard tyre may be used as a temporary
measure. Make sure that you use the
proper size and type (summer or winter
tyre). i
Vehicles with MOExtended tyres are not
equipped with a TIREFIT kit at the factory. It
is therefore recommended that you addi-
tionally equip your vehicle with a TIREFIT kit if you fit tyres that do not feature run-flat
characteristics, e.g. winter tyres. A TIREFIT
kit is available, for example, from a qualified
specialist workshop.
Important safety notes G
WARNING
When driving in emergency mode, the driving characteristics deteriorate, e.g. when corner-
ing, accelerating quickly and when braking.
There is a risk of accident.
Do not exceed the stated maximum speed.
Avoid abrupt steering and driving manoeu-
vres, and driving over obstacles (kerbs, pot-
holes, off-road). This applies in particular to a laden vehicle.
Stop driving in emergency mode if:
R you hear banging noises.
R the vehicle starts to shake.
R you see smoke and smell rubber.
R ESP ®
is intervening constantly.
R there are tears in the sidewalls of the tyre.
After driving in emergency mode, have the
wheel rims checked at a qualified specialist
workshop with regard to their further use. The
faulty tyre must be replaced. TIREFIT kit
Important safety notes TIREFIT is a tyre sealant.
You can use TIREFIT to seal punctures of up to
4 mm, particularly those in the tyre tread. You can use TIREFIT at outside temperatures
down to Ò20 †. Flat tyre
579Breakdown assistance Z
Page 600 of 637
damage. Hidden tyre damage could also be
causing the unusual handling characteristics. If you find no signs of damage, have the tyres
and wheels checked at a qualified specialist
workshop.
When parking your vehicle, make sure that
the tyres do not get deformed by the kerb or
other obstacles. If it is necessary to drive over
kerbs, speed humps or similar elevations, try
to do so slowly and at an obtuse angle. Oth-
erwise, the tyres, particularly the sidewalls,
may be damaged. Regular checking of wheels and tyres
G
WARNING
Damaged tyres can cause tyre inflation pres-
sure loss. As a result, you could lose control of your vehicle. There is a risk of accident.
Check the tyres regularly for signs of damage and replace any damaged tyres immediately.
Regularly check the wheels and tyres of your
vehicle for damage at least once a month, as well as after driving off-road or on rough
roads. Damaged wheels can cause a loss of
tyre pressure. Pay particular attention to
damage such as:
R cuts in the tyres
R punctures
R tears in the tyres
R bulges on tyres
R deformation or severe corrosion on wheels
Regularly check the tyre tread depth and the condition of the tread across the whole width
of the tyre (Y page 597). If necessary, turn
the front wheels to full lock in order to inspect
the inner side of the tyre surface.
All wheels must have a valve cap to protect
the valve against dirt and moisture. Do not fit
anything onto the valve other than the stand-
ard valve cap or other valve caps approved for
your vehicle by Mercedes-Benz. Do not fit any other valve caps or systems, e.g. tyre pres-
sure monitoring systems. Regularly check the pressure of all the tyres,
particularly prior to long trips. Adjust the tyre
pressure as necessary (Y page 600).
Observe the notes on the emergency spare
wheel (Y page 614).
The service life of tyres depends on various
factors, including the following:
R driving style
R tyre pressure
R mileage Important safety notes on the tyre
tread
G
WARNING
Insufficient tyre tread will reduce tyre trac-
tion. The tyre is no longer able to dissipate
water. This means that on wet road surfaces, the risk of aquaplaning increases, in particularwhere speed is not adapted to suit the driving
conditions. There is a risk of accident.
If the tyre pressure is too high or too low, tyres may exhibit different levels of wear at differ-
ent locations on the tyre tread. Thus, you
should regularly check the tread depth and
the condition of the tread across the entire
width of all tyres.
Minimum tyre tread depth for:
R summer tyres: 3 mm
R M+S tyres: 4 mm
For safety reasons, replace the tyres before
the legally prescribed limit for the minimum
tyre tread depth is reached. Selecting, fitting and replacing tyres
G
WARNING
Exceeding the stated tyre load-bearing capa-
city and the approved maximum speed could
lead to tyre damage or the tyre bursting. There is a risk of accident.
Therefore, only use tyre types and sizes
approved for your vehicle model. Observe the Operation
597Wheels and tyres
Z
Page 601 of 637
tyre load rating and speed rating required for
your vehicle.
Pay special attention to country-specific
requirements for tyre approval. These
requirements can stipulate a specific tyre
type for your vehicle. Furthermore, the use of certain tyre types in certain regions and areas
of operation can be highly beneficial. You can find further information regarding tyres at
specialist tyre retailers, at qualified specialist
workshops or at any Mercedes-Benz Service
Centre.
R Only fit tyres and wheels of the same type
and make.
Exception: it is permissible to fit a different
type or make in the event of a flat tyre.
Observe the "MOExtended tyres (tyres with
run-flat characteristics" section
(Y page 578).
R Only fit tyres of the correct size onto the
wheels.
R Run in new tyres at moderate speeds for
the first 100 km. They only reach their full
performance after this distance.
R Do not drive with tyres which have too little
tread depth. This otherwise significantly
reduces the traction on wet roads (aqua-
planing).
R Replace the tyres after six years at the lat-
est, regardless of wear.
Observe the notes on the emergency spare
wheel (Y page 614). MOExtended tyres (tyres with run-flat
characteristics)
With MOExtended tyres (tyres with run-flat
characteristics), you can continue to drive
your vehicle even if there is a total loss of
pressure in one or more tyres.
Only use MOExtended tyres in conjunction
with an activated tyre pressure loss warning
system or tyre pressure monitoring system
and only on tyres specifically inspected by
Mercedes ‑Benz. Notes on driving with MOExtended tyres with
a flat tyre (Y page 578).
i Vehicles with MOExtended tyres are not
equipped with a TIREFIT kit at the factory. It
is therefore recommended that you addi-
tionally equip your vehicle with a TIREFIT kit if you fit tyres that do not feature run-flat
characteristics, e.g. winter tyres. A TIREFIT
kit can be obtained from a qualified spe-
cialist workshop. Winter operation
General notes
Have your vehicle winterproofed at a qualified
specialist workshop at the onset of winter.
Observe the notes in the "Changing a wheel" section (Y page 605). Driving with summer tyres
At temperatures below +7 †, summer tyres
lose elasticity and therefore traction and
braking power. Change the tyres on your vehi- cle to M+S tyres. Using summer tyres at very
cold temperatures could cause tears to form, thereby damaging the tyres permanently.
Mercedes-Benz cannot accept responsibility
for this type of damage. M+S tyres
G
WARNING
M+S tyres with a tyre tread depth of less than 4 mm are not suitable for use in winter as they
do not provide sufficient traction. There is a
risk of accident.
M+S tyres with a tread depth of less than
4 mm must be replaced.
At temperatures below +7 †, use winter tyres or all-season tyres. Both are marked with
M+S. 598
Winter operationWheels and tyres
Page 614 of 637
!
Large wheels: the lower the section width
for a certain wheel size, the lower the ride
comfort is on poor road surfaces. Roll com-
fort and suspension comfort are reduced
and the risk of damage to the wheels and
tyres as a result of driving over obstacles
increases.
Overview of abbreviations used in the follow- ing tyre tables:
R BA: both axles
R FA: front axle
R RA: rear axle
You will find a table with recommended tyre
pressures for various operating conditions on
the inside of your vehicle's fuel filler flap. For
further information on tyre pressure, see
(Y page 600). Check tyre pressures regularly
and only when the tyres are cold.
Notes on the vehicle equipment – always fit
the vehicle:
R with tyres of the same size on a given axle
(left/right)
R with the same type of tyres at a given time
(summer tyres, winter tyres, MOExtended
tyres)
Exception: it is permissible to fit a different
type or make in the event of a flat tyre.
Observe the "MOExtended tyres (tyres with
run-flat characteristics" section
(Y page 578).
Vehicles with MOExtended tyres are not
equipped with a TIREFIT kit at the factory. It is
therefore recommended that you additionally equip your vehicle with a TIREFIT kit if you fit tyres that do not feature run-flat characteris-
tics, e.g. winter tyres. A TIREFIT kit can be
obtained from a qualified specialist work-
shop.
i Not all wheel/tyre combinations can be
fitted at the factory in all countries. Wheel and tyre combinations
611Wheels and tyres Z