2012 MERCEDES-BENZ SL ROADSTER tailgate
[x] Cancel search: tailgatePage 98 of 637
closing procedure. The boot lid opens again
automatically. The automatic reversing func-
tion is only an aid and is not a substitute for
your attentiveness to the boot lid while it is
closing. G
WARNING
The reversing function does not react:
R to soft, light and thin objects, e.g. small fin-
gers
R over the last 8 mm of the closing path
This means that the reversing feature cannot
prevent someone being trapped in these sit-
uations. There is a risk of injury.
When closing make sure that no parts of the
body are in the closing area.
If someone is trapped:
R press the Fbutton on the key, or
R press the remote operating switch on the
driver's door, or
R press the closing or locking button on the
boot lid, or
R pull the boot lid handle Opening/closing from the outside
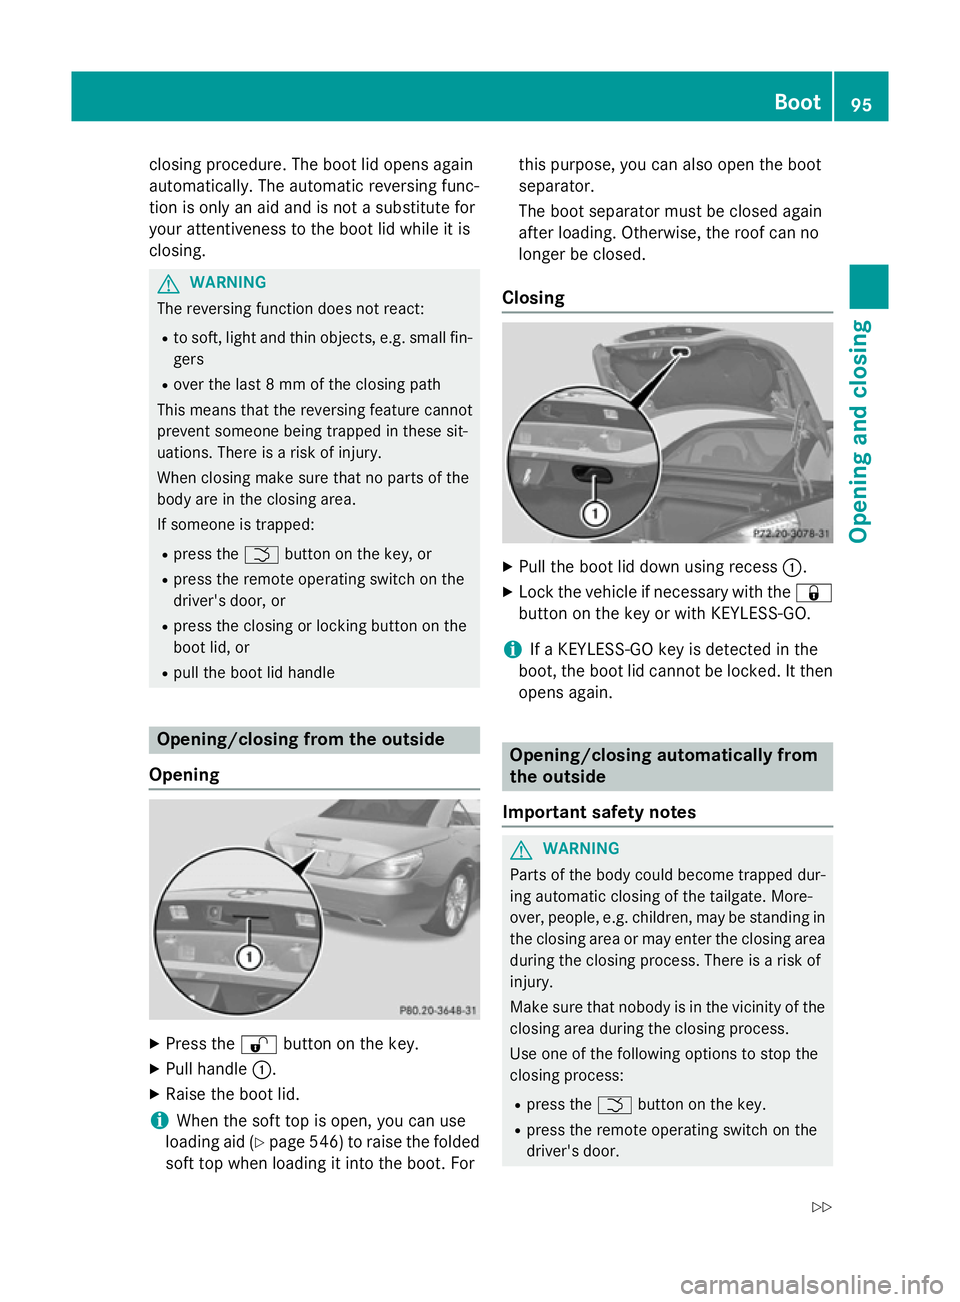
Opening X
Press the %button on the key.
X Pull handle :.
X Raise the boot lid.
i When the soft top is open, you can use
loading aid (Y page 546)to raise the folded
soft top when loading it into the boot. For this purpose, you can also open the boot
separator.
The boot separator must be closed again
after loading. Otherwise, the roof can no
longer be closed.
Closing X
Pull the boot lid down using recess :.
X Lock the vehicle if necessary with the &
button on the key or with KEYLESS-GO.
i If a KEYLESS-GO key is detected in the
boot, the boot lid cannot be locked. It then
opens again. Opening/closing automatically from
the outside
Important safety notes G
WARNING
Parts of the body could become trapped dur-
ing automatic closing of the tailgate. More-
over, people, e.g. children, may be standing in the closing area or may enter the closing area
during the closing process. There is a risk of
injury.
Make sure that nobody is in the vicinity of the closing area during the closing process.
Use one of the following options to stop the
closing process:
R press the Fbutton on the key.
R press the remote operating switch on the
driver's door. Boot
95Opening and closing
Z
Page 99 of 637
R
press the closing or locking button on the
tailgate.
R pull the handle on the tailgate.
! The boot lid swings upwards when
opened. Therefore, make sure that there is
sufficient clearance above the boot lid.
i Opening dimensions of the boot lid
(Y page 629).
Opening You can automatically open the boot lid using
the handle in the boot lid.
X If the boot is unlocked, pull the boot lid
handle and release it again immediately.
Vehicles with the boot lid remote closing fea-
ture: the boot lid can also be opened auto-
matically with the key.
X Press and hold the Fbutton on the key
until the boot lid opens.
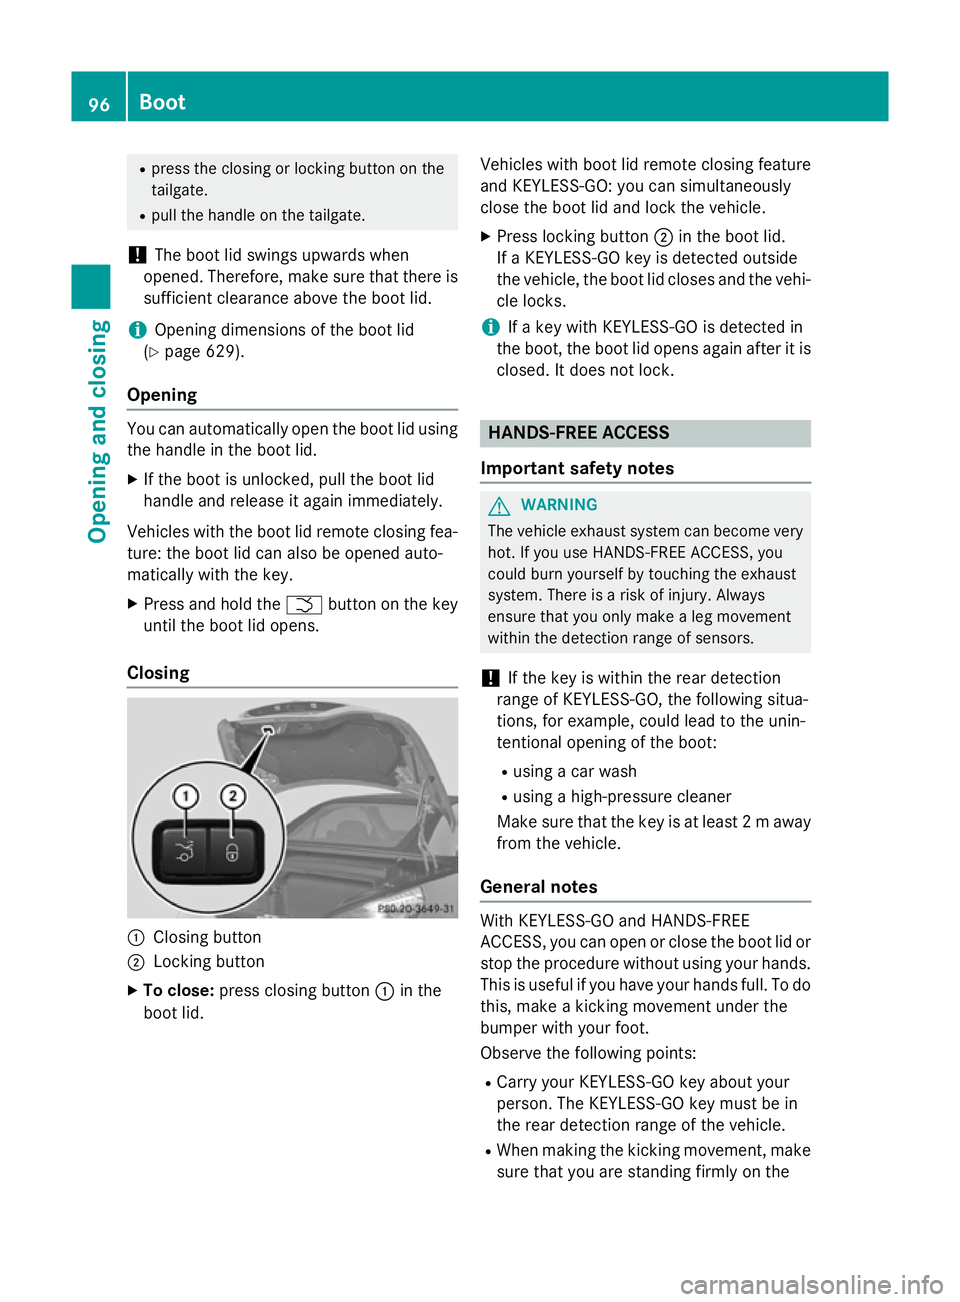
Closing :
Closing button
; Locking button
X To close: press closing button :in the
boot lid. Vehicles with boot lid remote closing feature
and KEYLESS-GO: you can simultaneously
close the boot lid and lock the vehicle.
X Press locking button ;in the boot lid.
If a KEYLESS-GO key is detected outside
the vehicle, the boot lid closes and the vehi-
cle locks.
i If a key with KEYLESS-GO is detected in
the boot, the boot lid opens again after it is
closed. It does not lock. HANDS-FREE ACCESS
Important safety notes G
WARNING
The vehicle exhaust system can become very
hot. If you use HANDS-FREE ACCESS, you
could burn yourself by touching the exhaust
system. There is a risk of injury. Always
ensure that you only make a leg movement
within the detection range of sensors.
! If the key is within the rear detection
range of KEYLESS-GO, the following situa-
tions, for example, could lead to the unin-
tentional opening of the boot:
R using a car wash
R using a high-pressure cleaner
Make sure that the key is at least 2 maway
from the vehicle.
General notes With KEYLESS-GO and HANDS-FREE
ACCESS, you can open or close the boot lid or
stop the procedure without using your hands.
This is useful if you have your hands full. To do
this, make a kicking movement under the
bumper with your foot.
Observe the following points:
R Carry your KEYLESS-GO key about your
person. The KEYLESS-GO key must be in
the rear detection range of the vehicle.
R When making the kicking movement, make
sure that you are standing firmly on the 96
BootOpening and closing
Page 101 of 637
Opening/closing automatically from
the inside
Important safety notes G
WARNING
Parts of the body could become trapped dur-
ing automatic closing of the tailgate. In addi-
tion, people may be standing in the closing
area or may enter the closing area, e.g. chil-
dren, during the closing procedure. There is a risk of injury.
Make sure that nobody is in the vicinity of theclosing area during the closing process.
Release the remote operating switch imme-
diately if somebody becomes trapped. To re-
open the tailgate pull on the remote operating
switch. G
WARNING
The boot lid can be automatically opened or
closed even if the key is not in the vehicle. If
children are left unsupervised in the vehicle,
they could activate the functions. There is a
risk of injury.
When leaving the vehicle, always take the key with you and lock the vehicle. Never leave
children unattended in the vehicle.
! The boot lid swings upwards when
opened. Therefore, make sure that there is sufficient clearance above the boot lid.
i Opening dimensions of the boot lid
(Y page 629).
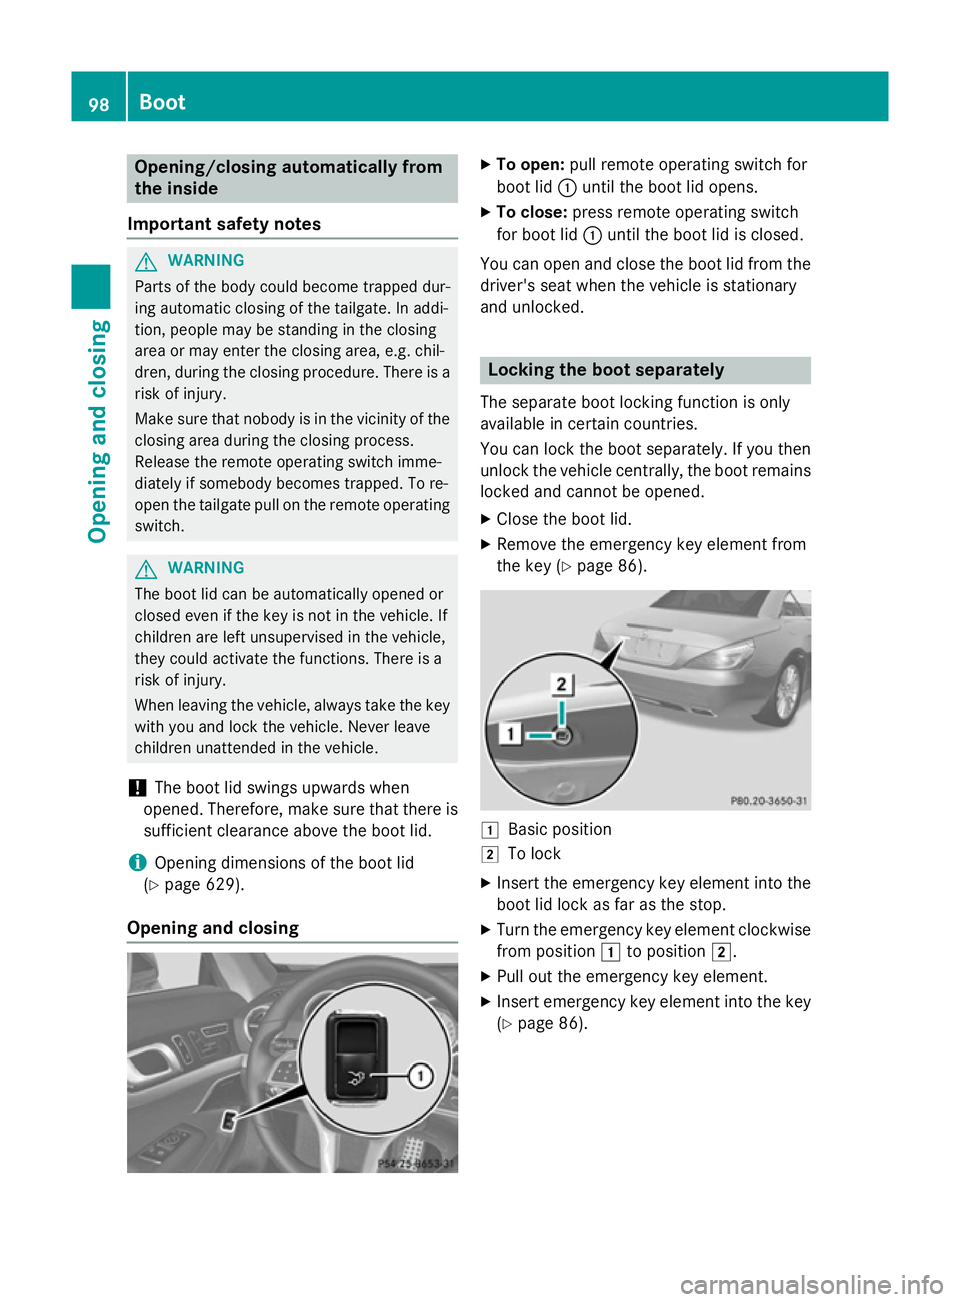
Opening and closing X
To open: pull remote operating switch for
boot lid :until the boot lid opens.
X To close: press remote operating switch
for boot lid :until the boot lid is closed.
You can open and close the boot lid from the
driver's seat when the vehicle is stationary
and unlocked. Locking the boot separately
The separate boot locking function is only
available in certain countries.
You can lock the boot separately. If you then
unlock the vehicle centrally, the boot remains locked and cannot be opened.
X Close the boot lid.
X Remove the emergency key element from
the key (Y page 86). 1
Basic position
2 To lock
X Insert the emergency key element into the
boot lid lock as far as the stop.
X Turn the emergency key element clockwise
from position 1to position 2.
X Pull out the emergency key element.
X Insert emergency key element into the key
(Y page 86). 98
BootOpening and closing
Page 214 of 637
X
Stop the movement of the multifunction
steering wheel or steer yourself.
Active Parking Assist will be cancelled at
once. The Park Assist cancelled
Park Assist cancelled mes-
sage appears in the multifunction display.
or X Press the PARKTRONIC button on the
centre console (Y page 206).
PARKTRONIC is switched off and Active
Parking Assist is immediately cancelled.
The Park Assist cancelled Park Assist cancelled message
appears in the multifunction display.
Active Parking Assist is cancelled automati-
cally if:
R parking using Active Parking Assist is no
longer possible
R you are driving faster than 10 km/h
R a wheel spins and ESP ®
intervenes or fails.
The ÷ ESP®
warning lamp lights up in
the instrument cluster.
A warning tone sounds. The parking symbol
goes out and the Park Assist cancelled
Park Assist cancelled
message appears in the multifunction dis-
play.
When Active Parking Assist is cancelled, you
must steer again yourself. Reversing camera
General notes Reversing camera
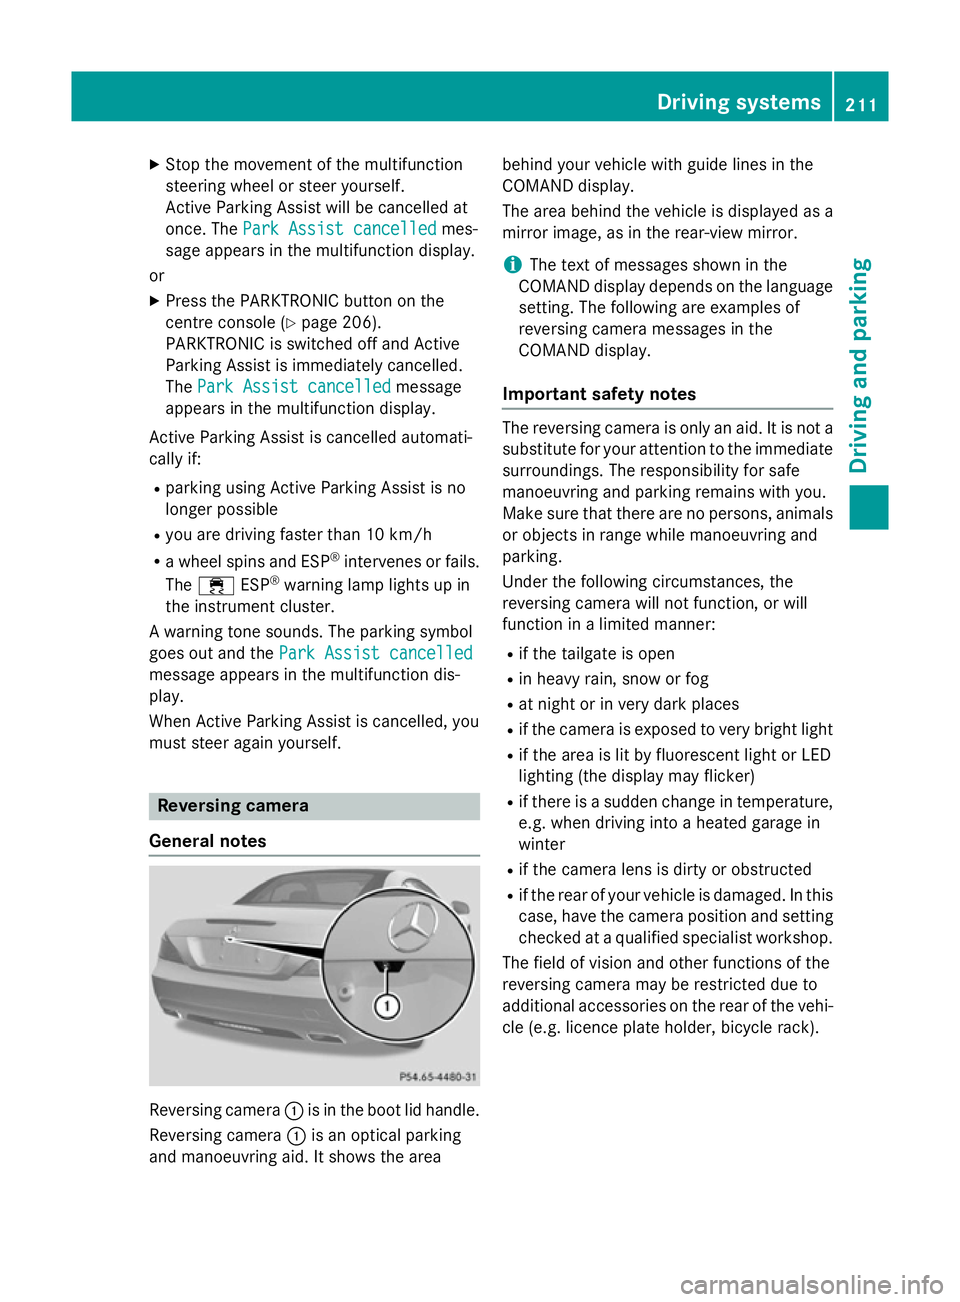
:is in the boot lid handle.
Reversing camera :is an optical parking
and manoeuvring aid. It shows the area behind your vehicle with guide lines in the
COMAND display.
The area behind the vehicle is displayed as a
mirror image, as in the rear-view mirror.
i The text of messages shown in the
COMAND display depends on the language
setting. The following are examples of
reversing camera messages in the
COMAND display.
Important safety notes The reversing camera is only an aid. It is not a
substitute for your attention to the immediate surroundings. The responsibility for safe
manoeuvring and parking remains with you.
Make sure that there are no persons, animals
or objects in range while manoeuvring and
parking.
Under the following circumstances, the
reversing camera will not function, or will
function in a limited manner:
R if the tailgate is open
R in heavy rain, snow or fog
R at night or in very dark places
R if the camera is exposed to very bright light
R if the area is lit by fluorescent light or LED
lighting (the display may flicker)
R if there is a sudden change in temperature,
e.g. when driving into a heated garage in
winter
R if the camera lens is dirty or obstructed
R if the rear of your vehicle is damaged. In this
case, have the camera position and setting checked at a qualified specialist workshop.
The field of vision and other functions of the
reversing camera may be restricted due to
additional accessories on the rear of the vehi-
cle (e.g. licence plate holder, bicycle rack). Driving systems
211Driving and parking Z
Page 215 of 637
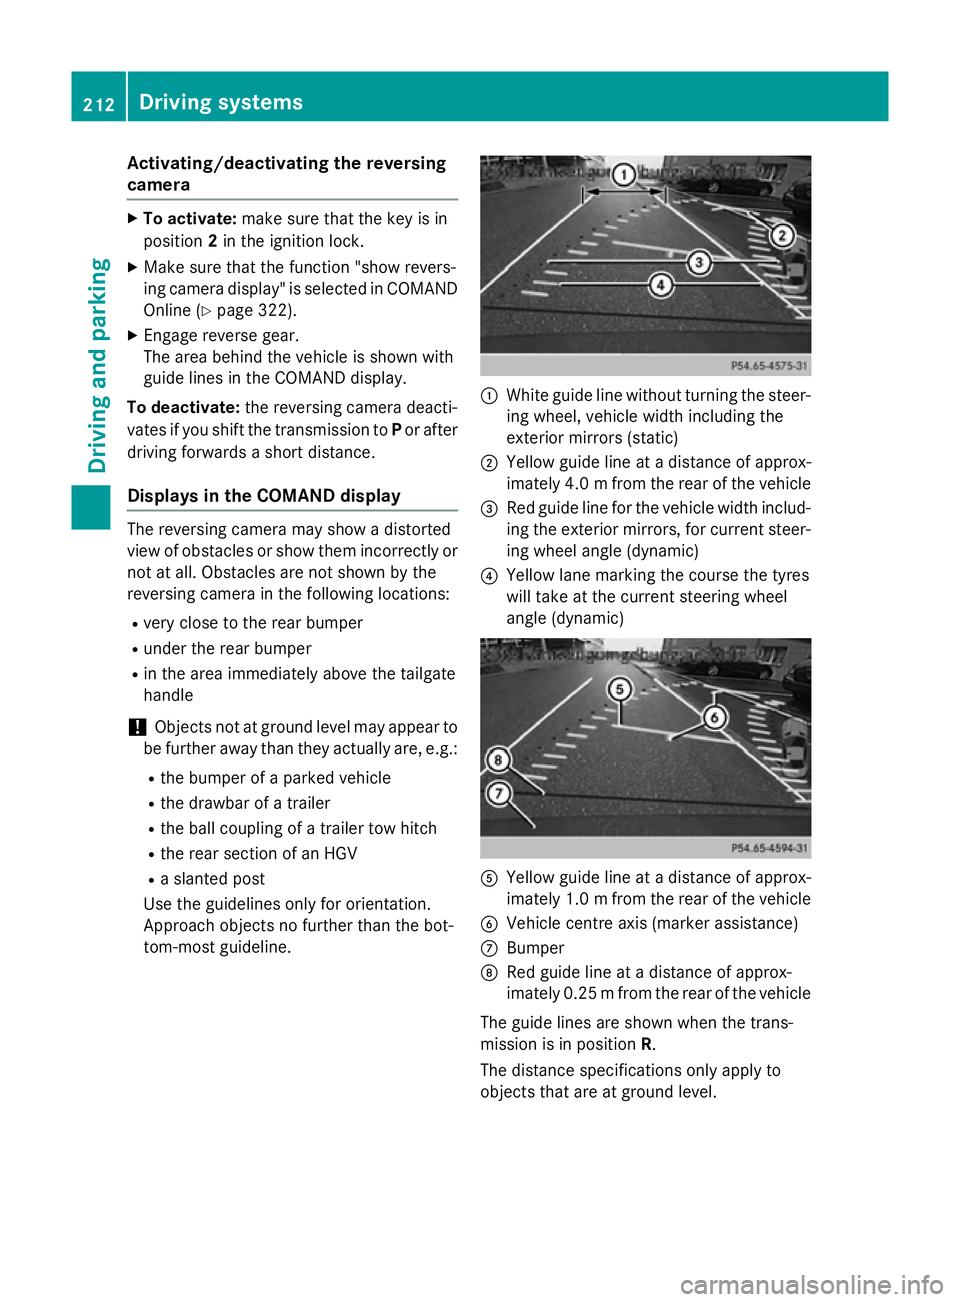
Activating/deactivating the reversing
camera X
To activate: make sure that the key is in
position 2in the ignition lock.
X Make sure that the function "show revers-
ing camera display" is selected in COMAND Online (Y page 322).
X Engage reverse gear.
The area behind the vehicle is shown with
guide lines in the COMAND display.
To deactivate: the reversing camera deacti-
vates if you shift the transmission to Por after
driving forwards a short distance.
Displays in the COMAND display The reversing camera may show a distorted
view of obstacles or show them incorrectly or
not at all. Obstacles are not shown by the
reversing camera in the following locations:
R very close to the rear bumper
R under the rear bumper
R in the area immediately above the tailgate
handle
! Objects not at ground level may appear to
be further away than they actually are, e.g.:
R the bumper of a parked vehicle
R the drawbar of a trailer
R the ball coupling of a trailer tow hitch
R the rear section of an HGV
R a slanted post
Use the guidelines only for orientation.
Approach objects no further than the bot-
tom-most guideline. :
White guide line without turning the steer-
ing wheel, vehicle width including the
exterior mirrors (static)
; Yellow guide line at a distance of approx-
imately 4.0 mfrom the rear of the vehicle
= Red guide line for the vehicle width includ-
ing the exterior mirrors, for current steer- ing wheel angle (dynamic)
? Yellow lane marking the course the tyres
will take at the current steering wheel
angle (dynamic) A
Yellow guide line at a distance of approx-
imately 1.0 mfrom the rear of the vehicle
B Vehicle centre axis (marker assistance)
C Bumper
D Red guide line at a distance of approx-
imately 0.25 mfrom the rear of the vehicle
The guide lines are shown when the trans-
mission is in position R.
The distance specifications only apply to
objects that are at ground level. 212
Driving systemsDriving and parking