2012 MERCEDES-BENZ SL ROADSTER change time
[x] Cancel search: change timePage 509 of 637
X
Press Wthe COMAND controller while in
full-screen mode.
The TV menu is shown.
X Select Preset Preset by sliding XVYor turning
cVd the COMAND controller and press W
to confirm.
X Select Autostore
Autostore and pressWto confirm.
COMAND Online searches for channels
with adequate reception. The available sta-
tions are automatically stored in the preset positions.
Information about the current pro-
gramme X
Press Wthe COMAND controller while in
full-screen mode.
The TV menu is shown.
X Select Info Infoby sliding XVYor turning cVd
the COMAND controller and press Wto
confirm.
You will see the information if it is provided
by the selected TV channel or radio station. The information field otherwise remains
empty.
X To display multi-page information, turn
cVd or slide ZVÆthe COMAND controller.
i It may take a few seconds for the infor-
mation to appear.
Displaying the current programme or
programme preview This function is available if the selected TV
channel or radio station transmits the neces-
sary information.
X Press Wthe COMAND controller while in
full-screen mode.
The TV menu is shown.
X Select TV
TV by sliding XVYor turning cVd
the COMAND controller and press Wto
confirm.
X Select Channel list (TV) Channel list (TV) orStation
Station
list (Radio)
list (Radio).
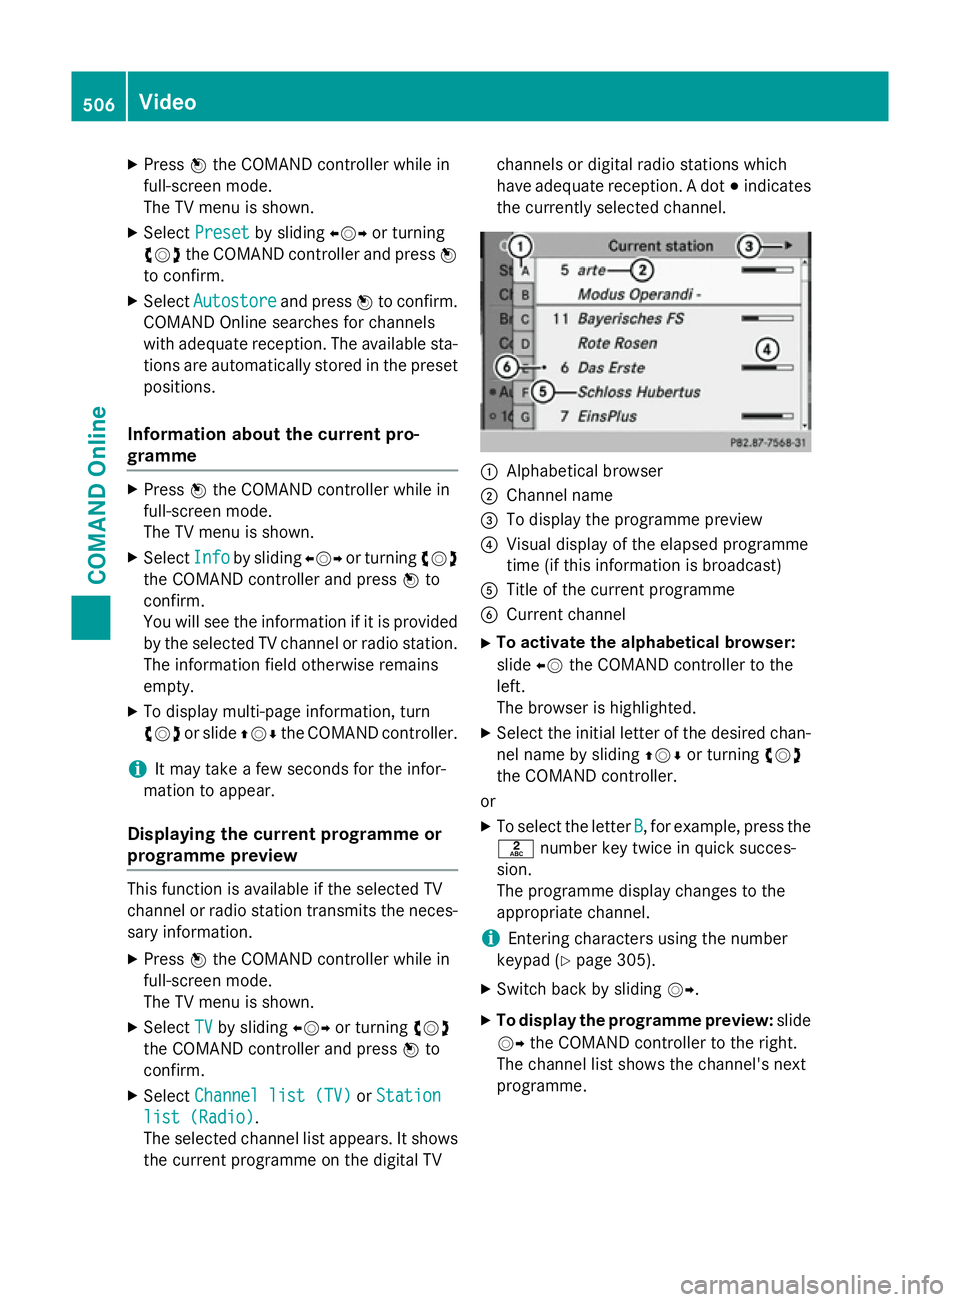
The selected channel list appears. It shows
the current programme on the digital TV channels or digital radio stations which
have adequate reception. A dot
#indicates
the currently selected channel. :
Alphabetical browser
; Channel name
= To display the programme preview
? Visual display of the elapsed programme
time (if this information is broadcast)
A Title of the current programme
B Current channel
X To activate the alphabetical browser:
slide XVthe COMAND controller to the
left.
The browser is highlighted.
X Select the initial letter of the desired chan-
nel name by sliding ZVÆor turning cVd
the COMAND controller.
or
X To select the letter B B, for example, press the
l number key twice in quick succes-
sion.
The programme display changes to the
appropriate channel.
i Entering characters using the number
keypad (Y page 305).
X Switch back by sliding VY.
X To display the programme preview: slide
VY the COMAND controller to the right.
The channel list shows the channel's next
programme. 506
VideoCOMAND Online
Page 514 of 637
Video DVD mode
Important safety notes G
WARNING
The CD/DVD drive is a class 1 laser product. If you open the housing of the CD/DVD drive,
invisible laser beams may be released. These laser beams may damage your retina. There is
a risk of injury.
You must not open the casing. Always have
maintenance work and repairs carried out at a
qualified specialist workshop. G
WARNING
Handling discs while driving will distract you
from traffic conditions. You could then lose
control of the vehicle. There is a risk of an
accident.
Handle discs only when the vehicle is station- ary.
Bear in mind that, at a speed of only 50 km/h, your vehicle is already covering a distance of
14 m per second.
Notes on discs !
Do not affix stickers or labels to the discs.
They could peel off and damage
COMAND Online. Stickers can cause the
disc to bend, which can result in read errors
and disc recognition problems.
! COMAND Online is designed to play discs
which comply with the EN 60908 standard. Therefore, you can only use discs with a
maximum thickness of 1.3 mm.
If you insert thicker discs, e.g. those that
contain data on both sides (DVD on one
side and audio data on the other), they can-
not be ejected and can damage the device.
Only use round discs with a diameter of
12 cm. Do not use discs with a diameter of
8 cm, even with an adapter.
You may encounter playback problems when
playing copied discs. There are a large variety of discs, DVD authoring software, writing software and writers available. This variety
means that there is no guarantee that the
system will be able to play discs that you have
copied yourself.
DVD playback requirements There are video DVDs available on the market
that do not conform to the current standards. Such DVDs may have picture, sound or other playback problems.
COMAND Online is capable of playing back
video DVDs produced according to the fol-
lowing standards:
R Region code 2 (for Europe) or region code 0
(no region code)
R PAL or NTSC standard
You will generally find the relevant details
either on the DVD itself or on the DVD case.
i If you insert a video DVD with a different
region code, you will see a message to this
effect.
i COMAND Online is set to region code 2 at
the factory. This setting can be changed at
a Mercedes-Benz Service Centre. This will
allow you to play video DVDs with a differ-
ent region code, provided that they are pro-
duced in accordance with the PAL or NTSC standard. The region code can be changed
a maximum of five times.
Function restrictions Depending on the DVD, it is possible that cer-
tain functions or actions will be temporarily
blocked or may not function at all. As soon as
you try to activate these functions or actions, you will see the Ksymbol in the display.
Inserting and removing DVDs X
Proceed as described in the "Inserting and
ejecting CDs and DVDs" section
(Y page 469). Video
511COMAND Online Z
Page 515 of 637
Switching to video DVD mode
Switching on automatically
X Single DVD drive: insert a video DVD.
COMAND loads the medium inserted and
starts to play it.
X DVD changer: insert a video DVD.
X Press h.
or
X Press the %back button.
COMAND Online loads the medium inser-
ted and starts to play it.
Switching on with the function button X Press the hfunction button.
COMAND Online switches to the disc oper-
ating mode previously set.
By pressing the function button repeatedly,
you can change the operating mode in the
following order:
R audio CD/DVD/video DVD/MP3 in the
DVD changer or single DVD drive (disc
mode)
R memory card mode
R MUSIC REGISTER
R USB memory
R Media Interface or audio AUX mode
R operation with Bluetooth ®
audio
X DVD changer: selectMedia
Media by sliding VÆ
and turning cVdthe COMAND controller
and press Wto confirm.
Single DVD drive: selectMedia Media by sliding
VÆ and turning cVdthe COMAND con-
troller and press Wto confirm.
X Select a ývideo DVD from the media list
(Y page 514).
Switching on with the video menu X Select Video
Videoin the main function bar by
sliding ZVand turning cVdthe COMAND
controller and press Wto confirm.
If video DVD mode was the last mode selec-
ted, it will now be active. If another video source is switched on, you
can now switch to video DVD mode in the
video menu.
X Select Video Videoby sliding ZVthe COMAND
controller and press Wto confirm.
The video menu appears.
X Select DVD-V DVD-Vand press Wto confirm.
Showing/hiding the control menu X
To show: in video DVD mode, slide ZVÆ
the COMAND controller.
X To hide: slideZVÆ the COMAND control-
ler.
or
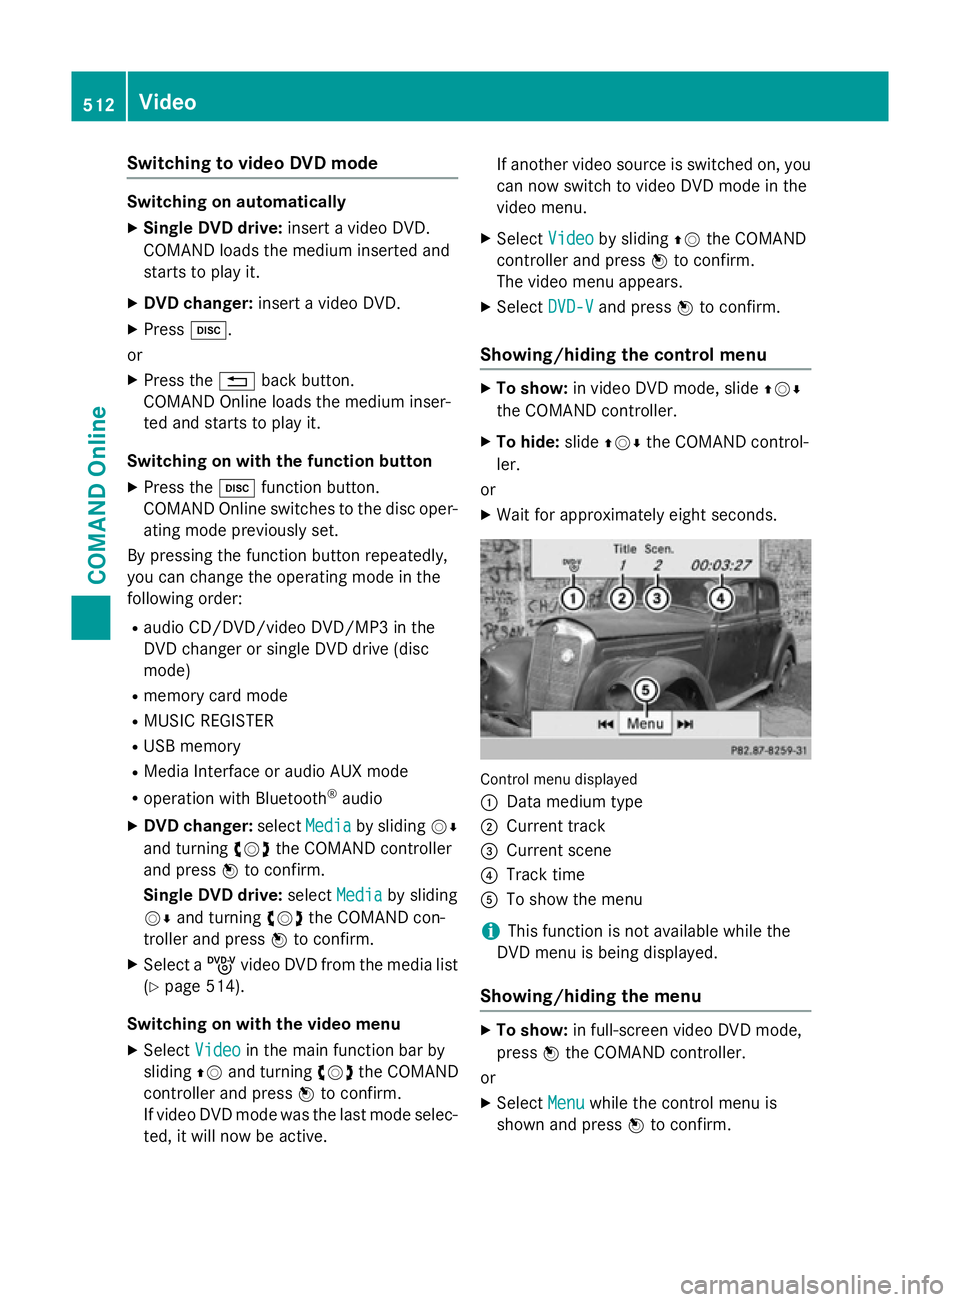
X Wait for approximately eight seconds. Control menu displayed
:
Data medium type
; Current track
= Current scene
? Track time
A To show the menu
i This function is not available while the
DVD menu is being displayed.
Showing/hiding the menu X
To show: in full-screen video DVD mode,
press Wthe COMAND controller.
or
X Select Menu
Menu while the control menu is
shown and press Wto confirm. 512
VideoCOMAND Online
Page 522 of 637
Rear Seat Entertainment System
Features of your COMAND Online
This Supplement describes all the standard
and optional equipment for your COMAND
Online system, as available at the time of
going to print. Country-specific differences
are possible. Please note that your
COMAND Online system may not be equip-
ped with all the features described. Overview
Important safety notes G
WARNING
The CD/DVD drive is a class 1 laser product. If you open the housing of the CD/DVD drive,
invisible laser beams may be released. These laser beams may damage your retina. There is
a risk of injury.
You must not open the casing. Always have
maintenance work and repairs carried out at a
qualified specialist workshop. G
WARNING
If objects such as headphones/headsets or
external audio/video sources are not secured in the passenger compartment, they can be
flung around and hit vehicle occupants. There
is a risk of injury, for example in the event of
sudden braking or a sudden change in direc-
tion. Always stow these items or similar objects
carefully so that they cannot be flung around,
for example in a lockable vehicle stowage
compartment.
Components The Rear Seat Entertainment System
includes:
R two screens for the rear behind the front-
seat head restraints
R a remote control
R a CD/DVD drive
R AUX jacks on both screens (AUX display)
and on the CD/DVD drive (AUX drive)
R two sets of cordless headphones Rear Seat Entertainment System
519COMAND Online Z
Page 538 of 637
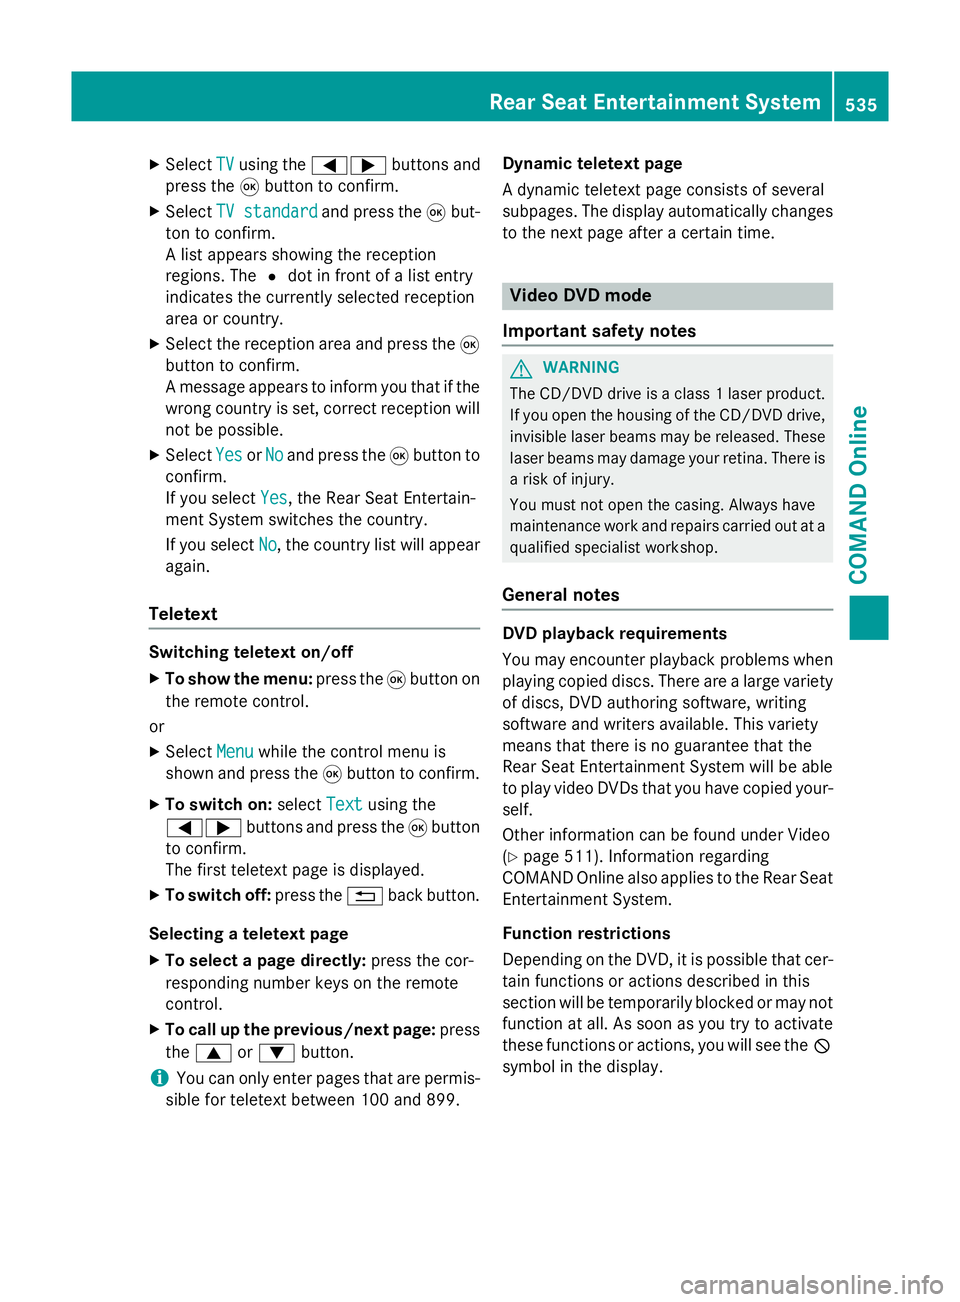
X
Select TV
TVusing the =; buttons and
press the 9button to confirm.
X Select TV standard
TV standard and press the9but-
ton to confirm.
A list appears showing the reception
regions. The #dot in front of a list entry
indicates the currently selected reception
area or country.
X Select the reception area and press the 9
button to confirm.
A message appears to inform you that if the
wrong country is set, correct reception will
not be possible.
X Select Yes YesorNo
No and press the 9button to
confirm.
If you select Yes
Yes , the Rear Seat Entertain-
ment System switches the country.
If you select No No, the country list will appear
again.
Teletext Switching teletext on/off
X To show the menu: press the9button on
the remote control.
or
X Select Menu
Menuwhile the control menu is
shown and press the 9button to confirm.
X To switch on: selectText
Text using the
=; buttons and press the 9button
to confirm.
The first teletext page is displayed.
X To switch off: press the%back button.
Selecting a teletext page
X To select a page directly: press the cor-
responding number keys on the remote
control.
X To call up the previous/next page: press
the 9 or: button.
i You can only enter pages that are permis-
sible for teletext between 100 and 899. Dynamic teletext page
A dynamic teletext page consists of several
subpages. The display automatically changes
to the next page after a certain time. Video DVD mode
Important safety notes G
WARNING
The CD/DVD drive is a class 1 laser product. If you open the housing of the CD/DVD drive,
invisible laser beams may be released. These laser beams may damage your retina. There is
a risk of injury.
You must not open the casing. Always have
maintenance work and repairs carried out at a
qualified specialist workshop.
General notes DVD playback requirements
You may encounter playback problems when
playing copied discs. There are a large variety
of discs, DVD authoring software, writing
software and writers available. This variety
means that there is no guarantee that the
Rear Seat Entertainment System will be able
to play video DVDs that you have copied your-
self.
Other information can be found under Video
(Y page 511). Information regarding
COMAND Online also applies to the Rear Seat
Entertainment System.
Function restrictions
Depending on the DVD, it is possible that cer-
tain functions or actions described in this
section will be temporarily blocked or may not function at all. As soon as you try to activate
these functions or actions, you will see the K
symbol in the display. Rear Seat Entertainment System
535COMAND Online Z
Page 539 of 637
Switching to video DVD mode
X
Insert a video DVD (Y page 528).
The Rear Seat Entertainment System loads the disc.
If disc mode was the last mode selected, it
will now be active.
If it was not, switch on video DVD mode as described in the following instructions.
X Select Disc
Disc in the menu using the
9=; buttons on the remote
control and confirm by pressing the 9
button.
If the video DVD fulfils the playback criteria:
the film either starts automatically or the
menu saved on the DVD appears. If the
DVD menu appears, you must start the film manually.
X Select the corresponding menu item in the
DVD menu.
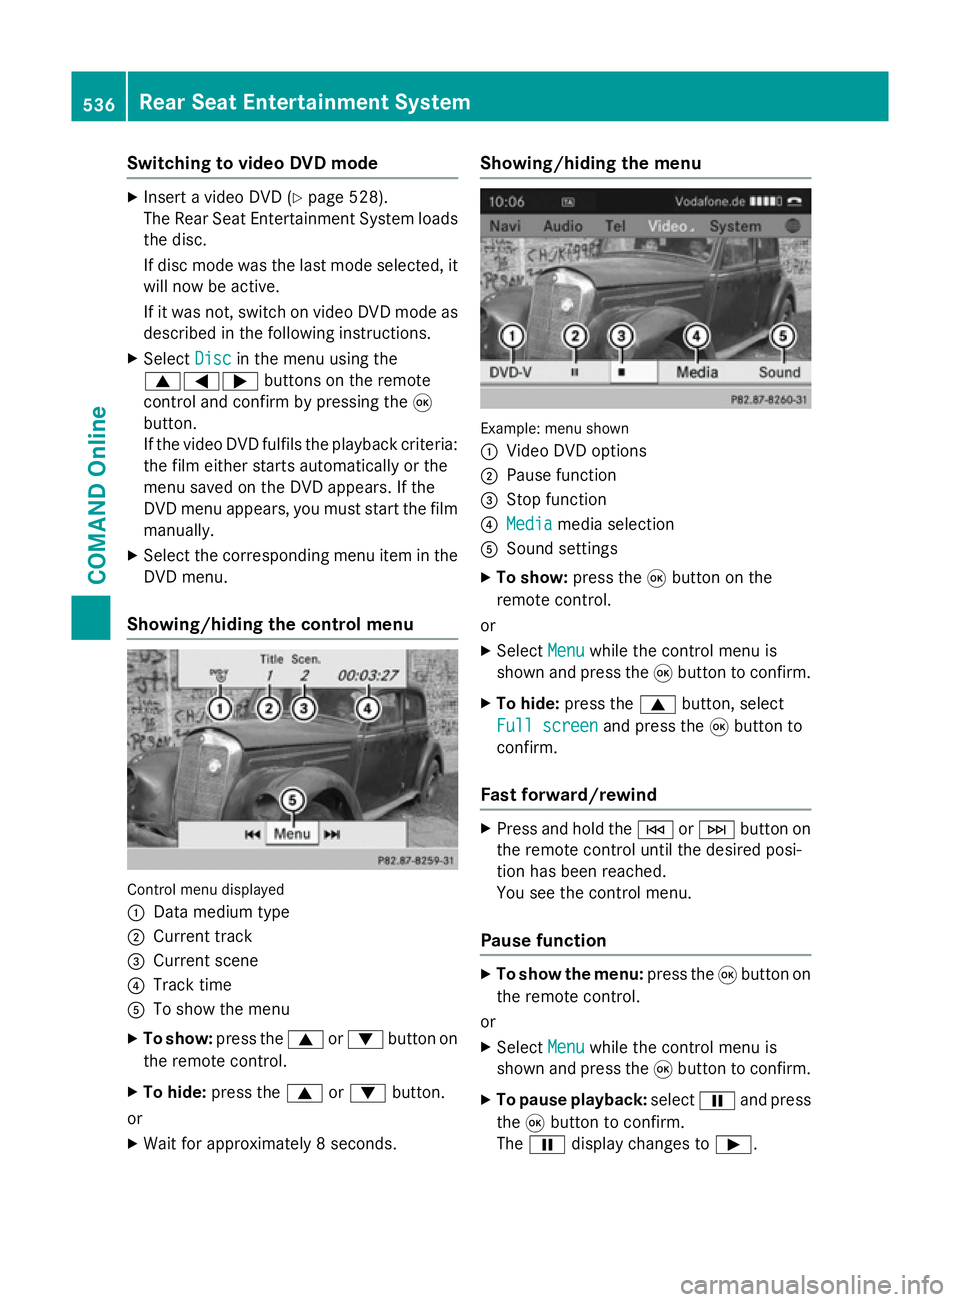
Showing/hiding the control menu Control menu displayed
:
Data medium type
; Current track
= Current scene
? Track time
A To show the menu
X To show: press the9or: button on
the remote control.
X To hide: press the 9or: button.
or
X Wait for approximately 8 seconds. Showing/hiding the menu
Example: menu shown
:
Video DVD options
; Pause function
= Stop function
? Media Media media selection
A Sound settings
X To show: press the9button on the
remote control.
or
X Select Menu
Menu while the control menu is
shown and press the 9button to confirm.
X To hide: press the 9button, select
Full screen
Full screen and press the9button to
confirm.
Fast forward/rewind X
Press and hold the EorF button on
the remote control until the desired posi-
tion has been reached.
You see the control menu.
Pause function X
To show the menu: press the9button on
the remote control.
or
X Select Menu
Menu while the control menu is
shown and press the 9button to confirm.
X To pause playback: selectËand press
the 9button to confirm.
The Ë display changes to Ì.536
Rear Seat Entertainment SystemCOMAND Online
Page 576 of 637
X
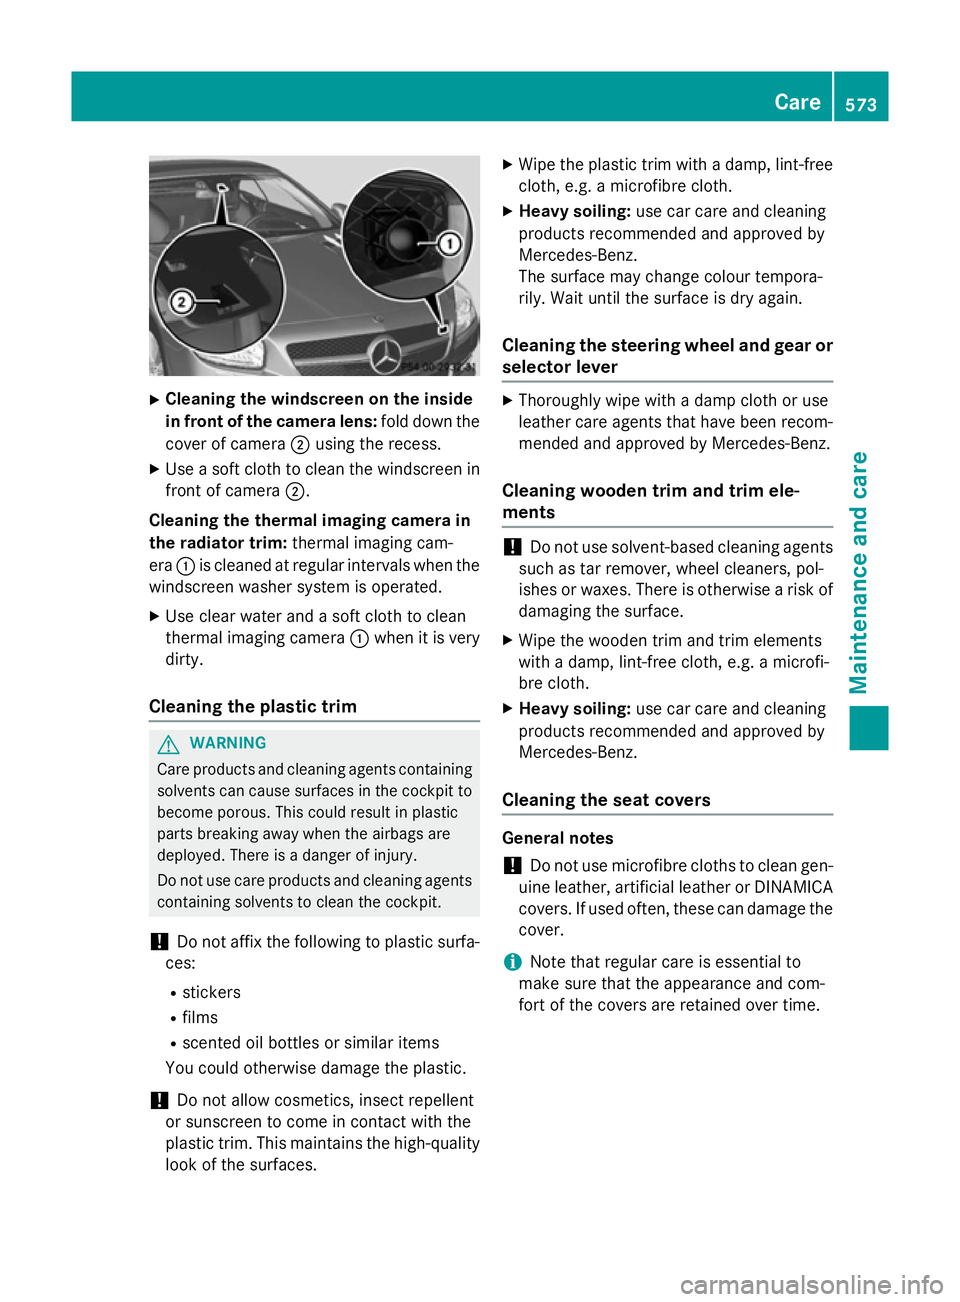
Cleaning the windscreen on the inside
in front of the camera lens: fold down the
cover of camera ;using the recess.
X Use a soft cloth to clean the windscreen in
front of camera ;.
Cleaning the thermal imaging camera in
the radiator trim: thermal imaging cam-
era :is cleaned at regular intervals when the
windscreen washer system is operated.
X Use clear water and a soft cloth to clean
thermal imaging camera :when it is very
dirty.
Cleaning the plastic trim G
WARNING
Care products and cleaning agents containing solvents can cause surfaces in the cockpit to
become porous. This could result in plastic
parts breaking away when the airbags are
deployed. There is a danger of injury.
Do not use care products and cleaning agents containing solvents to clean the cockpit.
! Do not affix the following to plastic surfa-
ces:
R stickers
R films
R scented oil bottles or similar items
You could otherwise damage the plastic.
! Do not allow cosmetics, insect repellent
or sunscreen to come in contact with the
plastic trim. This maintains the high-quality look of the surfaces. X
Wipe the plastic trim with a damp, lint-free
cloth, e.g. a microfibre cloth.
X Heavy soiling: use car care and cleaning
products recommended and approved by
Mercedes-Benz.
The surface may change colour tempora-
rily. Wait until the surface is dry again.
Cleaning the steering wheel and gear or selector lever X
Thoroughly wipe with a damp cloth or use
leather care agents that have been recom-
mended and approved by Mercedes-Benz.
Cleaning wooden trim and trim ele-
ments !
Do not use solvent-based cleaning agents
such as tar remover, wheel cleaners, pol-
ishes or waxes. There is otherwise a risk of damaging the surface.
X Wipe the wooden trim and trim elements
with a damp, lint-free cloth, e.g. a microfi-
bre cloth.
X Heavy soiling: use car care and cleaning
products recommended and approved by
Mercedes-Benz.
Cleaning the seat covers General notes
! Do not use microfibre cloths to clean gen-
uine leather, artificial leather or DINAMICA
covers. If used often, these can damage the cover.
i Note that regular care is essential to
make sure that the appearance and com-
fort of the covers are retained over time. Care
573Maintenance and care Z
Page 583 of 637
G
WARNING
In the following situations, the tyre sealant is
unable to provide sufficient breakdown assis- tance, as it is unable to seal the tyre properly:
R there are cuts or punctures in the tyre
larger than those mentioned above.
R the wheel rim is damaged.
R you have driven at very low tyre pressures
or on a flat tyre.
There is a risk of an accident.
Do not drive any further. Contact a qualified
specialist workshop. G
WARNING
The tyre sealant is harmful and causes irrita-
tion. It must not come into contact with your
skin, eyes or clothing or be swallowed. Do not inhale TIREFIT fumes. Keep tyre sealant away
from children. There is a risk of injury.
If you come into contact with the tyre sealant,
observe the following:
R Rinse off the tyre sealant from your skin
immediately with water.
R If the tyre sealant comes into contact with
your eyes, immediately rinse them thor-
oughly with clean water.
R If tyre sealant is swallowed, immediately
rinse your mouth out thoroughly and drink
plenty of water. Do not induce vomiting,
and seek medical attention immediately.
R Immediately change out of clothing which
has come into contact with tyre sealant.
R If an allergic reaction occurs, seek medical
attention immediately.
! Do not operate the tyre inflation com-
pressor for longer than eight minutes at a
time without a break. It may otherwise
overheat.
The tyre inflation compressor can be oper-
ated again once it has cooled down.
Comply with the manufacturer’s safety
instructions on the sticker on the tyre infla-
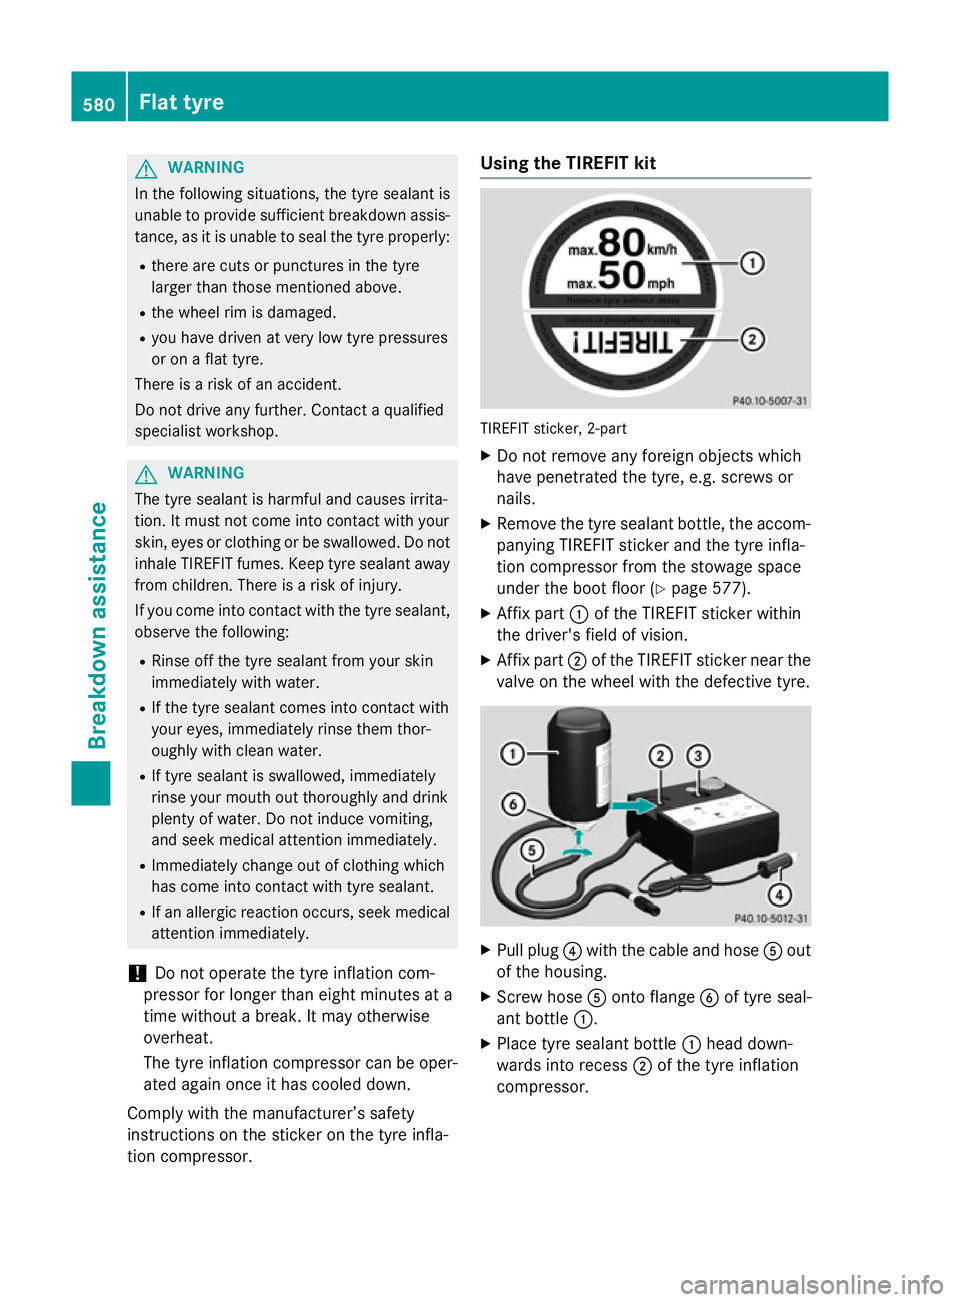
tion compressor. Using the TIREFIT kit
TIREFIT sticker, 2-part
X Do not remove any foreign objects which
have penetrated the tyre, e.g. screws or
nails.
X Remove the tyre sealant bottle, the accom-
panying TIREFIT sticker and the tyre infla-
tion compressor from the stowage space
under the boot floor (Y page 577).
X Affix part :of the TIREFIT sticker within
the driver's field of vision.
X Affix part ;of the TIREFIT sticker near the
valve on the wheel with the defective tyre. X
Pull plug ?with the cable and hose Aout
of the housing.
X Screw hose Aonto flange Bof tyre seal-
ant bottle :.
X Place tyre sealant bottle :head down-
wards into recess ;of the tyre inflation
compressor. 580
Flat tyreBreakdown assistance