2012 MERCEDES-BENZ SL ROADSTER remote start
[x] Cancel search: remote startPage 18 of 637

Harman/kardon® Logic 7® sur-
round sound system
see Surround sound (harman/
kardon® surround sound system)
Hazard warning lamps
Display message ............................ 272
Switching on/off ........................... 130
Head level heating (AIRSCARF) ........ 117
Head restraints
Adjusting ....................................... 115
see NECK-PRO head restraints
Headbag
Display message ............................ 255
Operation ........................................ .55
Heading up (navigation) ................... 374
Headlamp
Cleaning system (function) ............ 131
Cleaning system (notes) ............... .628
Headlamps
Misting up ...................................... 133
Topping up the cleaning system .... 566
see Automatic headlamp mode
Headphones
Changing batteries ........................ 523
Heating
see Climate control
High-pressure cleaners .................... 569
Hill start assist .................................. 158
HOLD function
Activating ....................................... 197
Deactivating ................................... 197
Display message ............................ 262
Function/notes ............................ .196
Home address ........................... 330, 332
Entering and saving ....................... 330
Selecting from the destination
memory ......................................... 332 I
Ignition lock see Key positions
Immobiliser .......................................... 79
Indicator and warning lamps
Coolant .......................................... 281
DISTRONIC PLUS ........................... 283
Engine diagnostics ......................... 280
SPORT handling mode ................... 278 Indicator lamp
................................... 523
Remote control .............................. 523
Indicator lamps
Display message ............................ 256
see Warning and indicator lamps
Indicators
see Turn signals
Inspection
see ASSYST PLUS
Instrument cluster
Overview .......................................... 40
Warning and indicator lamps ........... 42
Instrument cluster lighting .............. 228
Intelligent Light System
Activating/deactivating ................. 240
Display message ............................ 257
Overview ........................................ 131
Setting the dipped-beam head-
lamps for driving on the right/left .. 240
Interface (USB, iPod®)
see Media Interface
Interior lighting ................................. 134
Automatic control system .............. 134
Delayed switch-off (on-board
computer) ...................................... 241
Emergency lighting ........................ 135
Manual control ............................... 135
Overview ........................................ 134
Reading lamp ................................. 134
Setting the ambient lighting
brightness (on-board computer) .... 241
Setting the ambient lighting col-
our (on-board computer) ................ 241
Interior motion sensor
Deactivating ..................................... 81
Function .......................................... .80
Priming ............................................ 80
Switching off .................................... 81
Inter-
net ......................4 54, 457, 458, 459, 460
Calling up the carousel view .......... 454
Conditions for access .................... 432
Creating a favourite ....................... 459
Entering the URL ............................ 454
Favourites manager ....................... 459
Favourites menu ............................ 460
Menu functions .............................. 457
Opening favourites ......................... 458 Index
15
Page 25 of 637
Adjusting sound settings ............... 525
Adjusting the brightness ................ 526
Adjusting the colou r...................... 526
Adjusting the contrast ................... 526
AUX mode ...................................... 541
CD/DVD audio and MP3 mode ...... 527
Changing the batteries .................. 523
Changing the picture format .......... 526
Cordless headphone s.................... 522
Multiple users ................................ 525
Operating with the headphones ..... 525
Picture settings .............................. 526
System settings ............................. 526
TV mode ........................................ 531
Using the main loudspeaker .......... 525
Video DVD mode ........................... 535
Rear window heating
Problem (fault) ............................... 148
Switching on/of f........................... 147
Rear-compartment screens .............. 520
Rear-view mirror
Anti-dazzle mode (automatic) ........ 121
Dipping (manual) ........................... 120
Receiving vCards ............................... 418
Redialling (telephone) ....................... 397
Refuelling
Fuel gaug e....................................... 40
Important safety notes .................. 173
Notes for AMG vehicles ................. 624
Refuelling process ......................... 174
see Fuel
Remote control
Button lighting ............................... 521
Programming (garage door
opener) .......................................... 553
Rear Seat Entertainment System ... 520
Replacing bulbs
General notes ................................ 135
Reserve (fuel tank)
see Fuel
Reserve fuel
Display message ............................ 260
Warning lamp ................................. 280
Reset function ................................... 316
Resetting (factory settings) ............. 316
Residual heat (climate control) ........ 149Restraint system
see SRS (Supplemental Restraint
System)
Rev counter ........................................ 229
Reverse gear (selector lever) ........... 163
Reversing camera
Cleaning instructions ..................... 572
Displaying the image ..................... 322
Function/note s............................. 211
Switching on/of f........................... 212
Reversing feature
Side windows ................................... 99
Reversing function
Boot lid ............................................ 94
Reversing lamp (display message) .. 257
Roll bar
Display message ............................ 254
Operation ......................................... 55
Roller sunblind .................................. 109
Roof
Display message ............................ 271
Important safety notes .................. 103
Opening/closing (with key) ........... 105
Opening/closing (with roof
switch) ........................................... 104
Overview ........................................ 103
Problem (malfunction) ................... 110
Relocking ....................................... 105
Roof lining and carpets (cleaning
instructions) ...................................... 574
Roof switch ........................................ 104
Route .................................................. 358
Estimated time of arrival ................ 358
Route (navigation)
Calling up the "Routes" menu ........ 360
Displaying the distance to the des-tination .......................................... 358
Recording ...................................... 360
Route overview .............................. 359
Selecting an alternative route ........ 357
Setting route options (avoiding:
motorways, toll roads, tunnels,
ferries) ........................................... 325
Setting the route type (short
route, fast route, dynamic route or
economic route) ............................ 325
Starting calculation ........................ 329 22
Index
Page 87 of 637
Useful information
i This Owner's Manual describes all mod-
els, series and optional equipment for your
vehicle that were available at the time of
going to press. National variations are pos- sible. Note that your vehicle may not be
equipped with all of the functions descri-
bed. This is also the case for systems and
functions relevant to safety.
i Read the information on qualified special-
ist workshops: (Y page 34). Key
Important safety notes
United Kingdom only: G
WARNING
When the double locks are activated, the
doors can no longer be opened from the
inside. People in the vehicle can no longer get out, e.g. in hazardous situations. There is a
risk of injury.
Therefore, do not leave any people unsuper-
vised in the vehicle, particularly children, eld-
erly people or people in need of special assis-
tance. Do not activate the double lock when
people are in the vehicle.
If the vehicle has been locked from the out-
side, the double lock function is activated as
standard. It is then not possible to open the
doors from inside the vehicle. You can deac-
tivate the double-lock function by deactivat-
ing the interior motion sensor (Y page 80).
The doors can then be opened from the inside after the vehicle has been locked from the
outside. The anti-theft alarm system is trig-
gered if the door is opened from the inside.
Switch off the alarm (Y page 79).
All countries: G
WARNING
If children are left unsupervised in the vehicle, they can:
R open doors and endanger other persons or
road users
R climb out and be injured by the traffic
R operate vehicle equipment and, for exam-
ple, trap themselves.
Children could also set the vehicle in motion, for example by:
R releasing the parking brake
R shifting the automatic transmission out of
park position P
R starting the engine.
There is a risk of an accident and injury.
When leaving the vehicle, always take the key
with you and lock the vehicle. Never leave
children unattended in the vehicle. Always
keep the key out of reach of children. G
WARNING
If persons (particularly children) are exposed
to heat or cold for a prolonged period, there is a risk of serious or even fatal injuries. Never
leave persons (particularly children) unatten-
ded in the vehicle. G
WARNING
If you attach heavy or large objects to the key, the key could be unintentionally turned in the
ignition lock. This could cause the engine to
be switched off. There is a risk of an accident.
Do not attach any heavy or large objects to the
key. Remove any bulky keyrings before insert-
ing the key into the ignition lock.
! Keep the key away from strong magnetic
fields. Otherwise, the remote control func-
tion could be affected.
Strong magnetic fields can occur in the
vicinity of powerful electrical installations. 84
KeyOpening and closing
Page 523 of 637
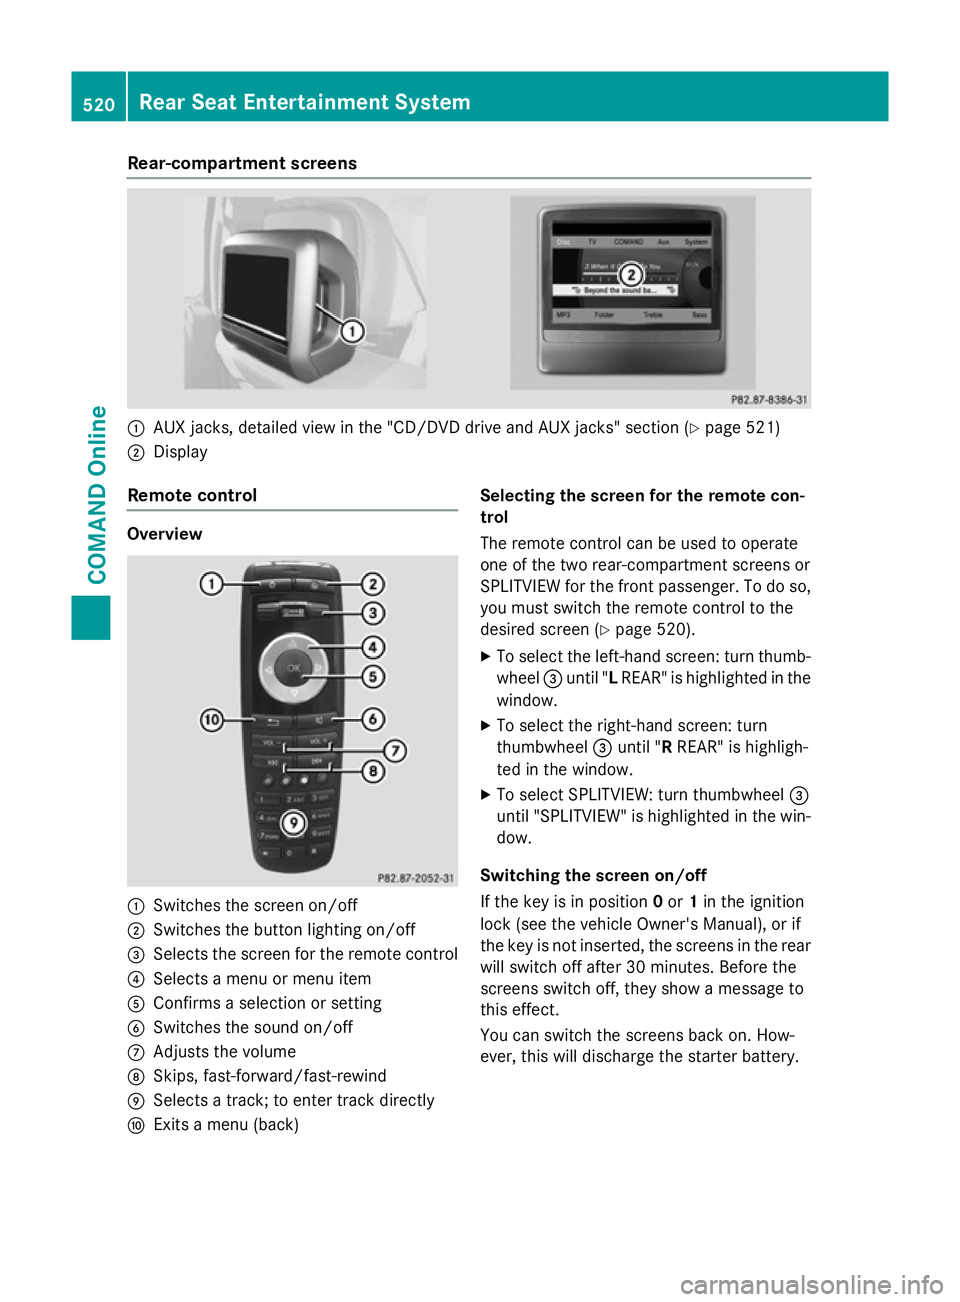
Rear-compartment screens
:
AUX jacks, detailed view in the "CD/DVD drive and AUX jacks" section (Y page 521)
; Display
Remote control Overview
:
Switches the screen on/off
; Switches the button lighting on/off
= Selects the screen for the remote control
? Selects a menu or menu item
A Confirms a selection or setting
B Switches the sound on/off
C Adjusts the volume
D Skips, fast-forward/fast-rewind
E Selects a track; to enter track directly
F Exits a menu (back) Selecting the screen for the remote con-
trol
The remote control can be used to operate
one of the two rear-compartment screens or
SPLITVIEW for the front passenger. To do so,
you must switch the remote control to the
desired screen (Y page 520).
X To select the left-hand screen: turn thumb-
wheel =until "L REAR" is highlighted in the
window.
X To select the right-hand screen: turn
thumbwheel =until "R REAR" is highligh-
ted in the window.
X To select SPLITVIEW: turn thumbwheel =
until "SPLITVIEW" is highlighted in the win-
dow.
Switching the screen on/off
If the key is in position 0or 1in the ignition
lock (see the vehicle Owner's Manual), or if
the key is not inserted, the screens in the rear
will switch off after 30 minutes. Before the
screens switch off, they show a message to
this effect.
You can switch the screens back on. How-
ever, this will discharge the starter battery. 520
Rear Seat Entertainment SystemCOMAND Online
Page 527 of 637
Batteries are required for the remote control
and for the two sets of cordless headphones. The batteries can be replaced (Y page 523).Only valid for South Africa
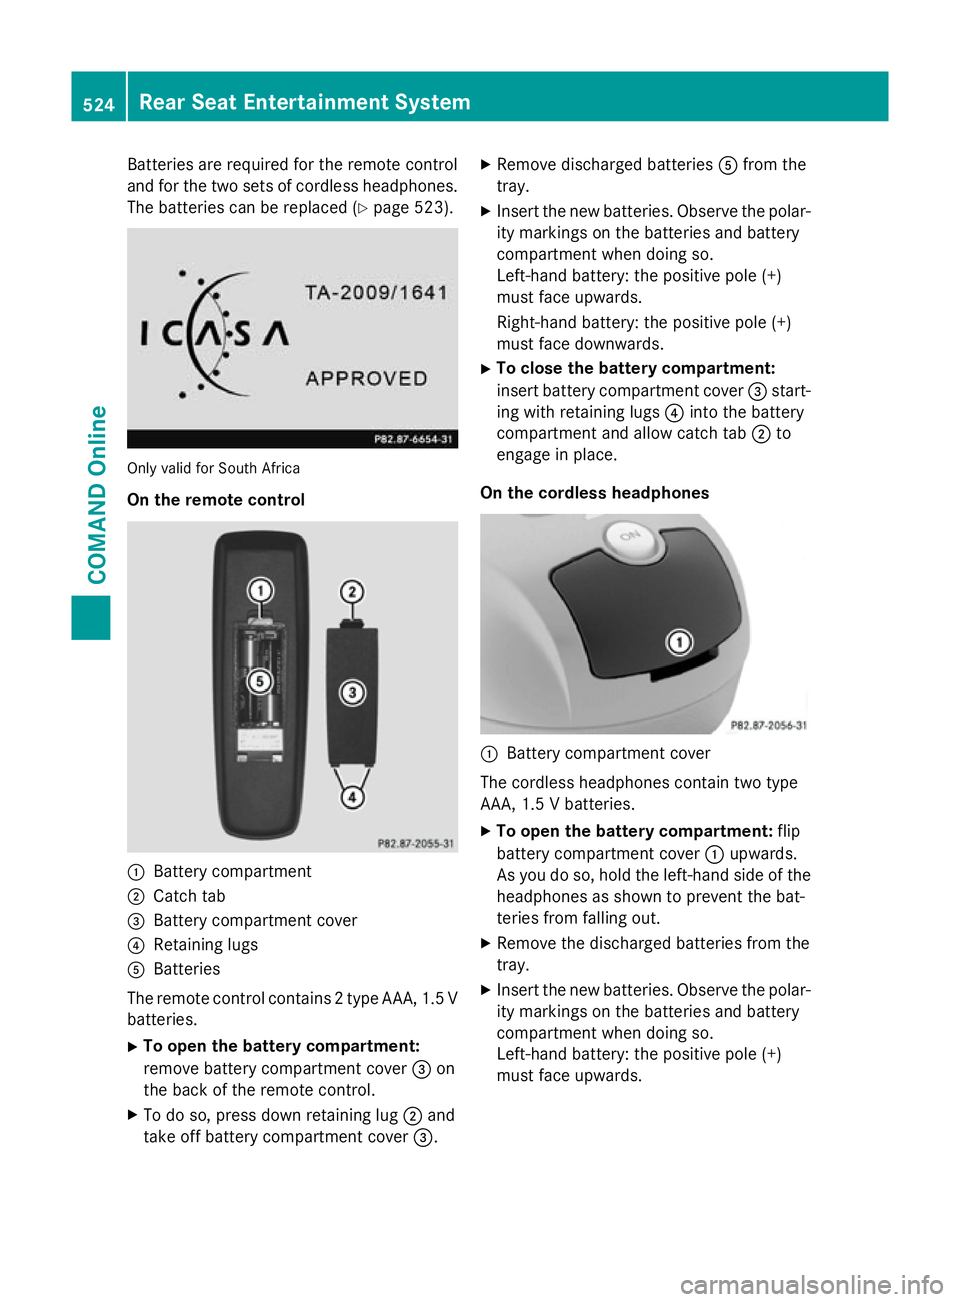
On the remote control :
Battery compartment
; Catch tab
= Battery compartment cover
? Retaining lugs
A Batteries
The remote control contains 2 type AAA, 1.5 V
batteries.
X To open the battery compartment:
remove battery compartment cover =on
the back of the remote control.
X To do so, press down retaining lug ;and
take off battery compartment cover =.X
Remove discharged batteries Afrom the
tray.
X Insert the new batteries. Observe the polar-
ity markings on the batteries and battery
compartment when doing so.
Left-hand battery: the positive pole (+)
must face upwards.
Right-hand battery: the positive pole (+)
must face downwards.
X To close the battery compartment:
insert battery compartment cover =start-
ing with retaining lugs ?into the battery
compartment and allow catch tab ;to
engage in place.
On the cordless headphones :
Battery compartment cover
The cordless headphones contain two type
AAA, 1.5 V batteries.
X To open the battery compartment: flip
battery compartment cover :upwards.
As you do so, hold the left-hand side of the headphones as shown to prevent the bat-
teries from falling out.
X Remove the discharged batteries from the
tray.
X Insert the new batteries. Observe the polar-
ity markings on the batteries and battery
compartment when doing so.
Left-hand battery: the positive pole (+)
must face upwards. 524
Rear Seat Entertainment SystemCOMAND Online
Page 531 of 637
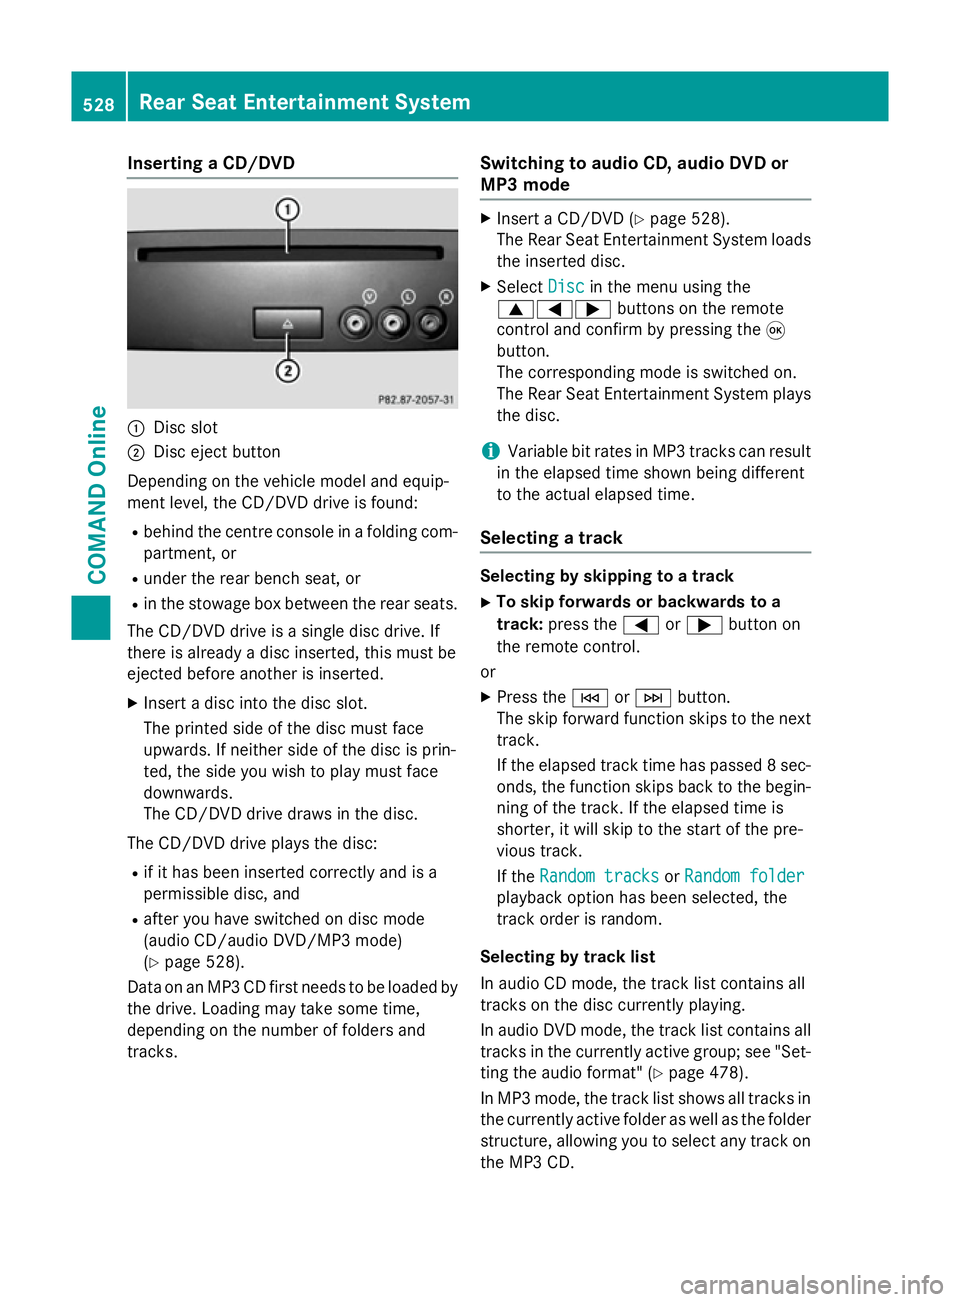
Inserting a CD/DVD
:
Disc slot
; Disc eject button
Depending on the vehicle model and equip-
ment level, the CD/DVD drive is found:
R behind the centre console in a folding com-
partment, or
R under the rear bench seat, or
R in the stowage box between the rear seats.
The CD/DVD drive is a single disc drive. If
there is already a disc inserted, this must be
ejected before another is inserted.
X Insert a disc into the disc slot.
The printed side of the disc must face
upwards. If neither side of the disc is prin-
ted, the side you wish to play must face
downwards.
The CD/DVD drive draws in the disc.
The CD/DVD drive plays the disc:
R if it has been inserted correctly and is a
permissible disc, and
R after you have switched on disc mode
(audio CD/audio DVD/MP3 mode)
(Y page 528).
Data on an MP3 CD first needs to be loaded by
the drive. Loading may take some time,
depending on the number of folders and
tracks. Switching to audio CD, audio DVD or
MP3 mode X
Insert a CD/DVD (Y page 528).
The Rear Seat Entertainment System loads
the inserted disc.
X Select Disc Discin the menu using the
9=; buttons on the remote
control and confirm by pressing the 9
button.
The corresponding mode is switched on.
The Rear Seat Entertainment System plays
the disc.
i Variable bit rates in MP3 tracks can result
in the elapsed time shown being different
to the actual elapsed time.
Selecting a track Selecting by skipping to a track
X To skip forwards or backwards to a
track: press the =or; button on
the remote control.
or X Press the EorF button.
The skip forward function skips to the next track.
If the elapsed track time has passed 8 sec- onds, the function skips back to the begin-
ning of the track. If the elapsed time is
shorter, it will skip to the start of the pre-
vious track.
If the Random tracks Random tracks orRandom folder
Random folder
playback option has been selected, the
track order is random.
Selecting by track list
In audio CD mode, the track list contains all
tracks on the disc currently playing.
In audio DVD mode, the track list contains all
tracks in the currently active group; see "Set-
ting the audio format" (Y page 478).
In MP3 mode, the track list shows all tracks in
the currently active folder as well as the folder
structure, allowing you to select any track on
the MP3 CD. 528
Rear Seat Entertainment SystemCOMAND Online
Page 533 of 637
X
Select a folder using the 9:buttons
and press the 9button to confirm.
You will see the tracks in the folder.
X Select a track using the 9:buttons
and press the 9button to confirm.
The track is played and the corresponding
folder is now the active folder.
Pause function This function is only available in audio DVD
mode.
X To pause playback: selectËusing
the :=; buttons on the remote
control and press the 9button to confirm.
The Ë display changes to Ì.
X To continue playback: selectÌand
press the 9button to confirm.
The Ì display changes to Ë.
Stop function This function is only available in audio DVD
mode.
X To interrupt playback: selectÉusing
the :=; buttons on the remote
control and press the 9button to confirm.
The Ë display changes to Ì.
X To continue playback: selectÌand
press the 9button to confirm.
Playback continues from the point where it
was interrupted.
X To stop playback: while playback is inter-
rupted, select Éagain and press the 9
button to confirm.
Playback stops and returns to the begin-
ning of the DVD. Ìis highlighted.
X To restart playback: selectÌand
press the 9button to confirm.
Playback starts from the beginning of the
DVD. Setting the audio format Further information on audio formats is avail-
able in the "Audio" section (Y page 478).
X Select DVD-A
DVD-Ausing the :=;
buttons on the remote control and press 9
to confirm.
X Select Group
Group using the 9: buttons
and press the 9button to confirm.
The list of available audio formats appears. The #dot indicates the format currently
selected.
X Select an audio format using the 9:
buttons and press the 9button to confirm.
X To exit the menu: press the=or;
button.
Playback options Further information on playback options is
available in the "Audio" section (Y
page 478).
X Select CD CD,DVD-A
DVD-A orMP3
MP3 using
the :=; buttons on the remote
control and press the 9button to confirm.
The options list appears. The #dot indi-
cates the option currently selected.
X Select Normal
Normal track
tracksequence
sequence, Random
Random
tracks
tracks orRandom folder
Random folder using the
9: buttons and press the 9button
to confirm.
The option is switched on. For all options
except Normal track sequence Normal track sequence, you will
see a corresponding display in the display/
selection window.
i If you switch the data carrier which you
are currently listening to, the Normal
Normal
track sequence
track sequence option is activated auto-
matically. If an option is selected, it
remains selected after the Rear Seat Enter- tainment System is switched on or off.
Switching track information on/off
(MP3 mode only) If the function is switched on, folder and track
names are displayed. 530
Rear Seat Entertainment SystemCOMAND Online
Page 539 of 637
Switching to video DVD mode
X
Insert a video DVD (Y page 528).
The Rear Seat Entertainment System loads the disc.
If disc mode was the last mode selected, it
will now be active.
If it was not, switch on video DVD mode as described in the following instructions.
X Select Disc
Disc in the menu using the
9=; buttons on the remote
control and confirm by pressing the 9
button.
If the video DVD fulfils the playback criteria:
the film either starts automatically or the
menu saved on the DVD appears. If the
DVD menu appears, you must start the film manually.
X Select the corresponding menu item in the
DVD menu.
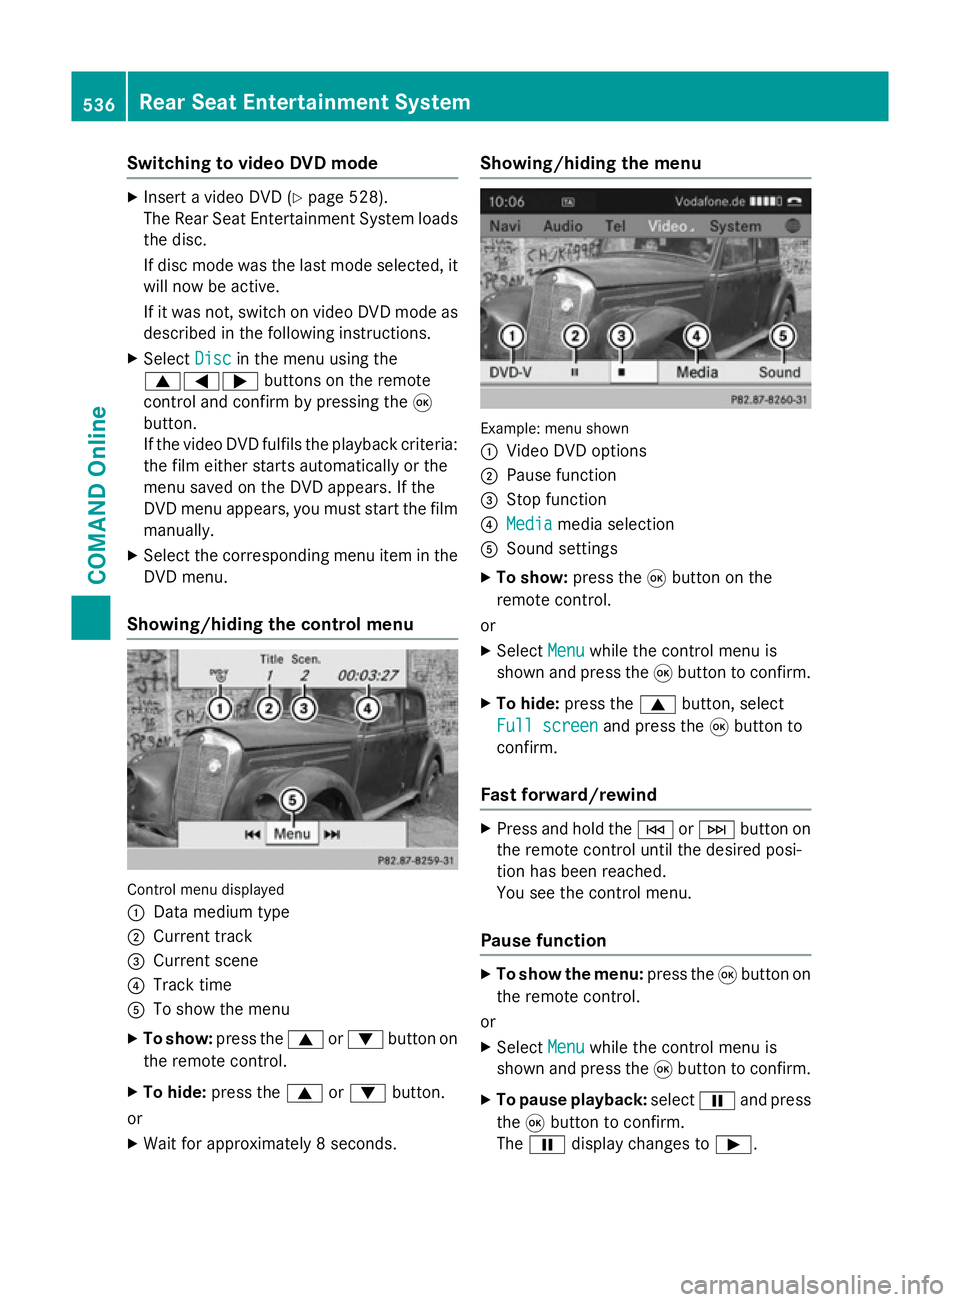
Showing/hiding the control menu Control menu displayed
:
Data medium type
; Current track
= Current scene
? Track time
A To show the menu
X To show: press the9or: button on
the remote control.
X To hide: press the 9or: button.
or
X Wait for approximately 8 seconds. Showing/hiding the menu
Example: menu shown
:
Video DVD options
; Pause function
= Stop function
? Media Media media selection
A Sound settings
X To show: press the9button on the
remote control.
or
X Select Menu
Menu while the control menu is
shown and press the 9button to confirm.
X To hide: press the 9button, select
Full screen
Full screen and press the9button to
confirm.
Fast forward/rewind X
Press and hold the EorF button on
the remote control until the desired posi-
tion has been reached.
You see the control menu.
Pause function X
To show the menu: press the9button on
the remote control.
or
X Select Menu
Menu while the control menu is
shown and press the 9button to confirm.
X To pause playback: selectËand press
the 9button to confirm.
The Ë display changes to Ì.536
Rear Seat Entertainment SystemCOMAND Online