2012 MERCEDES-BENZ SL ROADSTER remove seats
[x] Cancel search: remove seatsPage 34 of 637

Protection of the environment
General notes
H
Environmental note
Daimler's declared policy is one of compre-
hensive environmental protection.
Our objectives are to use the natural resour-
ces which form the basis of our existence on
this planet sparingly and in a manner which
takes the requirements of both nature and
humanity into consideration.
You too can help to protect the environment
by operating your vehicle in an environmen-
tally-responsible manner.
Fuel consumption and the rate of engine,
transmission, brake and tyre wear depend on
the following factors:
R operating conditions of your vehicle
R your personal driving style
You can influence both factors. Therefore,
please bear the following in mind:
Operating conditions:
R avoid short trips, as these increase fuel
consumption.
R observe the correct tyre pressure.
R do not carry any unnecessary weight in the
vehicle.
R remove the roof rack once you no longer
need it.
R a regularly serviced vehicle will contribute
to environmental protection. You should
therefore adhere to the service intervals.
R all maintenance work should be carried out
at a qualified specialist workshop.
Personal driving style:
R do not depress the accelerator pedal when
starting the engine.
R do not warm up the engine when the vehicle
is stationary.
R drive carefully and maintain a safe distance
from the vehicle in front.
R avoid frequent, sudden acceleration and
braking. R
change gear in good time and use each gear
only up to Ôof its maximum engine speed.
R switch off the engine in stationary traffic.
R monitor the vehicle's fuel consumption. Returning an end-of-life vehicle
EU countries only:
Mercedes-Benz will take back your old vehicle to dispose of it in an environmentally-respon-sible manner in accordance with the Euro-
pean Union (EU) End of Life Vehicles Direc-
tive.
There is a network of return points and dis-
assembly plants available. You can return
your vehicle to these plants free of charge.
This makes a valuable contribution to the
recycling process and the conservation of
resources.
For further information on recycling old vehi- cles, recovery and the terms of the policy,
visit the Mercedes-Benz homepage. Genuine Mercedes-Benz parts
H
Environmental note
Daimler AG also supplies reconditioned
assemblies and parts which are of the same
quality as new parts. For these, the same war-
ranty applies as for new parts.
! Airbags and seat belt tensioners, as well
as control units and sensors for these
restraint systems, may be installed in the
following areas of your vehicle:
R doors
R door pillars
R door sills
R seats
R dashboard
R instrument cluster
R centre console Introduction
31 Z
Page 117 of 637
!
To avoid damage to the seats and the seat
heating, observe the following information:
R do not spill any liquids on the seats. If
liquid is spilled on the seats, dry them as soon as possible.
R if the seat covers are damp or wet, do not
switch on the seat heating. The seat
heating should also not be used to dry
the seats.
R clean the seat covers as recommended;
see "Interior care".
R do not transport heavy loads on the
seats. Do not place sharp objects on the seat cushions, e.g. knives, nails or tools. The seats should only be occupied by
passengers, if possible.
R when the seat heating is in operation, do
not cover the seats with insulating mate-
rials, e.g. blankets, coats, bags, seat cov- ers, child seats or booster seats.
! Make sure that there are no objects in the
footwell or behind the seats when moving
the seat back. There is a risk that the seats and/or the objects could be damaged.
i The head restraints cannot be removed.
For more information, contact a qualified
specialist workshop. Adjusting the seats electrically
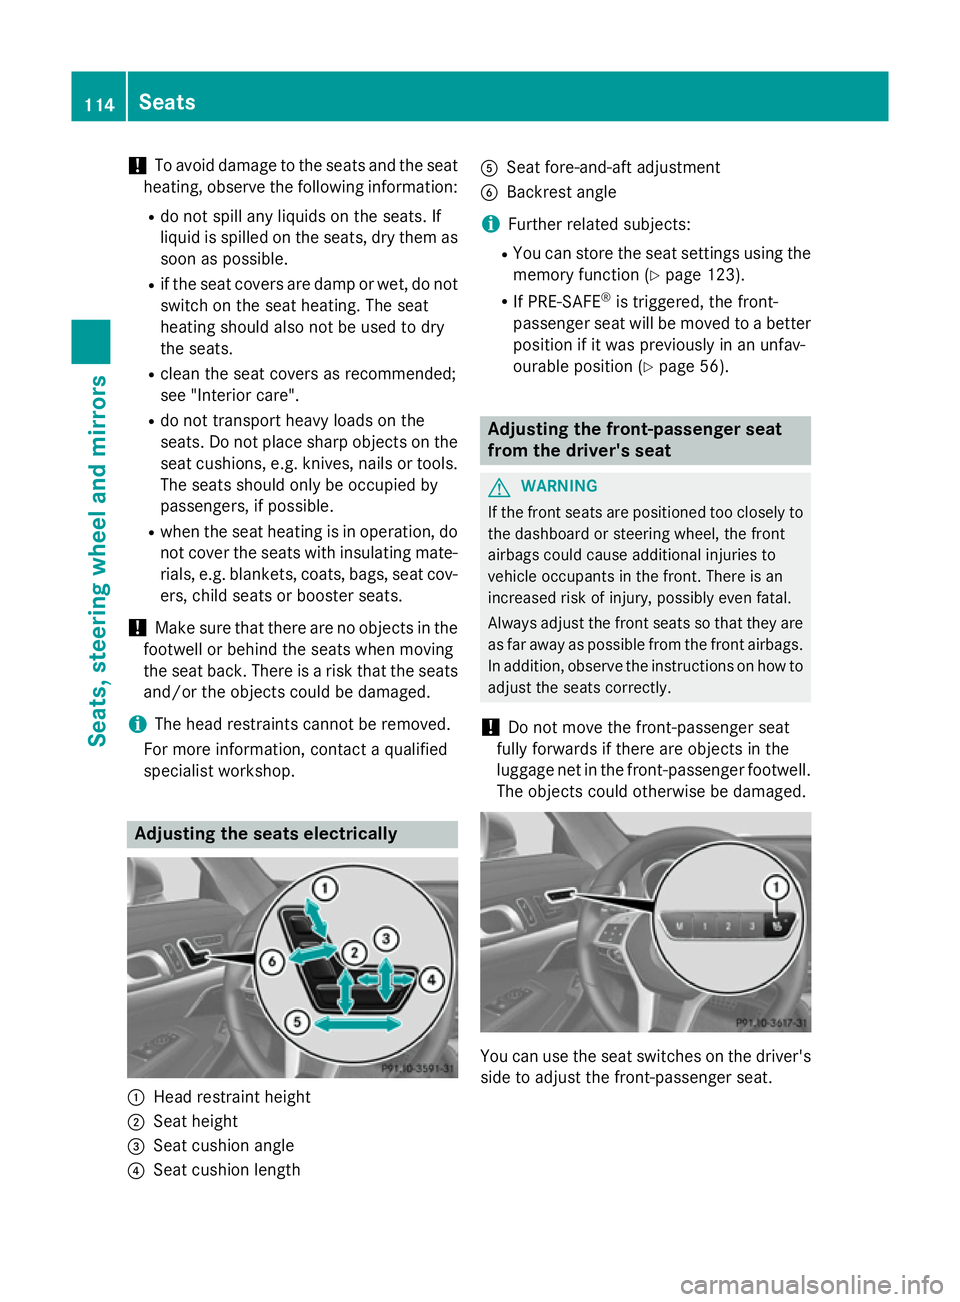
:
Head restraint height
; Seat height
= Seat cushion angle
? Seat cushion length A
Seat fore-and-aft adjustment
B Backrest angle
i Further related subjects:
R You can store the seat settings using the
memory function (Y page 123).
R If PRE-SAFE ®
is triggered, the front-
passenger seat will be moved to a better
position if it was previously in an unfav-
ourable position (Y page 56). Adjusting the front-passenger seat
from the driver's seat
G
WARNING
If the front seats are positioned too closely to the dashboard or steering wheel, the front
airbags could cause additional injuries to
vehicle occupants in the front. There is an
increased risk of injury, possibly even fatal.
Always adjust the front seats so that they are
as far away as possible from the front airbags.
In addition, observe the instructions on how to
adjust the seats correctly.
! Do not move the front-passenger seat
fully forwards if there are objects in the
luggage net in the front-passenger footwell. The objects could otherwise be damaged. You can use the seat switches on the driver's
side to adjust the front-passenger seat. 114
SeatsSeats, steering wheel and mirrors
Page 118 of 637
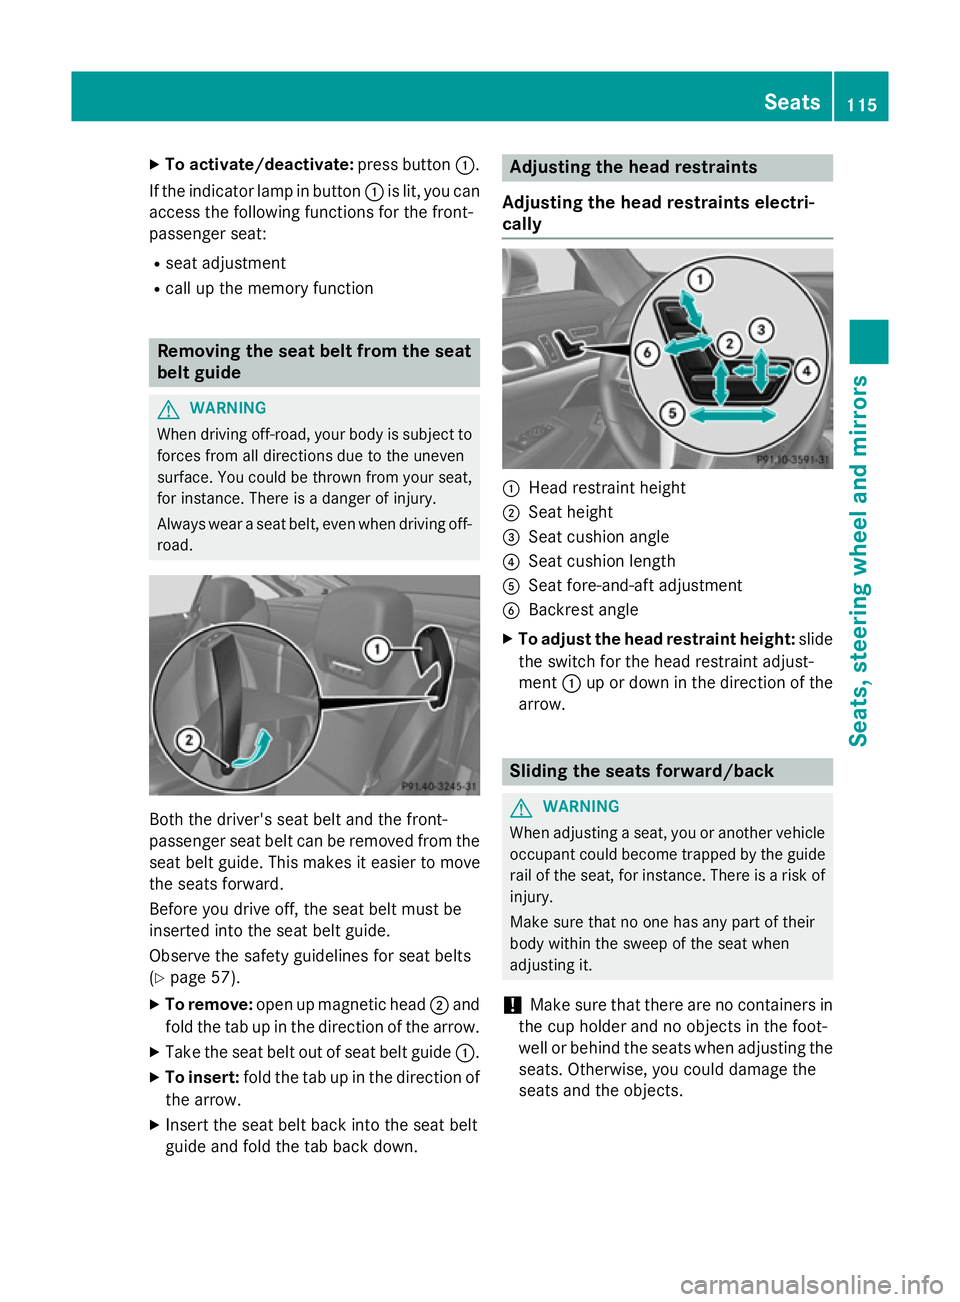
X
To activate/deactivate: press button:.
If the indicator lamp in button :is lit, you can
access the following functions for the front-
passenger seat:
R seat adjustment
R call up the memory function Removing the seat belt from the seat
belt guide
G
WARNING
When driving off-road, your body is subject to forces from all directions due to the uneven
surface. You could be thrown from your seat,
for instance. There is a danger of injury.
Always wear a seat belt, even when driving off-
road. Both the driver's seat belt and the front-
passenger seat belt can be removed from the
seat belt guide. This makes it easier to move
the seats forward.
Before you drive off, the seat belt must be
inserted into the seat belt guide.
Observe the safety guidelines for seat belts
(Y page 57).
X To remove: open up magnetic head ;and
fold the tab up in the direction of the arrow.
X Take the seat belt out of seat belt guide :.
X To insert: fold the tab up in the direction of
the arrow.
X Insert the seat belt back into the seat belt
guide and fold the tab back down. Adjusting the head restraints
Adjusting the head restraints electri-
cally :
Head restraint height
; Seat height
= Seat cushion angle
? Seat cushion length
A Seat fore-and-aft adjustment
B Backrest angle
X To adjust the head restraint height: slide
the switch for the head restraint adjust-
ment :up or down in the direction of the
arrow. Sliding the seats forward/back
G
WARNING
When adjusting a seat, you or another vehicle occupant could become trapped by the guiderail of the seat, for instance. There is a risk of
injury.
Make sure that no one has any part of their
body within the sweep of the seat when
adjusting it.
! Make sure that there are no containers in
the cup holder and no objects in the foot-
well or behind the seats when adjusting the
seats. Otherwise, you could damage the
seats and the objects. Seats
115Seats, steering wheel and mirrors Z
Page 119 of 637
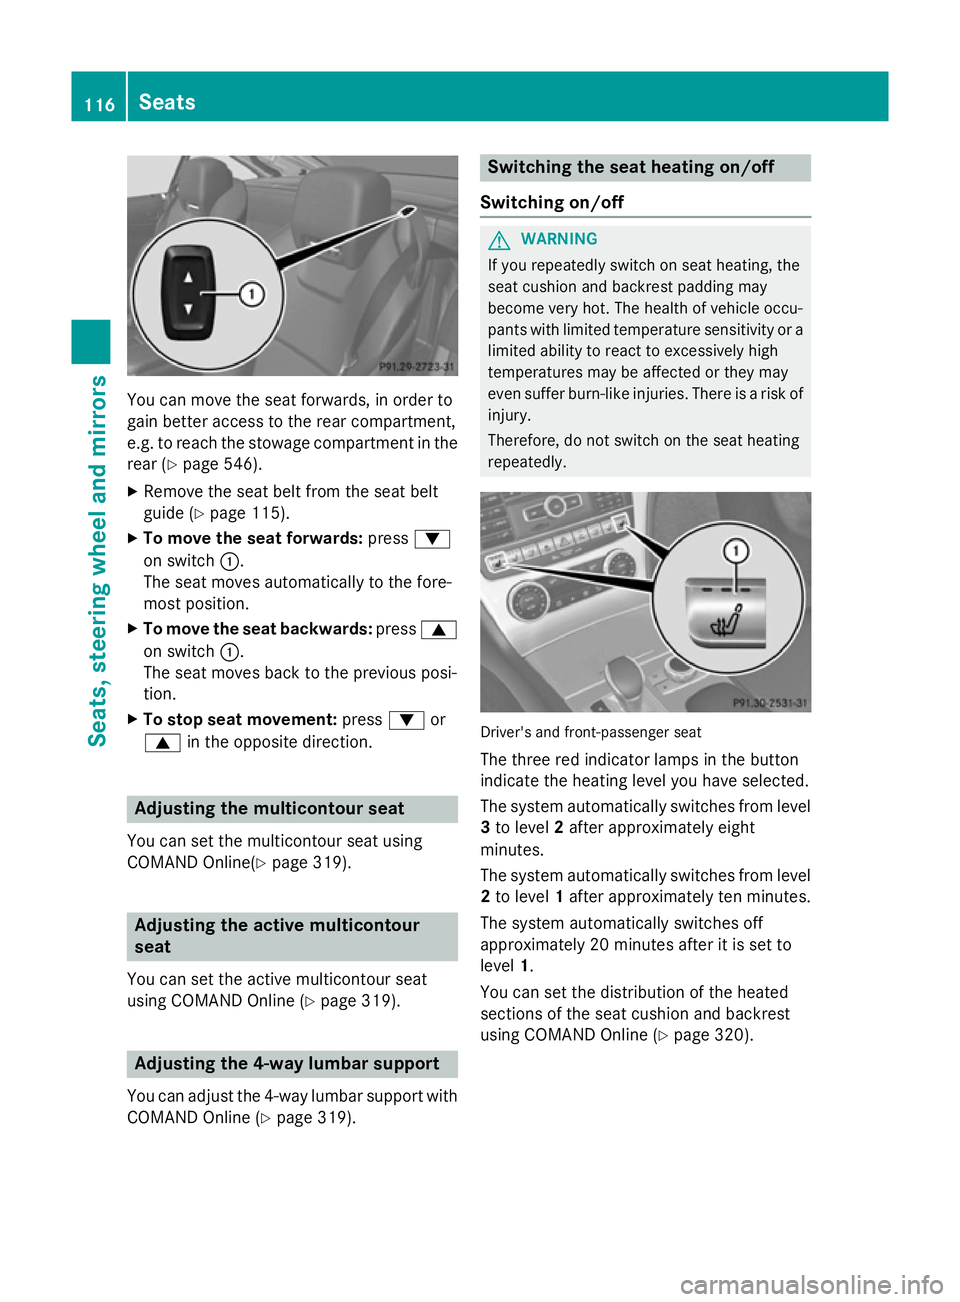
You can move the seat forwards, in order to
gain better access to the rear compartment,
e.g. to reach the stowage compartment in the
rear (Y page 546).
X Remove the seat belt from the seat belt
guide (Y page 115).
X To move the seat forwards: press:
on switch :.
The seat moves automatically to the fore-
most position.
X To move the seat backwards: press9
on switch :.
The seat moves back to the previous posi-
tion.
X To stop seat movement: press:or
9 in the opposite direction. Adjusting the multicontour seat
You can set the multicontour seat using
COMAND Online(Y page 319).Adjusting the active multicontour
seat
You can set the active multicontour seat
using COMAND Online (Y page 319).Adjusting the 4-way lumbar support
You can adjust the 4-way lumbar support with COMAND Online (Y page 319). Switching the seat heating on/off
Switching on/off G
WARNING
If you repeatedly switch on seat heating, the
seat cushion and backrest padding may
become very hot. The health of vehicle occu-
pants with limited temperature sensitivity or a limited ability to react to excessively high
temperatures may be affected or they may
even suffer burn-like injuries. There is a risk of
injury.
Therefore, do not switch on the seat heating
repeatedly. Driver's and front-passenger seat
The three red indicator lamps in the button
indicate the heating level you have selected.
The system automatically switches from level 3 to level 2after approximately eight
minutes.
The system automatically switches from level
2 to level 1after approximately ten minutes.
The system automatically switches off
approximately 20 minutes after it is set to
level 1.
You can set the distribution of the heated
sections of the seat cushion and backrest
using COMAND Online (Y page 320).116
SeatsSeats, steering wheel and mirrors
Page 122 of 637
G
WARNING
When the EASY-ENTRY/EXIT feature adjusts
the steering wheel, you and other vehicle
occupants – particularly children – could
become trapped. There is a risk of injury.
While the EASY-ENTRY/EXIT feature is mak-
ing adjustments, make sure that no one has
any body parts in the sweep of the steering
wheel.
If someone is trapped:
R press one of the memory function position
buttons, or
R move the switch for steering wheel adjust-
ment in the opposite direction to that in
which the steering wheel is moving.
The adjustment process is stopped. G
WARNING
When the EASY-ENTRY/EXIT feature adjusts
the steering wheel and the driver's seat, you
and other vehicle occupants – particularly
children – could become trapped. There is a
risk of injury.
While the EASY-ENTRY/EXIT feature is mak-
ing adjustments, make sure that no one has
any body parts in the sweep of the seat and
the steering wheel.
If someone is trapped:
R press one of the memory function position
buttons, or
R press one of the memory function memory
buttons, or
R move the switch for steering wheel adjust-
ment in the opposite direction to that in
which the steering wheel is moving.
The adjustment process is stopped. G
WARNING
If you use openings in the bodywork or
detachable parts as steps, you could:
R slip and/or fall
R damage the vehicle and cause yourself to
fall.
There is a danger of injury. Always use secure climbing aids, e.g. a suita-
ble ladder.
The EASY-ENTRY/EXIT feature makes getting in and out of your vehicle easier.
You can activate and deactivate the EASY-
ENTRY/EXIT feature in the on-board com-
puter (Y page 243).
Position of the steering wheel when the EASY-ENTRY/EXIT feature is active The steering wheel tilts upwards if you:
R remove the key from the ignition lock
R open the driver's door and KEYLESS-GO is
in position 1
R open the driver's door and the key is in
position 0or 1in the ignition lock
i The steering wheel only moves upwards if
it has not already reached the upper end
stop.
Position of the steering wheel for driv-
ing The steering wheel is moved to the previously
set position if:
R the driver's door is closed and
R you insert the key into the ignition lock
or
R you press the Start/Stop button once on
vehicles with KEYLESS-GO
If you close the driver's door with the key
inserted in the ignition lock, the steering
wheel is automatically moved to the previ-
ously set position.
The last position of the steering wheel is
stored when you switch off the ignition or
when you store the setting with the memory
function (Y page 123).
Crash-responsive EASY-EXIT feature If the crash-responsive EASY-EXIT feature is
triggered in an accident, the steering column
will move upwards when the driver's door is steering wheel
119Seats, steering wheel and mirrors Z
Page 580 of 637
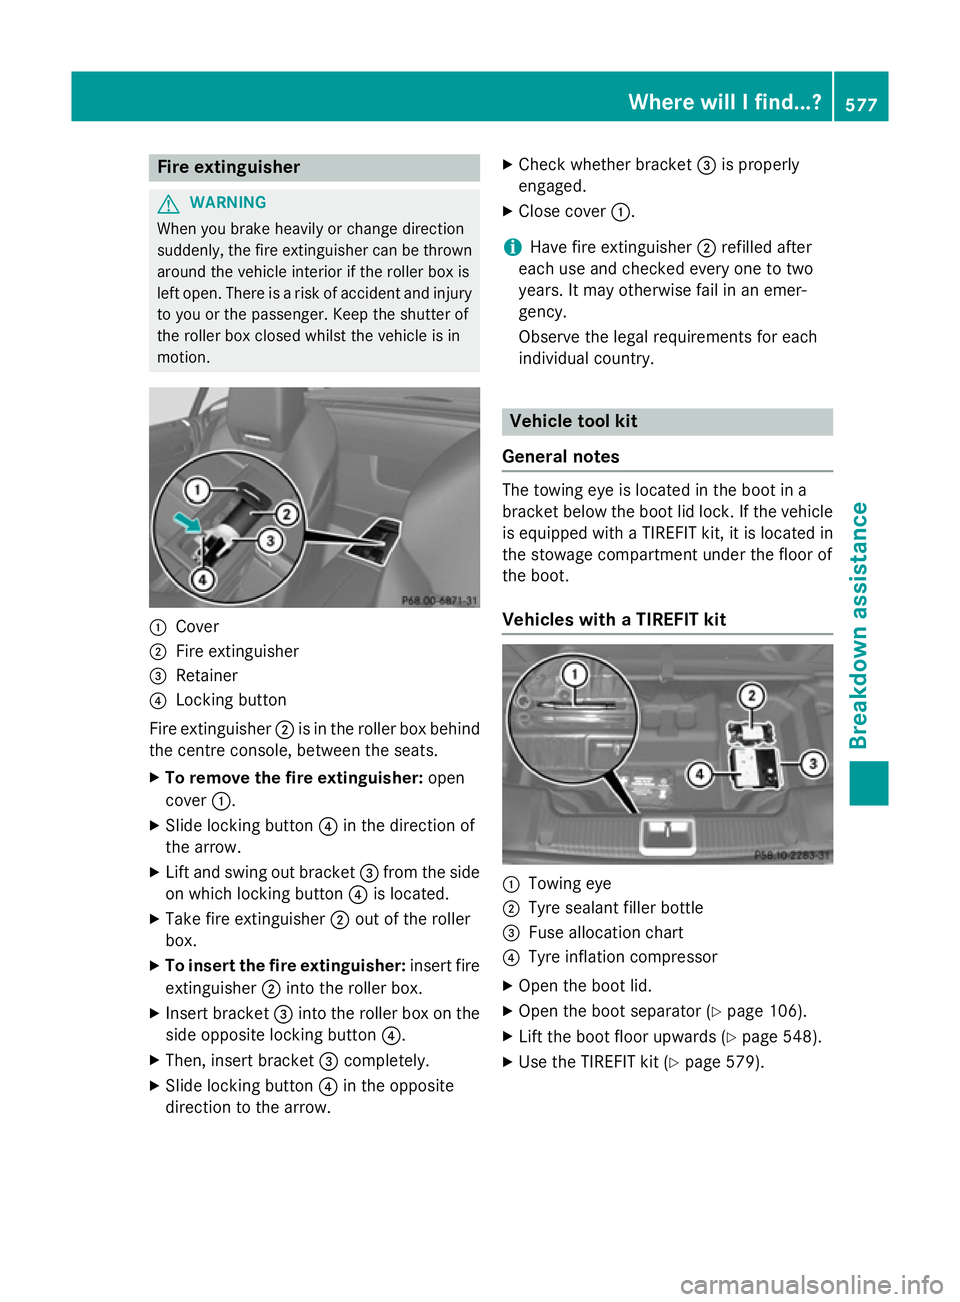
Fire extinguisher
G
WARNING
When you brake heavily or change direction
suddenly, the fire extinguisher can be thrown around the vehicle interior if the roller box is
left open. There is a risk of accident and injury
to you or the passenger. Keep the shutter of
the roller box closed whilst the vehicle is in
motion. :
Cover
; Fire extinguisher
= Retainer
? Locking button
Fire extinguisher ;is in the roller box behind
the centre console, between the seats.
X To remove the fire extinguisher: open
cover :.
X Slide locking button ?in the direction of
the arrow.
X Lift and swing out bracket =from the side
on which locking button ?is located.
X Take fire extinguisher ;out of the roller
box.
X To insert the fire extinguisher: insert fire
extinguisher ;into the roller box.
X Insert bracket =into the roller box on the
side opposite locking button ?.
X Then, insert bracket =completely.
X Slide locking button ?in the opposite
direction to the arrow. X
Check whether bracket =is properly
engaged.
X Close cover :.
i Have fire extinguisher
;refilled after
each use and checked every one to two
years. It may otherwise fail in an emer-
gency.
Observe the legal requirements for each
individual country. Vehicle tool kit
General notes The towing eye is located in the boot in a
bracket below the boot lid lock. If the vehicle
is equipped with a TIREFIT kit, it is located in
the stowage compartment under the floor of
the boot.
Vehicles with a TIREFIT kit :
Towing eye
; Tyre sealant filler bottle
= Fuse allocation chart
? Tyre inflation compressor
X Open the boot lid.
X Open the boot separator (Y page 106).
X Lift the boot floor upwards (Y page 548).
X Use the TIREFIT kit (Y page 579). Where will I find...?
577Breakdown assistance Z