2012 MERCEDES-BENZ SL ROADSTER wipers
[x] Cancel search: wipersPage 6 of 637
Index
....................................................... 4Introduction
......................................... 31 At a glance
........................................... 37 Safety
................................................... 49 Opening and closing
...........................83 Seats, steering wheel and mirrors
..111 Lights and windscreen wipers
.........125 Climate control
................................. 139 Driving and parking
..........................153 On-board computer and displays
....227 COMAND Online
................................ 285 Stowing and features
.......................543 Maintenance and care
......................561 Breakdown assistance
.....................575 Wheels and tyres
.............................. 595 Technical data
................................... 619 Contents
3
Page 33 of 637
Switching off .................................. 447
Switching on .................................. 447
Weather map (COMAND
Online) ........................................ 448, 449
Legend ........................................... 449
Showing/hiding the menu ............. 448
Switching to the weather informa- tion display .................................... 449
Website .............................................. 458
Adding to favourites ....................... 458
Wheel and tyre combinations
see Tyres
Wheel bolt tightening torque ........... 609
Wheel chock ...................................... 606
Wheels
Changing a wheel .......................... 605
Changing/replacing ....................... 605
Checking ........................................ 597
Cleaning ......................................... 570
Cleaning (warning) ......................... 606
Emergency spare wheel ................. 614
Fitting a new wheel ........................ 609
Fitting a wheel ............................... 606
Important safety notes .................. 596
Overview ........................................ 596
Removing a wheel .......................... 608
Storing ........................................... 606
Tightening torque ........................... 609
Wheel size/tyre size ...................... 610
Windows
Cleaning ......................................... 570
see Side windows
Windscreen
Demisting ...................................... 146
Windscreen washer fluid
see Windscreen washer system
Windscreen washer system
Notes ............................................. 628
Topping up ..................................... 566
Windscreen wipers
Display message ............................ 272
Problem (malfunction) ................... 138
Replacing the wiper blades ............ 136
Switching on/of f........................... 135
Winter operation
Important safety notes .................. 598
Overview ........................................ 598
Slippery road surfaces ................... 181 Snow chains .................................. 599
Winter tyres
Limiting the speed (on-board com-
puter) ............................................. 242
M+S tyres ...................................... 598
Wiper blades
Cleaning ......................................... 571
Important safety notes .................. 136
Replacing ....................................... 136
Wooden trim (cleaning instruc-
tions) .................................................. 573
Workshop
see Qualified specialist workshop Z
ZONE function Switching on/of f........................... 146 30
Index
Page 128 of 637
Useful information
............................126
Exterior lighting ................................ 126
Interior lighting ................................. 134
Replacing bulbs ................................. 135
Windscreen wipers ...........................135 125Lights and windscreen wipers
Page 129 of 637
Useful information
i This Owner's Manual describes all mod-
els, series and optional equipment for your
vehicle that were available at the time of
going to press. National variations are pos- sible. Note that your vehicle may not be
equipped with all of the functions descri-
bed. This is also the case for systems and
functions relevant to safety.
i Read the information on qualified special-
ist workshops: (Y page 34). Exterior lighting
General notes
For reasons of safety, Mercedes-Benz recom- mends that you drive with the lights switched
on even during the daytime. In some coun-
tries, operation of the headlamps varies due
to legal requirements and self-imposed obli-
gations. Driving abroad
Symmetrical dipped-beam headlamps If your journey takes you to countries where
vehicles are driven on the opposite side of the road to the country in which the vehicle is
registered, your headlamps must be switched
to symmetrical dipped beam. This prevents
oncoming traffic from being dazzled. Sym-
metrical lights do not illuminate as large an
area of the edge of the carriageway.
Convert the headlamps as close to the border as possible before driving in these countries
(Y page 240).
Asymmetrical dipped-beam headlamps Convert the headlamps back to asymmetrical
dipped beam as soon as possible after cross-
ing the border (Y page 240).
If the headlamps are converted to symmetri-
cal dipped beam, the "motorway mode" and "extended range foglamps" functions (Intelli-
gent Light System) are not available. Setting the exterior lighting
Setting options Exterior lighting can be set by:
R using the light switch
R using the combination switch
(Y page 129)
R using the on-board computer
(Y page 239)
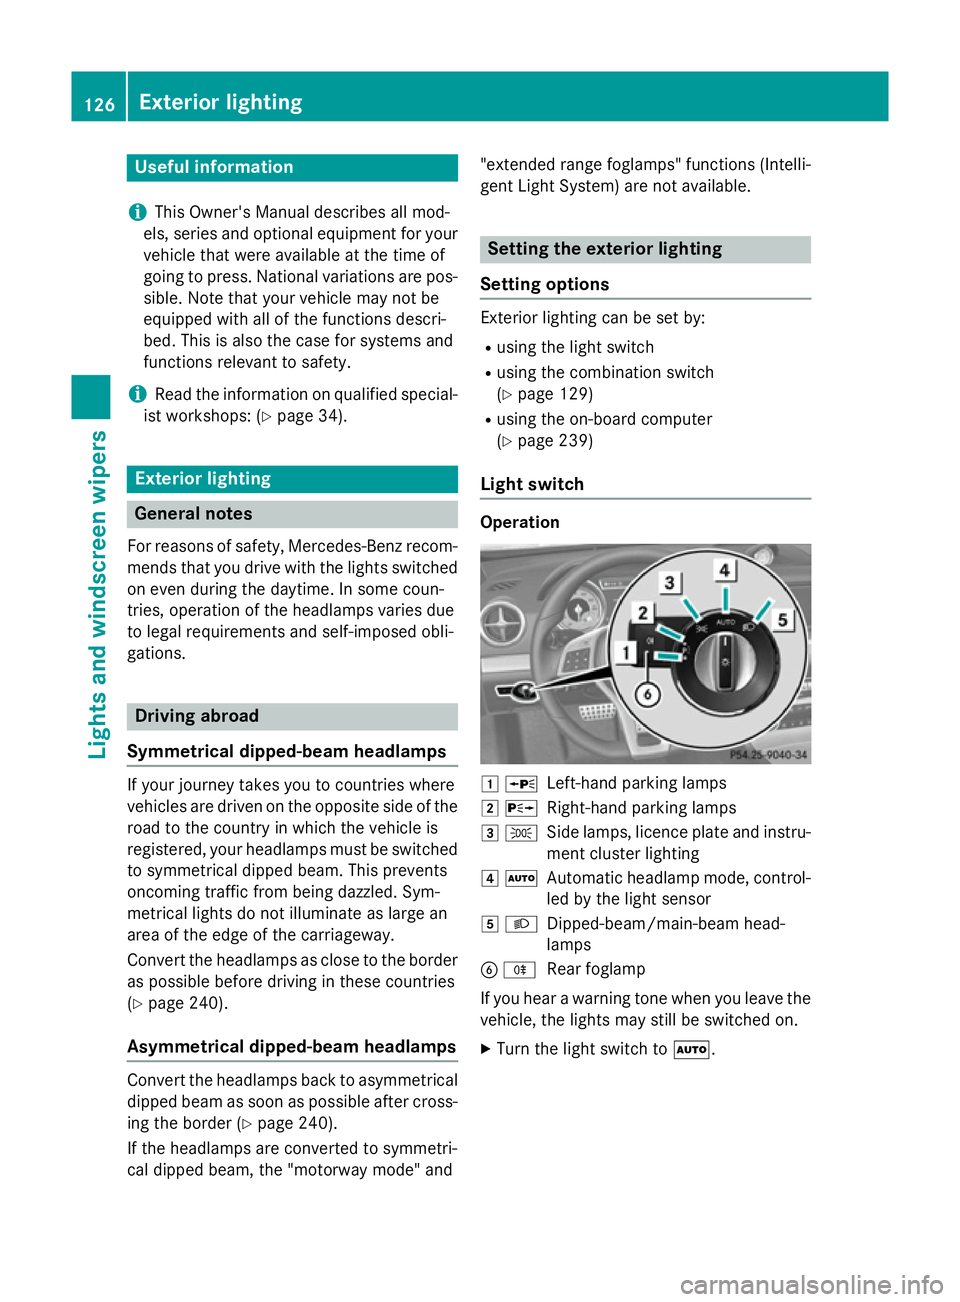
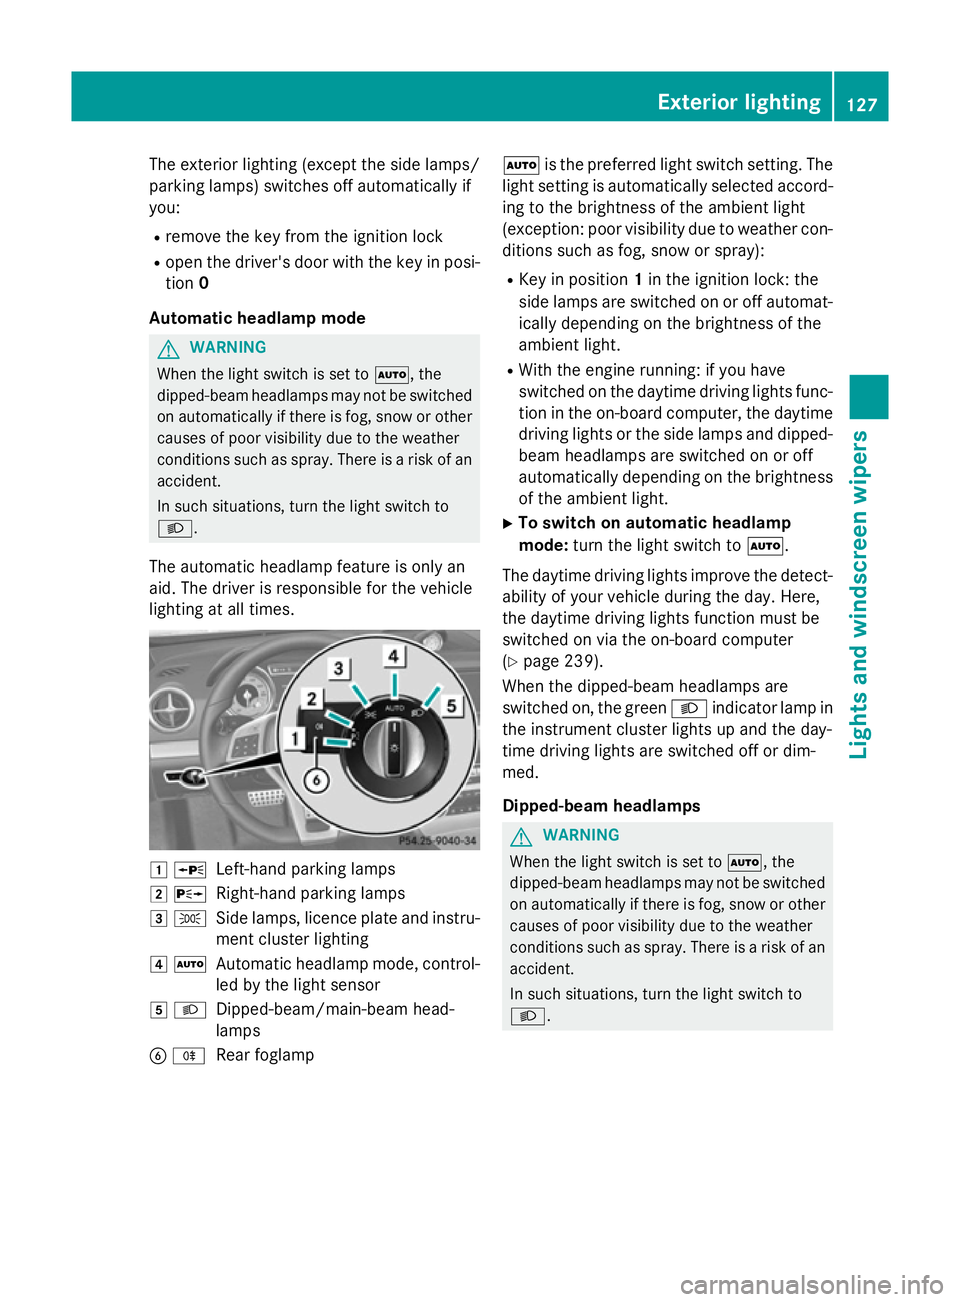
Light switch Operation
1
W
Left-hand parking lamps
2 X
Right-hand parking lamps
3 T
Side lamps, licence plate and instru-
ment cluster lighting
4 Ã
Automatic headlamp mode, control-
led by the light sensor
5 L
Dipped-beam/main-beam head-
lamps
B R
Rear foglamp
If you hear a warning tone when you leave the
vehicle, the lights may still be switched on.
X Turn the light switch to Ã.126
Exterior lightingLights and windscreen wipers
Page 130 of 637
The exterior lighting (except the side lamps/
parking lamps) switches off automatically if
you:
R remove the key from the ignition lock
R open the driver's door with the key in posi-
tion 0
Automatic headlamp mode G
WARNING
When the light switch is set to Ã, the
dipped-beam headlamps may not be switched on automatically if there is fog, snow or othercauses of poor visibility due to the weather
conditions such as spray. There is a risk of an
accident.
In such situations, turn the light switch to
L.
The automatic headlamp feature is only an
aid. The driver is responsible for the vehicle
lighting at all times. 1
W
Left-hand parking lamps
2 X
Right-hand parking lamps
3 T
Side lamps, licence plate and instru-
ment cluster lighting
4 Ã
Automatic headlamp mode, control-
led by the light sensor
5 L
Dipped-beam/main-beam head-
lamps
B R
Rear foglamp Ã
is the preferred light switch setting. The
light setting is automatically selected accord- ing to the brightness of the ambient light
(exception: poor visibility due to weather con- ditions such as fog, snow or spray):
R Key in position 1in the ignition lock: the
side lamps are switched on or off automat- ically depending on the brightness of the
ambient light.
R With the engine running: if you have
switched on the daytime driving lights func-
tion in the on-board computer, the daytime
driving lights or the side lamps and dipped- beam headlamps are switched on or off
automatically depending on the brightnessof the ambient light.
X To switch on automatic headlamp
mode: turn the light switch to Ã.
The daytime driving lights improve the detect- ability of your vehicle during the day. Here,
the daytime driving lights function must be
switched on via the on-board computer
(Y page 239).
When the dipped-beam headlamps are
switched on, the green Lindicator lamp in
the instrument cluster lights up and the day-
time driving lights are switched off or dim-
med.
Dipped-beam headlamps G
WARNING
When the light switch is set to Ã, the
dipped-beam headlamps may not be switched on automatically if there is fog, snow or othercauses of poor visibility due to the weather
conditions such as spray. There is a risk of an
accident.
In such situations, turn the light switch to
L. Exterior lighting
127Lights and windscreen wipers Z
Page 131 of 637
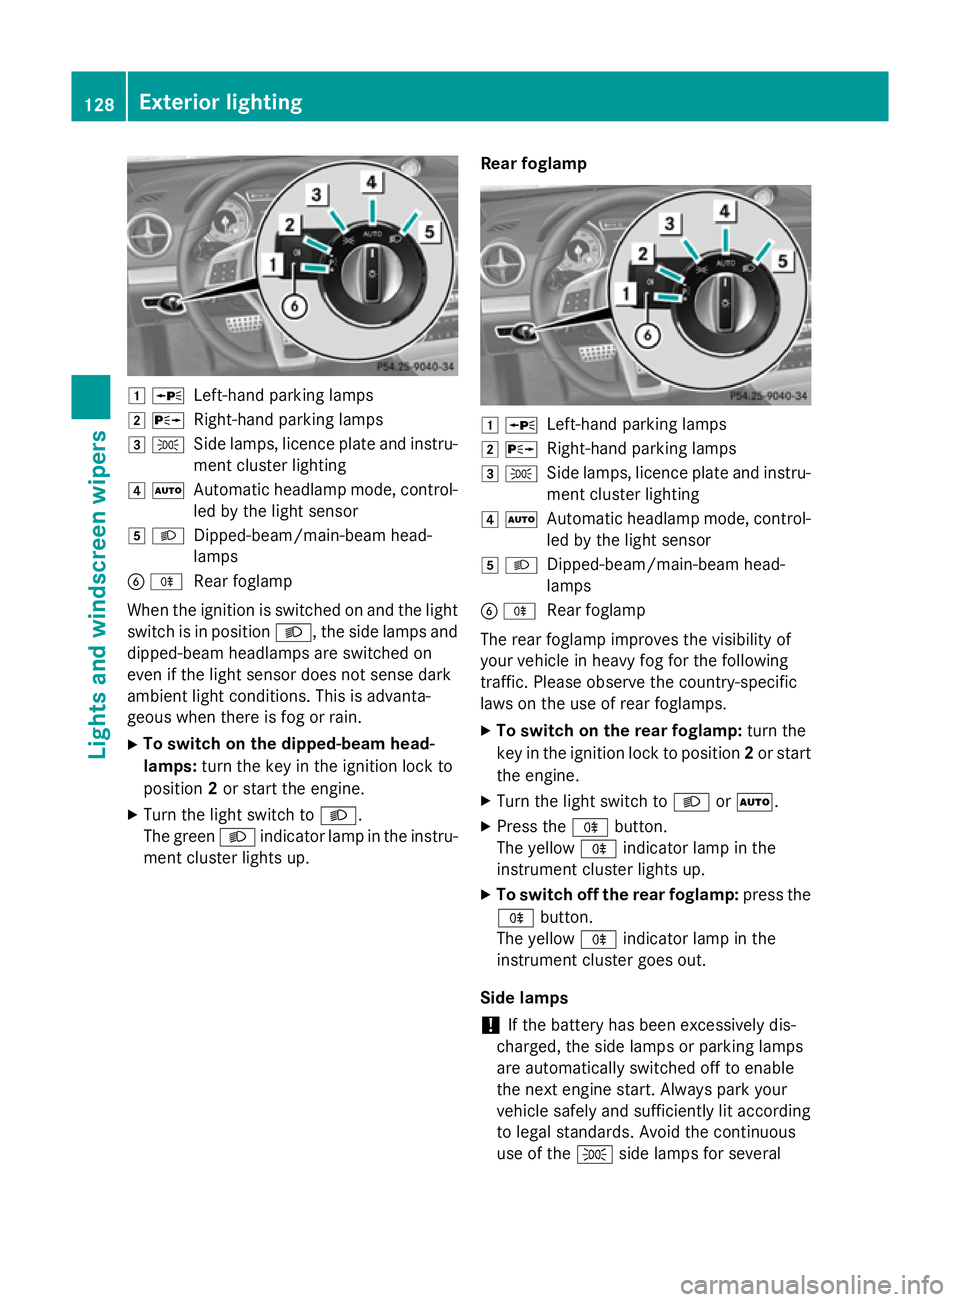
1
W
Left-hand parking lamps
2 X
Right-hand parking lamps
3 T
Side lamps, licence plate and instru-
ment cluster lighting
4 Ã
Automatic headlamp mode, control-
led by the light sensor
5 L
Dipped-beam/main-beam head-
lamps
B R
Rear foglamp
When the ignition is switched on and the light
switch is in position L, the side lamps and
dipped-beam headlamps are switched on
even if the light sensor does not sense dark
ambient light conditions. This is advanta-
geous when there is fog or rain.
X To switch on the dipped-beam head-
lamps: turn the key in the ignition lock to
position 2or start the engine.
X Turn the light switch to L.
The green Lindicator lamp in the instru-
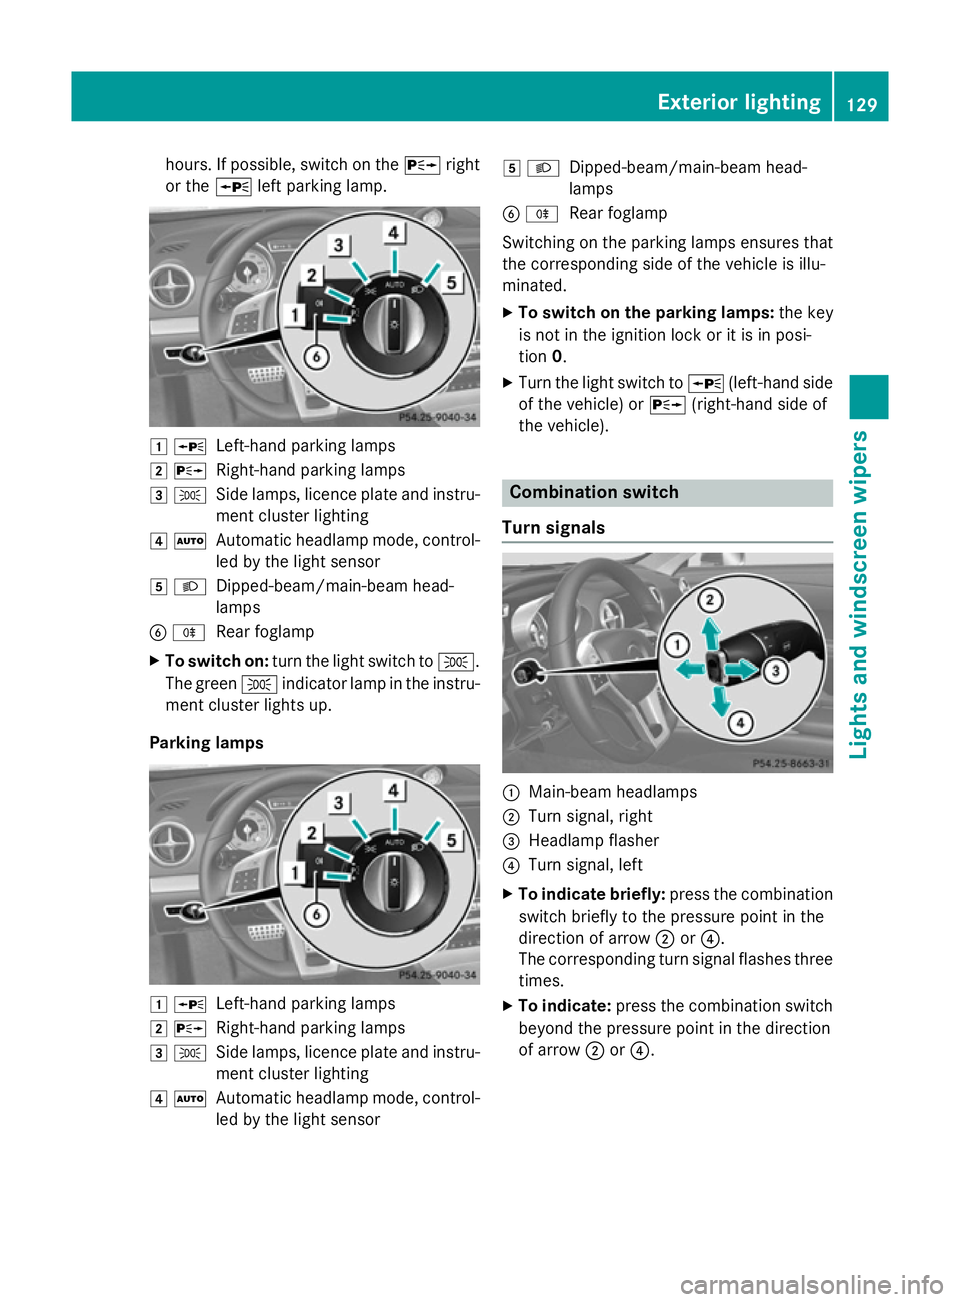
ment cluster lights up. Rear foglamp 1
W
Left-hand parking lamps
2 X
Right-hand parking lamps
3 T
Side lamps, licence plate and instru-
ment cluster lighting
4 Ã
Automatic headlamp mode, control-
led by the light sensor
5 L
Dipped-beam/main-beam head-
lamps
B R
Rear foglamp
The rear foglamp improves the visibility of
your vehicle in heavy fog for the following
traffic. Please observe the country-specific
laws on the use of rear foglamps.
X To switch on the rear foglamp: turn the
key in the ignition lock to position 2or start
the engine.
X Turn the light switch to LorÃ.
X Press the Rbutton.
The yellow Rindicator lamp in the
instrument cluster lights up.
X To switch off the rear foglamp: press the
R button.
The yellow Rindicator lamp in the
instrument cluster goes out.
Side lamps ! If the battery has been excessively dis-
charged, the side lamps or parking lamps
are automatically switched off to enable
the next engine start. Always park your
vehicle safely and sufficiently lit according
to legal standards. Avoid the continuous
use of the Tside lamps for several 128
Exterior lightingLights and windscreen wipers
Page 132 of 637
hours. If possible, switch on the
Xright
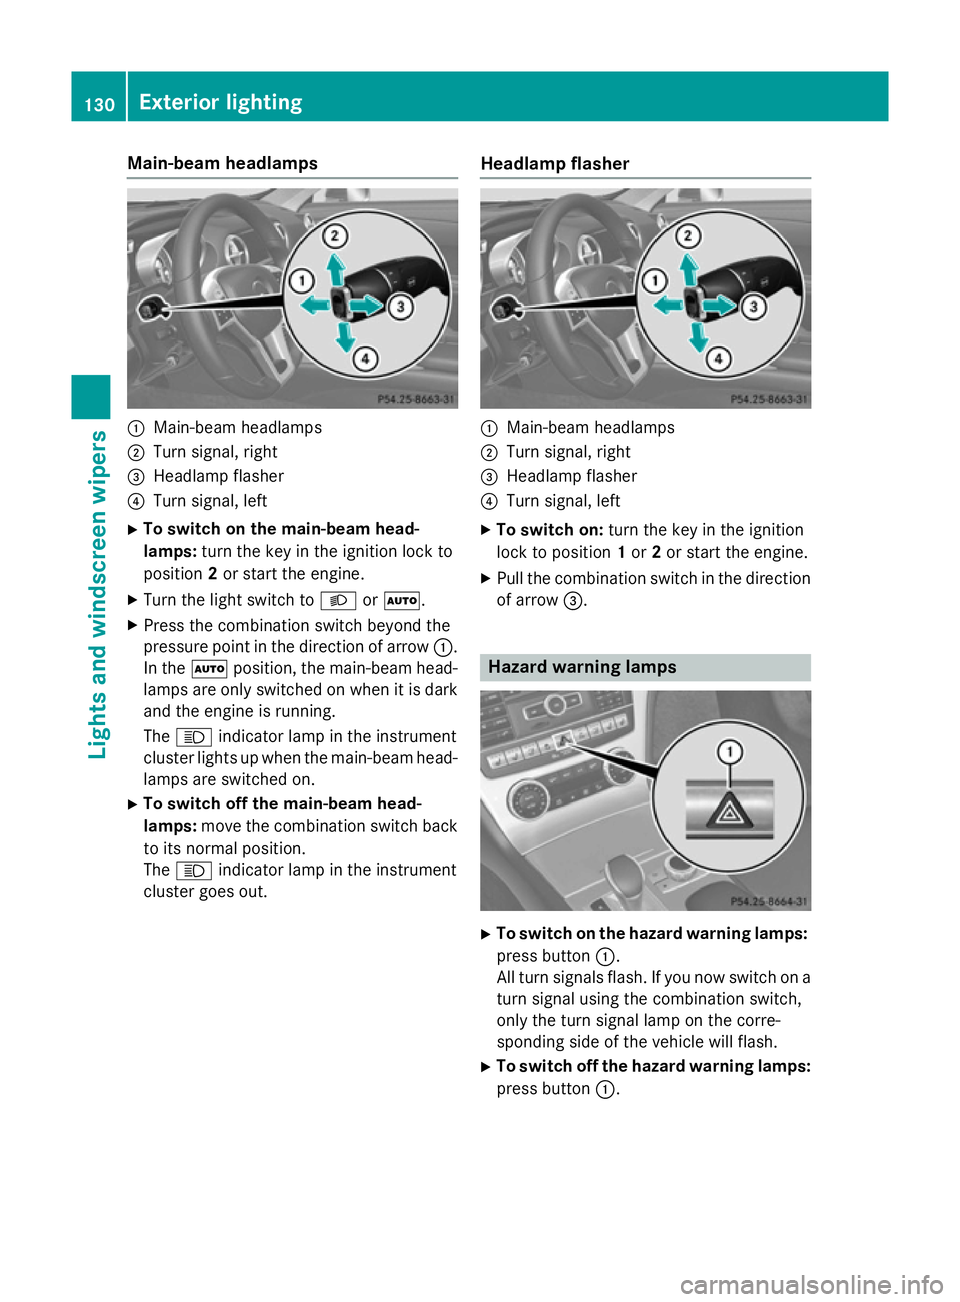
or the Wleft parking lamp. 1
W
Left-hand parking lamps
2 X
Right-hand parking lamps
3 T
Side lamps, licence plate and instru-
ment cluster lighting
4 Ã
Automatic headlamp mode, control-
led by the light sensor
5 L
Dipped-beam/main-beam head-
lamps
B R
Rear foglamp
X To switch on: turn the light switch to T.
The green Tindicator lamp in the instru-
ment cluster lights up.
Parking lamps 1
W
Left-hand parking lamps
2 X
Right-hand parking lamps
3 T
Side lamps, licence plate and instru-
ment cluster lighting
4 Ã
Automatic headlamp mode, control-
led by the light sensor 5
L
Dipped-beam/main-beam head-
lamps
B R
Rear foglamp
Switching on the parking lamps ensures that
the corresponding side of the vehicle is illu-
minated.
X To switch on the parking lamps: the key
is not in the ignition lock or it is in posi-
tion 0.
X Turn the light switch to W(left-hand side
of the vehicle) or X(right-hand side of
the vehicle). Combination switch
Turn signals :
Main-beam headlamps
; Turn signal, right
= Headlamp flasher
? Turn signal, left
X To indicate briefly: press the combination
switch briefly to the pressure point in the
direction of arrow ;or?.
The corresponding turn signal flashes three
times.
X To indicate: press the combination switch
beyond the pressure point in the direction
of arrow ;or?. Exterior lighting
129Lights and windscreen wipers Z
Page 133 of 637
Main-beam headlamps
:
Main-beam headlamps
; Turn signal, right
= Headlamp flasher
? Turn signal, left
X To switch on the main-beam head-
lamps: turn the key in the ignition lock to
position 2or start the engine.
X Turn the light switch to LorÃ.
X Press the combination switch beyond the
pressure point in the direction of arrow :.
In the Ãposition, the main-beam head-
lamps are only switched on when it is dark
and the engine is running.
The K indicator lamp in the instrument
cluster lights up when the main-beam head-
lamps are switched on.
X To switch off the main-beam head-
lamps: move the combination switch back
to its normal position.
The K indicator lamp in the instrument
cluster goes out. Headlamp flasher :
Main-beam headlamps
; Turn signal, right
= Headlamp flasher
? Turn signal, left
X To switch on: turn the key in the ignition
lock to position 1or 2or start the engine.
X Pull the combination switch in the direction
of arrow =. Hazard warning lamps
X
To switch on the hazard warning lamps:
press button :.
All turn signals flash. If you now switch on a turn signal using the combination switch,
only the turn signal lamp on the corre-
sponding side of the vehicle will flash.
X To switch off the hazard warning lamps:
press button :.130
Exterior lightingLights and windscreen wipers